Hand Tool Headlines
The Woodworking Blogs Aggregator
“Glory to God in the highest heaven, and on earth peace to those on whom his favor rests.” - Luke 2:14
Be sure to visit the Hand Tool Headlines section - scores of my favorite woodworking blogs in one place.
Norse Woodsmith Blog Feeds
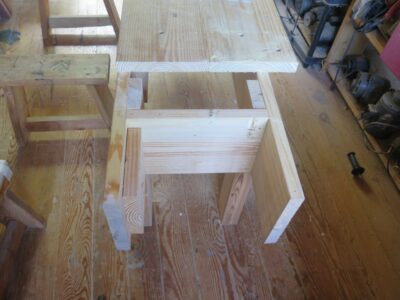
Drydock pallet frame cabinet part 2
Browsing through my phone, I suddenly realized that I had forgotten to make a blog post about the pallet frame cabinet completion last year.
We ended up having a bit of a tight deadline for the completion, since it was a wedding gift for Klaras friend. Furthermore I had to remain calm and pedagogical while trying to explain that: If you want the cabinet to be completed in time - well then you need to work on it.
For some reason it was very hard to understand that you couldn't both go to the movies or go to a sauna all evening and at the same time work on the cabinet. And that realization was really hard to fathom.
But after I had explained very clearly that the clock was ticking, and that I had spent hours helping, which was why I sort of expected some effort being put into completing the project, Klara saw what I meant and worked at it.
Klara originally intended to paint the cabinet, but lack of time made this impossible. I told her that the recipient would no matter what be thrilled to receive a homemade cabinet, and that painting was one of the things that she could easily do at home without my tuition.
She also needed to decide on a closing mechanism (magnetic or latch type)
Lessons learnt:
For young people it is very hard to miss out on anything social in favour of a project that they have started themselves. So I should probably have advocated for a much less complicated project from the start. But I had been completely honest with the amount of time that it would take to build something like that, and also described how it could be achieved by a steady effort each day for maybe a couple of hours. But somehow the coupling between doing other stuff for 6 days and suddenly be short of time was not clear.
The actual build was helped a lot by the fact that we had a table saw at our disposal and also a thickness planer.
Mouldings really help giving a finished look, as does a raised panel door.
It itched in my fingers to do part of the project myself, to speed up the process, but I managed to not do it, I wanted it to be her build, and I would only make sample joints so she could see how they should be carried out.


Workbench Wednesday – Get Thee To The Shrinkifier!
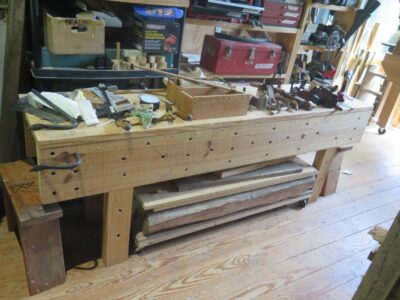
Last year when prepping for the Labor Day weekend 18th Century Trades Fair down at Fair Lawn Farm I included a stripped-down Nicholson workbench. As useful as the bench is for demonstrating and didactic exposition, it needed to be stripped down further.
What I’m subtracting is two feet from the length of the original 8-foot bench; one-half foot from one end, a-foot-and-a-half from the other. There are a couple reasons, not the least is being an 8-foot bench is a little bit much for this 70-year-old to rassle solo. Also, the larger bench took up too much space in my work area at the Fair. I also will refrain from bringing a large display table for my pile of joinery samples. Absolutely no one took a look at them so out they go, at least for this event.
The Nicholson bench has many benefits to providing a heritage work station, including simple and fast making (I can make one in less than a day), in addition to ease of both assembly and disassembly. In this case It was a piece of cake to disassemble one end of the bench and cut off 18-inches and move those legs two feet.
At the other end I just marked off six inches and sawed it off.
In the end I had the same bench, only two feet shorter.
But, I’m not just subtracting. This year I will be adding a leg vise to the workbench along with a Moxon vise.
Stay tuned
tiny japanese toolboxes pt V.........
 |
| cooked overnight |
Since I was relying only on glue to secure the fixed batten I left them clamped overnight. All of them felt secure and rock solid when I checked them.
 |
| still fits |
Had my fingers crossed that the fixed battens hadn't slipped when I clamped them.
 |
| nope |
This one must have slipped a wee bit. There is a gap and the alignment between the sliding and fixed battens was slightly skewed. I tried to plane it to fit but all I did was to make it too loose.
 |
| lid is now too long |
I had to trim an 1/8" off the lid before it fit again. Checked to ensure that it fit in either orientation.
 |
| nope |
This sliding batten isn't fitting so well neither. I made another one and after fussing with it for bazillion years, I gave it flying lessons. Then I got lucky when one of the oops sets I made yesterday fit. Smilely face on.
 |
| back to the first one |
I didn't get lucky with an oops sliding batten fitting. The first replacement and the 2nd one didn't fit. The fixed one had slipped and it was wrecking havoc trying to get a new one to fit. The problem was the fixed one wasn't square to the larger fixed batten on the top of the box. Had to deal with a double compound angle for the replacement batten.
 |
| removed the fixed one |
I tried making 3 new ones and had 3 failures. I was getting a good alignment but the fit was too loose. All 3 I was able to push out all the way across the lid. Zero resistance in spite of it looking good. Bit the bullet and knocked off the original batten.
 |
| clean |
 |
| done |
Sharpened and honed with RML shavings spitting out of each one. Finally feeling comfortable with my sharpening methods. I am getting consistent results with each and every iron I sharpen.
 |
| waiting on one |
Got these 7 done. Battens trimmed, sliding ones fitted, lids fitted both ways, they are ready for finish.
 |
| ta da |
I only need 3 of these to give to my sister Donna for her son's kids. I'll pick the best 3 and give them to her. Finished the last box after my post lunch stroll. I didn't see a lot of difference (time/effort) in making 8 at a time vice just 3.
 |
| hmm..... |
I bought a 3/4 HP motor to replace the 1/2 HP motor the bandsaw came with well over a year ago. I didn't have anything else on the dinner plate so I thought I would check out things. The center line of the shaft on the 1/2 HP and 3/4 HP motor matched. I wanted to check the size of the key next.
 |
| nice surprise |
The key off the 1/2 HP matches the 3/4 HP within a thousandth. I was expecting the 3/4 motor's key to be metric (it might be metric?). But it matched and so far the swap out was looking favorable.
 |
| layout fluid? |
This 'blue' key swapped out into the 1/2 HP motor and vice versa.
 |
| wee bit of a hiccup |
Initially the pulley wouldn't fit on the 3/4 HP motor. It would only engage about an 1/8" on the shaft and key. I sanded four sides of the key on 400 grit sandpaper and then the pulley slipped on easily.
 |
| feeling better about this |
The pulley slipped on easily with hand pressure. There was almost zero slop. I think I'll be able to swap this out in a few hours. The only potential speed bump(s) will be wiring the existing on/off switch and getting the correct rotation of the motor.
 |
| finish is next |
Branded all the boxes and no hesitation on what the finish I'll use. It is going to be the same finish I used on the cell phone holder.
accidental woodworker
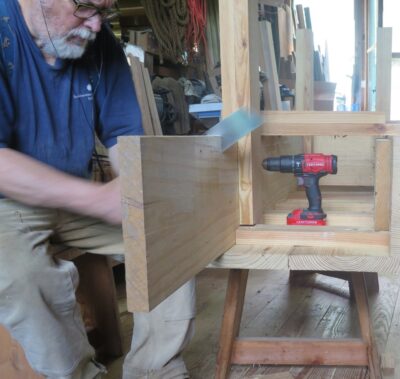
Struggling with Your Hand Drill? Try This
If your eggbeater drill feels clumsy or tiring, this simple technique might change everything. No electricity, no fuss, just easy, accurate holes with full control.
tiny japanese toolboxes pt IV.........
Made a lot of progress on the boxes. I'm 99% done with the woodworking. Tomorrow I should be done with fitting the last of the lids. Just a few minor hiccups to deal with and I'll be ready to slap some finish on them.
 |
| last coat |
It has been a few days since the last application. Knowing when this is dry is/was not easy for me to figure out. That is why I waited so many days between coats. This was the 4th and final coat I'm applying. I'll wait a couple of days and slap on some wax. Fini.
 |
| first lid |
One done and 7 to go. Still have time to decide on how long to leave the sliding batten.
 |
| sliding and fixed battens |
Making the sliding and fixed battens in two pieces. These 8 are the fixed ones.
 |
| sliding battens |
The sliding battens are 2 inches longer than the fixed ones.
 |
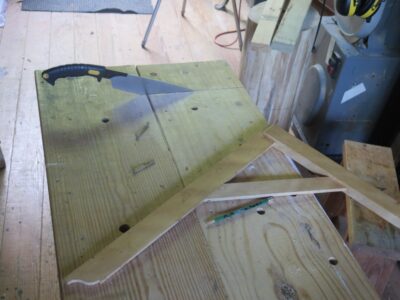
| jig |
I thought of this while sawing out the battens. This jig is used on the bandsaw which should be easier than the hand sawing jig I made before this one.
 |
| jig 1.a |
The previous jig worked but it was difficult and awkward holding the stock while pushing it through the blade. This is better and supports both the piece I want and the offcut (no offcut support on jig #1). And as a bonus I used it to saw both the short and long ones.
 |
| sigh...... |
I should rephrase this because I did manage two sets. However, they were so thin that they were useless. First round flushed down the toilet and on to round #2.
 |
| 8 for 14 |
Finally got round two done with 8 sets. I only needed 7 but I wanted at one extra for an oops. What was so frustrating was eyeballing how to plane the opposing angles and plane it wrong not once, not twice, not three times in a row, but 4 times before getting it correct. I repeated these steps once more again. The taper and the compound angle won a couple of battles but I finally won the war.
 |
| trimming |
Used my 1/2" Record to thin the 1/4" lip - it wouldn't slip under the fixed batten on this end. I had to wash, rinse, and repeat for all 8 lids.
 |
| first lid fixed batten |
I left the fixed battens proud and I'll trim them to length after the glue has set.
 |
| love this glue bottle |
I thought this tiny hole would be a ROYAL PITA but it ain't so boys and girls. A tiny bit of glue build up on the outside of the tip but nothing like on the Titebond glue bottles. I like the small controlled amount of glue that this tip dispenses and so far no headaches or hiccups. If needed I have another glue bottle that has bigger tips.
 |
| why it doesn't clog |
This drains efficiently and doesn't clog. At least it hasn't so in the month or so of use with me.
 |
| 2nd part |
This wide openings help with the glue draining back from the tip into the bottom.
 | |
| silicone? |
There is no way that the glue will ever touch the threads on the bottom. The top part mates into the inside opening of the bottom. A lot of thought went into this glue dispenser. I think I'm falling in love with it.
 |
| hmm.... |
I won't be able to flush the overhang on the battens because of the gap between the lid and the box. The lid can shift from side to side so I'll have to guess-ta-mate the best I can with it.
 |
| for tomorrow |
I was going to sharpen these two blades but it was after 1500 and past quitting time. Cleaned the pine pitch and bits and pieces stuck on the bevel with paint thinner. These two blockplanes - LN 102 and LN 60 1/2 - are my favorites. I usually reach for them before a bench plane.
Noticed that Lie Nielsen is selling a standard angle blockplane again. An iron version of the Stanley 103 along with an iron version Stanley 102. I have the LN 103 and LN 9 1/2(?) standard angle that they no longer sell/make. I rarely use either one of these anymore.
accidental woodworker
I’m back, but not, but maybe I am.
Around fifteen months ago, maybe a month after published my last post on this account, I found out that even Captain America isn’t invincible. It was a pretty tough year, and I will leave it at that.
In the meanwhile, I made a few changes. My table saw is gone, not for philosophical reasons, but because it was too large and heavy for me to continue to use, and it was taking up valuable space in my garage. I gave away around half of my woodworking hand tools, and I may give away more, and perhaps I may even sell a few. This is not to say that I have given up on woodworking…far from it. I still have enough tools to make most of the things out of wood that I may want to make now or in the future. But for the past year I have done very little in the way of furniture making or tool restoration, save for some basic upkeep such as cleaning and sharpening. For that reason, I have not written a blog post about woodworking, or tools, in quite a long time.
The last post I wrote on this blog, which apparently detailed my attempts at restoring a vintage leather tool pouch, ironically had a mostly happy ending. I remember spending weeks trying to get that old pouch cleaned up and looking decent again. While the appearance aspect wasn’t crazy difficult, getting the funky smell out of it was a challenge to say the least. I scrubbed it with saddle soap a half dozen times. I placed teabags inside of the pockets and let them sit for a few weeks….I then placed homemade baking soda teabags inside the pockets and let them sit for a few weeks more. I used odor reducing sprays specially designed for leather. All of my efforts were only partially successful.
Eventually I patched the holes in the pouch, not perfectly I will add, but enough to where they are not noticeable. At some point in April of 2024, I hung the pouch in an open window in my garage to continue to air it out…then things happened that caused me to forget about it….and there it sat, dangling for almost seven months. Strangely enough, the open window treatment did the trick, and the pouch no longer has any odor at all, save for the faint scent of a few coats of mink oil, which I added when I was satisfied that the pouch was as clean as I could possibly achieve.
So I may attempt a blog post or two over the next few months. I’ve been messing around a little here and there, trying to get back into the swing of things. I made a few boxes…just to see if I still had it…and I was disappointed in some ways, and happy in others. Like sitting down at the piano for the first time in a long time, or picking up a guitar after many years, it will likely be quite a while before I feel somewhat comfortable again. But before I do anything in earnest, I will have to reorganize my garage to make it conducive to using woodworking tools again, because right now it is not even close. Until then, I am still here, a little worse for wear, but still here.
tiny japanese toolboxes pt III.........
Bit down hard on the bullet and sawed off all of the battens. After that I planed the top smooth and twist free 360. The previous sentences don't make much sense because the pic that proceeded vanished. Don't know how or why, just another black hole blogger mystery.
 |
| last one |
I got lucky in that all of the boxes checked twist free. Round 2 for battens was in the on deck circle.
 |
| new batten stock |
This stock is a frog hair wider than 1". Band sawn to 3/8" thickness and planed smooth down to the knife lines. I thought I had enough stock here for all of them but I was one short.
 |
| ready for battens |
The hiccup with the stock was I could only get one batten each out of all of the short pieces. The off cuts were an 1/8" short. Sigh.
 |
| the difference |
The left one is the original and the right is the new one. I am not going to nail these but that may change. I might use brass brads if I get the itch to nail the top battens.
 |
| glued and cooking |
Took a while longer to do these vice the first ones. With these I aligned one edge of the batten flush with the side. Any proud I put on the opposite side. Had to deal with the battens slipping and sliding when I first applied clamp pressure.
 |
| flushing the proud ends |
Clamped an extra batten to prevent blowout. After I planed the proud flush I sanded the sides/ends with 80 and 120 grit.
 |
| last one |
All of the battens held fast. I secured them with glue, no fasteners used.
 |
| nope |
This was the practice/test lid from yesterday. It didn't fit - not even close to it.
 |
| done |
Planed flush, sanded smooth, and ready for finish. These took a few minutes and boatload of calories to get a check mark in the done column.
 |
| new test lid |
This went surprisingly well. No hiccups, no rework, no flight plans filed, and the locking batten is long enough. Got a 1/4" under the right batten and 5/16" under the left one. Got a warm fuzzy with the lid staying in place now.
 |
| half done |
accidental woodworker
tiny japanese toolboxes pt II.........
 |
| last night |
Came back to the shop and whacked out two more boxes. Of course one of them had to split on me. I am now of the opinion that predrilling, while helpful, doesn't eliminate splitting. The wood is going to do what it wants regardless. I've looked at the grain with the splits occurred and it was all squirrely running in a bazillion different directions. And I don't think the type of wood matters neither.
 |
| one more box |
With these long sides I will now have 8 boxes. The assembly line is still working, much better than I anticipating it being.
 |
| slight taper |
This is annoying but it is way better than what I used to get resawing. It took me less the five minutes to flatten these two to the knife lines.
 |
| 2 for 8 |
Two of the eight boxes were twist free. The other six were untwisted with just a few plane strokes.
 |
| bottoms |
First two glued, clamped, and cooking. Got all 8 done and set aside to set up.
 |
| last two |
I used some 1/8" thick plywood that was used to separate a shipment of solid 1/4" and 1/2" thick wood I had bought online. Used that for the bottoms of the boxes.
 |
| cleaned up |
Planed and sanded all the bottoms flush. Battens and lids are in the on deck circle.
 |
| battens cooking |
Five here and 3 on the workbench.
 |
| lids |
Used 1/4" poplar for the lids. This is an extra for any oops of which I'm sure I'll do. I hope that it is only one oops, if any.
 |
| 1/4" plywood |
Why didn't this happen on the other japanese boxes I made? Dawned on me to test fit one lid out of plywood vice using the actual 1/4" poplar lids. And with the assembly line approach, once this fits I am good for the 8 real lids.
 |
| hmm...... |
This is how much fits under the left batten. The right batten gets a 1/4". After playing with this and 2 more test lids, I came to the realization that I should have made the battens wider. The size on the boxes is 3/4" wide (twice the thickness of the sides) which leaves roughly 3/8" for a lid to slide under.
 |
| got the length |
It is not easy to insert the lid underneath the left batten and then push it to the right under that batten. I still don't have much room under the left one but it is about a 1/16" more than the first one. I plan on doing one poplar lid first and checking it before proceeding with the remaining 7.
 |
| sigh |
The locking batten slides in to much. I made the two of them from a 1" wide piece and I was expecting the sliding batten to close up more aligned at the ends with the fixed one.
Left this here and called it quits for the day. This lid detail is kicking my arse again like it did on the other small boxes I made. It was getting to be frustrating and escalating to the free flying lessons level so I killed the lights. I'll attack it again in the AM.
accidental woodworker
Sanding has changed

tiny japanese toolboxes pt I.........
Had an appointment at the VA today to check up on my back cyst surgeries. In spite of jacking the volume up on my hearing aids I still had trouble hearing the doc. I don't know all of what he did but he said they looked good with one a little worse than the other. He bandaged them and told me to remove them in 3 to 5 days. They feel a lot better now sitting back in a chair. The bandages provide a nice cushion. Looking forward to sleeping on my back tonight without them waking me up.
 |
| hmm..... |
Overall the bandsawn pieces looked ok to the eyeball. There was a slight taper to each individual board - enough to be a potential hiccup putting the boxes together. I ran a knife line 360 on each board and planed down to it.
 |
| surprise |
I have enough stock to make 7. I was thinking maybe 4 or possibly 5, not 7.
 |
| ???? |
Went on line and got the scoop on how to install a link belt. Supposedly there is an arrow every tenth link denoting the direction of the belt travel when installed. I checked every single tooth and nada. I found no indications or markings and I checked on both sides.
The flat side of the belt faces up and the other side with the 'fingers' is down in the vee of the pulleys. I had to remove a couple of links because initially the blade didn't ramp up quick. Removing two links did the trick.
 |
| sigh |
First box glued and nailed together. Along with a split. I have not had good luck with these cut nails. No matter which way I have nailed them I get splits. It is frustrating and incredibly annoying.
 |
| 3 on each end |
I have more nails on order from Lee Valley. I'm not sure if I have enough to do all the boxes but there is enough to do the 3 I need to give to my sister.
 |
| sigh |
While clamping one split I noticed a 2nd on the opposite end. The 2nd box came out split free.
 |
| predrilling |
I predrilled the holes in the sides and then nailed the long sides to the ends. What I didn't do for the first two boxes was to drill through the long sides into the ends. For some brain dead reason I didn't think it was necessary. I was wrong again.
 |
| #3 |
Box #3 came out split free. BTW, I was only getting splits on the two outside nails. I drilled through the sides into the ends which seems to eliminate the threat of splits. I had continued success with box #4 coming out split free.
 |
| batten stock |
Went nutso sawing out batten stock. I had a pile of scrap 3/4" thick pine that gave up this pile. I ripped it off and it was slow going. The saw was bogging down and I almost stalled the blade several times. The arbor pulley nut is still tight and the pulley is uniform when I move it 360. No taper or wobbling so that wasn't the hiccup. I'll be removing a few more links tomorrow.
So far the boxes are turning out uniform in dimensions. The OD and ID dimensions are almost dead nuts on. Feeling good so far about the assembly line boxes. Should be quicker and easier to finish them.
accidental woodworker
Holztechnisches Museum Rosenheim
Behind an ice and coffee restaurant in the centre of Rosenheim hides the Holztechnisches Museum Rosenheim. Christopher Schwarz from Lost Art Press brought it to my attention and as I passed Rosenheim on my way from Slovenia last weekend I visited it with my long-suffering and not so much complaining wife. (Had to invite her to a Wurstsalat afterwards.)
It is a kind of old fashioned Museum, with a lot of Show cases, some very detailed miniatures of saw mills and some screen with videos. There are very few interactiv place, but you can try a plane and pull a log by hand.
I concentrate on the displayed saws.

The teeth of a two man crosscut saw. You can see the trces of the flat or fether file used to sharpen each surface of the tooth seperatly.

Simple tow man pit saw. (To saw boards from logs.)

Drawing and picture of a sawing pit. Shown used with a 3 man frame saw.
Next object is this giant fram saw. I can not imagine that it was designet to be use by hands. I think it was oart of a water or animal driven saw mill.


The direction of the teeth changes in the middle. Lot of space between the teeth to clloect big amounts of shavings.


There is a lot more in this museum, but I think I will not show all the pictures I made. You will have to go on your own.
But this one I cannot keep to myself: Never saw a holdfast in Germany before:


More Oakum and lime mortar and other hot things.
Today's installation. 2.4 x 1.9m window in Accoya. 28mm argon-filled DGUs. It's not listed, but it is a traditionally built barn, with lime mortar masonry, converted to a house. When it was converted, the window that was put here, was sealed with expanding foam and portland cement, causing the window to rot and damp problems inside. This new window has been sealed with Oakum and lime mortar, which should help with the damp issues. Wet hessian outside curtains, to protect the mortar while it cures.

Draining beads to give the window it's best chances against the weather. Osmo + to protect the dark oak stain.
In the main worksshop this week, with the window in production, and a few other jobs on the bench.

My new(old) Multico morticer. If you need to use a machine, use an accurate machine...

....do it once..........and free yourself up for handtool work!
If you use old machines, you need accurate hand tools to maintain them. I love this adjustable spanner, all the way from Buffalo, NY. It stays where you set it!


Talking of tools, making some is getting closer. The forge is now up and running, and what a forge it is! Gas with the possibility of using coal, and with the lid on, a kiln.

cell phone holder pt VI.......
 |
| almost |
The shelf is a few frog hairs being shy of fully seated. Checked the notch for the charging cable was good and it was.
 |
| fitting the shelf |
Trying to plane the notch area with the blockplane wasn't working. The notches were playing havoc with evenly pushing the plane over them. Sanded the shelf with 100 grit until I got a snug fit.
 |
| sanded up to 600 grit |
I wasn't sure how the epoxy would look like just being sanded up to 220. I added 320, 400, 500, and 600 grit. Would have done more but 600 is the highest grit I have.
 |
| the finish |
I like how easy it is to apply this finish but more so how it looks. I did a couple of small japanese boxes with it and 2 months later they still look good.
 |
| pre test |
Before I committed to using the finish I applied some to same cherry as the stand. It looks wet and different against the natural unfinished wood.
 |
| first coat |
I'm happy with how the first coat looks. The epoxy came out looking fine. No scratches and the finish didn't cloud or obscure it. Big difference between the finished wood and the natural unfinished raw state.
 |
| plastic feet |
I like these for two reasons - one they elevate it about an 1/8 inch and two they keep it stationary. The feet act like 'anchors' keeping it where you set it. As a bonus I can apply the finish to the bottom at the same time as the rest of the stand.
 | |
| next project |
My oldest sister is staying with her daughter in Norwich. When I went there to pick her up I brought a load of boxes I made to give to my nieces and nephews. Donna liked the japanese boxes and asked me to make 3 more of them for her son's children. Started by resawing a bunch of scrap pine to about 3/8" thickness.
 |
| for the sides and ends |
These are slightly thicker than 3/8" which I will thin down when I plane the band sawn faces.
 |
| hmm..... |
Thought about using these for the bottoms and lids. I changed my mind because I don't like gluing up sock for lids/bottoms. I will stick these in boneyard and I'm sure I'll find a use for them.
 |
| 1/4" poplar |
This is what I am using for the lids. The bottoms will be 1/8" plywood.
Looking forward to some assembly line work. I think I have enough stock to whack out 4, maybe 5 of these. Depends upon whether or not I run into any hiccups. Doing the locking batten kicked my arse on the two small ones I've already made.
accidental woodworker
Before I Forget… A Few Things
cell phone holder pt V.......
 |
| hmm..... |
This ain't going to work. This is bigger than an 8x10 but that wouldn't fit neither. The option as a frame holder is out and this is strictly a cell phone holder/charging station now.
 |
| enough already |
I already made a blood offering and I still found another split. This is on the opposite side of the ones I glued yesterday.
 |
| cooking |
Got the uprights finally glued in. The shelf is in dry keeping its place for when it is glued next.
 |
| )%&@Q)%@Q gap fixer |
It isn't much of a gap but it is wide enough to throw me into a tizzy fit. I will fill it in with that piece of cherry veneer.
 |
| need a notch |
I have made cell phone charging station but without a notch/hole for the charging wire. Old dogs can still learn/remember sometimes.
 |
| gap gone |
This was the best match I can get with the small scraps of cherry veneer I had. I will secure it with a few dabs of superglue.
 |
| nope |
The width of the notch is spot on but the depth from the back is short. I had thought initially that I had made it extend into the shelf too much.
 |
| sigh.... |
This came this close '' to getting free flying lessons. Noticed this before I was going to glue the shelf on.
 |
| fits but..... |
I moved the notch in further another 1/2" but the plug wire end was up tight against the end of the notch. I had to drill it out another 1/4" to get some wiggle room.
 |
| gone somewhere in..... |
Got flying lessons here because I was done fixing splits and pieces popping off. This is now somewhere out in the wide blue yonder.
 |
| shelf #3 |
Laid out what I hope is the final shelf for a one day project that has morphed into several days now.
 |
| too snug |
I got a bit of blowout on the end when I sawed it square. The notches are too snug but I am ok with that. The important thing is that there aren't any gaps on either notch.
 |
| almost there |
Checked the notch and it is good. Lots of empty space and wiggle room. Not fitted yet or glued yet. It'll be another day before it is done. Then I get to pick a finish and I'm not thinking of shellac this time.
 |
| came today |
This is the awaited tenth anniversary edition. Got some reading material for at least one day.
Today was sweltering and humid. The temp get up to 97F -36C. A wee bit toasty and I soaked my T shirt on my post lunch stroll. In spite of the heat I did the walk with zero discomfort. I took my time, going slower than I normally do, and I got a Dels lemonade (a slushy ice lemonade) for the last 20 minutes walking back to the barn. It doesn't look like this weather is going away time soon neither.
accidental woodworker
A few more sharpening tricks

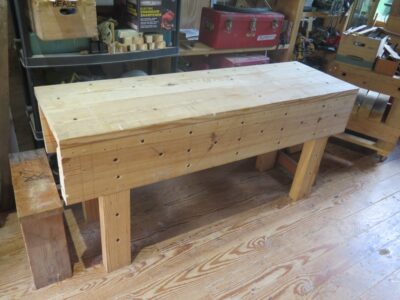
Workbench Wednesday – Too Many?
Several years ago, probably at one of the French Oak Roubo Project builds, Benchcrafted’s Jameel Abraham and I were chatting about the massive weight of good workbenches and good vises.
“Why couldn’t we collect carved thimble boxes instead of cast iron hunks?” he groused. “Instead we acquire stuff by the ton!”
At least he has the sense to only keep a couple benches in his studio. I, on the other hand, have not been so restrained. In great part due to my plan to host classes and workshop at the barn, I wound up with a dozen-and-a-half hefty benches scattered around, more than enough for every student who might come. (The cessation of that plan for a couple of reasons has made that situation non-optimal.) This preparation was exacerbated by my own fascination with workbenches, and plenty of space to put any that I bought or made.
I’ve reluctantly(?) come to the realization that I have too much real estate occupied by benches I do not use, at least as workbenches. I still have about 15 benches, but only use (at most) five of them as workbenches with any frequency, i.e. more than once a year. The rest are little more than really, really stout work tables.
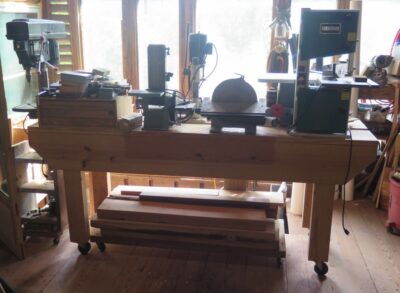
So I’ve taken the first small steps to eliminating or repurposing the inventory. I’ve sold two, and last week repurposed an eight-foot Nicholson as a rolling bench to hold benchtop machines. Obviously this is not a permanent nor irreversible arrangement — I can flip and remove the casters in about ten minutes — but it does provide a glimpse of what is possible, especially as I continue to explore the world of different workbench forms a la the ongoing Japanese planing beam build.
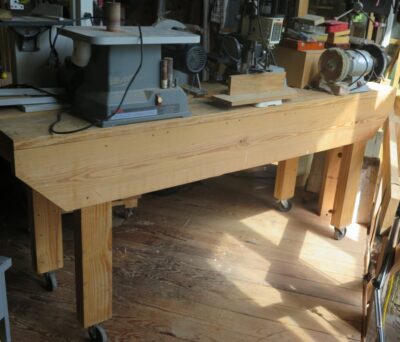
Rather than a hodgepodge of little rolling tables I now have all my main benchtop machines on one surface, easily accessible from both sides as the oversized casters make it a snap to wheel it out and around.
Toshio Odate toolbox done.......
Spent most of the day with my sister in and around Norwich Conn. We went out for fish 'n chips because she can't get seafood in Avila Indiana. We got stuck in traffic 4 times along with the usual slow downs due to it being tourist season in this part of south eastern Connecticut. In spite of that I got it toolbox done. I had applied the last of the shellac last night after dinner and in the first part of today's AM session. It was ready for glamour pics when I returned to the barn.
 |
| first glamour pic |
One of five knots visible on the toolbox. This one and one on the diagonal brace are brown knots - both reinforced with superglue. There are 3 reddish knots on the opposite long side, all stacked vertically.
 |
| 2nd pic |
The simplicity of the built handles is stunning IMO. No hardware required for the handles and the lid. Brilliant.
 |
| pic #3 |
This toolbox will transport a lot of tools. Still trying to wrap my brain bucket around this being just a box to transport tools, not to stow them.
 s s |
| locking batten |
I like this even though it isn't necessary. Gives me a warm and fuzzy about securing the lid.
 |
| without the locking batten |
It isn't needed nor necessary to secure the lid and keep it in place. However, if it isn't employed only one batten will be up tight against one of the top battens. There will be a slight gap with the other lid batten. I like the the look of having all the battens up against each other when locked in place.
 |
| hmm..... |
This is the one that was superglued. It didn't hold up. Popped off when I tried to fit the shelf and upright notches. Glued and clamped it while I visited with my sister.
 |
| looking slanted a wee bit |
Took care of that with a few extra raps on the high upright.
 |
| sneak peek |
I like how this is coming out. Definitely too large for a cell phone holder/charging stand but perfectly sized to hold an 8x10 (or smaller) frame.
 |
| not glued yet |
The right notch fit is loose and the left one is a snug fit. The uprights are square to the base and the shelf eyeballed parallel to it. When I do glue this I will dry fit the shelf and just glue the uprights. After those are set I'll repeat for the shelf.
accidental woodworker
And with a few adjustments.
This chest is being designed as I go. The panels to each side need something else to the carving. It's only now, with the trial assembly, that I realise what it is.

Not a huge adjustment; the leaves in the top part, needed more definition, and detail. And of course, having raking light, with the chest front in it's intended, vertical orientation, helps a lot.

And just another gratuitous photo of the central panel.

Carved boxes available for sale
If you follow my substack blog then you’ve already seen these two boxes. But I post frequently there, which bumps the post with the boxes off the top of the order. So I’ll put them here for a while.
Small carved oak box
 small oak box, July 2025
It’s based on some Thomas Dennis boxes, one of which I’ve seen, the others I only know from photographs. It’s made just the same as a period box – in this case, riven red oak with a millsawn pine board for the bottom. It’s small – 6 1/8” high, 9 1/4” x 13 3/4”. But it’s made just the same as my other full-sized boxes – all the oak riven and planed by hand, corner joints fastened with glue and wooden pins. This time it has iron hinges – these small-scale examples from Horton Brasses (although the hinges are iron.) A lidded till inside.
It’s available for sale – $1,000 – including shipping in the US. If you’re interested, email me and we can sort out the details. These days I add Paypal’s fee onto the price if paying that way. A check, though old-school, avoids the fee. My email is here Peterfollansbee7@gmail.com
a gallery of images


…………………
Carved oak box with lock
 carved oak box, pine lid & bottom. Lock by Peter Ross
There’s a story to this one – I made it several years ago – and a customer bought it and two other pieces. The story I heard is that someone didn’t like them, so they went into storage. I bought them back this summer – in the exact same condition they were in when they left here. This one’s not a copy of an existing box, but it’s typical in most of its features. Red oak box with white pine for the lid & bottom. The carvings are based on the works associated with Thomas Dennis of Ipswich, Massachusetts. The scrolls on the front appear in dozens of pieces from his shop. This box is nailed at the rabbeted corners – with what we often now call “T-heads” – wrought nails whose heads are flatted to form a narrow, wide head that buries nicely in the oak.
 detail showing T-head nails, escutcheon, etc
A till inside, oak lid with pine bottom & sides. In this view, you can also see the iron “gimmal” hinges- better known today as snipes/snipebill hinges.
 till, hinges, lock
These are the most common hinges on carved boxes in the 17th century. I only use them once in a while – I more often make a wooden hinge. These are simple and quick. But setting them just right takes a deft hand.
H: 7 1/8” W: 21 3/4” D: 13 3/4”
linseed oil finish
$2,000
Email me at PeterFollansbee7@gmail.com if you’re interested in purchasing this box (or ordering any of my oak furniture…)


