Hand Tool Headlines
The Woodworking Blogs Aggregator
“Glory to God in the highest heaven, and on earth peace to those on whom his favor rests.” - Luke 2:14
Be sure to visit the Hand Tool Headlines section - scores of my favorite woodworking blogs in one place.
Norse Woodsmith Blog Feeds
SALE: Spoon, Bowl, and Fan-Bird Videos
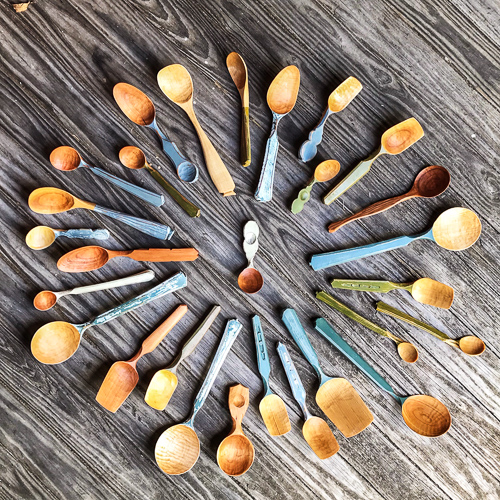
I don’t carve many spoons, but spoon carving is in the air this week. Yesterday I went to the log yard to get a white oak. What looked like the best log had metal in it – a problem for sawmills, but not for riven chair parts – so Junior gave the log to me for free. “Just make me a spatula,” he said as I left. (I split the log open yesterday and didn’t find any metal, just lots of hidden knots). Then today I hauled out my roll of sloyd knives in preparation for a friend’s bachelor party in which one of the events is carving a spoon in my shop.
So in honor of carving, and labor day, and maybe a labor-day spent carving, I’m running a 50%-off sale all the spoon, bowl, and fan-bird-carving videos that I did with Curtis Buchanan, Jane Mickelborough, Peter Follansbee, and Dave Fisher. Plus, a milk paint video with Curtis that has a lot of info on painting spoons.
More info about the videos here.
Happy carving!
The post SALE: Spoon, Bowl, and Fan-Bird Videos first appeared on Elia Bizzarri - Hand Tool Woodworking.glass door cabinet pt XVII..........
 |
| stopped chamfers |
I used the router butting against the stop to set the stopped chamfer. Added bonus is I get somewhat of a lambs tongue at the end.
 |
| attaching the top |
Eight holes - the back one three are 5/32" (same size as the screw) with the middle two and the three at the front 11/32".
 |
| pan head machine screws and fender washer |
The back screws will keep the back edge of the top flush with the back of the cabinet. The middle and front holes are oversized and will allow for expansion and contraction of the top. The fender washers span the 11/32" holes and they are not that readily visible. I bought 1" machine screws because ACE didn't have any 1" wood screws with a round head.
 |
| 2nd use |
I have 6 of these bar clamps. I had bought the pipe and the heads 30 years ago when I was going to make a bed. Didn't make the bed and only use one of the six clamps once before today.
It took me a bazillion years to get the top on, aligned, and dry clamped. Incredibly frustrating as a tap in one direction caused another to go OTL (out to lunch). Finally got it and I'm still sane and the cabinet didn't get free flying lessons.
 |
| the winner |
I bought a box of 12 of these from Lowes on the clearance shelf a few years ago. You can't go wrong with shiny brass. Even after having these for a couple of years there is zero evidence of tarnish on any of them.
 |
| found the glass knobs |
I don't like any of these for this cabinet. These knobs are quaint and artsy fartsy IMO. My daughter gave these to me for xmas. Still haven't find a project for them.
 |
| poor man's miter box |
Attaching the cove moldings on the base and I needed a miter box. I am getting better at sawing the miter saw kerfs. Still not exactly spot on vertically - I don't seem to have a problem getting the 45° dead on.
 |
| dry fit |
This was a PITA doing. The miter work was fine but the up down and fighting gravity sucked pond scum. My ceiling is too low to put this on my set up table so I had to do up/down clown routine.
 |
| switched |
I was trying to nail on the moldings and only succeeded getting one on. Kneeling and holding the brads with needle nose pliers wasn't working and I quit on trying the first nail on the second molding. I broke out the 22 gauge pin nailer and got the last 3 on easy peasy.
 |
| gap filler |
I glued in this strip of pine to fill a gap at the left front. I thought of using caulk to fill it in because I'm painting it but decided to fill it with wood because it is on the front. There is a gap at the back that I will fill in with caulk.
 |
| top molding |
Maybe a boo boo but maybe I dodged a bullet. I made the side overhang one inch. What I forgot to do was to add 3/4" to that for the molding. As it is now there is a 1/4 space on the sides and 3/4" at the front.
 |
| ugly looking |
I think this is going to take a few rounds of putty work. The first one didn't hide/fill in everything.
 |
| sigh |
Wasn't expecting this happen. I think this will be up against a wall but in case it doesn't, this gap can't be seen.
 |
| the gap cause |
This was misaligned and I used the 4x24 belt sander to flush it. In order to do that this outside edge got rolled down a bit leaving the gap in the above pic.
 |
| glass measurements |
This is the second measurement list, the first one is MIA. My usual place to get glass closed last year. I will check on line to see if there are any other glass houses and if not I'll get it from Lowes.
 |
| plywood edge cover |
For just in case - I'm going to put a thin piece of pine to hide the plywood.
 |
| chamfered |
I don't think this looks that bad. It doesn't look like it is applied but is for a purpose. The plywood is covered and I dead ended it a 16th into the ends of the side moldings.
 |
| glued and nailed |
accidental woodworker
Bowl Carving Instructional Video Sale
glass door cabinet pt XVI..........
Yesterday I ordered some goodies from Lee Valley. Today I updated it because I inputted my credit card number wrong. So my order will be delayed and I doubt I'll get this week now. Which will delay finishing the cabinet. I bought a new set of brass extruded hinges and I paid $51 for them. That was the price I saw (+/- $5-$7) checking various web sites. Sure hope they are worth the shiny brass they are made out of.
 |
| got lucky |
When I had eyeballed this a week or so ago, I thought I would only be able to fit 2 frames across but I got 3. There is 1/2" gap around the middle frame and the two outside ones are tight against the corners.
 |
| 6 of 7 |
Ran out of room to get the 7th frame here. I have another tool frame at Maria's being done with two more to follow. I'm doing those one at a time. I have the two walls (R/L) to populate with those along with the orphan 7th Stanley poster one. Plus I have additional real estate for more.
 |
| got lucky again |
I figured out the R/L length and this back stop is only about 1/8" longer than the top. I can easily blend the ends of the stop flush with that.
 |
| checking for square |
Penciled in the new outline and rasped and sanded it down to the lines. I'm getting better at eyeballing work like this for square. The right side is a wee bit high - that is usually the case. The lead in side that I rasp from tends to be higher than the exit side.
 |
| sizing the top |
The molding wrapping the top is 3/4" thick and I made the overhang plus 1". The last step was to sand the end grain ends with my sanding sticks.
 |
| bisecting to find the angle |
The last time I did this was when I was doing baseboards. One corner of the cabinet (right side) isn't square. It runs inward from the front to the back a couple of degrees.
 |
| glad I'm painting this |
I don't have a shooting board that will let me shoot an angle more/less than 45. This isn't off much but enough that I have to allow for it. I was expecting gaps and some misalignment to come.
 |
| top is sized |
I put the top on and placed a molding at the front and it overhung too much IMO. I changed it so that it overhung the molding by 3/4" vice 1". I left the sides overhanging 1".
 |
| 1/4" round over |
I wanted to break the square edge look of the stop. I ran a 1/4" round over on just the front face. I left the back squared off.
 |
| molding fitting time |
Cut the miters with the Ryobi saw. I wasn't trying to get a perfect fit off the saw. I was prepared to chisel, sand, and fill in with putty to do them. A couple of coats of paint will hide all my sins.
 |
| front one first |
This is the side that was off square and the fit off the saw was much better than I expected it to be. Two down and one more to go.
 |
| 42 degrees |
The angle on the front molding was 48 degrees. I checked them with a fancy protractor I had bought a couple of years ago. It was the first time I used it and I didn't have to make this jig. Forgot to snap a pic of that.
 |
| last one |
When I shot this on the shooting board the profile torn out crazily. I had to trim it a bit on the backside to close up the toes. I might use epoxy on filling the gaps on the miters.
 |
| back stop |
Glued and cooking. I will rout the chamfer on the sides and front after it has set.
 |
| the base |
It was a bit tricky attaching the base. The first 3 screws missed and came out the sides. No glue and only four screws to keep it in place.
 |
| hmm...... |
I have been running paint colors through the brain bucket over the past few days. Thinking of painting this with two colors - black for the base and back stop and a teal for the rest.
 |
| sneak peek |
The door doesn't seem to fit as well as it did yesterday on the width. The top to bottom is ok. Still haven't found a knob I like for the door. I have some but 99.9% of them are too small. I have some antique glass and colored glass knobs but I don't remember where I hid them.
I'll have time to hunt for them because I'm basically dead in the water now with this. I need the hinges before I can finish this up and they are delayed now. I don't want to use the hinges I bought from Horton Brasses because they take #4 screws. I don't want to risk hanging a heavy door like this with screws that size.
accidental woodworker
It's Here Because It's Here Because It's Here!
I am thrilled to finally be writing this blog post! 15 years after having an idea; almost 3 years after starting intensive development of that idea; and many trials and tribulations later, we are pleased to announce that we are finally taking pre-order deposits for the Gramercy Tools Treadle Lathe.
Last Sunday night we sent out an email to our mailing list of people who signed up to be notified of the lathe's progress and almost immediately sold out the first batch. So we added a second batch at the same pre-sale price so that more people could lock in their place in line.
We are still not quite at the point of shipping actual lathes, but being comfortable with offering a pre-sale is a huge milestone for us.
I must admit that I originally envisioned this projects milestones as more reasonable and attainable. The lathe has turned out to be the most complicated project of my career and possibly the most complicated hand tool manufactured in the United States since WWII (or WWI).
Our saga begins with the notion that a treadle lathe would be fun to use - and the unfortunate realization that I didnt have space for a lathe, so the lathe would need to be folded up. The other realization was an acknowledgement that if setting the lathe up and putting it back were too much work, I would not use it. I may be lazy but at least Im honest!
I ended up being willing to work hard to circumvent the downsides of my laziness. (Paradoxical, I know.) Good thing I wasn't alone in this. I want to acknowledge and thank everyone at Tools for Working Wood who contributed to the project. Kris Pastuszka was the engineer who designed the folding mechanism and a multitude of other details. Naomi Baxter, who is the shop supervisor, and Joel Sena (yes, we are a multi-Joel enterprise), run production in our shop and are responsible for making all the parts of the lathe that we directly produce. Which is a lot of parts! Our friend and woodturning wizard Alan Dorsey has been a source of invaluable inspiration and advice throughout the project. You can see Alan using the lathe here. Thank you as well to the numerous well-wishers at the Amana Hand Works show who gave us feedback and encouragement after trying out a prototype of the lathe, and more recently, visitors to our Brooklyn showroom who have seen the real deal.
We have a lot of advantages over the 19th century, including ball bearings and aluminum. I'm looking forward to spending time on the treadle for exercise and actually producing something at the same time. The most exciting thing is I feel like I can finally help people who live or work in tight quarters, who have the desire to make something but don't have space for a standing shop.
We expect to be delivering lathes by the end of 2025 with a second batch in early 2026, although I wouldnt be shocked if it would be a little later depending upon when all our parts arrive. There are over 100 parts in this lathe and the logistics involved with sourcing, identifying and keeping track of them has been mind-boggling. The final cost of the lathe will be $3,600, though we are offering the pre-order opportunity to pay $3,400 for the lathe, secured by a refundable $500 deposit. If you opt for the pre-order cost, when your lathe is ready to ship we will contact you for the balance of $2,900, which you can either pay or request your deposit back. This offer will be available until we either sell out this current batch, or start delivery. (This cost does not include the shipping charge.)
We encourage you to come by the shop if at all possible and play with the lathe prototype in person. And once the lathe is available to take home, we encourage you to do that in person as well. Your gratification has been delayed long enough!
Thanks to everyone for their support and encouragement on this long and winding journey.
glass door cabinet pt XV..........
 |
| hmm...... |
I'm kinda liking this reverse look of the base. Cleaned and sanded smooth, ready for the oohs and aahs.
 |
| nice |
I just realized looking at this pic that I had screwed up. The follow up to this was to rout a 45 ° chamfer on the front and up to the back stop. As I was envisioning that I saw that I hadn't trimmed the top to its final size. I don't think I'll be able to redo the pattern on one end. If not, I'll save it for a future use and make another one.
 |
| cleaned up |
The epoxy didn't like being rasped so I did most of the smoothing with sandpaper starting with 80 grit. I was able to smooth/flush the epoxy on the knot with my violin plane.
 |
| warm and fuzzy |
I added two more screws (total of 5) to each of the bearers. The weight of the cabinet and its contents will be felt on the four of them. Feel better knowing I added the extra ones. No glue - just screws.
 |
| something is awry |
I checked the front rail and it was square to the sides when checked from the R/L. I checked the door and it was not square. How that happened I am clueless. I had checked that the layout line was square but I missed it somehow. Easy fix and I had some wiggle room to square it off again.
 |
| got lucky |
Squaring off the top proved to be exactly what I needed. The margin at the top and bottom is perfect. Both the top and bottom margins are consistent and even from R to L.
 |
| working the long sides |
The door was a hair over a 1/4" wider than the opening. I ran both long sides through the tablesaw taking a wee bit less than a 1/8" off each one. That left the door a few frog hairs shy of fitting the opening. On the first plane and check run I planed 3 shavings off of each long side.
 |
| 2nd run |
Got a snug fit after the first plane run. Got a slightly better but still too tight of a fit on the 2nd run. I only did 2 shavings this time. 3 times was the charm again.
 |
| almost there |
The margin R/L isn't consistent top to bottom. The left side (which will be the hinge side) is good until the top 6-8 inches were it is tight against the side. I planed that area and checked it again - good margin top to bottom. The left side has about a 16th gap and the right is tighter. I am going to leave it as is for now until I get the hinges installed and door hung.
 |
| home depot |
I bought 13 feet of this molding this AM. I couldn't find any of the small moldings that I could use for glass retainers. The smallest quarter round available was too big - that I what I wanted to use. This molding appears to be maple and it is for underneath of the top.
I was looking to buy a large cove molding but the selection at HD is smaller than what Lowes offers. I have to go there to get the glass cut so I'll check what they have for any large cove moldings.
 |
| profile |
This is a baseboard cap molding and it was cheaper than I expected. 13 feet cost me $25. It is also 1 3/4" wide and the top rail is 2 1/4" wide. This will break up the wide flat expense of the top front rail and the top rail of the door.
 |
| I was wrong |
I thought I wouldn't have room for the pins and cups. I was hung up on the insert door sticking in too much but I now can see just how much room I have to play with. I am also playing with the idea of making adjustable wooden shelf supports. That is something that I haven't done before.
 |
| shelf pin drilling guide |
I have a couple of these already but they are all too short. This one is 41 inches high. The lowest the bottom shelf height can be is 10" and the highest the top shelf can be from the top is roughly the same.
I will need 64 cups and 12 pins for this. I ordered some from Lee Valley along with a new set of shiny brass hinges. Hinges are getting expensive and the ones I bought from LV don't come with screws. I bought 40 #6x5/8 flat head brass screws because I didn't have any this side. I'll need these for the hinge leaf attached to the side which is 3/4" thick.
 |
| almost done |
I gave the first couple of coats of finish a few days to dry before applying this hard wax to the box. I like how it looks on the darker wood but the white wood still looks unfinished to my eye. After a couple of days I'll mail this out to my sister.
accidental woodworker
glass door cabinet pt XIV........
I've been thinking about the shelves for the glass door cabinet. At first I was going to use shelf pins but I'm shying away from that now. There is a space limitation due to the insert door and the groove for the panels. Instead I'm now thinking of using fixed shelves - 2 definite and one maybe. News and updates on the 11 o'clock news.
 |
| bad oops |
I tried to cut too tight of a curve with the bandsaw and this chip popped off. I tried to glue it back on with superglue first but that failed. Used yellow glue this time and I glued this yesterday and gave it 24 hrs to cook.
 |
| glad I'm painting this |
The kerf says it all. If I left it off the hump would have been smaller than its sibling on the other side.
 |
| both sides |
I had to do the layout on both sides of the long base sides. The throat on my bandsaw isn't wide enough. The good thing is it turned out pretty much dead on both sides.
 |
| cleaning and smoothing |
Doubled up and did the front and back as one. There is no way that any of the sides can be compared to each other.
 |
| sigh |
I soaked this knot with super glue a couple of times yesterday. Today it seems to be tight and solid. Unfortunately I thought this was going to be on the back but it ended up on one of the short sides. A headache to deal with.
 |
| epoxy and silica dust |
Using this to fill in the saw kerf, add some to the hump, and slather all over the brown knot.
 |
| insurance |
I put it on with a wooden stick and then pressed it down into the knot as hard as I could with a putty knife. I put epoxy on the two sides and the top of the knot.
 |
| rethinking the top |
Initially I was going to wrap the top (all four sides) with a molding. Instead I'm going to only do the sides and the front. I will wrap the bottom with a cove molding.
 |
| hmm...... |
The top now overhangs each side 1 1/2". I don't need it at the back and it is probably too much for the sides/front but it offers some wiggle room. It is still possible that I might make a left hand turn on this again.
 |
| hmmm..... |
This is interesting turn of events. I ordered these hinges from Horton Brasses and got a shipping notice from John Wright and the package came from Amazon. I thought I had ordered bright brass hinges and these are satin. And I just noticed that I didn't get any screws!!
 |
| forgot one |
I didn't do the short leg with the epoxied knot because it hasn't set up yet. I'll do that one in the AM. I thought I had done this short side - duh.
 |
| no twist |
I flushed the four corners, top and bottom, and checked both for twist. Where I was expecting some due how much I had to plane off one corner, there was none.
 |
| bearers |
Screwed the bearers in with 3 screws in each one. I may add two more to the long ones but for now this will do. No glue, just screws, in case I want/need to revisit this.
 |
| fits |
I set the bearers down from the top 5/16" and with the cabinet in place the base covers about half of the 1/2" plywood.
 |
| the cove molding |
The cove molding completely covers the 1/2" plywood bottom with a reveal in the bottom front rail.
 |
| using gravity |
There is still a considerable amount of glue left in this bottle. I will leave it as is to drain down and I'll empty it in the AM.
 |
| came back for this |
I had killed the lights and I was going up the stairs when I thought of this. Invert the pattern and trace it on the back stop for the top. If I don't like I can think of something else. But I do like the look of the penciled layout.
accidental woodworker
My Japanese Plane talk at Woodworking in America 2025
My Japanese Plane talk at Woodworking in America 2025
I’m super excited to have the chance to present at Woodworking in America again this year. WIA is one of the premier national woodworking events, and I’m so glad it’s back. The click-baity title of my talk this year is “Japanese and Western Planes: The Common Ground”, which is really an excuse to talk about cool things regarding Japanese planes and planes in general. I’ll also be covering how to avoid tearout when planing, Japanese or otherwise, so that should be useful even if you’re a committed Stanley user.
Woodworking in America will be on Fri-Sat Oct 10-11 at the Iowa State Fair Grounds in Des Moines, IA. Looking at the other presenters, this will be a terrific event, and I’m honored to be included among them. There’s also a great selection of vendors who will be there as well.
There’s still time to get a discount. Use code SAVE10EARLY for an additional 10% off your ticket when purchased before Aug 31.
Hope to see you there!
glass door cabinet pt XIV........
 |
| hmm...... |
A bit of an experiment to see how it would go. The thought of the router tipping on the thin muntin bar wasn't far from my mind doing these two bottom lites. The first run wasn't too bad but the second one on the opposite side was the worrying one. I survived it by going as slow as pouring molasses in winter. After a bit of contemplation I jumped in with both feet and did the rest of them.
 |
| 2nd potential hiccup |
Wasn't sure how well the chiseling on both sides of these would go. I sharpened the chisel before diving in. Whatever chiseling stress there was it didn't seem to matter. The corners are clean, crisp, and square.
 |
| survived |
No weeble or wobble - no divots on any of the muntin bars. It took a while but I got it done hiccup free.
 |
| done |
All the corners chiseled and I'm happy it is over. The biggie is I don't have to make another door.
 |
| one of two hiccups |
Two chips popped out when chiseling this and another corner. The knife lines from the half lap layout were the cause. Glued the two of them back on with super glue.
 |
| sneak peek |
I like the door and the lites. I measured the small and large one lites and all were within a 16th of each other. I don't like the top front rail of the cabinet. I think I made that too wide. I made it that wide for a molding but it will allow me to put a large one there.
 |
| top |
Made the top oversized by 2+ inches on all four sides. A lot of wiggle room that is dependent upon the size of the planned molding.
 |
| base |
The base is 3 1/2" high and it will wrap the four sides. This way the cabinet can be positioned so the back can be visible.
 |
| ready for dovetails |
I sized the base so that is will be an 1/8" inch more in the front/back and side/side inside measurement. The gap will be hidden with a cove molding.
 |
| oops |
This is the door stile I screwed up and I was going to try and get molding stock out of it. Forgot that there were three 1 1/2" mortises in it. I did get one piece long enough to use to make moldings.
 |
| cove molding |
This is a 1/2" cove molding and I just realized today that the other 3 cove molders I have are also 1/2". This one is too small to use as the molding under the top.
 |
| 4 profiles |
I like the two top ones but again I feel that these are too small to go under the top. The two coves on the bottom are toast. The left one is uneven and the right one is tapered. Glad I experimented first with the molding planes. I'll need to make a few more practice runs to get the feel for them.
 |
| I like this one |
Totally clueless as to what this is called. I have something to say about the width of it and I can use that to size it to fit the underside of the top. This one is in the top two choices.
 |
| a 'S' curve molding |
The 2nd one in the top two. I like this too because I can vary the height of it. However, I'll have to practice more on making it. The left side is a bit higher than the right side. In other words I have a wonky looking tapered S molding. The ends will be mitered so it has to be a consistent thickness end to end.
 |
| what I wanted |
I found it - my large cove molding plane. This is my preferred molding for the underside of the top. This one looks decent to my eye. It isn't tapered and it is acceptable in evenness from left to right. However I think this plane was made for stock thicker then 3/4". The bottom edge of the cove is awfully thin and the plane hadn't bottomed out yet neither.
I really don't want to buy any moldings but I may have to. All my other choices for molding planes is limited. Most of them make too small of a profile and I need (IMO) a large molding for under the top.
 |
| ready for the tails |
I've been using the Moxon vise more and more for dovetailing. I used to do single tails (like this base) in the face vise. But lately my back has been protesting doing them in the vise. I don't have my back talking to me when I use the Moxon vise.
 |
| last pin chiseled away |
Just had to clean up the pin sockets and do a dry fit.
 |
| dropped over easy peasy |
Got the fit I wanted - there is roughly a 16th gap all the way around.
 |
| left over moldings |
I will use the cove moldings for the hiding the gap on the base. The quarter rounds to the left of them are too big for the glass door lite rabbets. I'll be making a run to Home Depot because they have a nice selection of small moldings, smaller than what I have here and the prices aren't prohibitive.
 |
| patterns |
I made most of these patterns after I got out of the Navy in 1994. I made them after seeing them in a book on colonial furniture. I only used four of these and all were for a bookcase I had made for my daughter Wendy. Time to pick one for the cabinet base.
 |
| the winner |
Looks better than just a simple half round into a straight run.
accidental woodworker
C. Parker Machinist Vise
Dovetail techniques upgraded

glass door cabinet pt XIII........
 |
| muntin bar layout |
The center vertical muntin bar is fitted. In the batters box are the 3 horizontal muntin bars. I was apprehensive about marking this layout because the vertical muntin bar laid across the center one. Upcoming was a half lap, two notches, and tenons. All dependent upon how well I did the marking times 3.
 |
| none fit |
I would rather deal with a too tight, non fitting half laps, then one that is sloppy and loose. The center muntin half laps are ok, it is the horizontal ones that are too small. Notches and tenons after tweaking the half laps.
 |
| after a bit of fussing and tweaking |
I got the half laps done. Overall I'm pretty happy with my results. I didn't see any gaps on the front face but a few popped out on the back notches.
 |
| teeny bit proud |
The ideal joint would have it flush on both the front and back. The front face is dead flush but the back is less than a 32nd off. Since the front is flush and that is more important than the back, I'm leaving this as is. After it glued and cooked I will plane the back flush.
 |
| notches done |
I chiseled all the notches splitting the pencil lines. Need to make tenons before I can check the fit.
 |
| splitting the tenon cheeks off |
All the cheeks split off easily and cleanly with a chisel.
 |
| wee bit proud |
The fit of the muntins in the notches is good but all of the horizontal
ones are proud. I don't understand it because the half laps are flush on
the front and almost on the back along with the tenons laying flat in
the bottoms. I tweaked the tenons by removing more with a router and
dropped it some more but still not flush. Another thing I'll leave as is
and plane flush after the glue has cooked.
 |
| smiley face on |
The layout/chiseling was spot on and the muntin bars dropped into their notches without any hiccups.
 |
| sneak peek |
I like the look of the lites but after seeing it I think I could tweak it some more. I would only use a top and middle horizontal muntin bars - leaving 3 graduated lites. Baby bear at the top followed my Mama bear in the middle, and Papa bear at the bottom. Something to think about if I make another one of these.
 |
| glued and cooking |
A productive AM session and goal met. Door is glued and cooking and I'll be able to play with it when I get back to the barn after my lunch time stroll.
 |
| notch gap |
Out of 8 notches I had to fill gaps on 3 of them. This is the last one to be filled with a wooden shim.
 |
| flushing |
No hiccups with the flushing. I didn't get any tear out planing the muntins where they terminated in the notches - planing from with the grain to across it. However one muntin bar didn't cooperate and I got some tear out due to reversing grain. I was able to smooth that somewhat by planing in the opposite direction.
 |
| hmm...... |
I had planned to do the rabbets on the back side with the electric router. But seeing how many I had to do and the narrow width I had for the router to sit on, time to back up and implement plan B.
 |
| plan B |
The plan is rip out the rabbets and glue and nail them in place. I made these muntin bars differently than I did the book case doors. On them I made the vertical and horizontal muntin bars thinner and secured them on top of the rabbets. I applied the front face of the muntin bars with a thin piece of stock completing the rabbet. I need a bunch of 5/16" x 7/16" 'rabbets' with plan B.
 |
| 4 long ones |
 |
| 16 short ones |
Got two extra long ones and a boatload of the short ones. I can oops quite a lot before I get bit on the arse.
 |
| planing gauge |
This is what I will use to smooth the bandsawn face down to.
 |
| Houston we have identified a problem |
My idea wasn't thought out fully. If I add the 'rabbets' it will make the front of the muntin bars too wide. It will also be unbalanced because there are only two added 'rabbets' per lite. I thought of checking this just before I was going to kill the lights.
 |
| back to the electric router |
This rabbeting bit is already set for the depth and it will cut a 1/4" rabbet. They should leave a 3/8" center shoulder on each muntin bar. I still have a mismatch in that there will be different sized rabbets in each lite due to the rabbet I did before. Dealing with that won't be too big of a headache as the next step would be to start over and make a new door. Hope to say that ain't happening boys and girls.
I'll deal with this in the AM.
accidental woodworker
Bass Build Pt 2
With the majority of the bass guitar’s design work resolved, it’s time to start work on its body. I’m using an unusual combination of Tasmanian blackwood and Spanish cedar. Let me show you………………..
glass door cabinet pt XII........
Made good progress on the glass door cabinet today. Door is half done and I put a decent dent in getting the muntin bars done. Happy with how this coming out. There isn't much more to do. I'm sure the door is going to consume the most time to finish this cabinet. I ordered the hinges from Horton Brasses and they should be here the first of next week. Hinges don't fill me with dread anymore. I'm looking forward to knocking them out easy peasy.
 |
| door rail measurement |
The door is isn't dead nuts square. It is off about a 32nd which isn't that bad. I decided to make the door oversized by a 1/8" in the width and height. That should be sufficient wiggle room for trimming and fitting the door to the opening.
 |
| dowels |
I have never doweled a door of this size together before this. Four dowels in the top rail and 5 for the bottom rail. I didn't screw this up and drilled the all the holes correctly.
 |
| set up and rock hard |
All of the holes I filled in with the epoxy were all still proud. None of them had sunken or dripped away. Flushed them with a blockplane and touched them up with some 120 grit sandpaper.
 |
| dry fit |
hmm..... it would seem that I made the door a 1/4" wider than the opening. Not a big deal because I made all the stiles and rails a 1/8" wider.
 |
| glue up time |
I thought doing this glue with yellow glue might be a PITA due to open time. I wasn't sure that I could get glue on all the dowels and in some in the holes before the glue froze. I managed ok and no hiccups. Did the dowels/holes on one stile, added the rails, and repeated it on the other stile. Worked well and nothing froze and I got a got a nice line of squeeze out on all four corners.
 |
| center rail |
This rail is dry - no glue or dowels. It is to help keep the stiles from bowing in/out and from twisting during glue up.
 |
| glued and cooking |
I clamped the the top and bottom over and under to keep the rails straight into the stiles. I also made sure that the door was laying tight against both clamps. Trying to fix a door that is twisted is like trying to put socks on a pig.
 |
| bottom front rail |
This front bottom rail ended up proud of the bottom of the two sides. Used my big LN blockplane and frequent checks with the straight edge to flush it.
 |
| door stop |
I'm thinking of two more door stop possibilities. Maybe another full width one at the bottom and a partial one on the stile where the knob will be. The partial one is a definite maybe because it will also have the magnetic catch to keep the door closed.
 |
| muntins |
I made the muntin bars 7/8" wide and 3/4" thick. Still running how to do the muntin bar rebates for the glass through the brain bucket. Going with wide muntins to help stiffen the door.
 |
| asymmetrical layout |
The top and bottom muntin bars are 7" high with the two between them about 13" high. I may change the height of the top and bottom after the center vertical bar is installed.
 |
| 1/2" plywood |
The bottom isn't going to be visible and short people won't be able to see the top. Either way both are getting painted and that will hide what type wood it is. Glued and nailed both of them in place with 1" brads.
 |
| top done |
The top overhangs on 2 sides because neither the top or the bottom is square.
 |
| flush trim bit |
This plywood is a )(@&%&)@Q&%*)(Q@_ to hand plane. Decided to flush the sides and front with some electrical help.
 |
| no twist |
It looked flat/straight to my eyeballs but I wanted confirmation. The sticks said that there is zero twist in the door on the either face.
 |
| a wee bit proud |
3 of the 8 rail/stile connections were a bit proud. Scraped the glue off first, then knocked most of the proud off with the block plane, and followed that up with 120 grit sandpaper.
 |
| what a mess |
I had planned to do the rabbet in the door from the git go with the electric router. I couldn't come up with a game plan for doing the stopped rabbets by hand that I liked. After listening to the router scream and the mess it made in the shop maybe I should have brain stormed a wee bit longer.
 |
| last corner squared off |
The rabbet is 1/2" deep and 3/8" wide.
 |
| vertical muntin bar |
The ends will be buried in the top and bottom rails about 3/4". That should be enough to provide a secured glue joint and keep the muntin bar from twisting.
 |
| will it fit? |
Got the tenon and the notch chopped without incident.
 |
| hmm..... |
Top was too tight and I had to plane the top outside faces before it fit in the notch. I didn't make the tenon long enough. The bottom face of the muntin bar needs to be flush with the face side of the rails.
 |
| it fits |
There is slight gap at the top and bottom where the muntin bar shoulder meets the rail. I will epoxy a shim in them when I glue the muntin bars in.
 |
| less than 16th |
I purposely marked and sawed into the waste side when I did this. I thought I would end up having to trim it to fit but I got a couple frog hairs worth of a gap to deal with.
I'm hoping tomorrow that I'll be done with the muntin bars. So far it is going much quicker then I expected and with no screw ups. Fingers crossed that joy continues in the AM.
accidental woodworker
Making a Joint Stool from Trees, Part 1: Layout and Joinery
Ever since I got this book, I have wanted to make a joint stool from a tree. The grainy picture alone should give you an idea of how long ago that was.

The book is Make a Joint Stool from a Tree by Jennie Alexander and Peter Follansbee. Although I wrote a review here back when it first came out, I never got around to building the featured project until now. The reasons for my delay were manifold, but they mostly came down to (a) lack of trees, and (b) lack of a lathe.
Then about five years ago, the tree problem was solved for me when we took down a 100-year-old oak tree in my front yard in Alabama. It yielded a small pile of straight, clear, white oak boards, some of which I cut into 2X2s that I expected to make into legs for chairs or stools once they dried.
I brought all of the stock with me to Ohio when I moved here, and now the wood is at 12-15% moisture content–quite dry enough to build with. Along the way, it got mixed in with some red oak that I harvested that same year. Both woods are ideal for this project.
I still don’t have a lathe, though. Fortunately, Alexander & Follansbee provide guidance in their book for making shapely joint stool legs without a lathe, and this is the result:

For a first attempt at this form, I’m happy with it. The legs are white oak (well, at least three of them are) and the stretchers are red oak. The top is cherry. All the stock is from wood that I got right from logs. It was a fun project, and I will definitely make another one, even though I will do a few things differently next time around.
I’m not going to indulge a build-along instructable post here. If you want that, buy the book!
Rather, in this post and its sequels, I’ll walk you through several elements of the process that I found especially interesting, as well as some problems I needed to solve, some of which went beyond the scope of the book. So consider this post a small tribute and supplement to Make a Joint Stool from a Tree.
Layout
If you’ve only every built furniture with right-angles, the joint stool is a good introduction to angled mortises and tenons. But because the legs splay only in two directions (as opposed to chairs whose legs often splay in all four directions), the angles are simple to visualize. There is only one angle.
The challenge, however, is determining the exact length of the stretchers. The distance between the tenon shoulders on either end actually determines where you should cut the mortises. It’s hard to describe why, but as soon as you start building the stool, you’ll see what I mean. If that distance between the shoulders is a bit too short, then the stretcher would want to sit too high. If it’s a bit too long, it would want to sit too low. So you have to lay out the locations of the stretchers very precisely.

That doesn’t mean you have to do it with numerical measurements, though. After giving the problem some thought, I grabbed a big board out of my scrap pile. (It was a drawer bottom I had mistakenly cut to small.) On it, I drew out the angles and used the full-size diagram to lay out the angles and the locations of the joints, as well as the precise length of each piece. I planned for the legs to be 23″ long when finished, and everything else was gauged from that single dimension.
I departed somewhat from the dimensions of Alexander & Follansbee’s stool, which is shorter than mine and employs a 6:1 angle for the legs. Mine is more like 12:1. Because it’s a taller stool, the splay angle needs to be shallower. As long as the legs extend just a little bit beyond the top of the stool (when seen from above) it will be perfectly stable in use.

With the full-size template, I was able to cut the stretchers to the proper length and mark the tenon shoulders right from the legs–no measuring required. I’ll set the template aside for when I decide to make more of these.
Sixteen Mortise and Tenon Joints
Yes, there are 16 mortises to chop. That’s a lot. I cut them all by hand.

But I found that after my first few, I got a lot faster. The process was not nearly as laborious as I had imagined.
I considered removing the bulk of the waste with a Forstner bit on the drill press and squaring up the holes with bench chisels. It would perhaps have been a little faster to do it that way, but I don’t particularly enjoy squaring up round holes, and the air-dried oak cut really well under the mortise chisel. I’ll do it this way again.
Sixteen mortises are cut to accept sixteen tenons, which did not take nearly as long to make, thanks to some tricks recommended by the book.
Normally when cutting tenons by hand, you first saw the cheeks and afterward you saw the shoulders. But with this method of construction, you saw the shoulders first.

You also intentionally undercut the shoulder on the back of the stretcher, as you can see above. That way, the shoulder on the face is guaranteed to pull up tight against the leg with no gap. That does mean there’s a slight gap in the back of the joint, but no matter. The joint is quite strong enough.
With the shoulders cut, you then cut the tenon cheeks. But you don’t saw them. You just split them off.

I remember the first time I saw Peter Follansbee do this–on an episode of Roy Underhill’s show The Woodwright’s Shop. I was almost mad at him for making it look so easy. But it IS easy. First split off about half the thickness of the cheek. Then set your chisel in the layout line and split that part off. Check the fit in the mortise, and pare off any bit that remains too thick.
This method works because the wood’s grain is very straight. It’s been split out of a log, after all, not sawn out any which way. So the wood splits pretty straight. This also works because the joint won’t be glued together. The real strength of the joint will come from the drawbore peg that will lock the two pieces of wood together. But we’ll get to that below.
Because the mortises meet inside the leg, the ends of each tenon must be trimmed so as not to bump into each other when the frame is assembled.

I did the work roughly with a drawknife.
And yes, this leg has a stray saw cut in the top. It doesn’t affect he integrity of the joinery, so I just left it. The book guides readers away from perfectionism and reminds us that it is perfectly acceptable to leave tool marks, layout marks, and even small flaws in the work, long as those things don’t compromise the structure or ruin the overall form.
Drawbored Mortise and Tenon Joints
There are lots of good tutorials on drawboring, and the book covers everything you need to know. But it doesn’t hurt to show how it’s done, because it’s genius.
I first bored 5/16″ holes through the mortises about 1/4″-5/16″ from the edge. The lower stretchers each got one hole. The upper ones got two holes on one side and one on the other. The holes mustn’t intersect.

Insert the tenon in the mortise and use an awl to make a mark slightly off-center, toward the shoulder of the tenon. That last part is important. You are intentionally going to bore holes that don’t match up, but that are slightly offset from one another, and the direction of offset is critical to the success of the joint.
Pull the tenon back out and bore the holes where you marked them. I repeat: on the tenon, the hole must be offset toward the shoulder. How far should they be offset? The exact distance doesn’t matter. Make it about the thickness of a half-dollar coin.

Thus, when I assemble the joint and drive in a peg, the offset holes will pull the joint up very tight, and there will be enough friction in the offset holes that the peg will never work loose.
Drawbore Pegs
I bored 20 holes in 16 joints, so I need 20 pegs.
Because the whole joint will depend on the structural integrity of these pegs, the stock should be chosen with care. The grain should be dead-straight all the way through the peg, and the wood should be as dry as you can get it–ideally drier than the stock they’re being driven into.
I found some off-cuts about 5″ long. These were from the end of one of boards I cut to make the stretchers, so they are at least as dry as the surrounding wood. And because boards tend to dry out more on the ends than in the middle, I can expect these pegs not to shrink on me.
To insure the grain runs straight for the whole length of the peg, they must be split out, not sawn. For successful splitting, don’t try to split narrow pieces off thicker pieces. Instead, split your stock in half, then half again, until you are close to the size you need.

Using a chisel to split the wood will inevitably make the split want to run out because the chisel edge is flat on one side and beveled on the other. So once you start the split, set the workpiece loosely in the vise and pull the chisel back a bit toward the flat side, as you see above. That should straighten out the split.
On a sacrificial block, use a chisel to carefully shave down each peg to a slight taper. You may have to turn them end-for-end at first to remove the bulk of the waste safely.

This looks much more dangerous than it is. Oak works particularly well in this way, especially when your chisel is perfectly sharp. Other woods may not shave so well in this way. I’ve tried making pegs like this from hickory, for example, and that was noticeably more difficult.

On each peg, you’re aiming for a nice, long taper. The peg should drop easily into a sample hole but not go all the way through.

On a few of these pegs, I used a spokeshave to finish shaping them.
Notice the peg is nowhere near round in cross-section. That’s intentional. It is better to leave the pegs somewhat square, or hexagonal, or octagonal in cross-section, as the corners will grip better in the surrounding wood. It is also a good idea to shave the tip to a dull point so it can slip through the offset holes.

It takes a while to make enough pegs for the whole project. You may wish to make one or two extra, in case one turns out to be a bit too thin or breaks unexpectedly when you start tapping it in.
Assembling the Joints
Woodworking is a curious process. You start with a pile of wood, and you work steadily for hours or even days making cuts and planing surfaces and shaping joints, and for that whole time, you still have what looks for all the world like a pile of wood.
Then, suddenly, in just a few minutes, that pile of wood comes together into a recognizable form. What was a heap of seemingly random bits of material is now a stool or a cupboard or a table. It’s almost magical the way it happens.
The assembly is the fun part, especially since assembling drawbored mortise-and-tenon joints is a relaxed process. You’re not worrying about clamping things up before the glue sets or anything like that. Because there’s no glue, there’s no hurry.

I assembled one end, then the other, and finally connected them with the remaining stretchers. Tap in the pegs just a little bit at first, until you’re sure each piece is in the right place and everything is coming together as planned. Then go around and tap the pegs further in to snug up the joints.
I did have a bit of trouble making sure that the pegs cleared the opposite stretchers when they came through the backs of the joints.

I had left the insides of the top stretchers quite rough, since they will be hidden and out of reach of anybody’s fingers. They vary in thickness quite a bit, since there was no need for them to be a regular thickness. As long as they don’t obstruct the drawbore peg, they’re fine.
So back to the pegs. How far do you hammer in the pegs? Well, I just tapped each peg in with a hammer until it stopped. If you’ve done this before, you know what I mean. Once you stop feeling the peg advance, and the peg has come through the back, and the shoulder of the stretcher is snug up against the leg, you should stop. You’re done. Some pegs will go in father than others.
Then I trimmed off the pegs with a dovetail saw.

I sawed off each peg. The easiest way to do this without marring the surface of the leg is to rest the spine of the saw on the surface and saw carefully so the teeth don’t touch the surface. This leaves the pegs just a little bit proud of the surface. You can trim them flush with a chisel if you like. Or you can just whack each one with a hammer to set it flush. The hammer method is faster.
On the lower stretchers, I sawed off both ends of each peg. (It hurts a little bit to see your hard work on the peg come off as waste, but you get used to it.) On the upper ones, where they won’t be seen, I left the pegs long on the inside. Just a little something for the conservator to appreciate.
Once the stool was assembled, I leveled the feet. You can do this very precisely by hand. I also chamfered the feet with a spokeshave so they won’t split in use.

As you can see in the photo above, I’ve added chamfers and a lamb’s-tongue detail to the legs in order to break the sharp edges and lighten the structure visually. In my next post, I’ll show you how it’s done.
glass door cabinet pt XI........
About 49 (wowie?) years ago while I was in BEE school (basic electricity and electronics) in the Navy I was late for school one day. There were 11 other late comers all in a line being drilled by the Master Chief as to why we weren't where we were supposed to be? I was 4th in line and 3 previous all said the alarm clock didn't wake them up. When he got to me I told him I had no excuse I wasn't where I supposed to be at the time I supposed to be there. Me not having an excuse threw him for a loop and he asked me if I would do it again. I told him no because I didn't like the idea of having to stand here explaining why again.
When the Master Chief got done he let me go and kept the other 11. I was the only one to own up to being late with no excuse. All of them blamed their problem on alarm clocks. That was the only time I was late or missed an appointment until today. I woke up at 0705 having a podiatry appointment at 0730. I couldn't get a hold of the clinic until 0816. Embarrassed to have to make that call and reschedule. I don't oversleep often and I certainly didn't think I would do it today. I'll blame it on being 70+ years old and not setting the alarm clock.
 |
| last dry clamp |
Got all the biscuit slots done and did a dry clamp to rehearse for the real one with glue. Did it twice hoping that hiccups would bite me on the arse.
 |
| needed two more |
I forgot the biscuit slots for the bottom front rail. The backer was to allow something for the entire fence of the jointer to rest on. Without it, almost half of the fence was hanging out in the air. This is a pic of the top front rail slot. I found I hadn't done the bottom ones on the dry clamp run.
 |
| glued and cooking |
Got this done just before the lunch bell chimed.
 |
| hmm...... |
Checking to ensure that the door stiles have lots of wiggle room.
 |
| hmm...... |
Happy with the diagonal report - less than a 16th off from each other. Repeated the same for the back.
 |
| sneak peek |
There is a base coming for this that will raise it up 4-6". Haven't decided on a design for it yet but it will be something simple.
 |
| side sneak peek |
I just realized that with the back I did this could be viewed as finished from all four sides. There won't be a need to bury the back up against a wall.
 |
| with home made filler |
I was going to buy some Bondo to fill in screw heads and biscuit slot ends but then I remembered this. Epoxy and silica dust will work just as well and save me a few $$$.
 |
| over filled |
I am not sure how well this will stay in place. This will go vertical and the filler may flow out with gravity helping it. This epoxy also takes 24 hours to set up and stays workable (from past uses) for at least 45 minutes. I'll find out in the AM if I need to do another round.
accidental woodworker
Birch Ummik and Woodworking in Estonia
glass door cabinet pt X.........
 |
| out of the clamps |
There is a slight gap at the shoulders. The cheeks are tight and gap free. I planed the the two arms flush.
 |
| one point for the home team |
The wooden square is still reading 90 degrees according to Big Red. And it still read 90 with the legs switched.
 |
| smiley face on |
Found my Union saddle square on the tablesaw fence this morning. I almost bought one last night from Lee Valley and I'm glad I didn't.
 |
| cross brace |
Laid this out based on the brace and arms being 3/4" thick. After I laid it out I realized that I had planed 1/8" off the legs. So I ran a second gauge line on the brace above the pencil line to compensate.
 |
| nope |
I have a bazillion routers and none of them had a base plate long enough to span between the shoulders. The LN rabbet blockplane worked flawlessly after removing the bulk of the waste with a chisel.
 |
| too small |
The LN rabbet blockplane wouldn't fit and I reached for the Record 073. I didn't bother to check doing it with a router plane.
 |
| first dry fit |
The brace is a wee bit proud. It is a strong 16th shy of being flush with the bottom. Did a second leveling of the brace half laps.
 |
| still reading 90 |
I didn't get the top flush but I was ok with that. I stopped once I had removed 1/2 of the brace half lap. The brace doesn't have to be flush with the legs top or bottom.
 |
| clamped and cooking |
I screwed the half lap on the legs on both sides but no screws for the brace. I am going to rely solely on the glue to keep it together.
 |
| ring box |
This doesn't look too bad with one coat. The 'white' on the box sides doesn't show much evidence of a finish. Another coat in the AM and then a coat of wax. I am going to give this to my sister Donna.
 |
| don't remember this |
This was kind of square, only a few spots needed to be knocked down. The pine is beat up a bit and there was a split on the end of one of the legs. Both legs were also out of square on the face. I could see it without needing to check it with a square.I must have made this just to see if I could do it. I don't recall needing a square of this style or need.
 |
| fixing the split |
There is a partial rabbet on both legs for 3-4 inches at the ends. Can't think of any reason for them which makes me think this was an experiment. Maybe I knocked this out when I went nutso and made a boatload of wooden squares?
 |
| flushing the brace |
I'm not doing any round overs or other design on the ends of the legs. I want that part to stay flat so I can put a clamp on it.
 |
| top front rail |
Placing this rail as is and the door will be an insert one. This rail will also provide the space to put a molding and not interfere with the door opening/closing. It will also shorten the length of the door stiles which should increase them staying straight and flat.
 |
| bottom rail |
I don't want this one to be the same as the top rail. If it was it might be a pain in the ass to lift things over it to put them in the interior and to get them back out. There shouldn't be any stress on either of these rails. All they are doing is keeping the sides parallel top to bottom.
 |
| oops |
I don't use biscuits that often anymore and I screwed up setting the height of the biscuit jointer. I initially had set it for 3/4" thinking the jointer saw blade would centered on 3/4" thick stock. I was wrong again and it worked as it should when I set it for 3/8" - now it was centered for 3/4" stock.
 |
| glued and cooking |
I wasn't going to glue a biscuit in this errant slot but changed my mind. I'll do the correct slot in the AM.
 |
| biscuits laid out |
The sides will get attached to the back with a biscuit every 7-8". I was hoping to get that done today but it didn't happen boys and girls. Maybe tomorrow where I should be able to get a rough idea on the height/width of the door. The stiles for that still eyeball straight and flat.
accidental woodworker
A Day Like No Other
