Hand Tool Headlines
The Woodworking Blogs Aggregator
“Glory to God in the highest heaven, and on earth peace to those on whom his favor rests.” - Luke 2:14
Be sure to visit the Hand Tool Headlines section - scores of my favorite woodworking blogs in one place.
Tools For Working Wood
Driving the Work - Lathe Tailstock Centers
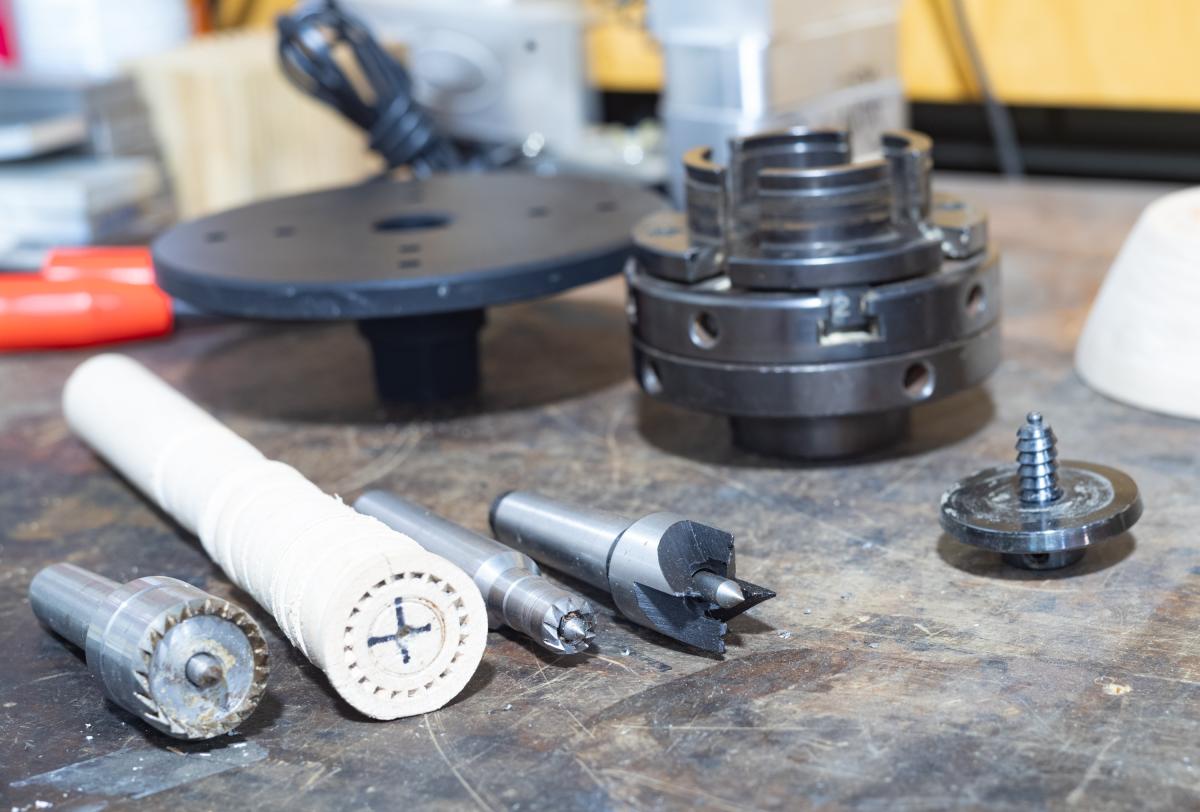
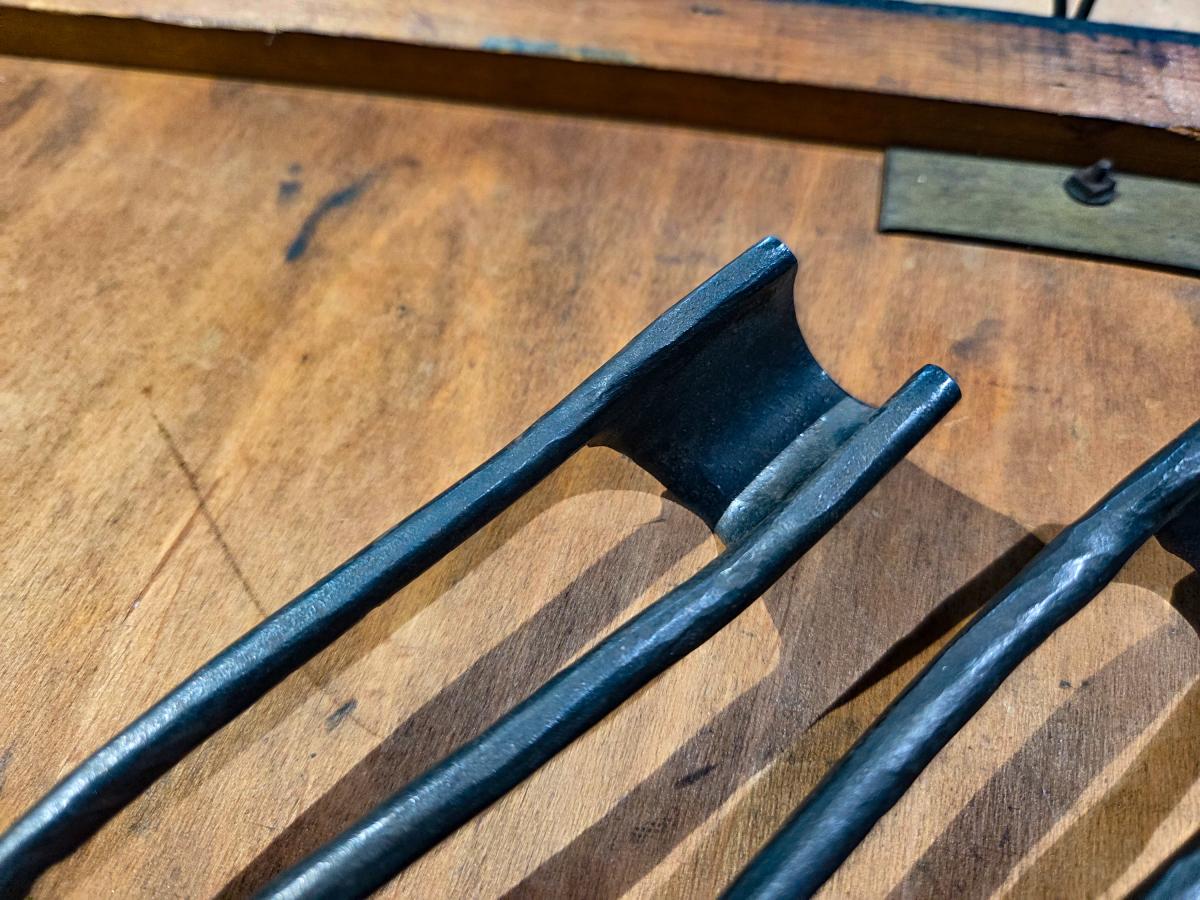
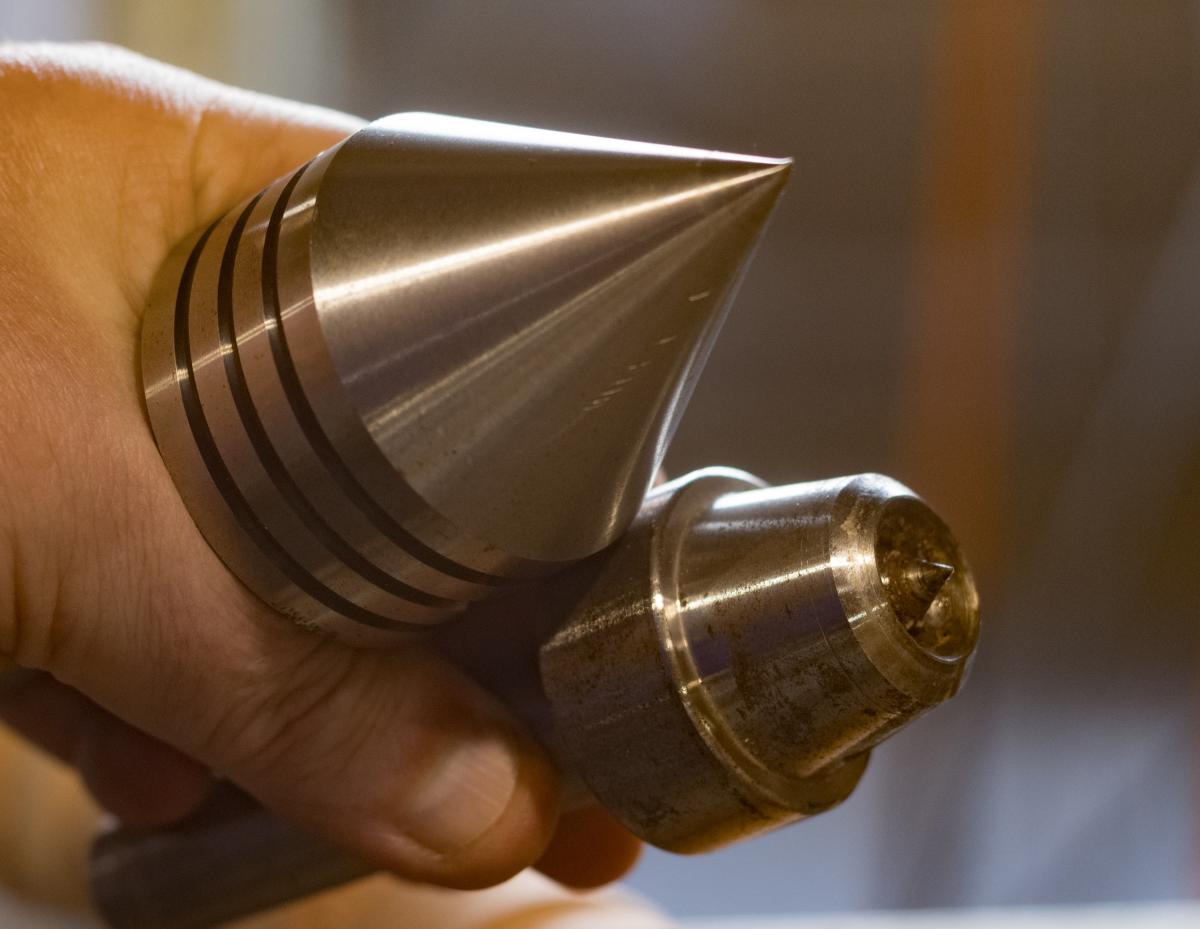 Left: 60 live center. Right: live cup center
I have previously written about the drive centers used on a treadle lathe. Today it's the tailstock's turn. The tailstock support does two things: the first is obvious - it keeps your spindle work from falling out of the lathe. The second, which is important even if you're using a chuck to hold a material, is that it prevents the end of the work from bending away due to tool pressure. In thin stock, this is very obvious that you want to support the material so it doesn't bend away from the tool as it cut. With large work held in a chuck, support from a tailstock center will help prevent the work from spinning out of the chuck if there is a catch.
The most primitive tailstock center is just a pointed bit of metal that the work can rotate around. Such a center is called a dead center, and is typically a steel rod coming to a 60 point. You can just put dead center in your tailstock and it will work. But in general, this isn't done anymore. The problem is that unless you keep the dead center continuously lubricated, the turning work creates a lot of friction and therefore heat, and you lose energy that could otherwise go for keeping the work turning. Before ball bearings became inexpensive, the aptly named dead center was a pretty common way of supporting work. I don't have a dead center for my treadle lathe - there is no point. I do have one for my metal lathe, but I've never used it.
Once the 60 live center with a rotating cone was invented and became affordable, there absolutely was no reason to use a dead center. The typical live center is a 60 cone that spins. All you do is drill a hole at the end of your work, with or without an additional countersink, and the cone supports the work. Works like a charm.
I don't use a 60 live center much either. The reason is that you have to drill a hole. Cup centers are more recent invention. That's what we supply with our treadle lathe. To use it, all you need to do is lay out the center location with a punch mark. The pin in the center of the cup registers on that mark. When you tighten up the tailstock, the sharp ring of the cup grabs the wood and holds it solid. That's it. No drilling. And it rotates along with the work like any live center so there's no friction problem either. I can't think of a reason not to use a cup center - except for two situations. First, if you're turning anything with a hole at the end, you can't locate a cup center. In this case, a regular 60 live center will just center itself on the hole just fine. This is actually pretty important when you're turning handles and other things that get drilled before you actually do the turning. The second case: if you're turning something that has a very small end. Our cup centers are 5/8" in diameter. This means if you want to turn the end of your work smaller than 5/8", you simply don't have the clearance. A typical approach is to leave a little waste at the end. But depending on how deep you put a center hole, a regular live center allows you to turn smaller at the end. The only problem I have with cup centers is that I find over time the ring wears in on the work and gets a little loose. So periodically I find myself having to tighten up the tailstock a little more.
One important advantage of a center - either style - is that it's repeatable. If you take work out of the lathe and put it back, the tailstock center ensures that the work will be aligned that same way as before.
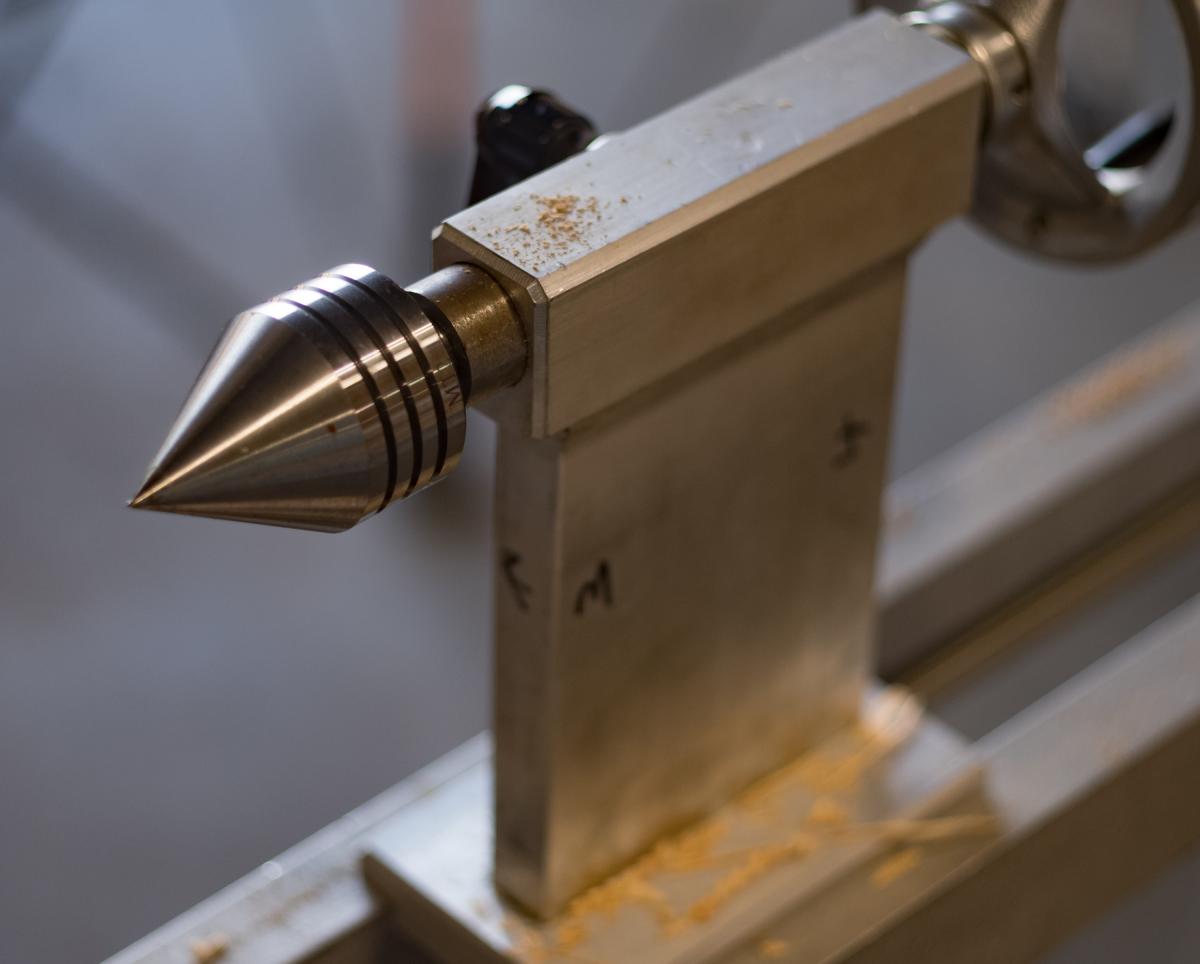
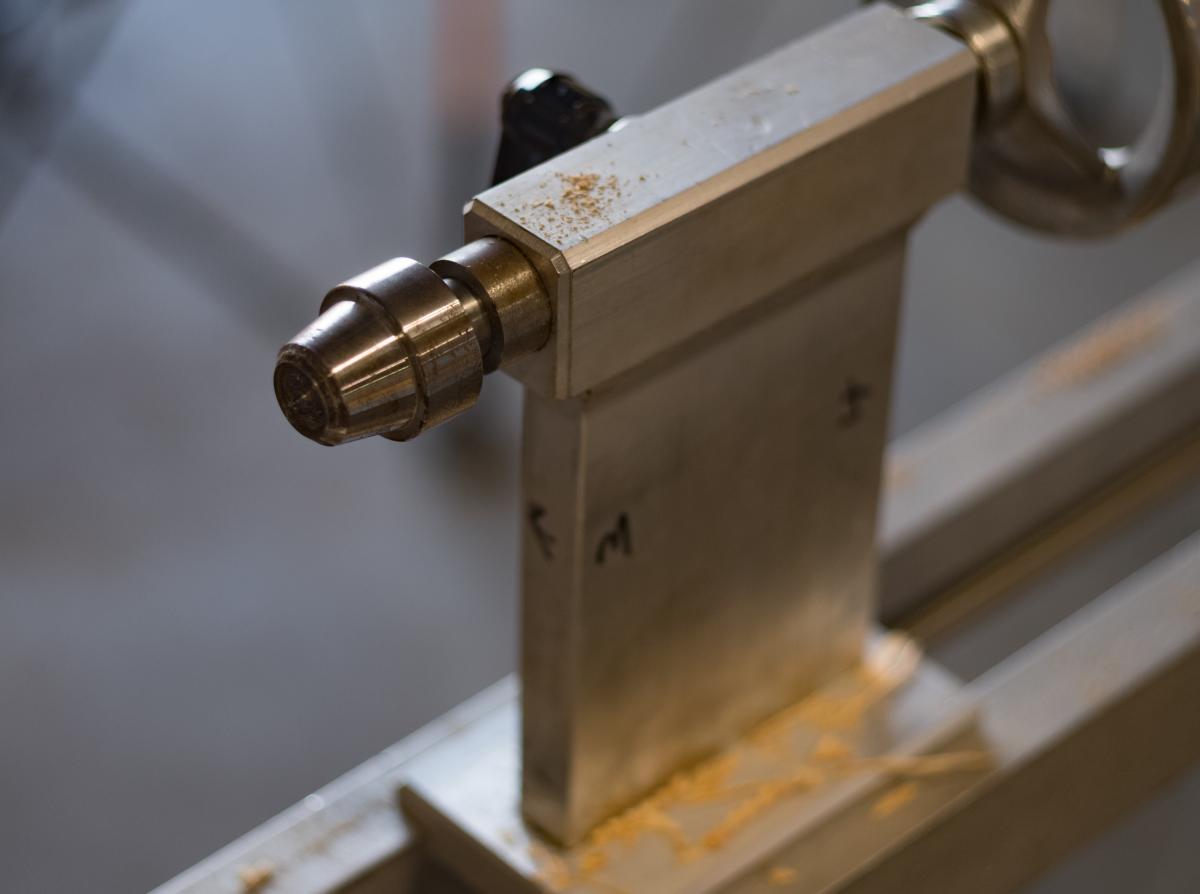
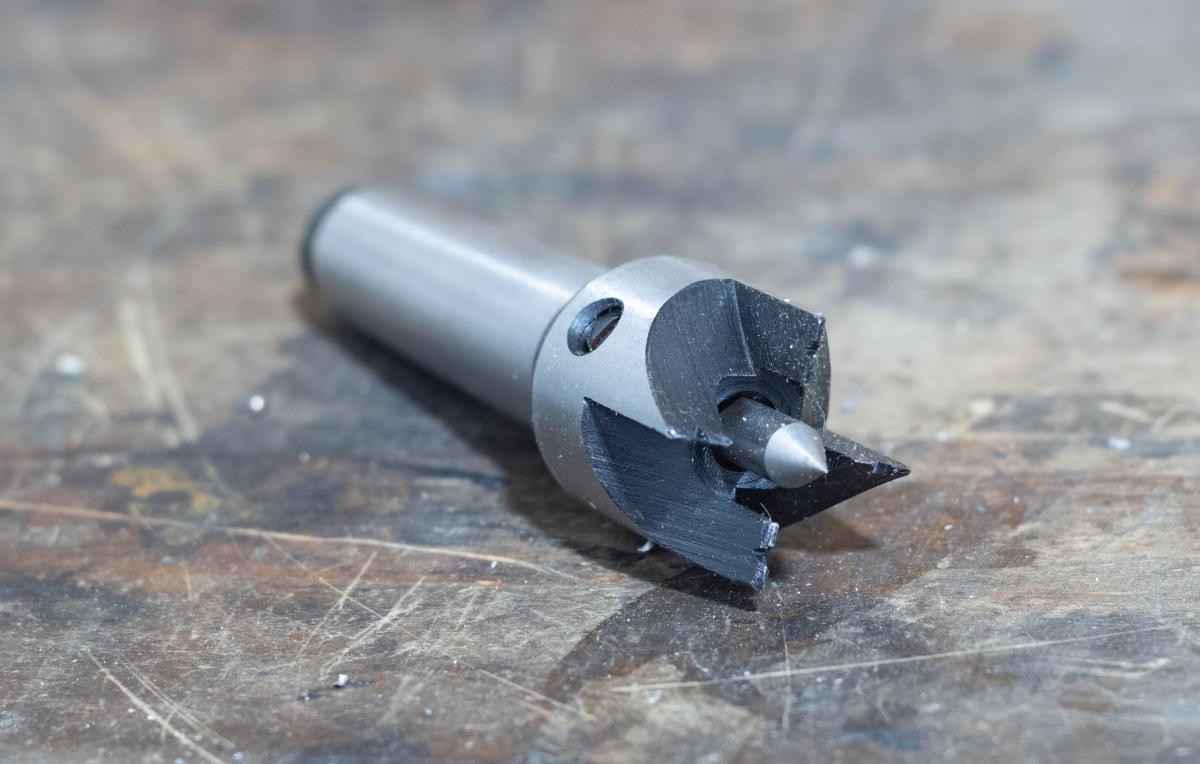
 The cup center installed and in use
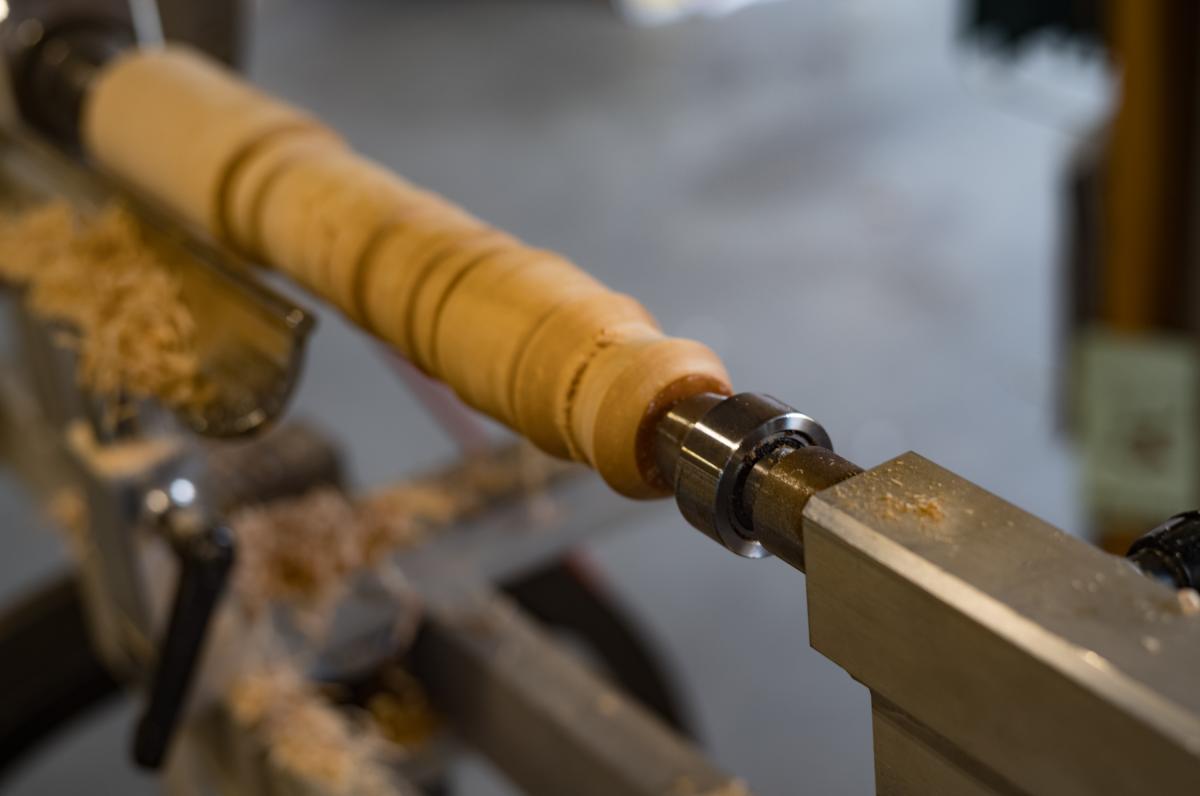
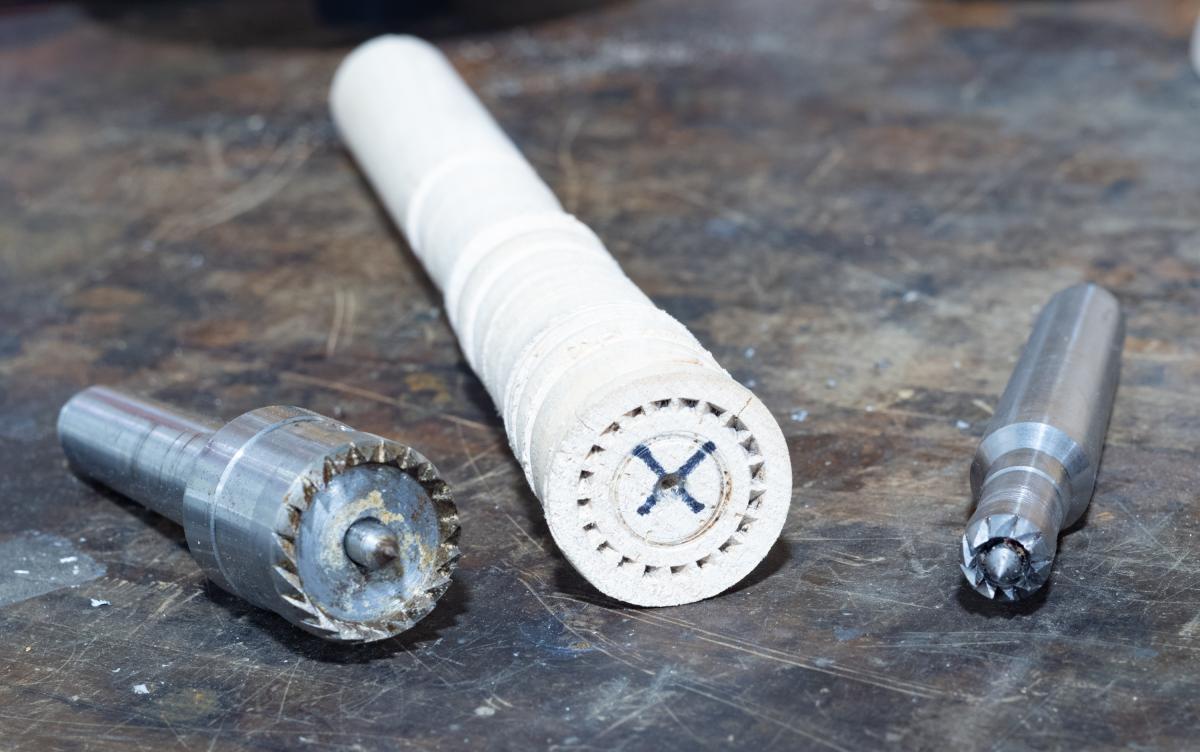
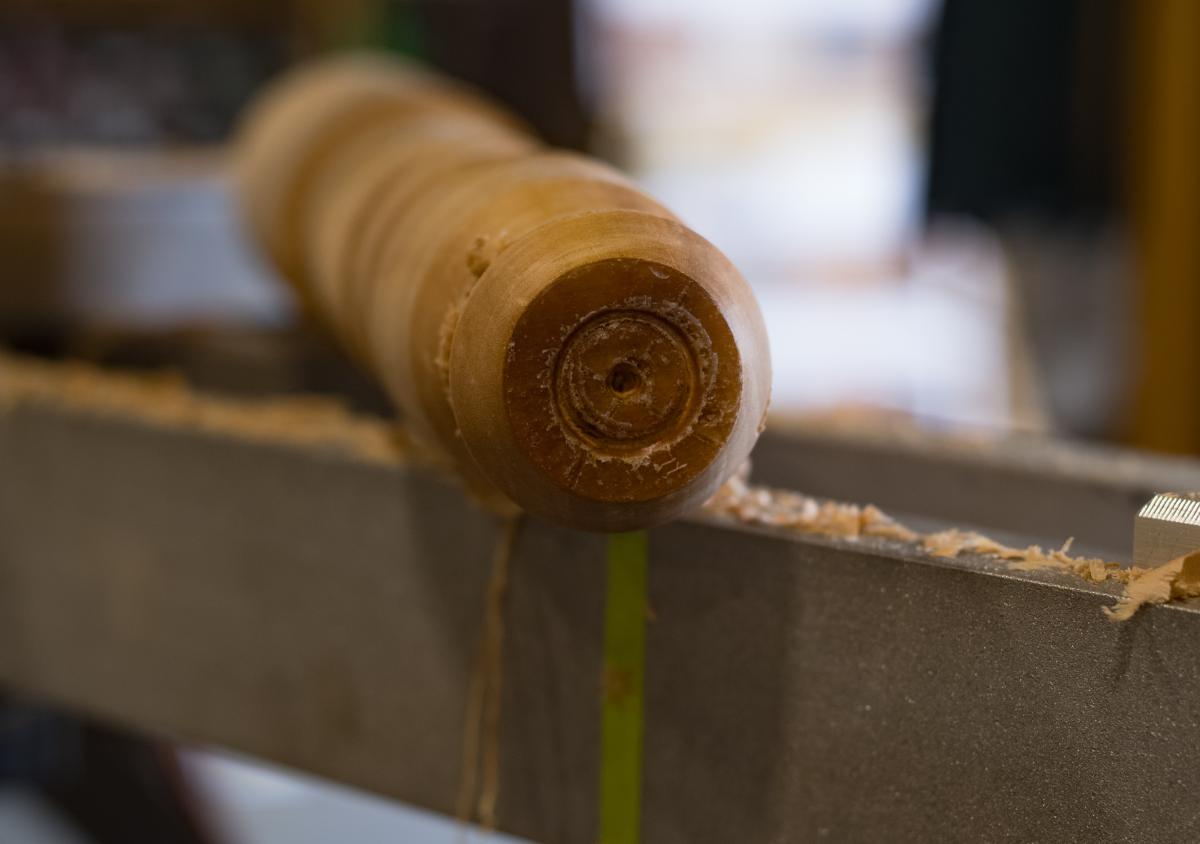 The ring cut in the work by the cup center. This particular stock was coated in wax - which is why the cut is so smeary
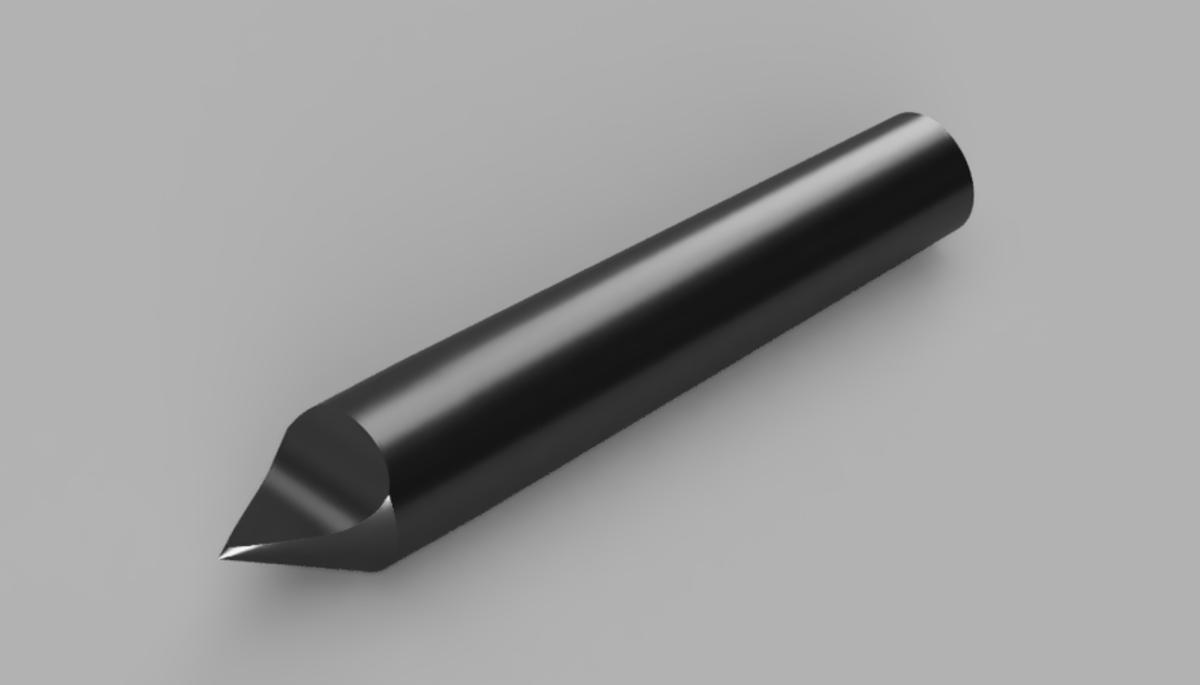 A rendering of a 1/2 center
This leads to a final type of center which I don't own. It's a half center. It's a dead center, so there's always that friction issue. You might want to avoid using it - except when you have to - but it has the top half ground away so you could actually turn right up to the center of the work without hitting your tool on the steel center. This is handy for small work. I would call this a specialty tool, and I haven't seen much commentary about it, but some vendors still stock them.
Categories: General Woodworking, Hand Tools
The Art of Noise
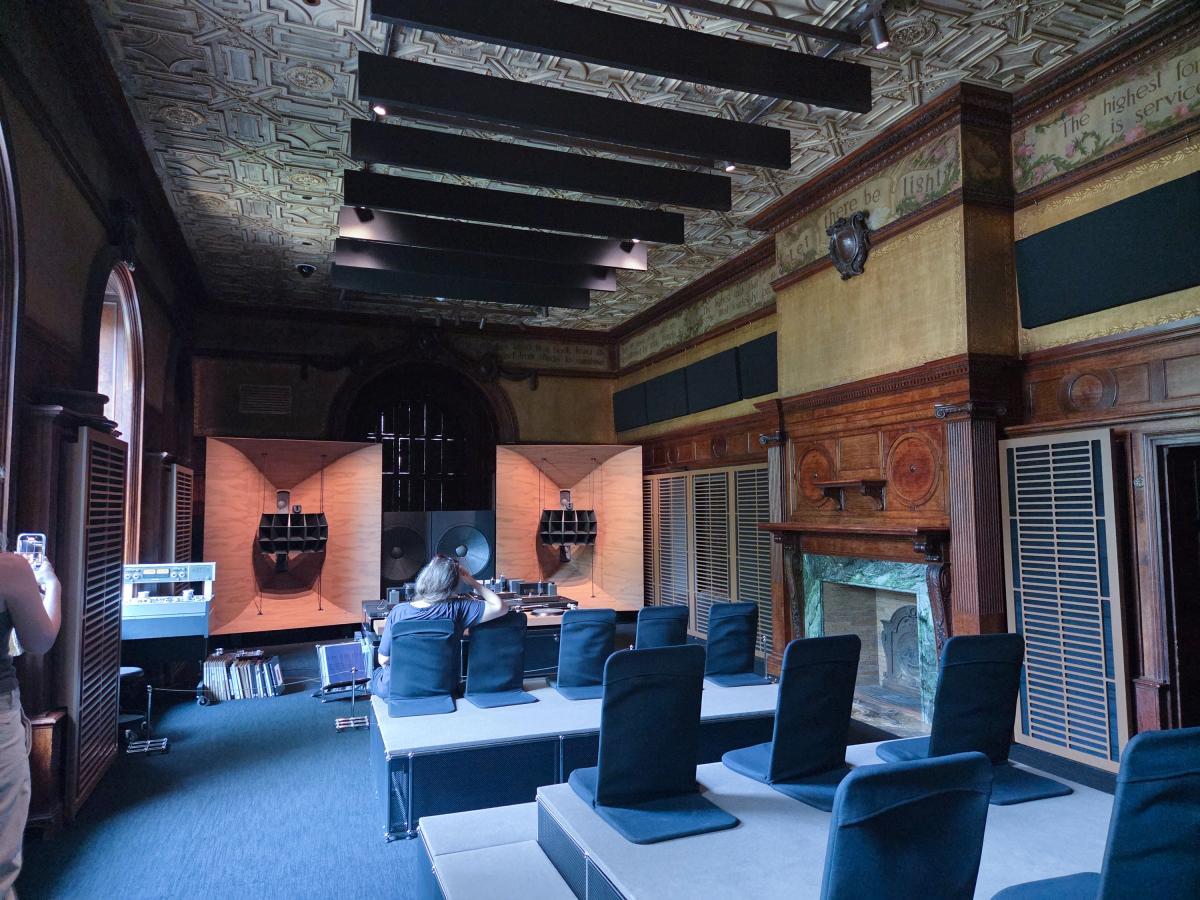 "HiFi Pursuit Listening Room Dream No. 3"
I just heard a spectacular sound system that was set up as part of an exhibit, The Art of Noise, at the Cooper Hewitt Museum a Smithsonian museum that focuses on design (above). The exhibit "HiFi Pursuit Listening Room Dream No. 3" by Devon Turnbull is a state-of-the-art listening system set up in one room of the spectacular Andrew Carnegie mansion in which the museum is based. The sound is powerful, crisp, with an articulated bass that I have never heard before. It was awesome listening to it. The room was totally subjugated to the requirements of the sound. Baffles were hung from the ceiling; sound absorption cushions were hung covering the awesome carved paneling that I could have spent hours looking at. The seating was nondescript although comfortable enough. The front of the room had two giant woofers; I'm not sure how the rest of the stuff in the middle works. This is a system costing many of hundreds of thousands of dollars. And yet - in a typical failure of design that we see in so many audio systems - the beauty of the room was hidden and the records, the heart of the system, were on the floor leaning against a soundboard.
The first floor of the museum included furniture pieces as exemplars of great artifacts of design. But "The Art of Noise" drew the bulk of attendees because furniture is increasingly something most people don't care about. Furniture has become a disposable purchase. It's something most people don't pay attention to (with rare exceptions, perhaps including you). This is why Ikea is so successful. Their furniture is intensely practical at the cost of elegance and longevity.
What we do care about is gizmos. The television was a very important one, with whole rooms designed around a giant screen. But as The Art of Noise documents, beginning in the early in the 20th century, and reaching a height in the 1970's and '80's, sound systems became important elements of the home. People set up phonographs, radios, and speakers in their living rooms and dens.
The exhibit has some of the more interesting stereo systems of that era.
When you design something, it's usually pretty important to figure out before you start what features are important. In the system by Turnbull, it's pretty obvious that the system was designed purely for the best sound, nothing else. Sound quality in the systems shown below took a back seat to convenience, modern elegance, and looking high-tech and expensive. (At least this was my perspective. The museum described the exhibit as "designed to envelop the listener in sound that is as rich in texture as it is in emotion, [so] visitors will experience realistic, natural sound from Turnbulls sculptures and a chance to slow down and engage deeply in listening.")
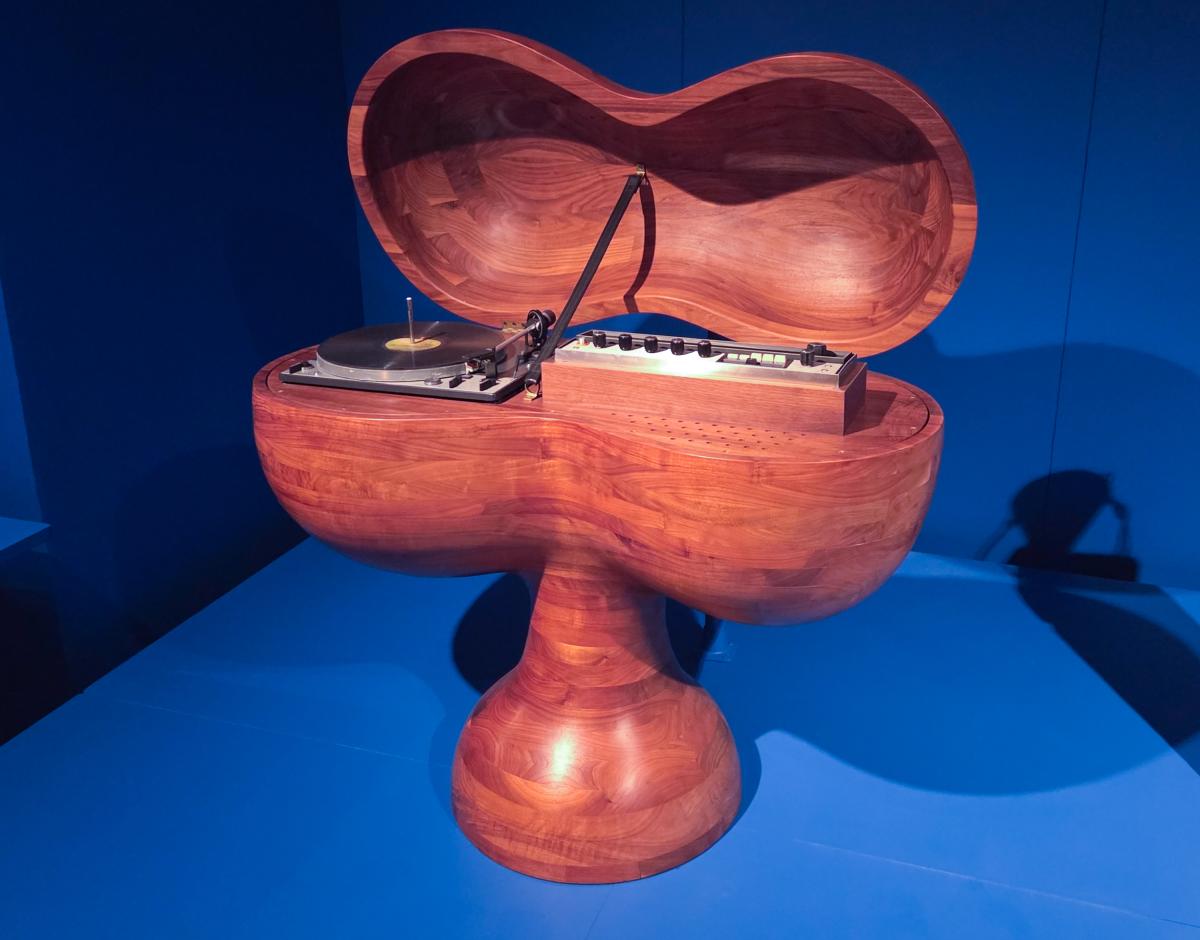 "Stereo Chest"
Most of the equipment shown below were by international manufacturers of audio equipment, but two boutique systems stand out. The walnut "Stereo Chest" (1973) by Wendell Castle fits right in with the rest of his work at the time, but it's not really about "sound" per se. When closed, the chest even conceals its purpose. To me it looks like a drinks cabinet that someone converted for audio.
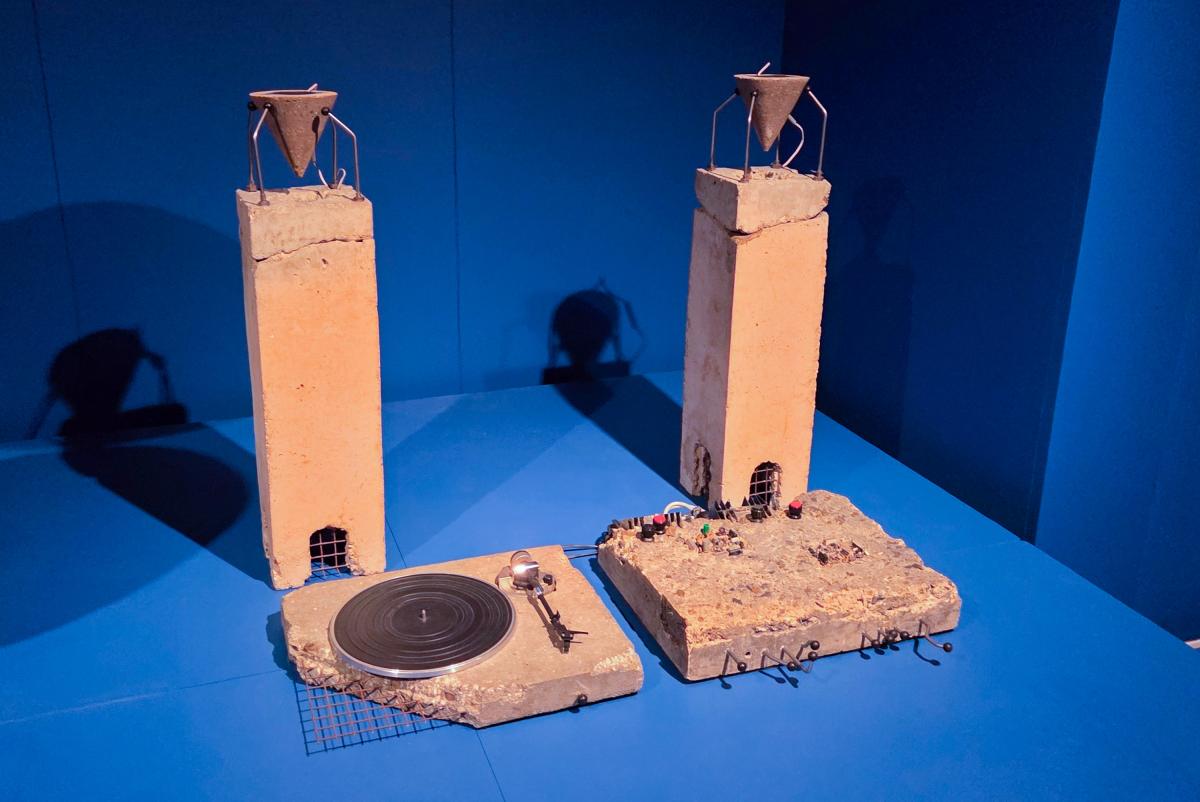 "Concrete Stereo"
Next door to the Castle chest is "Concrete Stereo" (1983) by Ron Arad. The setup includes a turntable, amp, and speakers. Again the artwork seems less about sound than visual interest. While it's not to my taste I think it's pretty cool.
The other images of these sound systems are more futuristic than what most people had, but I find them compelling. In general these packages do not sound as good as audiophile systems of the time, where the emphasis was on sound, rather than looks or convenience.
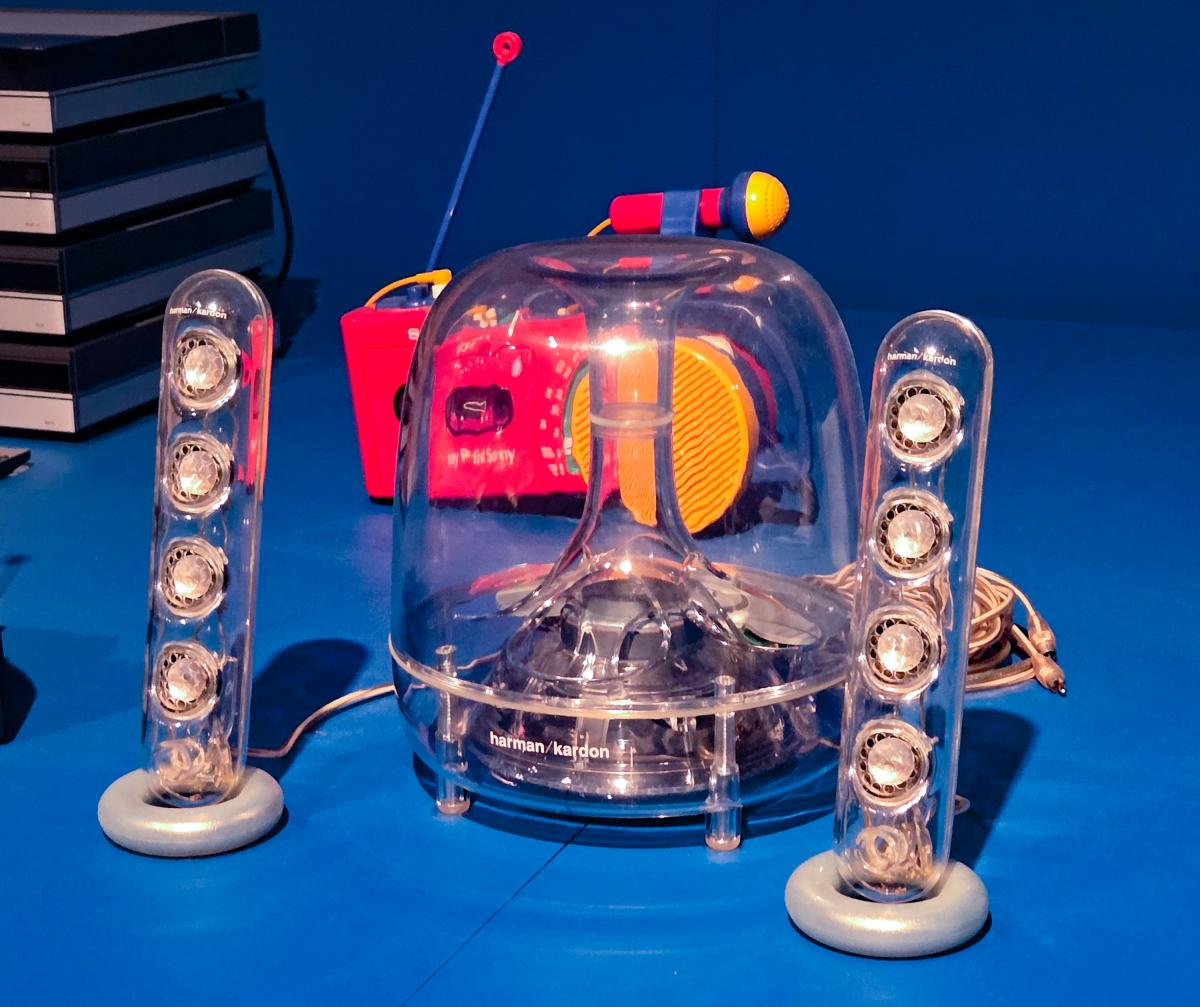 "SoundSticks"
The SoundSticks from 2000 are a fun stopgap between then and now. Designed by the Apple Industrial Design Group for Harmon Kardon, it was one of the cooler attempts at smaller "bookshelf" systems for people without the floor space for a full-sized system.
 TPS-L2-Walkman
The death knell for common sound systems first rang in 1979. Inventors had tried to make music portable since the 1930's, but the introduction of TPS-L2-Walkman and headphones made portability a reality. Sound became personal, and that changed everything. Music didn't need to tie you down to a specific room or location: you could bring it with you. And because the format was a cassette, you could mix and match your own music. What you listened to became yours and yours alone. This phenomenon was the tip of the iceberg. Later came the Ipod and of course phones. While I still prefer listening over speakers, and the Turnbull installation shows how involving that can be, most people listen to music as a portable, personal experience.
The exhibit included a vast range of portable music devices in addition to the Walkman. The exhibit also had a room with some wonderful concert posters reminding us that live music is still awesome. This collection included some very memorable posters - I know I won't soon forget the poster for a James Brown at the Apollo that featured the astonishing assertion that the show was suitable for all families.
I mostly rate art by whether or not I want it - how willing I am to wallow in covetous feelings. I own a decent stereo system, and I have a lot of records I don't play anymore now that I stream. I didn't really covet anything in the show except I wish I'd gone to those concerts listed on the posters. Even the awesome system on the first floor: I can't imagine turning a room into something like that. The equipment's just too big. But everything was fun to listen too, and see.
The show was supposed to close over the weekend, but has been extended through August 16, 2026
 Designed by Dieter Rams, 1962-1965, and manufactured by Braun AG
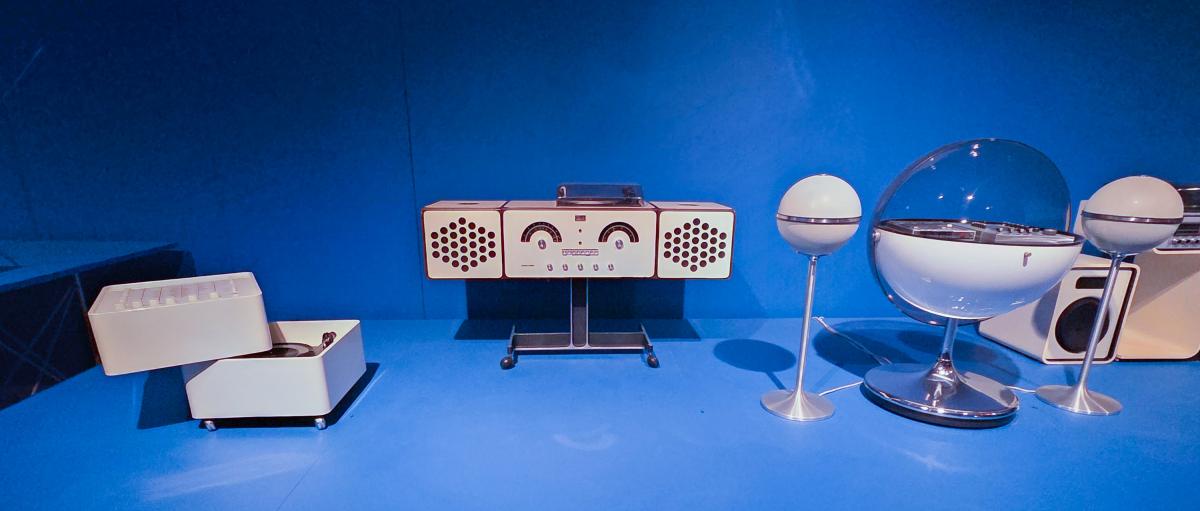 Center: RR-126 Radio - Phonograph 1965, by Achille Castiglioni and Pier Giacomo Castiglioni. Manufactured by Brionvega S.p.A. Right: Vision 2000 Cassette Player and Radio - 1971 - Thilo Oerke Manufactured by Rosita Tonmobel - Audiorama 4000 Speakers 1972 designed and manufactured by Grundi
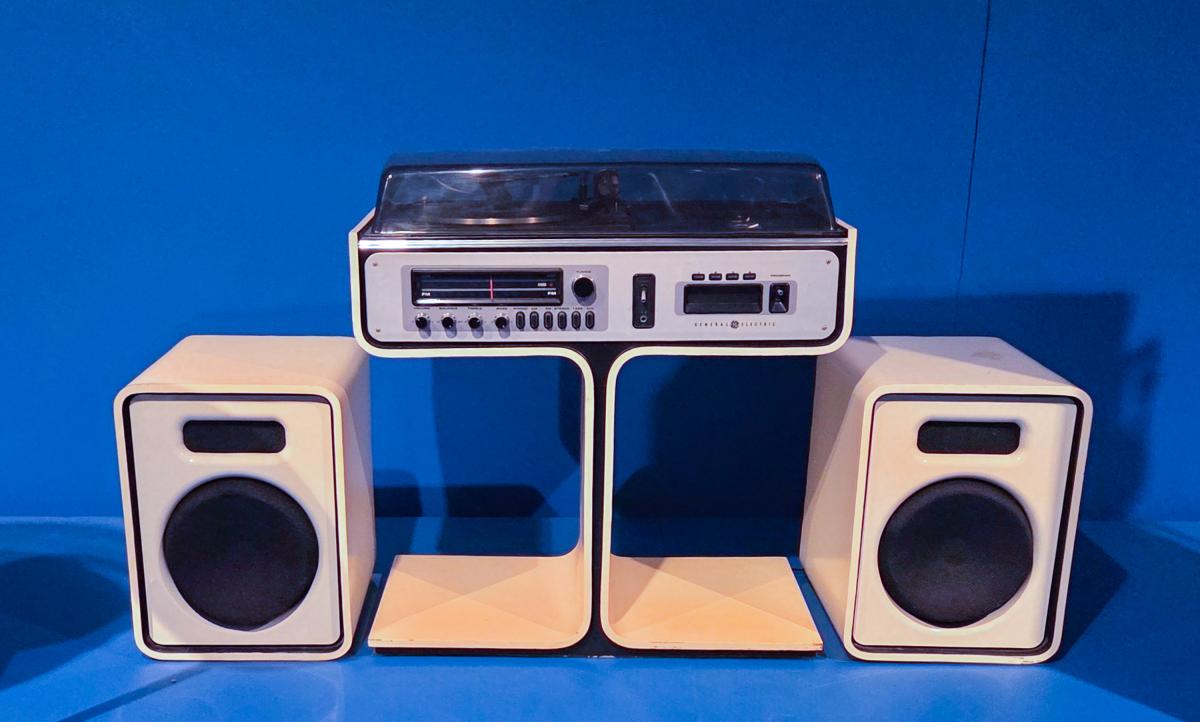 SC7300 Stereo System 1973 designed and manufactured General Electric Company
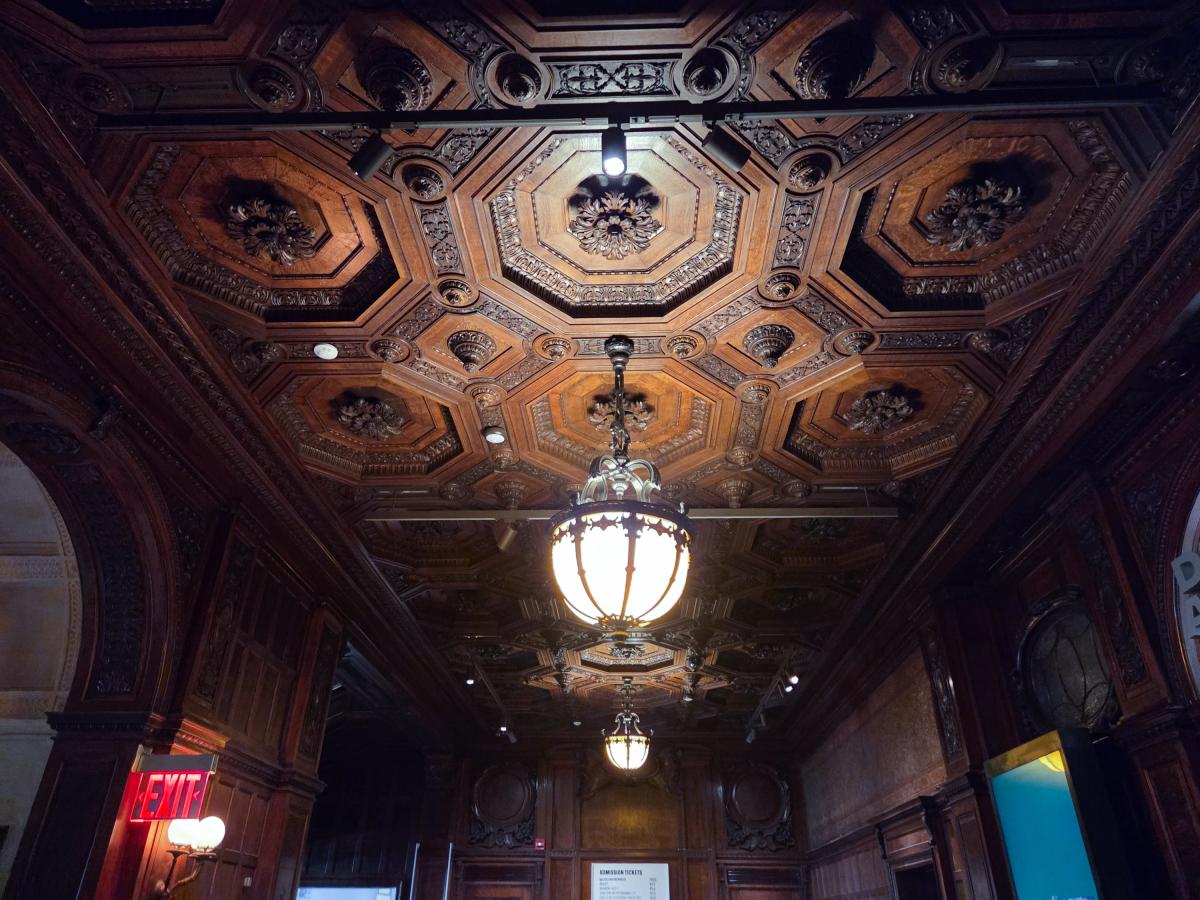 The wonderful main hallway of the Cooper Hewitt Museum, formerly the Andrew Carnegie Mansion
Categories: General Woodworking, Hand Tools
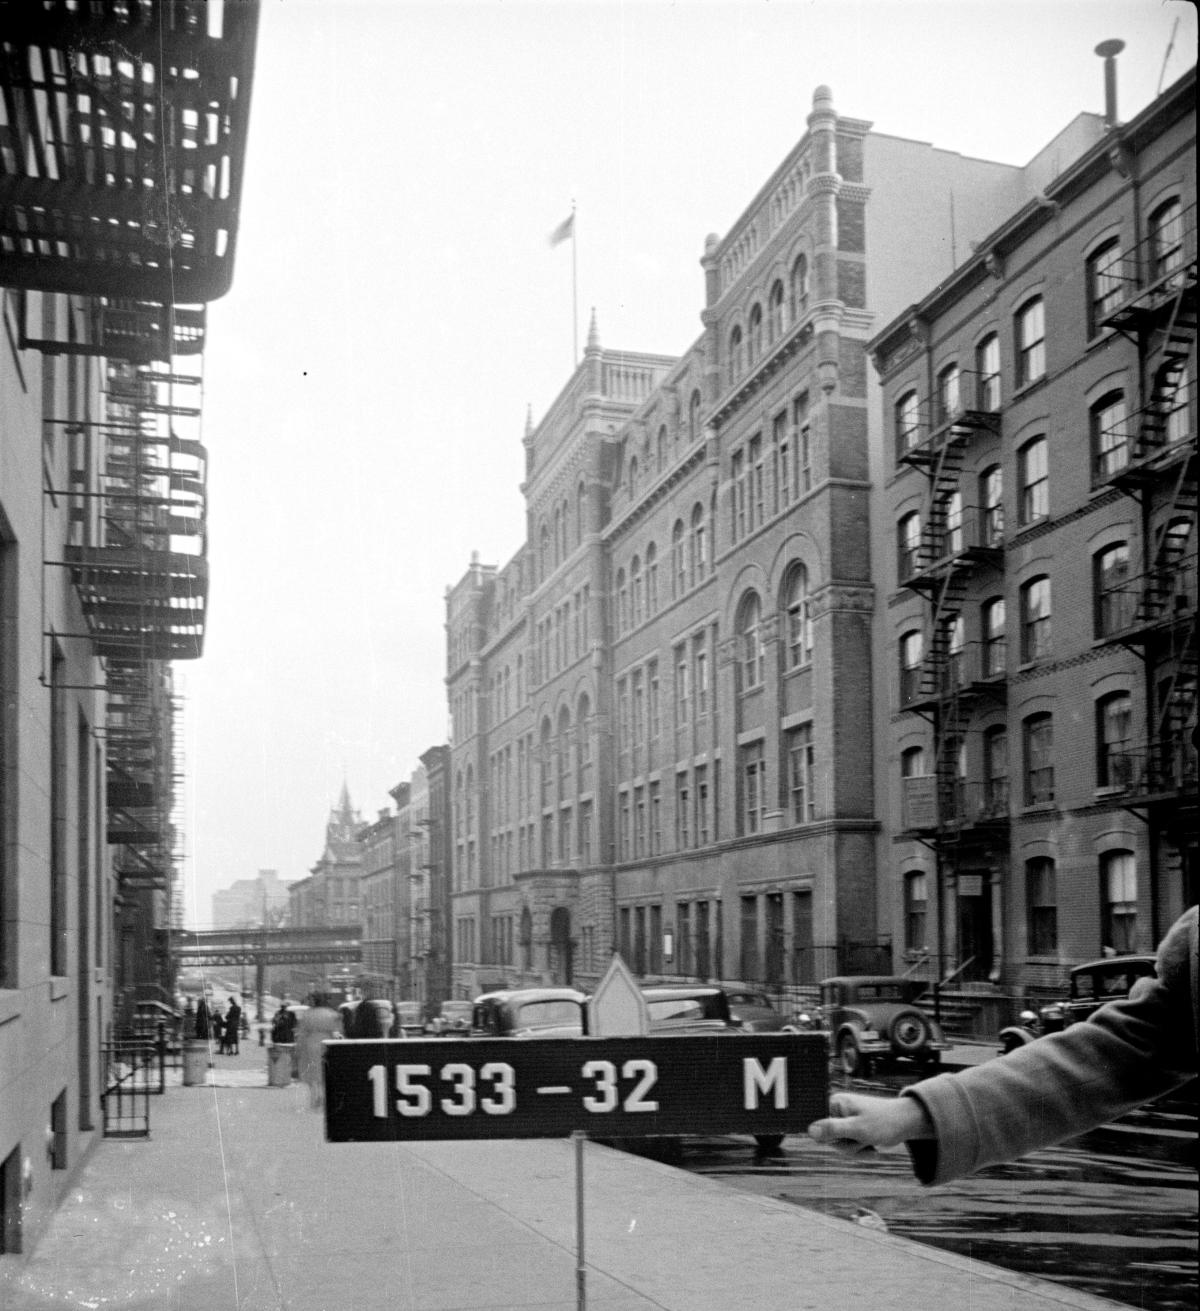
The Ladies' Mile
Manhattan is filled with boring skyscraper boxes. But fortunately Manhattan is also filled with the buildings that predate the boring boxes, so there are many opportunities to see incredible decorative elements. But you may have to look up.
Union Square doesn't have a lot of skyscrapers, but it does have many late 19th/early 20th century tall buildings that were the skyscrapers of their time. Retail shop remodeling on the ground floors has robbed some of the buildings' original details, but if you look up, the story is awfully entertaining and elegant. It's remarkable to see the practical application of the belief that even the skyscrapers-of-their-time should display the same level of detail that, for example, a highboy should. But you can't see this - unless you lookup. So I spent an afternoon a morning wandering around looking up.
These buildings aren't being cited as unique. They're actually pretty typical. In many cases these late 19th, early 20th century smallish skyscrapers are about taking an 18th or 19th century model and simply making it bigger. The commonness and frequency of the beauty is what's remarkable.
The pictures below are of the west side of Broadway in a stretch between 16th and 23rd Streets. This area was known as the "Ladies' Mile" during the Gilded Age because it was home to Lord & Taylor, B. Altman, Arnold Constable, and many other high-end department stores that catered to women, and developed a name as an area that was - very unusually - safe for women to go shopping unaccompanied by men. According to the New York Preservation Archive Project, the area's mix of aesthetically pleasing Beaux-Arts, Neo-Renaissance, Romanesque Revival, and Queen Anne style buildings was a "direct reflection of the City Beautiful Movement," a reformist movement of the era that also brought grandeur to other parts of Manhattan and to Washington DC and other cities.
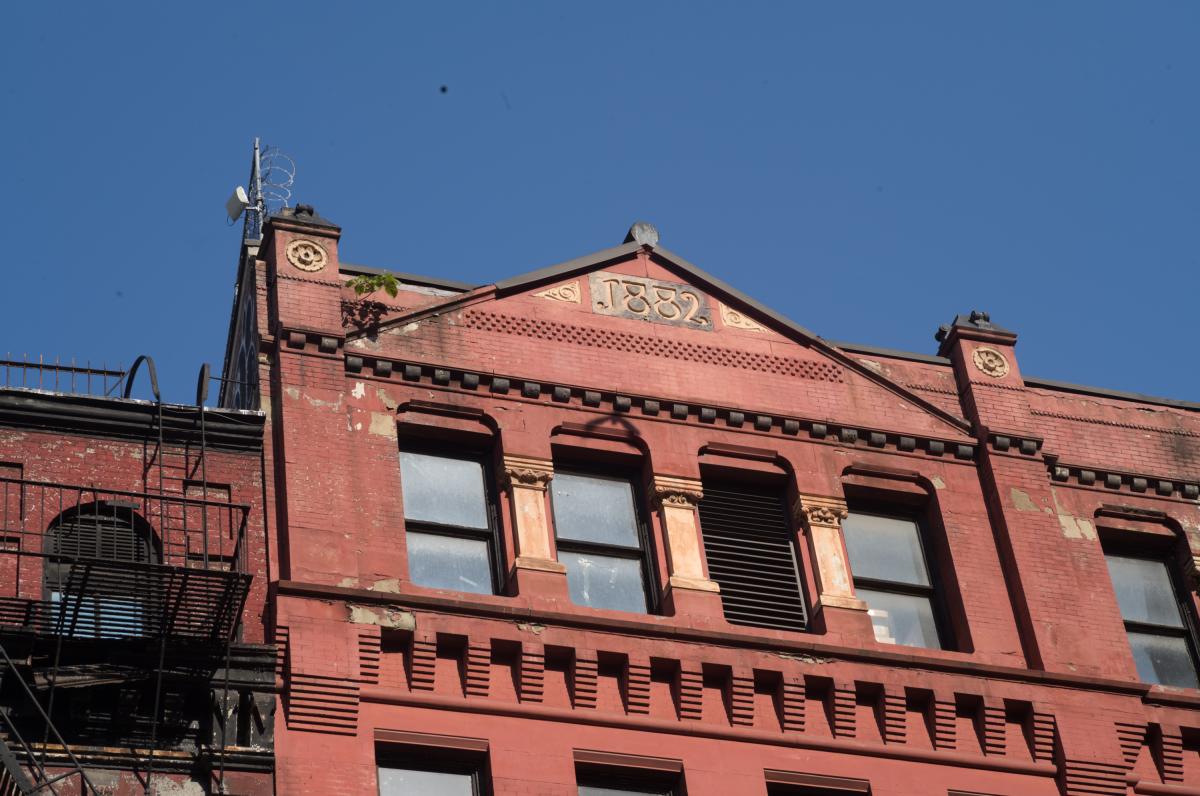
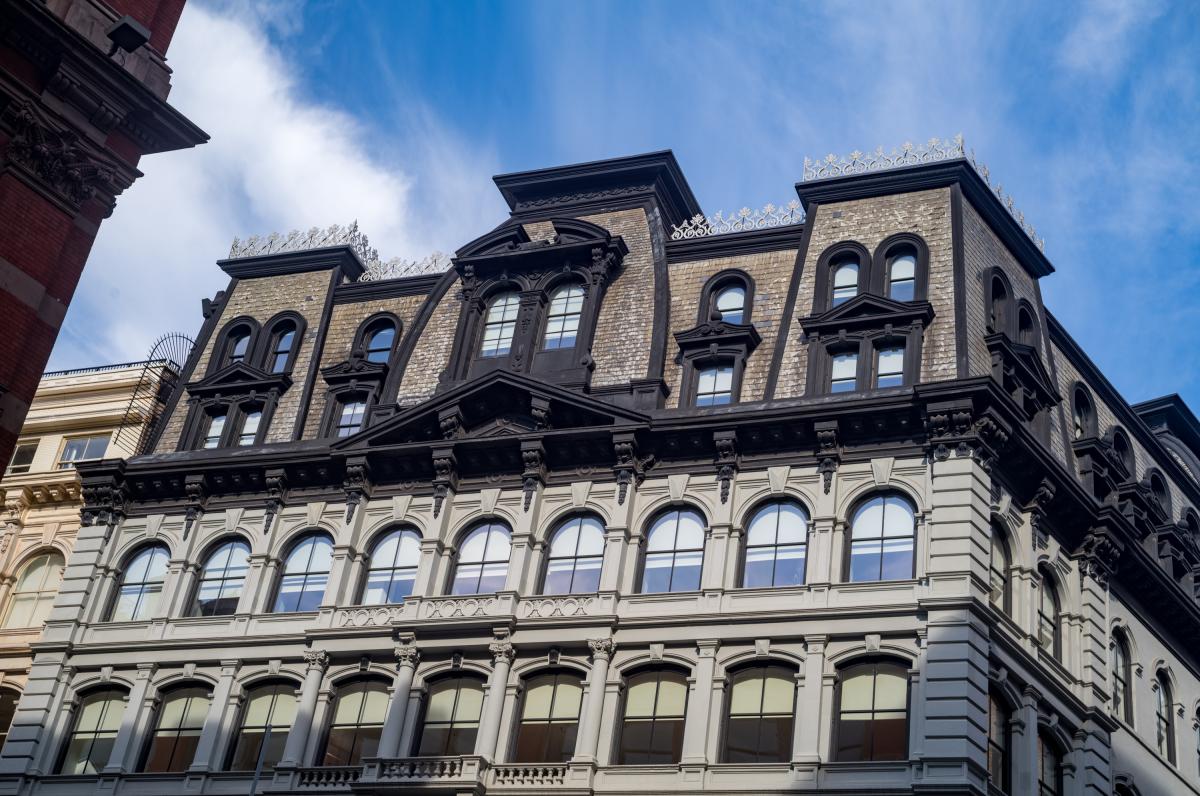 Originally the Arnold Constable dry goods store, this 1869 building on 19th Street has a mansard roof, which is both awesome and very Addams Family-esque.
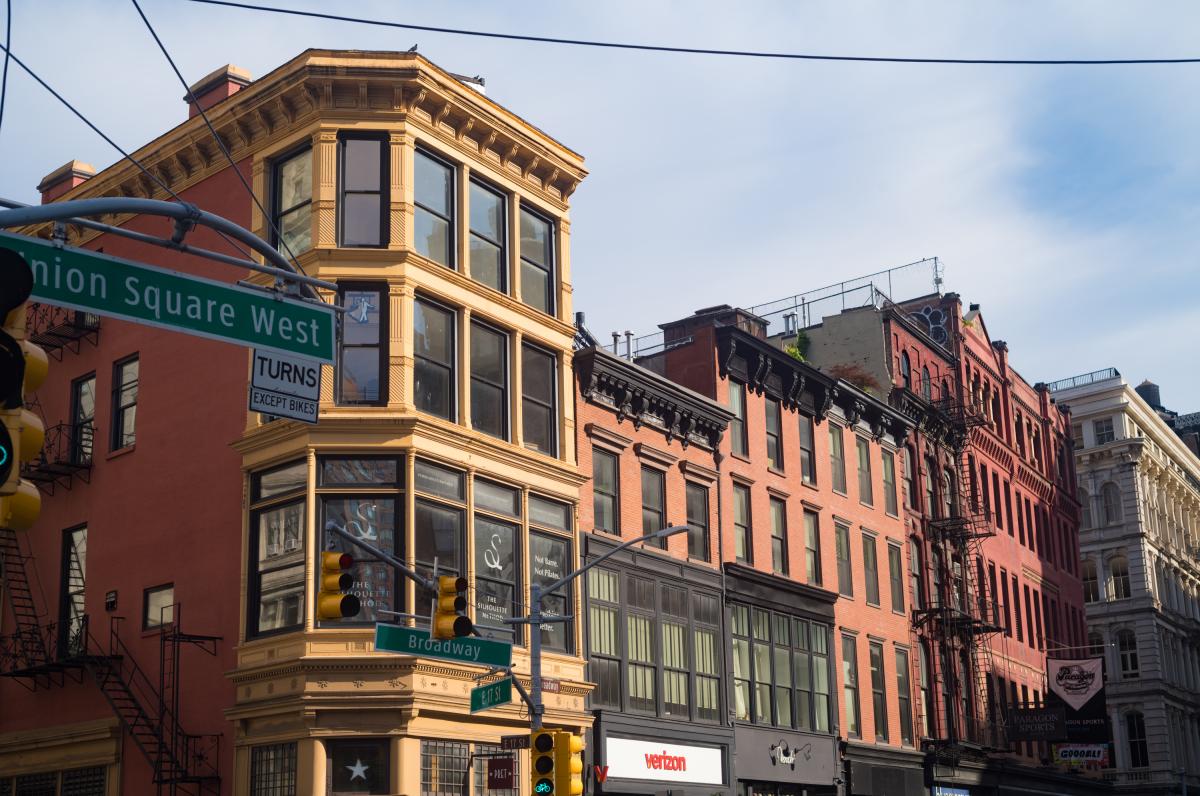 Looking north on Broadway from 17th Street, up the Ladies' Mile. The smaller, older buildings still have their decorative cornices.
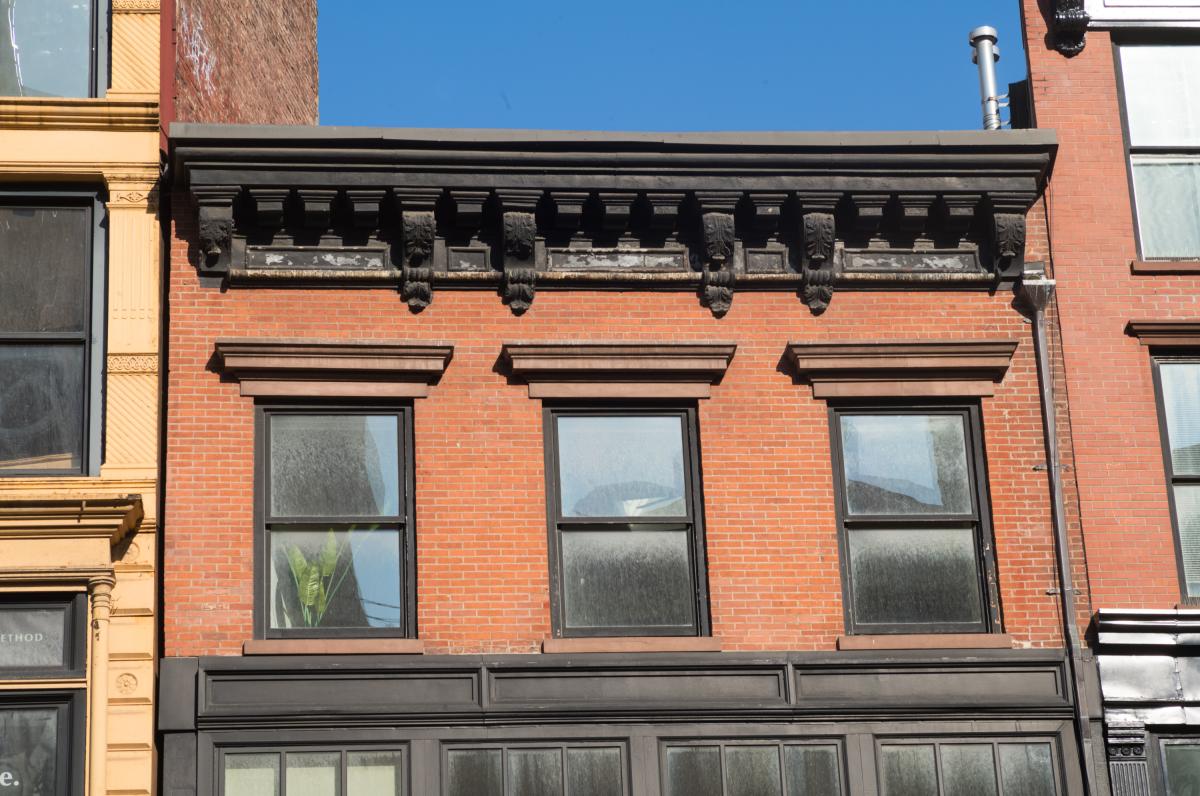 A closeup of one of the buildings from the previous picture
 Another closeup - simple, but it gets the point across. Now the longtime home of Paragon Sports, Manhattan's largest sporting goods store
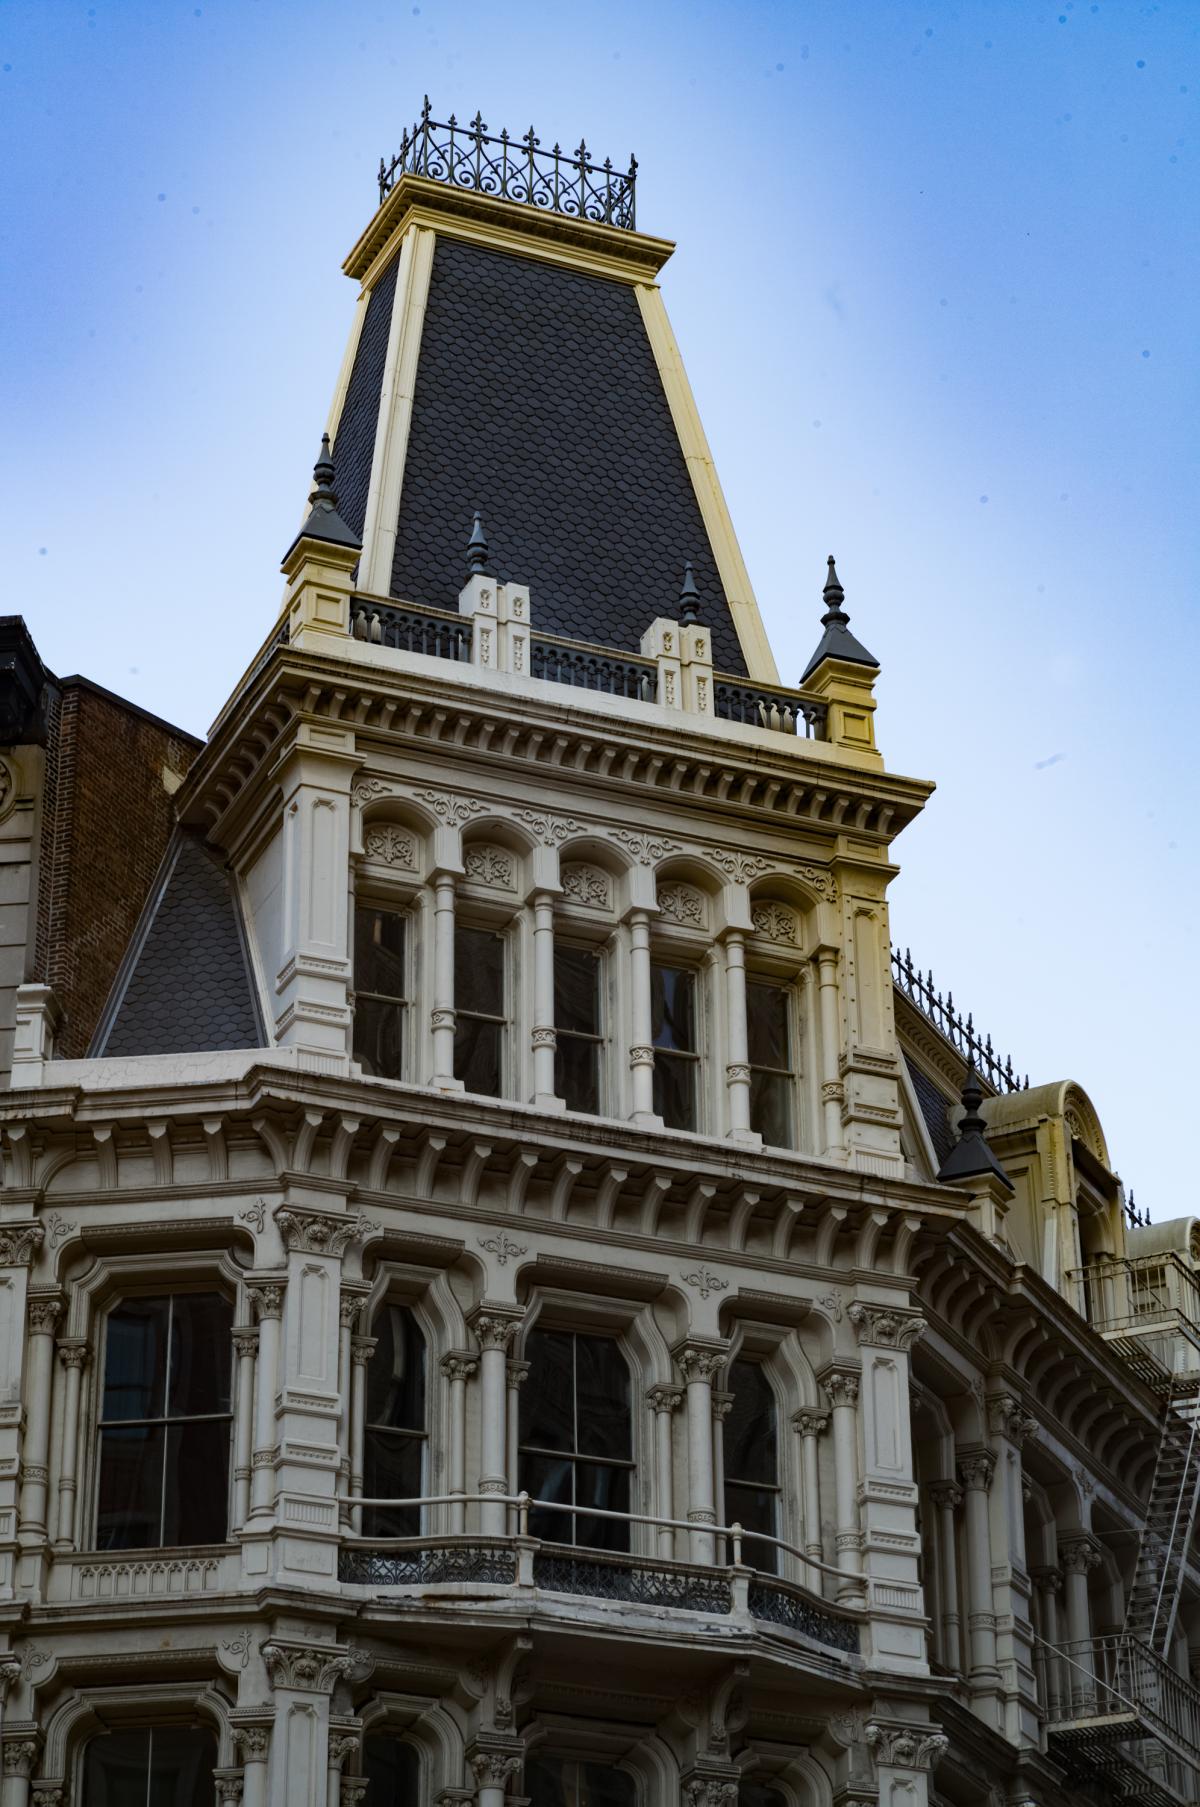 901 Broadway was built in 1870 as a home for Lord & Taylor. This remaining corner pavilion features a tall slate mansard roof in the the French Second Empire style.
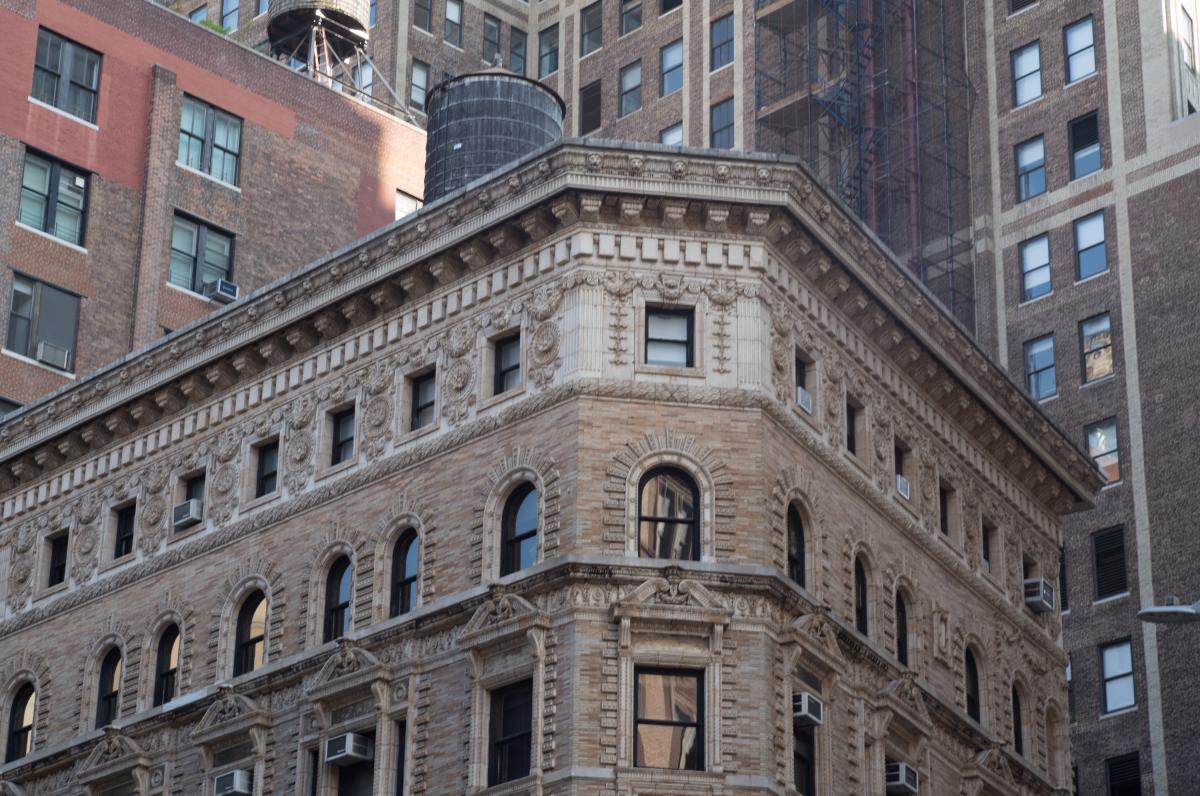 A tour-de-force of cornice carving! It's on the NW corner of 20th Street and Broadway.
 At the SW corner of 17th and Union Sq. West. I could not find much info on this awesome bit of decoration. Note the guys on scaffolding, doing work on the homely building next door.
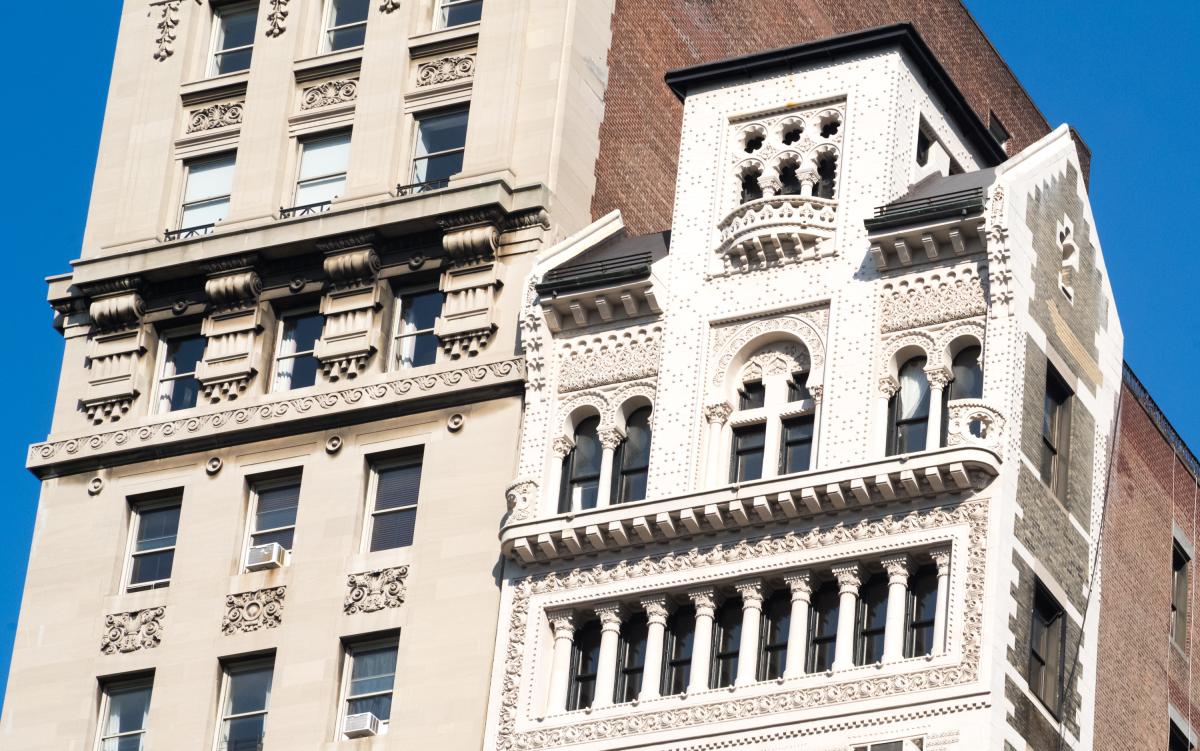 On the right is the Decker Building. Built in 1892, it was the home of Decker Brothers Piano Company. More famously, between 1968-73 it was home of Andy Warhol's Factory
Union Square doesn't have a lot of skyscrapers, but it does have many late 19th/early 20th century tall buildings that were the skyscrapers of their time. Retail shop remodeling on the ground floors has robbed some of the buildings' original details, but if you look up, the story is awfully entertaining and elegant. It's remarkable to see the practical application of the belief that even the skyscrapers-of-their-time should display the same level of detail that, for example, a highboy should. But you can't see this - unless you lookup. So I spent an afternoon a morning wandering around looking up.
These buildings aren't being cited as unique. They're actually pretty typical. In many cases these late 19th, early 20th century smallish skyscrapers are about taking an 18th or 19th century model and simply making it bigger. The commonness and frequency of the beauty is what's remarkable.
The pictures below are of the west side of Broadway in a stretch between 16th and 23rd Streets. This area was known as the "Ladies' Mile" during the Gilded Age because it was home to Lord & Taylor, B. Altman, Arnold Constable, and many other high-end department stores that catered to women, and developed a name as an area that was - very unusually - safe for women to go shopping unaccompanied by men. According to the New York Preservation Archive Project, the area's mix of aesthetically pleasing Beaux-Arts, Neo-Renaissance, Romanesque Revival, and Queen Anne style buildings was a "direct reflection of the City Beautiful Movement," a reformist movement of the era that also brought grandeur to other parts of Manhattan and to Washington DC and other cities.
Originally the Arnold Constable dry goods store, this 1869 building on 19th Street has a mansard roof, which is both awesome and very Addams Family-esque.Looking north on Broadway from 17th Street, up the Ladies' Mile. The smaller, older buildings still have their decorative cornices. A closeup of one of the buildings from the previous pictureAnother closeup - simple, but it gets the point across. Now the longtime home of Paragon Sports, Manhattan's largest sporting goods store901 Broadway was built in 1870 as a home for Lord & Taylor. This remaining corner pavilion features a tall slate mansard roof in the the French Second Empire style. A tour-de-force of cornice carving! It's on the NW corner of 20th Street and Broadway.At the SW corner of 17th and Union Sq. West. I could not find much info on this awesome bit of decoration. Note the guys on scaffolding, doing work on the homely building next door.On the right is the Decker Building. Built in 1892, it was the home of Decker Brothers Piano Company. More famously, between 1968-73 it was home of Andy Warhol's Factory
Categories: General Woodworking, Hand Tools
Frederick Kiesler's Multi-Use Chairs at MoMA

I was pleasantly surprised that the Museum of Modern Art was open on July 4th, when it was a million degrees in my apartment and most other activities were closed for the holiday. I figured the museum would at least have good air conditioning. Evidently I was not the only one with this idea. The place was fairly crowded, with art lovers and natives and World Cup tourists alike.
One of the high points of the visit was seeing furniture made by Frederick Kiesler (18901965) an architect who immigrated to the US from the Austro-Hungarian Empire in the late 1920s. Although Kiesler didn't have much of an impact commercially in furniture design, he did design some important buildings and some landmark furniture.
The Kiesler work shown here are the original Surrealist-inspired "Multi-Use Chairs" that Kiesler designed in 1942 for Peggy Guggenheim's "Art of This Century" gallery in New York. The chairs are made of linoleum clad oak. The original materials bill was $9 each. Depending on how you flipped or stacked the chairs, each unit could also serve as a rocker, table, bench, sculpture pedestal, easel, or painting support. Kiesler claimed 18 distinct uses (which might be hyperbole, as the show included no official list). The idea is that depending on the gallery and the usage, you could reconfigure the same furniture for different uses.
How practical or comfortable these pieces are I have no idea - the museum did not welcome visitors to take a load off their feet. I don't know if the materials used - Oak and Linoleum - were chosen because of ideological commitment to the Bauhaus movement's veneration of common materials, or if Kiesler was being practical and frugal and therefore took some solid oak flooring (that looks like it was repurposed from something else) and some linoleum was just handy, fit the budget, and got his point about form and function across. Nine bucks for materials even in 1942 was not a lot of money. These days I would think the end caps would be fancy plywood, with fancy bent veneer instead of linoleum for the sides. And at a hundred times the cost.
The pieces are too modern for Ikea. (The market for really ground breaking shapes and forms is pretty small.) And they are certainly not what Ikea specializes in (cheaply made versions of Scandinavian / Mid-century modern) but I could easily imagine something like these pieces in a modern apartment. They'd offer a comfortable conversation piece, if nothing else. Unfortunately I couldn't find any drawings of how this thing is put together. AI bot Claude said that a 1942 original in the Brooklyn Museum (not at MoMA) measures 29 1/8" 30 1/2" 15 5/8".
What's important is that 84 years after their introduction, the pieces still look modern and avant-garde, and a striking departure from what most people imagine when you say the word "furniture." And more importantly: the work isn't an evolution of an existing design vocabulary, much less a stop on a recognizable tour of furniture design movement with Colonial, Shaker, Arts & Crafts, mid-century Modern/Danish modern/Ikea, etc. It really is a new approach. They are wildly original.
The lesson for all of us is that our design approach and what we build are always influenced by our training, budget, and history. Coming up with anything good that is also actually new is hard. But that doesn't mean you shouldn't try. But at the same time, recognize your influences. It is perfectly excellent to design something where you take a known design and push it into something you like, with better construction, materials, and more appropriate design for the intended space. But it's also worthwhile to occasionally go all the way out to left field, and pluck a design from space.
 You see what I mean about repurposed materials
Categories: General Woodworking, Hand Tools
The Wooden Houses of Manhattan
Last Saturday I went to the Upper East Side of Manhattan, where I was born and lived for many years, to check out what turned out to be an unimpressive museum show. The plan was to take advantage of beautiful weather and commute back home with a ferry ride downtown instead of the standard subway ride. (NYC is a watery town, with not only spectacular beaches and bridges, but also ferry rides for commuters and day trippers - the world famous Staten Island ferry between Staten Island and Manhattan is one of many ferries between various boroughs and neighborhoods.)
This plan brought me from the museum on a northern stretch of Fifth Avenue to the ferry dock on 90th Street and the East River in the Yorkville neighborhood. 100 years ago Andrew Carnegie, one of the richest people in the United States, lived nearby on 5th avenue and 90th Street. Only four avenue blocks away from Carnegie's home, the Ruppert's Brewery cranked out millions of bottles of a really excellent dark beer that I miss to this day. Ruppert's and the industrial businesses all around the area east of Park Avenue employed thousands of people who lived in walk-up apartments all around that area. The factories are gone, the ethnic (mainly German and Hungarian) enclaves are gone, but some of the housing remains, even as the overall area has become probably the most densely populated residential area in the country.
The explosive growth of the area - from pretty empty to dense rows of walk-ups - was triggered by the explosion in population in post-Civil War NYC, along with some amazing foresight by the leadership of New York City before Civil War. The city ran out of water. The city also had no recreational space. Before 1850, the only real parks in the city were small, one- or two-block affairs like Madison Square Park. While adding parks and water could and did trigger a lot of corruption, the city elders realized that without a proper source of water, the city would die. Between 1850 and about 1870, the water system was installed, Central Park was built and the New York City took on a lot of the character it has today.
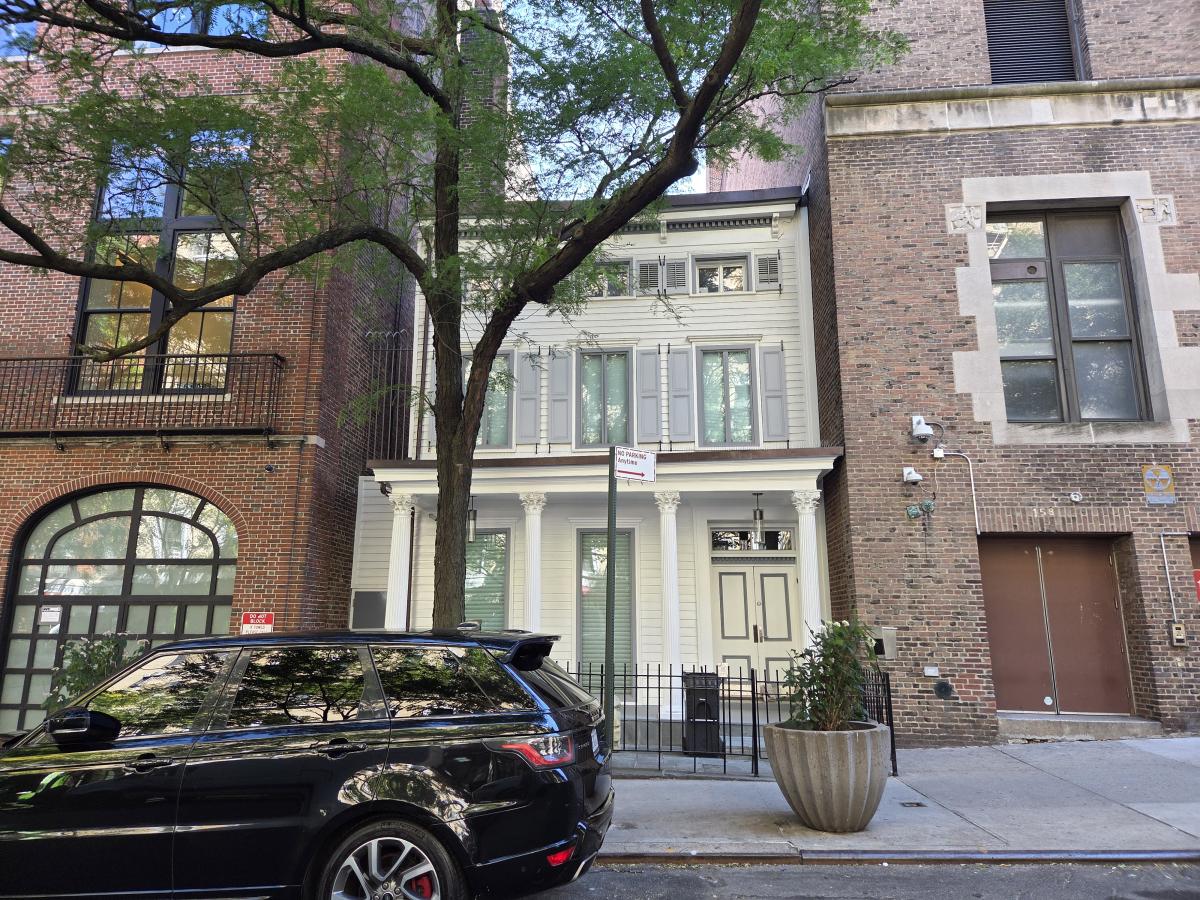
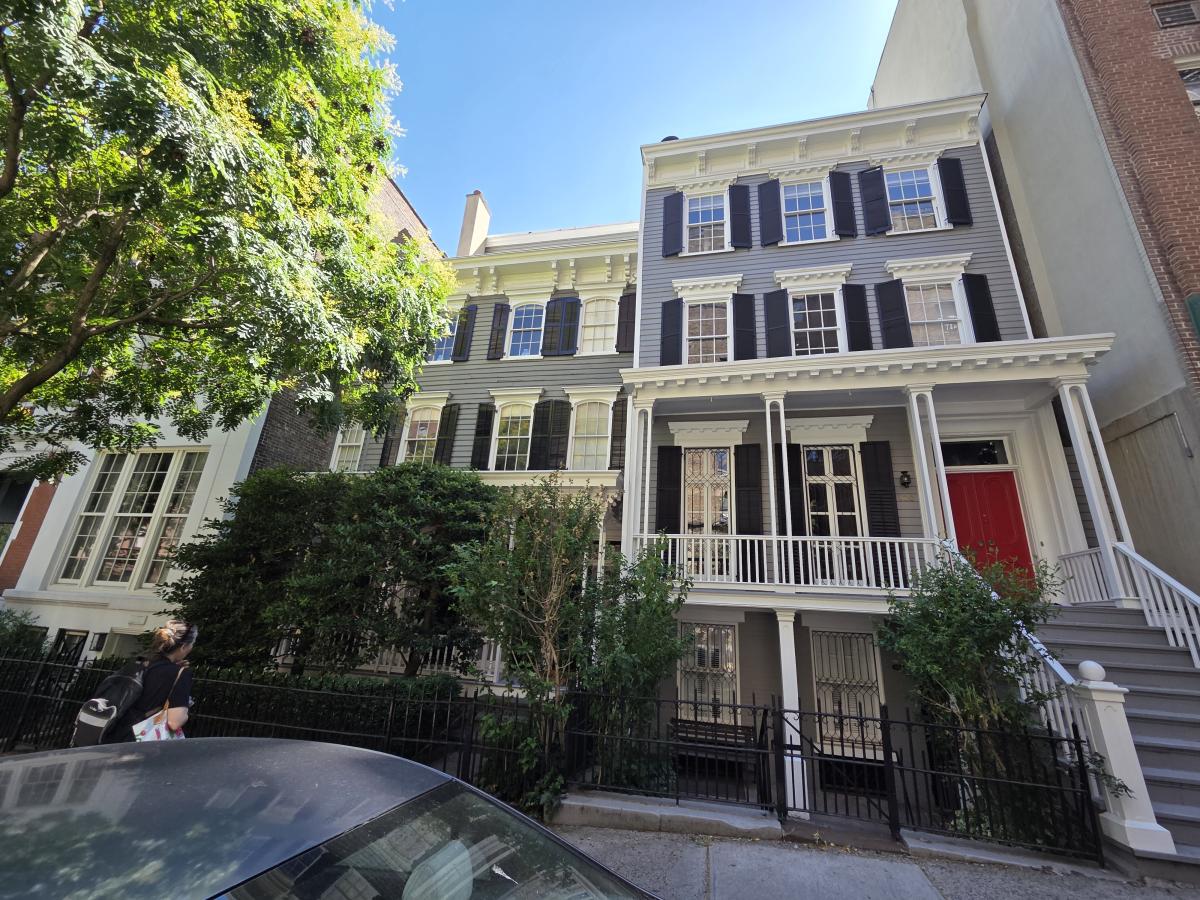
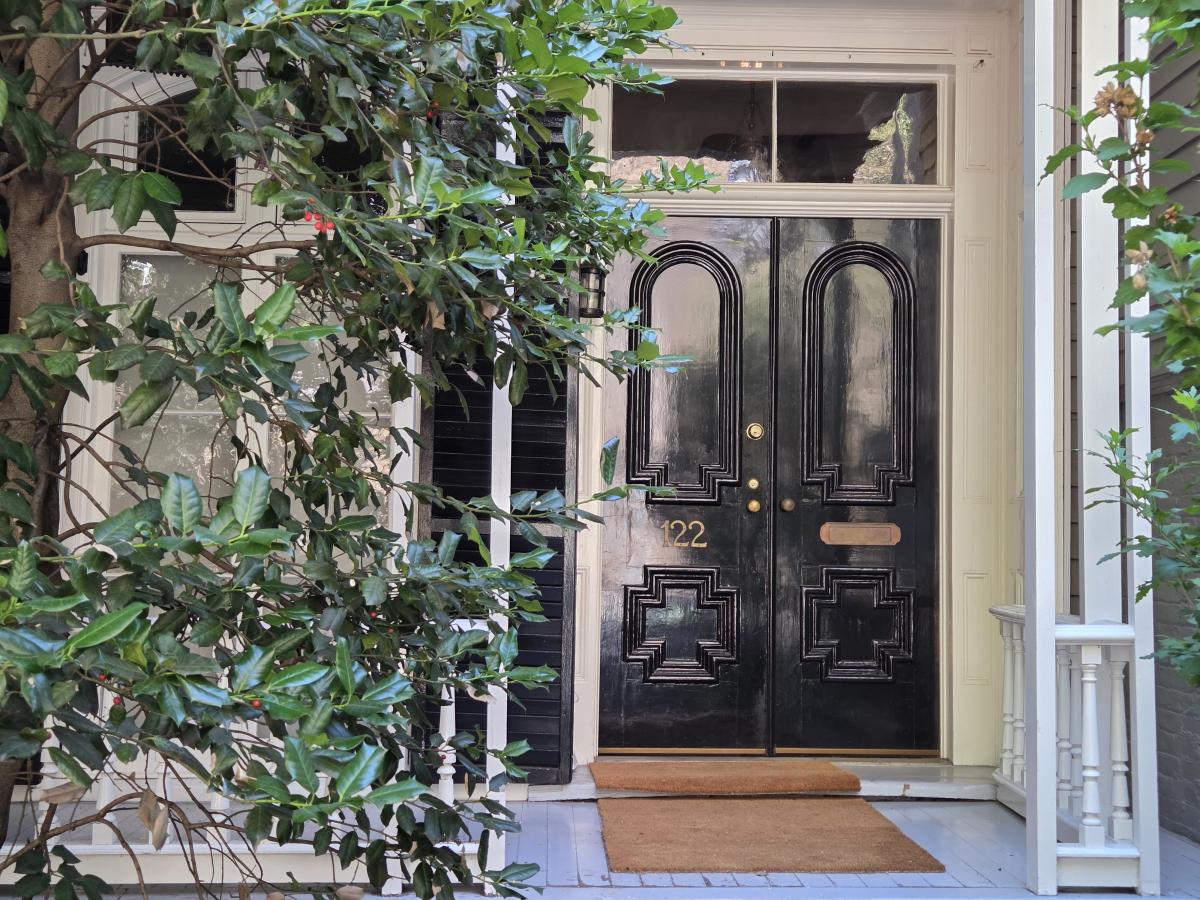
During this time Yorkville was rapidly built up. While the area near the river stayed pretty industrial until after WW1, The few existing private houses and farms were torn down for block after block of apartment buildings, mostly five-story walk-ups. But a few buildings from before the boom survive, including these three wooden frame houses on 92nd Street near Lexington Avenue. The oldest, #160, dates from 1853. Built by carpenter Albro Howell, these houses were built as middle-class housing, not the mansions of Fifth Avenue. The first resident of #160 was bookkeeper and mirror salesperson, Robert N. Hebbard. #120 and #122 are similar and were built in 1871 .
Because of the danger from fire, New York City zoning laws banned wooden buildings - first, in lower Manhattan from about the 1830s and, and for all neighborhoods south of 155th street from 1882.
In the 1898 insurance maps, these three wooden structures, along with a few other long-gone buildings, are the only wooden framed houses in the area. The rest of the blocks are already built up with walk-ups.
These three surviving wooden houses look a lot like similar wooden houses that you'll find all over other parts of NYC, especially in Brooklyn. Same time. Same technology. Same construction techniques. The original walls would have had three coats of plaster. The floors would have been heavy parquet. How much of the original interiors of these buildings still exist? I don't know. These are all private homes. The outsides are landmarked. They're also well maintained and each worth in the millions.
By the end of the 19th century, Manhattan was no longer a single-family home city.
Note: the walkups were pretty much capped at five stories because a building would not have enough water pressure (unless it had a water tower). While I am not positive that they came with electricity, the walkups probably did - but it was DC. - and remained that way for a lot of buildings until the 1960's. While such housing may be standard elsewhere in the world, walk-ups are relatively unusual in the US but still abound in NYC. If you help a friend move in or out of a 5th floor walk-up apartment, they owe you big time!
N.B. for those who are curious: Blogs are rarely planned much in advance. If we have a new product line, I'd want to talk about it. But most of the time, blog posts are like this one - inspired by something on the fly. On Saturday when I unexpectedly walked by a couple of houses I found so interesting I took some pictures, and then, when I returned home, I did some research about what I saw. I found out a lot more about these buildings, and located an archived 1898 insurance map and the 1940s municipal archive of photographs. The larger idea which I realized as the entry came together, was the role government had in shaping the neighborhood.
Categories: General Woodworking, Hand Tools
The Guy Second from the Right

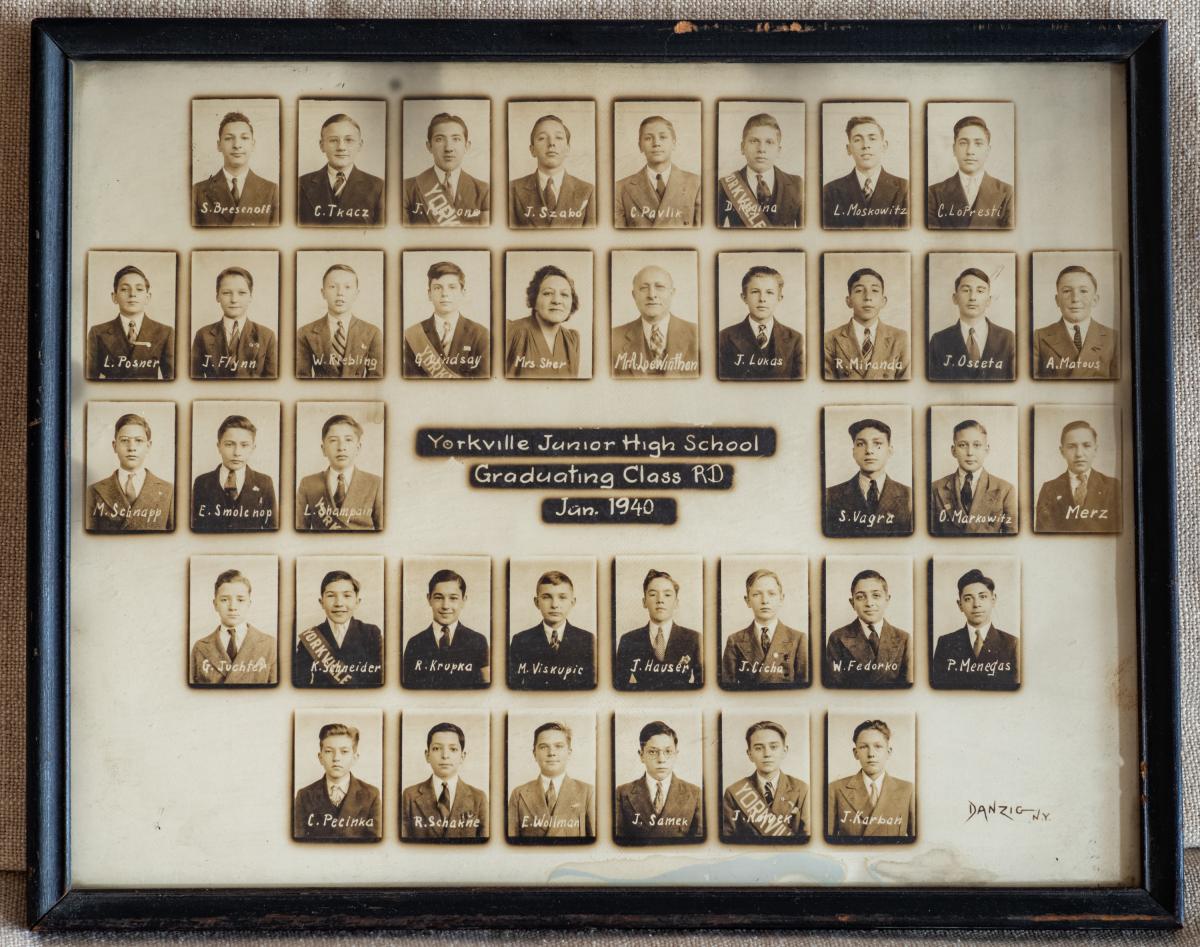
This picture is from the graduating class photos taken in 1940. The guy in the middle, L. Moskowitz, is my father. The picture is from P.S. (Public School) 30 Junior High School in the Yorkville section of Manhattan. My father was 18 at the time, and he was just graduating junior high.
My father came to this country four years earlier (1936) from a small town of what was then Czechoslovakia. He spoke no English. At home he and his parents and siblings spoke Hungarian, because their town was in Hungry before World War I. (It's now part of Ukraine.) From an Orthodox Jewish upbringing, he was initially sent to a yeshiva in Brooklyn for his education. He rebelled and insisted that his father let him go to the local public school. His family lived on 82nd Street; the school was on 88th Street between 2nd and 3rd Avenues. When I was a kid, I lived on East 88th Street and I remember walking by. By then the school was closed and abandoned. Later it was torn down entirely to make way for an apartment building.
Let's take a look at a larger picture of the entire graduating class. All boys, because I assume it was a boys school. Or at least the classes might have been segregated by sex. From the looks of the picture, my father wasn't the only older kid in the class. Some of those other boys look pretty old for junior high as well. And the names are the names of immigrants. Szabo, Tkacz, LoPresti, Viskupic, Fedorico. Given the neighborhood, I'm assuming most of them were Hungarian, Czech, or Slovak, with Polish, Italian, and other immigrants thrown in for good measure. There's was a large German population in Yorkville at the time. Yorkville was known for it; there were breweries and famous food establishments like Schaller & Weber (opened in 1937) In those days, students were not allowed to advance in public school unless they could speak English and keep up with the work, which is why there were older kids in junior high.
After my father graduated PS 30, he went to Seward Park High School on the Lower East Side. He rode the public bus with a kid named Bernie Schwartz, who later became known as the actor Tony Curtis. The country was still recovering from the Depression and the city had a huge influx of immigrants from all over, many fleeing Nazi Germany. The reason my father was able to learn English, in spite of the fact that it wasn't spoken at home, was that he desperately wanted to be American. The school assigned him, and all the other immigrant kids, individual tutors to help them along.
After graduating from high school my father enlisted in the Air Force. In 1943. He ended up as a mechanic on airplanes, mostly B24s. He did a lot of maintenance on the Norton bombsight in Italy. He was the youngest in his family and the only one to go to college. He attended City College on G.I. bill. (City University says that nowadays 45% of its students are immigrants or the children of immigrants.)
I mentioned the story for two reasons. The first is that my father's Junior high School picture has been sitting next to my desk since he passed away. The second reason I mention this is because it reminds me how we're a nation of immigrants. In my father's day and beforehand, like my wife's family, the immigrants came mostly from Eastern Europe and Southern Italy. Before that, Irish. You could go on like this for a long time. I am continually reminded that if grape harvest had not rotted on the tracks because of a rail strike in Czechoslovakia in the late nineteen teens, my grandfather would never have emigrated. He came to New York City in 1922 and became a blacksmith, working on the ironwork at the Cathedral of St John the Divine. He never would have gone on the in the grocery business thereafter. Once he was established, he called for his wife and younger children to join him, and they did. If there hadn't been a rail strike and resultant desperation, they would not have left their home, and my grandparents and my father and some of his siblings would have instead been murdered in Europe, like all my relatives - aunts, uncles, and cousins - who remained.
My father was always grateful to have been able to immigrate here, and to serve in the US army and to work as a NYC civil servant. In spite of his enthusiasm for the United States, he was always nostalgic about the Old Country. "You never saw so many types of wonderful apples at the market!" was a sample recollection. He also said to me that paying taxes was a privilege: it meant you were successful.
Happy Father's Day to all.
 PS 30 in the 1940's - from the NYC Municipal Archives
Categories: General Woodworking, Hand Tools
Is It Time To Go (Festool) Cordless?
 We get large and frequent deliveries from Festool, which is why our showroom routinely has a pallet or two, and a forklift in the way.
Festool is releasing a range of new cordless tools next Wednesday, June 17th, and some of these tools are even catching the eyes of woodworkers who typically work in a shop or on a jobsite with no shortage of dependable electricity.
Of course woodworkers have long used cordless drills and jigsaws as a matter of course. Whats more novel is the serious consideration of cordless planers, saws, vacuums and trimmers that Festool is promoting. As a New York City merchant, we are accustomed to working with customers from all over the world. One of our customers who immigrated to the US from Poland once told us that in many European countries it was assumed that contracting professionals would supply their own power on the job - electricity is expensive, so it would be unusual to use or count on using a building owners or homeowners electricity. The standard solution: battery-operated tools, which are ubiquitous in Festools home in Germany and elsewhere in Europe.
But are these battery-operated tools right for you?
The latest crop of cordless Festool tools includes both counterparts to existing Festool tools, like the cordless DFC500, a counterpart to the corded Domino DF 500, and the MFKC, a counterpart to the MFK trimmer. For these cordless tools, the primary advantage is freedom from the tether of the cord, which translates into the ability to work in tight spaces or where folks fear tripping over a mess of cords (their own or other peoples). To use the Domino 500 as an example, the plunge depth, choice of tenons, mortise widths, etc. are the same. The ergonomics of the tools is somewhat different: the cordless DFC has a soft-grip D handle (good for big hands or glove-wearers) and the cordless balance and weight are different as well.
But other tools differ more markedly - not just for mobility and power source.
One of the stars of our recent Festool Fest was the HLC82 planer. Since Festool announced the launch of the cordless planer, we have thought of it dozens of times as the solution to various problems mentioned by customers and callers. I dont know what happened, but the doors are sticking. Whoa - whoever did the cabinets left them kinda rough. To be fair some of those callers are looking for a miracle-working $20 scraper, but the HLC 82 is impressive and a nimble, hardworking asset at the jobsite.
Likewise, the OFKC laminate trimmer has no counterpart in the corded Festool USA world (the corded OFK is available in other countries). If you are in the market for a router for chamfering, routing trenches, roundover, etc., go with the MFK or MFKC. The OFKC is a specialist in laminate trimming. It is ideal for routing laminate, plastic and solid wood edges in the shop or on the jobsite.
A final note: as Festool increases its line of cordless tools, it has stepped up the capacity of the batteries that support the tool system. The new 4 Ah Tabless and 5 Ah High Power batteries are overachievers determined to upstage previous generations of Festool batteries, with higher output, less overheating and longer run time. The batteries are available individually and in a variety of sets with chargers and Systainers. All batteries are Bluetooth enabled to communicate with Festool Bluetooth vacuums and the Festool Werk app.
(Anticipating what some of you are thinking: yes, hand tools also don't have cords.)
Categories: General Woodworking, Hand Tools
Where Is Dickens When You Need Him? Hand or Simple Turning by John Jacob Holtzapffel - Chapter 7

The five volume compendium "Turning and Mechanical Manipulation" by Charles and John Holzapffel started with Volume 1 in 1846 and ended with Volume Five in 1884. A planned sixth volume was never completed. The series is a treasure trove of hand tool technology. Volume Four, on Plain Turning, and Volume Five on Ornamental turning are the bibles of their field.
Unfortunately the Holtzapffels, both father and son, may have been great tool makers but they were crappy writers of how-to books. In the time between their era and ours, "how to" instructional books have become more engaging and and much more than just a recital of facts. And of course, the act of writing a book - whether in the 19th century or today - doesn't of itself confer an engaging writing style. As a matter of fact, most Victorian books I have plowed through are pretty turgid. I can claim the honor of having read all six volumes of "The Morning Chronicle Survey of Labour and the Poor" a a groundbreaking 18491850 newspaper investigation into the living and working conditions of the British working class mostly written by the crusading Morning Chronicle journalist Henry Mayhew. I found the section on Billingsgate Fish Market to be particularly evocative and engaging - nearly two hundred years later, you can still smell the fish. Later in that section Mayhew notes that the description of the fish market section was contributed by his colleague at the Morning Chronicle: Charles Dickens.
But back to Holzapffel. I realized that in order for me to understand treadle lathes, I would need to plow though Holzapffel's description of using a treadle lathe - possibly the only instruction on using a treadle lathe specifically with hints on treadle speed, how to stand, and other treadle specific info - however turgid I found his prose.
I found it tough going. Too much of my time was spent getting lost in the text (in a bad way). And then I had a brainwave: what would happen if I took the important bits of the text and fed it into the AI chatbot Claude? I asked Claude to take the text and turn it into modern English. And it did - and wow, what a massive improvement. So here ya go. I don't have the time to do the entire book - you can if you want to; it's pretty easy - but here is what I hope is the first section of something useful. The PDF is also posted on the Gramercy Tools Treadle Lathe product page.
One important point. I look at this modernized version as a inexpensive translation. One wonderful feature of the modern internet is that Google and many services will do an instant language translation for you. The translations are rarely perfect and may miss the nuance and discernment that a real translator can provide. However, it's hard to imagine how a niche project like modernizing inaccessible language in a classic woodturning text could ever be economically viable, so having a starting point is great.
A note on the text: As I wrote in a previous blog, "softwood" in this time period included all the furniture woods, including oak. "Hardwood" referred to like Ivory, Rosewood, Ebony, and Boxwood. Meanwhile, a lot of modern forms such as roughing gouges hadn't been invented or named yet and so are not mentioned in the tools section.
Here is the link to the modern version of chapter seven.
and here is a link to the entire volume four in all its glory.
PS We used to stock reprints of all five volumes of Holzapffel but slowly they have gone out of print. We do have a single copy available of Volume Two which covers construction, action, and application of cutting tools and the machines derived from hand tools.
Categories: General Woodworking, Hand Tools
A Profound Revolution
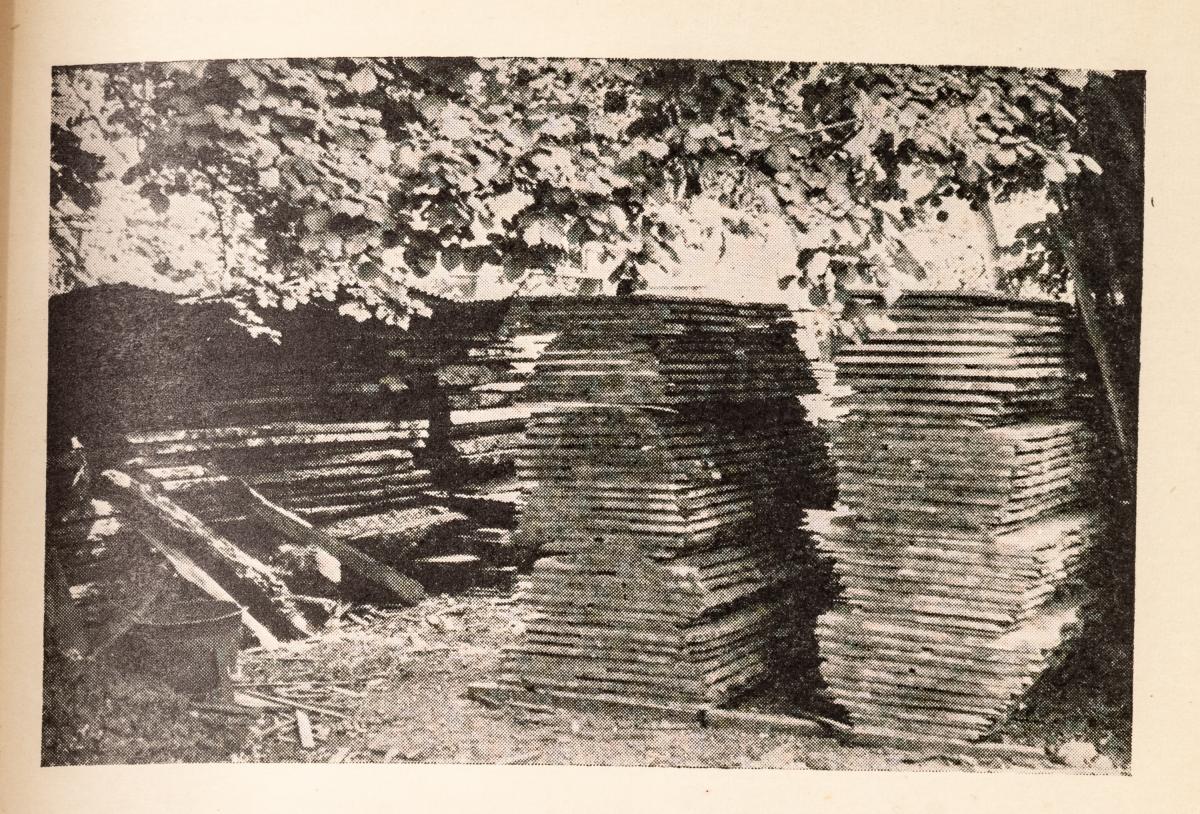 From "The Village Carpenter" 1938
Although the table saw and planer were invented in the early 19th century, it was only in the 20th century - with the invention of small electric motors and ubiquitous electricity - that professional shops, and later, amateurs, started using saws, planers and jointers on a mass scale.
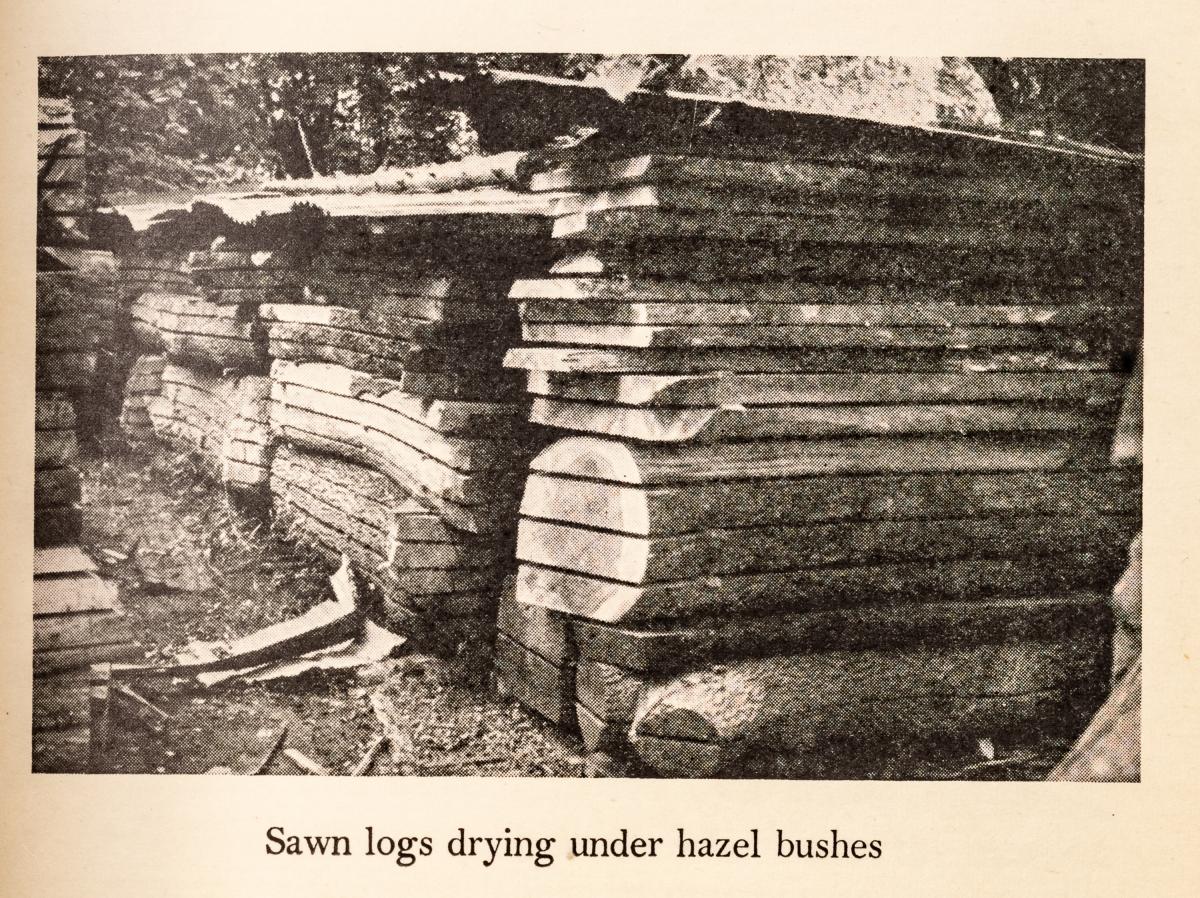
This development substantively changed the process of sourcing wood. If you're imagining woodworkers buying wood in rough thickness and then substantially planing it down by hand, think again. Woodworkers typically bought material, or had it custom sawn for a specific purpose at close to final thickness. In "The Village Carpenter Walter Rose describes having sawyers saw green wood to the right thickness from the get-go for drawers and carcasses and other uses. It was important that the wood was well selected so it was stable and didn't need a huge amount of hand planning to be flat. With the introduction of machines, that was not only unnecessary, but the selection and seasoning of the wood was no longer critical. With the elimination of finicky steps, processing wood became much less expensive. The savings associated with using machines was huge. No need for labor just to plane things flat. And sawing accurately entailed far less mandatory skill.
The first companies to have these machines were lumber yards. "Sam, an East-End cabinet-maker: the pocket-book memoir of Sam Clarke, 1907-1979," includes Clark's description of laying out material for a bedroom set and taking it by cart (no cars) to a nearby lumber yard to be planed. This was London in the early 1930s.
By the 1950s, the revolution was complete. With the gains came losses. The most obvious losses were the growing use of less stable wood and the steep reduction in the range of sizes of materials. If the wood was going to warp anyway, you needed extra material to flatten the board in your shop, so instead of stable material nearly the thickness you wanted, you bought material in 1/4 increments and planned away 1/8" or so. Easy by machine, but not so easy by hand. The machines also allowed a new generation of hobbyists, ones without years of training, to be able to build work in a reasonable time.
This change represented a massive revolution in the way woodworking was done from ancient times to the 19th century. We can argue the pluses and minuses, but the massive changes in the way furniture is made are here to stay.
We are now on the cusp of another profound revolution. Or revolutions. Additive manufacturer (3d printing) is becoming better and better and more shops are using it for a variety of work. Jigs and fixtures to speed up assembly are a typical use of 3D printing, and 3D printed hardware is becoming more and more common. Some designers are experimenting with totally new forms of furniture, some of which is totally 3D printed. In another area, AI tools, which are filling the headlines these days, are helping designers quickly prototype designs to show clients. More importantly, AI tools have the potential to increase the efficiency of the office work of any shop. How these new tools are changing our work - for better and worse - is an important story I will save for another day.
 From "The Village Carpenter" 1938
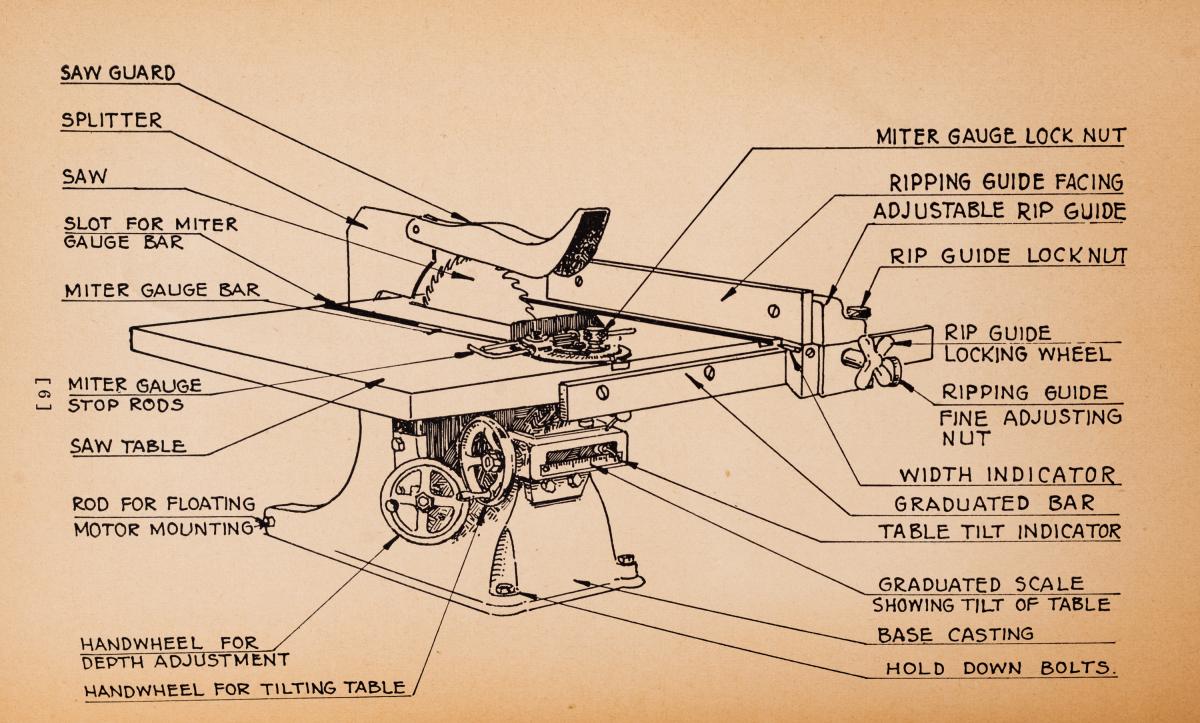 From "The Bench Saw Jointer and Shaper" The WALKER-TURNER CO 1934
Categories: General Woodworking, Hand Tools
Driving the Work - Lathe Headstock Centers
 5 Ways of driving things in the lathe
We've talked a lot about our folding treadle lathe. But let's not lose sight of the attachments, which also deserve our focus.
When using a lathe, the work is driven by the headstock and supported, if necessary, by the tailstock. Bowls and similar pieces can be gripped or screwed on to the headstock and wouldn't need tailstock support. A long spindle can be held multiple of ways, but it is driven by the headstock, and the tailstock simply functions to support it.
Old turning manuals show a million ways of holding the work. If you look at 19th century and pre-19th century depictions of lathe tools and attachments, you'll see a lot of effort devoted to driving the work. The reason is very simple: Turners of that era did not have our wonderfully made three- and four-jaw universal chucks. They also didn't have standard interchangeable tapers and threads.
Modern wood lathes all have hollow spindles, so some-sort-of center tasked with holding the work will be able to be popped into the spindle. Some very inexpensive lathes use a set screw and a collar to hold the center, but better (but still inexpensive) lathes have a tapered hole in the spindle, which can hold a center by friction. The standard American woodturning lathe will have an MT2 (Morse Taper 2) hole in the spindle for a center driver, and a threaded outside, 1"- 8 TPI, for screwing on larger chucks and face plates. Larger lathes will have all larger tapers and threads. All standard accessories with MT2 shafts and 1"-8 threads are interchangeable. This includes the lathe accessories we sell. All similarly tapered and threaded accessories from other vendors will fit our Gramercy Tools treadle lathe as well.
Long, thin work is typically held between headstock and tailstock centers. Bowls and other short workpieces are typically held in a chuck in the tailstock. But all sorts of work-holding arrangements arise depending on the situation.
The tailstock is simply there to support the work and keep a long piece steady while you turn. The headstock center is what actually drives the work. Whatever way you are holding the work, the headstock center has to force the work to turn and not slip when cutting force is applied.
 Four Prong Drive Chuck
Historically, the most popular way of driving spindle work is by using what's known as a "four prong center" or a "four prong chuck." (see photo above). You'll see these centers in old turning literature, but other options are eclipsing them. The four prong center is very simple to use. You drill a small hole in the center of the the piece and then put two saw cuts at 90 around that. Some people will just put in the center hole and then use a hammer to bang in the prongs. Then it goes in the headstock. The prongs in the slots drive the work. To make it work, you'll need to make saw slots or bang in the prongs, and I don't like either method. So we supply a crown center with our lathes, which we think is a lot easier to use.
 Crown chucks
A crown center (above) looks like a crown, hence the name. The center pin of a crown center is spring-loaded. To mount your work, just put a center mark on the work at the center; put the loaded pin on the mark; and then tighten up the tailstock. With the tailstock tightened, the crown edge digs in. Thats it - youre done. If you manage to do something silly and accidentally jam a tool, such that you would stop the work from spinning - and this is especially true on an electric lathe, as treadle lathes really dont have the power - a traditional four prong center will just keep on moving. This can cause real damage to the work, split the wood, break a tool, etc. With a crown center, on the other hand, the work is held more gently by crown points that do not penetrate the the workpiece that deeply. Because the individual crown points are not stuck that deeply, a jammed tool causes less havoc. The crown points just slip and work a groove in the work. Not ideal, but not a big deal. The turner just notes the problem, tightens up the tailstock again to engage the crown points again, and then resumes working.
We stock two sizes of crown driver; a 1 inch crown, which comes with a lathe, and a smaller half inch crown. I like them both. The only real downside that I can see for a crown drive is when your workpiece's diameter is very, very small diameter work and even a 1/2" crown driver will be too big.
 Faceplate
 While it is rarely used today, a traditional way of holding the work is using a faceplate. The work is attached to the faceplate - typically with screws, but also sometimes with little clamps - and away you go. There is no built-in centering mechanism, so it's not surprising that nowadays the faceplate is the workholder of last resort. Ive personally never used one, but it was a very common traditional way of mounting.
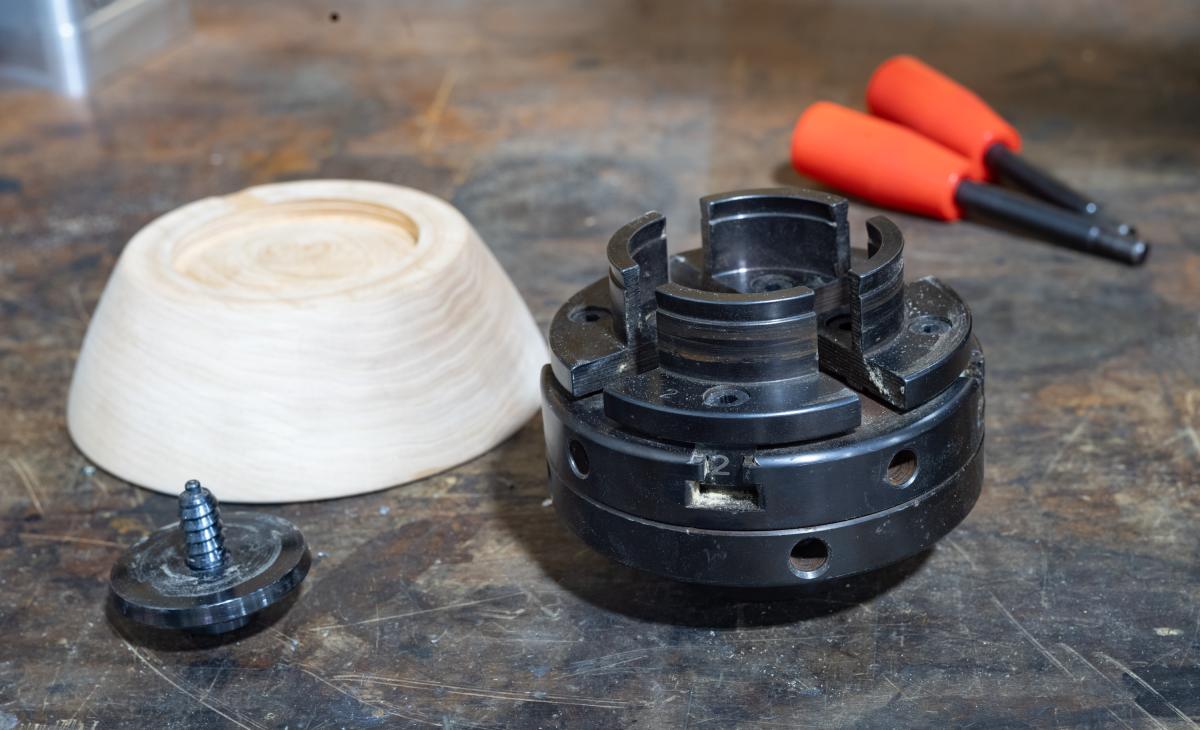 A screw chuck (left) and a Four Jaw Universal Chuck
 Here we have the most common way of holding a bowl for turning. You start by drilling a hole in the center of what will become the hollow side of the bowl blank and screw the stock onto a screw chuck (above left). The screw chuck can be driven a bunch of ways. In this version, the disk at the bottom of the chuck is clamped in a four jaw universal chuck. With the work in the lathe the outside of the bowl is turned, and in this particular case I also turned a recess in the base. With the outside done, I then flipped the blank around and clamped the work by expanding the four jaw universal chuck (above, right) into the recess I cut in the base. This method works solidly and reliably and is probable the most common way of clamping a bowl.
On wood lathes, four jaw chucks like the one above are standard. The jaws move as a group so the work is centered. Independent four jaw chucks are used mostly on metal lathes when the work is not round, or needs very careful manual centering, more accurately than a universal lathe can provide.
The four jaw chuck for a wood lathe comes in all sorts of permutations. We stock a nice but fairly primitive one without the attachments. The price ranges from "not a lot" to several hundred dollars, depending on features, precision and capacity. The jaws come in various sizes and are usually interchangeable on a particular chuck. Depending on which jaws are used, you can clamp on the inside of a recess by expanding outward, or on a lip clamping inward. The lips of the chuck jaws are tapered so grab the work solidly even if the recess or ledge on the work is pretty small.
On a final note, here are some pictures of some of a couple of chucks from Bergeron's 1742 "Manuel Du Tourneur." We see the elements of a faceplate and screw chuck - and even a very early independent four jaw chuck from a time when cutting screw threads was a big deal. But figure 8 is both interesting and practical. Particularly for production work, the turner would make a collet by drilling a piece of wood the same size as the stock; then cut slots in it thereby creating fingers; and then use a ring to force the fingers tightly closed. Or course this would only work for one size of stock, but for that size it works fast and tight. These types of collet chucks were very popular especially in production work.
I am barely scratching the surface of the different type of chucks that were used, but for most of us, a crown center coupled with some sort of four jaw chuck will cover 95% of the work were going to do. If you find yourself do oddball stuff, thats when you start doing some research especially in old books.
I'll talk about the tailstock when I next write about centers.
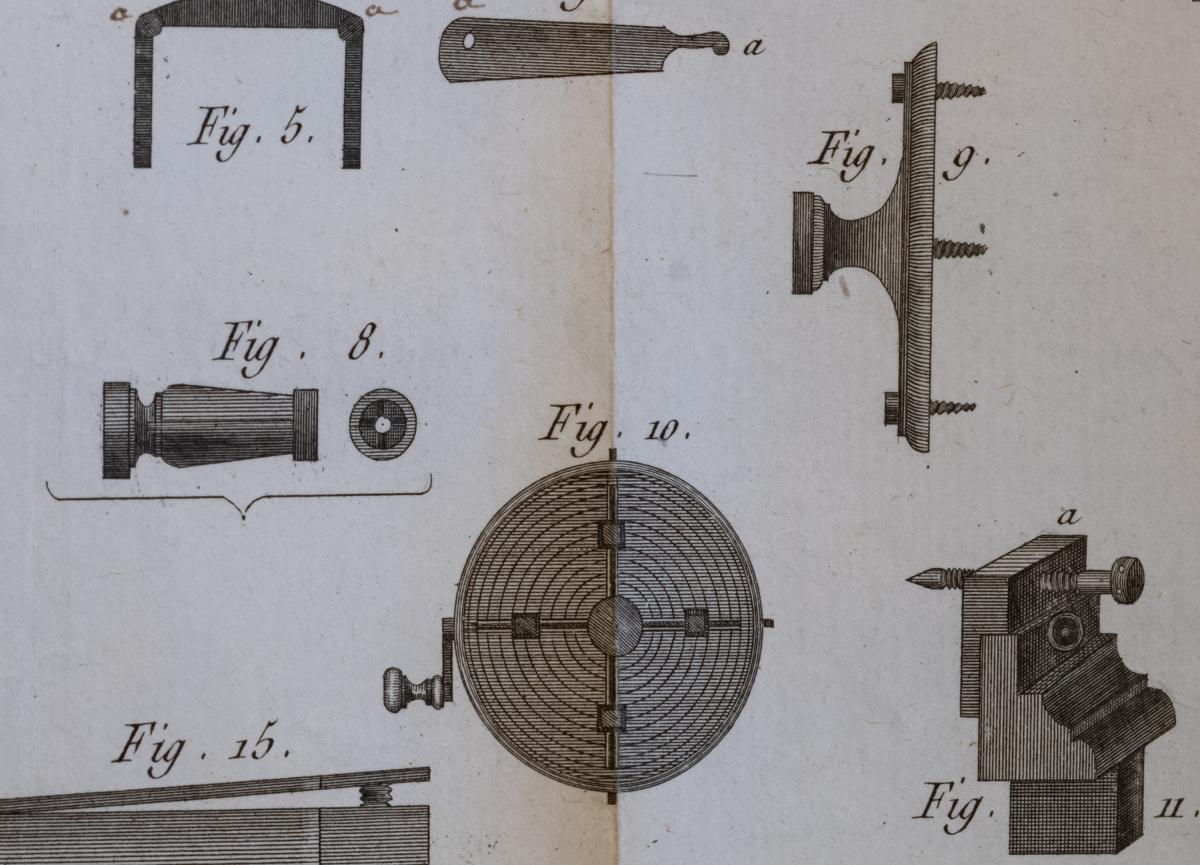 Various chucks from Bergeron's Manuel Du Tourneur Paris 1742 - #8 - collet chuck. #9 - Faceplate chuck with screws. #10 what looks like a very early four jaw independent chuck
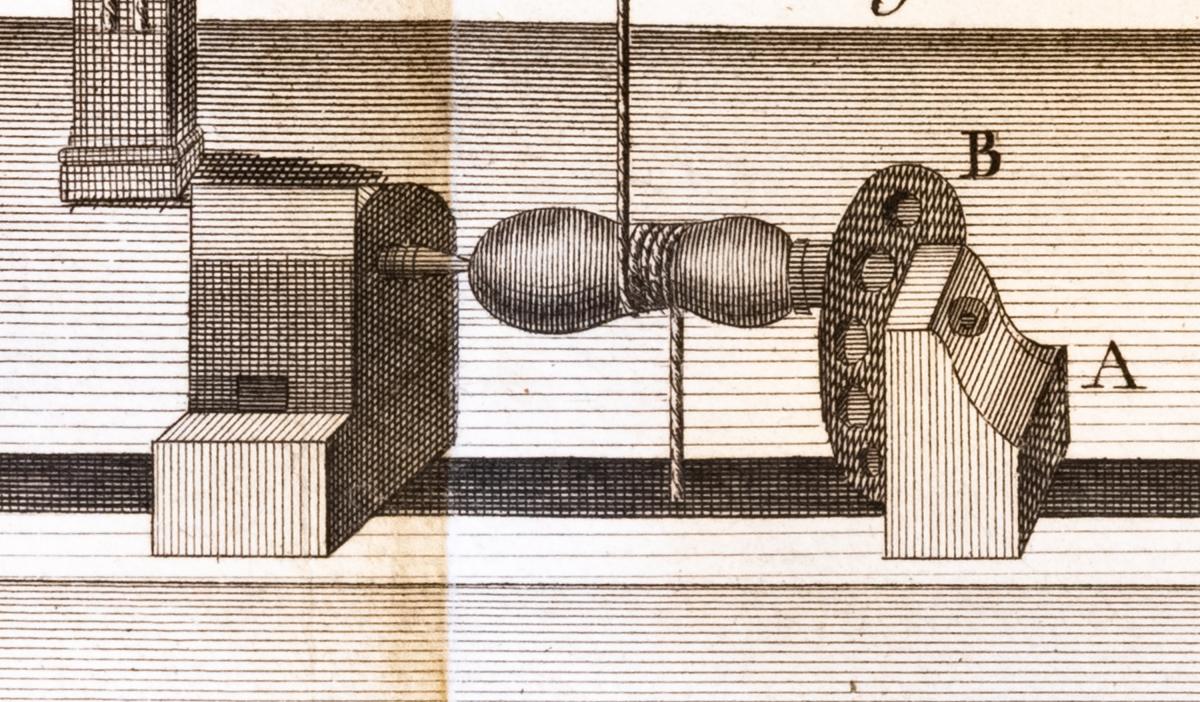 Disc support for holding handles for drilling - Bergeron's Manuel Du Tourneur Paris 1742
Categories: General Woodworking, Hand Tools
Don't Forget to Tip Your Guide
 Olive Bread from Vesuvio
One of my great joys at Tools for Working Wood is steering our visitors to great local places, whether great Mexican food in Sunset Park or worthwhile museums they might have otherwise missed. In that spirit, let me tell you about some of the food shopping I did with my son over the weekend.
We built up our fortitude for errands with a falafel at one one of my favorite falafel spots, the original Mamoun's on Macdougal Street in Greenwich Village. According to their website, the restaurant, which was founded in 1971, is "the oldest falafel restaurant in New York and one of the first Middle Eastern establishments in the United States." (This isn't exactly true - Mamoun's may be the oldest falafel shop in NYC, but from the late 19th century until its relocation to make way for the Brooklyn-Battery Tunnel and what would later become the World Trade Center site, New York had "Little Syria," a vibrant Middle Eastern neighborhood in downtown Manhattan.)

When we finished my meal, we headed to Pino Prime Meats for some lamb sausage. The shop makes the sausage fresh everyday, and I don't know a better supplier of lamb sausage anywhere. It's great with many things, including a side of robustly spiced pasta. This shop is tiny! There's a single corridor for customers and butchers, and the shop was pretty mobbed. (I generally have been at the shop on Saturdays, and it's always busy on Saturdays.) Just as noteworthy as the quality of the meats: Pino takes cash only. The trend in the past few years was to eliminate cash payments - with sufficient pushback that NYC passed a law mandating that stores are legally required to accept cash if their customers choose that method of paying. Well, no need for that intervention at Pino, which is a traditional store in this and so many other ways. The current family that owns Pino Prime Meats has been operating the store only since 1990, but the butcher shop has been operating the neighborhood (though I am not sure if it's at the current address only) since 1907.

Then it was off to Vesuvio Bakery for a snack, in this case some olive bread. Let me say they do not stint on the olives at this bakery. Vesuvio has a long history in the neighborhood as well. The original bakery was opened in 1920 but closed around 2009 - and then was reopened by a fan who was inspired to renovate the bakery's storefront and restore its operations.
 Raffetto's Fresh Pasta
And then we finally headed to Raffetto's Fresh Pasta on Houston Street. Raffettos too has a storied past: it was founded as M. Raffetto & Bros. in 1906. As the shops website says, In its early years, M. Raffetto & Bros. made three basic products: egg noodles, meat & spinach ravioli (Genoa Style) and, a little later, cheese ravioli (Naples Style). Since refrigeration was the exception more than the norm at the turn of the century, we produced and sold dry egg noodles much more than fresh egg noodles, made with the one roller machine our grandfather bought in 1916 (that machine is still used today). From the 1970s on, the popularity of fresh noodles and having only one machine to roll out the dough made us discontinue making dry noodles. Today, Raffettos produces about 50 different kinds of pasta. We often wonder what Marcello would think about our range of homemade creations that include pumpkin ravioli, black squid ink linguine and rosemary pappardelle. Regardless of whether it is a classic pasta or something a little new and creative, our family still chooses to follow the same principles that has guided our familys philosophy since 1906: use the best quality ingredients to produce the best quality pasta.
We bought some ravioli for dinner later in the week and headed home, snacking on the olive bread.
Probably the best part about dealing with these stores is that they're all owned, run, staffed by people I can identify with. They know the product, they know their business. They care. They make the best products they can. They engage with customers. Food in these stores isn't a commodity designed for easy barcode scanning. It's a craft and making a living at any craft is an achievement. Fewer people on any given day need a wonderful hand made chair than some sausages, but the principle is the same and needs to be encouraged.
As I was enjoying the olive bread reflecting upon my shopping experience, the thought occurred to me that this is what craft is about. Almost anyone can make olive bread, but actually making the bread, and doing so in such a way that the bread is stuffed with olives, and sold to a sufficiently appreciative customer base to pay enough to make the profit that enables you to pay the rent and the staff - well, that is about mastery of craft. Same with making lamb sausage every day, at a price that is in the sweet spot of affordable-profitable, etc.
My enjoyment of woodworking is really about the enjoyment of craft, appreciating the skill it takes to make something. And respecting the lifetime of skill it takes to master a craft effectively.
Categories: General Woodworking, Hand Tools
Hand Carved Basswood Printing Blocks From 20th Century Traveling Shows
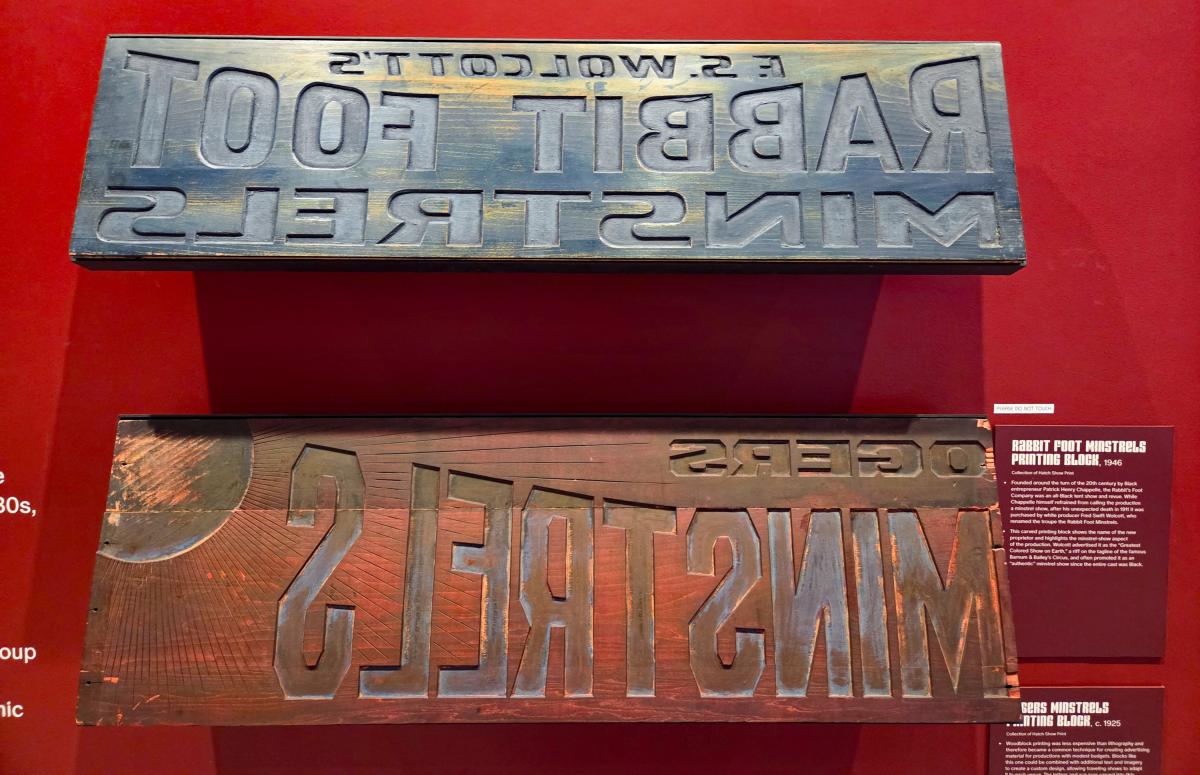
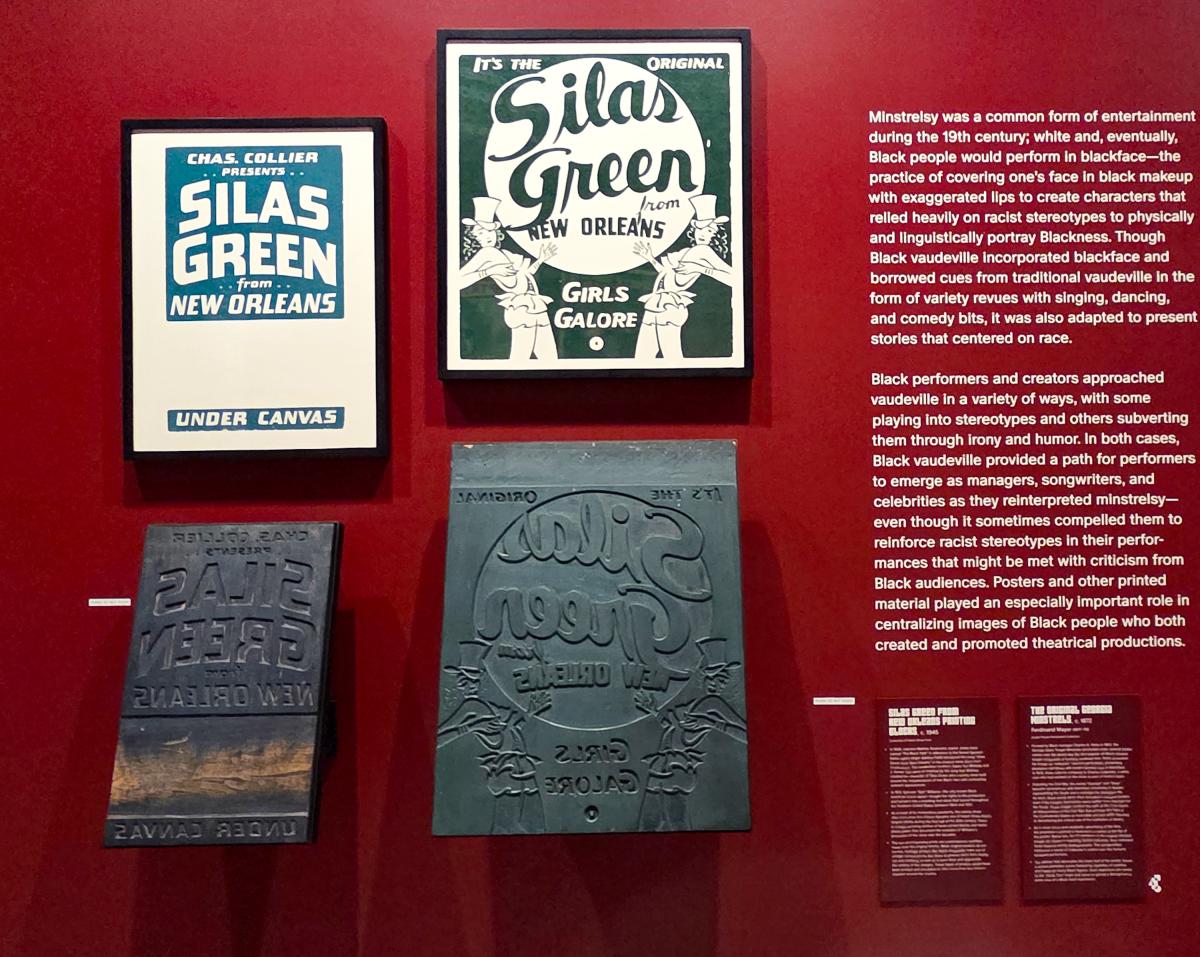
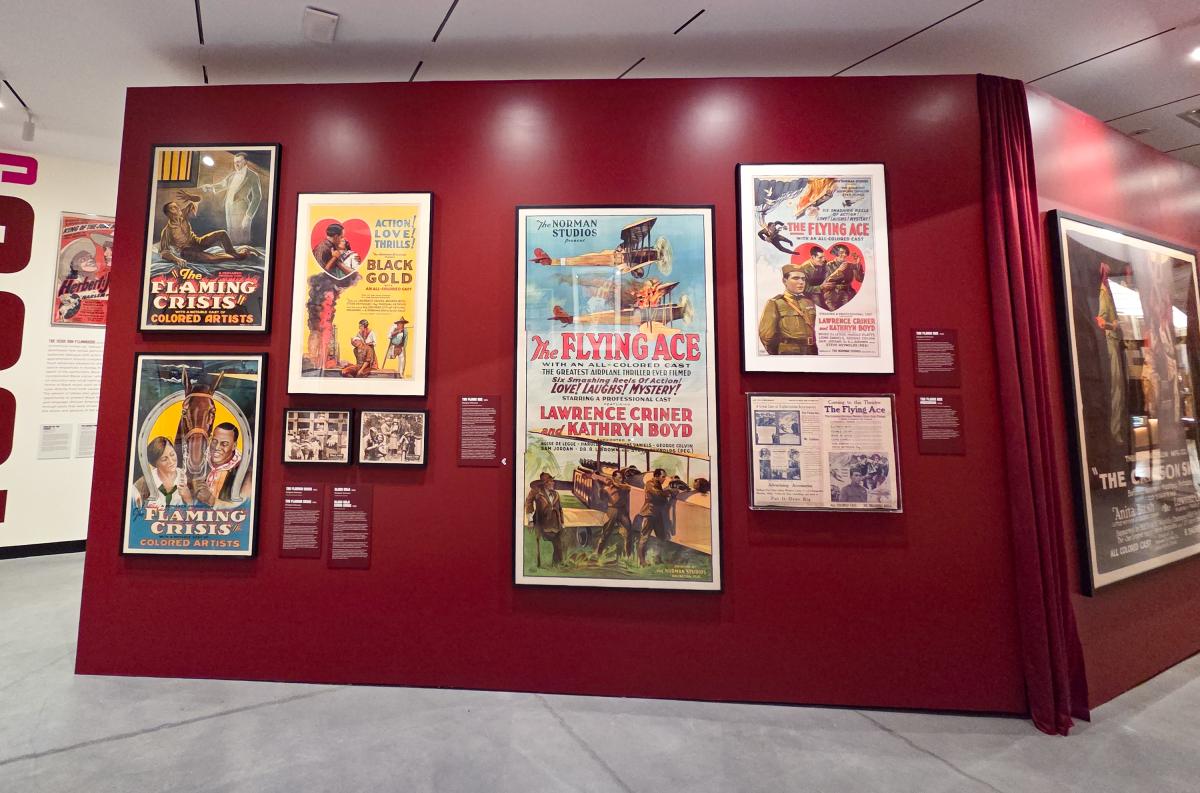
The gorgeous large advertising and movie posters that were popular in the 20th century were mostly printed using color lithography, a wonderful, but complicated and expensive process. For more modest budgets, and for traveling shows where the signage had to change based on locale, woodblock printing was a much more economical approach.
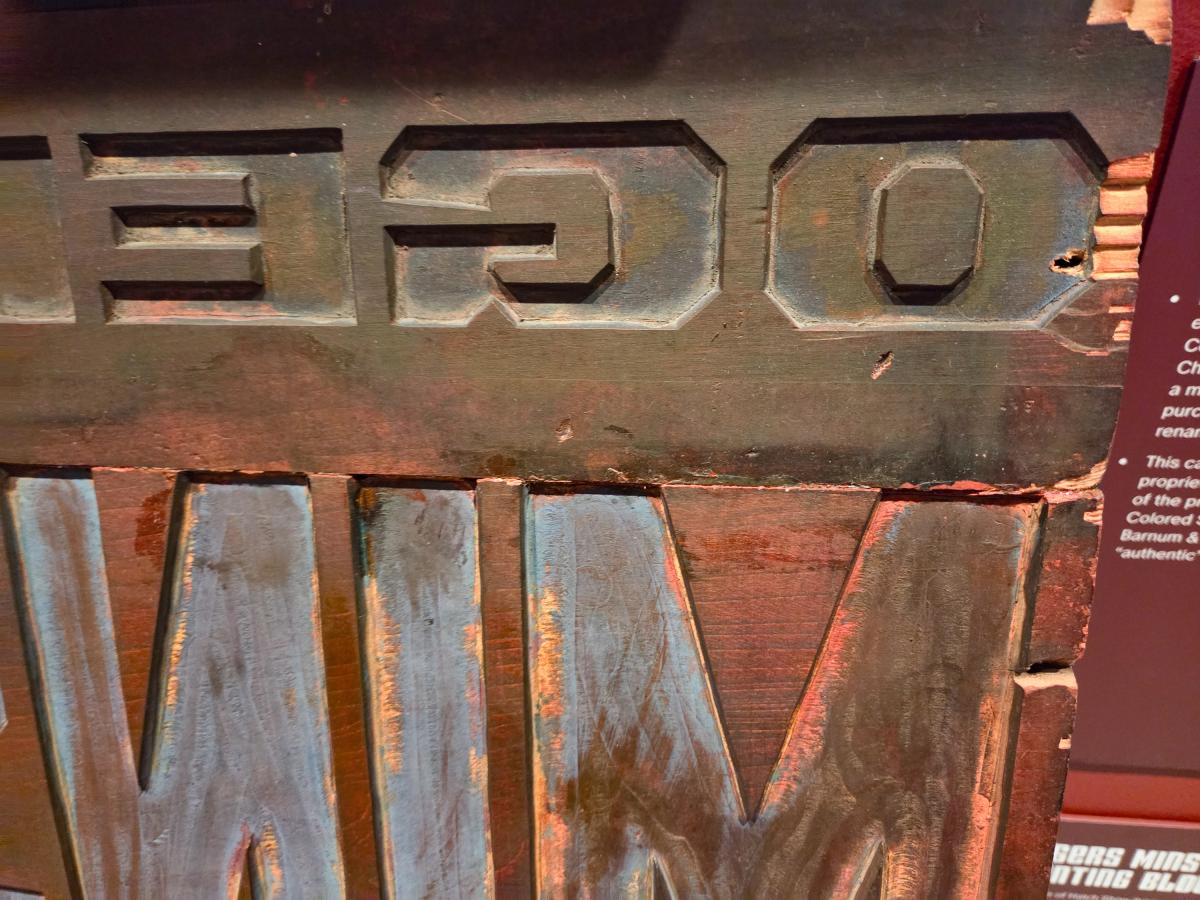
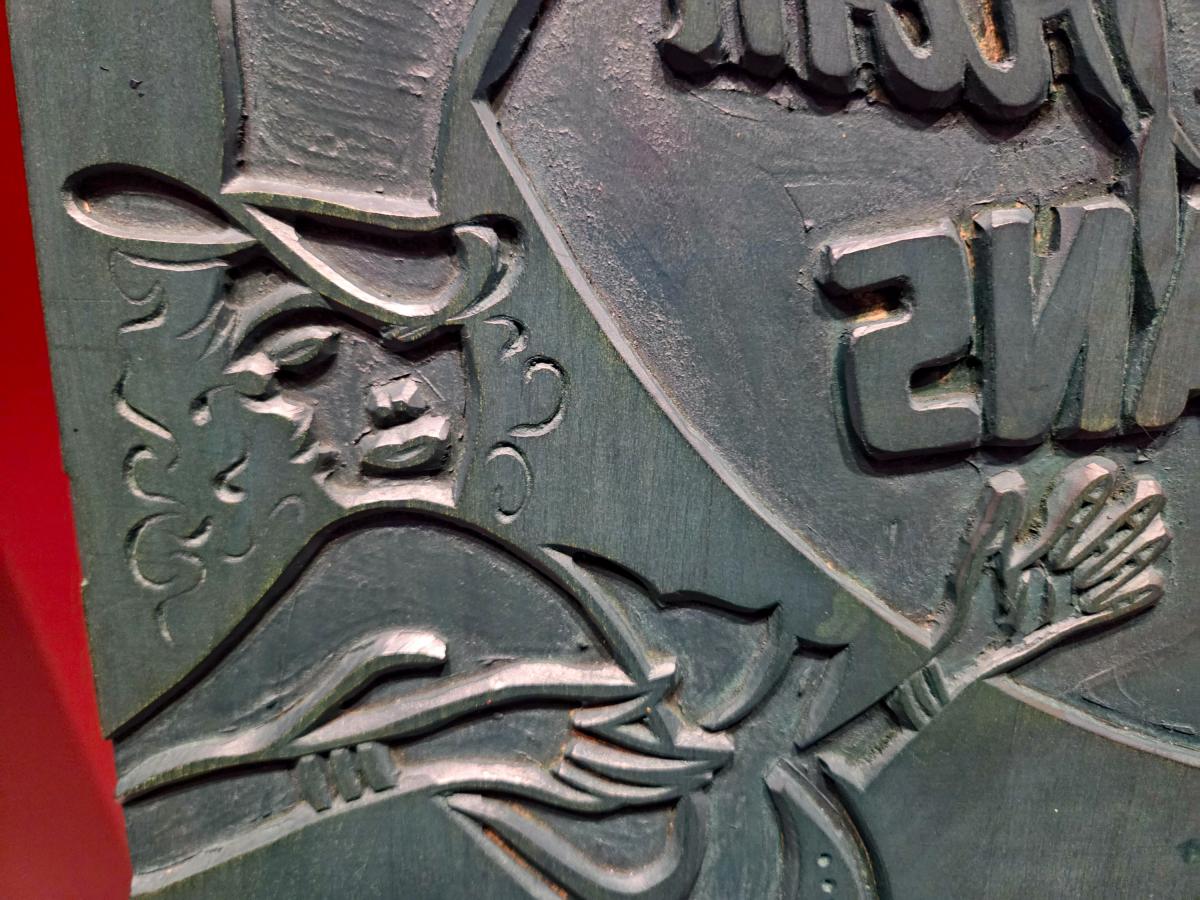
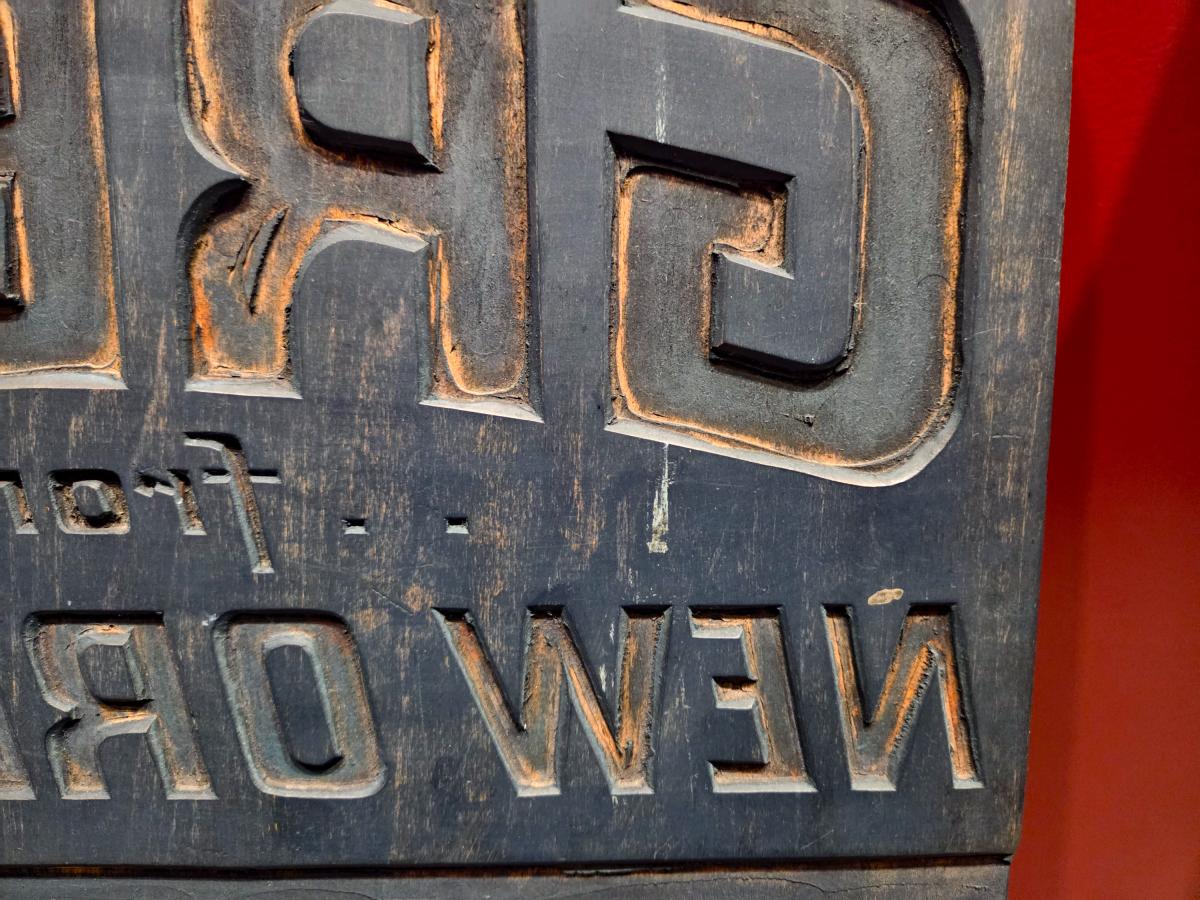
I was at the Poster House Museum, one of New York's best small museums, this past weekend to see their to see their fabulous new exhibit "Act Black: Posters from Black American Stage & Screen." And while the color prints for the movies are spectacular, I was also drawn to the very simple, but large basswood wood blocks that were used to promote traveling shows and other events. These are fairly large blocks, all of basswood, with large blank spaces where you could separately add extra text and imagery for a custom design based on each venue.
The printing blocks in this show are from 1925 or 1946, but the prints are recent "restrikes" made from the original blocks. (As the exhibit noted, heritage printers will reprint from the blocks out of appreciation for the artistry of the posters, but also - more practically - if the blocks aren't periodically used, they will dry out, crack and deteriorate.) This is why there aren't any inserts with details. But this is the type of hand bill and poster that you would see to tell you these acts were coming to town.
Basswood is still a common wood for carving in the US, although these blocks are pretty big. Unlike finer grain and harder woods that can take smaller detail, basswood is a far better material for something easy to carve, in a big vibrant block meant to be noticed from a distance. Most of the details, including the lettering, looks like it was done with a chisel, but there is a fair amount of gouge-work too. The non-printing areas, which are about 3/16-1/4" below the surface of the material, are pretty consistently leveled, which would ordinarily suggest a router for blanking stuff out. But these blocks date back to 1925, so that wasn't likely. These blocks were carved by professionals who knew what they were doing, with a lot of skill involved. The blocks do show some gouge marks that indicate hand work, and since all the blocks are covered with layers of ink or paint, there are probably plenty more that are obscured.
A great show of the practical aspects of woodworking.
The museum's other major show, "Love & Fury: New Yorks Fight Against AIDS," focuses on the AIDS awareness posters from the early days of the AIDS crisis, including the ground-breaking "Silence = Death" project.

 Most of the exhibit had awesome color posters - well worth the visit
Categories: General Woodworking, Hand Tools
Who Made These Planes?
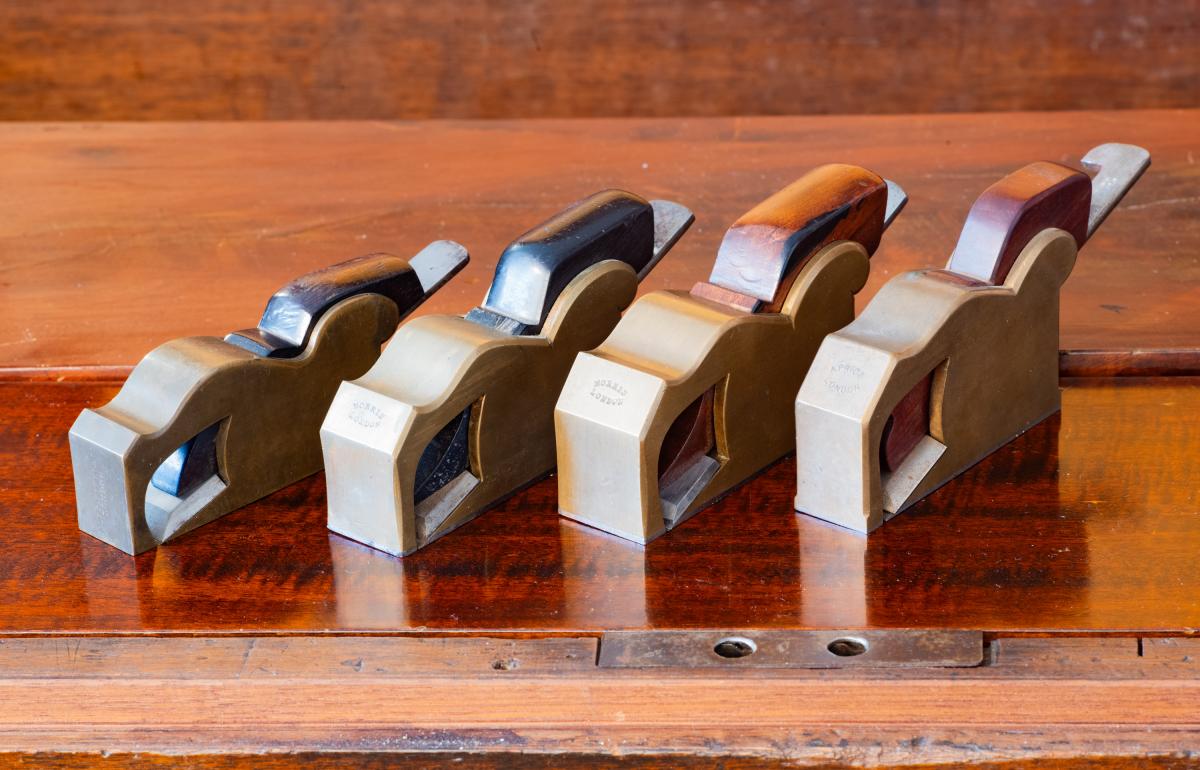
Here are four bullnose infill planes from the late 19th to the early 20th century: the oldest on the left is by Holtzapffel & Co (1828-1922); the two in the middle are by Norris (1872-1943); and the one on the right is by Arthur Price (1924-1967). All three companies were London makers. Bullnose planes are not that useful in a shop, so all of these planes show very little wear. The Holtzapffel plane does not have a steel sole for wear (planes without steel soles are less common that ones with steel soles). The two Norris planes are essentially identical, with the only real difference is the width - 1 1/8 vs. 1 1/4 - and wedges - one has a rosewood wedge and the other one has an ebony wedge. The plane with the rosewood wedge has never been ground and has just been honed a few times.
Who Made These Planes?
We know what brands the planes are stamped with. We also know that Norris didn't have a foundry. At the very least, someone else did their castings. Or did they buy castings from one of the various vendors that sold infill castings and simply finished them? Or did they outsource all their small cast planes like these bullnose planes in their entirety to a special maker that only made cast planes like Slater or Price? Norris and Holtzapffel planes are quite collectible, so we know a lot more about them. But there were many retail sellers of infill planes. For example, in Rd. Melhuishs 1912 catalog, a complete range of infill planes are shown with their own brand. However, while there are "Meluish" planes that survive, I don't know if the catalog branding extended to stamping the actual tool too.
I admit that these questions may not be that interesting to most plane collectors. But for someone like me who is fascinated by the process of manufacturing, these technical questions are very interesting indeed.
First let's take a look at the castings. All of these planes share the same DNA. The castings are essentially the same, but they are not from the same pattern. There are slight differences in proportion in the Arthur Price plane versus the Norris. The Holtzapffel plane is a little smaller. This difference can be attributed to one of three reasons: Each company had its own patterns that they had cast via third party foundries when they needed to make bullnose planes, all derived from the same original design; they all used the same castings from the same vendors and the differences reflect the fact that these planes are made over a period of about 90 years. They also might have purchased casting from one of the various retailers that sold plane castings. The last solution is certainly the easiest. All these makers were capable of filing a casting to clean them up. The hand filed decoration details by the different makers are quite different.
But I think the real answer is that Norris and other companies went to makers such as Arthur Price for small cast planes. The number of surviving Norris cast planes is quite high. The number of early Arthur Price planes is quite low, but the number of Arthur Price planes that date from the 1950s - after Norris closed - is actually high. Normally you would assume that a tool maker like Arthur Price, which stayed in business for a good stretch, would have more surviving planes. Unless the company dramatically altered either the number of planes produced or the method of production, their earlier planes should not be so scarce. This makes me think Arthur Price's early plane-making was devoted to planes sold under other brands. It also makes absolutely no sense for Norris to spend time making the cast planes when they have the special expertise for dovetailing steel planes. Outsourcing was incredibly common. Norris itself made planes for other brands. Robert Towell, the early 19th century plane maker pioneer, made planes under his own brand but also made many planes under other people's brands. As far as I know, Holtzapffel made very little outside their lathes. In general, the practical maker assesses their capabilities and resources and outsources everything for which they don't have a unique advantage. That having been said, we dont have any real evidence one way or another, so my theories are just theories.
I enjoy the premise that planes' commonality of design, and the efficiency of outsourcing, point to a London community of tool makers that supported each other.
I would love to find some documentation about how the hardware manufacturing business worked in London in the 19th century.
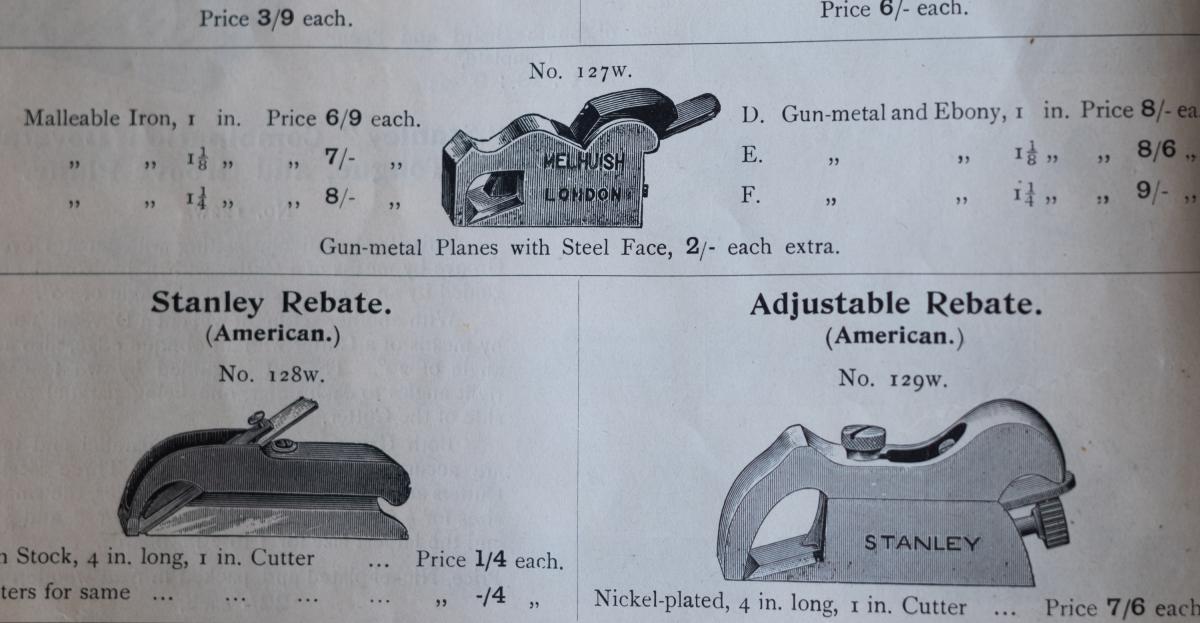 House brand infill planes in the Rd. Melhuish 1912 catalog
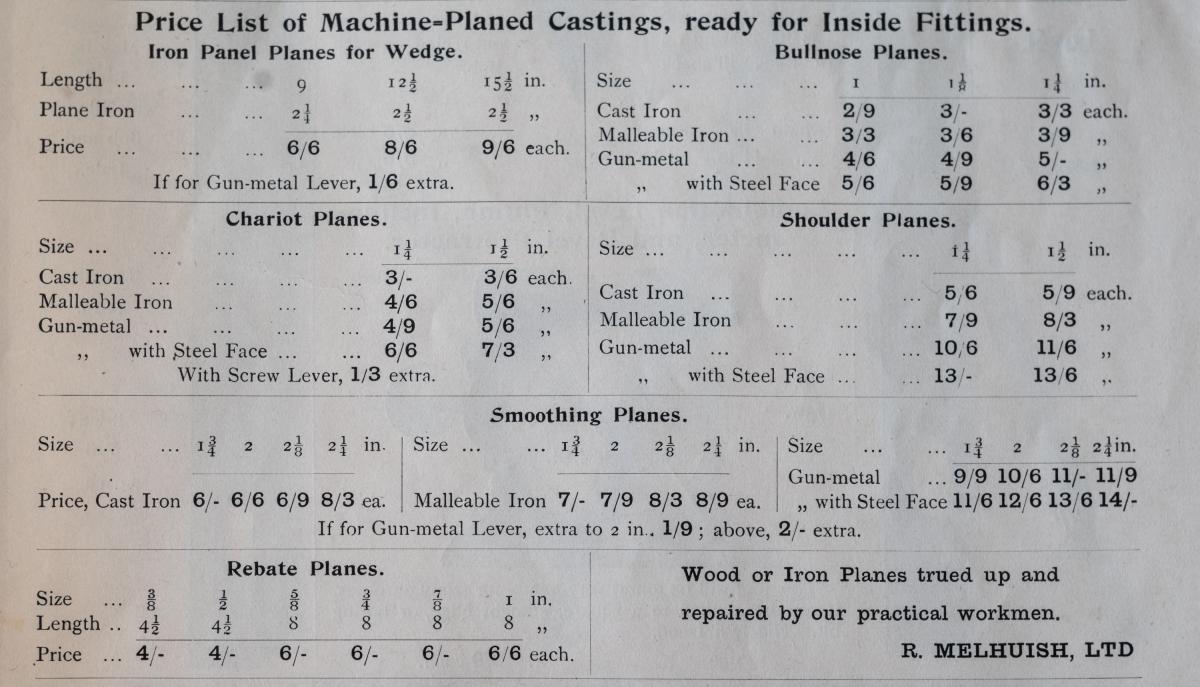 Machined casting ready for stuffing from the Rd. Melhuish 1912 catalog
Categories: General Woodworking, Hand Tools
Some 18th Century Bodger's Lathe Tools
 The set of five bedgers tools in a box
A few weeks ago I wrote about about the actual gouges and hook tools used for mainstream turning - as opposed to the scraping tools used mostly in ornamental turning on fancy hardwoods.
In that post I mentioned that I was unaware of any current manufacturer that makes hook tools today. Since I wrote that I have found a few specialty makers that make machined, beefier versions of traditional hook tools for turning the inside of a bowl. As it happens, while I have no practical experience with hook tools, I own a set of hook tools from the late 18th century made by Salt, a company based in Birmingham, England. Some of the tools look exactly like the images in the various books, and some are shapes that I've never seen illustrated anywhere.
So far I have been unable to track down any details about Salt. I think the tools themselves are probably a set (two of them are stamped Salt, but the others have no markings on them), the case seems a later addition. All the tools show a fair amount of wear - and are not sharp enough for use. The surface finish suggests that they were pretty rusty before they became a collectible. The handles are longer than average lathe tool handles because typically people would tuck them against their body and under their arm when using. The dealer who sold these tool told me that they were 18th century bodger's, or chairmaker's, tools. I have no idea if he is correct. Until I can track down the maker, I won't know for sure. Similar tools were used by chairmakers at least until before World War II.
 The three hook tools in the kit
Three of the tools are hook tools: a tight hook, a larger hook, and a third straight hook that are all right out of Moxon.
 The two "gouges" in the set both have their cutting edges on the inside between the rods
 The other tools look like gouges, but the cutting edges are on the inside of edge of the blade, not the outside, and the insides show extensive sharpening. The general geometry of the way the tight and larger hook tools are sharped, and in particular how they curve down from the handle, suggests that they are designed to work with the shaft of the tool on the toolrest and the cutting edge dangling below the center line of the lathe, shaving wood upwards. Green timber would turn wonderfully this way.
These tools were designed for use with a pole lathe. On a powered lathe, or even a treadle lathe, the added speed could be scary. I haven't had the courage to sharpen them up to give them a try. Maybe when I am a better turning and feel more in control I will.
 This small hook tool is very elegantly bent
  The well worn middle size hook tool that's in the kit
 "Salt" of Birmingham - the maker
Categories: General Woodworking, Hand Tools