Hand Tool Headlines
The Woodworking Blogs Aggregator
“Glory to God in the highest heaven, and on earth peace to those on whom his favor rests.” - Luke 2:14
Be sure to visit the Hand Tool Headlines section - scores of my favorite woodworking blogs in one place.
Norse Woodsmith Blog Feeds
success is fleeting.........
 |
| started with this one |
I got the Linux operating system (OS) on my shop computer with no headaches. This OS blew in a lot cleaner and quicker then the last Linux OS I did. I got Fire Fox set up and signed into my google account with no hiccups. All was looking golden in Ralphie's workshop.
 |
| hmm..... |
Made a left turn to play with the Stanley #59 doweling jig. I was clueless as to what this doo dad was. Labeled 3/16 -1/2 at the bottom.
 |
| test |
Dug these 3 out of the shitcan for doweling them together. Laid out my marks and drilled some holes.
 |
| happy face |
Glued the 3 up with no problems. The joints lines aren't dead flush but well within 1 frog hair. On top is a comparison look between the Stanley and the Dowel Max. I don't have a lot of time on the pond with either one but I can see where one would be easier to use then and other one.
 |
| it had instructions |
Their were two instruction sheets in the box. The one on top of this one was for the dowel making jig. It is a depth stop - goes from 3/16 to 1/2 inch.
 |
| it was working |
I updated the OS with all the updates and restarted the computer with no problems or hiccups. Surfed the internet and YouTube for a while and shut it down.
 |
| ditto |
I went to Best Buy and bought a SSD Hard Drive. OS loaded as quick and easy as the shop computer. Did the same dance steps on this one too. Happy face on.
 |
| came yesterday night |
I cost almost as much to ship as the lime. S/H and the tax were more than the lime itself. I decided to eat the extra cost to get clean Hydrated Lime. This 5 lb pail should last me a bazillion years.
 |
| booting up for the first time |
Good feeling that none of the crappola I endured yesterday shook hands with me today.
 |
| my home page |
This was the last thing I played/checked before bringing it upstairs.
 |
| toast |
Shop computer wouldn't boot up at all. Got nothing but nonsensical garbage. I don't understand what is wrong. It seems the longer the computer is off, the less the chance it will boot up.
 |
| back to the laptop |
I left the computer on and made a run to the grocery store. When I got back I had to sign in because I forgot to remove the screen activity time out. The computer wouldn't recognize my password. Kept telling me it was incorrect. So I shut it off and rebooted it. This is what the screen said hello to me with. I couldn't get it past this screen. It is frozen and won't go past the initial boot up.
Earlier I had two functioning Linux computers and a few hours later I two heavy paper weights. I'm ready to go find my 3lb sledge and do some gentle persuasion with these )(*^&%(@&)_*%!%K! computers.
The only bright spot in the day, other than the initial success loading the Linux OS, was the Stanley #59 doweling jig.
 |
| I'm convinced |
Cleaned the test piece with the #3. Big smile on the face. I remember watching my neighbor 40-50 years ago using a doweling jig. Don't know if it was Stanley but he used it to edge joint boards. The jig looked easy to use and I can see myself using it for a long edge glue up for alignment. Especially so if one or both boards is not straight.
accidental woodworker
Pair of snipe planes finished.
I'm happy with these. They are for my own use.


The blades are modified from other snipe planes. When I get some time, I will forge some new blades.
Closet Update
That’s correct, an update on a project never declared to be underway. To be transparent I’ve done many projects this year that seemed too lowly to meet these pages or my desire to write never materialized.
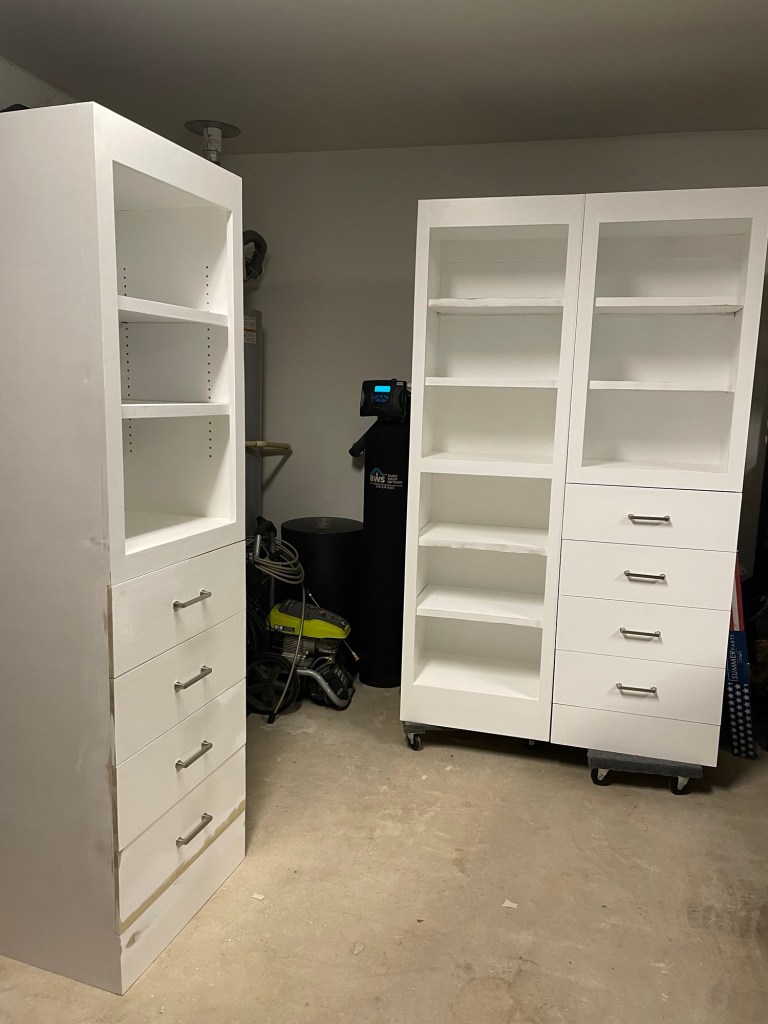
Early this year my largest customer declared that it would be nice to add some drawers and shelves into the walk in closet (for clarity this is not my wife). Noting a sense of urgency I began and after approximately a year have. Completed the build with only final painting and installation remaining. Why a year? It’s all about expectations, why deliver a project in a few weeks if you can spread it out and ensure that requests in the future have lower expectations.
The request was for three cabinets, one shelves only and two shelves and drawers and final color white. My only pause is my poor skills to paint anything white as learned from bookshelves made 20 years ago.
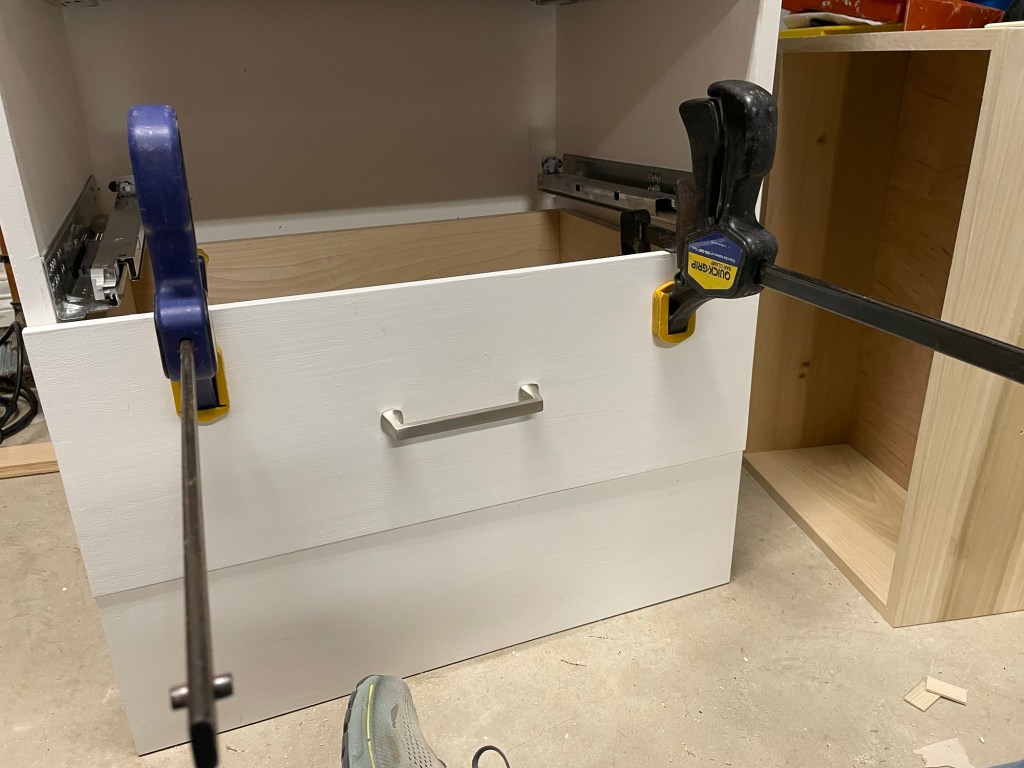
Three quarter plywood back and sides, half inch plywood back, three quarter plywood shelves with one inch trim for finish and strength. Trim around carcass is three quarter hardwood screwed and plugged. Tools – table saw, planer, handsaw, #4 Stanley plane and drill. Obviously mostly power tools. The drawers were put together using a routed joint.

Like most of the last couple of years I enjoyed the power tools challenges and continued to learn skills and techniques.

Yesterday I cleaned up my bench and swept the dust off the floor and turned off the lights. I’m thinking the next project will be mostly hand tools and back to cherry or oak.
ugh......
Today was one of those days where I felt like I walking through liquid fecal matter up to my armpits. Every thing I tried to do immediately went south on a bullet train. There were a few times where I had evidence of things going right only to hear laughter as the light went out. I'll attack this again in the AM and I don't plan on taking prisoners.
 |
| wristwatch size |
The time keeping movement is a lot smaller than what I expected. I gave up on this and shit canned it. I let it go for over two days and nada. The hands didn't budge a frog hair.
 |
| hmm..... |
Yesterday I thought this was pendulum movement and I had lost the arm. It ain't so boys and girls, this is/was a non pendulum movement.
 |
| missed it |
The pendulum movement arm has a magnet and the copper coil - those two are what keep the pendulum arm swinging right and left.
Spent the morning playing and failing with the movement that keeps time and Bim Bams. However, it isn't Bim Baming correctly. It is singing 4-5 minutes before the hour. I played with moving the hands and nada. Came close a couple of times but no cigar. After beating myself up with it for over an hour I said NO MAS.
 |
| another rabbit hole |
My USB stick with the latest Linux Mint OS came two days early. This OS install made me feel like my IQ had dropped down into triple negative numbers. I couldn't get the computer to boot into the Linux OS. I went in and out of the settings so many times it was ridiculous trying different combinations. I tried to install it 7 times and 7 times I failed.
I had changed something in the RAID settings that the computer didn't like. The computer wouldn't even boot up into the start screen. I couldn't get into the settings to change it neither. I cleared this headache by pulling the BIOS battery.
In the end I think I have a problem with the hard drive. One recurring error was that it couldn't find something, it was missing. I couldn't feel any movement in it and I couldn't find in the settings. Not 100% sure of that and I'm kind of rusty with this. New Solid State drives are only $40 or so. If I change this it will be the last thing I try with computer. I have dumped enough $$$ trying to revive it.
 |
| dark as I feel |
I looked and I think this computer will accept legacy IDE hard drives. I'll think about that over night.
 |
| the bright spot |
I got Linux installed on the shop computer. Got the network connected and it was looking like people were dancing in the streets of Mudville. That didn't last long.
I messed up jumping ahead of myself and crashed the install. I tried to reboot it but I got a scrolling line of numbers. I was beyond frustrated at this point. The urge to give both of these computers free flying lessons was making my toes tingle. Killed the lights here and I'll attack this one in the AM too.
 |
| before I left |
This is a Stanley doweling jig and it was on the table with the shop computer. Forgot I had it. To calm myself I made a bunch of holes. This is a slick and well designed doweling jig. I assumed that it was crude and not worth the calorie count to use. I was wrong, so very wrong.
The vertical scale on the right is for the center of the dowel hole. The short scale on the left is for the size bushing. You align the bushing size with the measurement on the right scale. Changed my mind an opinion of this. I will definitely be considering using this in future projects. The one bright spot in a overall dismal day.
accidental woodworker
My Completed Sofra Table: Carving, Finish with Lessons Learned
The sofra is now complete, and to my eye, the table looks good. I am very happy with how it turned out. The carving in particular stands out to me. I like it a lot and would like to repeat this style of carving in future projects.


Years ago, I used to follow a woodworker in Russia on YouTube who carved the most beautiful work I have ever seen. When my account was hacked, I lost everything and with it, I lost track of his channel. I do not know his name, and no matter how much I search, I only seem to get results from western countries. That is disappointing. I would really like to see how people in other parts of the world work wood and approach their craft.
The finish I used on this table is food safe. My preference for food safe finishes is tung oil thinned with a citrus solvent. You cannot use mineral spirits or turpentine to thin tung oil. They are petroleum based and not suitable for a surface that will be used with food. It is also important to use one hundred percent tung oil, not a blend. Many products sold as tung oil are mixed with other oils or varnishes. If you want to buy it, I highly recommend this company. You purchase directly from the source instead of through shops, which are middlemen, so the price is much lower. https://www.sceneys.com.au/product/tung-oil/
The citrus solvent is ridiculously expensive. A 4-litre (1-gallon) can costs $176. That’s why I only use it for food-safe projects and never for everyday work.


I prefer tung oil over mineral oil because tung oil actually cures. Once cured, it hardens within the wood and provides real protection. Mineral oil never cures. It stays liquid, continues to weep out over time, and needs constant reapplication. Tung oil, once cured, is stable, durable, and better suited for a table that may see regular use.
Tung oil takes about four weeks to fully cure. The table should not be used before that time. It may be possible to serve food on it with a tablecloth under the plates, but I am not fully confident recommending that before the cure is complete.
The legs of the table are turned and foldable. Unfortunately, the folding brackets are poorly made. I bought them from Amazon, and they took a month to arrive. On one leg, the rubber pad you press to activate the spring was torn in several places. After attaching the brackets to the legs, another bracket failed, and the leg now flops around.


None of the brackets properly secure the legs or lock them upright. You only press a lever to unfold the legs, but there is no solid locking system. Every bracket is flimsy, so the legs rattle instead of staying firm.
Lastly, the screws supplied with the brackets are very weak. You have to turn them slowly and gently, even when using a pilot hole. If you are not careful, the screw head can snap off, which is exactly what happened to mine.
If I were to make another table like this, I would spend more time searching for better quality folding brackets, assuming they exist. The table itself deserves better hardware than what was used here.
Dining Room Renovation
Welcome back folks, it’s been a while. A lot has happened over the past few months, and despite my best efforts it’s been hard to find the time to sit down and write. There’s so much I’d like to share here on the blog but between commissions, teaching, and the house renovation, time has become… Read More »Dining Room Renovation
The post Dining Room Renovation appeared first on Big Sand Woodworking.
now I wait......
I had my follow up CT scan. It was over and done with in less then 3 minutes. Remarkable technology done with magnets. I don't know when I'll get the results. The doc will review that and the pulmonary function test I did last week. Can't really say how I feel about it. It could be good news, no cancer, or bad news. Either way I'm not going to obsess about it until the doc tells me the results.
 |
| happy face on |
The router powered on and off with no hiccups. Turned it back on and cycled it up/down with the variable speed dial. Still haven't checked on the handles - I get the heebie jeebies every time I think of doing that.
 |
| it is all good |
Sometimes memory changes can be a hassle to straighten out. The 12G I replaced had 3 different makers which isn't a good idea IMO. All 24G I installed is from the same maker and all are the same amount. Just need to get the latest Linux on the USB drive. Checked that and it is supposed to be here on monday.
 |
| set for 1000 |
The minute hand is 30 minutes off but the Bim Bam sounded off on 1 thru 12 and then 1 to 10. I'll be using this movement for the clock project.
 |
| hmm....... |
Haven't figured out where to place the speaker in the clock case. There isn't a lot of wire and that will limit my choices. It doesn't sound muffled at all laying against the 1/4" plywood. It might though up against 5/8" thick solid cherry.
 |
| feels solid now |
This movement is for a 3/8" thick dial board and I plan on using 1/4" plywood. With a 1/8" thick plywood spacer along with a rubber washer, the movement is tight and secure now.
 |
| cleaning up the wood species frame |
Still wavering on completing this or sticking it in the boneyard. While deciding that fate I cleaned up the back frame which is butt jointed. No reason to go nutso on it . Flushed the four corners and checked them for square. Not necessary but I had nothing else on the hit parade to occupy my time.
 |
| planing all front facing surfaces |
Paint lays down better on smooth surface. I will go over the entire frame with water to raise the grain before I slap any milk paint on it.
 |
| worth it |
None of this will be visible if this is hung on a vertical surface. I did it mostly for the practice. I checked and corrected as I planed the edges square.
 |
| how? |
I was getting ready to put this aside because I thought I was done with it. Clueless as to how this chip/blowout happened. There is also one on the diagonal corner to this. Super glue and blue tape fixed it. Before I planed it I had scraped all the glue squeeze out off, inside and outside with a carbide scraper.
 |
| hmm..... |
Giving it a try but it ain't working. The far edge looks kinda ok but the front edge is torn out. That aside it still didn't look like a 1/4" round over.
 |
| hmm...... |
None of the four round overs seem to work nicely. I couldn't get the same shavings pushing and pulling the tool. Since sharp solves a lot of headaches I sharpened the four of them with the supplied sharpening doo dad with 320 and 500 grit sandpaper.
 |
| not much help |
These still weren't working that good. The shavings were a wee bit better and easier to make but they didn't feel reasonably sharper in use.
 |
| much better |
Nice shavings and they were about the same pushing and pulling. I used ceramic hones and slip stones to sharpen them this time. In spite of the better shavings, the round over still looked lopsided. There is no way I could use these to make a round over for the moldings on the wood species poster frame.
 |
| hmm..... |
The larger round overs (3/16" & 1/4") were larger enough for the ceramic hones and slip stones. The two smaller ones (1/16" & 1/8") were too small for the ceramic hones and slip stones. I made some small dowels to wrap sandpaper around that worked.
I didn't have a warm and fuzzy about sharpening these. Do you sharpen/hone both sides of each size? What I did was to lightly rub the flat side (bottom part in the pic) with 400 grit to knock back the burr. I used from 240 to 500 grit on the other face that makes the shavings (far top of the pic).
Another thought occurred to me while I sharpened these - will repeated sharpenings enlarge the profile hole? The four round overs are 1/16", 1/8", 3/16", and 1/4".
 |
| ready for paint |
My hydrated lime for making milk paint is coming tomorrow. I've been reading my book on making milk paint reviewing the recipe and I'm ready to try it. Blue for the miniature chest and black for this picture frame.
accidental woodworker
Known By Their Fruits

A chisel or plane leaves its trace identity in the surface of wood in similar fashion as the shell of a bullet discharged by any firearm identifies the gun, but not really the exact same. With a firearm, there are several distinct mechanisms that make the shell casing at different points, and prosecutors can use these as evidence to identify the gun. Our forensics are slightly different in that the working of the tools, leverage points, indents, and such tell us how the manmaker worked at different points and in different ways. I can tell when he was in a hurry, which was most of the time, and when he stopped to sharpen up. Mahogany transfers the information as it takes it in impressions from the tool being used and then, as in the case of these drawers and other parts, keeps the 'trade secrets' for later discovery. I have learned more through the decades of dismantling pieces than I can possibly put together, and each piece tells its unique story. This craftsman undercut here and compressed the pins over there. The wood absorbed his rushing mostly, but then he lost it a couple of times in frustration. I'll likely keep most of those because, all in all, this man-maker had integrity, and that integrity was reflected in many ways of his making.
Before I move too quickly along, I should point out that the veneers of the past were not the fake facing of today's sheet goods and mass-making industry designed to hide the fakeness of MDF and pressed fiberboards. Adding veneers enabled artisans to do things that would be otherwise impossible with solid wood. Facing veneers enabled sequential book-matching to guarantee tones and grain patterns for the fronts of pieces, as in the case of these drawers. Mahogany can be so diverse; were the real and solid to be used instead of sequential flitches of veneer, the drawer fronts would likely be far too busy for a harmonious look to give good balance and even tone to exist. There's much more to it than that too. But there it is, the starter. The image below shows how a softwood clear soft pine was used for an 11" wide drawer front to be faced with mahogany and lipped with a thick edge for the massive drawer of a wardrobe bottom drawer.
 It looks like it, but no, it's not solid mahogany but a thicker veneer on softwood.
The pine with the veneer is 21.3 mm thick, and the veneer is .75 of a millimeter, so 10 times thicker than face veneer on our modern-day decorative plywood.

My drawers had been somewhat mistreated before they ever came to me, and I have dragged them around with me for a few years, hoping I could repair the desk to reframe them one day. But alas, time gets away from us and becomes ever more precious as we continue to grow our output for the conservation of my craft. These six drawers have actually made it pretty well thus far, so I decided it would work best to make a new case from old wood I have also garnered from different scrappy places through the years. I've collected several panels and tabletops to do it from and plan to make a small chest for all of my art materials that I have scattered everywhere in the hopes that a central location will organise me a little more.
 The French polishing with shellac has preserved the wood really well here. The panels are dead flat because the wood was quarter-sawn and book-matched for grain and colour matching. Another skip find!
Imagine this wood was being thrown into a skip (dumpster, USA), trashed, on or about 2017/18, and the trasher-person was a woodworker who said to me, "Why would anyone want this stuff anyway?. Those three panels are about seven feet tall, 1/2" thick, and single-piece wide at 15". My cabinet will be paneled with one or two of them on three sides.
 Drawing out the dovetails to one side of three of the drawers and checking the widths and angles, encapsulates the reality that you have not seen it until you've drawn it. The smaller, left hand dovetails were really very inaccurate, even though for the most part the dovetails matched the recesses in width and aligned with the pins.
So, let's dissect this a little. The dovetails, as in the angles, fit well enough, but it's obvious that some were dead-on angles and some were not evenly or equally made. On one drawer the angles follow a 1:7 pitch on all three tails and both sides of the tails, whereas on another drawer they were entirely random in angle and size. This suggests to me that there was more than one man working on the piece. Was one an apprentice or a journeyman? Could one of them have been on equal standing as in fully trained but more slipshod in his ways?
Here are some questions with the pictures:

 1: Why did this maker take a saw to each corner of the appliqued drawer bottom groove at the back of the drawer when no one would see it, ever? On each of the drawers, he cut this corner off, in situ, after the drawer bottom was screwed in place.
 2: Why, out of the six drawers, did this drawer bottom split where the screws anchored the drawer bottom to the drawer back?
 3: Why was this common dovetail gappy at the back but with no gap on the inside corner?
 4: Why were so many repairs required to the front face marquetry veneers, especially at the corners?
 5: Why did the maker use planted or appliqued drawer grooving instead of ploughing the grooves directly into the drawer sides?
No picture for this one yet, but...
6: Why did he use poplar as the secondary wood even where it could be seen in place?

The drawer sizes are surprisingly accurate in that all of the drawers are equal in their overall width and length to one another, dead on 11" wide, and when they are stacked up on top of one another, they each stand square and in line with one another from front to back, top to bottom, and side to side. Furthermore, these drawers went into two separate cases in lots of three, diminishing in drawer height from top to bottom. I'm regretting using the word "surprisingly accurate" but kept it in. Perhaps I would consider my own work as accurate as this work in the overall reality of being a lifetime maker trained and training in handwork with hand tools for so very long.
The wood shows no sign of any machining whatsoever, and telltale marks tell me of handwork alone, and in different places where I have planed over existing surfaces, it has obviated hand-planed surfaces, chisel work, and handsawing all the way through. That's because there were undulations I would never consider inaccuracies per se. Such surfaces can only come from hand-planing in the course of truing and fitting them, and so too the saw work.
I have more to share on this and will also give my answers to the above questions shortly too.
Known By Their Fruits

Skullduggery on eBay
Small Chest of Drawers
OK, so way back in July, I started on this project. Then knee problems made it more complicated to get in the shop. Over the second half of last year, I gradually got most of it finished. And finally 6 months later it's complete.
The wood is reclaimed red alder. The main carcass is about 5" x 8". The sides, top and bottom were 3/8" thick, the dividers 1/4". Drawer parts were 1/4" or slightly less thick. Here's the build in pictures and captions, with a little prose thrown in as needed.
 |
| The four sides arranged |
 |
| First corner tails cut ... |
 |
| ... and assembled with the tailboard |
 |
| Dadoes for drawer dividers laid out. You can see on this board some screw holes - the price of using reclaimed wood. All screw holes were on the inside, back or bottom, so will remain unseen. |
 |
| Grooves to house the back are done |
 |
| Carcass dry-assembled |
 |
| Using the mini router plane to level the dadoes |
 |
| The main carcass dry-fitted with dividers |
The drawer sides were made from poplar, with a 1/8" ply bottom. Each drawer had a single dovetail at each corner, and the bottom was glued on to the underside. Later, a red alder front was glued to the drawer box and a handle was added.
 |
| A drawer box coming together |
 |
| Two drawers with bottoms being glued on (one in the end vise, one in the back corner of the bench using weights as a clamp), another drawer's parts being sized and made ready for dovetailing |
 |
| Drawer dovetailed |
 |
| Three fitted |
 |
| Experiments with handles. I'm going to write a separate post about making these. |
 |
| Now for the feet: making a template |
 |
| On a 1/2" x 1/2" blank, cutting close to the line ... |
 |
| ... and finishing with flat chisel, incannel gouge and file |
 |
| After mitering the ends, gluing two together to create a foot |
 |
| Gluing on a foot. Note the air-release holes in the back. Without those, when you close one drawer, others get pushed open. |
 |
| Four feet in place |
The piece is finished with shellac, followed by a coat of wax. The following pics don't show it well, but it got a nice luster and reflects light nicely.
 |
| The finished product |
 |
| Another view |
This is going to my 2 1/2 YO granddaughter. She might not appreciate it just yet, but hopefully later she'll have some jewelry or other treasures to put in it.
End to side-edge joinery, part 2
Planes
Enjoying making planes lately.


I enjoyed making the hollow so much, I decided to make a pair of snipe planes. The business part of a snipe is a fine point, so it needs to be tough. English planes are traditionally 'boxed' with....box. The boxing is secured into a dado with hide glue.


After the glue has set, profiling of the sole of the snipe can happen. A bit nerve-racking, with such a fine edge to be achieved, and on an expensive piece of timber; box takes a long time to grow into small diameter trunks!

First plane of the pair finished.

doctor day plus........
I had an appointment at the VA this AM and I have another one tomorrow in the AM. I had asked while I was at the VA if I could get tomorrow's MRI done today but there were no cancellations. In the PM I had to take my wife for her last colonoscopy. Because she will be older than 75 for her next one, she (me too) won't have endure the day before prep. Needless to say not much shop time neither today.
 |
| came last night |
Finally got all my slots filled with 21 gauge pin nails. I've had this nailer for several years and I've found that 5/8" nails are used the most followed by 3/4". Came last night and opening the containers was a (@^%)Q_)@#^%&)_)@*%*_ PITA. It took me several minutes to separate the two halves. On the bright side at least I had the strength to do that.
 |
| still good and square |
The corners were surprisingly pretty much flush. Thinking of painting this frame with black milk paint.
 |
| day late |
The current memory in my desktop is 12G and I bought 24G to replace it. When I saw the cost of the 4G sticks I didn't hesitate to pull the trigger. Back when I did computer repair etc, a stick of memory (name brand) was about 70-80 dollars a stick. Generic sticks were roughly half what name brand was.
 |
| last one |
Three sides glued, nailed, and clamped. Last one going in before lunch and then off to take my wife to her medical appointment.
 |
| big happy face on |
The movement spat on the Bam Bim for the 3rd hour. The time is working even though it isn't correct. It is keeping the correct 'time' when compared to my shop clock.
 |
| hmm...... |
Booted up the computer and it recognized that the memory had been changed. Ran a quick diagnostic on the memory. That was enough to imprint the memory into the BIOS. More importantly the computer recognized and tested all 24G without any hiccups.
 |
| first memory test |
The CPU on this computer has 4 cores and although it is over 15 years old, it is more than adequate for my needs. I like to run both memory tests as I have had pass on the first test and hiccups/errors on the 2nd one. This test reads/writes/reads all 24G into memory on all four cores.
 |
| 2nd memory test |
The first test takes less than 10 minutes while the second can take well over an hour. I let this run while I my wife to her appointment.
 |
| done |
At least the woodworking is almost done. I still have to make and apply the beading moldings to the inside and outside edges. Teetering on the edge about whether or not to complete this. Is it worth the expense to have Maria do her thing on the frame? I do have one spot in the boneyard where I could hang it.
 |
| look what I found |
I forgot that I had this. I bought this 20 years ago(?) and used it mostly to cope and stick rails and stiles. Just eyeballed it and didn't try to turn it on to see if it would power on.
 |
| 1/4" collet |
Lucky again that I found this box that had some accessories for the router in it. There is a 3/8" collet for this too but I have yet to come across a 3/8" shank router bit.
 |
| hmm...... |
These are where the handles go and they are MIA. They weren't in the accessories box. I doubt that after all these years that I'll find them anywhere in the shop. A quick look see on the part websites weren't encouraging. Three of them said to call for availability and pricing. That usually means I'll have to take out a second mortgage to buy them. By the way the screw that secures them is no longer available on any of the sites.
accidental woodworker
The Centipede's Dilemma
The centipede was happy, quite,
Until a toad in fun
Said, “Pray, which leg goes after which?”
This worked his mind to such a pitch,
He lay distracted in a ditch,
Considering how to run.
-Katherine Craster
The magic happens on the morning of the second day.
I have noticed a certain pattern in my woodcraft classes. Regardless of the subject, the first day is a bit of a hot mess. I like to think I am offering solid instruction and good tips, but there is so much for students to keep in mind–how to present the blade safely and effectively, how to control the bevel, and what shapes and designs to pursue–that they are on overload. From a brain science perspective, their logical, prefrontal cortex is simultaneously juggling instructions and directing the body’s actions. Students internal dialogue in a turning class might be something like: “Bend your knees, place your tool on the rest, grasp the flute with the left hand while the right hand holds the handle against the body for stability, now present the gouge with the flute closed and “find the bevel,” then twist the flute open about 20°, adjust the tool handle 20° toward your body and the cut will start, drop the handle for more sheer and less scrape, remember to float the bevel and not press too hard into the surface, quiet your upper body, picture the curve you want to create, transfer weight from your right leg to your left leg slowly in a movement that looks similar to Tai Chi, and off you go.” There is a lot to think about, and it is exhausting.
On that first day, students practice what psychologists call “explicit monitoring.” When you are first learning a physical task, the prefrontal cortex watches closely and tries to direct the action. This logical “commentator” part of the brain does its best to perform this new task, but its direction is often clumsy, herky-jerky, and almost always late. It is a bit like asking the brain to tell the hands to lift the legs in order to walk. Or if you are learning to play the drums, by the time the “commentator” side of their brain says “now!” and the hand moves to strike the drum, the moment has passed, and the sound comes late. All of this takes a lot of energy. By some estimates, the caloric demands of a hard-working brain are as much as 20% of the body’s total glucose stores.
With practice, tasks shift from the prefrontal cortex to the cerebellum, which is the portion of the brain that controls learned motor skills. This is the “doer” part of the brain, which we access when we ride a bike or press a car brake when the light turns red. It allows us to act automatically, smoothly, effortlessly, without conscious thinking. Once the cerebellum can perform a task, we have achieved “muscle memory,” allowing us to move fluidly and instinctually, like an athlete playing a game or an artist creating a gestural drawing, and freeing up space for the prefrontal cortex to think about other things.

Obviously, it takes time to shift knowledge from the prefrontal cortex “commentator” to the cerebellum “doer” (to my students’ great distress). That said, there are teaching practices that can accelerate this transfer. Here are a few:
Slow-Burn Repetition: Engaging the cerebellum involves establishing neural pathways, and nothing does this like repetition, especially slow, mindful repetition. When you increase the time under tension, muscles establish more neuromuscular connections, activating more muscle fibers and teaching the brain greater coordination. Like learning scales on a guitar, careful and deliberate practice is the key. In a multi-day carving class, have students practice knife grasps on practice sticks, being mindful of feeling the bevel, skewing and drawing the blade across the wood, thinking about what muscle groups are being engaged, making micro adjustments to the grip and posture.
Visualization: Ask students to visualize themselves performing the task before they actually perform it. When learning a new skill, visualization on its own is nearly as effective as actually doing that task in developing neuromuscular pathways. One great strategy is to ask students to visualize an action right before they perform the action. Be sure that students visualize the steps in the process, not just the final result. That said, being able to imagine the shape you want to create is an important part of creating sculptural forms, and drawing those shapes is an invaluable part of visualization.
Compression: When teaching a complex skillset, it is a good idea to find ways to help students reduce those skills to a manageable size.
First, select the most important ideas to teach and avoid the temptation to cram everything into the first few hours of class. I have seen some pretty spectacular craftspeople make the classic new-teacher mistake of talking for half of a day about everything that students need to know while the class gazes longingly at the tools, or worse, glazes over. Instead, first teach just enough to get them safely started, especially the gross motor skills and the big movements, and let them at it. Once students have the basics down, you can then make the fine adjustments to their technique. Trying to impart the subtleties of a craft to a student who has not yet experienced the basic movements is a bit like trying to hang ornaments on a Christmas tree that is still lying on the ground.
Second, help students make associations to related ideas. I begin every class by asking students about their experience with woodworking and other forms of handwork. If I know that a student has an understanding of casework, I might reference how skewing a hand plane or a draw knife is similar to how we skew a sloyd knife.
Third, “scaffold” your instruction by teaching skills in a sequence that builds on the ones already learned. For example, in a carving class, I teach knife grasps in an order that builds on the grasps already learned.
Fourth, “chunk” ideas into small patterns that are memorable. For example, when I teach turning, I talk about the “ABCDs” of taking a cut: Anchor, Bevel, Cut, Dance.
Finally, name the skill when a competency is performed. My students often remark on how excited I get when they do something right. What they might not recognize is that I am both reinforcing the behavior and helping them recognize what they are doing correctly as they are doing it. “Yes!” I exclaim. “Nice push cut!”
Recall. We learn when we are asked to recall and synthesize information, putting ideas into our own words and integrating them into our existing mental framework. The more often we recall information, the deeper the lesson nests in our brains. In a classroom setting, teachers might use the Socratic method, habitual journaling, or regular quizzes to achieve this. In a workshop setting, craft educators may teach a series of steps and then ask someone to summarize back what they are going to do. Or when a student is about to perform a task, I might ask the student to describe what steps they are about to take. Often, more experienced students will offer guidance to other, newer students in class. I encourage this, as teaching is one of the best ways to recall and synthesize what you know (just make sure they are giving good advice!) Finally, I provide my students with extensive notes on everything that we discuss in class, so that they have something to review once they get home.
Rest. We learn through bursts of intense effort followed by rest. When we rest, even for just twenty seconds, our brain plays back the lesson at ten to twenty times the speed at which we learned it, compiling information and beating paths across our neurons. Like exercise, the benefits of hard work are only realized after a period of rest and recovery. This learning cadence is called the ultradian cycle–learn, rest, learn, rest. For the craft educator, habituating regular breaks is super important, but it can be hard for students to take a break, especially if they are really invested. If you explain your process to them, set a timer (say every 90 minutes) to announce the start of a break period, and force them to put their tools down, stretch and hydrate, walk around to admire each other’s progress, for maybe 10 or 20 minutes, your students will see great benefits. Not only will their brains process more, but they will also see their own work with fresh eyes or in a new light, and even build community and connection with their classmates, which makes for a better experience for everyone.
Finally, related to rest is the importance of sleep. I don’t mind teaching quick, one-day classes, but the benefits of sleeping on a lesson are really obvious. When we sleep, our brain replays what we have learned that day, building pathways across our consciousness and internalizing lessons. It is while we dream that ideas are transferred from the prefrontal cortex to the cerebellum, and when we wake, our muscles remember. (Fun fact: some studies show that when we sleep, we are actually replaying what we learned in reverse. Bonkers!)
If I do my job right, on the morning of the second class day, something truly special happens. Students enter the class, stare blankly at their projects, and exclaim, “I have forgotten everything!” I assure them that it will all come back, offer a few prompts about where to start, and they pick up their tools and begin again.
And then the room goes silent.
They might ask for a few reminders here and there, but for the most part, the students are “flowing” through their tasks. They are simply doing. It makes me want to hold my breath, afraid of breaking the spell, not wanting to be the toad in the Centipede's Dilemma.
Easing Back In
After being out of the loop for the past three weeks I’m finally easing back into the world of donsbarn.com. My first stretch of being out of circulation was sublime as the clan gathered to celebrate the Incarnation. An extra special treat were the hours spent in my basement workshop with two of my little guys, repairing toys and explaining all the tools. That tradition will continue for the rest of my life.
The second interruption was pretty ridiculous as I’ve been fighting Fauci Flu for the past two weeks, including a bizarre visit to a clinic that refused to offer any pharmaceutical response strategy other than some piddly cough drops.
Anyway, I recently reflected on the fact that two of my most faithful blog correspondents, PM and PM, have nearly the exact same name and they are a great source of things for me to look at. This video came from that route and is immensely entertaining.
Looking forward to resuming a vigorous schedule of activities here in Shangri-la.
a different this and that.......
 |
| will it keep time? |
I'm taking the clock movement hiccups one step at a time. Set the clock up to see if it will keep time. Yesterday I hadn't done that, I was just listening for the Bim Bam.
 |
| nada |
It has been 20 minutes and the hands haven't moved. I don't have a warm and fuzzy with this movement.
 |
| movement #2 |
This one appears to be keeping time. I saw movement in the hands in less than 5 minutes.
 |
| hmm....... |
Been about a half hour and the clock seems to agree. I left this as is to keep on trucking. After a couple of hours the time was working but no Bim Bam at all.
 |
| this is odd |
There is no way to connect a battery on this side of the movement. But it shouldn't be necessary. The two C cells on the right drive the speaker and one AA battery is sufficient to run the time.
 |
| hmm...... |
The pendulum swinging arm is MIA. Couldn't find it anywhere in the shop. Noticed that the back of the movement case is not fully seated. Problem solved? No. A gear was rattling around in the case that I put back. 20 minutes later, still no movement in the hands and nothing out of the speaker.
 |
| picture frame time |
Ripped the stiles and rails to a rough width. Make one edge flat and straight. After the other three were done, I ripped them to the final width.
 |
| one dry fitted picture frame |
I doweled the frame together - 3 dowels at each corner. The frame is square with the diagonals less than a 16th off.
 |
| dry clamped and still square |
I couldn't get a tape measure in diagonally because the clamps were in the way. This is my largest pinch rod and I only had 4 frog hairs left to extend. As an aside the diagonal is 47 5/16".
 |
| sigh |
I was being careful but I was not double triple checking myself. Filled in the errant holes and I had to redrill one hole on the other three.
 |
| double triple checking it |
The inside dimensions are 2" more than the size of the poster. I didn't fully think this all the way through. Eyeballing the size of the frame I can see I don't have a chance in hell of hanging this anywhere in the shop or the house.
 |
| back frame stock |
I got all the back frame stock out of the extra stiles and rails I ripped out. I had four extras that decided to perform stupid wood tricks. Fingers crossed that I'll be able use them. They are thin and I should be able to position/secure them as needed.
 |
| glued and cooking |
Still square when checked with a square and the diagonals were dead on.
 |
| nope |
I'm not happy with how this is coming out. Getting lots of tear out and the beading planes are constantly jamming. And this still isn't done. I still have to rip/plane them to the final width.
I broke down and bought a small portable router table top. My trim router should fit the predrilled plate. I have a 1/4" beading router bit to use. I looked on line for a smaller beading bit but I couldn't find one.
accidental woodworker
My Life's Luxury

I have spent the last five years designing and then making pieces for a real family living in a real but quite ordinary family home. The average UK or European-sized home is more compact than those I came to know in the USA and Texas, and I chose this because globally, it was better to try for a more average size anyway. Whether people live in a cottage, a high-rise, in a single-wide mobile home, or an apartment, the ultimate goal was and is to teach and train other woodworkers how to make furniture solely using hand tool methods and embracing the whole of working with hand tools at that. I use a bandsaw for stock size reduction only. Not everyone in will be able to rip-cut 4" thick hardwood using a handsaw for many good reasons. I am using the house we bought quite publicly as a house to live in, but then also as a vehicle to showcase my made pieces in a real-life setting. The workspace I've used to make these pieces is the exact size of an average English single-car garage, so around nine feet wide by sixteen feet long with a headroom of around eight feet.
A bandsaw is my only freestanding machine. This blog post proves the efficacy of what I have taught others over three decades. It's not a powerful beast, just a sixteen inch version that costs around £1200 and takes only a small amount of floor space. The base measuresIt was in November 2020 when I started designing and making the first prototype for the house we refer to as our Sellers' Home, which you can find under sellershome.com if you ever want to join us. All of the 40 or more pieces we have now made and filmed were made in a space the size of a single-car garage. The designs are my most recent designs and are original to this five-year program. Nothing is copied, and none of them were made prior to November 2020. By mid-March 2021, I had made four of the rocking chairs shown below; by then, I was truly settled on a thorough, practical design. I felt that anyone with some basic woodworking hand skills and no machines could make one for their family home.
 When clamping is possible it my well be impractical so why not drive a screw and leave it there, tucked in beneath a tabletop that will never be seen. My act of pure practicality seemed sacreliges to the puritan woodworkers but I suspect that they, as always, were just looking for fault.
Five years goes very quickly when you're having fun, they say, but fun doesn't quite cut it alone. Yes, I have found tremendous enjoyment designing and making every piece, but what I have enjoyed the more is seeing the gallery of pieces made by those taking the instruction seriously and making their own from what we've been offering. Watching a rocking chair emerge from a stack of hand planed strips, knowing they were all hand planed square and true, becomes all the more remarkable when someone posts that they have made their first woodworking project as a result of watching your videos. As someone who has made such things throughout his woodworking life, I can tell you this. Nothing inspires me more than to see someone who just made their first baby cot or their dining table and do it using only hand tools. How about invigorating! How very rewarding, and what an adventure!
 This rocker looks entirely different when it's painted into a solid like this. Two friends came for a visit shortly after I'd finished three of them in different woodsin different woods, and they said that they liked this spruce version painted over the oak and cherry ones.
 It's something of a luxury to have an empty room; this blank canvas was hiding beneath old carpet. Now the whole room became the blank canvass we needed for our first efforts. We'd decided to dedicate the whole house like this as a luxury goal to teach others my hand skills in the realest of ways we could think of.
My first piece in the five-year plan was a newly designed rocking chair with a three-part split seat. Even the pine version from two-by soft spruce studs I bought from the big box store, which I painted black on top and sanded through to a red base layer beneath, came out to be a working/living rocking chair and cost only a handful of two-by studs to test out every aspect of the design engineering and construction. That's the one above.
 All of our western hardwoods are easy to work with ordinary hand tools. My workspace gets less as the projects come together in a single piece, but all the less when I make three or four of them in quick succession. But planks and beams of wood standing in shavings where I stand too have been my life for six decades now. I'd like another decade like this and without changing a thing.
 I have designed and made several rocking chairsdesigns through the years but I have never copied the work of another Many vintage rockers were actually working chairs used by people sitting to weave, spin, and work other hand crafts. Especially was this so in the USA, where people sat to work outdoors on their porches to get out of the heat indoors and then too the sunshine. In more recent years, rockers became more generously shaped as a luxury chair to relax in and were better suited for a more relaxed fit.
My garage space at the house is 14 feet long by 11 feet wide, with an eight-foot headroom. My available space for moving around is roughly four feet by 10 feet with pinch points. In this space, I have now made over 60 pieces ranging in size from coaster sets to a king-sized, solid oak bed. Currently, the number of handmade pieces for the Sellers' home series stands at 40.
 On the other side of that black floor line is the footprint of my single-car garage. Nothing is ever made on this side of that demarcation line. This side of the line is for cameras only to look through that invisible wall.
I refer to people following my work online in what might seem to be a possessive way, but it's not at all. My audience represents a body of work reaching out to those who simply want or prefer to adopt hand tool woodworking as their progressive way forward. In my hands-on classes they became my students; it was simply a way of identifying. The 'my audience' term differentiated between those who choose hand ways of working their wood and those who don't. It's mainly a category, you see. My audience simply means the hand tool woodworkers, but that does not mean they don't or can't use other means and methods if it pleases them. It simply means that if they are watching me to learn 98% of anything, then they will be looking for hand tools in my hands and not me pushing wood into a machine; that's all. They'll never see me pick up a power router or use a tablesaw, a chop saw, a planer thicknesser, or a mortise machine; those days are long gone for me, and that is because, yes, I needed to prove something to my audience. For them to believe that they could actually do as I do or aspire to do so, they had to see me both working and then, too, the result of it, but they also had to see that I was no more gifted than anyone else would be if they worked diligently to establish skill by as much rote practice as they could muster the time for. I hope that the term "my audience" or "my following" is appropriate without being in any way possessive or even demeaning. It's just my way of addressing what has become so very different in our new age. There can be no doubt that I have already lived the best years of my life and even that I have "had a good innings" thus far. The reality of a lived life, as in my case, has stemmed from an ambition to leave a legacy and to do so in more of a philanthropic way that would bring meaning to others in the same way it did for me. Hence the name of my UK school of woodworking was 'The New Legacy School of Woodworking.'
 My candle box class covers box making in a day and a half of the six-day class. I came up with this project as a means of teaching how to use the hand plane, the #4 Bailey pattern Stanley, and dovetailing the corners of a plain box in 1990. All the roundovers are completed with that Stanley plane.
 Part two in the class covers shelf making and how to cut two types of housing dado, along with the first four mortise and tenon joints, arching with stop cuts and a chisel followed by a spokeshave and so on.
 The final part of the course is table making so this piece can be scaled for any other table typs with four legs. It comprises eight mortise and tenon joints which provides a thorough understanding of the M&T joint plus planing and shaping with a variety of other tools. M&T is the most used joint of any kind in the world.
The recognition of luxury woodworking came through pure hard work and long days in the saddle. Hand tool woodworking is ten times harder and more demanding than machining wood; of that there can be no doubt. But people choose machine woodworking over hand tools for the wrong reasons. Usually, they misunderstand that developing skills takes a little time but that it should not be a prohibitive belief. In six days my students, the ones who came with zero knowledge of hand tools, took away a dovetailed lidded box with recessed hinging and bullnosed edges, a wall shelf with either three or five shelves fully recessed and mortise and tenoned, and an occasional table in solid oak with shaped legs, and mortise and tenoned joinery. I'm not too sure whether any one of them ever believed that they could actually do it, but I did.
 Even the over anxious soon settled around my workbench for demonstrations they could walk away from and say to themselves, "I think could do that." In this demonstration, I sharpened a tenon saw before showing the students how to sharpen their edge tools and expected them to sharpen the tools on the bench whenever they wanted to.
Month on month and year on year, 15 or so students arrived every week and took their place at a bench or around mine. Within the hour they were making their first dovetail joints with surgically sharp hand tools, and their eyes were aglow with excitement and self-belief.
What do a California judge, a Texas obstetrician, and a Dallas Episcopalian priest have in common? They all came to learn chairmaking with me back in 2008. But the most important point here is to see that these men had no prior experience beyond my week-long foundational course, and that is primarily what woodworkingmasterclasses.com replaced, along with our sister site, commonwoodworking.com. None of these men were in any way manual workers per se. I say this to say that we may have been led to believe that the more academic were not likely to be good at manual crafts. I have found that to be far from true.
 The Judge . . .
 The Priest . . .
 The obstetrician
But that was quite the luxury. I had to reach a wider audience, a greater following to pass on my skills to, and I had to write all the more not to be swallowed up by the fake-makes on social media. My craft of hand tool woodworking had been dealt a tremendous blow over several decades, and the craft of real handwork was dying out unchallenged. With no next-generation cohort entering the world to carry the baton, we would soon lose our future skilled makers...and we have!
Magazines dedicated to woodworking rarely promoted hand tool methods at that time. That was because their main income stream was from the big machine makers, who then spent masses on advertising on their pages and so hogged the limelight as the progressive way most of the time. Their high-demand output was therefore for a working knowledge of machines, not hand tools. Or at least that was the editor's interpretation of it. When the editor of Fine Woodworking at that time told me he didn't want "anything philosophical" in submitted articles, I realised just how much magazine editors controlled the rhetoric of writers and that what they wanted was my expertise in hand tool woodworking but not any ideals I might want to express. I felt it best to not write for magazines and start blogging. Magazine editors just wanted new wallpaper every few weeks. Best move ever, but the best and most accommodating editor I knew was the editor of the now defunct magazine called simply Woodwork. John Levine encouraged me month after month and took every article I wrote. I was sorry to see that one go, and though it was bought out or taken over by another magazine with the promise that it would continue as before, I could see the writing on the wall, and after a couple of issues, it was scrapped.
 Cherry is highly regarded as a furniture wood in the USA. When you work it, it peels like soap whether you use a plane, a spokeshave, or a chisel. Though it is a western hardwood that I am using here, there is nothing hard about it all. The other beauty in it is the change that takes place over the months. The colour goes from a light hue to a deep, rich redness.
By April 9th, a new coffee table emerged quite quickly from some rough-sawn planks and piles of shavings by my feet. This piece had a secret drawer that swung out sideways from one of the aprons in an arch. I wanted something for remotes and such. I think it was a clever point not only in the idea but also in the construction too. I kept continuity of grain throughout the five pieces so that nothing exposed this hidden feature of my design.
I enjoy seeing some basic hand tools surrounding my work, knowing that when I lift them to task, they will always obey the muscle and sinew I use to connect them to my goal. The idea was an experiment, but not the making methodology. Decades of handwork make my outcome predictable.
 Even now that the years have aged and coloured the cherry pieces in the living room nicely, when the drawer is closed, you can barely see its outline, and it fits perfectly flush with no discernible difference between the drawer front and the rest of the apron.
The blank canvas was near magic for me. Each design came together as a freedom of expression, and yet the traditions of my craft were indeed insistent in my designing. By that I mean that mostly I wanted the proven longevity traditional joinery gave to my designs, while at the same time I could use a screw through a dovetail that would never be seen if I wanted to. Yes, it would increase the strength of resistance that comes through such a fastening, but that was not the reason for its inclusion. I used it as an immediate 'clamp,' and, if I can conjugate the verb, the clamping with permanent pull power too. Even though it will be hidden from sight, there is an attractive quality to it.
 Newly installed, the colour is as yet undeveloped. In six months it will be transformed altogether. Much warmer and richer.
The tri-part seat construction was to facilitate the reality that a 24" wide piece of solid cherry within a frame would want to both expand and shrink according to seasonal atmospheric moisture changes. When I now sit in the chair, I am glad that I thought to accommodate the possibility; the wooden seat expanded by a total of 12 mm, which is half an inch in old money, and the gaps have all remained closed up for five years to date.
 Cherry is one of the most manageable hardwoods to work with hand tools, and it planes up to a pristine finish readily. That was good; making all of the pieces in cherry was a lot of handwork and fitness training too.
In May, I had bought in more rough-sawn cherry for bookshelves. Buying rough sawn gives you an extra quarter inch of thickness, and if you work with hand tools, cut judiciously, you can get a good inch of thickness if you want or need to. Yes, it took some planing, by hand, that is, but it was so needed for my health exercise, and I enjoyed it very much too.
 Prototyping from two-by-four studs (the one on the right) is the least expensive way to work up a design style. It planes well, and you could, if you wanted to, make a bookshelf that would be perfectly sturdy and serviceable to sell or give to family or friends later.
The luxury of prototyping results in a solid design, but of course it's not possible for everyone to make two with a home for only one. My first one came from pine studs, some might consider low-grade material or, in some worlds, trash wood, but I have never seen any wood as a trash wood. Here in the UK, we favour spruce for studwork, which is more stable than southern yellow pine, which crawls all over the place once the steel bands are snapped off.
 The room is now softening gently as complementary pieces begin to take their place in the whole. Five or six more pieces will come together before the year's end. See how the rocking chair has changed colour and is waiting for the coffee table to catch up.
By now you will better understand my world. The luxury of hard and diligent work became affordable for me because I chose my time would not be spent digitally more than a couple of hours a day. By nine in the morning I had worked for two hours writing every day. Then I put my computer away and didn't touch it again unless it was essential. My phone, too, is not much of an entity. If I am in a cafe with a friend, my personal rule is no digital devices. That's for me. I am totally in the presence of my company. It might surprise you that with this as a personal rule, rarely will my company pull out their phone either...and guess what? We spend the whole hour talking with each other. It's always nice!
 Height, depth, and width determine how much space can be taken up in the making of any piece. That's the benefit of prototypes, but, of course, scale drawings will do the same two-dimensionally, and usually that is where I begin.
It's mid June 2021 when I think of this. To be honest with you. I don't even know how to turn one on, nor do I know how to change channels. It's 1986 since I last watched TV or switched one on. But even so, I accept they are still central to most homes, even if it is only for the big events. But I was interested in creating a TV stand for my audience, though. The only game I ever played on a computer, which was a Sinclair ZX Spectrum in or about 1984, was a game called Thro' The Wall. After ten minutes I was done with the boredom of it and never returned.
 Oak and cherry combine nicely to give a tambour look to my design. Each frame is mortise and tenoned at the corners to ensure longe the work longevity.
The very sizable drawer makes a wonderful toy drawer for my granddaughter, but it works equally well for family blankets to watch TV on colder nights. The blank canvas allows me to invest in different joinery.
 Most of my joinery will never be seen again once the lid (cabinet top) gets anchored on with turnbuttons, the pulling power of a hidden dovetail or two will never be known beyond this image, but the secure feeling I get from knowing it's there, unseen, doing its job, is very satisfying.
Life in woodworking is always about composition of one kind or another and then composing the whole in a way that delivers a sense of completeness. My living room only needs small pieces now: a wall shelf, some coasters, one or two other casual tables.
 Whereas the oak will remain the same colour, the cherry will darken two times before it settles to contrast within the frames. Watching my granddaughter dip in and out for her toys is always an enjoyable moment. It's a huge drawer, so I used metal runners to make it easy for her.
I'm at the end of July with the above piece, still 2021. It's an exceptionally sad time for my family. We are about to fly to Dallas and on to Waco to be with my son and his wife and family. We had a sudden death this month, a young soul lost to us. As I look through my history of photographs, it's a loss that hits me most days and enough to remind me that life is very fragile. The deep questions in life rarely get answered fully enough for us to rest. Making, for me, reflects the physical as much as a drawing or written text, the photograph, and the video our minds play back to us as we go through our day. I hold to the fond memories, the smiles and laughter, the scrapes and tumbles that make for living.
 These coasters came from scraps I'd kept back to use for things like these coasters, but then, too, some other pieces. I used this style for clocks and cupboard fronts in other Sellers' home pieces.
The coasters are still working fine; not much to go wrong with them. I like the clean, striped look emulating tambour and then the multicolored diversity of mixed woods and grains like this. Offcuts, or what we called thinnings, work great for small pieces like this too.
 Go for round, octagonal, or square with this strip-wood look; they all work well. I even made some from strips of the same wood and used the grain for contrast, and they looked good too.
Here, last but not least for this post, is the wall shelf replicating the tambour used in the television stand below it. This method of closing in with narrow strips of otherwise useless offcuts that have almost no use is an unusual and remarkable solution. I just started keeping the rippings with this in mind, but of course you can create rippings from solid wood too. I like the the overall look it creates, and it really takes very little effort to create the strips, whether from waste offcuts or solid pieces from a wider board.
 I used only ten common hand tools (which most of you will likely own already) to make this uncomplicated wall shelf unit. Any wood will work but cherry, oak, or darker woods like walnut are great woods to work with.
 I used only ten common hand tools (which most of you will likely own already) to make this uncomplicated wall shelf unit. Any wood will work, but cherry, oak, or darker woods like walnut are great woods to work with.
This next cluster of tables came together in November. I made more than this, some in cherry and some in oak. They are corner fillers, armchair companions, plant elevators, and such. Just handy sports in any house or office, really.
 This table design lends itself to a range of alternative tops going from round to elliptical and square to octagonal simply by adapting the leg frames and elongating one stretcher or the other.
We have five more spaces to create for at the end of 2021. I may dip back into this room later, but for now, it's ready for Christmas celebrations 2021.
I will close by saying this work has been 98% hand tool woodworking. Just so that you know it can be done and that you will more than likely be equal to it.
My Life’s Luxury

this and that......
I strolled today for the first time in weeks. When I got sick I started filling the pie hole non stop. I wasn't walking and I think from when I got sick till today, I walked maybe twice? Paying the price now as I have piled on 42 pounds. T shirts are getting tighter along with my jeans and pants. Went back on the diet wagon monday and it is tough to do. Especially after eating whatever and as much as I could. After the eye opening cost of pants/jeans I bought at LL Bean, I can't afford to get a new wardrobe.
 |
| not impressed |
These are a lot smaller but they feel flimsy. The bars are thick but the tabs that get the screws are thin and bend when a gentle breeze blows over them. I didn't have a warm and fuzzy with these.
 |
| new frame coming |
I'll squeeze this in while I make the clock.
 |
| hmm..... |
I had enough numbers for a clock. Thinking of using these on the upcoming clock build.
 |
| clock face templates |
Made these two several years ago. They are a great help with positioning the numbers.
 |
| setting the iffy lid stays |
First step is to attach the hinges.
 |
| nope |
Played with the lid stay on the workbench and I thought I had figured it out. This is as far as the lid will close. All I got from this was three more holes to fill in.
 |
| this sucks |
The stays came with no instructions or templates. This didn't come out the way I thought it would. Nor did it come out the same way I had played with it on the workbench.
 |
| poorly made |
I had to flatten one of the tabs that bent when I screwed it to the lid. After I took it off I tried to turn the same tab and it popped off. All the hinge points and the tabs are peened in place. I easily pulled the hinge bars apart along with the other tab. These are garbage. I saved the bars and tossed the tabs into the shitcan.
 |
| shoulda, woulda, coulda, but didn't |
I should have gone with a chain stay from the git go. I had a chain snap on me when I lost control of the lid and it fell back. It works and fingers crossed it will stand the test of time.
 |
| sigh.... |
I filled in the wrong holes These two are for the hinges, not the (@%)*)@%*_*@)*%$ lid stay.
 |
| hmm..... |
Thinking of making the clock from cherry. This is the cherry I had in my scraps stash. I think I can build the clock I want without having to glue up anything.
 |
| a test |
I had one rough sawn board that I flattened one face and squared an edge to it. I was curious to see if this would be too strenuous for me to do. It wasn't. I didn't feel fatigued nor do I get winded. After seeing the grain pattern I am thinking of using this board for the sides.
Most of the cherry is 7/8 thick or a few frog hairs thicker then that. For the clock I'm thinking of doing, this is too thick. I'm leaning in the direction of 5/8" or a wee bit less than that.
 |
| 1/2" thick cherry |
I forgot I had this and after eyeballing it, I think it is too thin. 3/4 looks too thick so 5/8" thick stock is ringing the bell for me.
 |
| test time |
This is a quick jig so I can figure out the pendulum swing.
 |
| got it |
The swing is about 5 1/2 to 6 inches right to left. I need this in order to set the inside width of the clock case.
The movement is not a bim bam, it plays two different tunes. Both count out the hours after playing the music. However, I could barely hear either tune even with my hearing aids turned up. There is no way anyone could hear the music or the hour count once it is in a clock case.
 |
| hmm..... |
Something is amiss in Disneyland. I couldn't get either one of these two movements to spit anything out of the speaker. Both will play music or do bim bam. Neither one of them seemed to want to play nice. I let them go for an hour and heard nada. I had a wicked headache here and I killed the lights. I'll play some more with this in the AM.
accidental woodworker