Hand Tool Headlines
The Woodworking Blogs Aggregator
“Glory to God in the highest heaven, and on earth peace to those on whom his favor rests.” - Luke 2:14
Be sure to visit the Hand Tool Headlines section - scores of my favorite woodworking blogs in one place.
General Woodworking
hardware dresser pt XIV........
 |
| dry fitted dividers |
I applied glue to the underside only. I didn't put any glue on the vertical ends.
 |
| hmm...... |
The dividers were a frog hair off but there is enough flexibility in 1/8" plywood to align them with the grooves. Decided to fit each drawer I've done so far rather than wait until all five are glued and cooked.
 |
| layout for the half laps |
With the nine compartment layout I only have to layout for one end. I set the distance for it, sawed it, and then flipped it 180 to saw the other end.
 |
| fitting |
First step was to flush the 1/8" plywood all the way around. It is getting easier to fit drawers. The key for me is one, take my time. And two, look at the fit of the drawer from the front and the rear. Thirdly, don't go nutso and take too many shavings at once.
 |
| one down, four to go |
I am not that thrilled with the look of the plywood bottom. I glued it to the bottom because I didn't want the bottom inset in grooves. I also didn't want to give the little bit of real estate that would have eaten up. I have been eyeballing the off cuts from sawing the drawers to a 1/2" thick - I can glue it on the fronts and cover the 1/8" plywood bottoms.
 |
| hmm....... |
Wasn't expecting this. I thought it would have been closer to flush. My first thought on fixing it is too saw the proud off the back of the drawer.
 |
| how? |
This was making me scratch the bald spot on the roof raw. I don't know how the compartments on this drawer are different sizes.
 |
| ????? |
I laid out the dividers the same for both drawers but one is correct (left) and one wandered out into La La Land. It looks like I screwed up setting the stop on the miter gauge.
 |
| 3 fitted |
So far the first 3 drawers have about the same amount of proud.
 |
| 3 down, two more to go |
From the front I kind of like the proud look of the drawer fronts. The problem is what and how do I deal with the look from the sides?
 |
| #4 dry fitted |
It was looking like I might get all five drawers at least glued and cooking before quitting time.
 |
| yikes |
Made two boo boos with drawer #4. The first was I ripped one side a wee bit too much. Not a problem because the bottom of the drawer is flush - this gap will be on the side. I wanted it at the back but it ended up here.
The 2nd boo boo was the side split when I glued it up. I thumped it with my fist while seating the tail/pin and it gave up the ship. I glued the split and the 1/8" plywood bottom will bridge the split and keep the side together.
 |
| drawer #4 |
The last two drawers will have 12 compartments. A little bit of apprehension that I did the half laps right and it would fit in the drawer.
 |
| drawer #4 |
I think I should have gone with 12 compartments for all of the drawers. If a plastic container will fit in one of the 12, I'll be golden.
 |
| one left |
Drawer #4 took longer to fit then the other 3. I think it was because of the 12 dividers which aren't that easy to plane and knock down. Got it done and it opens and closes freely.
 |
| drawer #5 |
This drawer was rocking a little bit. The paint cans flattened the drawer. After ten minutes I removed the cans to check it. The drawer stayed flat on the workbench. I put the cans back on the let it cook.
I'll be done with this in the AM. All that is left to do is to make the base which I don't have any stock for. I used the base stock to get the drawers from. I'll have to make a Lowes run to get some pine for that.
I have an appointment with oncology tomorrow at 1000. I still haven't made up mind about the possibility of having to do chemo. Losing my hair I don't care if it happens. I don't want any nerve damage that would interfere with my woodworking. I'll find out what the game plan is in the AM.
accidental woodworker
hardware dresser pt XIII.....
Last night was the first one since the surgery that I slept through the night. I didn't wake up until 0750. It felt wonderful waking up refreshed and not tired and wanting to roll over and go back to sleep. Posted the blog a little after 0800 which is a wee bit late for me. I think the blog posting may be erratic until I am mended and feeling 100%.
I am feeling better. The cough is up and down - some days I cough a lot and others I don't. The burning sensation from coughing is almost all gone. One annoying thing left lingering is the fluid build up. It has decreased a lot but there is one bubble that refuses to go away. The doc said that it might be 6-8 weeks post op (or more) before I'm back to normal.
 |
| don't have happy thoughts |
This the top shallow drawer that wasn't laying flat. I hoped that laying it flat on the tablesaw with some weight might keep flat.
 |
| nope |
It is a 1/4" off on the highest corner. The twist in this makes the drawer unusable. I have tried in the past to trying to fix something like this only to give up. Planing away the high corners would make the drawer too thin. I broke up the drawer and shitcanned. I'm starting over again at square one.
 |
| new drawer |
Glad I had extras for making another drawer.
 |
| hmm....... |
Thinned the drawer so it fits the opening with a 1/8" plywood bottom. I'll be doing this to the other 4 drawers too.
 |
| replacement drawer |
Dry fitted and laying flat on the tablesaw. I think I had made the tails/pins a bit too snug and that is what twisted the frame.
 |
| glued and cooking |
I couldn't get the drawer diagonals to agree. I tried everything I could think of but gave up. Used a couple of 90° blocks to square up the drawer.
 |
| stepping off |
Used dividers to layout the grooves for the compartments.
 |
| couple of hours later |
The compartments are too big now that I can see them completed. They are bigger then the plastic containers. Started to rethink the compartments and maybe going with 12 per drawer?
 |
| bottom on |
I lucked on the drawer size. I have 7 sheets of 12" x 24" 1/8" plywood. I'll be able to get two bottoms out of each sheet. The dividers and the bottom will stiffen and strengthen the drawer box. That will help when I plane it to fit the opening.
 |
| drawer #2 |
I'll put 9 compartments in this drawer. With 5 drawers I would have 45 compartments. What I think I will go is 3 drawers with 9 and the last two with 12. That is subject to change. Half lapping the dividers for 9 compartments is way easier to do then it will be for 12.
 |
| 3 down, two to go |
I got the third drawer glued and cooking and ran out of gas. I am still not able to go for hours in the shop yet. I'll pick this back up in the AM.
accidental woodworker
hardware dresser pt XII.....
 |
| I was wrong |
I had more than enough pine to get all the drawer parts. Four drawers all the same size and one drawer about 1/4" smaller. Also got lucky that depth and width of the drawers were less then 12".
 |
| extras |
These are for any oops. I don't know how I missed thinking I didn't have enough stock to get all the drawer parts.
 |
| hmm....... |
Got one edge flat, straight, and square. I used that to square the ends and get the length.
 |
| snug |
The R/L is loose - it is about 2-3 frog hairs short. It is good enough for a parts dresser.
 |
| first drawer |
I will use through dovetails at all the drawers. I thought of using half blinds but nixed it. A single dovetail is enough for drawers of this size.
 |
| for the dividers |
Each drawer will have 9 compartments. I could have added more but I wanted to ensure that each plastic hardware container would fit in each compartment. Instead of using 1/4" thick poplar for the dividers I'm using 1/8" plywood.
 |
| yikes |
This side split when I glued the drawer up. I glued and clamped it and it should be ok once it is cooked. I trimmed a 1/8" off all the drawer sides. I plan to glue a piece of 1/8" plywood on as the bottom.
Got most of this done in the AM session. I went to lunch to get my weekly fish 'n chips because I was in West Roxbury on friday. The meal was good but I got massive attack of heart burn that turned me into a blob sitting at my desk. I felt miserable but to close out the PM session I glued up the drawer. One down and 4 to go.
accidental woodworker
pine test frame......
Spent another sleepless night which translated into me rolling out of the rack a little before 0700. Got no AM shop time because I had to get ready to go to the West Roxbury VA. Got there at 1020 for my 1100 appointment.
The news is I have a 60% chance of living another 5 years. I should make at least one more xmas and fingers/toes crossed it will be a few more.
I found out that I have stage 3 cancer and the doc removed a 8 cm tumor from my left lung. He said that the tumor was stiff and difficult to pull out between my ribs - he said that he doesn't expand the ribs to facilitate the tumor removal. That is why I am sore and have the pain I have when I cough. The doc said I'm doing better than most and that I have another 3-4 weeks before the surgery effects disappear.
I can drive which is a relief. Not being able to do that these past two weeks has sucked pond scum. The doc told me to be aware of how I turn my head/torso as it may cause a spike in pain. I'll deal with it and drive slow.
 |
| start of the PM session |
We didn't leave the West Roxbury VA until 1230 and the traffic going home was horrific. What is normally an hour drive was almost 2. Before going home we stopped and had lunch at Gregg's. The only thing I wanted to do here was check on the pine test frame I made yesterday.
 |
| looks good |
All the miters looked good - no gaps on the joint lines. Nothing moved, shifted, or groaned when I took the frame out of the clamps. You know the glue up is solid and strong when that happens.
 |
| dead nuts |
17 11/16" on both interior diagonals. The outside diagonals were a frog hair off from each other. I couldn't twist the miters apart with my hands. I rapped the frame on the bench on each miter and nada. With past miters (no dowels/splines), the miters gave up the ship on twisting the miters. I never got to try hitting them on the workbench.
 |
| happy face |
All the toes and heels are flush. There is zero misalignment on any of them. The faces on the joint line are a wee bit off but still within a frog hair.
 |
| no rocking |
Neither side of the frame is rocking when pressed on any of the corners. The frame is twist free. I cleaned up both sides with my #3 hand plane.
 |
| my boo boo |
With this errant hole I can't leave the frame natural. I could put a dutchman over it but that would show. Another option is to fill it with wood putty and paint it.
 |
| better option |
I like this option best. I have a lot of thin pine in the shop that I can put on the outside and the inside of the frame. It will also afford me the option of leaving it natural or painting it.
I still can't lift anything heavier then a gallon of milk. That restriction gets eased 6 weeks post op. So I won't be able to use my lunchbox planer so thinning the pine on the tablesaw is my only option for making the drawer stock. Thinking of making a run to Gurney's Saw Mill to get some 1x12 pine. Maybe they will have some 1/2" pine in stock.
accidental woodworker
miter sled jig pt II.........
 |
| last nite after dinner |
This had been in the clamps for almost 5 hours and I was anxious to see how it looked. I did some after dinner puttering in the shop.
 |
| Mr Starrett says all is good |
The outside was good - not dead nuts. There was about 1/2 a frog hair of light on the left end.
 |
| The inside was dead nuts 90 |
Happy with how this came out. The top face is flush along the joint line but the other face isn't. That is because the two pieces aren't exactly the same thickness. In spite of that the toes and heels are aligned which is the important thing.
 |
| hmm....... |
Decided to glue the cap on the back rail before heading topside. I clipped the ends at a 22.5° angle.
 |
| glued and cooking |
In the AM I can get this attached to the sled and road test it with making a frame.
 |
| start of the AM session |
Flushed the test miter, top and bottom to get a better look of the joint line. Toes and heels were tight and the joint line was tight and gap free. I couldn't break the miter neither. I whacked it on the bench and nada. Tried to pry it apart with hands and again nada. Happy with this and I'll use it for the certificate frame.
 |
| laid out the miters |
This is the cherry test frame that will be the first one off the miter sled.
 |
| clean up |
This face needed a wee bit of flushing. After this I sanded both faces and called it done.
 |
| done |
The miter sled is fini (french for finished). Not sure if I am going to finish this with shellac or anything else. I have a 90° sled that I made 5-6 years ago that I didn't finish. It still is dead on accurate.
 |
| sigh |
Miters bit me on the arse again and drew blood. At least I was consistent in my screw up. I would lose too much correcting one end to make them usable. At least I didn't screw up the long legs.
 |
| hmm...... |
Looking at the screw up on a brighter note. All four of the miters, according to Mr Starrett, are dead on 45. Not even a teeny, teeny sliver of light escaped. The jig is far more accurate then I had expected.
 |
| new test frame |
Sawed up a test frame of pine. I really wanted to make a test frame before I committed to making the real one.
 |
| joy in Mudville |
All the miters aligned and closed up. This was a dry fit and I was so happy with it I could have wet myself. Based on past experiences with miters I was expecting the miters to slip by each other and not come together.
 |
| two dowels in each miter |
Dry fitted again but this time with dowels in each miter. I had one boo boo with one dowel hole going straight through from the miter to the outside face.
 |
| hmm...... |
The toes are not aligned and it is the only one throwing a hissy fit. I tried to adjust the corners but I couldn't get the toes/heels to align at this corner.
 |
| ta da |
All four corners are now dry fitted and aligned - all the toes/heels are flush and even. The clamps easily pulled the recalcitrant miter together.
 |
| glued and cooking |
Had a wee bit of apprehension once the glue was applied. One corner wouldn't come together with hand pressure. Even mallet blows wouldn't close the miter. However, the clamps pulled it tight. Found out that the miter band clamp isn't needed. With the bar clamps and the dowels, the joints came together easily without worrying about slipping or shifting on the mitered faces.
I'll have to be careful with the dowel placement. I plan on routing the outside edge and I will have to be careful with where the outside dowel is. Nothing would suck pond scum worse then the router zipping away and exposing the dowel.
Didn't get a full day in the shop today. I haven't been sleeping well and have only slept through the night twice since the surgery. That includes my hospital time too. I went to bed last night at 2200, nodded out right away, and woke up at 1248. I stayed awake until around 0430.
I was tired in the AM and after being in the shop for about an hour I quit and went upstairs. I felt like a wet sack of whole wheat flour. I nodded out at my desk for a while before getting up to walk around. I didn't want to sleep now and go through another night without sleeping. I went back to the shop around 1330 to do the test frame.
Don't know what I'll get done tomorrow. I have to go to West Roxbury for an eleven o'clock appointment with pulmonary. The swelling and fluid build has subsided a great deal but a bit remains and it is incredibly annoying and still painful at times. I hope the doc will have good news about it. I am hoping that I'll be able to drive again - fingers crossed.
accidental woodworker
Avoid a Vintage Plow Plane Nightmare!
miter sled jig........
 |
| last bottom drawer rail |
I was waiting for the glue to set but stopped that. With three nails, and no stress on the rail, I just kept on installing them.
 |
| done |
After a snap of my thumb and forefinger all ten drawer guide rails were done. The back will stay off until the drawers are made and fitted.
 |
| hmm...... |
I was wrong about gaps on these. A couple here on the left side have closed up. When I clamped the rails all four had gaps.
 |
| right side |
I thought the right side was good with no gaps. After they have cooked, a couple of gaps popped up.
 |
| gone |
I couldn't think of any way to remove the glue from the gaps to insert shims so I filled them all in with wood putty.
 |
| Lowes run |
Squeezed in a Lowes run when my wife needed to go to Michael's craft store. 1/2" and 3/4" plywood for the miter jig and cove molding for the hardware dresser base.
 |
| hmm...... |
This cherry is from a base that went south on me. I sawed off the pins/tails and I'm going to make a practice frame with it. It will be the first one off the upcoming miter sled jig.
 |
| hmm...... |
The height and thickness is good but it is too short on the R/L. IMO it should extend past the back frame the plywood will sit in.
 |
| much better |
Same everything as the first one but over an inch longer R/L. This puts me dead in the water with the hardware dresser. Drawer making is next but I don't have enough stock to make the needed four drawers. Instead I'm thinking of making the base - I have enough pine to do that.
 |
| sled guides |
Decided to use 1/2" birch plywood for the guides. Got a snug fit in the grooves and I left them proud of the tabletop. I had gotten ahead of myself and had cut the slot in the sled before I made the sled guides.
 |
| #6 x 1" flat head screws |
I glued and screwed the guides to the sled base. In hindsight I should have skipped the glue and just used screws. It would have easier to replace the guides without them being glued too.
 |
| left leg |
I used my 18" Starrett combo square to layout a 45° for the right arm. I screwed both of the left and right arms only, no glue. After the right arm was secured I used Big Red to set the left arm so that is forms a 90°. I used 1/2" plywood for both arms - 1 3/4" wide.
 |
| securing the left arm |
Clamped Big Red to arms to make sure that they don't move/shift on me as I screwed it to the base.
 |
| kerf killer |
This 2x4 will be used to bury the saw blade as the jig is pushed forward making the miter cut. Used the crosscut part of the saw to make a 90 with two 45s at this end.
 |
| first test miter |
I cut one miter placed on the right arm and the second one on the left. The reasoning is since Big Red says that this is a 90° angle and if make one miter on the left and the other on the right it should be 90°.
 |
| hmm....... |
This was encouraging - Mr Starrett said that both miters are dead nuts 45°. Batting next is will the two together be 90°?
 |
| using dowels |
I don't want to spline these miters - don't want to see them and also because I plan to rout the outside edge of the frame. Two dowels should do nicely with keeping this miter closed up.
 |
| gap free |
The green miter jig is just to keep the miters together while I used bar clamps. I clamped the toes with one clamp and the heels with the other one. What I don't know is whether or not the inside/outside is 90°. I'll find out after dinner as that will have given this sufficient time in the clamps to set up.
 |
| stiffener |
This 2x4 will be used at the top of the sled where the saw blade kerf is. It should keep the sled from opening up and moving. I am not that concerned with weight - I want this jig to stay together and be accurate every time I use it.
 |
| needs some height |
I will glue another 2x4 to this to increase the stiffness and strength. The glued on piece will be 2/3 the length of the bottom one.
 |
| over 4" |
I don't see the need for more then this for making picture frames. If I do need more room I can remove the stiffener, it will be attached with just screws - no glue.
 |
| almost done |
The blade kerf thing and a back pusher thing installed. Both are secured with screws only. The weight of this isn't that heavy. The 2x4s are spruce and they weigh almost nothing. Looking forward to whacking out the practice cherry frame in the AM.
I intend to strengthen the sled runners by applying epoxy to sides which are half end grain. I remember reading something about diluting epoxy with alcohol and brushing it on for just this purpose.
accidental woodworker
Introducing the Direct-Mount Suction Controller for Dust Extractors
After many years of development, I am very excited to announce that my direct-mount Suction Controller is now available. You can order yours here.

Though designed for use with Festool CT 26, 36, and 48 dust extractors, it works just as well with workshop vacuums from brands like Ridgid and DeWalt… it just doesn’t look as slick when installed on those round-bodied tools.

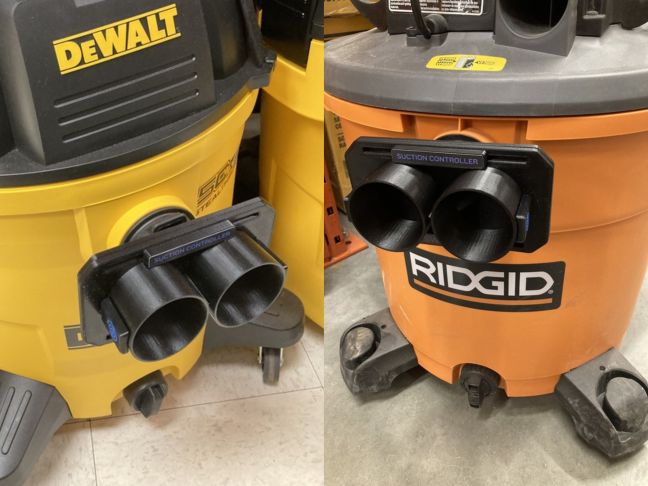
It plugs into the front of a dust extractor or workshop vacuum and allows you to connect one or two hoses. This is useful for one person switching between two tools, or using a tool like a router with two dust extraction ports. It also allows two people to work simultaneously with different tools, such as sanders, using just one dust extractor.

It’s different from a Y splitter in that the suction to each hose can be completely controlled, so you can regulate how much suction goes to each hose. You can have a 50/50 split, a 60/40 split, suction to only the left, or right, or any other ratio.
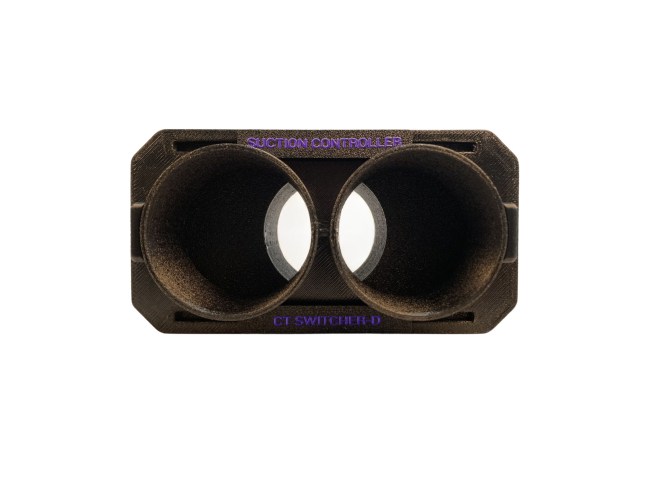
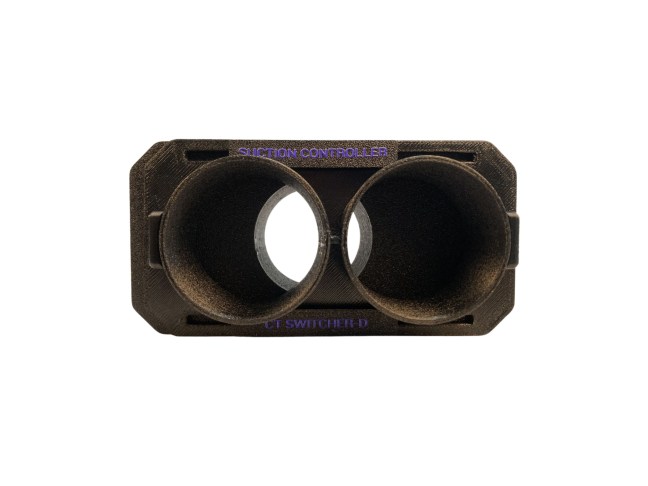
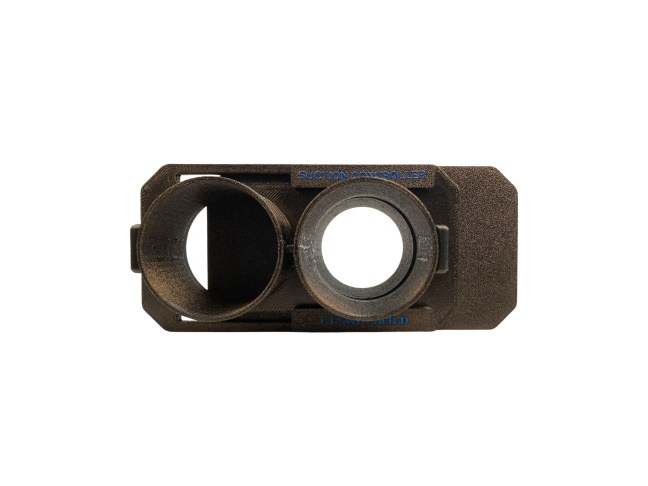
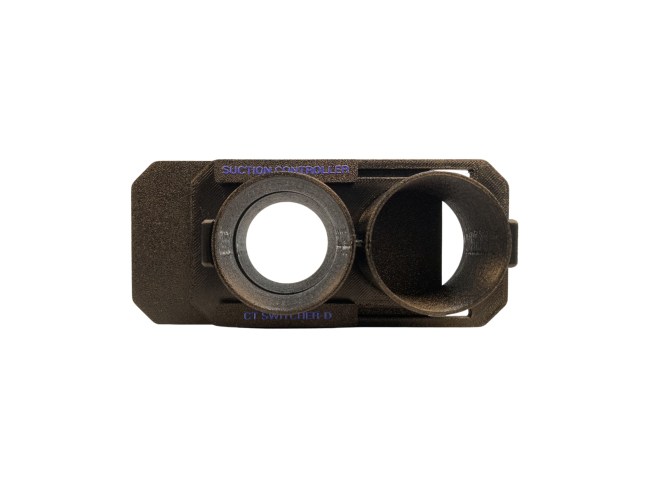
There are two versions available – the CT SWITCHER-D which is anti-static, and the VAC SWITCHER-D which is not. You can order yours here.
New Model Mandolin: 6
Time now to shape the neck!
Also, I have a brief chat about the tools needed for this process. After running through the shaping process, I start the clean-up in preparation for setting-up the mandolin, “in the white.”
Cheers Gary
hardware dresser pt XI.........
 |
| one down, 3 to go |
This was a wee bit difficult to get the notch measurement in the cross rail. Once I figured that out I whacked them out one at time.
 |
| go/no/go stick |
The rails were all about 1/8" over length and the stick was a slip fit between the dadoes R/L. In hindsight I should have did the go/no/go stick before I sawed the notches at the top for the rail ends.
 |
| last one |
I sawed out all the rails with the dozuki saw. No problems except with the 3rd one. The distance between the dadoes was a few frog hairs less then the others. I trimmed the notches equally with a chisel until it fit.
I was pleasantly surprised by how well I sawed the notches. I didn't wander into La La Land with any of them. All the vertical saw cuts split the pencil almost dead nuts. I had thought of doing the cuts on the tablesaw but nixed it. No blue chips for taking the easy road. These were the best (multiple) precision saw cuts I've done.
 |
| dry fit |
Happy with the fit. The front is within a frog hair of being flush and the ends are a little bit wild. They will clean up easily once the rails have been glued and cooked.
 |
| glued and cooking |
A wee bit of proud but not a problem to flush. On the right side all the rails are tight and gap free. However, on the left side all of them have a teeny gap. Using a mallet to try and seat them further on the left did diddly squat. I'll have to fill them in with a shim or putty.
 |
| hmm...... |
Flushed up the proud on both sides. The gaps on the left looked like they closed up some after sawing.
 |
| first drawer guide rial |
I clipped a nail on the end that butts up against the cross rail. I applied glue to the end grain and about 3" of the drawer guide to anchor the front.
 |
| the easiest one |
The bottom drawer guide rails I can clamp a straight edge to set it correctly. The others won't be as easy to set. I used two nails also - one at the mid point and another one an inch from the end. The middle one cooperated but the end one split the rail.
I glued the split and put another nail in a half inch away from the errant one. After this has cooked and set I plan to add another nail at the front.
 |
| prep |
I planed both edges of the rails straight and square to the face. I added a clipped nail at one end. These are ready to go.
 |
| oops |
Noticed that I was short two drawer guide rails. Whacked them out and prepped them for tomorrow. Killed the lights here and I'll get back to this in the AM.
I can't drive yet and I won't know if I can until this friday. Which means I have to depend on my wife which ain't easy. She does a lot of dead people stuff on line with a lot of zoom meetings. I didn't realize how lucky I was with driving until now.
I want to make a mitering sled for the table saw - I've been watching You Tube vids on how to make one for a couple of days. Still haven't been able to squeeze in a 'wife taxi ride' to Lowes to get some stock. I have zero 3/4" (or 1/2") plywood scraps in the shop. I don't expect this jig to a one use deal - that is why I want to use plywood.
I got the grandsons each an Ipad. (cashed in my Reward points on the Visa card) Along with a cover, red for Miles, and blue for Leo. Shipped them out today via UPS for $70. It could get there by thursday or up to week later. For $108 I could have gotten guaranteed delivery for friday. This confused the crap out of me but it is what it is. Shipping is a deal killer for sure.
accidental woodworker
The Wooden Houses of Manhattan
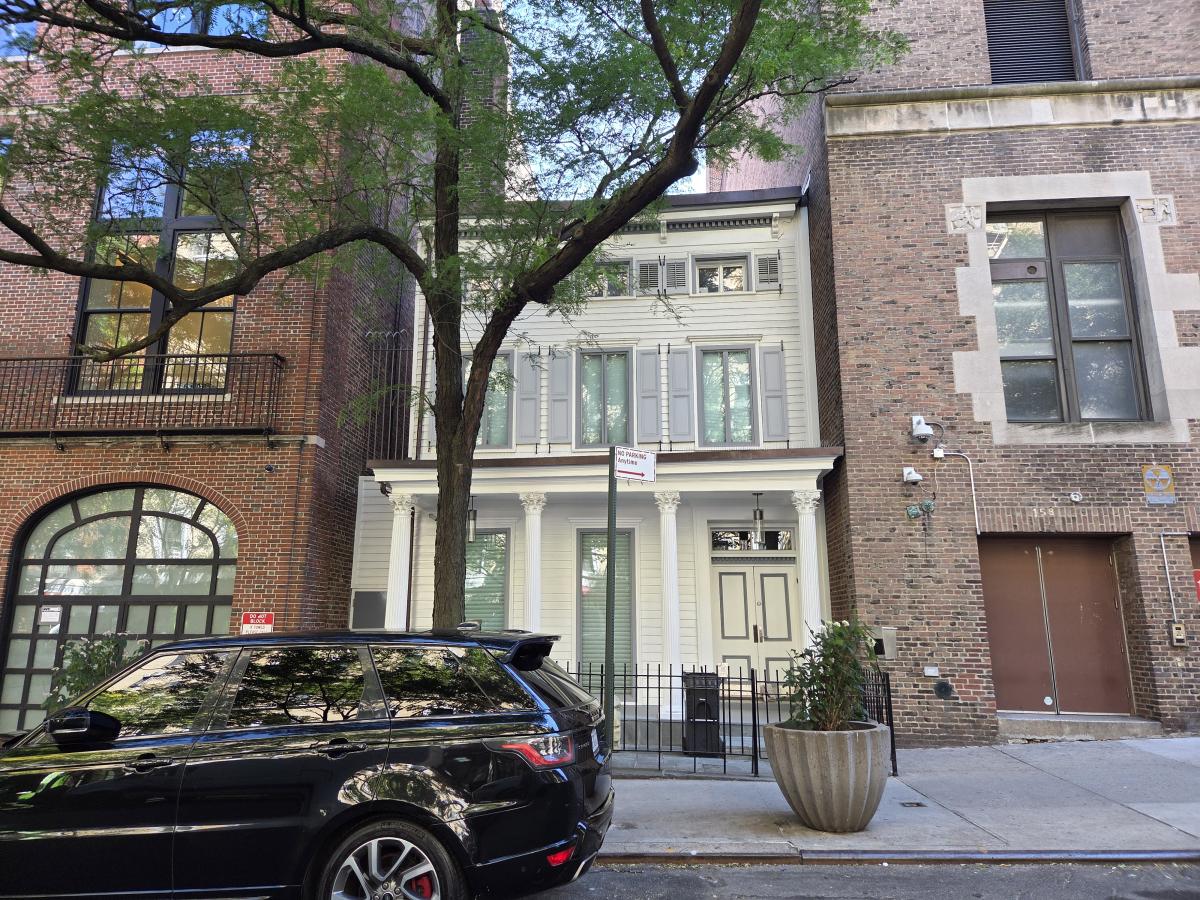
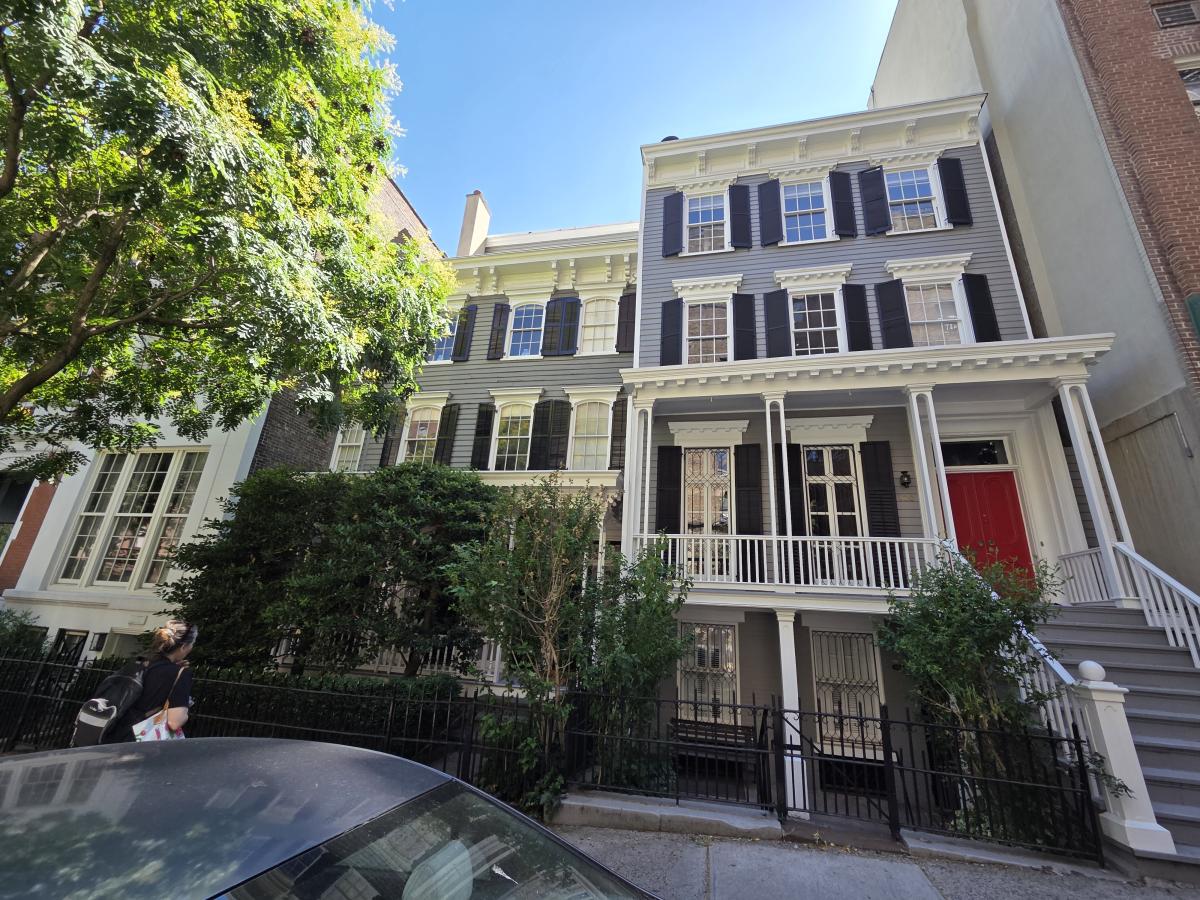
Last Saturday I went to the Upper East Side of Manhattan, where I was born and lived for many years, to check out what turned out to be an unimpressive museum show. The plan was to take advantage of beautiful weather and commute back home with a ferry ride downtown instead of the standard subway ride. (NYC is a watery town, with not only spectacular beaches and bridges, but also ferry rides for commuters and day trippers - the world famous Staten Island ferry between Staten Island and Manhattan is one of many ferries between various boroughs and neighborhoods.)
This plan brought me from the museum on a northern stretch of Fifth Avenue to the ferry dock on 90th Street and the East River in the Yorkville neighborhood. 100 years ago Andrew Carnegie, one of the richest people in the United States, lived nearby on 5th avenue and 90th Street. Only four avenue blocks away from Carnegie's home, the Ruppert's Brewery cranked out millions of bottles of a really excellent dark beer that I miss to this day. Ruppert's and the industrial businesses all around the area east of Park Avenue employed thousands of people who lived in walk-up apartments all around that area. The factories are gone, the ethnic (mainly German and Hungarian) enclaves are gone, but some of the housing remains, even as the overall area has become probably the most densely populated residential area in the country.
The explosive growth of the area - from pretty empty to dense rows of walk-ups - was triggered by the explosion in population in post-Civil War NYC, along with some amazing foresight by the leadership of New York City before Civil War. The city ran out of water. The city also had no recreational space. Before 1850, the only real parks in the city were small, one- or two-block affairs like Madison Square Park. While adding parks and water could and did trigger a lot of corruption, the city elders realized that without a proper source of water, the city would die. Between 1850 and about 1870, the water system was installed, Central Park was built and the New York City took on a lot of the character it has today.
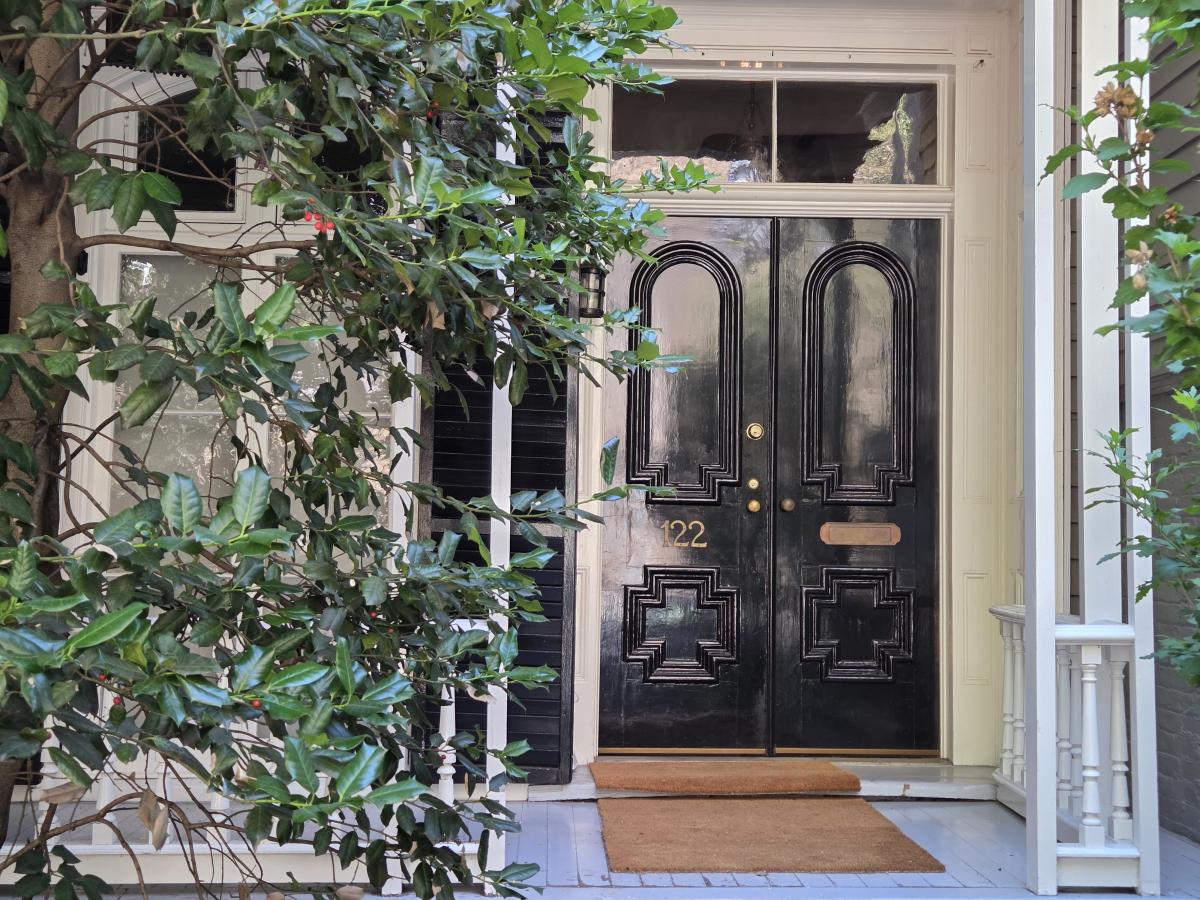
During this time Yorkville was rapidly built up. While the area near the river stayed pretty industrial until after WW1, The few existing private houses and farms were torn down for block after block of apartment buildings, mostly five-story walk-ups. But a few buildings from before the boom survive, including these three wooden frame houses on 92nd Street near Lexington Avenue. The oldest, #160, dates from 1853. Built by carpenter Albro Howell, these houses were built as middle-class housing, not the mansions of Fifth Avenue. The first resident of #160 was bookkeeper and mirror salesperson, Robert N. Hebbard. #120 and #122 are similar and were built in 1871 .
Because of the danger from fire, New York City zoning laws banned wooden buildings - first, in lower Manhattan from about the 1830s and, and for all neighborhoods south of 155th street from 1882.
In the 1898 insurance maps, these three wooden structures, along with a few other long-gone buildings, are the only wooden framed houses in the area. The rest of the blocks are already built up with walk-ups.
These three surviving wooden houses look a lot like similar wooden houses that you'll find all over other parts of NYC, especially in Brooklyn. Same time. Same technology. Same construction techniques. The original walls would have had three coats of plaster. The floors would have been heavy parquet. How much of the original interiors of these buildings still exist? I don't know. These are all private homes. The outsides are landmarked. They're also well maintained and each worth in the millions.
By the end of the 19th century, Manhattan was no longer a single-family home city.
Note: the walkups were pretty much capped at five stories because a building would not have enough water pressure (unless it had a water tower). While I am not positive that they came with electricity, the walkups probably did - but it was DC. - and remained that way for a lot of buildings until the 1960's. While such housing may be standard elsewhere in the world, walk-ups are relatively unusual in the US but still abound in NYC. If you help a friend move in or out of a 5th floor walk-up apartment, they owe you big time!
N.B. for those who are curious: Blogs are rarely planned much in advance. If we have a new product line, I'd want to talk about it. But most of the time, blog posts are like this one - inspired by something on the fly. On Saturday when I unexpectedly walked by a couple of houses I found so interesting I took some pictures, and then, when I returned home, I did some research about what I saw. I found out a lot more about these buildings, and located an archived 1898 insurance map and the 1940s municipal archive of photographs. The larger idea which I realized as the entry came together, was the role government had in shaping the neighborhood.
hardware dresser pt X........
 |
| hmm....... |
I'm trying to reverse engineer how I made this frame and I ain't doing so good. Don't remember how I did the beading on the inside edge. The outside edge I used a router bit and I dimly recall using a hand plane to do the bead. The miters look good and there isn't any chips or blowout on any of the bead heels. The initial plan is make the 2nd frame look like this one.
 |
| how |
It kind of looks like I half lapped the corners but it looks too small. There also isn't any evidence of that other then this corner. I can't see a spline either and I don't think I would do a miter without one - I don't like miters and I wouldn't depend on just glue to hold one together. I have plenty of time before I get to the mitering stage to figure it out.
 |
| didn't see this |
I ripped the rough sawn left edge before I ripped out the frame pieces. Wasn't expecting this tapered cut off to pop up.
 |
| working the dresser molding |
I only need three pieces for the plywood back on the dresser. I will nail the bottom of the plywood to the bottom rail.
 |
| clean up |
The rabbet inside corner needed some clean up. The chisel turned out to be the quickest and easiest one to do it.
 |
| done |
Glued the three legs on the back. I plan on shaping the outside of the molding after it has cooked. Once that is done I'll add some nails (or screws) to it.
 |
| last one |
Smoothing and cleaning up the faces of the frame. Two of them planed beautifully with no crazy grain to deal with. Two faces on the remaining two had some crazy grain that tore out no matter what I tried planing it. I'll have to smooth those two out with card scrapers and sandpaper.
 |
| ready for mitering |
Pencil wasn't showing up on the sapele so I used blue tape. Got both edges square to one face but I still needed to get the width of the four to match.
 |
| hmm...... |
Flushed the miters and realized in hindsight that I should have waited before doing this. I still have a lot more manhandling of the carcass to do before this is done. At least this is on the back and won't be that visible.
 |
| ran out of gas |
Switching between the two ended here for the day. Tomorrow I'll work on getting the drawer cross rails installed. I can get that done before I can do the drawers themselves.
Thinking ahead on the frame, mostly shooting the miters, is that they may be a bit difficult. Planing this sapele, even with freshly sharpened irons, it isn't going to be easy. The first frame is a true mahogany and planing that was a dream. I'll find out tomorrow or the next day.
 |
| last part |
This is what was left over after ripping out the frame. This will do nicely for the back rabbeted frame.
 |
| how?????? |
I have a book on mitering where the each miter was sawn by hand and glued up. True and square and with much joy and dancing in Mudville. My miters were sawn by hand, one on each end, and both were off. This end was worse than the other one.
 |
| cleaned up |
I had no problems truing the miters up. Mr Starrett confirmed that the two of them are dead nuts on. I could do this with the 2nd frame but the book doesn't mention this being done. It was layout, saw them out, and glue it up. I'm concerned that I'll seesaw and the frame will go south on me. The question I still have is, how did the old guys do this so well?
I continue to feel better each day. A lot of the swelling and fluid build up has gone way down but a stubborn part is still hanging on. It still hurts to cough but the burning pain is gone. Still hurts but it is way better than the burning coughing crap.
Sleeping through the night is proving to be elusive. I slept through the night on thursday and friday but come saturday night, nada. Spent sat/sun sleepless. Got a lot of time viewing You Tube vids with zero shut eye. I seemed to wander in and out sleeping for 10-20 minute periods followed by staying wide awake for hours to nod off again for 10-20 minutes. It is most likely a lingering after effect of the anesthesia.
accidental woodworker
hardware dresser pt IX or X?.........
Some things are looking up for me. I can see my toes again when I look straight down. Over 1/2 of the swelling and fluid build up is gone. I still think the fluid build up is what is causing my pain when coughing. As my chest expands to cough the fluid is putting pressure on my chest cavity. The swelling and fluid build up I had with my hip operation was mostly gone within 7-9 days. It ain't happening as quick north of that.
 |
| still square |
There is a wee bit of gap at the front but I'm not going to slip into OCD overdrive about it. The plan for now was to glue and nail the front and back rails in place.
 |
| hmm....... |
This side of the rail is a few frog hairs below flush. This isn't a problem as the rail's main function is to keep the sides from spreading in or out. Most of the exposed end on the outside of the carcass will be hidden with a molding.
 |
| yikes |
I used cut nails to secure the rails. This one decided it wouldn't cooperate and threw a hissy fit. It curled and came out on the inside of the carcass. I tried to punch it out with a nail set without success. I used the nail set to put the nail below the surface. I then filled it in with wood putty.
 |
| sneak peek |
This came out smaller than I expected. I'm sure it had to do with my mixing up the length and width when I glued a 2nd board on.
 |
| the back molding |
This is want I intend to make to hold the back plywood on. Still deciding on the height and width but I won't be 3/4" square.
 |
| prepping for the cross rails |
Used the dozuki saw to do the notches for the cross rails. I was surprised that the waste popped off cleanly without ripping and tearing out chunks of wood. The baselines on the outside faces are almost perfectly clean and smooth.
 |
| good fit |
All four rails fit snug. The top left one is a wee bit more than that and I'll have to plane/sand that end before gluing it.
 |
| close |
The top drawer opening is 1 9/16" and the other three are all 1 3/4", plus or minus a frog hair. If I have to make a another one I'll add a couple of more drawers.
 |
| sapele |
I've had this in the shop for over ten years. I've had it so long that I can't remember what I bought it for. I will use this to make the frame for the latest certificate my wife received. I'll start on that next week some time.
Had a good day and made 3 trips to the shop to work. Only the second trip was without a coughing fit to deal with. Still haven't found the threshold for not coughing but I worked through it and got something accomplished today. I will be going dead in the water for now because the drawers are next.
Can't use the lunchbox so I will have to resaw what pine I have on the tablesaw. It is either do that or resaw the sapele for the frame.
accidental woodworker
day 3 .......
If I move, or exert myself suddenly, I will have a coughing spasm. That will cause the burning pain in my right rib cage. The lung that I didn't have the surgery on is the one that is continuing to throw a hissy fit. I feel no discomfort or pain from the left lung surgery site. So today I mostly sat on my arse again and did nothing. I got up to pee and get coffee.
The pain site has shifted today. It is still under my right bottom rib cage but the pain has moved to the left a couple of inches. My left boob hasn't changed, it continues to hurt when I touch it, bend over, or strain to fart. I would think it would go spastic when I cough too but it doesn't.
 |
| made in august of 2008 |
My wife has cleaned out some of the boneyard residents and sent them to a storage unit. This she wants this to use on the porch which is going to be a 'sitting room'. The table is poplar and red oak. I remember making it and putting in the boneyard where I forgot about it.
 |
| faded |
The black streaks were a purplish color but they had disappeared into a brown color before I was done making the table.
 |
| still tight |
I had wedged all the bottom and top tenons. 18 years later they are still tight and gap free.
 |
| wandered down to the shop |
The plan was to give the wood my best goofy looks and fondle some of the tools. Instead I decided to glue up the carcass. I took my time, and I mean I moved like molasses flowing at 40 below freezing. I got it done without having a coughing fit too.
 |
| hmm....... |
I only glued the sides into the bottom of the top. I left the front and bottom cross rails dry. I will glue and nail them in place later. When and if I get to the shop tomorrow.
 |
| another hmm....... |
The other three spots I checked for square were dead nuts and stayed square when the clamps were tightened. The right corner when I tightened the F clamp in the middle, this corner would go out of square. I need both sides of the front to be square for when I put in the 4 front drawer rails.
 |
| long and wide enough |
I am going to apply a 'L' shaped molding to the back that I can slip the 1/4" plywood back into. That means I won't be giving up any drawer real estate to the back. I will give up details on that when I do it a little ways down the road.
 |
| got demoted |
Another august of 2008 project. Poplar sides with cherry corners. I made this just before I went full out on hand tool woodworking. I used a router table to rout two 1/2" wide dadoes in the cherry to accept the solid poplar panels. My wife decided to use a plastic shitcan now. I can't figure out why?
 |
| my shitcan |
All solid poplar with a plywood bottom. 72 total mortises and no I don't think I'll make another one. I saw both of these in a mission furniture style book and they caught my attention. A lot of what I make are pictures of things I've seen that I would like to make. Haven't seen anything in a while that has tickled my fancy. Unlike my wife, I like my shitcan and I'll continue to use it.
accidental woodworker
New Iron for the Veritas Plow Plane
I've recently been working on my old woodie plow plane and it got me thinking about the Veritas plow. When I bought it, I got a 1/4" and a 3/8" iron with it. But it seems most of the grooves I make these days are small. I absolutely love using the wooden plow, but the irons are a little funky. None of them are the nominal size - they're typically off by a bit (some more than others). For example, the 1/8" iron (0.125") measures 0.157". That's almost 22% over nominal. But the 1/4" iron for the Veritas is spot on.
 |
| Here's the Veritas plow plane |
 |
| And here's its 1/4" iron |
Anyway, I thought I'd make a new 3/16" iron for the Veritas, and maybe later I'll make a 1/8" iron. Their irons are 1/8" thick and, as luck would have it, I have some 1/8" O-1 tool steel. So I got out the old hack saw and cut a blank to just over 1/4" wide and just over 3" long.
 |
| Sawed it out to just over 1/4" wide |
 |
| The blank filed to 1/4" wide next to the factory 1/4" iron |
Next was to file away 1/16" of metal in the lower 3/4" to 1" of the iron. I probably should have hacksawn this because filing it took a while. But I got a fairly precise 3/16" wide iron.
 |
| Iron clamped sideways in a vise |
 |
| Filed the width, and also sawed and filed the notch for iron depth adjustment |
I also filed the sidewalls so that the bevel side of the iron is a little thinner than the flat side, giving clearance for the iron in a cut. The next pic shows the iron test fit into the plane. I made the body of the iron 1/4" wide so that the iron clamping screw would act similarly to the way it does for the stock 1/4" iron. You can also see where the lever cap meets the iron - that's why I didn't go higher on the iron with the 3/16" width.
 |
| First test fit into the plane |
 |
| The notch fit nicely with the depth adjusting nut |
Just a note here. The metal that was filed away to make the business end 3/16" wide, was filed on the outer side of the iron. You can't tell in these photos, but the plane's skate sits below the inner side of the iron. So for the skate to properly support the iron, the metal had to be removed from the outer side.
I heat-treated the iron with a torch until cherry red and nonmagnetic, then plunged into oil. Then because I didn't want to use our kitchen oven to temper the iron (it was 96° that day and we have no A/C), I tried for the first time to temper it using the colors that advance to the cutting edge as I heated the iron about midway along its length. When the golden straw color reached the bevel, I plunged in oil.
I didn't get any pictures of that, but it seems to have worked well. When I sharpened the iron, I thought I might have done the tempering wrong because it seemed I couldn't get a good cutting edge. But after I removed a bit of material, I sharpened again and got a great cutting edge. I'm guessing that the initial hardening treatment left the thin cutting edge area a bit brittle and it just needed to be ground back a bit.
 |
| Here's the iron sharp and ready to go |
 |
| First 3/16" groove cut in some soft wood |
 |
| And a 3/16" groove cut in some fairly hard oak |
I'm happy to report that the new iron performed very well. It locks into the plane nicely, is easy to adjust and cuts a relatively precise 3/16" groove. Now I've just got to decide whether or not to make a 1/8" iron.
UPDATE: I ended up making a 1/8" iron and it also works very well. There's something very satisfying about making your own tools.
New book out from Lost Art Press
[If you read my substack blog, skip this one. Just notifying readers of the new book about the Essex County cupboard.]
 PF version of 1680s Essex County Massachusetts cupboard
I was the luckiest woodworker around when I got the chance to make TWO versions of one of the most elaborate cupboards I know…and even more so when Lost Art Press (who else?) agreed to turn my notes and photos into a book.
The link for ordering is here – https://lostartpress.com/products/17th-century-essex-county-cupboard

I first saw the cupboard this is based on in 1998 – it’s in the collections at the Massachusetts Historical Society in Boston. At that point, I was embarking on a study with my friend Bob Trent of this cupboard and its relatives. That study took a couple of years to research, digest and write.
 PF photo of the Paine/Sawyer family cupboard at MHS
Along the way I had a chance to collaborate with my joiner-friends Ted Curtin and Rob Tarule – they were building a copy of a related example to be exhibited at the Saugus Iron Works – and they included me in some of that work. Then in 2001 the article I worked on with Trent and Alan Miller was published in the 2001 edition of American Furniture. At that point, I figured that my Essex Co Cupboards notebook would go on the shelf and stay there. And so it did, for 20 years – when out of the blue I got asked would like me to make one! I jumped at the chance and was twice-blessed. I wrote enough about the project that another person chimed in & said “I want one too.”
Along the way I shot a bunch of video of the process in addition to the photos for the book. I’ve edited a bunch of those – about 5 hours’ worth and made a vimeo-on-demand page for them. Think of them as a companion to the book. All the details are in the book. Many of the processes are presented in the video series. Link is here: https://vimeo.com/ondemand/504407
I posted a sample video of about 10 minutes of setting the pintle hinges on the cupboard door over on my substack blog. That video is above the paywall – so you should be able to see it. Maybe you need a free subscription – those that get the truncated posts. Often those are about half the length of the full post…
https://peterfollansbeejoinerswork.substack.com/p/the-cupboard-book-is-done
 detail upper case of the 2nd version
New Model Mandolin: 5
In this episode, I design and make a new jig for routing the neck joint. Then: fit the neck, the fretboard’s supporting wedge, and the fretboard itself. Quite a lot there to take in!
I skim over the fretting process as I’ve demoed this many times before, but if you’re interested in how I fret, have a look at thisvideo-
Although I fret my short scale bass, the actual process is the same, just the scale is different!
Cheers Gary
Repairing and Refinishing a 19th-Century Sideboard – Part 2
In my last post, I showed how I removed the old finish from this 19th-century sideboard.

Most any antique furniture I can afford to buy is going to need some repair, and that was certainly true of this piece. No doubt it was priced low partly due to the hole burned into the top.
As you can see, the gap is large and deep, and it runs right out the front edge. I first considered filling most of it in with epoxy and doing some kind of decorative inlay to top it off. Then I came to my senses and settled on an plain wooden panel. I’ve done this kind of thing a couple times before, though never with something this big.

I happened to have a 4″ wide white oak board available. I resawed it and edge-glued the two halves together. After planing it down, I ended up with a panel measuring about 12″ by 8″, and 3/8″ thick. I made sure both halves had the grain running the same direction.
The first step was to clamp the panel to be inlaid exactly where I wanted it.

Make sure the grain direction of your inlay more or less matches the grain direction of the surrounding wood, because you’ll eventually have to plane this whole thing flat. You don’t want the grain of the inlay going one direction while the grain of the surrounding wood goes the other.
I outlined the whole thing with a knife.

Use a chisel to cut into the knife line, resulting in a clear knife wall. Deepen those cuts with mallet and chisel. Everything inside will be cut away.
Now it’s time for some serious excavation. There is a lot of wood to remove here.

I found it helpful to work across the grain at times, not just with the grain.
After removing a good amount of material with the chisel, I switched over to the router plane.

I set the router plane somewhat more shallow than the final depth, and started going around the edges.
Because this was a really big surface to excavate, it was important to leave a little “island” of material in the middle for the router plane to ride on.

In retrospect, I should have left even more in the center and the front edge so the router plane had more surface to reference.
I went back and forth between the chisel and the router plane, slowly increasing the router plane’s depth, until I got to the final depth. Then I chiseled out the center.

Because the router plane wouldn’t reach into the very center, I used a small handplane to bring the center down to the right level.
I managed to go deep enough to get most of the damaged wood out, but there’s still a nice burn mark underneath. But no matter. The patch will cover it all, and the surrounding wood is sound, so the patch will stick just fine.

I put in enough glue to make the patch stick. There’s no need to put in so much that the whole panel starts floating on the glue, as there aren’t a whole lot of places where excess glue can squeeze out.
If the fit of the patch is a bit too snug, try using a handplane to relieve the underside of each edge, so it drops in easily at first. Then you can tap it the rest of the way home with a mallet.

I clamped the patch down as well as I could and walked away.

Once the glue had time to dry, I leveled it off with a handplane. I’m very glad I ran the grain in the right direction. But I also wish I had either excavated the hole a little deeper or planed the panel down a bit more before installation, as it took me too long to plane the whole thing down level.
The next fun challenge was to plane the edge to match the profile on the front edge.

I got as close as possible with the shoulder plane.
Then I switched over to a hollow plane. I own just one, which I picked up on a lark at an antique mall a year or so ago.

It’s the only molding plane I have, but it fit the profile well enough. I’m so glad I have it!

It’s the first time I’ve used this plane on a project, and I’m really pleased with the result. I’ll have to be on the lookout for more molding planes like this.

I used some card scrapers and sandpaper to finish the job.
Once I had finished, I realized that there was a little gap at the far end, where some of the old wood had splintered away from the initial chisel cuts.

These kinds of little gaps are very easy to fix. I sprinkled a bit of oak sawdust into the gap and flooded it with regular superglue. Once it was dry and hard, I scraped it all level with a card scraper.
Even with all the repair on this end, the top of this sideboard still had a lot of scratches, burn marks, and other stains, some of which you can see in the above photo. (Maybe somebody was using it for chemistry experiments for a while. I dunno.) I decided the whole top needed to be sanded down.

One of my daughters was interested in learning to use an orbital sander. So I showed her how to do it. She went over the whole top to try to remove as many of the scratches and stains as possible.

It eventually became clear that we were either going to have to remove a good 1/8″ of wood from this top, or leave some of the deeper burn marks there.
We reminded ourselves that we weren’t going for a like-new look. It’s okay to leave some scars visible.
However, all the sanding had gotten us down to fresh wood, so putting a clear coat of finish on it would not only fail to color-match the rest of the piece, but it would also risk accentuating every stain and discoloration.
So I decided to apply a coat of medium-brown stain to the whole top.

I used an aniline dye (“Georgian brown” from Lee Valley), which brought the color back closer to the rest of the piece. It didn’t need to be an exact match, but it turned out fairly close. More importantly, it hides the burn marks just a little bit.
With the sanding and staining done, it was time to apply a fresh finish.
I went with my all-time favorite: home-mixed Danish oil. Here’s the recipe: put equal parts polyurethane, boiled linseed oil, and mineral spirits into a jar. Shake it up a bit to make sure it’s thoroughly mixed.
Using this finish is very easy, and I normally put on only one coat. Flood the surface of the wood liberally with the mixed oil, using a brush or a wadded up piece of paper towel to spread it out evenly. Wait 2-5 minutes, and add more to any spots that look a bit dry. Once the whole surface is fully coated, wait 15-20 minutes. Wipe off any excess. (Make sure you wipe off the excess before it turns tacky.) Let it dry for at least 24 hours, or until you no longer get a strong smell from the surface.

You can add additional coats if you like. The results are a surface that feels like wood, not like plastic, but that is still easy to clean. It also really brings out any figure in the wood, which is a really good thing in this case.
This sideboard was never going to look like new, but it certainly looks a lot better than it did before.

You can see the burn marks on the far right side, right below the inlaid patch. That’s where the burning liquid that damaged the top spilled over and dripped down the front. Whatever it was even burned off part of the original wooden drawer pull! But there’s enough of the pull left that it remains functional.
Like I said, on a functional piece this old, it’s okay that some scars are visible.

The sideboard is now at home in our back hallway, which we are (slowly) renovating to be our coffee and tea bar.
I think it looks happy in its new home.
ain't so good........
Yesterday was bad and today was worse. The swelling and fluid build up is going down. I no longer have a XXL beach ball belly but a XL one. That is good along with the coughing spells subsiding in frequency and length. The downside is there is a burning pain sensation just under the bottom of my right rib cage. The same pain is in my left boob extending under my armpit out to the site of the lung tube. My boob is sensitive and it hurts a lot when I move or bend over.
The pain under my rib cage is much worse. It hurts just sitting and with small movements but when I cough, I want to put a gun in my mouth. I get a sharp, intense burning pain when I cough. I can feel the cough pressing a 'lump' and the lump doesn't like being bothered. The fluid build up is right along the bottom of my rib cage, with more on the left than on the right.
I have been sitting at my desk doing nothing trying not to cause a coughing fit. Pressing on the 'lump' helps some knocking down the pain but it is still incredibly painful to cough.
I didn't go to the shop at all today. I did go to lunch to get fish 'n chips and I won't be doing that again. I spent the entire meal in fear I would have a coughing fit. They aren't pretty sights boys and girls should see and most time they bring tears to my eyes. The Tylenol and oxycodone the hospital gave are useless managing the pain. It is like I am taking nothing for it because it still hurts like _)*@#^%__@)%*Q#@*)^*(#+_)^(_324-534=7*(%^** hell when I cough.
On a bright note I did sleep well last night. I woke up 3 times, twice because of a coughing fit, but I was able to go back to sleep each time. Still can't sleep flat on my back but I have to sleep propped up against the head board.
I don't know if it is worth while to go to the ER about this. I feel that they are just going to tell me that it is post op symptom that I have to deal with. We'll have to wait and see what shakes out with that.
No promises for shop time tomorrow. I may go down there just to look around and fondle the wood and tools though. Maybe that will be a cough suppressant?
accidental woodworker
hardware dresser pt VII........
Another sleepless night. The rest of my lingering symptoms are still gradually getting better. I'd trade that for a goods night sleep. I hit the rack before 2200 and slept fitfully until the peepers failed open for good at 0231. In between 2200 to 0230 I slept for less then an hour, woke up, and drift off to sleep again. That would have been acceptable if it had continued until morning.
Instead I was wide awake watching You Tube until until I felt sleepy around 0500. I debated about getting up but I closed my eyes and when they opened again it was 0810. I felt a whole lot better then and got up then to face the day.
By the time I had posted my blog I felt blah as in I just wanted to occupy space, suck in oxygen, and expel carbon dioxide. I stayed that way vegetating until I dragged my myself down the shop in the PM session.
 |
| honey do project |
My wife asked me to make a frame for her new certificate. The left one is mahogany that I made out of a mahogany table I got off of Facebook Marketplace. I don't have any more of that but I do have some 8/4 sapele. That is the closest thing I have to mahogany and it'll have to do.
 |
| 2nd honey do project |
This is from daughter #2 that she wants framed as a present for her husband. I have a frame for this already so I just have to pick out a mat for it. I'll get this one to Maria ASAP as his birthday is next month.
 |
| yikes |
At this time of the day in the shop I'm usually looking to wrap things up. Today it is the time I finally made it to the shop. It was a chore to get myself motivated to do something.
 |
| done |
Cleaned up the bottom of the top and the sides. That took me all of 3 minutes to knock out. This was all I had on the to do list but I stayed to find something else to do.
 |
| what a relief |
Searched the shop looking for these. As the last place I searched, I found them in the shitcan. How and why they were tossed in here, I am totally clueless. Happy that I found them and they weren't damaged.
 |
| hmm..... |
My first choice for the back was 1/8" plywood but I don't have any wide enough for the back. I'll have to use 1/4" which would be stiffer and stronger but it will eat up some of the drawer real estate. The rabbet at the back top isn't that bad - a bit awkward to execute but no headaches to do.
 |
| I like this rabbet |
This one will hidden when viewed from the side. I think overlaying it looks sloppy and crappy. It is worth the calories (IMO) to do it this way.
 |
| nope |
This is the rabbet on the sides and I don't like it. It is eating into the half tail which will decrease the strength of it. I'll have to rethink how to get a back on that doesn't look haphazard or an afterthought. I already have an idea percolating in the brain bucket for that.
I didn't feel up to gluing the the carcass today. Past glue ups have taught me that they are stressful enough without not being fully up to snuff. Maybe tomorrow I'll get it glued and cooked.
accidental woodworker