Hand Tool Headlines
The Woodworking Blogs Aggregator
“Glory to God in the highest heaven, and on earth peace to those on whom his favor rests.” - Luke 2:14
Be sure to visit the Hand Tool Headlines section - scores of my favorite woodworking blogs in one place.
General Woodworking
one day and counting........
Didn't get much shop time today. Spent most of it nodding out at my desk and watching You Tube vids. I don't get this way often but with what is looming on the horizon....
 |
| it is 13 years old |
This is something my wife kept in her office that is now an orphan. I used it at the VA for to keep my binder clips in them. My wife used it for the same purpose and now it is back in my care. The finish is a little worn but the drawers still work silky smooth.
This was my project for the day. Sanded, scraped it, and applied 3 coats of shellac to it over a period of 7-8 hours. I am thinking of using it to hold specialty hardware items or screws, etc etc.
After I had made this I had to fix a couple of stupid wood tricks it threw at me. The right side had cupped and the top right and bottom drawers were binding. I shaved the inside of the right side with a chisel and eliminated that headache. In the time since then it hasn't come back.
The 2nd headache was the middle rail came loose at the ends. I know I had nailed each end through the outside into the rail but not if I glued it again. It doesn't matter as the repair has held up but I never set and filled the nail holes. I did that today with wood putty.
 |
| see the white dot? |
Got two coats on the body and the wood putty filled nail hole popped like a neon sign. Normally this would send my OCD into overdrive but this is a shop piece of furniture. I can deal with it. This will be done definitely by tomorrow. I don't expect to burn up the shop on sunday doing much of anything beyond sweeping and cleaning things up a bit.
accidental woodworker
in between.........
I just finished the miniature cherry chest and the cherry bench/plant stand. BTW, daughter #2 said yes, I'll take it. Getting back on track, finished two and there is no project on the horizon at the moment. I have to take a step back and wait until I see what this coming monday says to me.
I have surgery scheduled at the Roxbury VA on monday at 0600. The CT guided biopsy last month confirmed that I have lung cancer in my left upper lobe. Before the surgery they will take a sample of my lymph nodes to confirm that they are cancer free. If they are they will remove the cancerous portion of my left lung. If the lymph nodes are cancerous, it is toast for me and there will be no surgery.
Either way the wind blows this, all I am really concerned with is being able to continue to work in the the shop. Fingers crossed that the lymph nodes come out negative, the cancer is removed, and I'll be able to figure out what the next project from Ralphie's shop is.
I would have started something now but I would only have two days to work on it. I also don't know if the blog will continue after monday - my wife will be posting while I'm in the hospital. I'll make that call after I get back to barn, hopefully on thursday at the latest.
 |
| hmm........ |
The blackening solution worked. The directions were straight forward and the screws matched the color of the hinges. This solution has scary chemicals and I took a lot of precautions using it. If push comes to shove I'll try to get steel next time and use heat to blacken the screws.
 |
| happy with this |
There were a few spots of shiny brass peeking through that I dabbed with a cotton swab to darken them.
 |
| the honey do project |
The back was a plywood wanna be thing secured with staples, no glue. It came off easily and I had no problems pulling out all 23 bazillion of them.
 |
| 1/4" staples |
These staples barely held the plywood back on the bookcase. Just about everyone of them remained on in the bookcase.
 |
| hmm....... |
I had to cut off 15" according to my wife. That went off without a hitch. The bottom and the center shelf were still attached keeping the bookcase reasonably square and together.
 |
| hmm....... |
I got lucky that the rabbet was in the top and not the sides. The joint came apart cleanly and the glue residue scraped off with no headaches.
 |
| sigh |
Glued and nailed the top back on with the 5 penny nails through the sides and the top. It should be ok because it was only previously held together with 3 staples and a bit of glue.
 |
| top on and cooking |
I stapled the back on and nada. The plywood was thin and the staples blew right through them like I was stapling paper. I had to attach the back with 3/4" brads.
 |
| done |
This bookcase is going here in the boneyard. This is the space my wife has decided to turn into a reading room. The left wall has all of my crappola that is facing eviction. Some hard choices coming.
 |
| 100% done |
I mixed up a fresh quart of shellac and put two coats on the bench/plant stand. My wife will be bringing this to daughter #2 in august. On monday the movers are coming to pick up the desks and the dresser to ship them to her. That is the downside of living so many states away from daughter #2.
 |
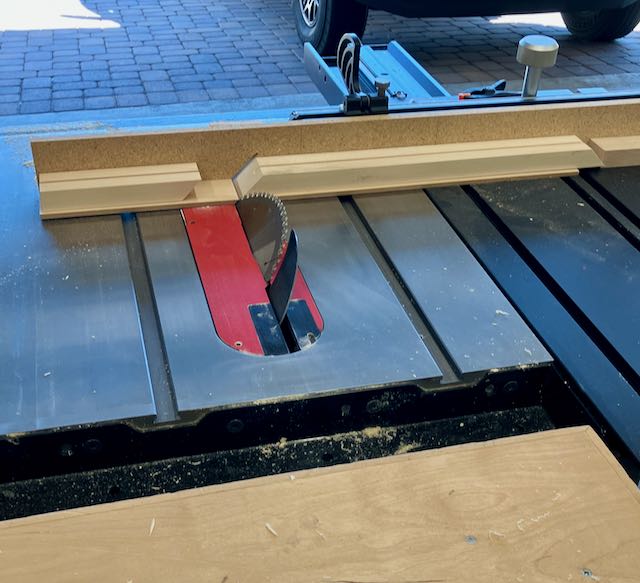
| experiment time |
I've noticed lately that a lot of the You Tube woodworkers I watch use this saw to rip and crosscut. I am in between so I ripped this piece of pine off following a groove I had plowed in it.
 |
| hmm...... |
Cross cut #1 and it ain't pretty. It is square across but wee bit out to lunch on the plumb cut.
 |
| 2nd crosscut |
Cross cut #2 and it wasn't any better neither. It was square across (no problems there) but still off on the plumb cut.
 |
| 3rd cross cut |
No problems sawing it square across the face. It doesn't matter if I use the japanese or western saw. The problems come when sawing the plumb part. The plumb pencil line helped a lot.
 |
| square |
The easy part of the sawing for me. All of the crosscuts I did were all square.
 |
| better |
The plumb line helps me a lot to saw plumb. I did 8 crosscuts total and went 8 for 8 with square crosscuts and 5 for 8 with square plumb cuts.
 |
| hmm....... |
I bought these clamps a couple of years ago specifically made for using with these machinist's blocks. Today was the first time I used these. Made a cross cut and edge plumb cut with it. Both of them came out dead square. The 2nd set up was making a practice tenon.
 |
| hmm...... |
This is my preferred way to make tenons. Saw the shoulders and split off the cheeks.
 |
| done |
After splitting off the cheeks I use my LN rabbeting blockplane to get down to the knife lines. I should have made a mortise to test fit this but I didn't. Maybe I'll do that in the AM because there is nothing else on the hit parade.
My sister and brother in law stopped in again today for another visit before they head back to Indiana. I'm thinking of driving out there because once you get past New York it is basically a straight shot to where they live in Indiana. Maybe, that is what I told my sister.
The weather lately has been out of sorts. There was a mini heat wave and then it got cold, the kind of cold where I had to turn the heat back on. Now we are back to a mini heat wave. I went to Wally World and bought an AC. The temp at the house hit 93F 34C at 1430. I got the AC now because I will have a weight limitation after monday if the surgery goes through. Got it installed and it is working good - the bedroom temp is down to 70F from 88F.
accidental woodworker
Some sample transcription from that 19th-century door
A follow-up to the previous post about that 19th-century door. One reader, Dennis Santella, was able to create very clear images from some of my photos. How he did it is hocus-pocus to me – all that matters is he did it. I’ll post a few of them here with some partial transcriptions. Thank you to Dennis – and if anyone can fill in my blanks, I’d love to hear from you. The transcription I put in italics, to distinguish from my comments.
 #5814 top batten, left
 #5815 top batten 2nd photo from left
Across part of this batten I can make out the following:
First real snow of the season Dec 4, 1886
First white frost season Sept 21, 1886
Heavy freeze Oct 4, 1886
—————————————————————-
1891 Robins and blue birds Mar 15
Frogs Mar 20
Crickets [evening of?] Oct 2? [7?]
“ “ “ 14
“ “ “ 18
“ “ “ 20
Crickets heard first time on Aug 9
First frost of the season Oct 2,
Total eclipse of the moon Nov 15, 1891 [illegible beyond date]
Dennis showed me the part about the eclipse. I looked it up & there was an eclipse then visible in Massachusetts – over night on Nov 15/16. The next photo of that batten shows a small area blocked off in 2 squares:
 #5816
#5816
June 15, 1887
White frost this AM. No damage to Garden
First frost of the Season Sept 16, 1887
No damage to Garden
I’m pretty sure that first date is 1887. One pass through I recorded it as 1889, but that doesn’t make sense. The last photo of that batten has a few entries on it –
 #5817
#5817
Crickets distinctly [heard?] for first time Aug 5 [?] 1887
Crickets on Oct, 8, 1887
“ “ 17 “
“ “ 18 “
The last part of that batten has records from two different years, much of it I can’t make out.
The worst and longest ____ ____
Of the year with ____ _____ ___ in the
Night of Nov 7, 188_
Thunder Storm & very heavy rain Nov 18, 1886
First Snow of the season Nov 13, 1886
Heavy [thunder?] & ____
Feb 18, 1887 ____ ____
[bottom bevel on right-hand end of batten:]
Bad NE Snow Storms _____
April] 13, 1887 4 or 5 inches _____
____ to 9 PM _________
Some of that beveled section shows up better in a later photo – I cropped it & insert it here:

Westone Thunder I Bass Restoration
As you’ll know, once in a while, I like to do resto project: just for fun really! I’d been hankering for a Westone bass made in the legendary Matsumoku factory and I finally managed to get my hands on one. So, this series of videos is all about bring a 44 year old bass back to life!
Part 1
miniature chest & bench/plant stand are done.........
 |
| squirrely grain |
The grain on two of the faces of the legs have an interesting grain that I like. A downside to it is that it is full of shallow tear out pockets. It is/was very difficult to remove it. Sanding did diddly squat and scraping was the only thing working. Even that wasn't nice sailing trying to remove and smooth it out. Wiped it with alcohol to show me where it was still and how well I was doing removing it.
 |
| bottom is done |
I got three coats on the underside of the top and I'm calling it done. There isn't any need to put anymore on it.
 |
| stretcher |
Got three coats on the bottom and sides of the stretcher. After I install it I'll finish the top of it.
 |
| sigh |
I thought I was done with scraping the base but it ain't so boys and girls. I was getting ready to shellac this when I caught several spots of tear out in raking light. Spent another hour and a pound of calories dealing with it.
 |
| oops |
I forgot to or rather I thought I didn't have to sand the ends of the stretcher. The angled saw cut was pretty smooth but this piece of end grain was raw and rough. Sanded it and the saw cut up to 220.
 |
| not waiting |
The last screw for the hinges. This chest had been done except for this for a couple of days. The back stop on the lid increased the real estate for driving screws on the lid. I'll deal with replacing the phillips head screws after my #4 screws come in.
 |
| lid stay |
I have several bent arm lid stays but nixed using them. My track record for installing them is dismal. Chain stays are very forgiving and almost impossible for me to screw up.
 |
| eyeball is off |
Got the upper part of the chain on the lid a wee bit too far over to the right. I'm leaving this as is because I don't want to fill in any errant screw holes.
 |
| extremely happy with this |
The front of the chest had the most work fixing the gaps on the pins/tails. From a foot away I had to stare and concentrate to pick out the shims and hide glue/sawdust filler. The latter blended in seamlessly too. From 3 feet or more away the pins/tails look flawlessly tight.
 |
| lead off glamour pic #1 |
I absolutely love these handles. This chest is heavy (due to being made from 3/4" thick cherry) so handles of some sort were necessary.
 |
| glamour pic #2 |
Don't know if the back will be visible but it is finished so it can be viewed. The tails/pins look good here too.
 |
| left side glamour pic #3 |
I prefer the larger handle but the price of them is prohibitive IMO. One handle is about $70. These two are 4 1/2" and cost me $21 each including S/H.
 |
| left side pins/tails |
Up close and personal and almost nothing to pick out. I had my doubts about the pins/tails being presentable after what I had to do to close/fill all the ugly gaps I had. Couldn't be happier with this. I have no issues with giving this away as a present.
 |
| final glamour pic |
I like the top of this chest. It has cathedral graining, sapwood, and black gum streaks that matches the rest of the chest.
 |
| bench/plant stand |
Glued the stretcher to the end rail and I'm adding screws to give me a warm and fuzzy.
 |
| ran out of shellac |
The can is bone dry but I have two spray cans of shellac. This one is about a 1/3 full and the other is full to the brim. More then enough to finish the bench/plant stand.
 |
| calling this done |
The top of the stretcher is all that needs to have some shellac slapped on it. I will do that with spray shellac and it will probably take 6 or so light coats.
 |
| bench/plant stand glamour pic #1 |
This looks better than I expected. The top of it is 15 5/8" up from the deck.
 |
| side view glamour pic #2 |
I think not putting a bottom shelf on this was a good call to make. The size of this would be perfect for the grandsons to use as bench.
 |
| glamour pic #3 |
It is hard to pick out the double bung holes I did on this side and the opposite one. At first glance I didn't notice them.
 |
| glamour pic #4 |
The top has some interesting grain and my first attempt at a butterfly tie (also called a bow tie). In hindsight I should have used walnut rather then cherry.
 |
| hmm...... |
There is a slight bit of rocking which I wasn't expecting. When I checked this yesterday there was none.
 |
| high spots |
I put a piece of blue tape on the high legs. After the shellac is done I'll trim these two down until the rocking goes bye bye.
 |
| sigh |
My #4 screws and shellac flakes were waiting on my desk when I killed the lights for the day. When I put the #4 screws away I found that I already had 50 #4 x 5/8", flat head screws and now I have a 100. A little later on the Birchwood Brass Black came in early. When I had checked it at lunch it was scheduled to come tomorrow.
I'll check it out in the AM and see how well it works on turning my brass #4 screws black.
 |
| a honey do quickie project |
My wife wants this bookcase shortened by 16". I'll be taking it off at the top and she knows that she will be losing at least one shelf position. She said she didn't even care what it looks like but of course I will give it my best shot.
accidental woodworker
made some progress.......
Today was an interrupted one. I had an appointment with my new PCP at 1000 and at 1200 my sister and brother in law stopped in for a visit. We went out to grab lunch. Three of us got fish 'n chips and the wife got a patty melt, well done. The only seafood I have seen go into her pie hole in 27 years is a fish sandwich from McDonald's. Needless to say not much time in the shop but I did manage to squeeze in a few things. Still not done with either the cherry chest or the cherry bench/stool/plant stand. Maybe tomorrow I'll knock out both or maybe at least one of them.
 |
| bottom stretcher |
Settled on how I want the bottom stretcher to be attached to the bottom end rails. The notch in the end rails is half the width of them. The 1/2 lap notch on the stretcher is 3/16". It will sit proud of the end rails.
 |
| hmm...... |
The ends of the stretcher will extend past the outside face of the end rails 1". I thought of putting the stretcher flush and putting a shelf on it but nixed it. With it being proud it says that this was intentional.
 |
| clipped the ends |
I didn't like the look of the ends being squared so I clipped them This cut isn't 45° neither but something shallower - 5/8" in from end and 3/8" down. I liked how smooth the cut face was off the saw - no need to play with it anymore.
 |
| sneak peek |
This definitely has the look of a bench but it could be used as a plant stand. The bench is roughly 16" off the deck which, IMO, is as low as seat height should be. The fit of notches on the stretchers/rails is spot on.
 |
| not easy |
I was able to chop down but angling the chisel to remove/pop out the
waste wasn't happening. Not enough room to leverage the chisel to do
that.
 |
| surprise |
I got my heaviest picks to pry out the waste but the exacto knife is what I used to remove it. It outclassed the picks by a mile which surprised me to no end at all.
 |
| step one fixing the errant drilled holes |
Positioned the drill block on the center of the leg and drilled two teeny depressions on it.
 |
| hmm...... |
These could be a decorative item, I'll have to keep this in mind. I did this only on the outside faces of the long side legs.
 |
| step two |
Used my Fuller countersink to drill in the depressions I did with step one.
 |
| step three |
Make more bungs then needed to fill in the countersinks.
 |
| first one done |
This is what I repeated on all four legs. They will all look the same, with two cherry plugs. I orientated the grain on the bungs to align with the grain on the legs. Normally I would put the grain of the bung at 90° to the leg grain.
This is as far as I got. Stopped here and went to the VA for my PCP appointment.
 |
| blast from the past |
The wife is rearranging her office and this got demoted to the boneyard. It is a revolving bookcase I made for her 14 years ago (?). She still wants it which surprised me because she uses something and then discards it without another thought. This she likes and wants to keep.
 |
| hiding the me-steak |
I got enough of these thin strips of cherry to apply to the tops of all four rails.
 |
| covering the notch |
I covered the notch in the end rails so I don't get any shellac on it. I learned the hard way that you can't glue over shellac.
 |
| happy face on |
It isn't shaking or rocking in any direction. This is/was almost ready for shellac. I don't have enough to finish this but I have a 1/2 pound of flakes on order.
 |
| sigh |
Got a divot on this end from the router. I brain farted and forgot to tighten the collet on the bit. Too big to ignore or sand and blend out.
 |
| fixed |
I had to saw off a 1/8" to remove the boo boo divot. After that I had to smooth the end grain with my sanding sticks.
 |
| nope |
I thought I could sand the top and be done with it. I was wrong because the butterfly developed some gaps I didn't like. Mixed up some cherry sawdust and hide glue and filled it in. I'll have to wait until the AM before I can sand this smooth and stop slapping some shellac on it.
accidental woodworker
Where Is Dickens When You Need Him? Hand or Simple Turning by John Jacob Holtzapffel - Chapter 7

The five volume compendium "Turning and Mechanical Manipulation" by Charles and John Holzapffel started with Volume 1 in 1846 and ended with Volume Five in 1884. A planned sixth volume was never completed. The series is a treasure trove of hand tool technology. Volume Four, on Plain Turning, and Volume Five on Ornamental turning are the bibles of their field.
Unfortunately the Holtzapffels, both father and son, may have been great tool makers but they were crappy writers of how-to books. In the time between their era and ours, "how to" instructional books have become more engaging and and much more than just a recital of facts. And of course, the act of writing a book - whether in the 19th century or today - doesn't of itself confer an engaging writing style. As a matter of fact, most Victorian books I have plowed through are pretty turgid. I can claim the honor of having read all six volumes of "The Morning Chronicle Survey of Labour and the Poor" a a groundbreaking 18491850 newspaper investigation into the living and working conditions of the British working class mostly written by the crusading Morning Chronicle journalist Henry Mayhew. I found the section on Billingsgate Fish Market to be particularly evocative and engaging - nearly two hundred years later, you can still smell the fish. Later in that section Mayhew notes that the description of the fish market section was contributed by his colleague at the Morning Chronicle: Charles Dickens.
But back to Holzapffel. I realized that in order for me to understand treadle lathes, I would need to plow though Holzapffel's description of using a treadle lathe - possibly the only instruction on using a treadle lathe specifically with hints on treadle speed, how to stand, and other treadle specific info - however turgid I found his prose.
I found it tough going. Too much of my time was spent getting lost in the text (in a bad way). And then I had a brainwave: what would happen if I took the important bits of the text and fed it into the AI chatbot Claude? I asked Claude to take the text and turn it into modern English. And it did - and wow, what a massive improvement. So here ya go. I don't have the time to do the entire book - you can if you want to; it's pretty easy - but here is what I hope is the first section of something useful. The PDF is also posted on the Gramercy Tools Treadle Lathe product page.
One important point. I look at this modernized version as a inexpensive translation. One wonderful feature of the modern internet is that Google and many services will do an instant language translation for you. The translations are rarely perfect and may miss the nuance and discernment that a real translator can provide. However, it's hard to imagine how a niche project like modernizing inaccessible language in a classic woodturning text could ever be economically viable, so having a starting point is great.
A note on the text: As I wrote in a previous blog, "softwood" in this time period included all the furniture woods, including oak. "Hardwood" referred to like Ivory, Rosewood, Ebony, and Boxwood. Meanwhile, a lot of modern forms such as roughing gouges hadn't been invented or named yet and so are not mentioned in the tools section.
Here is the link to the modern version of chapter seven.
and here is a link to the entire volume four in all its glory.
PS We used to stock reprints of all five volumes of Holzapffel but slowly they have gone out of print. We do have a single copy available of Volume Two which covers construction, action, and application of cutting tools and the machines derived from hand tools.
they're both cherry.......
The miniature cherry chest isn't done. I'm waiting on the screws which are coming friday, but I'm still applying shellac too. In between doing that I started and almost finished the cherry bench/stool/plant stand. Came close but no cigar but I am so awfully close to being done with it. I have already started looking ahead to what will be coming out of my shop next.
 |
| rearranging the shop |
I needed the workbench to be cleared off so I can work on the bench/stool/plant stand. I need the bench to plane and clean up the rails and legs.
 |
| cleaned up |
All the rails had burn marks that cleaned up easily. The legs were mostly burn free but had saw marks to plane smooth.
 |
| hmm...... |
Legs and rails sawn to length and dry fitted. The stretcher I'm leaving over length because I haven't decided how I'm going to use it. This gives a peek at what it will look like which IMO ain't too bad.
 |
| swapped out |
Removed the 1/4" drill block and installed the 6mm drill block. Looking at my stock of dowels, 99% of them are 2" and 1 1/2" 6mm pins. I have about 40-50 1/4" diameter, 1 1/2" spiral dowels.
 |
| 6mm dowel in a 6mm drilled hole |
The dowel fits snug and I mean snug. I can't push the dowel into the hole with my hands. No probably driving it home with a hammer. As an aside the 6mm dowels fall straight through the 1/4" diameter drill block bushings.
 |
| oops |
Got ahead of myself and drilled a hole I shouldn't have. The rail will cover about half of it but not all.
 |
| scratched off the bucket list |
I have wanted to put a butterfly on a split/crack for a bazillion years. The split/crack here doesn't extend straight through to the other face. It only goes less then half way.
 |
| hmm...... |
This came out better than I expected. I have a gap here at this end but the rest of the butterfly is gap free. This is going to be the up face of the top. If this butterfly had come out crappy I would of placed this face down.
The depth of the mortise is about 5/16" deep and I sized it so that I could use my small Stanley router to get the depth consistent.
 |
| stretcher |
Still figuring out how to do this. Overall I want the stretcher to keep the bottom of the ends from moving in/out. I kinda have an idea but that won't happen until after it is glued and cooked.
 |
| panic time |
The glue up plan was to do the ends first and then the two long rails. Things went south on me first when I couldn't align the 2nd bottom rail with the top one. The top rail fit on both ends but the bottom one was off.
I thought it was me not drilling the holes correctly so I drilled one more. That did diddly squat and left me with a hole I had to plug.
 |
| the problem |
When I drilled the dowel holes I did them opposite of each other. The holes on this end should have had the closest dowel to the edge on the right and not the left. The other end of this rail I drilled correctly. Drilled the holes again in the right orientation this time.
 |
| another me-steak |
After the screw up from above, I was checking the holes lining up and they do. However, I saw another misalignment that I'll deal with after this has cooked.
 |
| 2nd _*&%@)(@*_)(_#@ me-steak |
When I put this rail in I thought I had done it right - making sure the slot for the table clip was facing the inside of the base. Missed that by a mile. I had remembered to do the table clip slots with my plunge router but I'll have to chop this one by hand on the other side of this rail.
I made this same brain fart on Miles's desk and the fix to hide the me-steak is I'll cover it with a thin slat of cherry.
 |
| hidden brain fart |
While I was trying to figure out why the bottom rail holes didn't align, I drilled two holes on this face that I'll have to hide somehow. These won't be partly hidden though but will be staring right back at me.
 |
| one more |
I had a couple of drips and runs that I had to card scrape away. It is going to take a couple of covering coats of shellac to blend them in. I should be done with the shellac tomorrow. Before glamour pics I'll have to wait for the screws to come in.
 |
| hmm..... |
Clamped and cooking away until the AM. I have been thinking of the stretcher and I think I have decided how to do it. I will notch the ends to go over the rails - not a full half lap joint but a 1/4 one. We'll see how that shakes out in the AM.
accidental woodworker
Furniture Maker Floater Frames Revisited
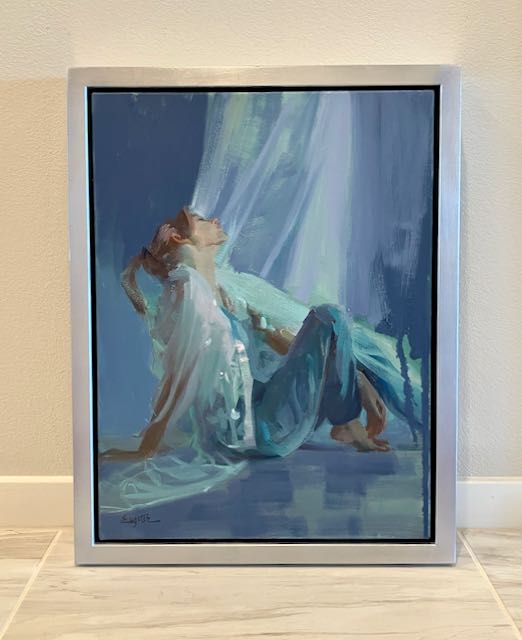
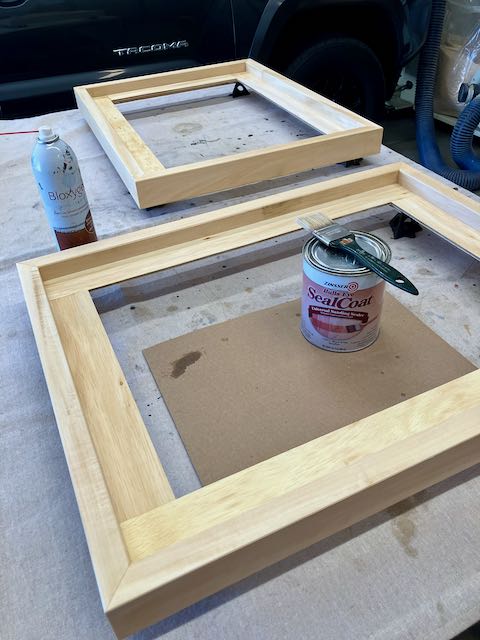
Quite a few years ago I began making floater style frames for my wife’s work and wrote this blog post. Since then, I’ve made a number of them and my methods are different from most of the commercial floater frames available. My goal is to elevate the floater frame from its origin of lattice strips tacked to the sides of canvas to one that has more of a presence. Granted, as a furniture maker I tend to overbuild everything and at this point in my life I have the time to do that. The Picture Framers Grumble has been a place where I can have interactions with other frame makers and I really enjoy that. Unfortunately, here in Las Vegas there isn’t a thriving art scene. This painting is one Diane recently completed, it measures 18″ x 24″ and the frame is about 1″ wide and 2″ deep. The finish is imitation silver leaf which has been sealed Platinum shellac which was toned with French Ultramarine blue powdered pigments.
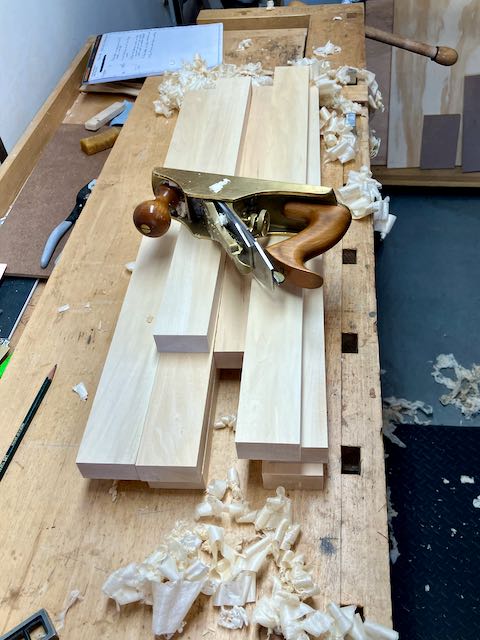
I’d like to share my process with a series of pictures to illustrate the process. I’d be interested in hearing from other framers who make their own frames and moldings. Basswood begins with 5/4 stock which I try to get at least 7″ wide. A combination of hand planes and a power planer will yield material that is about 1 1/16″ to 1 1/8″ in thickness. I hand plane every surface of the boards after cutting them to rough length and finished width. For this profile I wanted a slight chamfer on the edge which was cut with a low angle block plane.
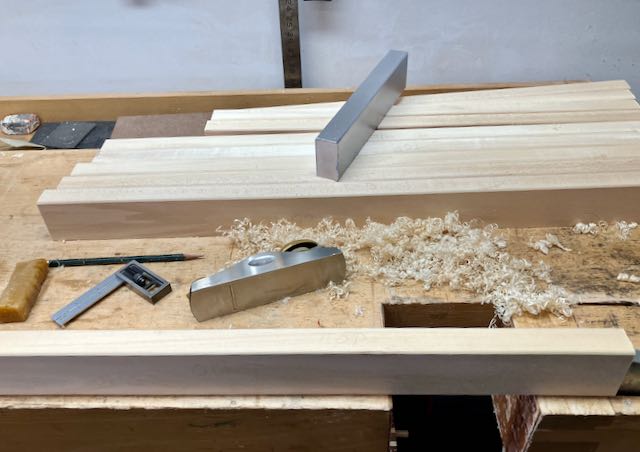
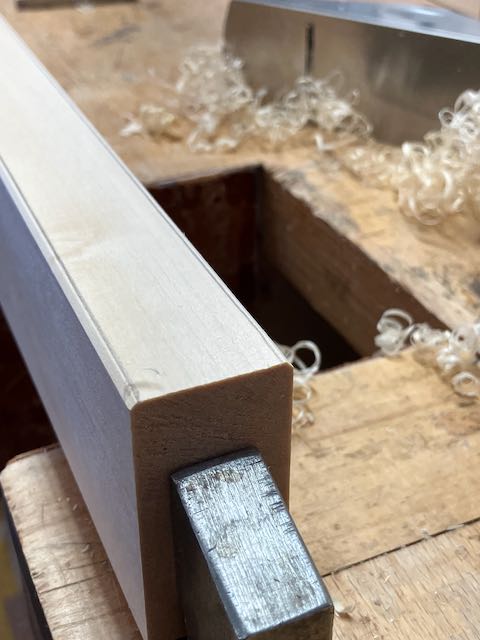
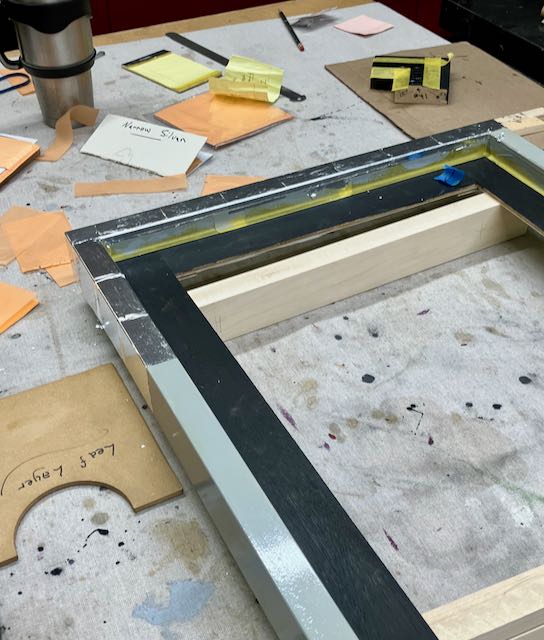
To support the painting I cut a 1/4″ groove on the inside of the piece about 1″ from the top surface. Plywood (1/4″ thick) is eventually glued into it to support the painting and strengthen the corners. The corners are strengthened further with a face frame sized biscuit. Miters are cut using my shop made jig on the tablesaw and the frame is glued and clamped overnight. In the clamped picture you’ll notice a spring clamp in each corner; there is another piece of plywood on the backside to strengthen that — I know: overkill!

I keep projects glued up over night and check for any misalignment, glue, scratches, etc. before starting the finish process — it is so easy to miss them; don’t ask me how I know!
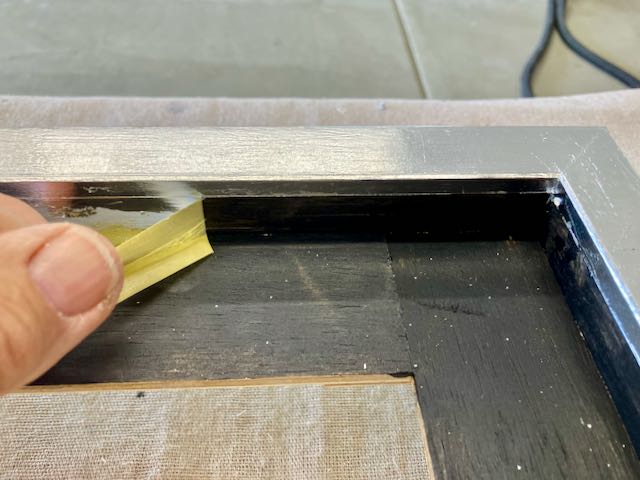
The first step to the finish process is to use Zinsser Seal Coat shellac on every surface. Once dry I lightly sand with 400 grit paper. Next up is taping off the top edge to apply a flat black paint to the inside of the frame. I tape down about 1/2″ from the top and use latex simply because it’s easy to clean up. Once that’s dry, the black areas are taped off so that the gray burnisher/sealer can be applied. Prior to applying the slow set size the frame is buffed with 4/0 oil free steel wool. In my experience, whenever an area is taped off for gilding it’s best to press the taped area down firmly and remove the tape right after gilding. I used to wait until the size was completely set (24 hours or so) but that could result in a jagged edge. By carefully pulling the tape off before the size has set I find that any leaf that wants to rip off can usually be pressed down while slowly pulling the tape off.
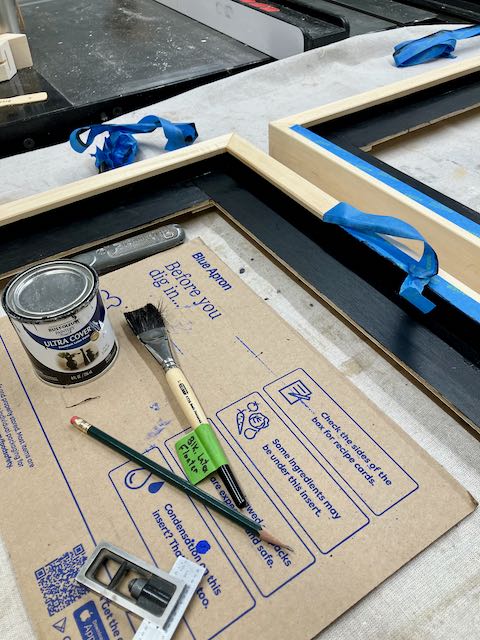
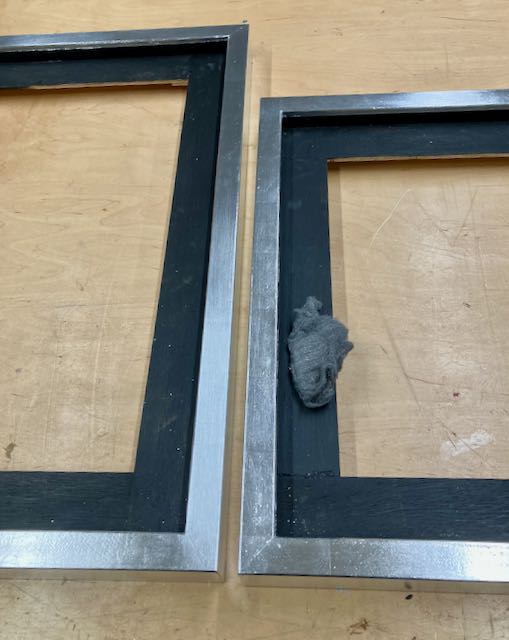
Imitation silver leaf always needs to be sealed to prevent it from tarnishing, my preference for that is Platinum Blonde shellac made from flakes. Since the paintings for both of these frames have a blue palette the shellac was tinted with French Ultramarine Blue dry pigments. To tone down the garishness of the silver leaf it was lightly buffed with 4/0 steel wool prior to airbrushing on the shellac, you can see the difference it makes in the left photo. After the toning was dry, cotton pads and Liberon clear Black Bison wax was used to rub out the shellac and add a slight sheen.
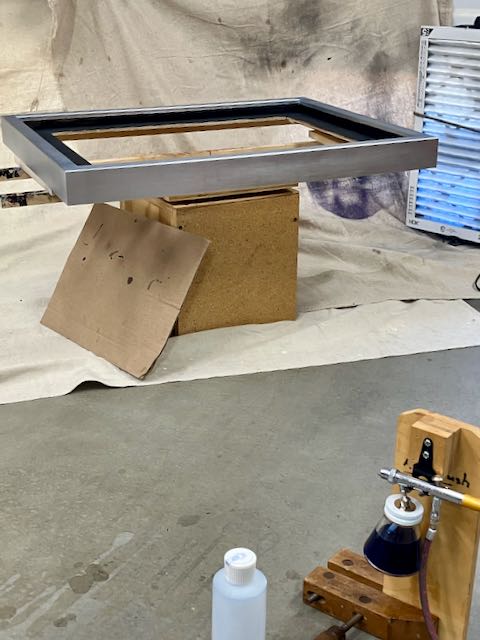
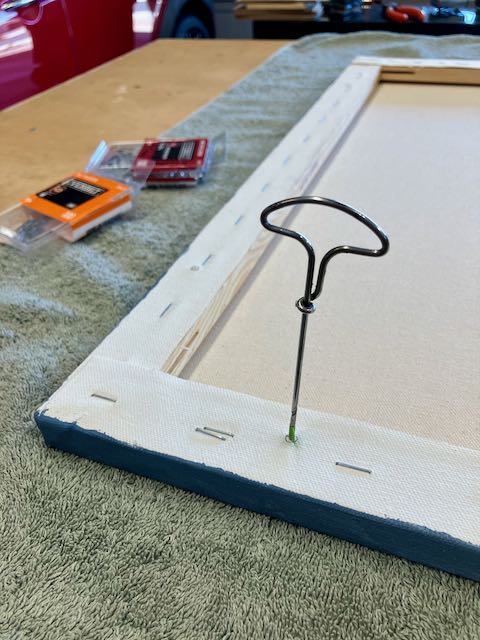
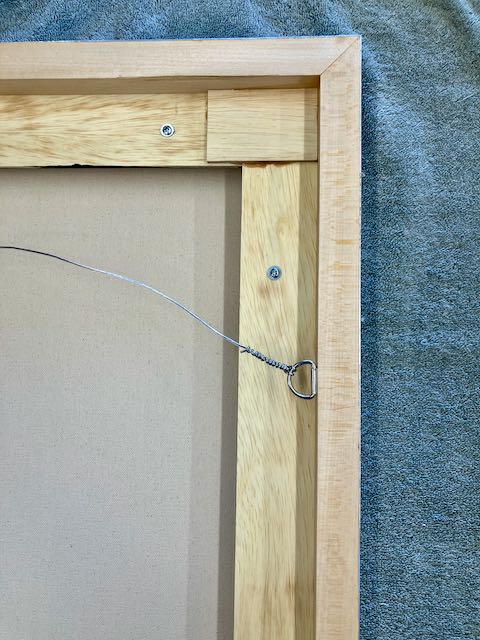
The final step of course is to install the artwork. Holes are located and drilled through the plywood using a 1/4″ forstner bit. I’ve found that the forstner leaves a clean hole which allows for any slight adjustments. Number 6 screws with washers are used, the hole size allows for slight adjustment. My process is to use spacers to center the painting and then locate the holes from underneath the frame. They are pre-drilled with a gimlet and the art is attached with the screws, snug at first to allow any adjustments in case the painting is slightly out of square; this does happen sometimes! One thing I like about the depth of the frame pieces is that the D-ring can be installed so that it isn’t visible from the side. In the picture showing the back view you can see the gusset that is glued into each corner.
So there it is, my process for floater frames which I’m happy with as is my wife and her gallery. Are there any other frame makers that use a similar process? Like I said earlier, Las Vegas doesn’t have a thriving art scene so there are few that I can share frame making with.
cherry miniature chest pt IX..........
I had my annual peepers check this AM. Got there at 0730 for my 0830 appointment. I went early because Rte 10 gets nutso with rush hour traffic. It worked in my favor because at 0740 my annual exam began. An hour later I was driving home with 20/20 vision. It seems like every year the exam takes a wee bit longer and they add new tests and checks. Hopefully that is what it is and not because I can't remember what happened a year ago.
 |
| chest attached to the base |
I used two screws on each bearer to secure the chest to them.
 |
| not rocking |
Happy with this. I was expecting some rocking because the base had a teeny bit of twist. Maybe the chest pulled it straight but it doesn't matter. The chest is tight and flat to the bearers and base ain't rocking.
 |
| moldings |
Got the four moldings sawn out over the lengths needed. This is as far as I got in the AM session. My peepers were dilated and I was working with sunglasses on and it wasn't working. I couldn't focus and see clearly so I went upstairs and did the crossword and sudoku puzzles.
 |
| up side of the lid |
Got the first coat on the lid and it didn't pop like I thought it would. I like the sapwood and the black grain lines. There are black gum pocket/lines on the back stop too. Subsequent coats of shellac should pop this.
 |
| sizing the moldings |
The molding under my finger is a test piece. I used it make sure the front molding is positioned dead on the corner.
 |
| yikes |
I had seen this but I thought it was a black gum pocket. The peepers still weren't operating at 100%. The screw was too close to the edge and caused the bulge.
 |
| fixed |
Squirted some glue in to the crack and clamped it shut. I'm lucky with this fix because the molding will hide all of it.
 |
| first one done |
Got the first molding set, checked, then glued and nailed in place. The plan is to repeat this for the two short ends. The last one I will trim/fit between the short open ends.
 |
| got 3 attached |
Fitting the last long molding in place was batting next.
 |
| sanding stick |
Used a 120 grit sanding stick to sweeten the miters. The corners of the chest after planing and sanding were slightly off 90°.
 |
| sigh |
Over corrected my trimming and the last molding is short. This gap is too wide (and ugly) to ignore. I have one more piece of molding left to replace this one.
 |
| the problem |
This short side molding is a few frog hairs short of the corner. I pulled this one off and used the last long molding to get a new short side one.
 |
| new molding |
Got the left corner tight.
 |
| ditto for the right side |
Happy with the fit of the miters on the back. Glued and nailed it off and with that the moldings were done.
 |
| hmm....... |
This was the molding I had dyed the bare wood and I can see a color difference between this and the other three. Got lucky because I wasn't pay attention as to where this molding was going. If it had been at the front I would have ripped it out and replaced it with a new molding.
 |
| decided |
My choices were to rip out one of these to match the 1 1/2" square leg.
Instead I'm going to knock these two down to 1 1/2" because they are the
exact same length.
 |
| done |
I got one leg blank for any oops that might bite me on the arse.
 |
| done |
I got all the parts needed for this bench/stool/plant stand. Four legs, 6 rails, and one stretcher for the bottom rails . The board on the right is an extra rail, again for any potential oops.
In between getting shellac on the cherry chest I'll start working on the new project. I'll be doweling this like I did for Leo's desk. I will use the 6mm dowel jig I just bought for my Dowel Max jig.
accidental woodworker
A pictorial overview of medieval furniture made by the Saint Thomasguild
Saint Thomas shrine

Tresoor / dressoir for Castle Hernen


Medieval toolchest


Strycsitten

Savonarola folding chair


14th century X-chairs


Sedia tenaglia


Part 1 of a 3-part blogpost.
Turned triangular stool

Sella curulis


St. Thomas / St. Joseph bench


Scapradekijn / hanging cupboard for Amsterdam Castle / Muiderslot


15th century bench


cherry miniature chest pt VIII...........
 |
| installing the hinges |
I always try to do my hinging the same way. Which means chopping the hinge gains on the wider board/part first. Then repeat for the other (thinner) one.
 |
| stop and move on |
A big chip out happened the first lid hinge - I super glued it and clamped it with a piece of blue painter's tape. While it set up I chopped the other hinge.
 |
| yikes |
A hinge is MIA. I spent an hour searching the house retracing my steps trying to find it and nada. I almost bought another set of them from Horton Brasses. Hint - look at the far end between the vise faces. The MIA hinge was hiding there.
 |
| nice touch |
Horton sends steel and brass screws with their hinges. However, I had two strikes against them already. The first is they are phillip head screws and secondly, they are too long. They aren't too long for screwing into the chest but they are for screwing into the lid.
I tried ordering some black oxide, #4 x 5/8, flat head screws and nada. In fact I was ordered a lot of screws to get above the minimum and they only had two of the 9 screws I tried to order. I ended up buying brass, flat head slotted screws off the internet. It was site I hadn't ordered from before.
 |
| no help |
I had no #4 x 5/8" screws in any flavor and the #5 x 5/8" screws I had were too big for the hinge countersink. I'll have to wait for the screws to come in.
 |
| yes they are 3/4" long |
I thought of clipping/filing the screws down to 5/8" but nixed it. I'll cool my heels and wait. Once they come in I will paint the heads black.
 |
| prepping for shellac |
All the woodworking is done except for attaching the back stop on the lid. The glue joint on the underside of lid wasn't flush. A few strokes with the card scraper and it was.
 |
| swagged hinges |
I made both gains the thickness of the leaves which left me with this big gap. I expected that and to lower it I will trim the gains on the chest until I get a gap I like.
 |
| handle template |
Drilled the holes for the handles now rather then after the shellac was done.
 |
| better looking tear out |
The grain on the front at top reverses three times along the length. I skewed a #3 and got most of it to look presentable. I followed that up with a card scraper. I didn't get it all but enough. I stopped because I didn't want a hollow in the front between the chest and the lid.
 |
| sneaking up on it |
The gap I wanted needed about a 16th to go bye bye. Used the router plane to sneak up on that - took me 3 plane and checks before I got there.
 |
| almost there |
I was slowly reducing the gap but I didn't like this one - still too wide.
 |
| done |
Trying to avoid the lid becoming hinge bound. That would require adding shims to the gains which was the opposite direction I was going in. I'm happy with this one. The lid is laying flat on the front edge and the angle from the back to the front is a frog hair off 90°. (It sill may get sucked down some when I screw the hinges in place too.)
 |
| first coat of shellac |
I like watching the first coat of shellac pop this cherry. I can't wait to see what it looks like with 5 or more coats slapped on it.
 |
| last of the woodworking |
I had 3 coats on the underside of the lid and set the back stop in place. I used a couple drops of super glue along the length to hold it in place while I screwed it off.
 |
| last one |
Five screws and a few drops of super glue secure the back stop. All the woodworking is done. The oohs and aahs will commence after the last coat of shellac is on.
 |
| easy oops fix |
I forgot to remove my center line pencil mark on the back edge. Shellac is very forgiving with something like this. Card scraped the pencil mark and put shellac on this and it disappeared like it was never there.
 |
| 3 coats on |
Got four coats on the underside of the lid. Next batter up is marrying the chest to the base. Then I'll attach the cove moldings and finish applying shellac to the chest and lid. I should be snapping glamour pics on tuesday (for Wednesday's blog post?).
 |
| couldn't get it to flow |
The cathedral grain doesn't flow around the chest in one direction. I tried to do it but it wouldn't work out. I wanted the sapwood on the outside of the chest and couldn't get the cathedrals to cooperate.
 |
| next project |
Most of these scraps of cherry have been hanging out on the tablesaw and they have to go. I think I have enough here to make a small table/bench/plant stand.
 |
| leg stock |
The two bigger ones are too big for this project. The thinner one is 1 1/2" square and I think that fits better with the overall scale of what I intend to make. I'll start on it after the chest is done.
I found something that will turn brass black - Birchwood Casey Brass Black Metal Finish. Heating brass doesn't turn it blue/black but this will. Coming from Amazon tomorrow.
accidental woodworker
Schoolmaster’s Desk 1: Base

My son asked for a desk or table, as all he has in his room is an end table that's too small to use a chair with. I had saved some ideas and thought this would be a good match. The inspiration is from Bill Hylton's Country Pine Furniture. My son helped with most of the steps.
 photocopy from the book
The only wood that I had enough wide and thick pieces to use was maple. I think that's a good choice as it should be hard enough that it won't easily get impressions, as compared to poplar, pine, sycamore, etc. Most of the maple is curly. Curly maple looks nice but I am hesitant to handplane it because it tears out so easily. Not many handtools in this project.
 marking out soft / curly maple
We marked out the pieces leaving room for snipe. The widest pieces can be used to make the lid and the aprons. The thickest pieces were 1 3/4" and will be legs. All of these pieces were sent through the thickness planer at least a couple times to smooth their faces.
 nice and smooth
Some of the maple had bug holes. I do not find them delightful. I fill them with clear superglue and scrape them level later.
 we can't have holes in our desktop!
The first step was to glue up the lid and cut it to size. The lid is large and heavy. I have concerns about it staying flat. Breadboard ends would be a good idea, and what are pictured in the plans, but it will be easier to go with battens. I'm also worried that if it slams shut it might break along the glue line. Maybe I can add some of that toybox hardware that keeps lids from slamming.
 two wide pieces to make the lid
After the lid's size is set, the base can be made to fit. The base has four legs and four aprons. I am using dominos for all of these joints.
The side aprons are slanted. For these angles I followed the plans. I cut both sides at once on the bandsaw so they would match. After they were cut I set a bevel gauge to match the angle, in case I needed to transfer it to other pieces later.
 the side aprons are angled
I needed to make angled cuts on the tops of the front legs. I crosscut these on the bandsaw after tilting the table to match the bevel gauge.
 side apron mating with over-long leg that needs to be cut
 tilted table to match
Then the front apron needed a matching angle on its top edge. This was a rip cut with the same angle.
 the front apron needs to be beveled to match
The long taper of the legs were also cut on the bandsaw. I have a plywood sled and leave the edges hanging over the side as I push it through. On one leg I cut the tapers on the wrong sides. We had planned on the ugly faces being on the back, but I had to rotate that leg 90° to make it work, so the ugly side will be more visible.
 long tapering cuts on bandsaw
Before gluing the aprons and legs together I tried to smooth everything. In the next picture you can see my tools:
 planing scraping and sanding
The card scraper is used for 90% of the work. A smooth plane or #80 scraper can help for the larger bumps or ridges. I also use a hand sander, mostly for the corners and edges.
Before gluing anything together we applied one coat of transtint Honey Amber and then handsanded back. This is supposed to add some depth to the curls.
I glued up the short, angled sides first. After this I decided to add pins, as I wasn't sure glue alone would hold everything together. Not all of these joints are square and flat and flush and tight. So I drilled 1/4 inch holes and made 1/4 ash pins, as I have done a couple times before. The pins in these tenons were not drawbored, which saves a couple steps.
 split ash to make pegs
 hammer through a series of smaller washers
Later the front and back aprons were added to complete the base. In the picture the base is resting on the bench with the legs hanging in the air.
cherry miniature chest pt VII...........
 |
| next day AM session |
I checked the base for rocking and immediately was annoyed. The top was rocking a teeny bit and the bottom twice as much. Spent my first ten minutes getting the top and bottom to be rock free again.
 |
| new bearers |
Didn't have any cherry so I used pine. They are snug fitting and dry - no nails or glue. Before I commit to this I wanted to make sure it is going to work.
 |
| first fit was good |
The bearers felt snug and they held the weight of the chest on them. No rocking which put a happy face on me. Took the chest out and put it back in again and it was rocking.
 |
| not rocking |
Checked the chest but it was still laying flat on the tablesaw. I was getting the heebie jeebies about this base and chest ever getting married.
 |
| a happy sigh |
The far left corner is down - that was why it was rocking again. Evened the bearers out and checked the chest and no rocking.
 |
| baby steps |
The plan was to nail the bearers on, no glue, and checked the chest for rocking.
 |
| oh what a relief |
Bearers nailed on and the chest is dead flat on them - zero rocking.
 |
| hmm....... |
Leaving the nails in the bearers. I didn't want to risk pulling them off, applying glue, and then nailing them back on.
 |
| screwed the bearers |
I added screws to the bearers one at time. After screwing one on I checked that the chest still wasn't rocking. Got them all screwed off and the final check of the chest still had no rocking. Much joy and dancing in the streets of Mudville commenced and lasted for hours.
 |
| cleaning up the base |
There were a lot of shallow tear out spots that the sandpaper wasn't removing. I had to use a card scraper to finally remove them. I used a #3 only to flush the pins/tails at the end. I didn't want to risk tear out planing the entire length of the sides.
 |
| shellac and black dye |
Trying this to see how it will look on the cove molding I dyed yesterday.
 |
| not black enough |
This is the back side of the molding that I didn't dye. I guess I was looking more for this to be a deep black like it was paint.
 |
| the dyed side |
I don't like this look at all. I thought some of the red oak would peek through but it isn't. This molding doesn't look like wood to me.
 |
| from ACE |
I had to make a grocery store run and ACE is in the same parking lot. $10 for a pint can of cherry dye.
 |
| cleaning up the chest |
This took a lot of time and a ton of calories. Used the #3 to flush the tails/pins on the corners and sanded the chest after that was done.
 |
| hmm........ |
The middle one was dyed on the bare wood. The other two I put a seal coat of shellac first before applying the dye. The middle one is dark but not as splotchy as the top and bottom ones are. They are also lighter. The cherry dye IMO doesn't look like cherry. I think I like the red oak dye was a better match for cherry. Regardless I am going with the cherry dye as is for the cove molding. It will be a contrast between it and the chest cherry.
 |
| it worked |
Made a template for the handles and tested it on a piece of scrap pine.
 |
| back stop |
Rounded over the top edge on the front and back to soften it. Got the hinges laid out and stopped here for the day. My wrist was hurting probably from the RO sander work I did. I'll get the hinges done in the AM. After that is done I can attach the back stop to the lid.
accidental woodworker
a 19th century door with a local story
A non-woodworking post – but it has a hand-made 19th century door in it. Some friends & I often chat about the birds we see around the neighborhood and in one of those conversations recently they re-told me a story of a door in their house. It came out of an old house here in town about 50 years ago. Though I had heard the story, I hadn’t seen the door until this spring – of didn’t remember it anyway.
 19th century interior door
As far as that sort of thing goes it’s a nice, but pretty common, white pine door. Shiplapped boards, clinch-nailed battens. I like how some of the boards taper in width – that’s a nice feature. Its original configuration was from a house-to-a-shed. I don’t know what went on in that shed, but someone kept notes written on the door about the weather and comings and goings of nature –

Here’s what I can read from the middle of that section:
1890
Bluebirds Robins + Blackbirds
10th of March ______ _____ ___
First Crickets Aug 7, 1890
First frost of the Season Sept 25
Crickets on Oct 10 [Rainy? ???]
“ “ “ 16
First Snow flurry Nov 11 1890
These notes are scattered all across the top half of the door. Some legible, most less-than legible. There seems to be no rhyme or reason to the format – one year is here, the next is elsewhere.
On the top cleat are some notes from 1886 – then right under them 1891
 top cleat
I can’t quite make out the top line but just below that is:
“First white frost of [the season?] – with the date just past the nail head – “Sept [21?] 1886
Heavy freeze Oct 4 1886″
Then right below that a line setting off the next entries for 1891
“1891 Robins and blue birds Mar 15
Crickets heard first time on Aug 9″
It goes on – but that photo cuts it off right there…it spills onto the next photo. “Frogs Mar 20 Crickets….” [illegible]
So – if you’d like to help decipher what’s written on this door, I’m all ears. I shot large photo files – and if I’ve done it right you can view and/or download them – but you gotta have a dropbox account…
I wasn’t sure of a way to create downloadable files here on this blog – and I gave up trying.
Any of you with graphics wizardry might be able to improve the photos to bring out the writing. The earliest date I’ve seen is 1872, latest maybe 1894 or 5. I think this link will bring you to a folder of 30 or so photos. If you can transcribe stuff, key it to the photo’s number
I tinkered with the brightness & contrast on this section from the 1870s
 1870s
1870s
the bottom third I get:
“Crickets Aug 1st 1877
” heard distinctly on
Oct 15 1877 after a very Warm day”
Anything you have to add, leave a comment or send an email – PeterFollansbee7@gmail.com
cherry miniature chest pt VI...........
I went back to the shop after dinner last night intending to spend a few minutes checking out the base/chest rocking issues. Those few minutes morphed into almost 2 hours. One thing led into another and I lost track of time. Figuring out why things were going south on marrying the chest to base started to consume me. In the end I still didn't have a clue as to what was going on.
Instead of adding the pics from that session to tomorrow's post I am writing it up as a separate post for today. As soon as I post this I'll be returning to that headache and commence doing battle again.
 |
| the problem |
The base has a teeny bit of twist over the sticks both top and bottom. IMO it is no where close to causing the headache with the chest and base being married. I was starting out first by checking the base and the chest for twist.
 |
| the flatness check |
This is my preferred way to check for flatness and the chest ain't a rocking on either diagonal. I also checked with the sticks and they said no twist too.
 |
| hmm....... |
Thinking about this I thought that maybe there was a hump on one or more of the bearers. There wasn't, all four were flat and straight.
 |
| light assist |
I even shined a light behind the rule and no light peeked out on any of the four bearers.
 |
| hmm...... |
Thought I had found the problem. Two corners had one above the other and two were the rule hit. I evened the ends were they met but that didn't make the rocking go bye bye.
 |
| one of the high corners |
Both of the high corners were where I had the veneer. I really thought this was the fix boys and girls.
 |
| it wasn't easy |
Of course where I had to remove some wood was against the grain. One corner torn out and looked ugly.
 |
| sigh |
I had to shim the ugly torn out corner so the rule lay flat across corner to corner. Got zero joy when I put the chest on the base. If anything, the rocking was worse then before.
 |
| checking the offset |
Next check on the hit parade was checking the bearer offset from the top of the base to the bearer. It was off less than a frog hair 360 in a few spots.
 |
| hmm....... |
Clamped the chest to the base. The clamps pulled it flat and tight to all four bearers. I could see and feel them pull the twist out of base onto the chest.
 |
| no joy again |
The chest ain't rocking on the base but the base is rocking. It wasn't rocking as bad as the chest unclamped but enough to be annoying.
 |
| back to square one |
Starting over by checking and removing the twist on the base. I wanted to go forward from here with a known, good flat base.
 |
| the final check |
When doing this I saw that two of the bottom corners weren't square in one direction. Squared those, flipped it and kept at it until there was zero rocking on the tablesaw. Repeated it for the other side. Base was now flat and not rocking on either the top or bottom.
 |
| removed |
The bearers came off without any problems. I thought with them being glued that they wouldn't come off as cleanly as they did. The reason why I didn't extend the bearers from side to side was I didn't have any scraps long enough for the long side. When I replace the bearers again I will do that.
 |
| hmm..... |
Still surprised after seeing this pic how easily this cleaned up. I used a card scraper to remove the glue residue.
 |
| last check |
According to the straight edge the top of the base is flat, straight, and all in the same plane 360.
 |
| hmm....... |
This is not the look I was expecting. I put on a 2nd seal coat of shellac and once it was dry, I wiped on the ebony dye. I was hoping that it would be more dark and black. Maybe I can boost that happening with adding some black dye to the ebony?
accidental woodworker
cherry miniature chest pt V...........
 |
| I stuck to the plan |
After dinner I went back to the shop and glued up the 2nd base. It was twisted a bit so I clamped it flat to the workbench. I wasn't expecting it to do anything but when I took off the red handled clamps, the base stayed flat on the bench. Nothing moved or shifted when I did that. Sometimes you get lucky.
 |
| cleaning up the base |
It probably wasn't necessary but I planed and rasped the base cutout smooth.
 |
| it fits |
I had built in wiggle room, R/L and F/B. However, it seems I added a wee bit too much R/L - it was 3/16". But that is what the cove molding is for - to cover any gaps between the base and the chest.
 |
| blurry pic |
Just as well that this was blurry because the tails on this base have some of the ugliest gaps I have seen in many, many moons. This blurry corner had the worse looking ones.
 |
| the other end |
This corner looks better but it still ain't good IMO. I will use it and shim all the gaps.
 |
| the best corner |
This is what I was expecting to see on all four but that didn't happen boys and girls.
 |
| homemade putty |
Gathered up some cherry sawdust and mixed hide glue with it. I filled in all the small gaps with this that didn't need a shim.
 |
| bearers done |
I glued and screwed the bearers to the inside of the base. I will screw up through them into the bottom of the chest.
 |
| too high? |
The bearers are 5/16" down from the top of the base. That puts the plywood bottom a few frog hairs below the top edge. Not that matters much because the cove molding will hide it. In the pic it looks high to my eye, but in person it doesn't.
 |
| bottom on |
I nixed just screwing the bottom on and instead I glued and nailed it. Flushed the edges of it to the chest.
 |
| lid sized |
The lid is a 1/2" oversized on the front and sides. I may knocked that back to 3/8" because I'm not exactly in love with this amount of overhang.
 |
| needs shims |
I had 4 pin/tails to shim on this end. The other end I had to do 6. Overall I used 14 shims to close up gaps.
 |
| shim stock |
I picked through my cherry scraps and used those that closely matched the chest. The japanese dozuki did extremely well sawing the thin shims I needed.
 |
| more homemade putty |
I shimmed what I could but there were still a few gaps that looked ugly. 99.9% of them were on the tails. I only had to fill two spots on the short ends.
 |
| the cove molding |
The first step is to put a thin coat of shellac on so the dye doesn't end up splotchy. I put one spoonful of shellac into the container.
 |
| hmm....... |
I added 3 spoonfuls of the alcohol from the brush container into the spoonful of shellac. That should thin it so the dye goes on even. I don't think the cove molding is pine but it looks like poplar to me. I don't know if this molding will act like pine does when it is dyed.
 |
| two of the choices |
The plan is to dye it with red oak first. The right one didn't look like the cherry at all. After the red oak has dried I will apply another coat of shellac as a sealer. After that has dried I will apply the ebony as the 2nd dye.
 |
| happy with this |
The color came out more even then I expected. It also doesn't look that bad against the cherry. (BTW when I was at Lowes there wasn't a drop of cherry dye in the store.) After dinner this will be dry and I'll put on the ebony. I want this molding to stand out from the cherry and that is why I'm using a dark ebony as the top coat dye. I'm hoping that the red underneath will peek out too.
 |
| hmm........ |
The chest is rocking in the base. The chest isn't rocking sitting on the bench. I stacked up some veneer on the low corners until the chest stopped rocking on the base.
 |
| it went south |
Took the chest out of the base to super glue the veneer stack together. Put the veneer stacks on the bearers and put the chest in place. It was rocking again. Less than two minutes before it wasn't. WTF?
The chest lays flat on the tablesaw with zero rocking in any direction. Under the sticks it shows zero twist too. The bearers show a little twist but I don't think it is enough to cause the amount of rocking I'm seeing. I'll have to set this aside for now and think on it for a while.
 |
| back thing doo dad or doo hickey |
I have a book on furniture styles and the names of the parts of them. What I don't have is one thing that has anything like this. I like the look of it on the lid over leaving the lid flat and unpopulated. A back stop is what I came up with to call it.
accidental woodworker
cherry miniature chest pt IV...........
 |
| hmm....... |
In pine this would have been a nice looking, deep rosebud. In cherry I can't feel even a hint of a depression from the clamp head. I'm pretty confident that these will disappear once I plane and sand the chest.
 |
| making cove molding |
This is a 1/2" round nose bit and the cove molding it would make is too small. This is roughly about a 1/4 of being able to cover a 3/4" width.
 |
| a bigger size round nose bit |
The cove is bigger but still not big enough. I have a larger round nose bit but it is 1/2" shank and I don't have a router table for the plunge router. This road is a dead end.
 |
| hmm..... |
I have two small cove molding planes - both of them are 3/8". The profile looks to my eye to be a wee bit too big. But the headache is and was, trying to run the plane on cherry. First I had to fuss for a bazillion years trying to get the plane to take a good shaving - not too shallow and not too heavy. A kind of Goldilocks and the three bears story.
Got that sorted out but I couldn't get a consistent cove on the entire length. The lead in wouldn't develop the full profile no matter what I tried. Decided that was ok as long I added about 6 inches of extra length for the lead in. But when I checked my cherry scraps I didn't have anything long enough to do that. Sigh.
I tried both molding planes and I wasn't happy with what I made with either one of them. I know both work well and make good moldings in pine but with the cherry I have it was garbage. Another big hiccup was the available cherry I had wasn't straight grained. It was mostly cathedrals I would have to plow through. Nixed this and decided on buying and dyeing ready made cove moldings.
 |
| working on the base |
Molding problem solved so I moved on to making the base for the chest. I didn't know it here yet that I had a major brain dump that would bite me on the arse in the PM session.
 |
| not happy with this |
I can remove some of this defect when I saw the half pin but not all. Thinking that I will plane a chamfer on the outside edge to remove what is left over.
 |
| I like this |
If I flipped the board all this would disappear. The opposite face is 99% clear. I want this be facing out so I'll deal with the defect after the base is glued and cook. This is why the defect is on the outside face.
 |
| tails laid out |
I did two tails at the corners vice one big one. I didn't like the look of a single tail and two didn't look crowded or too small.
 |
| one of 3 that came today |
I saw these squares on a Fireball You Tube vid and pulled the trigger on the two pack. You can also get a 3 pack or buy the 3 sizes individually. I have a poor record with miters and I think these may help a wee bit.
 |
| hmm...... |
These 45's are substantial. They are made out of steel (?) and it is almost a 1/8" thick. They aren't flimsy feeling and have some heft/weight to them. Both sides have scales on them. I don't know if they offer them in metric. They are made for metal working but I can envision them working with wood with no problems.
 |
| I got half sizes |
The big square is twice the size of the smaller one. Both will layout 45's, 22 1/2, and 90 degrees. The inside corner is rounded but the flange was dead square when I checked it with my 6" square.
 |
| cove moldings from Lowe's |
I got lucky as there were only 4 of these left. I hope my estimation won't bite me on the arse. The plan is to stain these and I have a few ideas percolating in the brain bucket with that.
 |
| hinges and handles |
Bought a black oxide hinge for the chest from Horton Brasses. The bail handles I got from eBay for $42 including S/H. eBay is the cheapest price I've found this style of handles.
 |
| grandson's art |
Leo did the xmas tree when he was 3 years old. Miles's is on the right and he did his a couple of months ago. I hung them on my wall cabinets and snapped a pic of them. I sent it to their mother so she could show it to them. Both are waiting to see them hanging in the shop.
 |
| I'm learning |
Chiseled a relief on the tails before I tried to dry fit the base.
 |
| yikes |
This is not what I wanted to see at this point. Go back to the 5th pic and you'll see the boo boo that I totally missed. The long base pieces are short - they are on the inside of the short ends rather than out to the outside faces of them. Real big sigh.
 |
| one point for more |
Got the short sides correct - so I get one of the two points available.
 |
| 1 1/2" short |
There is no way to fix this mostly because you can't stretch cherry. I can't see repurposing this for something else neither.
 |
| hmm..... |
I got lucky finding enough wide scrap to get a new base from. This one is about a 1/4" higher and I'm keeping it as is.
 |
| tails laid out |
It was a strange feeling after finding my boo boo. I didn't have the urge to give it flying lessons. I'm getting better at dealing with my brain farts I guess.
 |
| stayed late |
Tails sawn and ready to chop out the center waste. I plan to return to the shop after dinner and get the tails/pins chopped, dry fitted, and glued up and cooking. I want to keep moving on this and get it done ASAP.
 |
| the store bought cove molding |
I like this look and the coverage it will have on the base. The molding definitely needs some help color wise. It is too stark of a difference between it and the cherry.
accidental woodworking
Repairing a J. B. Van Sciver Chair
I volunteer for an organization called the "Repair Cafe", whose purpose is to rebuff our throw-away culture by fixing things for people (for free) and thereby keeping stuff out of landfills. A client brought in an incredibly rickety chair that belonged to his mother. It wobbled excessively front to back and only a little less side to side. Usually we fix things right there at the repair event, but this one was going to need a workshop and some tools that I didn't have at the event, so I brought it home.
 |
| The Van Sciver chair |
This chair had an emblem on the underside of one rail indicating the J. B. Van Sciver Co., of Camden, NJ. A quick internet search found this company was in business from the late 1800s to about 1980. I'm not good at dating furniture, but it was all mortise and tenon construction and it used hide glue, so maybe it was made more than 50 or 70 years ago. The screws that held the seat to the rails were slot head screws, but they were clearly manufactured screws (not blacksmith-made).
 |
| J. B. Van Sciver |
I've seen several videos of furniture repair, but have only ever worked on a couple old pieces that needed some help. The first thing I did was to label all the parts so I could get them back in the right position during reassembly.
 |
| Parts labelled |
Almost all the joints in the chair were very loose, so it didn't take much to get the chair apart. Two "spreader" clamps helped with that. One complication was that the upper backrest rail was screwed to the legs (and probably glued), with plugs in the countersunk holes. Those joints were solid and I didn't want to take them apart, which meant I had to disassemble the chair in a certain order so as not to stress those joints.
Before I could do this, though, there were corner blocks under the seat that needed to be removed. And each had 5 or 6 small nails in addition to the glue holding them in place.
 |
| Arrrgh! Nails!! |
Some of the nails were proud and easy to remove, but others were tough. I bought a tool called a "cat's paw" that helped to remove the nails. What a bummer, though - I had to chisel out some wood around the more stubborn nails and thought I might have to replace the corner blocks, but in the end they were still good enough to use.
 |
| Almost fully disassembled |
The builders used hide glue in the joints, but it was mostly gone and what was still there was extremely brittle. I tested it to make sure it was hide glue.
 |
| The water test to see if it was hide glue |
The weird thing about this chair was that the mortises were WAY longer than they needed to be for the size of the tenons. It's no wonder that the chair was racking so badly! So I added some wood to the sides of the tenons to get a better fit.
 |
| A poorly fitting mortise and tenon |
 |
| Gluing some wood onto the tenon with PVA glue |
All the seat rail mortises were way oversized and inconsistent - some were about 1 1/2" long, some 1 1/4". But the tenons were about 1" wide. The wood I added allowed me to get a far better fit to the mortises and this should help keep the chair from racking over time. The stretcher mortises fit much better, but I had to thicken the tenons by gluing on some shavings. Some of the seat rail tenons needed this, too.
 |
| Here's a dry-fit before glue-up |
Since my hide glue is about 5 years old, I did some testing before using it. It has been in the fridge all that time, and it performed perfectly.
 |
| Testing the hide glue on scrap with and edge joint and a face joint |
I glued up the chair with the hide glue and left it to cure overnight. Later, I glued and screwed the corner blocks back in place. I managed to find some slotted-head screws in my stash that matched very well the screws used to hold the seat to the seat rails.
 |
| Two new screws holding the block in place |
And that was it. The chair is now solid as a rock and should be good for another couple of generations of users.
 |
| The repaired chair |
I did not try to fix any dents, scrapes or finish problems. But I did scrape away some tiny paint droplets from the seat. This was a very interesting chair and the owners are thrilled to have it in good condition again.
cherry miniature chest pt III............
 |
| first end panel |
Starting chopping pin waste a little after 0800. It took me about the same amount time doing this as chopping the tail waste.
 |
| hmm....... |
It looks good. Only a couple of the pencil lines are still visible. The pin walls are plumb from the top edge. Batting next is checking the fit.
 |
| first corner |
It didn't go off the saw. It might have but I didn't want to risk trying it. I rasped the pins until the fit went together with gentle mallet taps. It took 3 trim and checks before I got this.
 |
| first corner tail side |
Got a gap across the board on the baseline. Wasn't sure what the headache was here yet. I just checking the fit before chopping the next set of pins.
 |
| starting on the 2nd corner |
It took me over an hour to chop and fit the first corner. I didn't think I would break that record on the 2nd corner .
 |
| not easy |
The pins initially seated and then stalled about a 1/4 of the way in. I could see which pins were tight and needed some rasping. I did those dance steps 5 times before the pins and tails mated.
 |
| I see a pattern developing |
The baseline gaps are actually better the previous two attempts to seat them. I was getting a little frustrated trying to get the left 3 to close up but couldn't.
 |
| finally got it |
Got all the baselines to go bye bye. It took a while but I finally managed to figure it out.
 |
| yikes |
I rasped the pins too many times. The baseline gaps are history but I now have gaps on the pins. Sigh.
 |
| the fix |
I rasped the pins too many times. I was chasing my tail here because the pins weren't the cause of the gaps. The baseline gaps are history but I now have gaps on the pins. Sigh. But chiseling a relief on the tails is what got the them to seat gap free.
 |
| #3 corner |
Some pins were tight and after rasping them once, I got this fit. I had already chiseled all of the tails. They seated gap free.
 |
| #4 corner |
I rarely if ever, chisel my tails. It is me being stubborn and thinking it isn't necessary. Well boys and girls, I am still capable of learning and saying I was wrong.
Happy with the fit of the box. Except for the over rasped pins, all the tail pin joints look good. The top/bottom corners are within a frog or less of being flush.
 |
| hmm....... |
I have my doubts that glue will swell these gaps shut. They might do one or two though and I'll deal with the ones that don't cooperate.
 |
| less than a 16th |
It is square and it isn't rocking neither. Both the top and bottom are laying flat.
 |
| lid |
I had forgotten that this lid is a two board glue up. It about 6" too long R/L and 2" F/B. I like the grain pattern in this a lot. No painting can match what nature does in wood.
 |
| hmm...... |
I found this blow out from chopping the waste. I'll glue it in when I glue up the chest. There is another blow up but that one is MIA.
 |
| some came |
My order from Blacksmith Bolt came but a few didn't make it. I had gotten a refund a couple of days ago but I thought it was from a price issue. Turns out it was screws that weren't in stock. The kicker? - The #6 screws I bought were too small. The screws in the handle are a #7 or metric?
 |
| I was ready |
Initially I was going to do the glue up in the AM but nixed it. Got the brush, water jug, and wet rag in standby.
 |
| hide glue |
I probably could have used yellow glue but I went with hide glue. I have never had a joint freeze on me with hide glue. Besides I didn't have to rush like an idiot to get the glue on and the chest together.
 |
| needed some help |
The tails would seat fully but they wouldn't stay. I clamped each tail on both ends. I had to clamp and unclamp this a couple of times because it kept going out of square. As soon as I clamped the top tail it would throw off the square. I had to start clamping from the bottom and work upwards for the chest to stay square as I clamped the tails.
 |
| quick Lowes run |
This plywood panel was $20 bucks. The same panel in birch was $30. No
brainer IMO. This panel felt just as stiff and strong as the birch
panel. This face has quarter sawn grain which I like an the other face
is white-ish.
 |
| the bottom is ready |
I think I'm going to just screw the bottom panel on vice glue and nails. At least that is what the game plan is as of this typing.
accidental woodworker