
Hand Tool Headlines
The Woodworking Blogs Aggregator
“Glory to God in the highest heaven, and on earth peace to those on whom his favor rests.” - Luke 2:14
Be sure to visit the Hand Tool Headlines section - scores of my favorite woodworking blogs in one place.
General Woodworking
A Profound Revolution
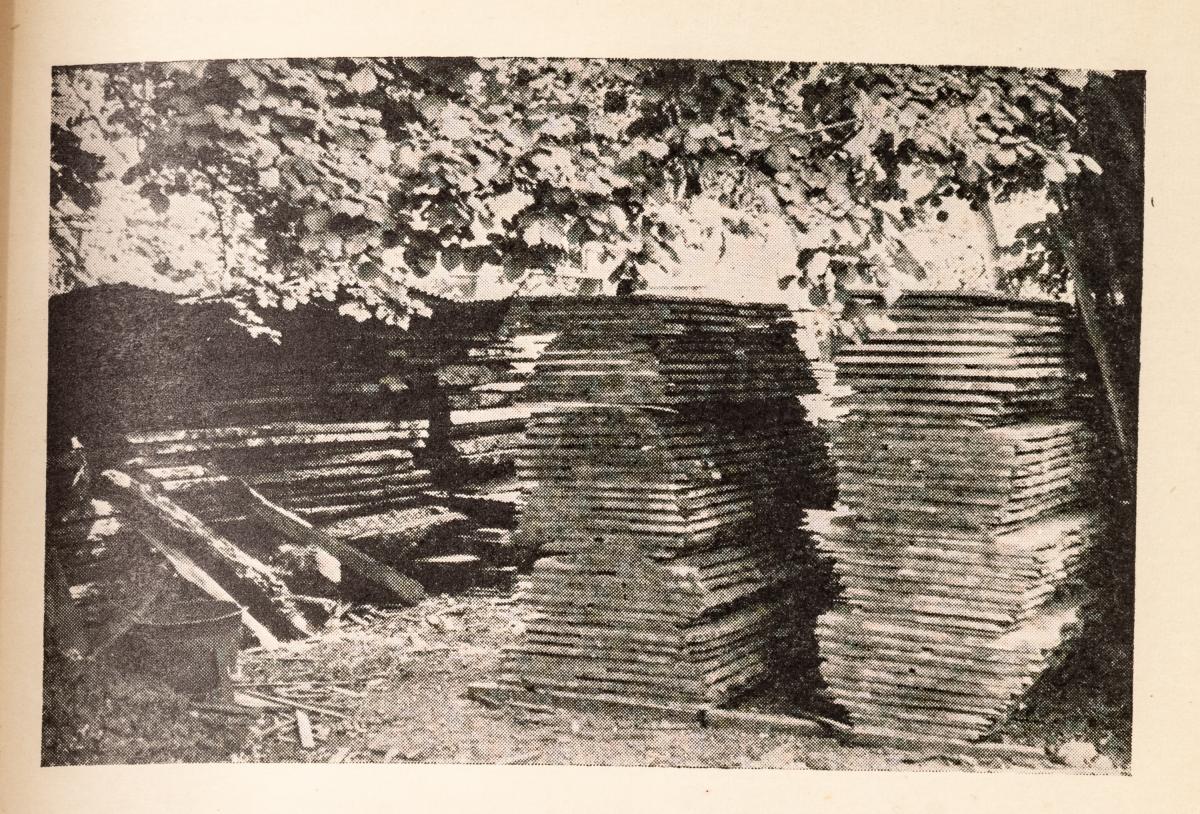 From "The Village Carpenter" 1938
Although the table saw and planer were invented in the early 19th century, it was only in the 20th century - with the invention of small electric motors and ubiquitous electricity - that professional shops, and later, amateurs, started using saws, planers and jointers on a mass scale.
This development substantively changed the process of sourcing wood. If you're imagining woodworkers buying wood in rough thickness and then substantially planing it down by hand, think again. Woodworkers typically bought material, or had it custom sawn for a specific purpose at close to final thickness. In "The Village Carpenter Walter Rose describes having sawyers saw green wood to the right thickness from the get-go for drawers and carcasses and other uses. It was important that the wood was well selected so it was stable and didn't need a huge amount of hand planning to be flat. With the introduction of machines, that was not only unnecessary, but the selection and seasoning of the wood was no longer critical. With the elimination of finicky steps, processing wood became much less expensive. The savings associated with using machines was huge. No need for labor just to plane things flat. And sawing accurately entailed far less mandatory skill.
The first companies to have these machines were lumber yards. "Sam, an East-End cabinet-maker: the pocket-book memoir of Sam Clarke, 1907-1979," includes Clark's description of laying out material for a bedroom set and taking it by cart (no cars) to a nearby lumber yard to be planed. This was London in the early 1930s.
By the 1950s, the revolution was complete. With the gains came losses. The most obvious losses were the growing use of less stable wood and the steep reduction in the range of sizes of materials. If the wood was going to warp anyway, you needed extra material to flatten the board in your shop, so instead of stable material nearly the thickness you wanted, you bought material in 1/4 increments and planned away 1/8" or so. Easy by machine, but not so easy by hand. The machines also allowed a new generation of hobbyists, ones without years of training, to be able to build work in a reasonable time.
This change represented a massive revolution in the way woodworking was done from ancient times to the 19th century. We can argue the pluses and minuses, but the massive changes in the way furniture is made are here to stay.
We are now on the cusp of another profound revolution. Or revolutions. Additive manufacturer (3d printing) is becoming better and better and more shops are using it for a variety of work. Jigs and fixtures to speed up assembly are a typical use of 3D printing, and 3D printed hardware is becoming more and more common. Some designers are experimenting with totally new forms of furniture, some of which is totally 3D printed. In another area, AI tools, which are filling the headlines these days, are helping designers quickly prototype designs to show clients. More importantly, AI tools have the potential to increase the efficiency of the office work of any shop. How these new tools are changing our work - for better and worse - is an important story I will save for another day.
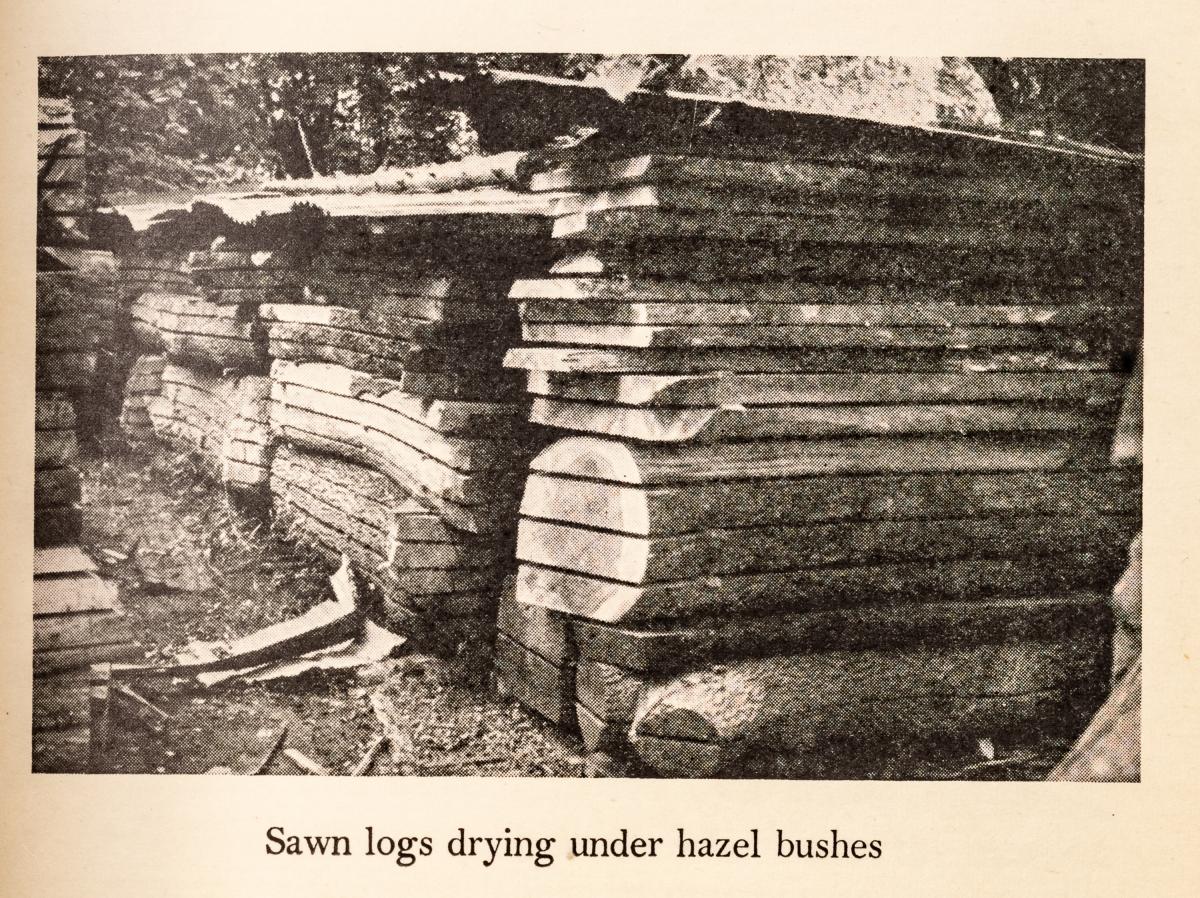 From "The Village Carpenter" 1938
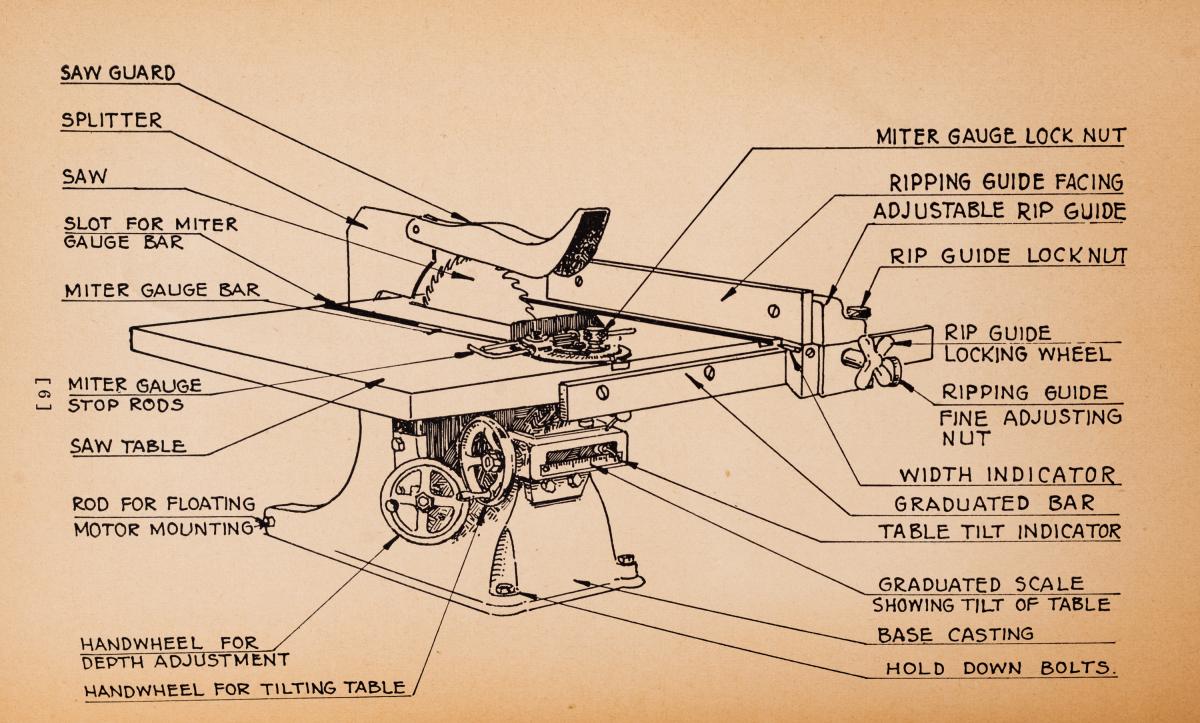 From "The Bench Saw Jointer and Shaper" The WALKER-TURNER CO 1934
Leo's desk pt XIX..........
 |
| fresh batch |
Mixed up some shellac after dinner last night. Brought it to my desk to shake it so it would be ready in the AM.
 |
| done |
Got the right drawer fitted moving in/out smoothly. This one went quicker than the left drawer did. Next batter was flushing the front face flush with the rail.
 |
| ready |
The on hole centers is 3 3/8". Center punched the holes for the screws now. I'll install the pull after I'm done applying the shellac.
 |
| easier |
Gravity at my age sucks pond scum. Rather then do my dance steps trying to kneel and slap shellac on the base, I put it on the workbench to do that. It made for a slow day getting 3 coats on it to finish it up.
 |
| hmm....... |
Attaching the top was so much better and easier then doing Miles's. Predrilling and attaching the table top clips paid dividends. I only had to use this ratcheting wrench on 4 clips.
Got ahead of myself on attaching the top again. I wanted to get the drawer pull out stops installed before top going on. Totally forgot about them and it is going to be a PITA to do it now. I'm not looking forward to that.
 |
| hmm....... |
I forget how many coats of shellac I have on the top already. Regardless I smoothed the top with a card scraper first followed up with a good rub down with 4-0 steel wool. Put on a coat of shellac. I'll evaluate it later to see if I'll slap on another one.
 |
| hmm...... |
I got 3 coats on the inside and outside and I'm calling that done. There are four coats on the front and I'll be doing one more before I attach the pulls and calling the drawers done.
Already thinking ahead to the next project. It will either be the miniature cherry chest or a box for my DeWalt plunge router. Or it could be something else thrown in from left center field.
accidental woodworker
Leo's desk pt XVIII........
Wasted the first part of my day with a ghost appointment at the VA. The appointment call was in the system but the actual appointment with the doc didn't exist. What a waste of gas and time. At least I was able to straighten out were my missing Rx's were. Got back to the shop a little after nine.
On a brighter note I am getting real close to the finish line on Leo's desk. Just the drawers need to be done, slap on some shellac, and attach the top and fini. I wonder how long that is going to take me?
I got a quote to ship Leo's bureau and the two desks to North Carolina and the estimate didn't disappoint me. I figured about 2500 to 3000 and the estimate came in at 2800. It is making me rethink renting a U haul driving it NC and flying back home. I'll have to crunch the numbers.
 |
| blurry pic lead off |
The left drawer is glued and square - less than a 16th off. The blurry pic fits in with the start of my day. The tails were snug and I didn't need any clamps.
 |
| oops |
Had a mind fart thinking it was through dovetails. Easy fix to knife the proper line and then saw and chop the waste again. The only boo boo is the double knife line. One will be hidden in the pin socket but other won't. Not sure if I'll remove it when I plane the sides to fit the drawer opening.
 |
| sawing to the new baselines |
Easy going - just laid the saw against the existing tails and sawed down to the line. Chopping the waste was super easy too.
 |
| hmm....... |
What awaits me when I chop the waste? I filled up the voids with super glue - it is the whitish, gray spots. Chopping the same stuff on the other drawer was drama free but this drawer is worse.
 |
| hmm....... |
No problems so far. This pin socket has most of the defect crappola. No headaches or hiccups chopping the waste out.
 |
| wee bit too snug |
I think I could have made it fit but why risk cracking/splitting a tail? I trimmed the pin socket because I could still see a wee bit of the knife line. That eased the fit enough that I left the tail alone.
 |
| the other end |
Snug fitting again. These I seated and had a small chip out on the right tail. I trimmed the tail this time and left the socket as is. Glued the chip when I glued up the drawer.
 |
| back tails |
I was more confident sawing the back tails this time. I double checked myself by eyeballing the first drawer before sawing.
 |
| off the saw |
Snug and gap free even on the half pins.
 |
| loving this prefinished plywood |
I don't know what the finish is but it shiny (I like) and tough. This has been hanging out in the shop for months and nada. The finish is still pristine and it looks good as the drawer bottom.
 |
| yikes |
Houston we have a problem. Both sides taper out from the front to back. The drawer bottom is dead nuts square but I couldn't get it to seat in the drawer front groove without pushing the sides out of the front pin sockets.
 |
| what I thought the problem was |
I would have bet the ranch that the back length matched the front. Obviously I didn't do that. I don't mind me-steaks like this because they are easy to recover and don't involve free flying lessons and making a new part.
 |
| happy face on |
I only had to do the pins a wee bit deeper on one side only. Both sides are now dead square to the front.
 |
| done |
Dry fitted and the diagonals are less than a 16th off. Got it glued up and set aside to cook. Like the left had drawer, didn't need clamps on this one neither.
 |
| didn't forget |
This is something I usually miss and forget to do before I glue up. I only plane in between the tails - I don't plane in or off the board.
 |
| back fits |
The top/bottom has breathing room but the sides don't have any.
 |
| hmm....... |
The front fits on this side but doesn't on the other one. I'll try and get this fitted after dinner today. That will give this about 4-5 hours to cook.
 |
| sigh |
I put the left drawer on the bench to start planing it to fit and stopped. It was rocking a healthy amount. I didn't notice and didn't check this after I glued the drawer up. Planing the twist off isn't the problem. The problem is how much I'll have to plane and if that will make the drawer margins too large. I don't have any figured cherry to match this if I have to make a new drawer.
 |
| fitting the left hand drawer |
I knocked down 90% of the twist off the bottom. I want the bottom to be flat across the bottom of the drawer opening. I left that and worked on planing the sides and the top getting the drawer to slide in/out easily.
 |
| took a while |
It took about 30 minutes before the drawer slid into the drawer opening. The drawer front fits snug but I'm not entirely happy with the margins. The flops a bit R/L too that is annoying.
 |
| hmm..... |
There is still a wee bit of rocking but if I address that I think my margins will go south on me. The drawer slides in/out easily as is so I'm leaving it as is.
 |
| checked the right drawer |
It has a small amount of twist in it but no where near what its sibling had. I'll hoping that planing it to fit will make it go bye bye.
 |
| hanging a bit |
The drawer runner shifted on me. It is a wee bit out of square and the
drawer is binding around the last 2-3 inches of the back of the drawer.
The 073 shaved a wee bit off and removed the binding headache
 |
| because of the twist? |
This was the best I could get trying to flush the drawer to the front rail. It is either caused by the twist or the small amount of bow in the rail. I marked it so I could plane it fit flush.
 |
| hmm....... |
I installed the drawer stops now so that the taper I have to plane doesn't change on me. I should have used this drawer stop on Miles's desk.
 |
| got it |
I wanted the large part of the taper facing me. I stood to the right of the drawer pulling the plane towards me. I was better able to keep an eye on the pencil lines this way.
 |
| done - ish |
Not 100% happy with this drawer. The margins aren't even and change as the drawer slides in/out. The front face isn't quite flush on the left side end and it is a few frog hairs inset on the right end. As I am looking it from 3 feet away it looks acceptable. Big sigh......
accidental woodworker
My First Show
Yesterday, I did something that I have never done in 20 years of selling antique tools. I set up a booth at the Burlington Antique Show in Burlington, KY.
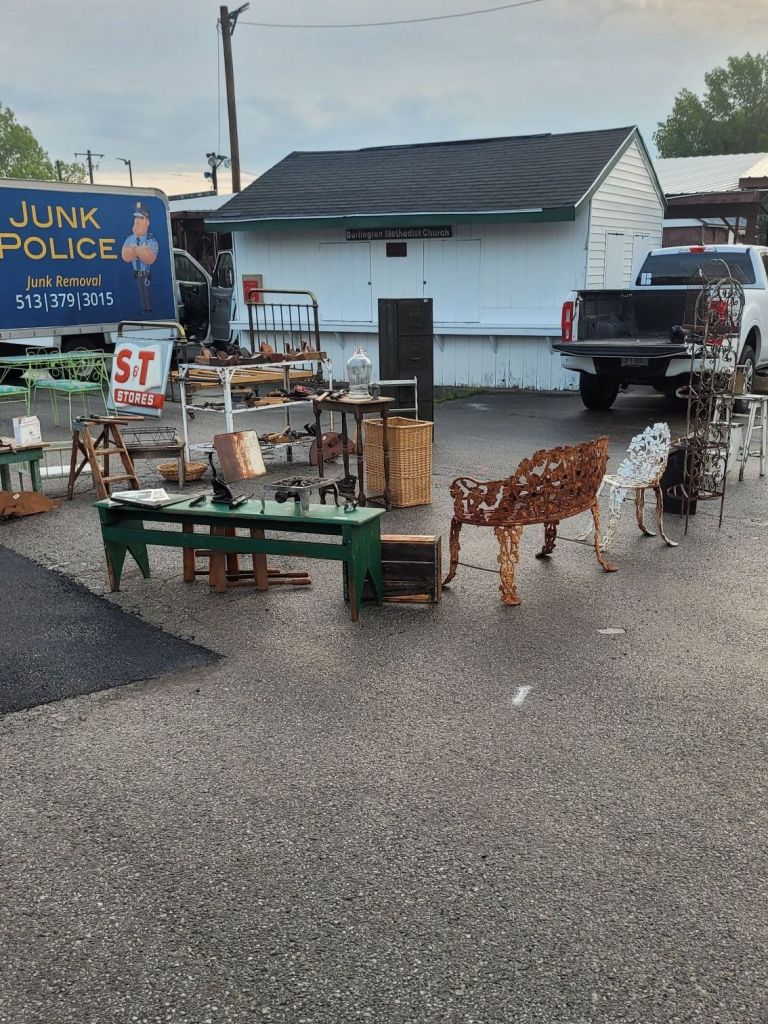
The reason for my booth was that my wife, Anita, is down sizing her booth rentals at the new antique mall she is in. She’s been renting two rooms for the past few months. While her sales have been phenomenal, she found taking care of two rooms, filling it up with antiques was too much to bear. Plus, the majority of the sales were coming from the one room by the register. The furniture she was selling in the back room, she was getting off her Facebook Marketplace ads. She told me she doesn’t need to spend $400 a month in rent if she could just as easily sell it in the garage instead. Makes sense to me.
So Saturday night, we loaded some of the stuff that was still in the back room and shoved it in my truck to head to the antique show in the morning. Since I was going to work the show, I decided to bring some of my tools with me and put them out for sale.
I decided to bring tools that were too big to ship. I sell planes and smaller items on eBay all the time, but shipping large items has always been a pain in the ass. First, it’s hard to find a box to fit the tool, and then it’s hard to estimate total shipping if I don’t have the box on hand. I’ve been burned more times than not when it comes to shipping big tools.
I woke up at 4:00am and headed out the door at 4:45, arriving at the fairgrounds at 5:30 am. This gave me 30 minutes to unload and set up the booth. I didn’t have too much stuff as all I had was what I could fit in my pickup truck, but hopefully, I had enough to make it worth my time.
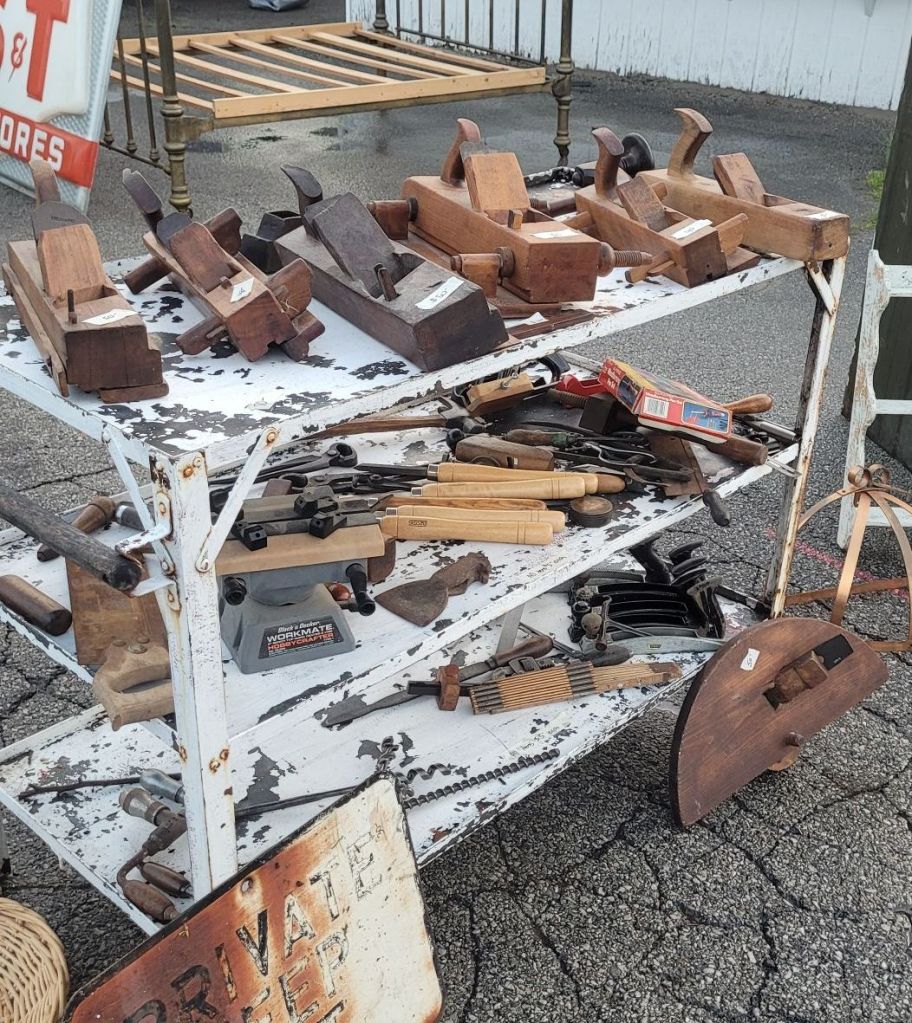
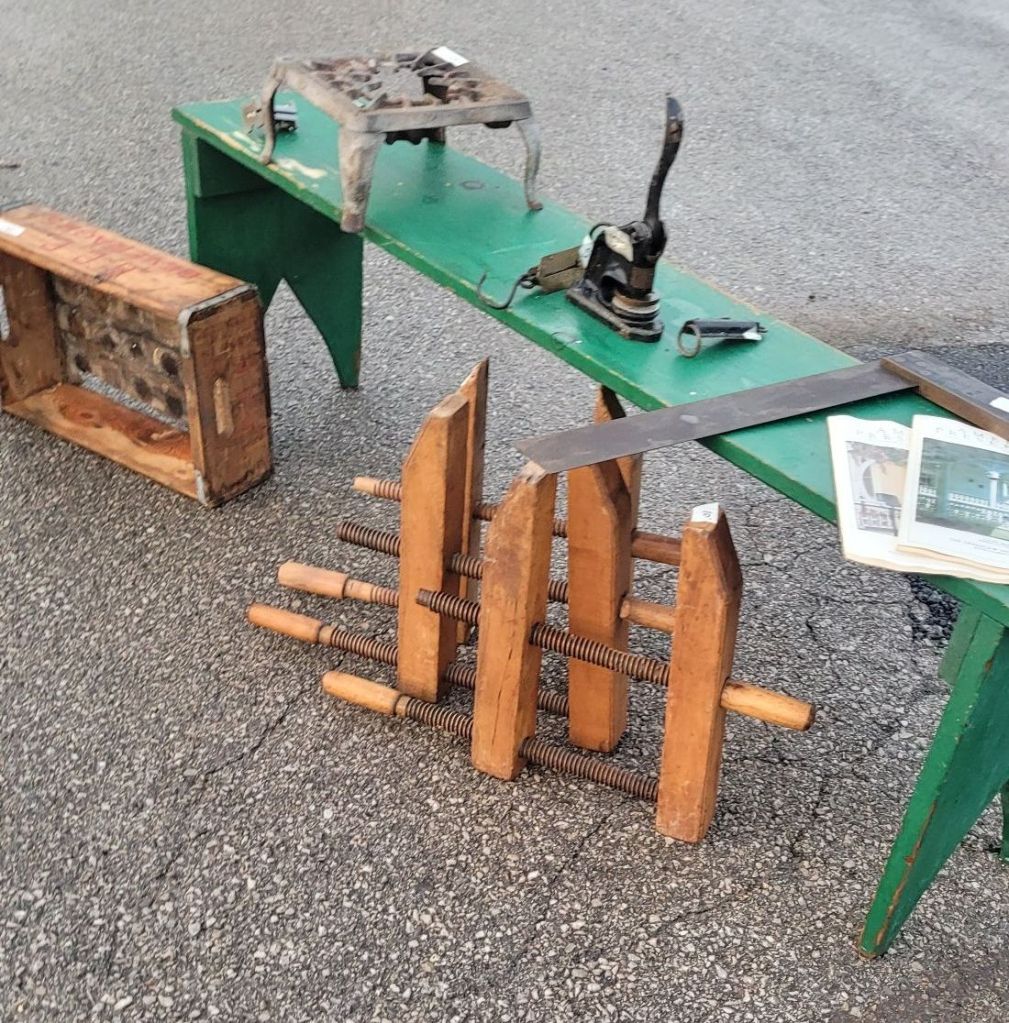
I put most of my tools on a white metal shelf Anita had in her booth. On top were big panel raising planes. On the two shelves were smaller tools that I sold for $5.00 each. I’ve found over the past year that cheap tools don’t sell well on eBay anymore. The buyer will pay $5.00 for the tools but will spend $13.00 in shipping. I mainly ship USPS Priority Mail for the free boxes, but I’ve been rethinking about buying my own boxes and switching to UPS.
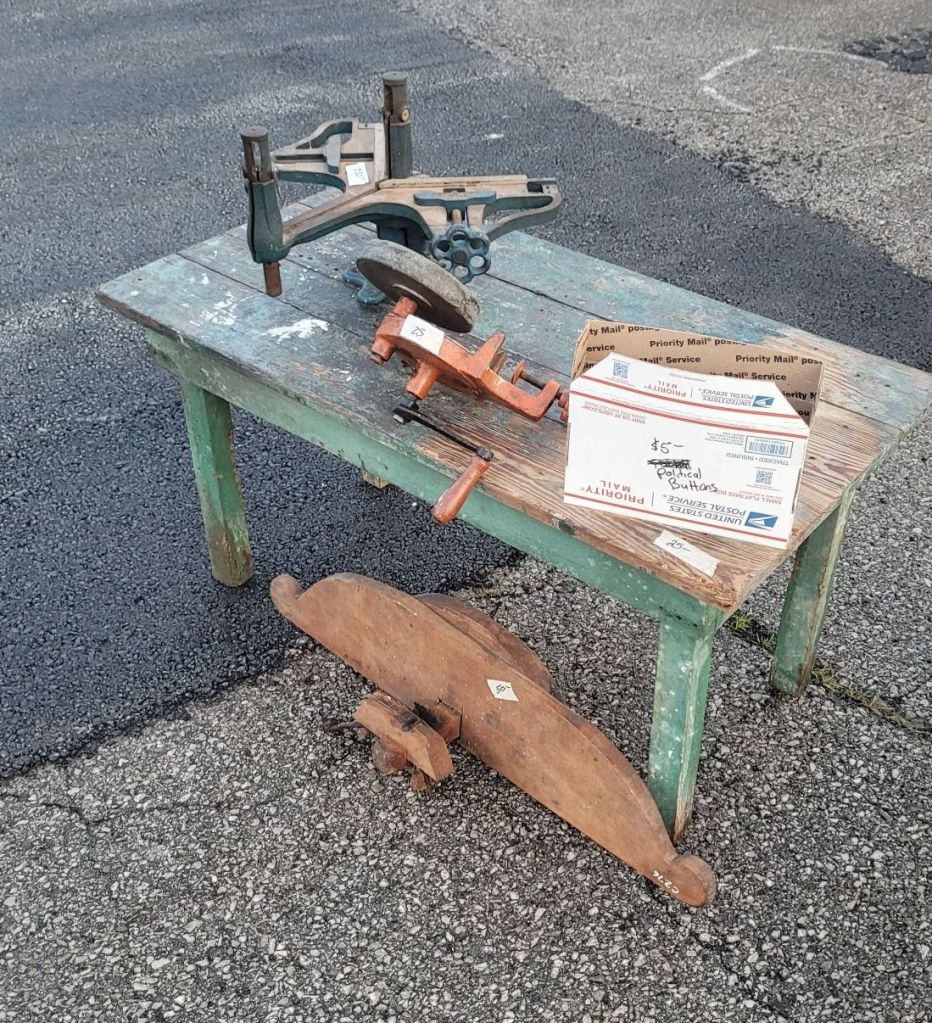
The tool of the day was this Stanley No 100 Picture Framers Miter Box. I had $50.00 on it, which was a steal. Even though I could probably sell it on eBay for more, the shipping would be outrageous. In fact, I checked eBay recent sales, and one sold for $50.00 with $120.00 in shipping. No thanks! I’ll sell it here and let the buyer save the money.
I sat out all day sitting on my trucks tailgate and spoke to numerous customers. Everybody was nice and thankfully had cash. I don’t have Venmo, so cash was the only payment I would take. I negotiated with customers all the time, making sure they felt they were getting a good deal. A lot of time, if I had $20.00 on an item, they would ask if I would take $15.00. I always said yes and never missed out on a sale.
My goal was to sell $400 for the day. By 10:00 am I was close at $280.00. The $5.00 tool shelves were the most popular as customers were looking for deals. People would look at the panel raiser planes, but no one offered me anything for one. Anita’s stuff was more popular with customers than my tools, but I expected that. Most of my customers were women.
By noon, I hit my goal as I surpassed $400. There were plenty of customers left still walking around, so I was happy to still sit on my truck’s tailgate. Nearing the end of the show, a guy came back to look at the Stanley No 100 Miter Box. He asked me what my bottom price was for it. I told him $40.00, and he took it. It was a little less than what I really wanted for it, but I was glad it was going to a good home.
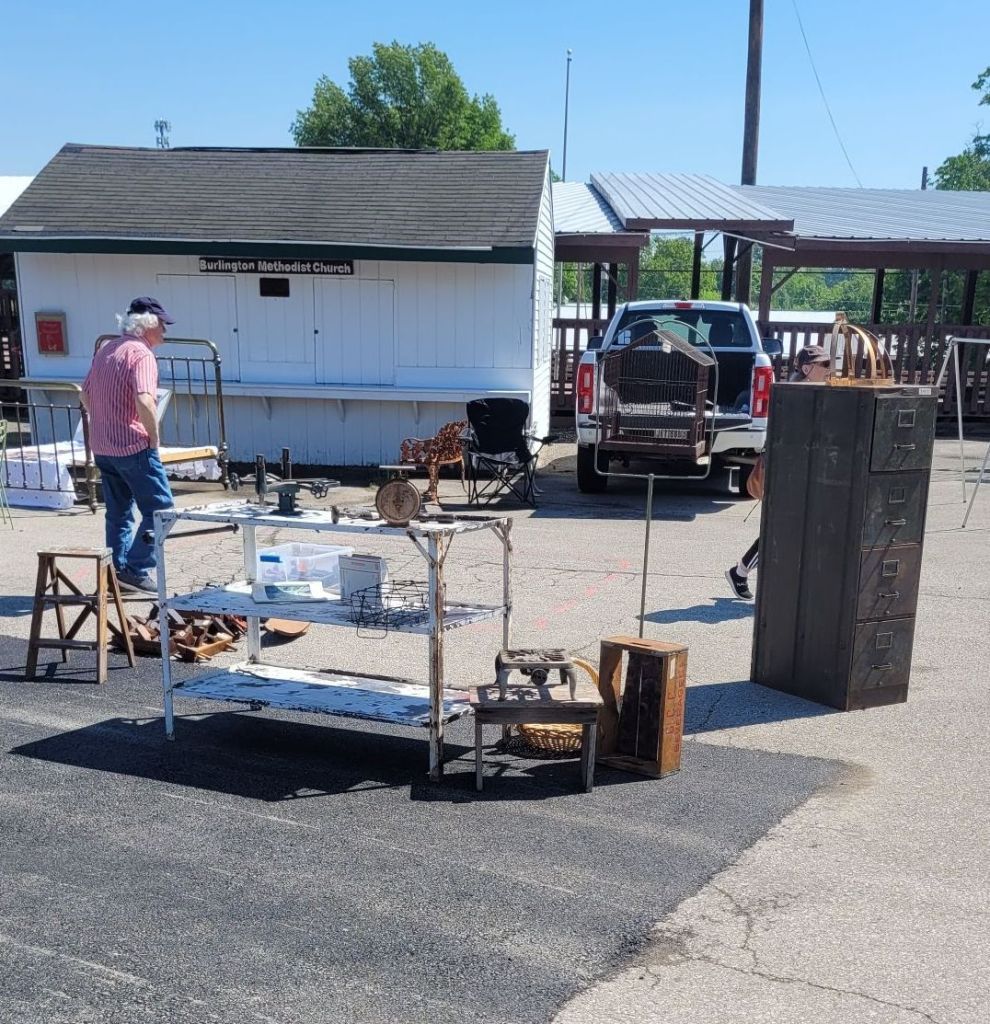
In the end, I sold $641.00 worth of stuff. Out of that, $263.00 were my tools. There was an old file cabinet and that white metal shelf that came home with me. Anita didn’t want either one back in the garage, so I took it to the recycling center this morning and got $18.25 in scrap metal for it.
Doing the show was a lot of fun. It was nice sitting out and relaxing a little bit and talking to people all day and making new friends. I’ll definitely do it again. In fact, I’m considering buying an enclosed trailer so that I can bring more items with me in the future. If I had a lot more inventory, I think I could sell thousands of dollars during the show. I know several people who do the same.
Issues With the Ohio Tool Plow Plane
I've had this Ohio Tool #96 plow plane for a number of years now and I really love using it. So much so that I haven't used my Lee Valley plow plane since I fixed up the wooden plow. But recently I worked on a project that required cutting a groove in the ENDS of a board, and the Ohio Tool plow was not up to the task. It cuts great (usually) when going with the grain, but across end grain was not good.
 |
| Ohio Tool Co. #96 |
 |
| Left side view |
 |
| My set of Ibbotson irons From right, numbered #1 (1/8"), #2 (3/16"), etc. through #8 (5/8") |
Probably 99% of the grooves I make are 1/8", 3/16" and 1/4". The iron that inspired this post is the 3/16". I'm trying to figure out why it's not performing as well as I would like.
To get a comparison, I pulled out (for the first time in several years) the Lee Valley plow plane to test it making an end grain groove. It performed very nicely, with the groove having a smooth bottom and walls.
 |
| Nice clean groove in end grain - Lee Valley plow with 1/4" iron |
So this had me take a close look at the wooden plow. It wasn't that my irons weren't sharp - they were. It just felt like the iron was not well supported well. This hasn't seemed to affect the plane at all when grooving with the grain. But with the extra resistance plowing end grain, the plane had a really hard time. And this was true with a very light set.
I had a close look at the business end of the plane and the first thing I noticed was that there was a little gap between the wedge and the iron.
 |
| Showing the skate, iron and wedge |
 |
| Pencil pointing to a small gap |
That gap did not go all the way to the other side of the wedge and iron. So there is good contact for the unseen part. I trimmed the wedge a tiny bit to try to get a better fit, but didn't go far out of fear that I might ruin the overall fit of the wedge.
Looking further, I saw that there is not very good contact between the iron and the skate. Most of you will know that the back of the iron has a V-shaped groove that fits on an inversely similar shape on the front of the rear skate.
 |
| Showing the V-grooves on the backs of the 1/8", 3/16" and 1/4" irons |
 |
| This is where I don't have good contact |
 |
| A piece of paper easily fits between 3/16" iron and skate |
I was able to place that single thickness of paper about 3/8" - 1/2" up between the iron and skate. This gave me an idea. I stuffed a double thickness of paper between the iron and skate and trimmed it so that it wouldn't get in the way when I tried to plane a groove.
 |
| The double paper thickness went about 3/16" up between iron and skate |
 |
| But it allowed me to plow a better groove in end grain |
I decided then to look at the other irons. I found the 1/8" iron fit well with the skate - no gap at all. But the 1/4" iron also had a gap. When I plowed a 1/4" groove with the grain, I could see the telltale sign that the iron is not supported well.
 |
| See the juddering lines in the bottom of the groove? |
That means the iron is flexing and jumping as it's cutting - it's not well supported. And while I was able to cut an end grain groove, it wasn't as smooth an operation as it could be.
 |
| 1/4" groove in end grain |
I ended up testing the 3/16" and 1/4" irons with a couple thicknesses of blue tape between the iron and skate. I got much better cuts, but that is not a good permanent solution. Somehow, I need to move the rear skate forward or get the iron to move back toward the skate.
If anybody out there has ideas of the best way to handle this situation, I'd love to hear them. Please leave a comment.
Leo's desk pt XVII.......
 |
| last night |
I came back to the shop and filled in the screw holes with unfinished golf tees. I wanted to start from square 1 in the AM which I did.
 |
| clamped front and rear |
I added a clamp in the middle holding the blade against the drawer guide. Screwed the front one first, nailed the back, and finally added a screw.
 |
| done |
I like this drawer guide assembly a lot. It is simple, easy to make and install. It is also hard to screw it up. And I don't have to allow for any expansion or contraction.
 |
| test cuts |
Doing the tilt rails for the drawers. I made on cut on each end of the tilt rails centered on the width. However, the corresponding biscuit slot on the desk rails aren't centered.
 |
| marking the slot |
I had marked the position of the slot off of the tilt rails. This block was for checking/setting the distance from the top edge for the slot.
 |
| done |
Nailed the position just right IMO. The bottom of the tilt rails are exactly two frog hairs shy of being flush.
 |
| done |
A one inch #6 FH screw secures the ends of them. It is a strong connection - I picked the desk up with the two tilt rails and shook it with no hiccups. They will get much less abuse then what I subjected them to.
 |
| hmm..... |
With the drawer guide assemblies done it was time to start making drawers. I didn't know what to expect from this discolored spot. On the other drawer was open and split. I chopped through it without any headaches. It wasn't completely solid but it also didn't crumble or disintegrate neither. Fingers crossed the other drawer will behave just as well as this one.
 |
| underside |
I am putting two coats of shellac on the drawer guide assemblies. I knocked that out while doing the half blinds.
 |
| snug fit |
Not entirely happy with the fit. I chopped one pin socket off the knife line on the wrong side. Sigh. Other than that it is a good fitting joint.
 |
| ditto for the other end |
Snug fit with teeny gaps but I am hopeful that glue will swell them shut.
 |
| yikes |
My mind went totally blank on this. I had to get one of Miles's drawer as a visual aid that did diddly squat for helping me. The right side above the drawer bottom groove is what is messing with me. I couldn't picture it my mind even after taking a coffee break.
 |
| hmm....... |
Miles's drawer is a wee bit smaller than Leo's. It is close enough that you will have to measure it to confirm.
 |
| figured it out |
I got it once I had chopped the first tail. I'm glad I didn't make this vertical saw cut after the the first tail was sawn.
 |
| good feeling |
Got a double rush - one for the fit and another for the getting it right.
 |
| expected |
Only this corner fits in the opening. As it should because the drawer is slightly oversized.
 |
| done |
Dry fitted and it looks good. Debating whether or not to leave the drawer bottom long at the back. There is plenty of room for it and it would aid in removing it if necessary down the line.
 |
| improving the fit |
Tails were a shade too tight and were slightly proud. I chamfered the underside of the tails and that helped a lot. The proud disappeared and the fit loosened a wee bit.
 |
| sigh |
I got half pin gaps top and bottom to deal with. Glue ain't going to swell them closed.
I'll get this glued up in the AM and get started on the 2nd drawer.
accidental woodworker
New box.
First completed new box in a while. This is based on the plaster mouldings and a chest in the same room, in Bogan House, Totnes. It will be showing at the Birdwood House Gallery 12-18th July.

Riven oak, obviously. Wooden hinges, nailed and clinched.

Mouldings run with a scratchstock, then carved/scratched. Nailed on. Look at that tiger-stripe.

Leo's desk pt XVI..........
 |
| looking good |
A bit of rocking but the deck here but the deck is as flat as a plowed field. It feels solid and there aren't any gaps at the rail/leg joints. So far I can't see or feel any difference between dowel joints and traditional mortise and tenon ones.
 |
| gap fillers |
I had plenty of scraps to get the gap fillers for the sides. To balance it out I am also putting another one on the back.
 |
| helping hand |
The side fillers have to be flush with the tops of the legs so they will cover the gap at the top of the rail. I clamped the filler on top of the board I have clamped across the tops of the legs. I tried to do it without it but with glue on it, it was impossible to clamp and keep it flush. I glued it on with yellow and super glue.
 |
| back drawer guide rail |
I tried to get this installed with the desk on the bench but it was too awkward. I was fighting the urge to give it free flying lessons. After the desk was back on the deck I got it installed dry - just screwed on.
 |
| top attached |
I got the table top clips installed with no hiccups. I outlined the leg positions with blue tape so I can put it back together as it is now.
One of the problems I had with Miles's desk was drilling starter holes for the clips under the drawer guides. No hiccups screwing them in. Once the drawer guide assembly is installed drilling them ain't happening.
 |
| hmm...... |
I like the look of the black screws against the cherry. I'm thinking of painting the table top clips black now. I've got the time.....
 |
| drawer guides |
 |
| tilt rails |
I had to look at Miles's desk to see how I had installed them on his desk. I used a biscuit jointer and I'll repeat that for Leo's desk. These will installed last and just before the top gets married to the base.
 |
| came a week early |
This was scheduled to come on the 22nd. It is for 6mm dowels of which I have a couple of hundred. It is complete with everything that came with the imperial 1/4" jig.
 |
| I had room for it |
My finger is pointing to the 6mm drill block. The 1/4" one is in the dowel jig and the drill block on the right is 3/8". The styrofoam block holds the 6mm accessories. I might redo that with a wooden version. BTW - the left drill block was for the 1/2" one. I doubt that I would ever use 1/2" dowels.
 |
| 90° drill block |
The only other accessory I don't have for the Dowel Max jig is the 45° plate. My OCD has been quiet on that so I doubt I'll be adding it. I have used the 90° twice already.
accidental woodworker
Leo's desk pt XV.........
 |
| 2 coats |
Decided to shellac the sides and the back before I did the glue up. It is way easier to do as much of that now then after it is glued up.
 |
| 7 coats |
I'm calling this done, for now. It is smooth and I couldn't see any hiccups in raking light. It is going to be a while before it gets married to the base. I may have to do a touch up after the marriage happens.
 |
| hmm...... |
Doing another dry fit before I apply any glue. The drawer rail fit yesterday but today there is a slight gap. I drilled out the holes a wee bit deeper.
 |
| done |
The back rails fit flush as did the other end of the drawer rail.
 |
| ready to glue up |
The plan is to glue this up in stages. First stage is to glue one end. I will let that set and cook for an hour or so and then I'll glue the other end.
 |
| not quite.... |
The countersink isn't deep enough and the head is a frog hair proud. I need both to be below the surface so that they don't interfere with the drawers.
 |
| done |
I got it recessed enough that it won't interfere with the drawers going in/out.
 |
| better |
Some of the bow in the drawer rail is gone, not all, but some.
 |
| prepping |
Getting my ducks in row for the upcoming glue up. These 3 sticks are for ensuring a good glue spread in the drilled holes. Planing the sticks thinner to fit in the holes. Got the 6 clamps set and ready. The final step was getting a wet rag and a small container of water.
 |
| survived |
Clamped up and cooking with no hiccups. I did a few other things while this cooked for an hour.
 |
| squaring them up |
I like how these little corbel like doo dads look on Miles's desk. I am repeating the same on the Leo's desk. This time I will put two on the back rail - didn't do that on Miles's.
 |
| poor mans mitering jig |
I've been making these for years now and I still can't get the 45's dead nuts (getting closer) and I have no better luck with the 90. The evidence of that is in the pic above. Easily taken care of with a shooting board.
 |
| hmm....... |
Good fit and ready to glue in place almost.
 |
| hmm...... |
FYI - initially you can glue bare wood to shellac but it will not last. I speak from experience on this. I scraped the shellac off where I was going to glue this before I did that.
 |
| need some help |
When I was scraping one of the spots, I had some blow out on the outside face edge. After the corbel is glued I will have to fill the gap. The plan is to use cherry sawdust and super glue to fill it in.
 |
| &&#^&%%&^(*)(*^&*^%$( gap |
It still amazes how little of gap will make my OCD go into turbo assisted overdrive.
 |
| mind fart |
I didn't need to glue in dowels here but I did. It shook hands with me when I went to put this end on. The glue had already set and I couldn't pull any of them out. I had to drill them out again which went surprising very well. The biggest headache was cleaning out the crappola that got stuck in the flutes of the drill.
 |
| cooking |
Survived the last glue up. I will let this set and cook until the AM. Then I'll get the final coats of shellac on it and then I'll start on the drawers.
 |
| oh what a relief |
I wasn't sure if these parts for the drawer guides would be long enough. All 8 parts are several inches over.
 |
| nice touch |
I got #10 x 5/8" sheet metal screws for the table top clips. Got a 100 of black ones that I think will look good against the cherry. And the cherry on the top is the included screw driver wasn't expecting that.
I like these screws for table top clips over wood screws. These screws have larger heads for a broader bearing surface. The threads are coarse, grab tenaciously, and pull tight without stripping, and I have yet to have one fail on me.
 |
| silver ones too |
I saw the black ones first but decided to get the same size in silver. These aren't stainless steel according the write up on Amazon. Stainless steel ones were over twice the cost of these.
accidental woodworker
Leo's desk pt XIV.......
 |
| done |
I got three coats on the underside yesterday. First thing this AM I put a 4th coat on. It looked ok but I felt one more coat would give me a warm and fuzzy.
 |
| first coat |
I used a cotton T shirt rag balled up. It went a lot easier than I thought it would. No drips or runs and no brush marks.
 |
| drawer rail |
Glued on the bottom drawer guide rail. Debated whether to just screw it on dry over gluing it. Another one of these will go on the back top rail and serve as support for the drawer guides.
 |
| hmm...... |
Testing to see if my reverse countersink will work. This scrap of cherry is the same width as the top drawer rail. First step was to drill a hole straight through top to bottom.
 |
| lift off |
I replaced the tapered drill that came with the Fuller pilot screw/countersink. A #18 drill is the same size as the tapered drill bit. I first tried drilling it in forward but nada. I had to drill it with the drill in reverse as I pulled upwards.
 |
| it worked |
It is a little deeper than it should be but the important thing is I have a countersink. If this hadn't worked I would have chopped a 'square' countersink.
 |
| prepping the drawers |
I found two four foot long, 1/2" thick poplar boards in the shop. I also had enough poplar leftover from Miles's desk for one drawer. I also made a Lowes run and bought two 1/2" thick maple boards for drawer bottom runners.
 |
| drawers are ready |
The lengths of the drawer parts are a wee bit oversized. I'll do the final sizing when the drawer guides are done and I start making the drawers.
 |
| hmm...... |
Other than that, I was happy with how the rolled on coat looked after 15 minutes (sans the hiccups). I'll put on a couple more rolled on coats before I put a check mark in the done column.
I got 4 coats on the slats and they look good. I wasn't sure how the coverage would be on them with a rag doing it. The coverage is smoother than a brushed coat but the build seems to be a wee bit less. I'll put on a couple of more coats and evaluate it again.
accidental woodworker
Leo's desk pt XIII........
 |
| fixing the slots |
I let all of the slot fillers cook over night before sawing them off. Flushed them with a blockplane next. The new slots are a frog hair above the first one. I went a little nutso doing slots on the drawer rail to help with the bow in it.
 |
| back rail |
The back rail and the drawer rail I could do with the plunge router.
 |
| new slots |
Did the first ones on the wrong side of the layout line. I put super glue in the filler just in case.
 |
| hand chopped |
On the sides I could use the plunge router to do the center slot. I had to chop the two outside ones by hand. Practice makes perfect, these 4 are almost as clean as the routed ones.
 |
| prepping the top |
Sanding the end grain wasn't working. It was smoothing it but the scratches from the saw were still visible. I used a card scraper to remove them and smooth down the end grain ends. I still sanded them after that up to 220.
 |
| wooden #4 |
Used this to smooth the two long grain edges. I have never really warmed up to this plane or any other wooden bench plane I have used. I prefer metal Bailey planes but this one did leave a better surface then the 5 1/2.
 |
| sigh |
Go fast, go slow, take a shallow run, it didn't matter. The cherry burned on the end grain ends (expected) but it also burned some on the long grain too. Cleaned the burn marks with the blockplane, sanding sticks, and a card scraper. Of the 3, the card scraper worked the best.
The top is ready for shellac. I sanded the face side starting with 80 grit and ending with 220. The bottom I only did with 100 grit or was it 80?
 |
| arris work |
What a difference in the feel after knocking the edges back. Before it felt like the edges of the slats could slice my fingers open. There are zero sharp edges on this desk now.
 |
| first coat of shellac |
The underside of the top is getting 3 coats. I should be able to get 3
on before I hit the rack. Tomorrow in the AM I'll start on the top which
will get at least 5-6 coats.
 |
| sapwood |
I think I'm one of the few that likes sapwood. IMO you can't paint a better picture than what Mother Nature does in wood. My best friend hates it and he is a magician with hiding and blending it in with the heartwood.
 |
| leg bottoms |
I used to do the chamfers on leg bottoms with a blockplane or a chisel. I now do them with the Shinto rasp. Quick, easy, and almost as smooth as a chisel or blockplane would leave. After rasping them I followed it up with a 120 grit sanding stick.
It is supposed to rain until saturday in my part of the universe. However, the sun did come out today but the wind was blowing and gusting pretty good. I wanted to spray shellac the slats outside but it didn't happen.
Rather then sit and wait with my thumb in my A-hole I will shellac the slats with a balled up cotton T shirt rag. I really want to get Leo's desk done and in the boneyard before the next weekend comes around.
accidental woodworker
Time to Slow Down
My late uncle Archie used to say that getting old wasn’t much fun, but it beat the alternative. It’s been about 40 years since he told me that, and he was correct. In a few months I will celebrate (or at least experience) my 72nd birthday. The first 30 years of my career was as a skilled trades person, in the cabinetmaking and millwork industry, and the last 25 have been mainly in writing, editing and publishing. I have been blessed to have spent the last half-century doing the work I loved to do, and I don’t regret that I didn’t sell out somewhere along the way to make more money.

I can’t say my plans for retirement didn’t work out because I never really had a plan. When I interviewed for a job at Popular Woodworking magazine more than 25 years ago I mentioned that my long-term plan was to do three things part-time; make the stuff from wood I wanted to make, write about all aspects of making that stuff, and teach others how to design, plan and make the things they wanted to make. The job at PopWood fit that plan for 10 years, and I managed to continue juggling those 3 things since then. I reckoned I could continue that indefinitely, but advancing age and health problems have let me know that it is now time to scale way back and go sit by the ocean and relax.

My health issues, according to my doctors, are things I will die with, not from. A few years ago I realized that I couldn’t work in the shop for very long at a time without a lot of pain, and the quality of my work wasn’t what it used to be. A bit more than a year a year ago my lovely, charming and talented wife and I had a serious talk about who we are now and what we ought to do in the time we have left. I decided that it was time to stop woodworking, which meant that we no longer needed a shop and all the tools and equipment. If we didn’t need the shop space then we didn’t need the house that was perfect for who we were a decade ago, but too much for us to keep up with now. We came to Cincinnati in 2004 to take the magazine job, and if we sold the house we could live anywhere we wanted that we could afford.

That’s what we decided to do and the decision about where to go kept circling back to our son, who moved to Spain a few years ago at the urging of his Spanish wife. We really miss the kid and he really likes living in Spain. We decided to take the risk and made a decision. Last November we took a two week scouting trip, filled our bellies with tapas and jamon and found a nice area with reasonable housing prices and a relaxed atmosphere along the Mediterranean. Our house will be on the market this summer and if things work the way we hope they will, we will be leaving in the fall. I’m writing this to let the people who have purchased my books, attended classes and read what I’ve written know that we are incredibly grateful to you. Folks like you have made things possible for a guy like me and I want to say thank you from the bottom of my heart. I have met and become friends with an amazing bunch of folks that I will never forget.
If you’ve read this far you likely have a few questions; like what will become of Bob’s stuff? and what will become of this website/micro business? Let me answer those in order. When I decided it was time to let go and move on I gave away most of my hand tools to people starting their careers and sold most of the rest to students in the career program at the Sam Beauford Woodworking Institute in Adrian, Michigan. Shipping a house full of stuff across the ocean is quite expensive, so in addition to selling the house, we have been liquidating almost everything, except for the cat who is going with us.
I still have several things that need good homes that I need to sell:

- The biggest thing (literally) is my workbench, the original “21st Century Workbench”.
- A pretty nice table saw.
- Several power tools; routers and bits, clamps and other related items.
- Several pieces of furniture that I made for magazine articles and for my own amusement.

My plan is to create several posts over the next week or so with details and asking prices here on this site. I’m hoping to sell most things for local pickup and I’ve been listing things on Face Book Marketplace. You can find me on that platform at this link.
I have a PDF of the furniture pieces that you can download here. You can also reach me by email. I can’t deliver or help load, but I will gladly assist in arranging white glove shipping if you can’t come to Cincinnati.
What’s the plan for this website, and my other site craftsmanplans.com?
- I plan on keeping both sites up and running, but there will be a significant change.
- Around the first of September, 2026 I will stop selling and shipping printed books and plans.
- More plans in PDF format will be added to the store in the next year.
- My online SketchUp class will continue and the PDF version of “Woodworker’s Guide to SketchUp, 3rd edition will still be available.
- If you have an interest in taking over the fulfillment of printed books and plans I’m interested in talking to you about that. It’s not a cash cow, but it has kept me from becoming a greeter at the local Walmart for quite a while. It would be nice to see that end of the business continue, but I won’t be able to do that from outside the USA.
- I probably will have time to post more often.
Once again, my family and I thank you for your interest in my work and for your support over the years.
Leo's desk pt XII.......
Yesterday when I quit the shop my lower back hurt and my joints were achy. I thought after a good nights sleep that all would be well in Disneyland. Well boys and girls that didn't happen. I woke up stiff, still achy, and my right foot hurt like hell. I think my days of going balls to the wall are over. Or maybe if I do more of them I'll get used to it again.
It took a while before the back and joints stopped aching. The foot took a while longer. I went slow and easy for most of the AM/PM sessions. I killed the lights early and I'll probably repeat today's routine tomorrow.
 |
| didn't fit |
I had to drill the dowel holes a bit deeper. I only did it in the legs. After that the drawer rail fit tight to the leg.
 |
| back rails dry fitted |
It took a couple of taps before the rail aligned top and bottom. I moved the top rail only to make sure the bottom of the slats were fully seated in the bottom rail mortises. There is about 3/16" of dead space in the top rail mortises.
 |
| flushing the epoxy |
The mound of epoxy was still proud of the top. Removed the bulk with the blockplane and cleaned/smoothed it with a card scraper.
 |
| underside |
I am not going nutso on the underside at all. I flushed the glue joints with the #4 first and sanded it with 100 grit.
 |
| done |
Smooth and clean. I kind of like this side of the top - there is a shimmering quality to all 3 boards in the glue up. But I'm leaving it as the underside.
 |
| sigh |
Made a boo boo doing the slots for the table top clips. I routed on the wrong side of the layout line. The table top clip wasn't bearing down on the bottom of slot - it wouldn't work for holding the top down tight to the rails.
 |
| a ways off |
The bottom line was the first slot position. The top one is where it should be.
 |
| before I committed again |
Used a couple of scraps to test the slot position. This one was iffy. The clip wasn't bearing down on the slot sufficiently. Micro adjusted the slot upwards a few frog hairs.
 |
| made a test slot |
This one was too high and there was a gap under the clip where it screwed to the board.
 |
| 3 times was the charm |
The 2nd one was still too high. It was like the 3 bears fairy tale.
I had to glue in fillers in the slots I did earlier. I will let them cook until the AM and redo all the slots.
The plan for today, sans the aches and pains, was to bring the side and back slat assemblies topside to the driveway and spray shellac on the slats. The over spray goes everywhere in the shop and it leaves fog. Yesterday was sunny and I don't know what tomorrow will be like. I want to spray the slats before I glue the back and drawer rail to the sides. Fingers crossed tomorrow will cooperate.
accidental woodworker
Driving the Work - Lathe Headstock Centers
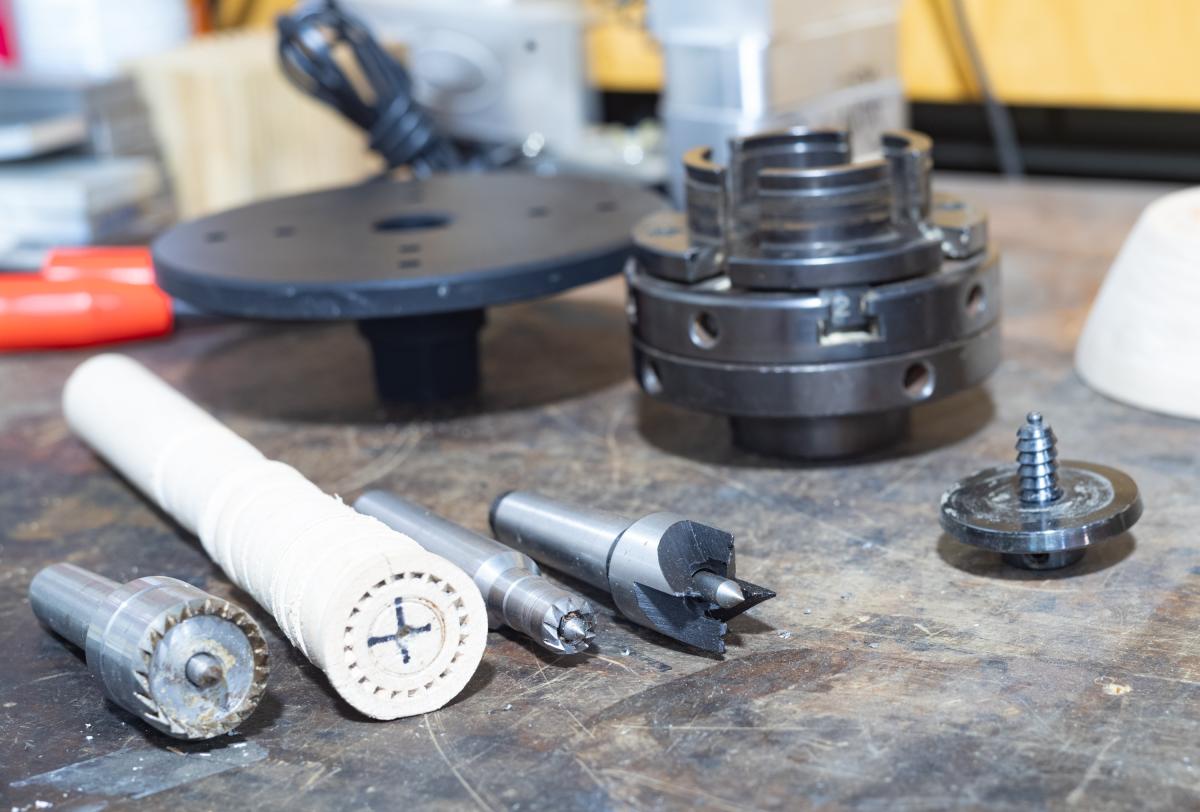 5 Ways of driving things in the lathe
We've talked a lot about our folding treadle lathe. But let's not lose sight of the attachments, which also deserve our focus.
When using a lathe, the work is driven by the headstock and supported, if necessary, by the tailstock. Bowls and similar pieces can be gripped or screwed on to the headstock and wouldn't need tailstock support. A long spindle can be held multiple of ways, but it is driven by the headstock, and the tailstock simply functions to support it.
Old turning manuals show a million ways of holding the work. If you look at 19th century and pre-19th century depictions of lathe tools and attachments, you'll see a lot of effort devoted to driving the work. The reason is very simple: Turners of that era did not have our wonderfully made three- and four-jaw universal chucks. They also didn't have standard interchangeable tapers and threads.
Modern wood lathes all have hollow spindles, so some-sort-of center tasked with holding the work will be able to be popped into the spindle. Some very inexpensive lathes use a set screw and a collar to hold the center, but better (but still inexpensive) lathes have a tapered hole in the spindle, which can hold a center by friction. The standard American woodturning lathe will have an MT2 (Morse Taper 2) hole in the spindle for a center driver, and a threaded outside, 1"- 8 TPI, for screwing on larger chucks and face plates. Larger lathes will have all larger tapers and threads. All standard accessories with MT2 shafts and 1"-8 threads are interchangeable. This includes the lathe accessories we sell. All similarly tapered and threaded accessories from other vendors will fit our Gramercy Tools treadle lathe as well.
Long, thin work is typically held between headstock and tailstock centers. Bowls and other short workpieces are typically held in a chuck in the tailstock. But all sorts of work-holding arrangements arise depending on the situation.
The tailstock is simply there to support the work and keep a long piece steady while you turn. The headstock center is what actually drives the work. Whatever way you are holding the work, the headstock center has to force the work to turn and not slip when cutting force is applied.
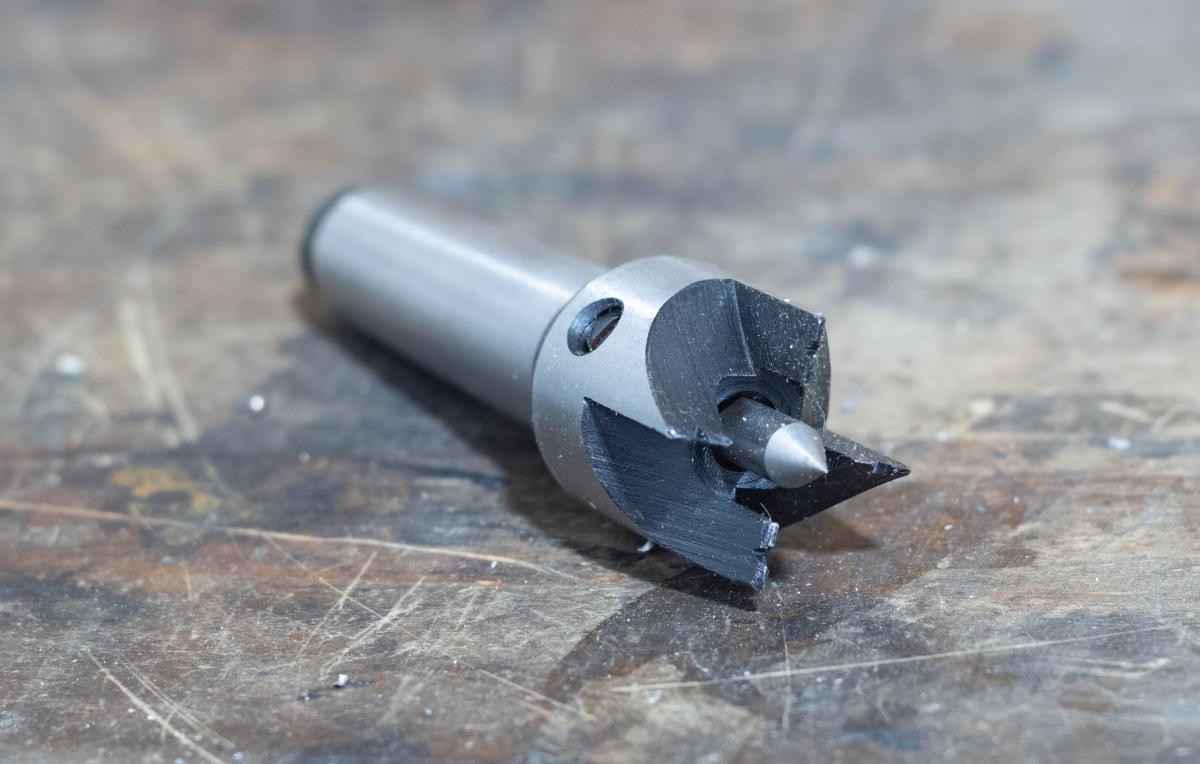 Four Prong Drive Chuck
Historically, the most popular way of driving spindle work is by using what's known as a "four prong center" or a "four prong chuck." (see photo above). You'll see these centers in old turning literature, but other options are eclipsing them. The four prong center is very simple to use. You drill a small hole in the center of the the piece and then put two saw cuts at 90 around that. Some people will just put in the center hole and then use a hammer to bang in the prongs. Then it goes in the headstock. The prongs in the slots drive the work. To make it work, you'll need to make saw slots or bang in the prongs, and I don't like either method. So we supply a crown center with our lathes, which we think is a lot easier to use.
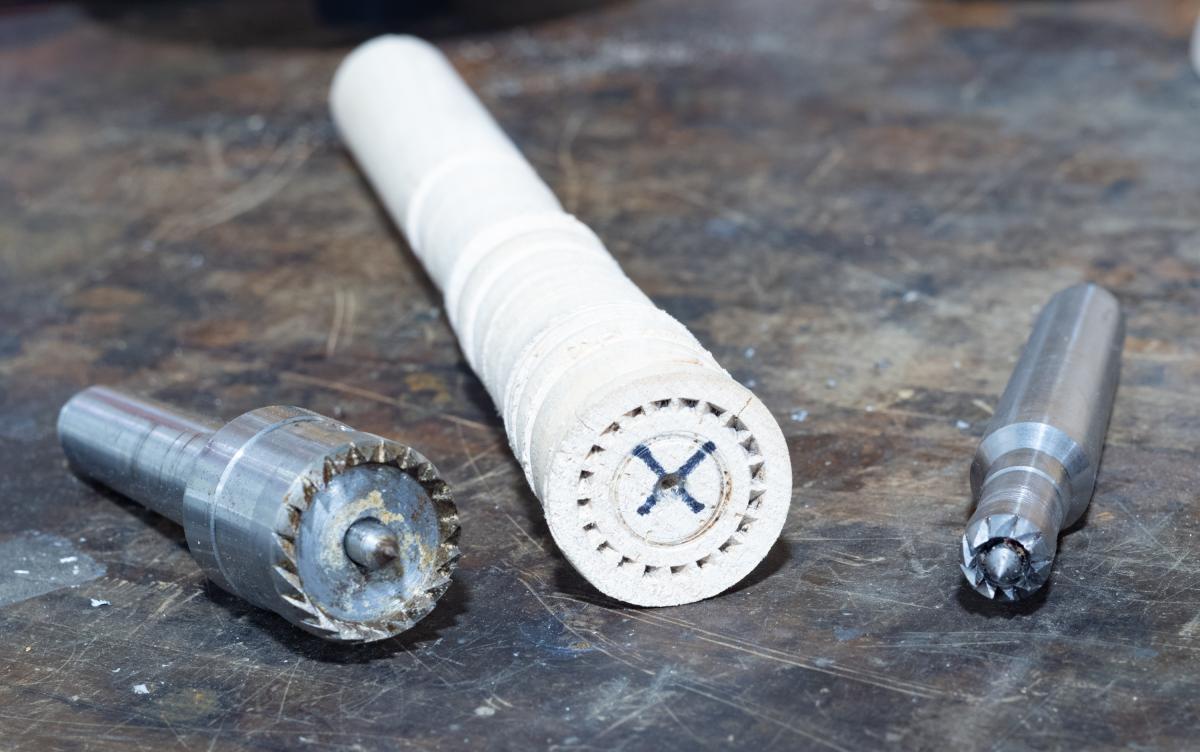 Crown chucks
A crown center (above) looks like a crown, hence the name. The center pin of a crown center is spring-loaded. To mount your work, just put a center mark on the work at the center; put the loaded pin on the mark; and then tighten up the tailstock. With the tailstock tightened, the crown edge digs in. Thats it - youre done. If you manage to do something silly and accidentally jam a tool, such that you would stop the work from spinning - and this is especially true on an electric lathe, as treadle lathes really dont have the power - a traditional four prong center will just keep on moving. This can cause real damage to the work, split the wood, break a tool, etc. With a crown center, on the other hand, the work is held more gently by crown points that do not penetrate the the workpiece that deeply. Because the individual crown points are not stuck that deeply, a jammed tool causes less havoc. The crown points just slip and work a groove in the work. Not ideal, but not a big deal. The turner just notes the problem, tightens up the tailstock again to engage the crown points again, and then resumes working.
We stock two sizes of crown driver; a 1 inch crown, which comes with a lathe, and a smaller half inch crown. I like them both. The only real downside that I can see for a crown drive is when your workpiece's diameter is very, very small diameter work and even a 1/2" crown driver will be too big.
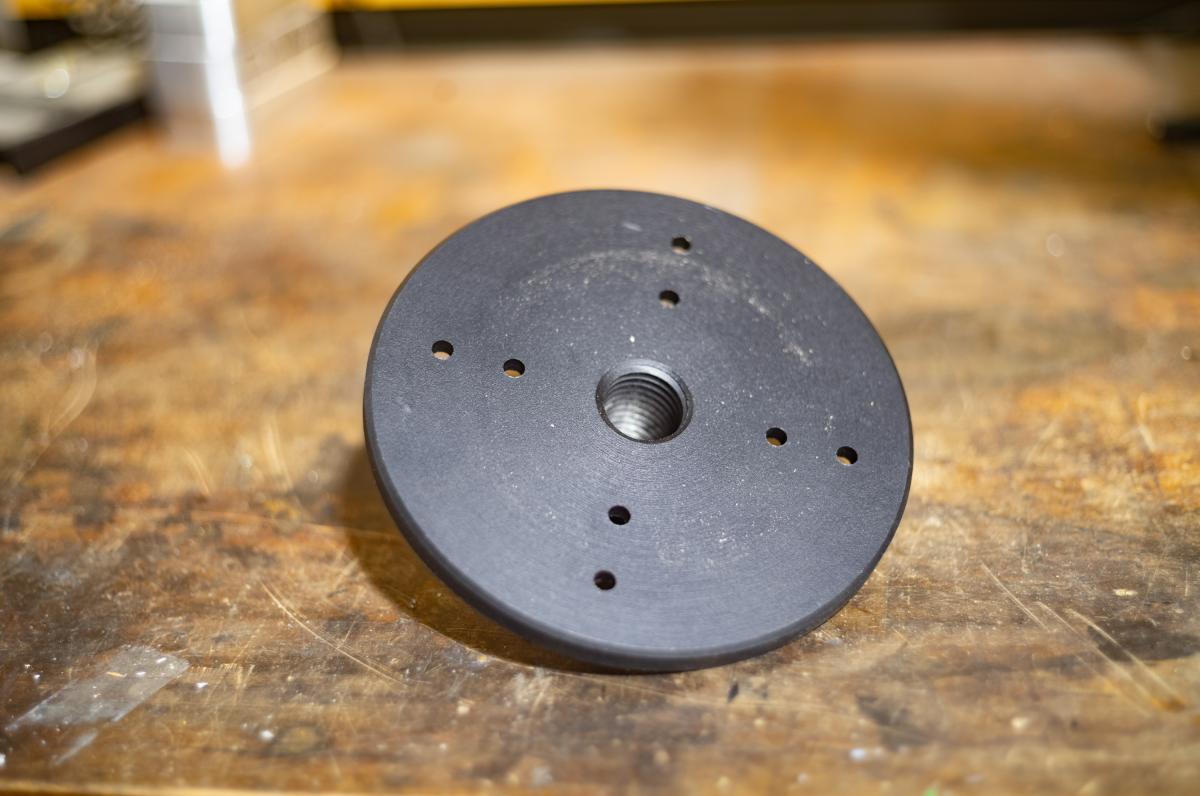 Faceplate
 While it is rarely used today, a traditional way of holding the work is using a faceplate. The work is attached to the faceplate - typically with screws, but also sometimes with little clamps - and away you go. There is no built-in centering mechanism, so it's not surprising that nowadays the faceplate is the workholder of last resort. Ive personally never used one, but it was a very common traditional way of mounting.
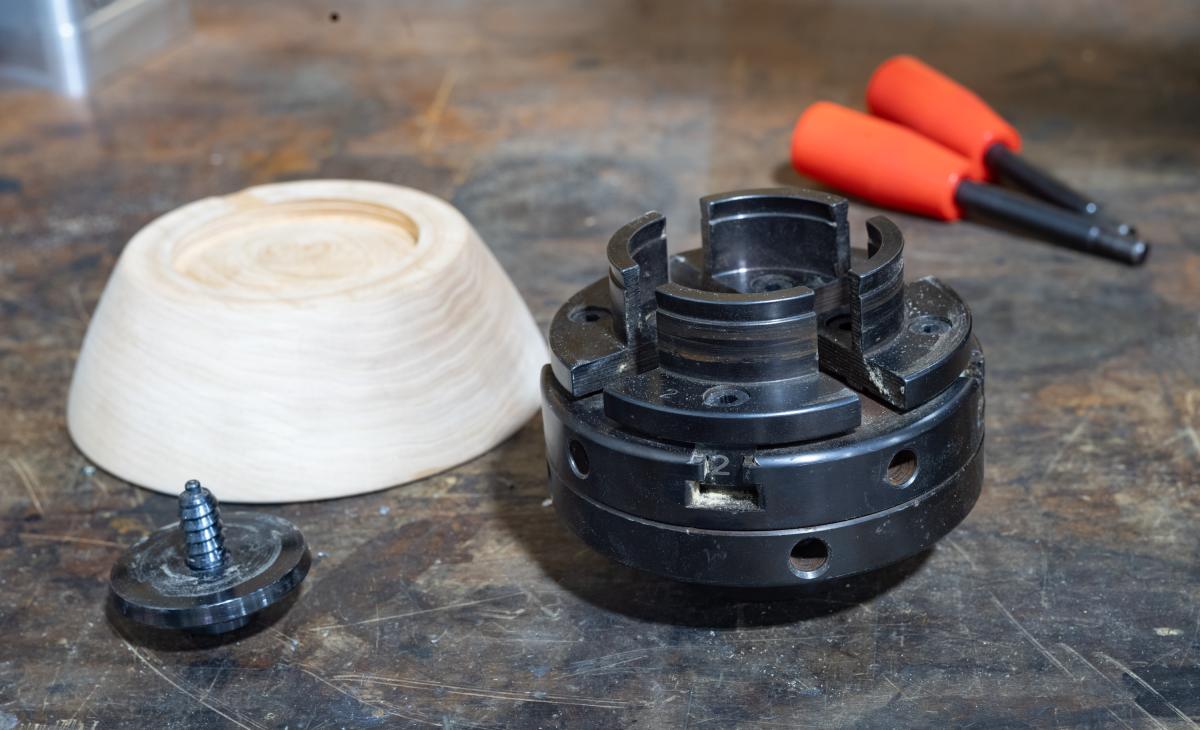 A screw chuck (left) and a Four Jaw Universal Chuck
 Here we have the most common way of holding a bowl for turning. You start by drilling a hole in the center of what will become the hollow side of the bowl blank and screw the stock onto a screw chuck (above left). The screw chuck can be driven a bunch of ways. In this version, the disk at the bottom of the chuck is clamped in a four jaw universal chuck. With the work in the lathe the outside of the bowl is turned, and in this particular case I also turned a recess in the base. With the outside done, I then flipped the blank around and clamped the work by expanding the four jaw universal chuck (above, right) into the recess I cut in the base. This method works solidly and reliably and is probable the most common way of clamping a bowl.
On wood lathes, four jaw chucks like the one above are standard. The jaws move as a group so the work is centered. Independent four jaw chucks are used mostly on metal lathes when the work is not round, or needs very careful manual centering, more accurately than a universal lathe can provide.
The four jaw chuck for a wood lathe comes in all sorts of permutations. We stock a nice but fairly primitive one without the attachments. The price ranges from "not a lot" to several hundred dollars, depending on features, precision and capacity. The jaws come in various sizes and are usually interchangeable on a particular chuck. Depending on which jaws are used, you can clamp on the inside of a recess by expanding outward, or on a lip clamping inward. The lips of the chuck jaws are tapered so grab the work solidly even if the recess or ledge on the work is pretty small.
On a final note, here are some pictures of some of a couple of chucks from Bergeron's 1742 "Manuel Du Tourneur." We see the elements of a faceplate and screw chuck - and even a very early independent four jaw chuck from a time when cutting screw threads was a big deal. But figure 8 is both interesting and practical. Particularly for production work, the turner would make a collet by drilling a piece of wood the same size as the stock; then cut slots in it thereby creating fingers; and then use a ring to force the fingers tightly closed. Or course this would only work for one size of stock, but for that size it works fast and tight. These types of collet chucks were very popular especially in production work.
I am barely scratching the surface of the different type of chucks that were used, but for most of us, a crown center coupled with some sort of four jaw chuck will cover 95% of the work were going to do. If you find yourself do oddball stuff, thats when you start doing some research especially in old books.
I'll talk about the tailstock when I next write about centers.
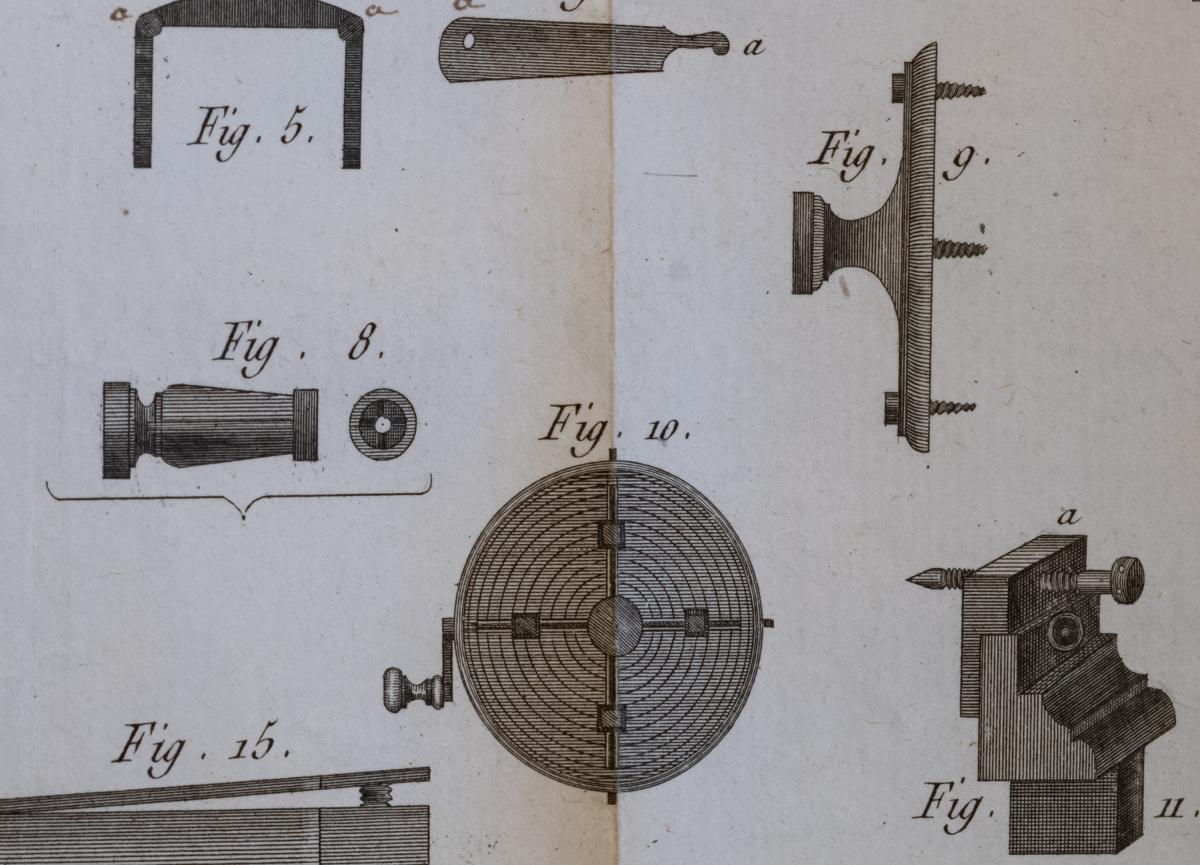 Various chucks from Bergeron's Manuel Du Tourneur Paris 1742 - #8 - collet chuck. #9 - Faceplate chuck with screws. #10 what looks like a very early four jaw independent chuck
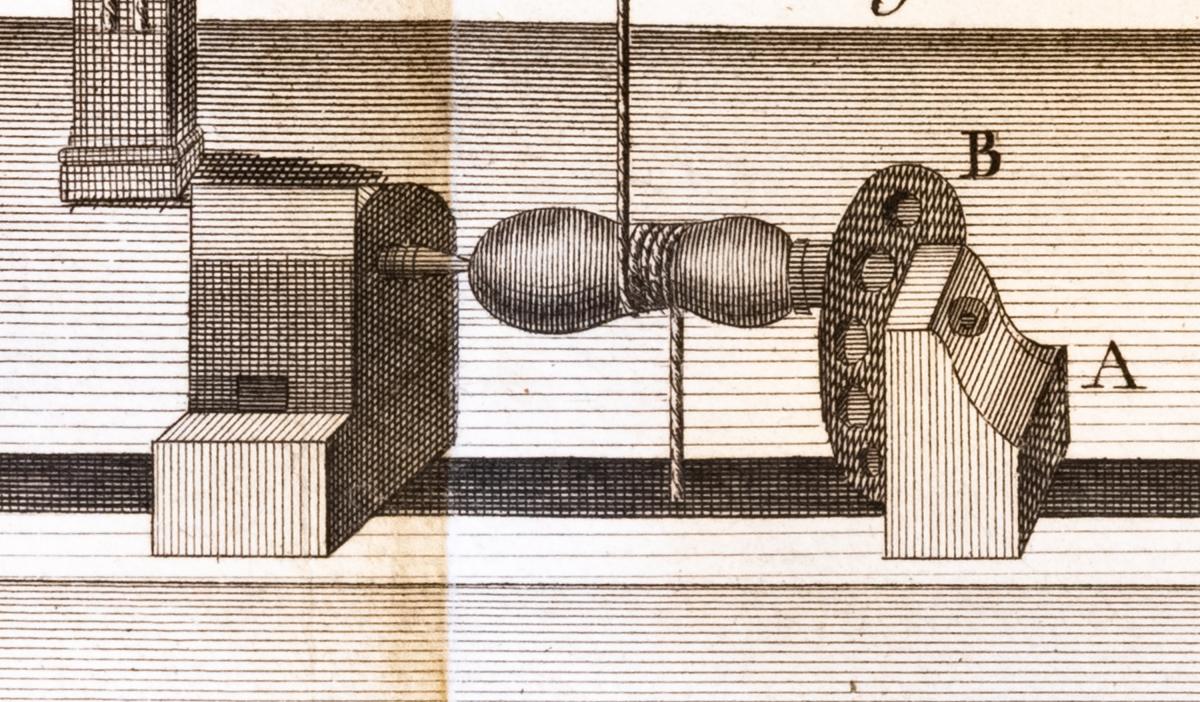 Disc support for holding handles for drilling - Bergeron's Manuel Du Tourneur Paris 1742
The Quiet Workshop Spring Newsletter
Is it still spring? It’s been such a busy start to the season that we suddenly seem to be in summer already. Thank you to everyone who has come on courses already; just as it starts to calm down we move into show season.
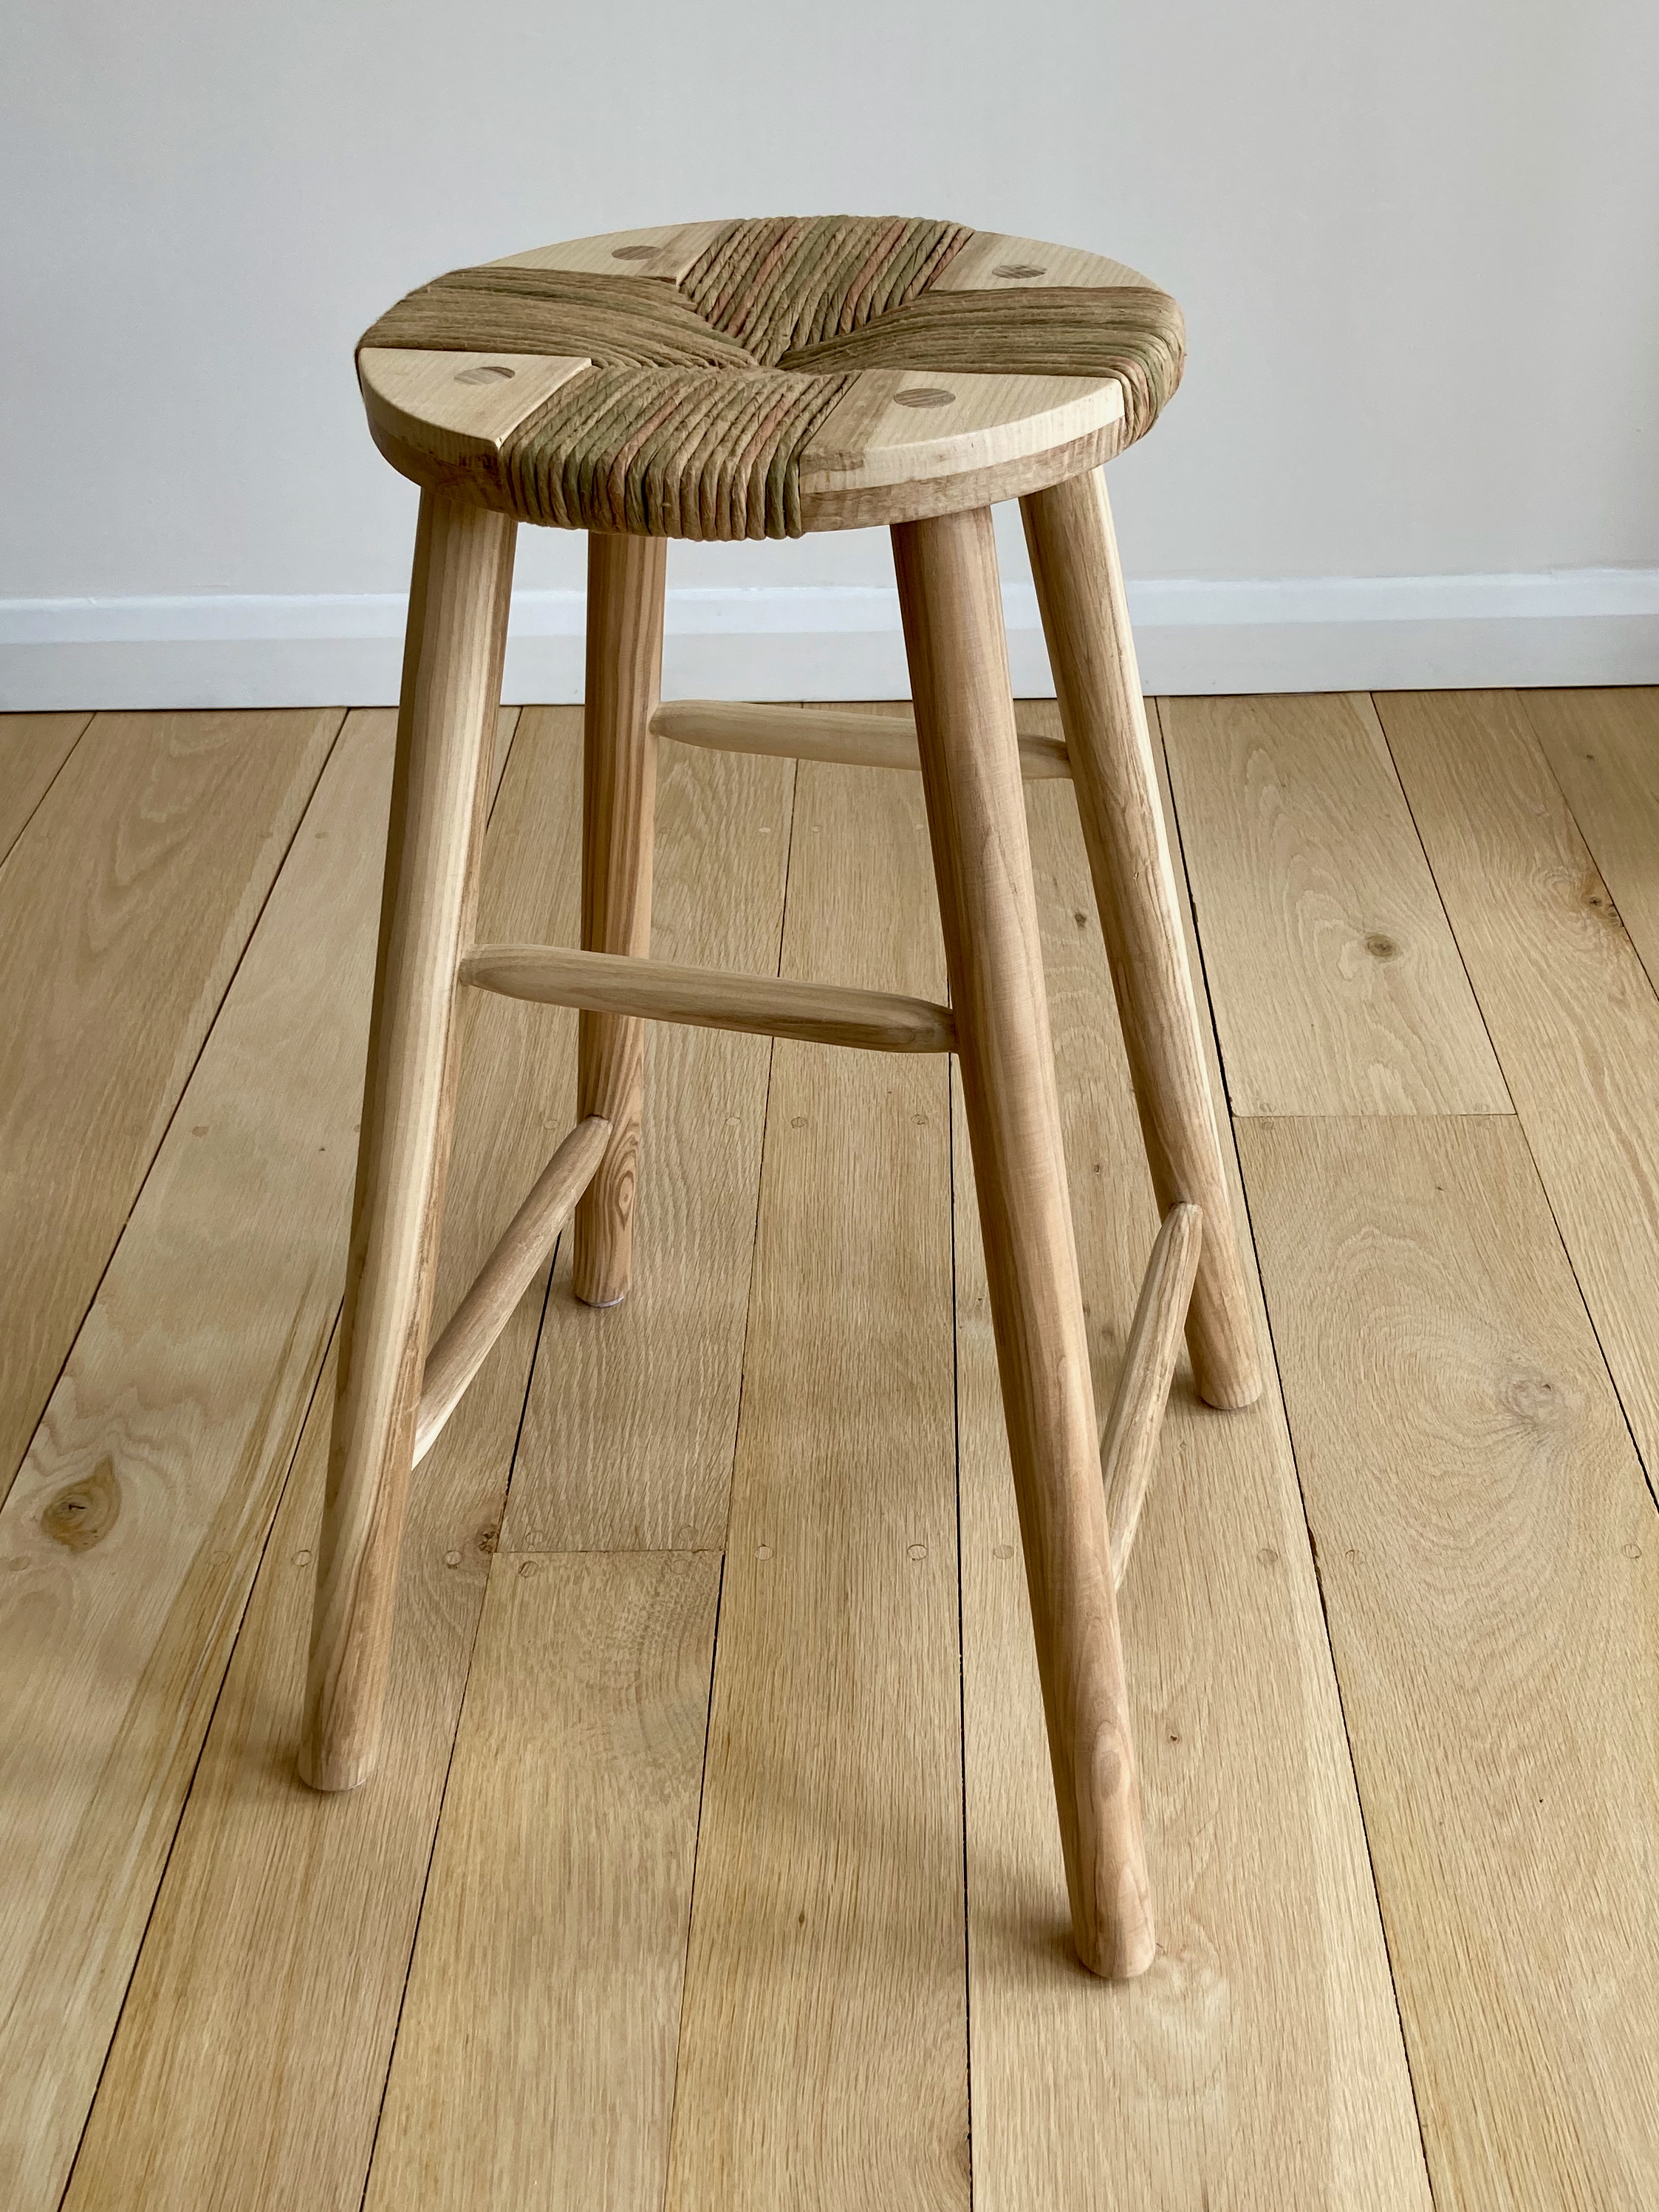
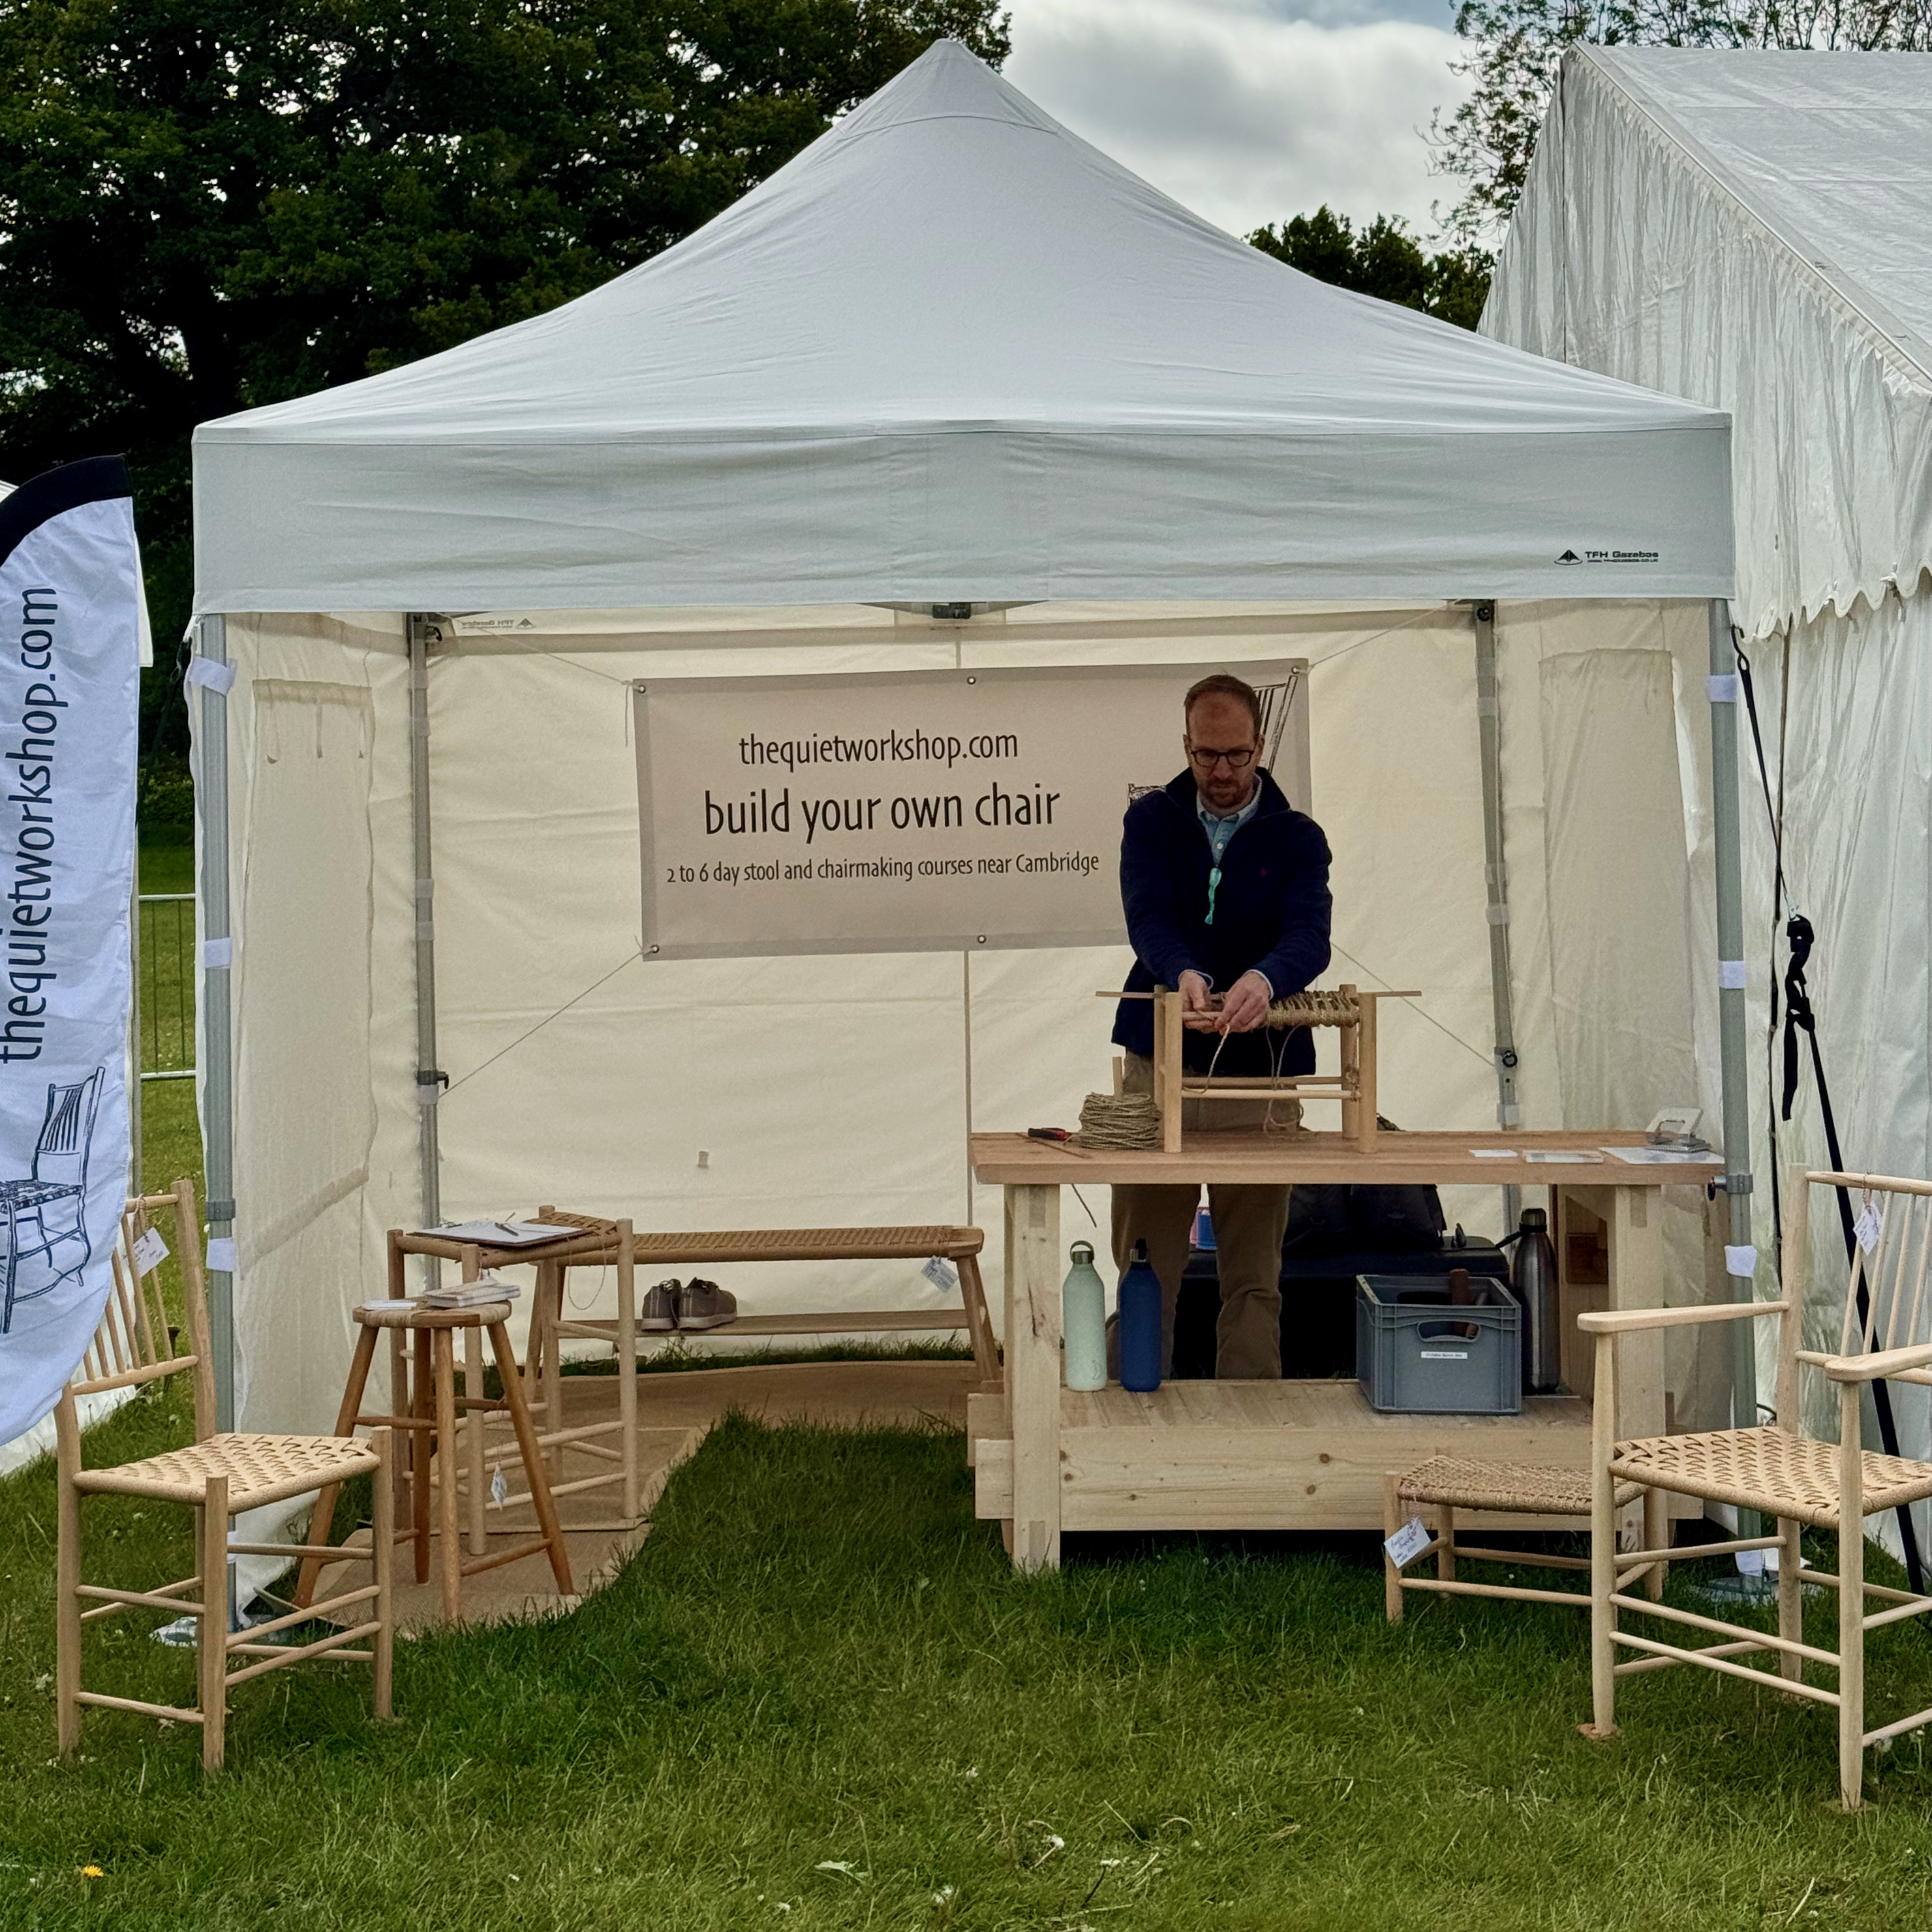
We’ve been invited back to the Festival of Upholstery and St.Alban’s Upholstery School to teach expanded workshops at both: at the festival we’ll be teaching a three day weaving course which will cover our standard square weave, L nail weaving and the envelope weave. Participants will be putting together a stool from a kit and will take home their final project. We’re really looking forward to it; we had a great time there last year.
We’ll be teaching another Danish cord workshop at St.Albans in September and then a dedicated envelope weave course in January. At these workshops you bring your own chair to weave so start looking out for one now!
Our vice screw kits have had a good reception and we’re almost out but we’ll be restocking over the summer.
Course Dates 2026
The dates for all of our courses for the rest of 2026 are available on our website. They link through to Craft Courses for booking.
So that we don’t disappoint anyone we always run courses that have bookings; on the rare occasions that just one person books on a particular date then that course will run. Whilst this makes no financial sense whatsoever we feel that if people make plans in advance they should be confident that they’re not going to be disappointed.
If you’d like a course for a small group and our dates don’t suit you please get in touch. If we haven’t had a booking at a time that does suit you we’re always happy to move things around.
Shows – 2026
Our show season started with a lovely four day exhibition at Hatfield House for Living Crafts. It was great to meet so many people who are interested in traditional crafts.
- 13-14th June Cambridge Town and Country Fair, Parker’s Piece, Cambridge
- 4-5th, 11-12th, 18-19th & 25-26th July Cambridge Open Studios – right here in Great Wilbraham
- 8-9th August Cambridge Country Show, Stow Cum Quy
- 12-13th September The Wonder of Wood Fair, Burwash Manor, Cambridge
- 30th-31st October London International Woodworking Festival, LDE UTC, Royal Docks, London
If you think there’s a craft show within an hour’s drive of Cambridge that we should attend please drop us a line. We’re always grateful for new opportunities.
Danish Modern kit
If you want to learn L nail weaving or just want to build an elegant and comfortable stool at home we’re launching a new kit.
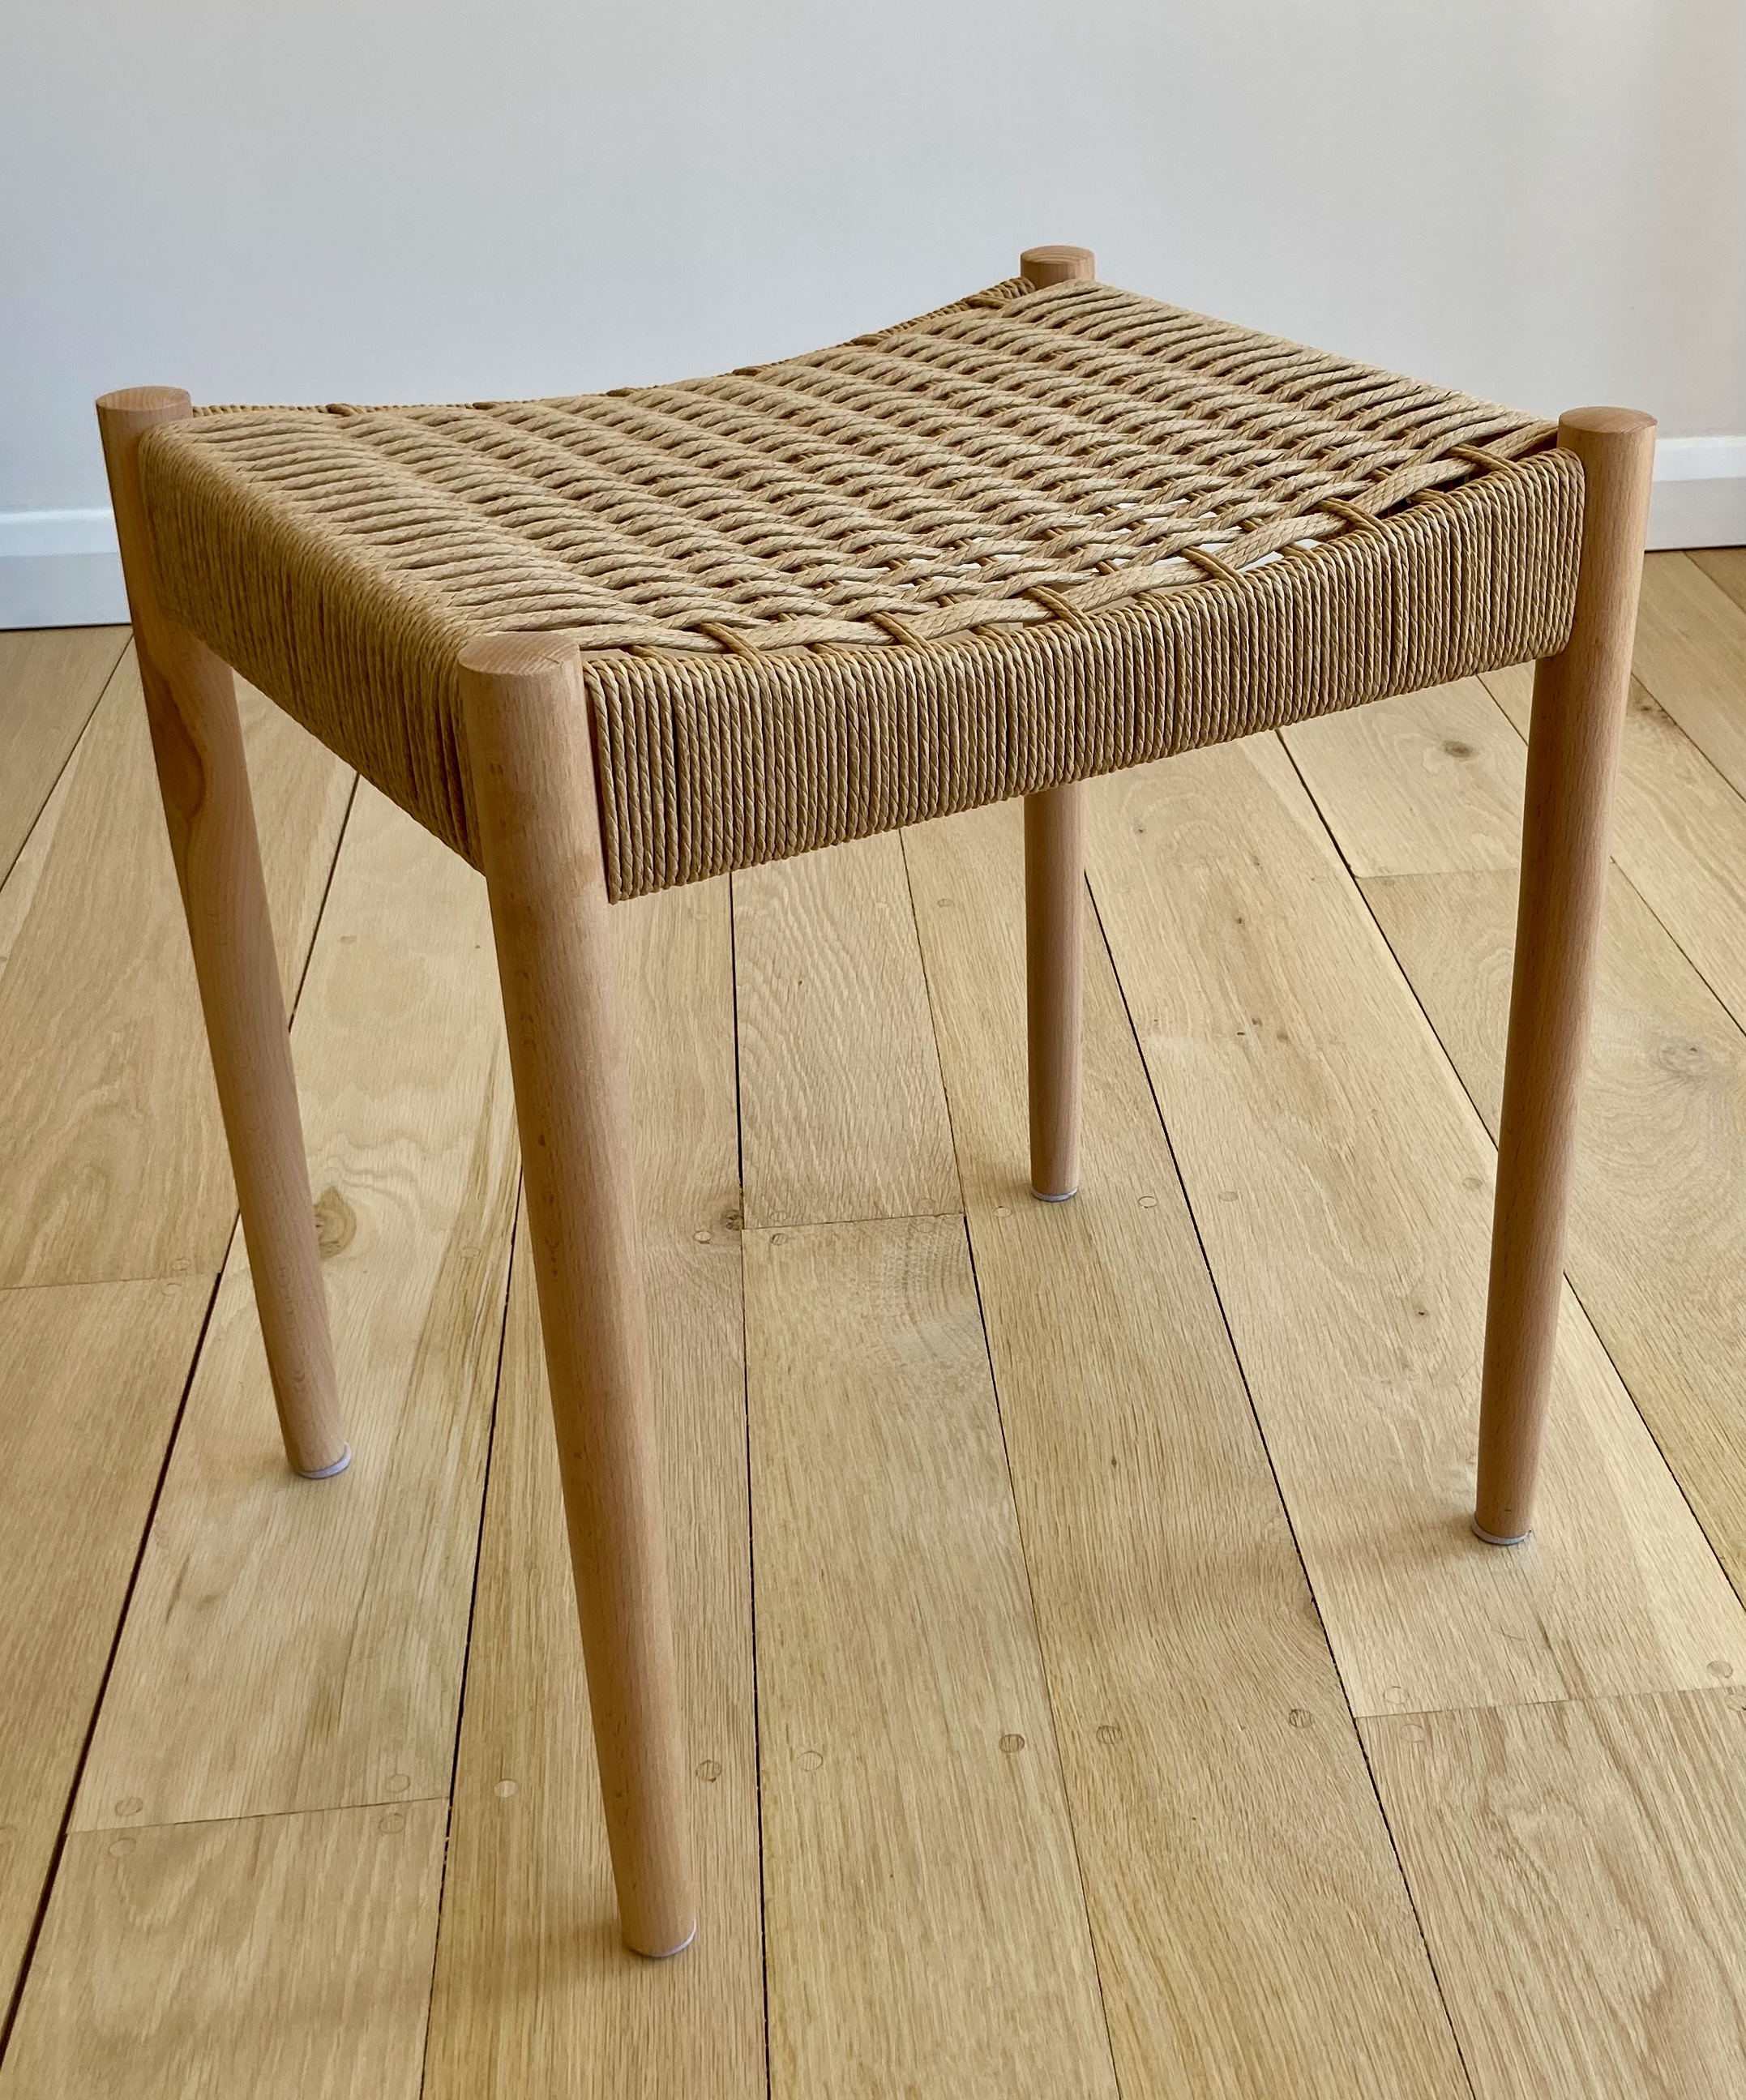
The kit will contain all the materials needed. You just provide a few basic tools and a couple of clamps. We’re working on a video to talk you through putting the stool together and weaving the seat. When it’s ready we’ll make it available in our shop.
Fresh Bakes
Lunch and refreshments are included on all our courses. Three times a day we down tools and decamp to the conservatory to eat Bryony’s lovely bakes and talk about chairs (and anything else). We think these breaks are really important to give you an opportunity to go back to the workshop well-fed and refreshed, ready for more chair-making!
 Freshly baked Shoo Fly Buns – a new course favourite
Open Studios – steam bending demonstrations

We’re opening the workshops to the public every weekend in July as part of Cambridge Open Studios.
We often get asked at shows how we bend timber for the backs of our chairs so we’re going to do a steam bending demonstration at 12 noon on the 18th July. If it’s not raining this will be outdoors.
As always, if you’re interested in coming on a course and you want to find out more please give us a ring (07778 397328) or drop us an email. You can book all of our courses through the links on our website. If our dates aren’t perfect for you or you want to book for a group give us a call; we can usually work something out. Don’t forget course fees include all materials, lunch and refreshments each day.
Enjoy your time in the workshop.
StJohn & Bryony

Leo's desk pt XI.......
 |
| chamfering the holes |
This doo da does an acceptable job chamfering the dowel holes.
 |
| problem |
I initially knocked down the top of the holes with a chisel but I could still feel a wee bit of a raised bump. The hand chamfering tool got rid of that. I didn't want anything to keep the rail from laying up tight to the legs. It also gives a little relief for glue.
 |
| sigh |
I need to chamfer for the head of the screw I intend to put here. I have off set screwdrivers for driving the screw but no offset chamfer doo da. I have an idea percolating in the brain bucket. It is a trick I saw on a Popular Woodworking You Tube post. Fingers crossed that it will work.
 |
| back rails |
I had to take the back rail slats out again to plane/clean up the top edge with the mortises.
 |
| two taps |
Doing the last dry clamp before gluing it up. I put a piece of blue tape on the leg face that the side rails will be glued to.
 |
| hmm....... |
The offset that I knew about shook hands with me. Rather than glue a piece on the top I am leaving this as is. I will glue a thin piece of cherry over the face like I did on Miles's desk.
 |
| ditto |
The other rail has the same offset.
 |
| less than a 16th difference |
 |
| survived the first one |
Paid attention this time to getting all the glue squeeze out cleaned up on both sides of the rail. Had a slight panic attack due to glue freeze. It took a while to get glue applied to the dowels and the in the holes. The clamps pulled the legs tight to the rails.
 |
| 2nd one done |
No hiccups with this one. A bit of a PITA getting the squeeze out cleaned up. Noticed that I forgot to do the slots for the table top clips.
 |
| sigh |
Had a mind fart. Initially I glued one end of the rails to the wrong face of the leg. Even though I had put blue tape I still managed to ignore it and screw up. Lucky for me I noticed that the offset on the rail with the leg wasn't correct. I caught it within a couple of seconds. I had to clean out the glue in the holes. Before I glue up the back rails I will run a drill through these holes again.
 |
| another oops |
I assembled this and the diagonals were OTL (out to lunch). One was 38 3/4" while the other was 39 1/2". The distance between the two rails was 14 5/16" R/L. I had a parallelogram. The top and bottom mortises were misaligned. (Don't know why I have four fingers here - can't remember why).
 |
| success |
Aligned the mortises correctly and checked my diagonals again. This time they were both dead nuts on 39 1/4".
 |
| missed it |
The first time I assembled this I noticed that the center wide slat looked crooked. I assumed that it was because the rails were slightly offset R/L from each other. Should have checked for alignment then rather then assembling the entire thing.
 |
| sigh |
I had glued the chip now missing here with superglue. It didn't last at all. The chip missing is on the top rail so it will be difficult to see, if at all.
 |
| the misalignment |
This is the result of not centering the layout stick. I had centered it on Miles's desk and had no hiccups with his.
 |
| aligned |
 |
| sizing the top |
The top has to lose about 2" off one of the long edges. This last board is a little more than 7" wide. That will leave this at roughly 5". hmm...., don't like that much.
 |
| the other option |
If I take 2" off this edge it would balance out the two outside boards
better. However, it would remove this knot defect that I want to keep.
Sucked it up and sawed 2" off the other edge.
 |
| hmm....... |
This was surprising because the 'hole' didn't look that deep. It had been less than a minute and it had already sunk. FYI - You don't need a pound of dye mixed in with the epoxy. I used less than a 1/4 of what I used previously. The color is still deep and with no clear spots.
 |
| first saw cut |
Used my cordless skil saw to do both the long rip and cross cuts.
 |
| yikes! |
Where is all this epoxy going? Less than 5 minutes after doing pour #2, I had to do a 3rd one.
 |
| hmm..... |
The diagonals are off by 1/8". You can't see that amount eyeballing the top. I doubt anyone would throw a square on it or break out a tape and check the diagonals.
 |
| no choice |
I had no choice. I couldn't fully lower the blade below the top. This mess has a 'hole' that the gear extends into when raising the blade up/down. It was packed full and it was a solid blob of saw goo. I dug that out thinking I had fixed the problem but I was wrong.
 |
| tight quarters |
This rod (I removed the handle and nut) turns a worm gear which engages a half circle toothed gear that raises and lowers the blade. Everything from this view point seems to be working as it should.
 |
| sigh |
That looks a lot like a hole for a pin that would keep the worm gear from spinning as the handle turns it. And spinning is exactly what the worm gear is doing. It will spin forward, stop, engage the toothed gear, and lower/raise the blade. What it won't do is lock down and keep the blade at a specific height. Which the problem I have had with this saw for a while now.
 |
| time flies |
I came to the shop just before 0800 and worked through lunch. This was the time when I checked it. Been a long time since I worked this much and missing filling the pie hole. I kept on trucking.
 |
| 4 times filling this |
It has been over an hour and the epoxy is still raised. When I checked it again before I killed the lights it was the same. Hopefully it will be same in the AM.
 |
| side drawer guides |
Used the scrap from sizing the desk top to get the four guides. Fingers crossed that I won't use them for something else without thinking of them.
 |
| 1/2" maple |
I've had this piece of maple in the shop for 5+ years. I can get 3 bottom supports for the drawer guides from this. I'll address the cup after I rip out the pieces.
 |
| hmm...... |
Planed the hump first and then I attacked the cup. Started with the #3 criss crossing and switched to the #4. I thought it might be difficult to remove the cup on such a thin width but it wasn't.
 |
| done |
I got all three flat and straight. I'll need to make a Lowes run and buy a 1/2" maple board for the 4th guide.
accidental woodworker
Leo's desk pt XI.........
 |
| round 2 |
What will it be this time? I heated the top on all sides before clamping and setting it aside to relax over night yesterday.
 |
| hmm........ |
It closed up a wee bit more but still not enough. I can effortlessly close it flat with hand pressure. I clamped the center and set it aside until I need it. I am definitely leaning in the direction of screwing it to underside of the table.
 |
| made good progress |
Got the rest of the slats trimmed and fitted for the back. I was having problems aligning the slats to their respective holes and switched to clamping it. That worked way better than I expected without all the nightmare scenarios banging around in the brain bucket.
I started the first two in their mortises and then used the clamps (one at each end, one in the middle) slowly closing them as I worked from left to right. I have a good, snug fit in all the mortises and when it comes time to install it I'll do it dry. There isn't any need to glue the slats. Plus it will make it easy to replace one if ever needed.
 |
| no hiccups |
I was expecting to do some adjustments to get the rails to align with the legs but I didn't. I didn't have to tap either rail in any direction to have the dowels in the rails align perfectly with the holes in the legs. I quick and painless dry clamp.
 |
| hmm....... |
The top of the rail is flush with the top of the legs. I thought after yesterday it would have been down about 1/8". Having the top flush like this will make installing the drawer guide assembly a lot easier.
 |
| first side done |
Trimmed and fitted the slats on the first side and dry clamped it. I had to do a couple of mallet taps on the top rail before the dowels in the rails aligned with the holes in the leg.
 |
| last one |
The holes are the same on the legs so this works for checking for fit. Two taps on the top rail and the fit was like a hand into a well worn glove.
 |
| final prep |
Planing and sanding to get the side assemblies ready to glue up. The master plan is to glue up the two sides first and let them cook. Then I will glue the back and drawer rail. After that is making drawers and attaching the top. IMO doing the slats is the hardest part of building this desk.
 |
| careful time |
I can't mix up the slats. They have been individually fitted to each rail and aren't interchangeable. I have a bad habit of not adhering to that particular policy.
 |
| ready |
I planed all the rails when I fitted them. I eyeballed each one to make sure they were clean and smooth on all four edges. I won't be sanding them and I'll go with the finish off of the plane.
I'll prep the legs in the AM and hopefully get the two sides glued and cooking.
accidental woodworker
Leo's desk pt X.........
 |
| drawer rail |
After dinner last night I went to the shop, unclamped this, and heated it with my heat gun. Clamped it back together and let it go until the AM. Any bets?
 |
| hmm....... |
It straightened out a wee bit but not enough. Yesterday it was less than a frog hair more then 1/8" at the center. Today it is a couple of frog hairs under 1/8". I heated it again with the heat gun, clamped it, and set it aside. I'll check it in the AM. I'm not betting the ranch on it working.
 |
| done |
Got the last slat mortise chopped and cleaned up. Stopped here and brought Miles's frame to the Frame it shop.
 |
| heebie jeebie dance time |
I find doing this a tad nerve wracking. It so incredibly easy for me to miss and not position the jig correctly. Which is exactly what I did on the first holes I drilled. I was so focused and intent on getting the jig positioned correctly that I forgot to also make sure it was also on the right face.
Got lucky with boo boo. Because it was the front leg I was able to erase the old reference marks and do new ones based on the leg being rotated 90°. Sometimes you get lucky.
 |
| hmm....... |
I did this one wrong. The right side edge was the original one for the slat mortises. I changed my mind and did the mortises on the left edge. The hiccup was I had already drilled the holes before I made this change. The hole spacing is not the same R/L L/R. Not sure how I'll deal with this.
 |
| another hiccup |
The mortises are a wee bit off too. I did the layout from the left end going to the right on all the rails. I have to align the bottom rail keeping that in mind with the top rail. I think this is the last hiccup I have to account for.
 |
| hmm...... |
I got the holes drilled for all the top rails. Before I did the bottom rails I had to determine where they were going to live. I eyeballed it and 5" up from the bottom is what looked good to me. The slats ended up being 15 1/8" long.
 |
| done |
I survived another round of drilling dowel holes. Other then the initial brain fart, I got all the holes drilled exactly where they should be.
 |
| lifesavers |
This mark is worth its weight in gold squared. I used to do this with RF and LB etc and with numbers. This can't be beat and I used it extensively when setting up the doweling jig.
 |
| done |
Got all the slats sawn to the same length. Fitting them is in the on deck circle.
 |
| first one fitted |
Started with the wide center slat first. Got it fitted in the bottom and top rails.
 |
| first 8 slats |
I was going to fit the slats in the bottom rail first and then in the top rail one at a time. I only did the first rail and stopped. It was too awkward moving the rails in/out of the vice. So I did them the same way I did Miles's desk, fitted them all in the bottom ones first and then the top.
That plan went south because I came upon two cracks/splits among the slat mortises 9 thru 16. I had to glue them and let them cook. Instead of killing the lights I fitted the first 8 slats into the top rail.
Then I killed the lights for the day. I should have this glued up by monday?
 |
| Amazon came at 1804 |
I had to satisfy my curiosity about the fluted dowels. I would say that they are 6mm and not an imperial 1/4". I'll have to check and see if Dowel Max has metric bushings.
 |
| metric equivalent of 1/4" |
This is a spiral dowel. Extremely happy that I got a true 1/4" dowel. (6.30mm = 1/4")
 |
| a 1/4" is 0.250 |
This is close enough to 0.250 IMO. These dowels were a loose fit but tighter than the 6mm ones.
accidental woodworker
Exhibition
Vertical grain. Why riven oak? Radially riven oak is the most stable, because the rings of the tree are at 90 degrees to the face of the timber, or vertical. Better than quartersawn. Come and see how it's done in practice. Sign up for a course, or see demonstrations at Birdwood House Gallery, Totnes 12th-18th July. 'Jonathan Bayes (&Co)-Carving History'

Leo's desk pt IX...........
 |
| almost ready |
It is the AM and I let the holiday I painted yesterday dry thoroughly overnight. Got the 2nd coat of shellac on and the 3rd and final coat in the PM session. I'll get this and Miles's drawing to Maria in the AM.
 |
| shoulda, woulda, coulda, but didn't |
All the holes filled in and flushed without any hiccups. However, up close I can see a difference between the two epoxy pours. It would have been better if I had dyed the epoxy black. From a couple of feet away, I can't see anything different. And who (besides me) would eyeball the the black spots up close and personal?
 |
| side rail mortises |
The side rails have two more mortises (total) to chop than the back ones (with the wide center slat). One benefit of this new method is the long sides of the mortises stay cleaner and crisper.
 |
| snug fit |
I like the fit of the slats so far. It is snug on the width and doesn't fit at all the other way. There are burn marks on the sides that I will plane off. That should be enough for the slat to fit.
 |
| chopping away |
It isn't taking a lot of time per mortise. I would estimate that it isn't more then five minutes each.
 |
| yikes |
A brain fart that shouts and laughs at you. Missed drilling the holes in one of the top rails. I didn't notice here that I made the stinky fart me-steak again with the bottom rail. Fixed that one later on in the PM session.
 |
| too shallow |
I measured the holes and they were all about 7/8" deep. Too shallow for the 2" dowel pins I intend to use. I marked the stick at 1 1/16" (16th for glue) and redrilled all the holes to that depth.
 |
| last two |
Got the outlines done on the last two side rails. Stopped here for two reasons. The first was my right wrist was starting to hurt which means I was waking up my carpal tunnel. To go along with this, my lower right back was hurting. Bending over for hours ain't what it used to be. Not a real problem as the pain goes away once I straighten up and head upstairs.
The 2nd one is the 3/8" chisel edge was chipped. I was still chopping clean but I could see the one big and small chip missing on the blade's toe. Stopped here and sharpened it removing the chips first which didn't take much time on a 100 grit runway.
 |
| this one is 80 grit |
I have two of these runways that I use. This one is 80 and used for heavy removal and squaring blades. The other is a double sided runway with 100 grit on one side and 150 on the other.
 |
| can you see it? |
This is the front top, drawer rail. It is bowed an 1/8" at the middle. This has to be straight so that the flush drawer fronts stay flush. So for the leading candidate is to screw it to the underside of the top on either side of the center block.
 |
| worth a try |
It is easy to flatten it with hand pressure and the quick grips are strong enough to do it too. I'll check this in the AM and see what shakes out with it. If I see no results, I'll try hearing it with my heat gun and clamping it again. I really don't want to make another drawer rail.
 |
| fluted dowels came today |
Not 2" long but about 1 7/8". There are from China too so I don't have high hopes that they 1/4" diameter pins neither.
 |
| they ain't a 1/4" |
In a 1/4" hole this dowel has a 32nd space all around. I don't think that is tight enough even allowing for glue swelling to be joint worthy. The spiral dowels are coming in tomorrow. Fingers crossed that they are imperial and a 1/4" in diameter.
 |
| dead battery |
It worked yesterday but its dead the next day. There was a little battery corrosion that cleaned off the contacts with alcohol. Went to CVS to get a L1154C button battery and nada. CVS has cut way back on the range of button batteries it used to sell. I went to Wally World next and the same results. They don't sell N batteries anymore neither and they used it because they were my source for them. Ordered both batteries from Amazon and I'll have them tomorrow. Then I can measure these pins - the calipers read imperial and metric.
accidental woodworker
Pages
