Hand Tool Headlines
The Woodworking Blogs Aggregator
“Glory to God in the highest heaven, and on earth peace to those on whom his favor rests.” - Luke 2:14
Be sure to visit the Hand Tool Headlines section - scores of my favorite woodworking blogs in one place.
Tools For Working Wood
Feeds and Speeds on a Treadle Lathe
 Tearout that shouldn't be there
When you work on a CNC mill, it's all about feeds and speeds. For a particular material, the questions are: how fast do you spin a given milling cutter, how fast can you move the tool across the work, and how deep a cut can you take? Do it right, you get a nice smooth finish and fast cutting. Do it wrong and you waste time, break the tool or damage the work.
With a wood lathe, when it's just you holding the tool in your hand against a toolrest, the same actual criteria apply - but we don't actually calculate them. Instead, you go by feel. When making a cut, how much pressure do you put on the tool so it feeds into the wood and how fast you move the tool across the work? A treadle lathe has totally different feeds and speeds than a regular powered wood lathe has.
For example, I've been playing around turning a piece of cherry wood. Cherry is dead easy. The wood turns easily, but because everything is coming out well, I have noticed my tendency to do what I do with powered equipment: lean into it. That is, subconsciously my brain is thinking that everything is cutting nicely, and the lathe seems to have plenty of power, so why not push a little deeper?
If I am lucky, when I stop the lathe I just see more tearout than I would want; if I am unlucky, this tendency is rewarded with a rough cut - chatter. Chatter in spindle turning occurs when the interplay between the sharpness of the tool, the speed of the lathe, and the depth of cut exceeds the force of the tool needed to shave the wood easily. So you have the tool unable to cut cleanly, and one of three things will happen.
1 - You get a shaving - but probably not since the force on the wood isn't enough to remove a thick shaving.
2 - The tool is so jammed into the cut that everything comes to a screaming, dangerous stop. The tool could break or get jerked out of your hands; the work could shatter; or the lathe could stall.
3 - The most likely outcome on a treadle lathe is that the wood just pushes the blade out of the cut and keeps turning. That doesn't sound too bad, but the wood is rotating while you are still trying to take that heavy cut, and as the wood revolves the tool is sneaking back for another try, going for a heavier and heavier shaving until the tool gets pushed out of the cut again. This is how you get chatter.
Treadle lathes run slower than powered lathes - under 1000 RPM vs 2,500 to 4,000 RPM on a 2" spindle. With the same pressure on a tool, the tool will advance into the wood 2-3 times the feed rate per revolution. Less power and a potentially higher feed is why a treadle lathe is more prone to chatter than a powered lathe.
What I just described really applies to spindle turning where the grain of the wood is perpendicular to the cutting action. In bowl turning where the grain of the wood is parallel to the tool, the problems are worse. You get tearout (above) or chunks of wood flying out from the work. Half the time when turning a bowl you are cutting against the grain of the wood. Bowl turners have strategies for combating the grain problem with tool selection and cutting approach, but unless you are controlling your feed, you will have this problem to various degrees.
The picture shows the tearout in my cherry bowl that occurred when I went against the grain - my tool wasn't very sharp and I was holding it wrong. (Since I took that picture, the bowl has progressed and the problems were fixed.). On the other side of the bowl blank (below), I am cutting with the grain, and in spite of my dull tool I am getting a clean surface.
The other problem is when starting a project, the wood isn't round yet, you are cutting air a percentage of the time, and there is nothing for the bevel to ride on. When that happens, the tool wants to lurch forward into the cut, and suddenly you are taking way too thick a cut (and bad things will happen - see above).
The first step towards a solution is sharp tools. While sharp tools are critical on any lathe, it's even more important when turning with a treadle lathe. A sharp tool lessens the force needed for a clean cut so you can take heavier cuts before the lathe rebels. With a sharp tool, the shaving is cut away cleanly, and not just ripped off the wood. I have all HSS tools and I keep an extra fine diamond stone next to the lathe and routinely touch up the edge. A strop with green honing compound helps too.
The second step is to understand how to keep the tool steady so that you can control the depth of cut no matter if you are cutting wood or air. I have learned enough to now know that have been doing it all wrong. I am used to resting the tool on the toolrest and the bevel on the wood and then raising the handle so the tool cuts. I maintain pressure, relying on that pressure on the wood to keep my cut consistent. This doesn't work at all when cutting air on an interrupted cut. Resting the bevel on the wood and raising the handle is how you set the depth of cut, and riding the bevel against the wood keeps the tool from shifting about. But keeping the handle in a consistent position is what keeps the feed rate constant. You do that by holding the the tool at the end of the handle. (The other hand is at the rest moving the tool back and forth.) Any hand movement is reduced proportionally by the ratio of distance toolrest to work versus toolrest to where you hold the handle. You can also brace the tool against your side. Long- handled tools allow for a steadier cut. But long handles do get in the way on a treadle lathe. Increasingly I find myself automatically changing my position and alternating feet as I turn to get out of the way - and the long handle is becoming less and less of an issue. On a bowl I do a lot of turning standing facing the headstock, treadling with either foot from the side. This is a big learning curve for new treadle turners, myself definitely included.
Some turners will say that this idea is obvious - but obviously for me it wasn't. Short handled tools are easier to use on a treadle lathe because they get in the way less, but they need more gentle, steadier holding at the handle end. Long handled tools make for a steadier turning session, once you learn to get out of their way. We know that the lathe has attracted attention from folks who are new to turning and - as someone myself learning new tricks - I want to acknowledge the learning curve (and also say developing the skill has been a lot of fun).

"/> No tearout when the grain direction cooperates on the opposite side of the bowl
Categories: General Woodworking, Hand Tools
Seek and Ye Shall Find (perhaps)
 E. Hoppus, "Mr. Hoppus's Measurer", London, 1777
Before the internet, finding things in a book could be challenging. A library with a good librarian could be essential for success if your topic was obscure. But even with the book in hand, a table of contents only got you to the general neighborhood and you might need an index for the actual item. Library indexes date from ancient Greece and Egypt but the indices at the end of the books are a thirteenth century innovation. Tool catalogs really are a late 18th century invention (not entirely). In the picture at the top, we have an 1777 edition of "Mr. Hoppus's Measurer," a book mostly of tables and formulas for computing the value of timber and other items. But the back has a more narrative look at some useful items likes saws and their prices. Hoppus also has a table of contents at the beginning of the book - but no index.
Why am I thinking about the quest for knowledge? It's because I think all time how hard it is for people to find us, and how hard it may be for them to find the things they want from us. My favorite job at Tools for Working Wood is interacting with customers in person. Unfortunately I don't spend most of my time doing that. My main jobs are as follows: paying bills, doing all the bookkeeping, figuring out how to make tools, designing tools based on what I figured out, writing a blog, and caring for and maintaining our website.
I realize I am no damn good at some of these tasks - as many of you know, when you are a small business owner, you still have to do a task even if you are no damn good at it - but Ive actually developed competence at some of them. Competent enough? Its hard to know. We occasionally hear from customers when something really really good happens, but we always hear from some customers when something bad happens.
Bad can mean a lot of things, both to our customer and to us. The nature of complaining is that most complaints are aired to people who cant do much about them - typically whoever is there at the time. As a merchant, I know we are probably not going to hear complaints from people who are new to our site or casual browsers. They will just leave if they cant find what they want.
So the thing I am concerned about and we don't really hear from you enough about is, can you find the things you want to get on our website? We are particularly attuned to this topic because we just changed the websites search engine. (This is why the words enhanced by Google now appear in the search box in the upper right hand corner.) The search engine covers products for sale as well as information in the blogs. So I have a question for you: when you look at our website, can you find what you're looking for? I mean either by typing in a product in the search box, or by drilling down in the list of departments or links from products to products? When you get there, do you find what you're looking for? Between tariffs and high fuel costs, we are out of certain items, and Ashley Iles and Ray Iles products have always been a challenge to have in full stock. But we do have a lot of items that you nevertheless cant find and you may just think we don't stock it. It is those items that concern us the most. We are also interested in products you wished we carried but dont. (Customer requests are literally why we carry Odies Oil, Pica pencils and Fastcap; we look into all customer suggestions but sometimes the wholesale terms are too unfavorable to a little guy like us to consider.)
So we welcome your thoughts about how to make search better. Please add your comments below. And we - and many strangers - thank you.
The picture below is from the index at the end of Randle Holme's 1688 The Academy of Armory (York, England). Not a catalog but full of useful information. The index is invaluable. 19th and 20th century tool catalogs moved the index to the front so you could easily find what you were looking for.
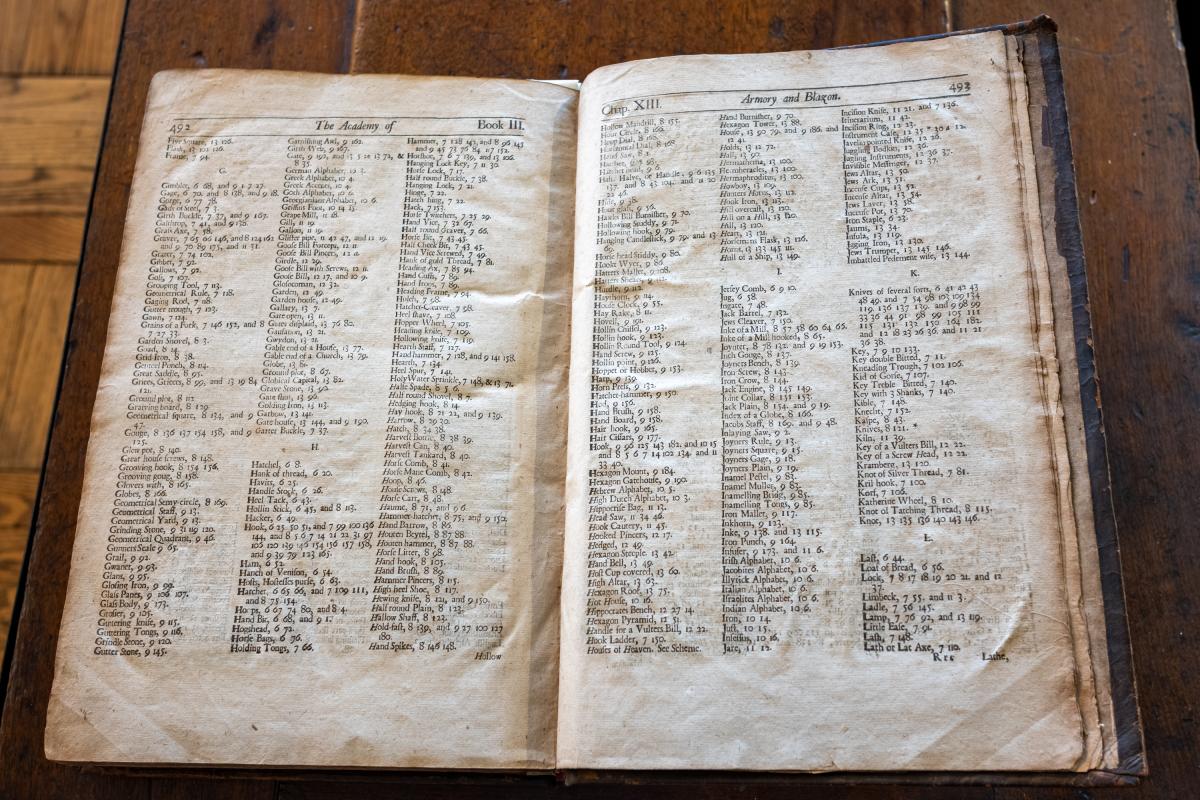 Randle Holme, "The Academy of Armory," York, England, 1688
Categories: General Woodworking, Hand Tools
Are All Those Old Turning Manuals Wrong?
 Hulot, pere "L'Art du tourneur mecanicien" 1775
I've always been puzzled why most of the turning tools listed in classic books on turning (published in the 17th - 19th centuries) are what we would now call scraping tools. One possible rationale is that scrapers are a lot easier to make than forged tools like gouges.
As I found myself diving more deeply into the literature, I discovered a couple of things. Early tool catalogs that show turning tools don't show a lot of scrapers.
They show gouges - as you would expect. Pre-1850s tool catalogs show gouges and instructional books from that era show a few gouges along with pages of scrapers. By the second half of the 19th century, this situation changes. Perhaps the tools were hard to make but I am unpersuaded that this is the only reason for the changing landscape.
For a more satisfying answer, let's look at the turning sections in Mechanick Exercises by Joseph Moxon, published in 1680. I have not been able to figure out where Moxon took his pictures from or if they are original. As in the joinery section, the book's turning chapter features what is considered the first set of instructions. Moxon very clearly states that you use gouges when turning softwood. But it gets interesting when Moxon lists the softwoods: "The softwood turners use is commonly either Maple, Alder, Birch, Beach, Elm, Oak, Fir and &c. and for some particular purposes each of these sorts are best."
If you have ever worked Elm or Oak, you will readily agree they are not "softwoods." Did Moxon make a mistake? No. He is differentiating between the woods that are normally used for turning furniture. The woods turners use for making everything from bowls to banisters, and differentiating it from the super hardwoods -ivory, ebony and boxwood among them. These were materials that were used for ornamental turning and by rich people who turned as a hobby. If you are a professional 17th century turner, you were not buying expensive instructional books on turning; you were using your funds to buy gouges and hook tools so that you would be able to make 300 banisters. On the other hand, if you were a wealthy person interested in decorative arts, you might decide to take up turning - and a book on how to turn ivory and other exotic materials might come in handy. Using gouges and other typical tools on ivory, especially in a human-powered lathe, would not really work, since the material is much too hard. But scrapers will work, and they would give you a good finish that could easily be polished up.
This also explains to me why so many of the fancy books by Plumier, Hulot, or Bergeron, devote so much space to scrapers and exotic fixtures for ornamental turning. None of these books are really about the bog-standard turning that professionals did at the time and still do, the standard work for architectural woodworking.
The next question is, When did amateurs start doing regular work and stop doing ornamental turning? That is a different story
that has to do a lot with the rise of the middle-class in the 19th century. The treadle lathe played its part in that story, which we should save for another time.
All the images in this blog post come from Hulot's 1775 "L'Art du tourneur mecanicien." Most of the early books on turning, including Moxon and earlier works, show images of turning tools, but Hulot is the most comprehensive. All of the books basically show one or two gouges. In the image above, we see the tools for "softwoods"; all the later images are for various scrapers for hard materials, including metal. In the last image, we also have chasing tools for making threads on ivory, hardwood, and soft metals (internal and external, coarse and fine). Getting back to the first page for softwoods, the familiar gouge and skew are shown, although you don't have the variety of roughing, bowl, etc, and other gouges that we are familiar with nowadays. These tools hadn't been invented yet. The hook tools shown on the bottom left of the page were common at the time, and very useful. Moxon describes them as the first tool you would use for roughing out stock. He also hints that hook tools basically do the same thing as gouges but they were harder to use. Hook tools are easy to make, but the flex in the hook makes them a little tricky to handle, and therefore potentially dangerous. (I do not think any company currently makes them today.) All tools, especially lathe tools, get a lot of wear and tear in actual use, and the steel of the time was expensive. Sharpening stones of the time were soft and slow acting, and while a larger shop might have a grindstone, it was cumbersome and time consuming to grind and then hone the tools. Hook tools are far easier to make and keep sharp than gouges, which is why they were more popular (until steel became less expensive and sharpening easier). But only for "soft woods."
The other pages show tools for drilling, internal turning, more scrapers and thread chases. These were used on all materials, especially very hard materials. Except for the thread chasing tools, the average scrapers were very easy to make and easily sharpened.
 Hulot, pere "L'Art du tourneur mecanicien" 1775
 Hulot, pere "L'Art du tourneur mecanicien" 1775
 Hulot, pere "L'Art du tourneur mecanicien" 1775
Categories: General Woodworking, Hand Tools
Center Punching

I got the idea for this blog entry because Im learning to turn and I've been watching a lot of lathe videos. What has struck me about the very simple operation of mounting a piece of wood between two centers is how complicated people can make it. When I first started turning, I would follow some of these more complicated instructions to the letter and I didn't get great results. Mostly my own fault, but now that I know more I can say these protocols were also unnecessarily hard and complicated ways of getting stuff done.
I'm not exactly sure where I first saw the method I will describe in this post. I instantly concluded, Oh, this is much easier. It might have been from the videos of Richard Raffan, who has put out some excellent turning videos which I highly recommend. And he's eminently practical.
The Gramercy tools treadle lathe comes with a 1" crown center to drive the work and a live cup center to support the spindle work at the other end. There are a lot of excellent reasons for using a crown and a cup center to support the work, including safety, but one real advantage is that it makes mounting the work in the lathe really, really simple.
All you need to do is find the center of each end of the stock and put a punch there. Other types of centers require an actual drilled hole, but when you use a crown center and cup center, you don't need more than a punch mark.
The question is, Where does the punch mark go? And the answer is, In the center of the stock. There's a whole host of gadgets for figuring this out. They sort of work, but if the stock isn't actually square, they don't really work. Moreover, they are not necessary anyway.
Here's what you do:
Take a pencil hold it at approximately halfway over the stock and mark the stock all around (above). You can't see it too well in the picture but I am using knuckle on my middle finger as a fence against the wood so that the pencil square is centered all around on the stock.

You will end up with a little square in the middle. Put a punch mark in the center of that square. Eyeballing that center is perfectly fine (but don't punch yourself in your eyeball).

I use an automatic punch, but you can use a nail and a hammer. I always punch twice cuz I just do.
Then we do the other side.

That done, it's time to mount it in the lathe. The crown center is a spring-loaded pin. All you do is put the punch mark up against the pin on one side, with a little pressure so it doesn't slip out. Then you advance tailstock so that the pin in the cup center presses into the punch mark on other side. They you tighten the tailstock until the cup digs into the stock.
That's it! You are done. As you turn, the crown center especially has a tendency to loosen up a little bit. And the cup center may work itself a little deeper, so you might want to tighten the tail stock periodically. It's pretty easy.
Incidentally, as I mentioned in the beginning of this blog post, I've been watching Richard Raffan videos. He has a method of putting stuff between centers without any layout at all, just eyeballing it as he's putting it on the centers. I tried this method and it works fine. The reason I don't just eyeball it is that I think the method I've described here is even easier and requires even less thinking. Although you do need a pencil and punch handy.
Categories: General Woodworking, Hand Tools
25 Years of Changes
 Game Table. NY 1760-1790
A recent visit to the furniture collection at the Metropolitan Museum really emphasized how profoundly furniture-making has changed since my youth - and even in the 25 years since I founded TFWW.
I grew up reading Popular Mechanics, and I imagined that I too would engage in their home improvement projects when I grew up. Build a den; build a media center; build a kitchen cabinet; stuff like that. On top of that, the magazine offered tons of material on building reproductions of colonial style furniture, usually with the latest power tools. Home repairs, like car repairs, were within the grasp of ordinary people with mainstream skills and tools. DIYing was a popular hobby and for the average guy, (and I mean guy at this point in time) practical classes in Shop class in school gave you the foundation to make things.
I also began reading Fine Woodworking in 1976. (I missed the first two issues and started with Issue No. 3.) The magazines focus on fancy techniques like wood bending and a high valuation of the craft were real eye openers for me. Fast Forward to now. The major area of business for modern cabinet makers is in architectural woodworking - re-fitting kitchens, building interiors, stores, bookcases and other millwork. The popular expectation of dressers, tables, beds, etc. is inexpensive and disposable, made by IKEA and IKEA-like companies.
Fewer people now than ever before would consider themselves amateur woodworkers. The interesting part is that the ones who are doing it are doing it to a higher standard than ever before. They are no longer constrained by the mass market. If youre going to the trouble of making a colonial style high boy, youre probably doing it because you want to dive into that kind of piece, even if that means learning how to veneer, learning how to dovetail, learning how to carve details. All sorts of wonderful skills - which is where the challenge and interest lies.
Getting back to the museum: While the Metropolitan Museum of Art has the second largest collection of American furniture in the US (after Wintertur), most of the vernacular stuff they have is in the study collection, not in the fancy exhibition halls. The period rooms almost all have fancy rich furniture - items that highlight and show off wealth rather than comfort and function. The pieces are all beautifully made with great skill, but very few things are relatable nowadays. People aren't looking for a chair with fancy decorations and inlays. They want something that conjures up the image of a traditional chair - and the vernacular stick chair world does that in spades.
For most people interested in traditional skills, the direction seems not to copy the stuff in museums, but rather focus on the kinds of vernacular furniture that frankly was too downmarket to interest bigtime furniture collecting. I'm talking about stick chairs and other folk work. People are following this path for two reasons: first, while you need much fewer tools to make a stick chair, the craft demands the same rules of design and proportion so its still a fun challenge, and second, vernacular furniture is a lot more relatable in a modern house than the fancy furniture we see in museums.
Note: the Metropolitan Museum of Art has remounted a lot of works in their American Wing. They're mounting furniture in a way that asks you to look at it closely and see the details. They're trying to create an appreciation of the design of traditional furniture, or should I say, traditional high-end furniture that has largely vanished. I think a lot of people look at the furniture in the American Wing, and say, My word! That stuff looks dated! and never look past this unrelatability to the details. (This is especially true when whole rooms are preserved.) They therefore dont enjoy or appreciate the craft that went into making fancy furniture. Of course the museum pieces were expensive luxury items. But theyre still wonderfully proportioned; theyre elegantly made; and a pleasure to examine and well. A lot of them dont fit into a modern lifestyle, i.e. a place to put your laptop, a sofa you can watch TV from (and sadly nobody these days is coming over to play games). But this doesn't mean the works aren't extremely elegant in the context of their original use - and we can still learn from them.
Note: We stock a lot of detailed, accurate measured drawings by Carlyle Lynch of early American Furniture, some fancy,some not.
We also stock "Welsh Stick Chairs" a wonderful book and we have a few copies left of The Stick Chair Journal.
For a more philosophical look at chairmaking you might want to look at "Chairmaker's Notebook" by Peter Galbert.


Categories: General Woodworking, Hand Tools
The Flywheel, Lathes, and the Industrial Revolution
 Hulot, pere "L'Art du tourneur mecanicien" 1775
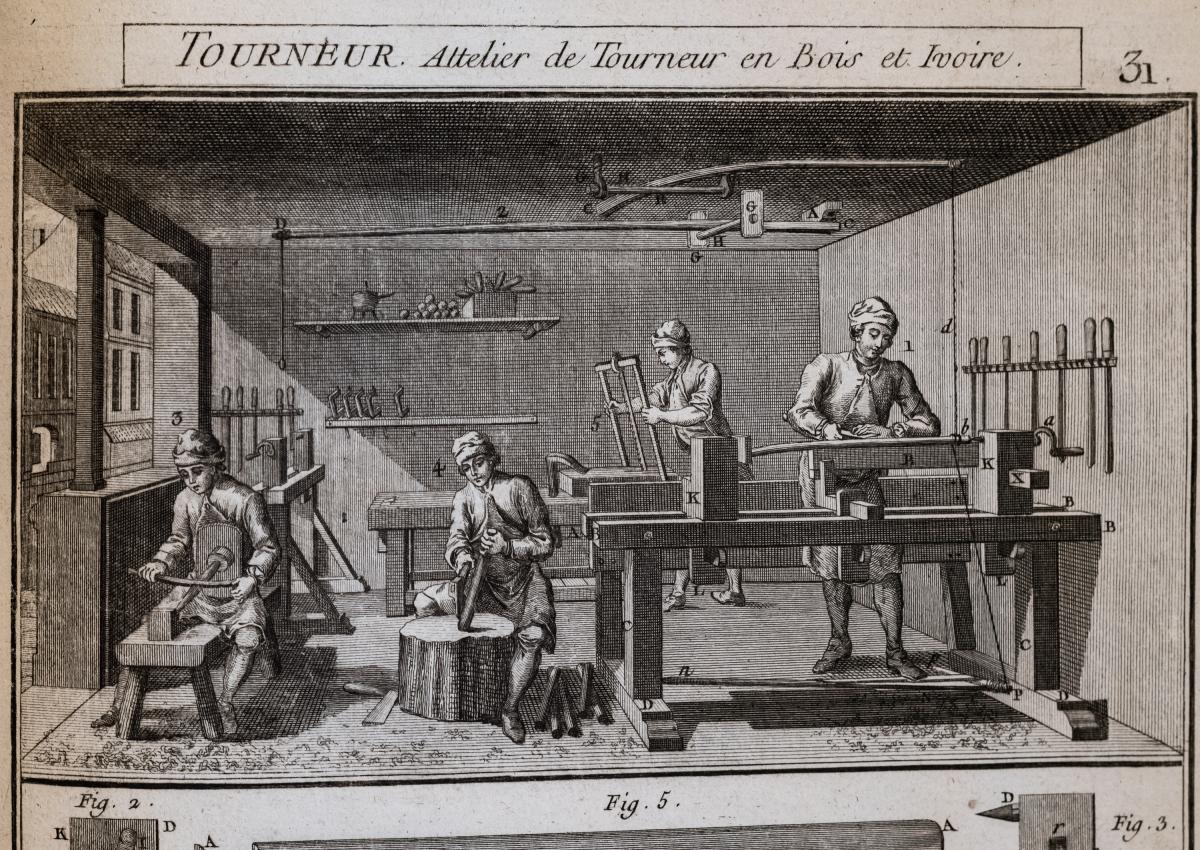
Prior to the Industrial Revolution, the two most common styles of lathes were pole lathes and great wheel powered lathes. Pole lathes featured a string looped around work held between centers. One end of the string was fastened to a springy wood pole and the other was attached to a pedal. The turner would press down on the pedal and the work would rotate in one direction. The work would be cut and then the turner would let up on the pedal so that the pedal would be pulled up, rotating the work in the wrong direction, and concurrently resetting the string for the next cut. This method worked well -- and a pole lathe was very easy for a capital-deprived turner to afford. The image above features a pole lathe in action at a French shop for wood and ivory turning. Interestingly, while the person in the back is sawing out stock, two people, one looking pretty young, are roughing out stock before it gets turned. Pole lathes work with an interrupted motion, and rounding the stock saves oodles of time. The lathe itself, with a springy pole attached to the ceiling, was pretty standard. This image from 1775 isn't the earliest image of turning, but it is representative (and also makes for a great opening picture for this blog post).
 Joseph Moxon's "Mechanick Exercises" 1680
The second way of powering a lathe was using a great wheel (as in the picture above). A large wheel - as large as the turner had space for - was mounted in line with the lathe and connected with a string belt. A second person turned the wheel, powering the lathe while the turner cut wood. This model worked very well, giving the turner continuous motion, but had the downside of requiring a second person's involvement.
At the time of the picture (1680) water and water mills could have been used to gear up a wheel to power a lathe, as it was used for all sorts of larger machinery. I do not know know of a specific case where this occurred, and I am not sure if the mechanics at the time were precise enough to drive a line-shaft fast enough to be practical for a lathe.
Many permutations of the pole and great wheel lathes existed. The spring of the pole could be replaced with a bow, and all of the early books on lathes show pole type lathes with small crankshafts on the ceiling which could be pumped by a second person with the cord attached to the crank.
The main problem with a pole lathe was the interrupted rotation. The main problem with a great wheel lathe (and its derivatives) was the need for a second person. You could, I suppose, also use a treadmill apparatus for an animal, but I haven't found any examples of lathes being powered in such a way.
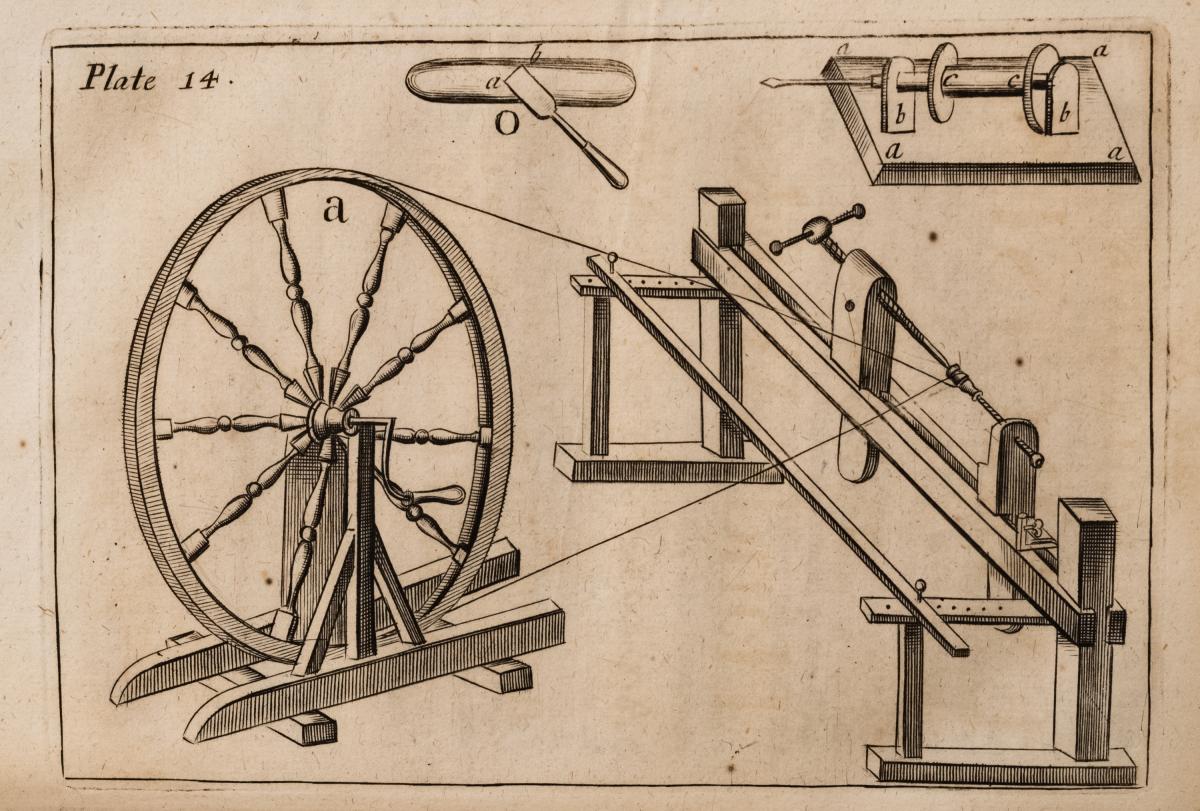
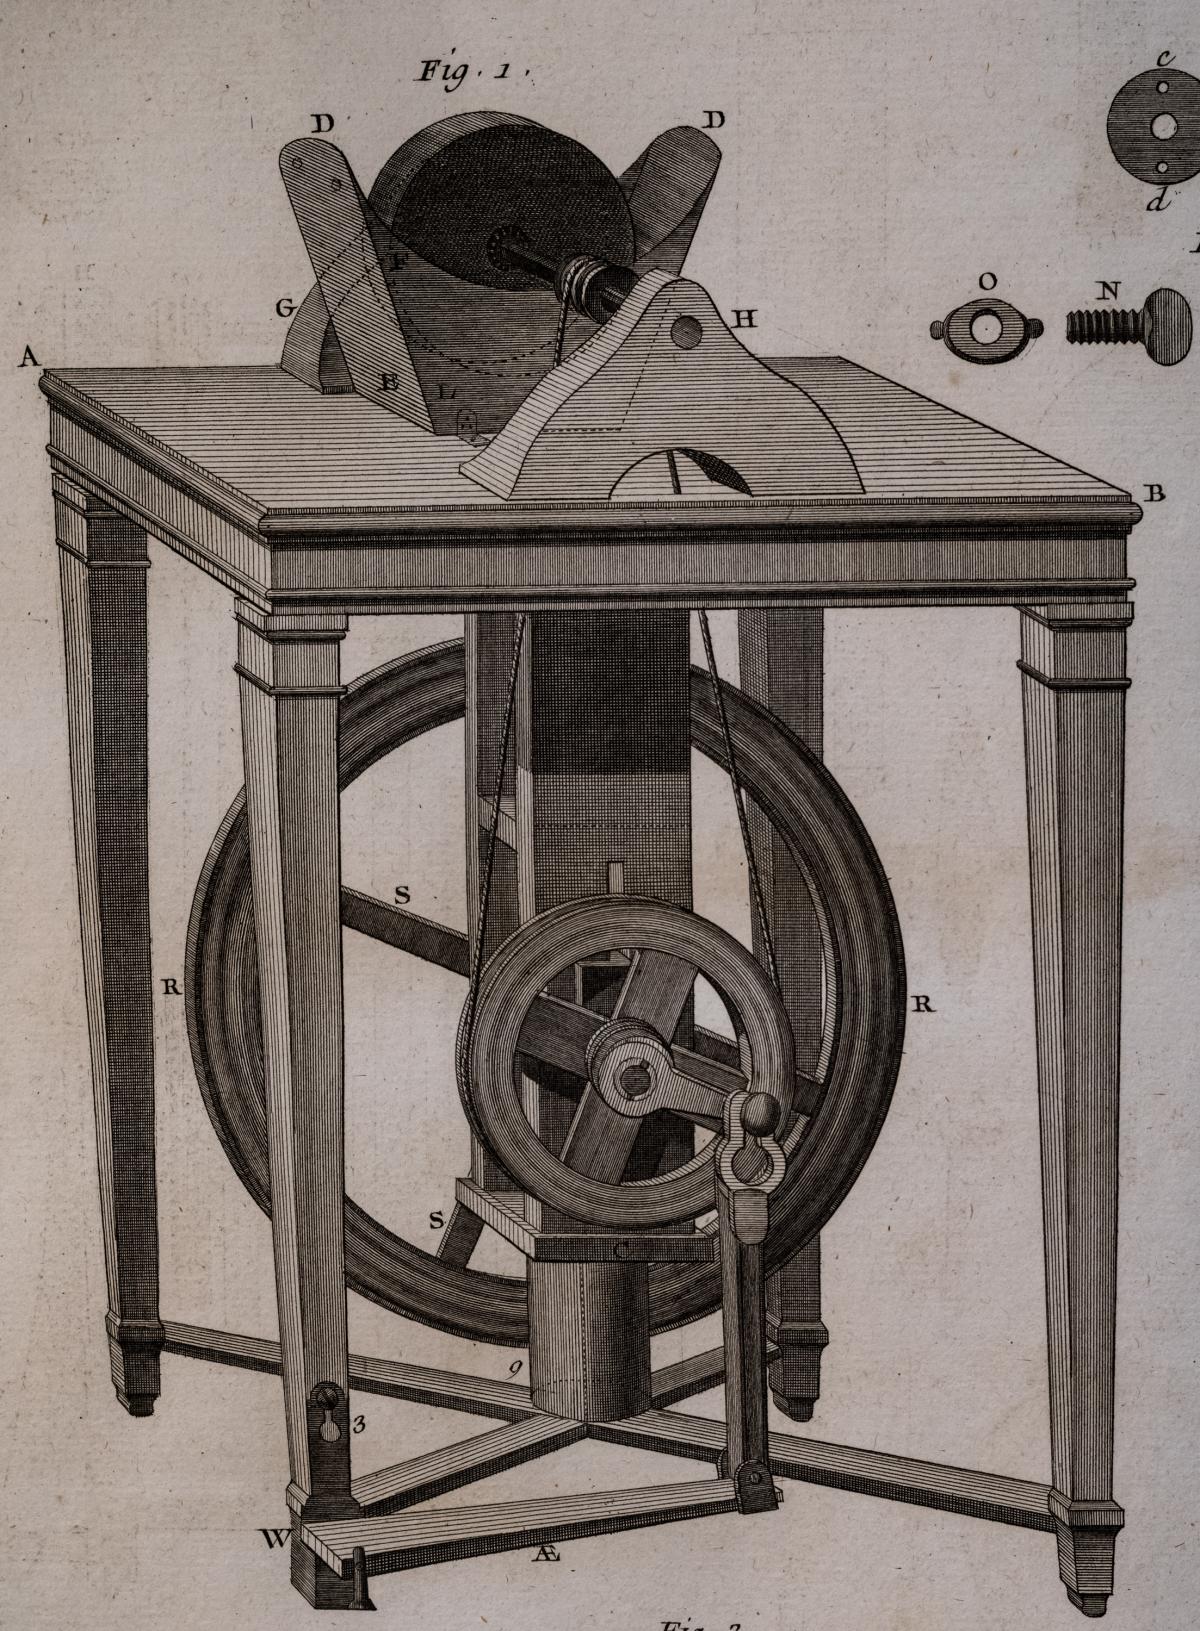
There exists a drawing from 1480 by Leonardo da Vinci that shows a treadle lathe. Was it something he saw, dreamed up but didn't build, or actually built what he designed? There is no proof one way or another for any of these options. The earliest image I have of a treadle lathe dates from 1680 and appears in Joseph Moxon's "Mechanick Exercises." That might be the first published image of a treadle lathe in literature, but I'm not sure. Considering how many pages are devoted to pole lathes and great wheel lathes in the few lathe books that exist from the 17th and 18th century, you have to make an assumption that treadle lathes were not that common. Moxon shows the treadle (below) on a special lathe for oval turning. It's doing fairly light work, but Moxon says that the treadle is useful for turning oval work, as is a great wheel lathe, because you needed continuous motion.
 Joseph Moxon's "Mechanick Exercises" 1680
 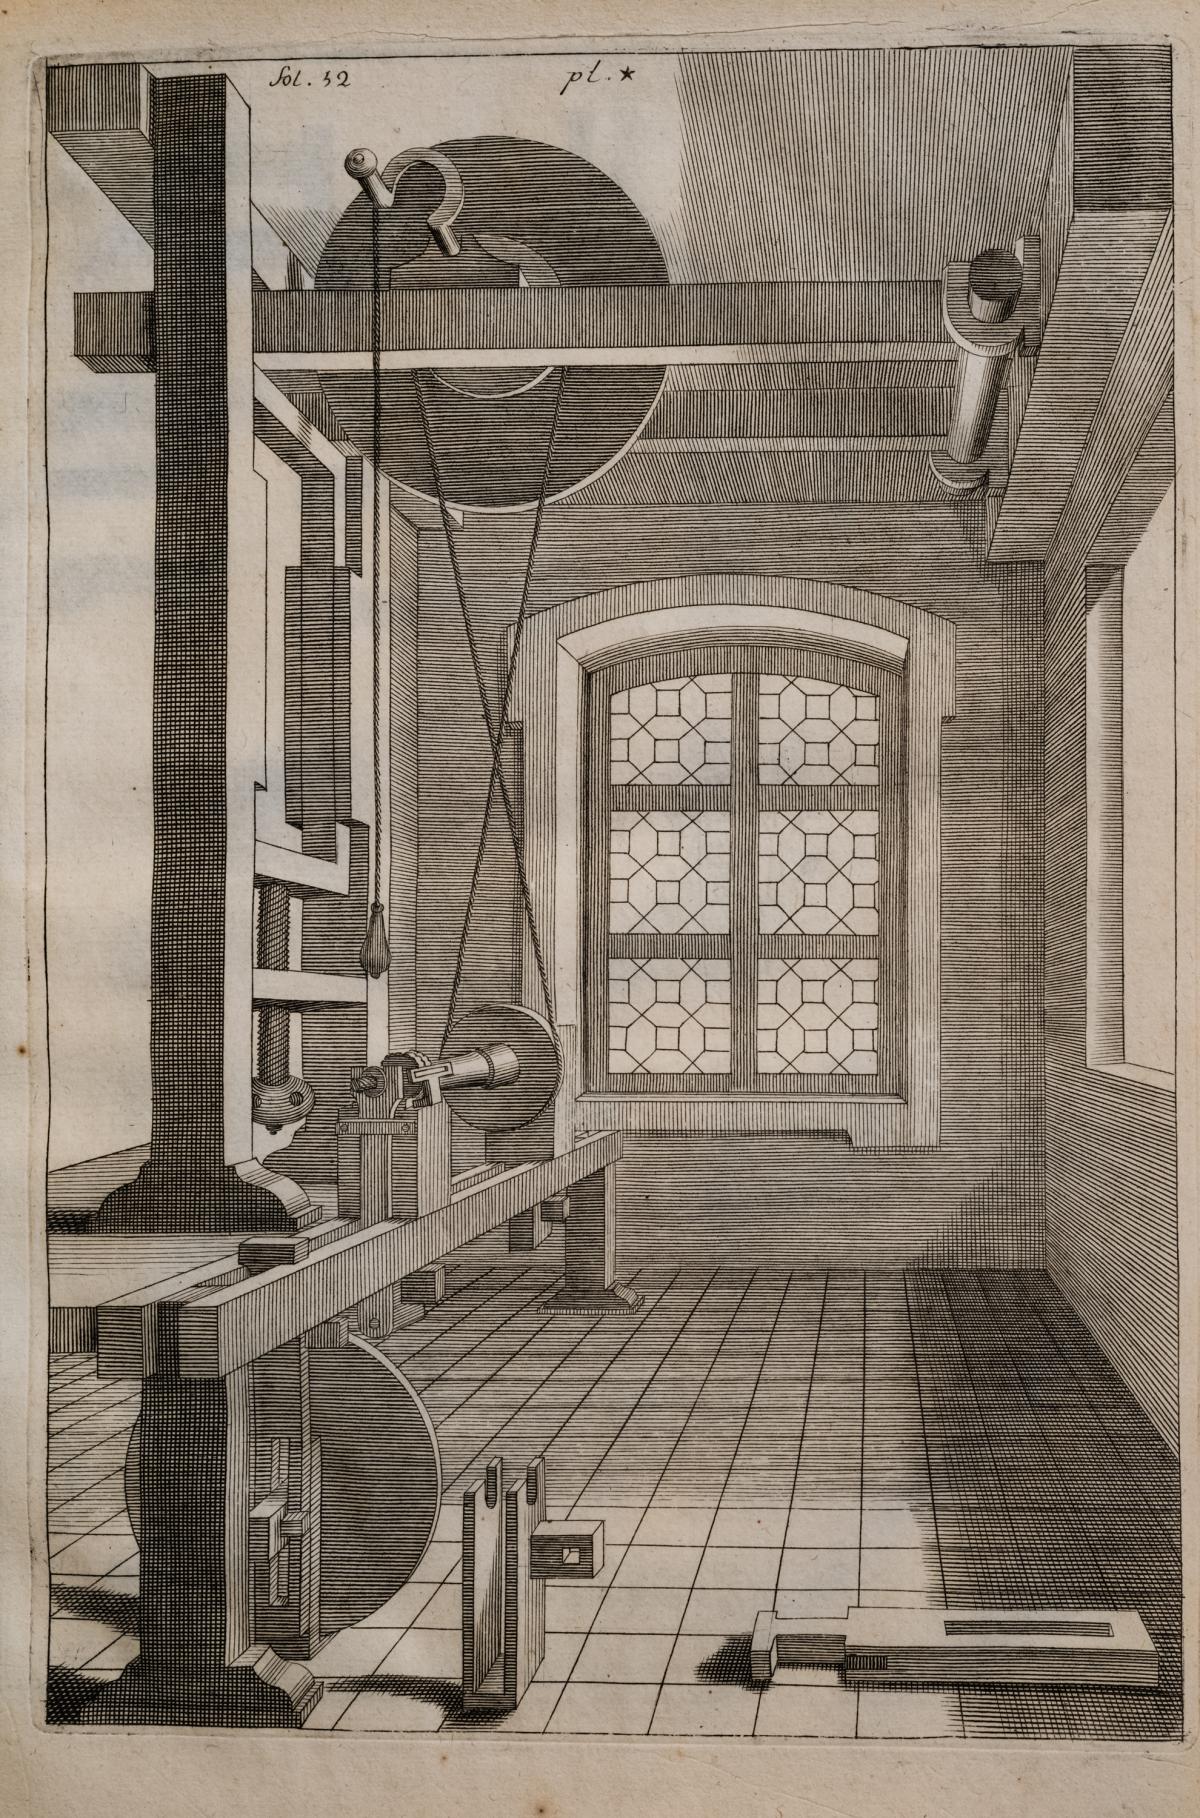 Charles Plumiers "LArt de Tourner" 1701
Plumier, writing in France in 1701, has drawing upon drawing of pole lathes, great wheel lathes, overhead drive mechanisms. The first illustration in his book is of a large lathe which has an overhead hand cranked wheel and a pole option. But a few pages later, a large illustration (above) of another main lathe shows the same hand-pumped flywheel mounted on the ceiling as before - but no spring pole option. Later in the volume, he detailed the parts of this lathe, and the detailed drawings shows something interesting.
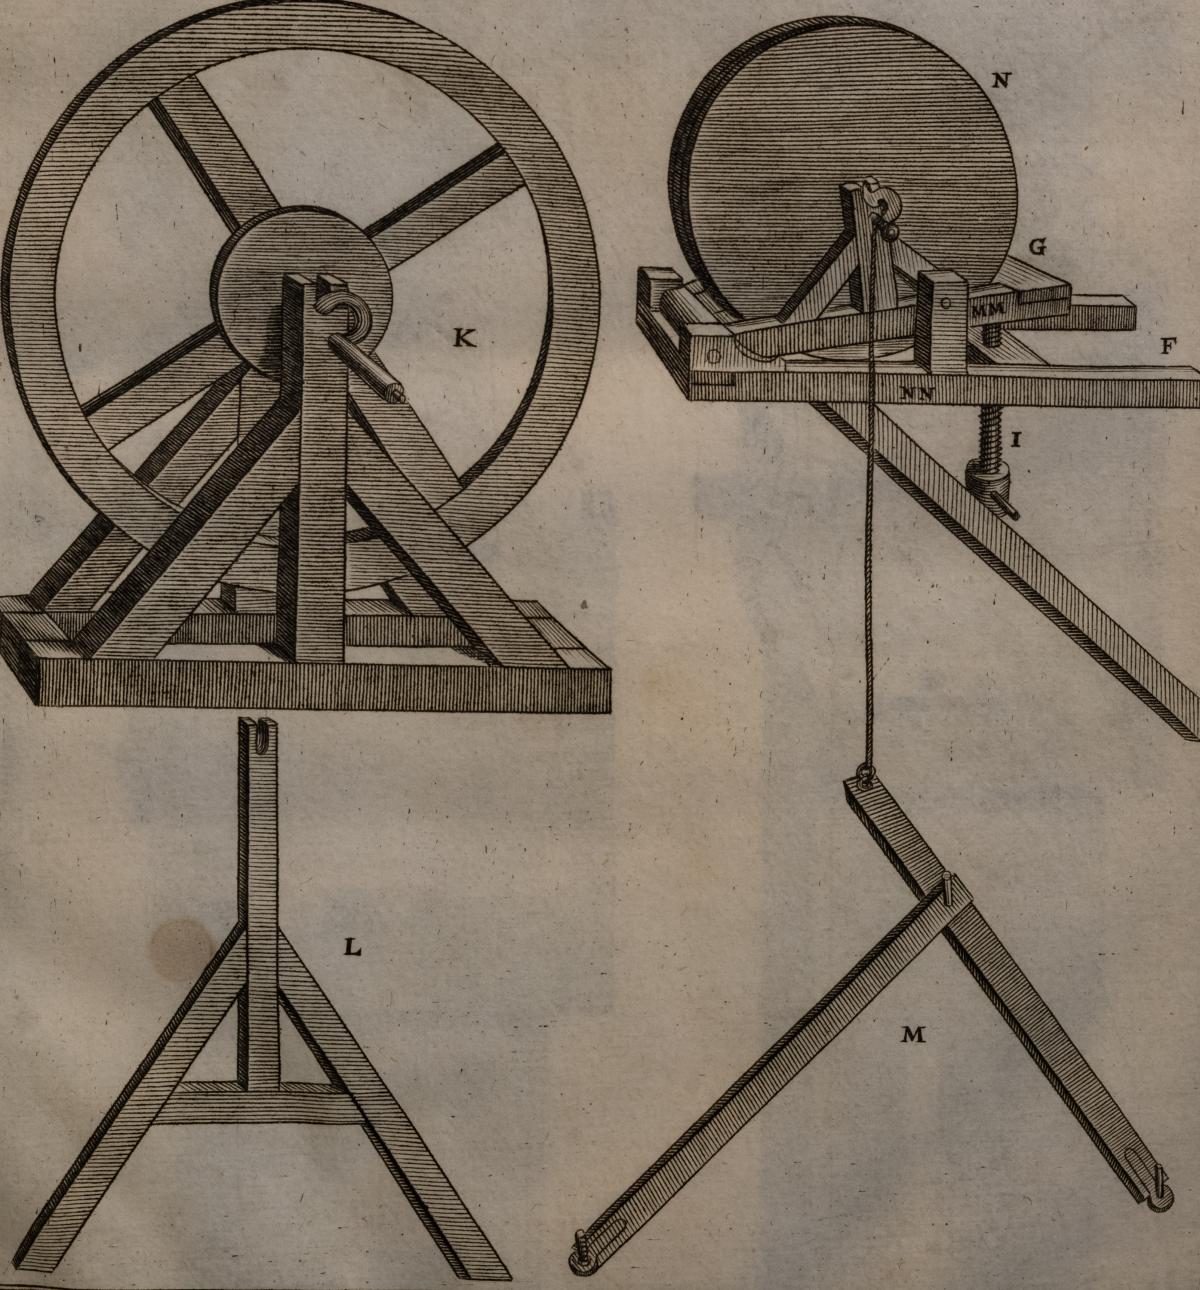 Charles Plumiers "LArt de tourner" 1701
Whereas in the main drawing the pull cord for the flywheel is clearly meant for hand action, the drawing above shows how to connect the flywheel on the ceiling to a floor pedal. As near as I can see from the drawings, the flywheels are just heavy wheels of solid wood and would work but are pretty light for a general purpose lathe. This is a big deal. Part of the advantage of a flywheel is that the flywheel stores energy and evens out the footwork so the lathe is powered all the time, not just on the downstroke of the pedal. The pedaler might be coasting on the way up, but the lathe is still drawing power throughout the entire stroke.
Later in the book, Plumier shows a light duty treadle lathe. This makes sense: a lot of the fancy work Plumier described required continuous motion and many of his readers were hobbyists who would want to work alone.
But these circumstances changed. By 1800 (and certainly by 1840), treadle lathes became all the rage - from the high end of Holtzapffel, to random low-end lathes for homeowners and hobbyists. I found many advertisements for these lathes. If you were a small shop or a hobbyist, the treadle lathe was the way to go. Great wheel lathes disappeared and factory line shafts appeared in mills. Pole lathes remained in use at least until the middle of the 20th century by bodgers working in the forest, where it was easier to turn chair parts in the forest then haul out raw wood.
What changed?
What happened?
It's easy to point to the nature of invention, to say that things have to be invented piece by piece by piece by piece. And the treadle is a natural evolution for small lathes. But I don't think that's the real case. If you're in a production environment, a great wheel lathe allows you to have continuous turning - as long as you have someone to do the powering. With the overhead drive motion seen in Plumier and Moxon and even earlier in Felibien (below), a turner could be very productive cranking the overhead crank if you had somebody else helping. In a production environment, a great wheel made a lot of sense. Pole lathes made a lot of sense as well because they entailed very little capital to build one, and they worked well for a one-man shop. Moxon's treadle lathe is a dainty little thing, with Plumier is not far behind. Plumier's overhead flywheel powered by a treadle could be operated by one person. The wooden flywheel could be big and store more momentum, but it would far from ideal. Plumier also illustrates a fairly lightweight treadle lathe, but it had a wooden flywheel.
I think the key is that there's a technical problem with all treadle lathes before 1780. The flywheels that you see in Moxon and Plumier are of wood - and they are simply not heavy enough. Holtzapffel tells us that the flywheel should weigh anywhere between 30lb and 100lb (for a big metal turning lathe). The flywheel also has to be machined and balanced, otherwise the entire lathe would shake and wobble. The cast iron flywheel on our treadle lathe weighs about 30lbs. But the operative word is cast iron. Cheap cast iron is an 18th century invention, and the ability to machine the grooves easily is a very late 18th century invention. While a great wheel lathe can be huge and made of wood, it gets its momentum from its diameter, not its weight. A treadle flywheel that has to live under a lathe bed and has a maximum diameter. It gets its momentum from mass. While it was certainly possible, even in the 16th century, to make a heavy bronze flywheel, accurately machining and boring it would be very difficult before 1800. And if the flywheel isn't machined, it's useless.
Up until the late 18th century it was possible, but very difficult, to can make a balanced cast flywheel except on a onesie-twosie basis, so it wasn't until the 19th century that machining a cast iron flywheel was cost-effective.
We actually tested a wood flywheel in an early prototype of the lathe. It worked, but not as well as the same same flywheel did when we bolted some metal plates to it. There are of course tradeoffs in weight, and some basic physics involved. If you have a light flywheel, the lathe is easier to start and spin, but it doesn't hold a lot of momentum, so heavy cuts slow it down a lot. If you have a heavy flywheel, the lathe is hard to start and you have to pedal for a few seconds to get it up to speed, but then it can power through work and its overall performance is better. In other considerations, a heavier flywheel is harder to move around, and it and costs more. Flywheel design is a compromise between usability and cost.We thought the learning curve would be easier with a cast iron flywheel, ideally in the sweet spot of a good bit heavier than a wood one, but on the lighter side of the weight range.
Incidentally, there's almost no literature on the design of treadle lathes. Part of the interest fueling this project for the past 3 years has been understanding the engineering why something was done and then actually testing it out - i.e., reinventing the wheel.
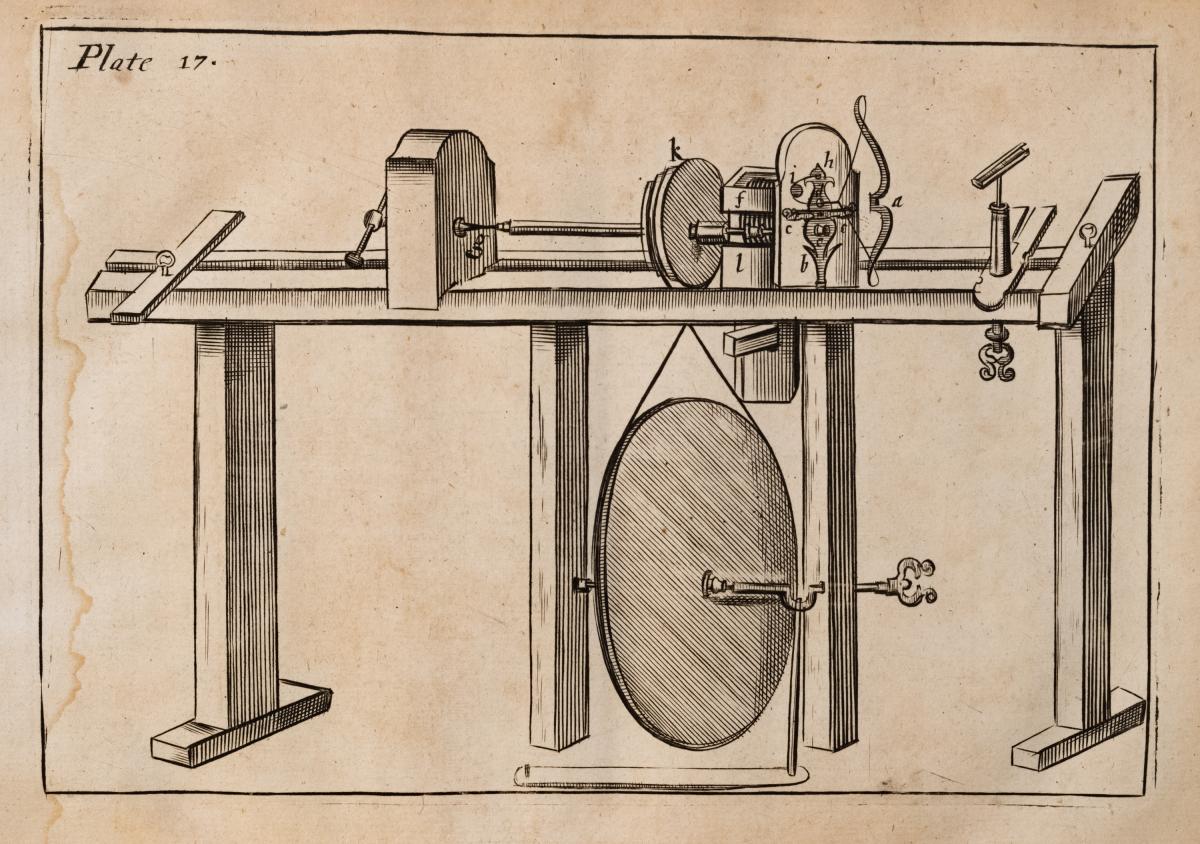
The drawing of a treadle-powered grinder (below) from Hulot is interesting. Chronologically, Hulot is later than the other references in this blog. The book published in 1775, with parts written very significantly earlier than that. But the grinder, unlike the traditional pole turning lathe at the start of this blog, is high tech. I can't tell if the flywheel is metal or not, but it looks metal to me, and in 1775 or earlier making it would have been quite a trial.
Lastly, Flibien's book is slightly earlier than Moxon's, but the lathe is nearly identical to the other lathes shown here. And we have the combo power option of pole or wheel. I originally thought that this was a drawing convention with a weird perspective, but I wonder if having a pole made it possible for one person to do pretty heavy turning, but having a wheel option allowed for faster, lighter work, if a second person were available to pump. (Lighter work because it's a wooden flywheel)
 Hulot, pere "L'Art du tourneur mecanicien" 1775
 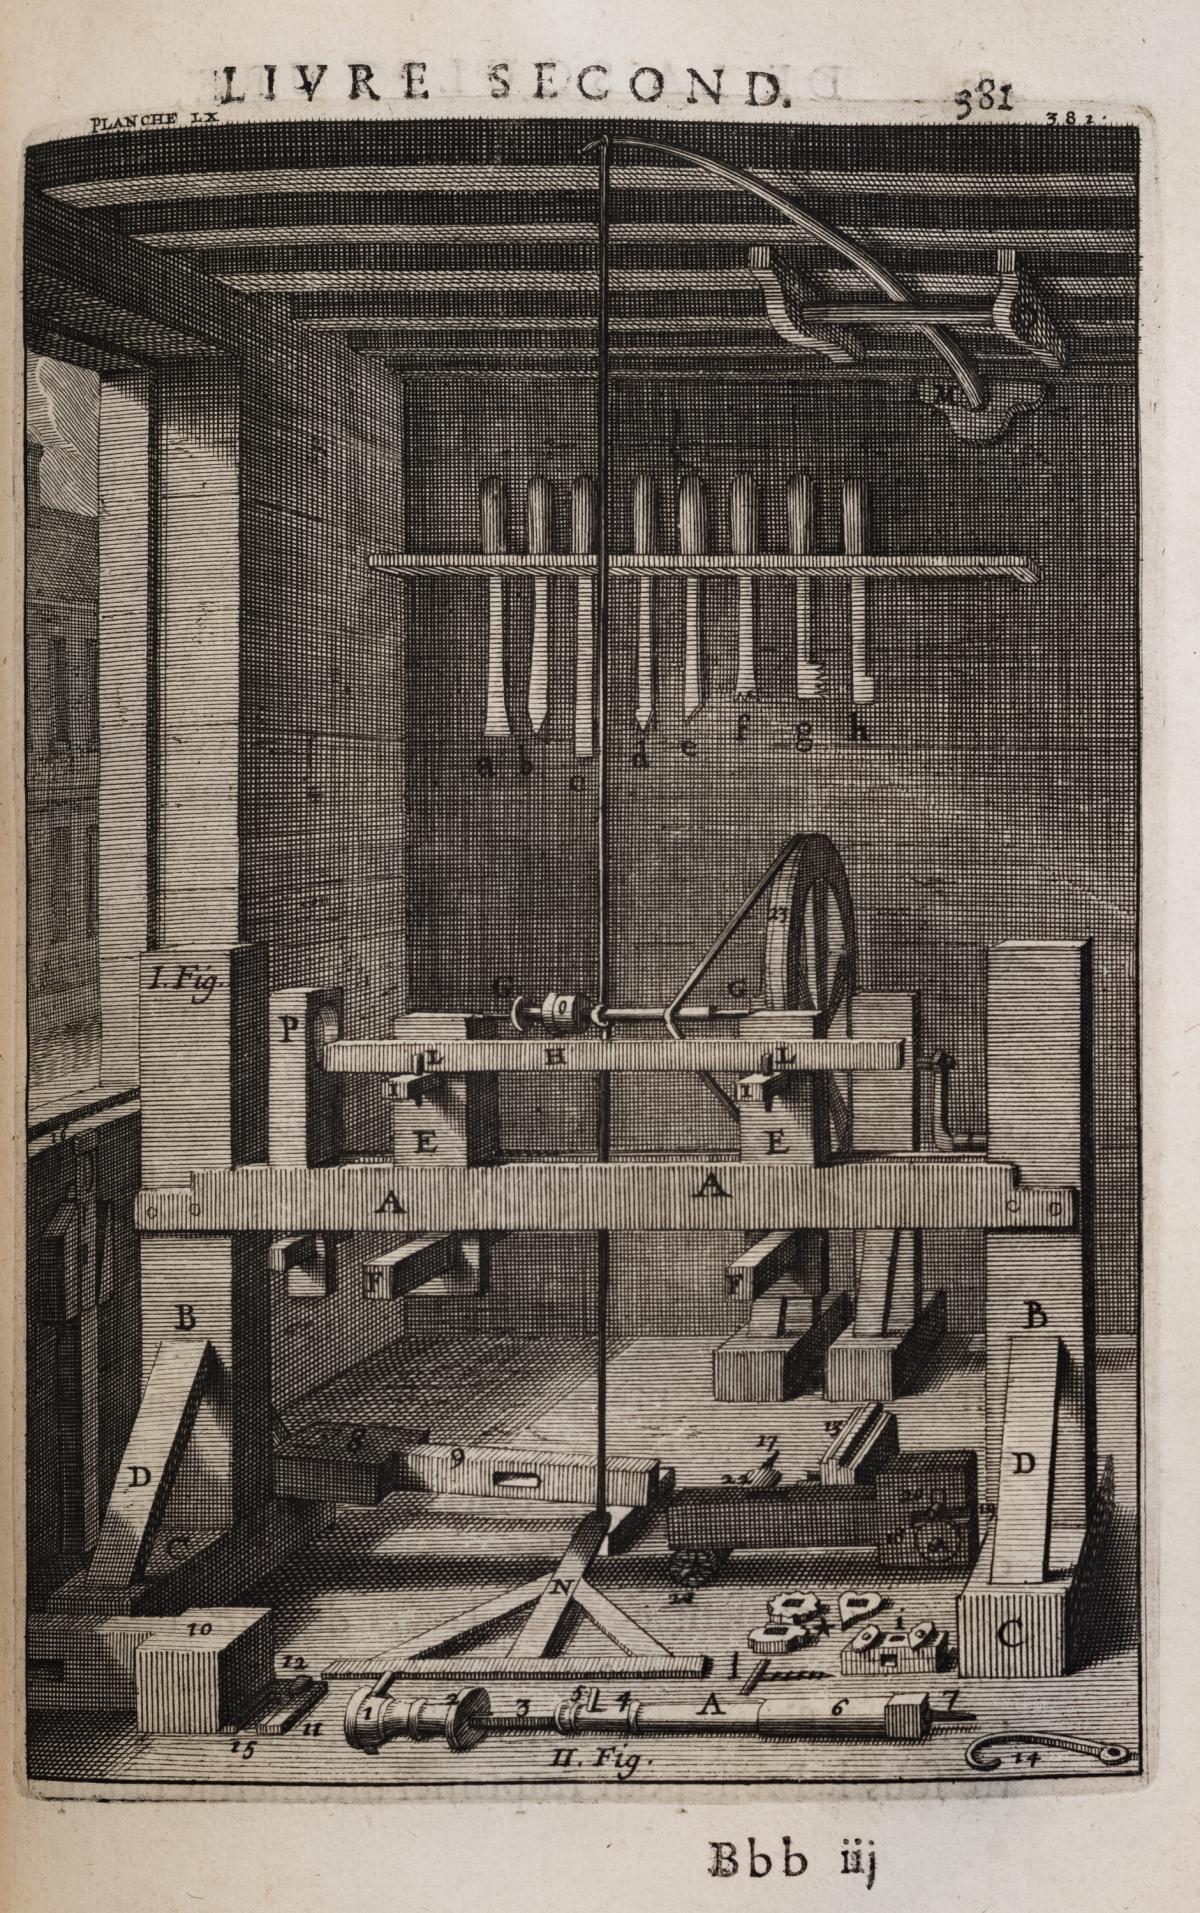 Andr Flibien "Principes de l'architecture, de la sculpture, de la peinture, &c." 1676
Categories: General Woodworking, Hand Tools
What Do the Words "Modern Design" Mean? Asking for a friend.
 Edo period, late 18th century
Last week I visited the Metropolitan Museum of Art - the first visit in awhile. I had a good experience (aside from a supposed upgrade to the coat check that entailed a time-wasting data entry session on an iPad rather than the give-a-jacket-get-a-number standard method).
One of the exhibits I had wanted to see was on "The Infinite Artistry of Japanese Ceramics." As expected, the exhibit was full of pottery, fabrics and wood prints. I was struck by one very nice-looking modern piece. Being open minded, I said to myself, "That's great, they're having some modern stuff along with the old stuff. It's a really wonderful contrast between old and new." But then I took a closer look at this "modern" pottery and discovered, much to my surprise, that was 250 years old! A lot of pieces on display were just like that: modern design in appearance, but in fact actually centuries old. This phenomenon can be a real source of double-takes, because it turns on its head what it means to say "modern" as opposed to "new." After all, usually when talking about design, when someone says, "This is a very modern piece," they also mean it's new and cutting edge. Certain designers like Gerrit Rietveld have designs from the 1920's that don't look dated. But I wouldn't exactly call them "modern." I would say Rietveld's furniture doesn't look like most current furniture that would be considered modern today. In the case of modernist Danish 20th century design, Ikea has commonly co-opted everything, and increasingly anything that's sort of Danish style is assumed to be mass-market and probably cheap junk. But it's not, and it doesn't have to be.
But seeing this Japanese pottery and not identifying the style as modern makes no sense to me. Sure, you can say it's from such and such a period, and such and such an artist, but it still looks modern. Also notable: this style didn't really catch on. Most of the other pieces in the show, some quite beautiful, certainly look of their time period. NYC has several Japanese supermarkets (and Korean and Chinese markets that stock Japanese items) in which some of the same patterns of the not-so-modern goods are still on offer. But we wouldn't call those designs "modern." Is it possible that the word "modern" means "different from the standard of the time" rather than new per se? If the style catches on and everyone copies or riffs upon it, then the style will get its own name. For example, "mid-century modern" defines a specific genre in a specific style. Eventually the style became more accepted, and then more simplified, until it became (in the popular consciousness anyway - and I say this as someone who once owned a Wim & Karen bed) as "Ikea" or "Ikea-style." Rietveld's furniture, nearly a hundred years on, still looks pretty avant-garde. But it never really became a thing. The Bauhaus design movement (1919-1933), which eventually evolved in many respects to mid-century modern Danish furniture, was designed from the get go be be factory made and lent itself to a popular genre - even if later designs aren't directly connected with the Bauhaus. (And perhaps Bauhaus nowadays is best known as the name of the British goth band.) Reitveld, on the other hand, designed his furniture to be made largely by hand so anyone could built his designs from common wood materials. But most of his work would be fussy on an assembly line and his style never caught on.
I'm wondering if 300 years ago in Japan, a potter produced a pot, and his friend said "That's a really modern pot!" and the potter replied, "Yeah, shame nobody likes anything new." That potter used a design vocabulary of his region and most of what he made would be in that design vocabulary because that's what people wanted - the definition of a popular style. Doing anything new and different would make the creator an outlier - and outliers are the modernists of their time. And it seems that, at least back then in Japan, a potter's idea of a modern design would be pretty much what we would call modern today. And now, like then, people still mostly prefer traditional designs (simplified for manufacture) not modernism.
 Early 17th century
Changing anything for anyone making products is always a risk. You need to convince people that the conventional style, which is by definition what is popular, is just one option, and other options are different and better in a meaningful way. That's not easy to do and this problem has been true from centuries.
N.B. Before you accuse me of drawing conclusions without enough evidence, let me remind you that for centuries archeologists have been postulating civilizations and taxonomy based on the survival of a single bone. So I am in good company! The furniture in museums isn't usually representative of what most people had. Rather it represents what donors and other rich people used - and what managed to survive.
 Edo period, ca. 1670-90
 Cast iron and Bronze. Onishi Gorozaemon mid-17th century
Categories: General Woodworking, Hand Tools
Roughing Out
 Even on a treadle lathe, the roughing gouge throws off tons of thick shavings
Roughing out is the first thing you do on a lathe project, when you take a square piece of wood and turn it round. You want to do this fast. Surface finish is not that important, although you don't want a disaster. Since the wood is square, you are at least starting with interrupted cuts.
 l-r: 1" Continental Gouge, 3/4" Roughing Gouge, 1/2" carbide insert tooling
I have three tools that I can use for roughing out (above).
A continental gouge. If you look at early catalogs, you'll see that essentially they offered two kinds of tools: what we now call the continental gouge, and a typical spindle gouge. Mine is a 1" continental gouge.
A roughing gouge. This is the standard tool people use for roughing nowadays. I have a forged 3/4-in roughing gouge. I also have a much larger one that is really overkill and too big for a machine of this power. This tool is forged because of its size. Ashley Iles and other companies also make machined roughing gouges in smaller sizes.
Insert tooling carbide square edge scraper tools that can be used for roughing as well. Many people prefer the insert tooling carbide scrapers because the learning curve is easier. I bought this tool and a few other carbide insert tools because I've gotten a lot of questions about whether they could be used on a treadle lathe.
In truth, I have a fourth tool that can be used. If I wanted to, I could use a regular spindle gouge and it would work fine - though slower. I left the spindle gouge out of the demo because I would use it only if it were my only option.
A roughing gouge is the most popular tool for this purpose but the question is: for a treadle lathe for which makes the most sense.
 l-r: scraper, continental gouge, roughing gouge
 In the picture above, you can see the results of all three tools with the tool used underneath it. All this work was done with each tool in under a minute - maybe even under 30 seconds. I developed a sense of how fast they cut - and we can see the quality of surface they leave behind. I used all tools with about the same amount of pressure and force. But not enough to overwhelm the machine. The wood is soft maple.
From left to right:
The carbide scraper. My least favorite tool of the three, because it leaves such a rough surface. But it was dead easy to use. You take the tool, you hold it horizontally, and just feed it with moderate pressure, and it wastes away the material. It's exactly what a roughing tool is supposed to do. My only complaint is that there are splinters on the edges of the cut. On harder materials, I would guess it works better; on softer materials you would have a worse, rougher surface.
The continental gouge is historically the oldest design of the group. It is basically a wide, shallow gouge with a slight curvature to the face of the gauge. This particular one is one inch wide and a joy to use. The tools roughs out well and is very easy to control. While not as fast cutting as a roughing gouge, it allowed me plenty of control. The final surface was pretty good. It's also a versatile tool because you can do a lot of finishing cuts with it.
The three quarter inch roughing gouge on the right differs from both a spindle gouge and the continental gouge in that its front is sharpened straight across and the sides go up high and vertical, so they can slice interrupted grain cleanly. The tool profile is more of a "U" than a gentle curve. What you get is a tool that produces very thick shavings very quickly, and makes short work of turning a square billet round. It also is a very reliable tool in that you don't have a sense that you're about to fall off the edge of the Earth or anything like that. It certainly cuts faster than the continental gouge. As you can see, it leaves a reasonably clean surface.
I think the Continental gouge is a very versatile tool. Even when you're not roughing, it takes nice wide shallow cuts. But in terms of actual roughing, the roughing gouge is the winner. I just didn't like the square scraper: the surface it left is rough. I didn't feel the need to use a scraper since I didn't have trouble with the gouges.
If I were a more experienced turner than I am, I would follow the roughing gouges work with a skew chisel to create a perfect cylinder with a perfect surface. Neither the continental or roughing gauges really chew up your surface, so there's not much material to remove to get something perfect. Since I'm less than experienced turner, I find having a fairly decent cylinder from the Continental gouge to be actually quite nice.
If I were doing smaller work, my guess is a less aggressive Continental gouge might be a better choice, although all of these tools come lots of sizes, including pretty small tools meant for pen turning. If I only had one roughing gouge, I wouldn't want one too much smaller.
The most important takeaway from this experiment is that - as in most areas of woodworking - many different options work, provided that the tool is sharp. While there are cases in turning where something won't work well - for example, using a spindle gouge inside a bowl - overall you could do an awful lot of turning with just a spindle gouge and either a roughing gouge or continental gouge (just make to it easier). The most important thing I did during this test wasn't learning some secret technique handed down by turners since 1642. Rather it was making sure my tools were sharp and of the correct geometry when I sharpened them. I am spending time at the lathe nearly every day and as my experience grows and my technique gets better, my turning is naturally improving. I am going faster with far fewer catches and slip-ups.
 The continental gouge on the left is ground with the nose sticking out slightly. The roughing gouge on the right is ground square
Categories: General Woodworking, Hand Tools
Some Chisels From My Great Local Hardware Store

I've just added to the store three interesting chisels. By "three" I mean I actually only have three. The story behind them is interesting, hence the tale.
English toolmakers make two kinds of of "mortise chisels": the oval-handled mortise chisels of the sort that we stock by Ray Iles, which are designed for deep mortises and are tapered front to back so they can loosen themselves in a deep joint. The second kind are sash mortise chisels, which have parallel sides and round handles. They were used for shallow mortises, specifically window sashes. The advantage of having parallel sides is that they are simply less expensive to make. There's no real advantage for registration or anything like that.
Continental Europeans have never really cottoned to the oval bolstered mortise chisel. Instead they use are very large sash mortise chisels, which are typically tapered front to back. These tools have round handles, which makes them harder to register and use - but they are less expensive to make.
The great American tool company Stanley, which made all sorts of wonderful chisels, never actually made a real mortise chisel, sash or otherwise. So imagine my surprise when one of the owners of my local hardware store (more in that later), told me he had something special to show me - three Stanley sash mortise chisels, made in France and England, probably in the late 20th century. These sash mortise chisels are not in any of my catalogs. And I only have three in metric sizes. If you're interested, you can click on the product description here; if you act fast enough, you can actually buy them. They are perfectly good great tools, properly hand forged. When I say hand forged, I don't mean by hand banging on an anvil. I mean, with a power hammer, with a human organizing the blows. It's a real skill.
Before we go back to the history of the chisels, let's talk a bit about this hardware store. Warshaw Hardware Store on 3rd Avenue between 20th and 21st streets in NYC is run by its third generation, Eddie and Carl Warshaw. It is typical of the small neighborhood hardware stores that used to be all over New York City. It has everything. In other words, when I need 1/4"-20 bolt 1/2" long I can order a box from McMaster and have them the next day or I can go into Warsaw and buy three 1/4"-20 bolt 1/2" long for probably about a buck. For a tinkerer, and a guy trying to run a machine shop, this is a godsend. Your sink breaks, you need a weird washer: they got it. The fact that they are conveniently located is a godsend.
Back to the chisels. If you're running a hardware store for three generations, the chances of finding stuff in weird corners of the shop is 100%. So Eddie called me and said that he had found these chisels, had no idea what they were for, and thought of me. Did I want them? Of course I was intrigued. So I stopped by I took a look and saw that they were sash mortise chisels, which made no sense.
Eddie said "In the 1990s, one of my distributors went out of business and we bought their entire inventory. Over the years I sold everything but these chisels because they're not really our thing and they ended up being pushed aside."
I'm guessing the chisels are from around the 70s or the 80s and were sitting in the distributors warehouse a long time. They might have been a marketing experiment by Stanley, to import some of the more woodworking friendly tools that were available in Stanley Europe into the United States to see if they would sell to hobbyists here. Apparently they didn't.
In case you're wondering how I know that they are forged and handled mostly by hand, it's because the forgings aren't perfectly symmetric, a mark of an open die not a complete drop forge. When you hand forge chisels, the balance isn't always centered correctly on the tang. To address this problem, when you put the chisels into a handle - the job of the cutler - you compensate so the chisels weight is perfectly balanced and symmetrical. But visually it may be off slightly - and that's the case with these chisels. The mark of somebody paying attention. Two of these chisel still have their fancy store hanging display hoops on.

Categories: General Woodworking, Hand Tools
How I Sharpen Turning Tools

Let me establish from the start that many, many methods of sharpening can work. And while I may be courting controversy in my approach, I really am interested in this blog post in discussing how I sharpen, not offering a comprehensive review of all plausible methods. I will also say from the get-go that there is also a big difference between regrinding a tool to a new geometry to repair damage and routine maintenance because of use.
Here is how I am keeping my tools sharp.
Except for one 3/8" spindle gouge ,all my turning tools are made of high-speed steel (HSS). There are gradations of quality of HSS, but in general HSS tools stay sharper longer than traditional carbon steel tools. On the other hand, carbon steel is easier to sharpen. Pole turners have a tendency to want to use carbon steel tools, because such tools are easily sharpened with a stone in the field. Other that that, HSS tools have replaced carbon steel in the marketplace.
One complaint people have with sharpening high-speed steel is that HSS doesn't get as sharp an edge as carbon steel. I would suggest that with modern sharpening equipment such as diamond stones, CBN wheels, and quality waterstones, HSS can get pretty darn sharp. It not so much the steel, which is kind of gummy, but diamond and CBN cleanly cut through the carbide inclusions that are found in HSS.
For the one or two times I've wanted to really change the geometry of a tool, I've used a grinder with a CBN wheel. The CBN wheel isn't essential, but it does mean my chances of burning the tool are nearly non-existent. Many people finish up on a grinder and call it a day, although they are usually finishing up on a much finer wheel (220 and up) than I have (80).
Since I don't have a super fine grinding wheel, in all cases no matter how I get to the ground edge I'm following up the fine and extra fine diamond stone. And then I'm doing one of three things. Leaving the tool as is and getting back to work. Stropping with strop treated with micro fine green honing compound, or polishing on an 8,000 grit water stone. I'm going back and forth between the strop and the 8000 grit waterstone trying to figure out which is better. I don't have an answer yet. I do think however if you have a sharp tool to begin with. a polished edge will cut better and longer.
Since I free-hand sharp everything anyway, I free-hand sharpen my turning tools. Learning to sharpen the handle heavy turning tools took some adapting, but it's the same skill. One of the reasons I'm a big fan of free-hand sharpening regular chisels is once you can free-hand sharpen chisels and plane blades, you can also free-hand sharpen pretty much everything else as well.
When my turning for the day is done, I feel the tool for sharpness. If I'm unsure if it's sharp, it's probably not. I then touch it up on the fine and extra fine diamond stone. And then follow whatever polishing medium is handy.
In the photo above, we have a 1" skew chisel and a 1" continental gouge. You can see the hollow from the grinding. I have a 6" grinder. Most turners prefer a lesser hollow and use 8" grinders. But unfortunately I can't justify a new grinder. The polish marks on the heel and toe of the bevel are the result of hand honing.
I can't emphasize enough how much of a pleasure and a rush it is when I take a tool that was cutting weirdly, sharpen it, put it back on the lathe, treadle away, and get curly shavings.
Categories: General Woodworking, Hand Tools
An Observation

Here is a question for you: should the point of a marking gauge be sharp or dull? And why?
Woodworking instructors answer most questions based on their experience. And most of the time when you're studying with a woodworking instructor, what you're paying for is not some universal truth of woodworking but rather your instructor's way of doing something. "This is the way I do it and that's what I know how to teach," is the instructional mantra. The more open-minded of the group will also say something along the lines of, "This is the way I was taught, and I recognize other traditions do it differently, but as I said, I teach what I know and I know that's just works very well." Some instructors have been teaching the same way for decades, whereas others see themselves as lifelong learners and explorers so their instructing evolves along with them.
My own woodworking mentor, Maurice Fraser, was compulsive, and basically taught woodworking techniques only if he had explored them extensively. The reason he taught a particular technique a particular way was because he tried every other possible method he could think of (or found out in his books) and determined that that way was the best.
Many years ago I wrote extensively about flatness of the back of a chisel or a plane blade and I polled some woodworking experts for their opinions. A very famous woodworker, a writer and instructor addressed my question, Why flatten the entire back of a chisel rather than only the first 1/32" - especially considering that Japanese chisels are purposely not flat and have a hollow? He responded by saying it was easier to teach a student to flatten the entire back properly rather than stop after the first 32nd or 16th of an inch.
A secret of woodworking is most techniques actually work. They may work at different speeds and efficiencies; they may require more or less capital investment or practice; but they work.
Certain tools fall out of favor for one reason or another, and then they can come back into vogue. Sic transit gloria mundi.
The ancient Egyptians built stone pyramids, furniture, and an empire with bronze tools.
When it comes to marking gauges, I have seen all sorts of modifications. Many of the modifications seem based on misunderstandings about how these gauges can be used. When you start out you don't know anything, you feel free to assume the problem with the tool is that it's not as good as it should be. As I turn on the treadle lathe I am connecting with New Learner energy. The trick is to bring some humility to the process as well. The wheel has been invented; I have to continually remind myself that I do not need to reinvent the wheel.
Incidentally if you want to know how to use a traditional marking gauge click here to a article I wrote ages ago. If you just want to cut to the chase, the answer is a slightly dull point works a lot better than a very sharp point because it doesn't cut the fibers. The dull point simply depresses the fibers of the wood - no scribe line that will catch stain or finish and leave a mark. The dull point also isn't as vulnerable to grain shifts as a sharp point is, so it stays straight and doesn't wander in the grain.
I'm hopeful that this year I will be able to write more blogs. I'm constantly getting comments about people who say they enjoy reading them, and I like writing them. I really do. But my time has been very very constricted this past year because I'm working on the lathe and running a business in a very tough environment. Whoever said necessity is the mother of invention is actually completely and totally wrong. Leisure is the mother of invention. If you don't have time to sit down, relax let your mind free and wander, you won't get any new ideas, and if you don't have time to actually explore new ideas from a practical sense, you won't have them fully fleshed out either.
Happy New Year, everyone!
Categories: General Woodworking, Hand Tools
Learning to Turn, Exercise, My First Accident, and a Progress Report

Every day I am at work I spent at least 15 minutes - more like 30 minutes -a day using the showroom treadle lathe. I would do more but I don't have time. And this was the point of designing the lathe in the first place: I need the exercise. Using the lathe, I break a sweat; I can feel my heartbeat go up; and I can feel the improvement in my stamina. I hate going to the gym, and at this point I don't pretend that this New Year will be different. But this is different. I focus on my goal of learning to turn properly and the time just slips by. Eventually my goal is to make certain items. I have a list but I am not skilled enough yet.
And this is what will bring me to the lathe in the future - interest in turning. The important physical benefit is frosting. Consequently I don't have to negotiate with myself, resort to post-workout bribery or make complicated podcast or music playlists to distract myself from (what I experience to be) the monotony of gym exercising.
But there is a learning curve.
Turning in general has a learning curve, but I am also learning the important aspects of turning on a treadle lathes. Pedaling is one example. I am now at the point where I routinely switch feet. I am learning how to position my body so that I am not in the way of moving the tool in a cut - yet still be able to pedal comfortably. I am is getting better, but I am not yet where I need to be, or where I hope to be within a few weeks.
I also had my first accident today. It was pure stupidity and carelessness, as accidents sometimes are. If I had been using an electric lathe, I might have lost a thumb. I was rounding out square stock and stopped pedaling so I could see where I was and I touched the wood to see if it was round. It was far from it and my thumb was dragged and stuck between the work and the tool rest. This was totally avoidable mistake and it served as a real wake-up call. Fortunately instead of causing an emergency trip to the hand surgeon, the accident just caused a mild pain at the base of my thumbnail. I don't even think I will lose the nail.
I counted myself lucky and finished roughing out.
Update on manufacture: We are basically done assembling all the bits and bobs that go into the lathe. The Treadle Lathe is the largest and most complicated hand tool project I can think of by any manufacturer in several generations. We are dealing with multiples of over 100 different parts. All of the parts with three exceptions are sitting here waiting to be assembled. The parts that are missing are a few of the headstocks - we had a CNC milling crash last week and we lost a few days waiting for the machine to be repairs. That's done. We don't feel comfortable finishing the tailstocks until we have assembled a production machine and double- checked the actual center distance from the ways. (It would be just foolish to make an assumption.) And finally the welded frames were supposed to be shipped to us last Wednesday but the trucking company confused bills of lading, reported our shipment picked up and on schedule when in fact it was just sitting at the fabricator. In theory, by the time you read this we will either have frames or we will be waiting for a truck to pull up, which will be followed by a mad dash to assemble the machines. If you have signed up as a pre-sale buyer, you will then get your call to arrange delivery, although that last bit may not happen until January because most of our shop people are on vacation Christmas Week.
We still have lots of work to do on manuals and videos.
All of this is a roundabout way of saying: I expect to spend more time turning and be a better turner in better physical shape starting now.

Categories: General Woodworking, Hand Tools