Hand Tool Headlines
The Woodworking Blogs Aggregator
“Glory to God in the highest heaven, and on earth peace to those on whom his favor rests.” - Luke 2:14
Be sure to visit the Hand Tool Headlines section - scores of my favorite woodworking blogs in one place.
Covington & Sons

Trees, Wood, Carbon and Bugs
 A giant California redwood tree located at the time of this photo near my former home in Forestville California. The gentlemen shown have done a marvelously clean bit of work up to this point using only a two-man saw and their axes. A serious job performed by serious men.
All that is gold does not glitter,
Not all those who wander are lost;
The old that is strong does not wither,
Deep roots are not reached by the frost.From the ashes a fire shall be woken,
A light from the shadows shall spring;
Renewed shall be blade that was broken,
The crownless again shall be king.J. R. R. Tolkien, The Fellowship of the Ring
Thank you for visiting our humble website, focused primarily on woodworking tools, especially those made by Japanese craftsmen for Japanese professional carpenters and woodworkers.
Consistent with the educational and contemplative nature of this website, in this article we will examine the nature of wood itself including the trees that produce it, two of their controversial by-products, and a couple of techniques for dealing with wood’s inherent weaknesses of which Gentle Reader may not be aware. It will a useful read without being boring, I swear by Grabthar’s Hammer!
The Miracle of Trees
As a matter of common sense, most people assume that trees, such as the California Redwood shown above which once grew very near my old house in Forestville, grow to such height, diameter and mass by extracting minerals from the ground at their roots. That huge mass must come from somewhere, right?
Of course trees do extract some minerals from the ground, along with many tons of water. But if it’s as simple as that, please consider why trees don’t create correspondingly huge depressions in the soil into which they are rooted, depleting minerals and biomass from the soil. Moreover, please consider how trees add biomass to the soil they’re rooted in instead of making a hole. You’ve heard of conservation of energy, no doubt, but is conservation of mass a thing?
Most people think plants and trees are made of minerals robbed from soil, but the fact about trees and plants so heavily hushed-up nowadays is that they are built almost entirely of carbon extracted directly and entirely from the atmosphere. Yes, from thin air.
Clearly, despite what the doom goblins wail on TV in order to shame and cooerce actors and politicians for support, to solicit clicks, and to extort donations, carbon dioxide is a useful substance critical to all plant life; it’s not the poison the smelly, screeching doom goblins claim it is. Consider what would happen to this planet and all creatures who live on it if carbon dioxide went away. Or if oxygen went away. Ah! Could it be there’s no money to be made by speaking the simple truth rather than inciting panic?
 A climate scientist fleecing the ignorant (and gullible) masses. I wonder if he has any of my favorite Idiotbegone pills in his wagon?
Of course, plants do extract a few minerals from the soil along with great amounts of water. Powered only by sunlight, plants and trees remove carbon from the air and use it to create cellulose, a material very similar to sugar, BTW, and which many insects and animals, but not humans, can digest. Think grass and other plant matter.
Show me a single “scientist” that can replicate this miracle in a lab and I will bow down and kiss his bulging bunions. Good luck in your search for that miracle worker, but in the meantime, I won’t be needing any scientific kneepads.
Plants need free carbon dioxide in the atmosphere to grow, and animals, including me and thee, need both plants and oxygen. Indeed the greater the concentration of CO2 available, the more plants grow, the more CO2 they remove from the atmosphere, and the more oxygen they produce. Indeed, every molecule of oxygen surrounding planet earth was respirated by a plant. Hmm, sounds a lot like an endless, natural cycle, one that animals and humans rely on unconditionally. Imagine that…
Plants are marvelous sunlight-powered miracles. And don’t forget, except for the salt, every crumb of every ingredient in your peanut butter, humus and boiled mutton sandwich on rye originated with plants produced using sunlight, carbon, and water.
The Importance of Wood
Wood is a wonderful material, used by humankind since well before the archaeological record to produce heat, light, shelter, clothing, tools, weapons, food and water. Even today it remains the supreme catalyst.
Although computers, concrete and carbon fiber get all the attention nowadays, and those who evaluate the complicated “environmental” impacts of materials on this world carefully ignore it, there would simply be no human civilization without wood.
There are those who disagree with this statement, mostly highly edumacated individuals affiliated with supposedly serious organizations, many of whom are short-sighted, financially-conflicted souls with short attention spans that never exceed the news cycle, and who, despite clear evidence to the contrary, choose to equate the use of wood with the destruction and/or pollution of the natural environment for fun and profit.
Of course, they believe, or at least profess, that the carbon released by the combustion and decomposition of wood is wholly poisonous. These nitwit geniuses instead promote the supposedly “ecological” use of steel and concrete and petroleum products instead, all materials that require huge amounts of energy to fabricate, transport and recycle, all while while releasing millions of tons of truly (versus imagined) poisonous substances into the natural environment annually. Alas, the medicinal cure for idiocy your humble servant strongly advocates is apparently not yet widely available.
Wood contains a tremendous amount of energy, as Gentle Reader has observed in wood-fueled fires. The immutable laws of thermodynamics state, in essence, that all heat comes at a cost. Oil costs money to pump, transport and refine as well as special machinery to use it, but the heat given off by wood is simply the conversion of sunlight gathered by the plant while it was alive back into heat and light. A complete and pure circle.
Sure, the combustion and decomposition of wood releases carbon back into the ground and atmosphere, but every molecule of carbon released by wood was originally extracted directly from the atmosphere by many, many plants over many many cycles. Therefore, plants remove carbon from the atmosphere, and only release that carbon when they return to the big lumberyard in the sky. This is true “net zero,” without the production of an ounce of pollution, unlike steel, concrete, oil, coal and every other fuel and material used by mankind without exception.
I’m not suggesting the use of petroleum and coal and windpower, within limits, is irresponsible, but if the environment is important to you, as it should be, then using organic materials and fuels instead of oil, coal, steel, concrete and wind turbines should be a high priority.
Furniture Pests
Our Beloved Customers use our tools to make elegant, useful stuff out of wood. This wood is formed of cellulose, the most abundant organic compound on Earth, one very similar to but fundamentally different from the sugars we consume for energy. Many animals, including herbivores such as elephants, cows, rabbits and termites have the built-in ability to convert the cellulose in the plant matter they eat into energy by a process we cannot replicate. Humans can’t do this, nor have we figured out a way to accomplish this apparent magic without the intervention of animals, insects or fungus. Once again, puffed-up prideful science can’t do what every carpenter ant and every mushroom obediently does without even be asked to.
A part of the “carbon cycle” relies on such animals, bugs and micro-organisms. If left to their own devices bugs and fungus quickly recycle wooden objects, including houses, furniture and parts of our tools made from wood. You may not have noticed these pesky critters, but you’ve probably seen the holes they chew and the wood dust they excrete. Check an old tool handle, handplane body, or antique table leg for evidence of death watch beetles of powderpost beetles, two common varieties of bugs commonly called “furniture beetles.”
I don’t know about you, but I hate the very idea of icky bugs eating my furniture, tools and handiwork. But what to do?
There are plenty of chemicals manufactured to make wood taste yucky to bugs and fungus, but most of those are toxic and/or carcinogenic so you wouldn’t want to leave them in contact with your skin or lungs for any period of time. But what’s a safe way to keep bugs and fungus from chewing on your workbench, furniture, tool handles or plane bodies? And what can be done once some of them have taken up residence therein?
Termites are are problem bugs, too of course, but most of them prefer a higher moisture content in the wood they dine on than is typically found in houses and tools. That said, I’ve seen subterranean termites and Formosa termites in Guam swarm and eat interior furniture and wooden doors down to hollowed-out toilet paper tubes in front of my eyes. Scary stuff. This is precisely why people don’t build much of anything from wood on that island but spend lots of money on chemicals to prevent termites from turning cellulose into bug crap.
For example, while living on Guam, I had a neighbor in the US Airforce stationed there who’d imported some beautiful Amish furniture made of American Cherry wood from his home in Pennsylvania. Unfortunately, there was a crack in the concrete slab-on-grade floor underneath his beautiful dining table with a corresponding gap in the ceramic tile on top that allowed the local termites to access a single cabriole leg of that table unseen. The table collapsed into a pile of sticks and red termite crap after a year. I kid thee not. Vicious, voracious, vile bugs.
If Gentle Reader has ever frequented flea markets and antique shops, or even perused photos of antiques, you will have seen the many holes left by furniture beetles. I own several old hammers, axes and planes with their wooden components riddled with bugholes. But how can you prevent bugs from infesting your valuable wooden objects in the first place without using highly-toxic, corrosive, and expensive chemicals containing lead, chromium and/or arsenic? Easy peezy. Borax is the answer.
A Non-toxic and Inexpensive Method of Wood Preservation
There are any number of effective chemicals available for wood preservation. Borax is what I recommend based on direct workplace experience. Its a naturally-occurring white powder sold everywhere as a laundry detergent additive. But it’s not just for washing Gentle Reader’s socks, oh no. It’s essential in many industrial processes, including blacksmithing, where it’s used as a flux when forge-welding iron and steel. Japanese blacksmiths use it too.

The vast majority of borax is mined in California where there are huge deposits in ancient lake beds. You may have heard of famous “Twenty Mule Team” wagon trains once used to transport borax from Death Valley.
For this application you don’t need wagons or mules, just water and borax powder, but NOT Borax-brand washing detergent. Both are sold as laundry additives, so don’t confuse them.

 2 mule team wagon


 A borax mine in Boron, California USA
To prepare this wood preservative and insecticide, dissolve borax powder in warm water to make a 7-10% mixture. Then spray it onto wooden objects at-risk, or better yet, soak the wooden objects in this mixture and let dry. Be careful not to spray the cat or the carpet.
Borax messes with the internal functions of bugs and fungus, but it’s harmless to humans and domestic animals to handle, so long as you don’t soak in it and ingest it. Indeed borax and its variants are the only sure way to protect wood against bugs and rot without putting human life and health at risk. No VOC risk. No carcinogens. It won’t pass through skin. No environmental contamination risk (that’s important). Won’t corrode metal fasteners. It has no odor. And it’s cheap. These are all important reasons for woodworkers to use borax.
There are only two downsides to using borax. First, since it’s water soluble, you need to keep wood treated with borax from repeated wetting or the borax will leach out. Second, you need to keep wood treated with borax out of direct contact with soil because moisture in soil will, once again, leach borax out of wood.
I add borax to the water I soak my sharpening stones to prevent crud from growing. It works for years at a stretch, and doesn’t harm any variety of sharpening stone, synthetic or natural, nor does contact with dissolved borax harm me, or even irritate my skin, so long as I don’t drink it (see the Wood Finisher’s Pledge above). That said, I don’t bathe in it, and I understand that some people have a reaction, so don’t go crazy.
Borax also makes the water alkaline preventing rust.
But before using this mixture to treat wood, please recite the Wood Finisher’s Pledge along with me now: “I will not drink wood preservatives, use CCA impregnated toothpicks, nor wash my face with oven cleaner.”
A Quick, and Cheap But Slightly Toxic Way to Eliminate Bugs from Wood
Borax will kill bugs already in the wood given time, but is there a quicker way to get rid of those voracious beasties?
Here’s a technique to deal with wood-eating bug infestations I learned from woodworkers in Japan. I’m sure its not unique, but I’ve never heard of it being used elsewhere.
Before employ this methodology, please recite the Wood Finisher’s Pledge again, but with more feeling this time.
Simply find the entrance/exit holes bugs chew into and out of an infested wooden object and, using a syringe or pipette, squirt or drip a little gasoline into each of them. You might even soak the wood overall in a bit of gasoline.
But, be warned, because Murphy rules the universe and truly wants to hurt you and yours, be sure you do this outdoors well away from anything flammable. Also be sure to put out your stogey, give your Puffco Cupsy bong a rest, and dial down your “electrifying personality” because “hair on fire” is not simply a real risk around uncontained gasoline, it’s practically garan-frikin-teed.
After judiciouly and carefully applying this small amount of gasoline, you can wrap the object in plastic, or place it into some kind of airtight container, to allow the gasoline vapors to permeate the wood. Do this outdoors, once again, and refrain from smoking. The gasoline fumes will promptly send the bugs, their eggs, and all their chilluns to the big lumberyard in the sky. In nomine Patris et Filii et Spiritus Sancti, Amen.
After a few days, unwrap/unseal the wooden object and place it outdoors in the sunlight to remove the smell of gasoline.
This technique works perfectly, everytime, and cost almost nothing. The chemical companies don’t make a penny on this process which is why you’ve never heard of it.
YMHOS
 I can’t believe those damned bugs ate my favorite bow! If only I’d followed Stan’s advice and treated it with borax.
If you have questions or would like to learn more about our tools, please click the “Pricelist” link here or at the top of the page and use the “Contact Us” form located immediately below. You can also reach us at Covingtonandsons@gmail.com
Please share your insights and comments with everyone in the form located further below labeled “Leave a Reply.” We aren’t evil Google, fascist facebook, or the Congressional IT department of the Democrat Party and so won’t sell, share, or profitably “misplace” your information. If I lie may bugs eat all my tool handles, and food taste like charcoal.
Japanese Handplanes Part 9 – Maintenance & Storage

Preventive Maintenance: Don’t start today by doing yesterday’s work.
– Deniece Schofield
Maintaining, transporting and storing handplanes and other handtools is a simple job, but some review might be useful.
High-quality handplanes are not cheap, and when you have a good one in good fettle, the time and effort it takes to maintain it ready to rock and roll immediately is never wasted. Indeed, it’s a solid investment that pays higher dividends than General Electric stock ever will, I promise you, on condition that the maintenance is done right, and your handplanes are stored and transported properly. On this subject as in many others, knowledge is power, so let’s get some.
Maintenance
The quote at the top of this article by Deniece Schofield describes a sound policy, especially when it comes to tool maintenance.
There are several items to consider when maintaining your handplane. We’ve discussed how to set-up and fettle a Japanese hirganna handplane in previous articles, all listed at the end of this article. In this article we’ll examine how to maintain it while we’re using it, and how to store it when we aren’t.
Sharpening
A dull plane may make excellent firewood, but it’s as useful as a screen door in a submarine, so the first step in keeping it useful is sharpening it. The true value of the high-quality-forged blade in your plane is that it’s easily and quickly made extremely sharp, and it will retain that sharp edge a long time, reducing the time, trouble and cost of maintaining it. Does your time have value?
For detailed directions about sharpening, please read the series of 30 articles linked at the end of this article. They will explain the what and why of the blade of a high-quality plane. If you haven’t already, please read and digest these articles.
Maintaining and Storing a Handplane In-use
The following is a list of maintenance items you should consider performing and the specific conditions under which I think they’re applicable. These are suggestions not rules, of course, but unlike most of the woodworking gurus on the internet, I didn’t steal them from noobtube, nor suggest them because they’re good clickbait, or fish them out of my fundament because they smell like lilacs, or because I think they’ll sell tools or books to the gullible. They are simple and they work, but it’s important to understand the conditions detailed for each item.

- Condition1 – Overnight Storage: The plane is working fine, its blade is still sharp, and you intend to use the plane in the same place for the same jobs tomorrow, but just need to set aside on your workbench for a few hours, perhaps overnight. You may want to take the following actions:
- Don’t remove the blade and chipbreaker, but simply wipe the body with a clean, dry rag and clear dust and shavings out of the blade opening with a clean, dry brush. Purpose: To prevent wood resin from accumulating and gumming things up (depends on the wood), and to prevent corrosion.
- Oil the cutting edge using your trusty, ever-faithful oilpot.
- Condition 2 – Short-term Storage: The plane is working fine and the blade is sharp, but you need to relocate it to another location for a short time. In this case, you may want to take the following actions.
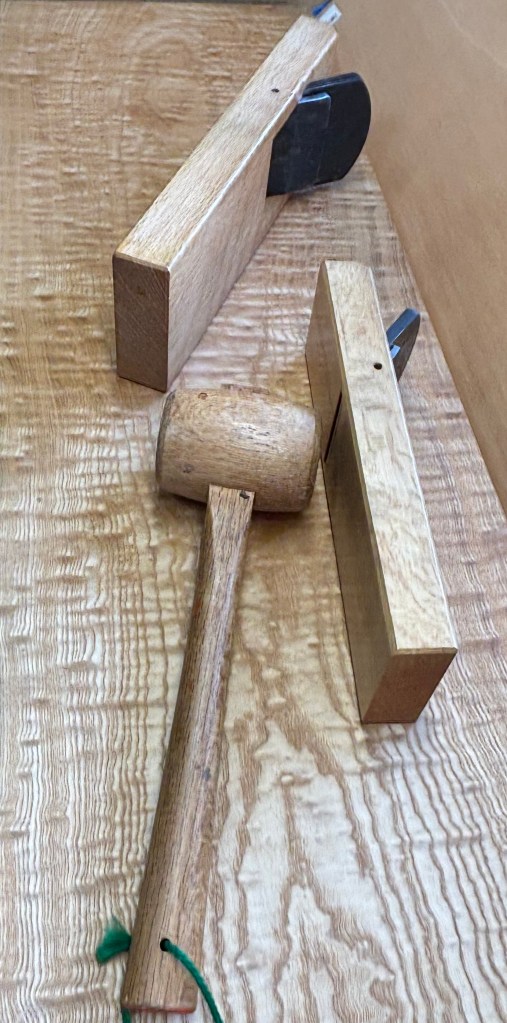
- Safe the blade by retracting it into the body using your wood, plastic or leather mallet so it doesn’t become damaged, or damage other tools while lounging in the tool box or tool bag during the relocation.
- Remove dust and shavings from the plane, especially the mouth opening, because they will make the toolbox or tool bag dirty.
- Condition 3 – Short-term Storage: The plane is working fine, the blade is sharp but we need to store it out of the way short-term.
- Remove blade and chipbreaker entirely (see previous article)
- Clean the blade and chipbreaker of sawdust and wood resin. Resin may have accumulated on the blade and chipbreaker which, if not removed in a timely manner, can harden over time increasing friction. Use you oilpot and a clean rag and/or a small stick of wood to scrape-off built-up resin resin. If that doesn’t work, use acetone or lacquer thinner.
- Clean dust and shavings from blade opening and mouth with brush/rag.
- Wipe down the plane’s body with a clean rag.
- If the body is dirty with oil, sharpening stone mud or fingerprints, clean it all over with your oilpot and wipe. If that doesn’t make it clean enought, dampen a clean rag along with drop or two of dishwashing liquid (neutral PH), then wring it out as hard as you can. Scrub the body clean with this nearly-dry rag. Caution: We need the soap and water to remove oil and dirt, but making the body wet may cause it too warp. When you’re done, make absolutely sure the body is perfectly dry.
- Oil the blade and chipbreaker.
- Reassemble the plane but leave the blade’s cutting blade up inside the mouth opening. How tight should you fit the blade/chipbreaker? Tight enough to firmly retain blade and chipbreaker so they won’t rattle out, but no more.
- Condition 4: Long-term Storage:
- Remove the blade and its chipbreaker entirely.
- Clean the blade and chipbreaker removing sawdust and all accumulated wood resin as described above.
- Apply a protective coating of a paraffin wax-based corrosion prevention product such as CRC 3-36. For longer storage under more difficult conditions, CRC SP-350 or CRC SP-400 are even better.
- After the carrier has evaporated to some degree, wrap the blade and chipbreaker in aluminum foil and store them together with the wooden body so they won’t become separated. Don’t assemble the parts!
- Clean the wooden body removing all dust and shavings.
- Place a mothball in the body’s mouth and wrap the body, along with the blade and chipbreaker, in newspaper, or place it in a plane bag. This will be good for a number of years in any condition except underwater.
Plane Storage on the Workbench, Atedai or Planing Beam
There is some disagreement about how to set down one’s handplanes when they aren’t being used. I won’t consider all the possible options, but will simply present the one that I was taught and use.
The old boys who trained me insisted that it is improper set down a plane with its sole touching the workbench, atedai, tatami mat, carpet or ground for any length of time, but one must instead rest it on its side. After many years of using handplanes, I feel this is a good habit to develop for both Japanese and Western handplanes.
Since I’m right handed, this results in the plane resting on its right side with the cutting edge oriented towards towards the left side as shown in the photo below. This position takes up less space on the workbench, and protects the cutting edge and sole of my plane from contacting anything but air.
 80mm and 60mm hiragann handplanes at rest but just wiggling in anticipation of yummy shavings.
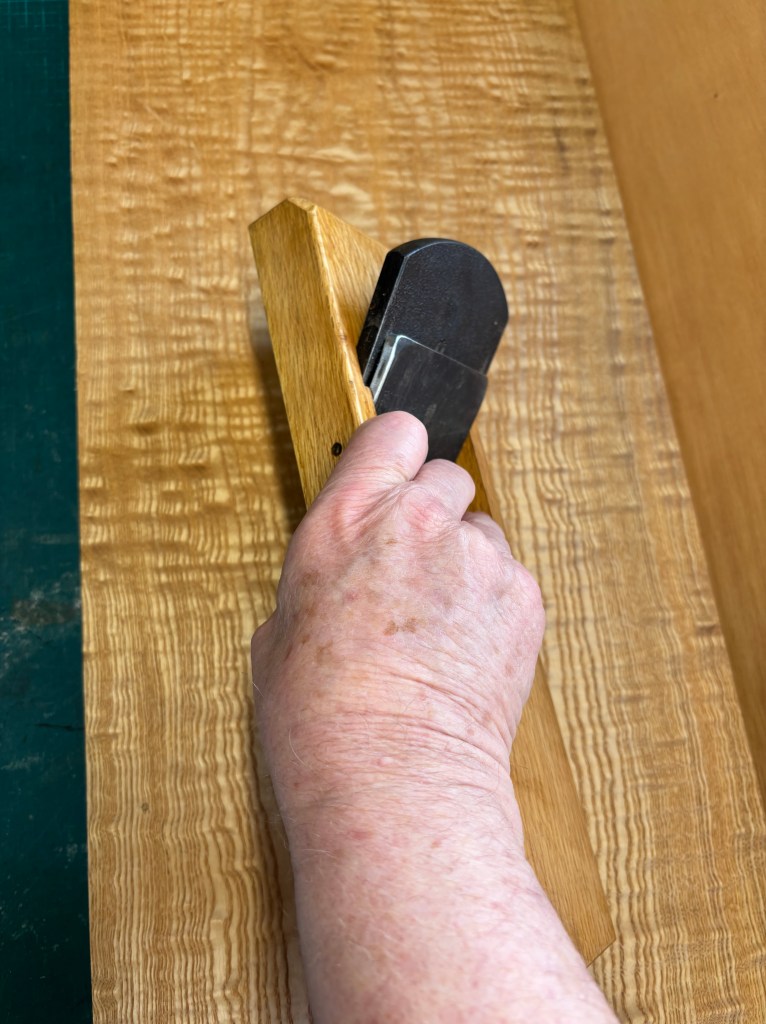 Resting on its side, even a larger plane like this 80mm hiraganna plane can be picked up and put to use quickly and deftly.
This position is also makes it quick and easy to pick the plane up and get it back into battery without fumbling.
Is it rude to rest the plane sole-down, or will it damage it? Probably not, but seeing a handplane with it’s blade oriented up or down bothers me like a bug crawling on my neck. OCD?
I also rest my planes on their sides when placing them in boxes, toolboxes or toolbags even for long-term storage.
 A Japanese carpenter back in the day with his hair done up in the traditional”chonmage” haircut, wearing his employer’s “happi” jacket, and carrying his open-topped wooden toolbox on this shoulder
One can place a plane on any stable surface it’s willing to sit on, and where it won’t be kicked or fall from, even a chair, bench, board, carpet, floor tile, or other flooring material, but never directly on gritty surfaces such as bricks, paving, concrete, or heaven forfend, the naked ground.
Place the plane resting mouth-down only when the plane is actively being used or it’s wrapped in cloth or newspaper.
Do all Japanese craftsmen follow this rule? Heck no. Why do I recommend these habits? Well, first of all, because this habit shows proper respect to my tools, to the craftsmen that made my tools, and to those who taught me how to use them. Second, because these habits help my tools last longer with less damage. Thirdly, because it helps to keep my workplace better organized.
Until we meet again, I have the honor to remain,
YMHOS
Please Leave a Reply Cancel reply
Other Articles in the Japanese Handplane Series:
- Handplanes Part 1: East vs. West
- Handplanes Part 2: Blade Adjustment
- Handplanes Part 3: The Blade
- Handplanes Part 4: Fitting Blade and Body
- Handplanes Part 5: The Chipbreaker
- Handplanes Part 6: Setting-up and Maintaining the Sole
- Handplanes Part 7: Bedding the Blade – Correcting Some Common Misunderstandings
- Handplanes Part 8: Operator’s Manual
- Handplanes Part 9: Maintenance & Storage
Links to Articles in the Sharpening Series:
- Sharpening Japanese Woodworking Tools Part 1
- Sharpening Part 2 – The Journey
- Sharpening Part 3 – Philosophy
- Sharpening Part 4 – ‘Nando and the Sword Sharpener
- Sharpening Part 5 – The Sharp Edge
- Sharpening Part 6 – The Mystery of Steel
- Sharpening Part 7 – The Alchemy of Hard Steel 鋼
- Sharpening Part 8 – Soft Iron 地金
- Sharpening Part 9 – Hard Steel & Soft Iron 鍛接
- Sharpening Part 10 – The Ura 浦
- Sharpening Part 11 – Supernatural Bevel Angles
- Sharpening Part 12 – Skewampus Blades, Curved Cutting Edges, and Monkeyshines
- Sharpening Part 13 – Nitty Gritty
- Sharpening Part 14 – Natural Sharpening Stones
- Sharpening Part 15 – The Most Important Stone
- Sharpening Part 16 – Pixie Dust
- Sharpening Part 17 – Gear
- Sharpening Part 18 – The Nagura Stone
- Sharpening Part 19 – Maintaining Sharpening Stones
- Sharpening Part 20 – Flattening and Polishing the Ura
- Sharpening Part 21 – The Bulging Bevel
- Sharpening Part 22 – The Double-bevel Blues
- Sharpening Part 23 – Stance & Grip
- Sharpening Part 24 – Sharpening Direction
- Sharpening Part 25 – Short Strokes
- Sharpening Part 26 – The Taming of the Skew
- Sharpening Part 27 – The Entire Face
- Sharpening Part 28 – The Minuscule Burr
- Sharpening Part 29 – An Example
- Sharpening Part 30 – Uradashi & Uraoshi
The Japanese Gennou & Handle Part 23 – Finishing the Job
A man in love is incomplete until he has married. Then he’s finished.
– Zsa Zsa Gabor
This is the last article in our series about designing and making a handle for a Japanese gennou hammer.
In previous articles in this series Beloved Customer completed designing, shaping and fitting the handle of your gennou hammer and attached the head. Then you tested it and perhaps made adjustments. Assuming Beloved Customer is satisfied with the results of those adjustments, at least for now, the time has come to sand it and apply a finish.
Finishing Options
There are a couple of approaches your humble servant might propose on the subject of finishing tool handles. The first is perhaps the oldest, and easiest, and that’s to do nothing. After all, tools are made for hands not museums, and flashy finishes too often make otherwise workmanlike tools look silly.
In addition, most woods (except for those that might cause allergic reactions) perform just fine unfinished, thankee kindly. In this “au natural” approach, you may choose to leave tool marks on the surface of the handle without sanding them into oblivion, lending your handle undeniable gravitas and dignity, even character.
An unsealed, unfinished handle will, however, unavoidably become stained and discolored, and it’s head may not stay attached as long as a well-sealed, well-finished handle. I say this from experience.
A good light-duty finish material for an au-natural handle is a quality non-slip floor paste wax like Johnson’s well-known product in the yellow metal can. Does it seal the wood? No, but it does help keep the handle looking cleaner. Why floor paste wax? Some waxes, for instance those used to polish furniture and automobile paint, are intended to provide a slick surface that encourages water to run off and to which dirt doesn’t adhere well. History has shown that slippery waxes used on floors will result in slips, falls, and a transfer of wealth to the legal profession. For the same reason, carnuba automotive wax is not ideal for tool handles, while non-slip floor wax is.
And then there are the chemical finishes such as linseed oil (BLO), milk finish, tung oil, shellac, varnish, lacquer, polyurethane, etc. To one degree or another, these chemicals tend to seal the wood reducing the penetration of dirt and oil, and (sometimes) slowing the movement of moisture into and out of the wood.
But what chemical finish is best suited to a gennou handle? It is far beyond the scope of this humble scribble to properly describe, much less evaluate, the many varieties of finish applied to wood, so I will simply provide a few comments.
Linseed oil and BLO, a by-product of the flax plant, are organic materials used for centuries if not millennia as a traditional finish in Europe. It was once used widely for paint and, until it was replaced by rubber and later petroleum products, flooring and waterproofing materials. Have you heard of “linoleum?” Of course, this was back in the day when lead was a common ingredient in paint and makeup. Linseed oil no longer has any value as a finishing material for wood because it never really dries without adding problematic, even toxic, chemicals called “driers,” it seals poorly, collects dirt, and discolors badly over time. But because it’s constantly mentioned in old writings, which many people trust just because they are old, linseed oil products are still in-use today. To advocates of linseed oil products I say “make sure you soak your oily rags in water and dry them outside well away from any fuel (like your house).”
I am a fan of the modern milk paints, but do not like it for tool handles. Nonetheless, it’s a valid option.
Tung oil is an ancient finish, but the price nowadays far exceeds its value, assuming you can even find an unadulterated source.
Shellac creates a beautiful surface coating but it’s far too delicate for tool handles.
Standard synthetic varnish, nitrocellulose lacquer, urethane and polyurethane are readily available, easy to use and can create a beautiful, durable finish, but when used in the traditional manner, the surface film coating they produce eventually chips and cracks with time, exposure to ultraviolet light, and expansion and contraction of the wood to which they have been applied. And every scratch accelerates this degradation.
Why is degradation of film finishes the a problem you say? The obvious downside of a once beautiful finish looking ratty aside, every defect in a surface film finish promotes the movement of moisture into and out of the wood, and of course increases the swelling and shrinkage of the wood it’s intended to protect. What most people don’t realize is that, as time goes by, the solvents and compounds in film finishes intended to provide flexibility in dealing with expansion and contraction of the wood dissipate causing the finish to gradually become more brittle, and break down and crack at a ever-increasing rate, independent of dings and other defects.
In modern times, the use of latex rubber in water-based paints has greatly reduced this problem, but such paints are not especially durable as a tool handle finish.
Sanding
If the au-naturel approach appeals to you, I recommend erasing marks left by files and rasps and replacing them with crisp marks and cleanly cut surfaces left by sharp edged tools like knives, carving tools, and spokeshaves. Unless a chemical sealer/finish material is applied afterward, a plain sanded finish is probably the worst surface treatment possible, whereas a surface cleaned with sharp blades will serve you better. I often use this texture for the endgrain butts of my hammers and saws.
If, on the other hand, you prefer a smoother finish, and are prepared to apply a chemical finish, then by all means sand away. But please do not sand the tenon. If you decide to sand the handle before installing the head, please apply masking tape protection to the tenon.
How fine should you sand your handle? I think 600 grit is fine enough, but I’ve gone as high as 1200 grit on fine-grained, hard woods like black persimmon. Did using such fine sandpaper make a difference? Nah.
After you’ve sanded the surface to where you like it, the next job is to eliminate hidden hairs. No, this does not involve applying hot wax to delicate areas of the body and then violently ripping out body hair so that you look delightfully-sleek in your new sequin string bikini, but rather it’s the job of encouraging the naughty ends of wood fibers still connected to the handle, but currently pressed flat onto and into the handle’s surface, to stand up so we can cut them off using sandpaper.
Dealing with these fiber is always important when finishing wood because, with time and moisture, they may pop up over time creating rough patches in the finish encouraging degradation. Once they are standing and no longer hidden, we can cut them off at the base with sandpaper to create a durable, smooth surface long-term even when exposed to moisture and sweat.
Although it’s not used much nowadays, sanding sealer was originally a shellac product developed specifically for this purpose.
To raise hairs, lightly wet the handle’s surface (but never the tenon) with water and allow it to dry completely. Some hasty people like to dry the wood quickly with a forced-air blower or even propane torch at this point to make any loose fibers stand up immediately in preparation for the next sanding pass. But simply allowing the wood to dry naturally is effective too.
This is an ancient, very effective technique. Please do this at least twice, after which you can apply the finish material.
 Kanō Hōgai, Two_Dragons_in_Clouds (1885), ink on paper. Philadelphia Museum of Art. Father and son dragons are depicted playing in the clouds.
The London Finish
There’s a durable wood finishing technique I learned from custom gunstock makers that I wrote about in an earlier article about handplanes called the London Finish. This is the finish I recommend for hammer handles too. It can be as subtle or as flashy as you like.
A pretty handle is nice, but the key objectives for applying a finish to your gennou handle should be (1) to moderate swelling and shrinking of the tenon during seasonal and climactic changes in humidity; and (2) to prevent oil and dirt from penetrating the wood making it look grubby. This matters because such swelling and shrinking can cause the head of your gennou to loosen and do naughty, acrobatic stuff at inconvenient times. And a greasy, dirty handle is no way to treat a friend.
If the head is attached when applying the chemical finish of your choice (I recommend it be so), please tape it well to keep finish off the metal. Apply masking tape to the hammer head on all four sides of the eye, but leave the end of the wooden tenon exposed.
Tape the rest of the head well with masking tape.
Soak the finish material (flat varnish or polyurethane thinned 100% with high-quality thinner) into the eye and the butt as deeply and thoroughly as possible. Plan for three or four applications allowing time for the material to soak in and dry.
Do no use low VOC thinners as they contain politically-correct compounds of water, acetone, emulsifiers and other counterproductive substances the State of California’s poorly-educated but thoroughly-conflicted and richly-corrupt lawyers have determined will save the polar bears, but that will weaken the finish.
If you faceted the butt and want to keep it that way, you must be careful when sanding it or the facets will disappear. This is a matter of personal preference.
Of course, be sure to apply lots of finish to other surfaces of the handle, and wet sand them well as described in the article linked to above. Don’t allow a surface film to dry except for the first time as described in the webpage linked to above.
Hammers are lifelong tools, but too often handles are not. You can help your gennou’s head stay tight longer, stay cleaner, and look better longer by applying a London Finish instead of a thick surface film finish.
YMHOS

If you have questions or would like to learn more about our tools, please use the questions form located immediately below or email us at Covingtonandsons@gmail.com. Please share your insights and comments with everyone in the form located further below labeled “Leave a Reply.” We aren’t evil Google, incompetent facebook, or gossipy X and so won’t sell, share, or profitably “misplace” your information. Promise.
A list of our gennou heads: C&S Tools – Gennou Hammer Head Pricelists & Photos
Previous Posts in The Japanese Gennou Hammer & Handle Series
- Part 1 – Introduction
- Part 2 – Ergonomics
- Part 3 – What is a Gennou?
- Part 4 – The Varieties of Gennou: Kataguchi, Ryoguchi & Daruma
- Part 5 – Kigoroshi
- Part 6 – The Ergonomic Anaya
- Part 7 – The Unblinking Eye
- Part 8 – Head Style & Weight
- Part 9 – Factory vs. Hand-forged Gennou Heads
- Part 10 – Laminated Gennou Heads
- Part 11 – Decorative Gennou Heads
- Part 12 – The Drawing: Part 1/6
- Part 13 – The Drawing: Part 2/6
- Part 14 – The Drawing: Part 3/6
- Part 15 – The Drawing: Part 4/6
- Part 16 – The Drawing: Part 5/6
- Part 17 – The Drawing: Part 6/6
- Part 18 – Wood Selection
- Part 19 – Laying-out the Handle
- Part 20 – Making Sawdust
- Part 21 – Installing the Head
- Part 23 – Finishing the Job
Leave a comment Cancel reply
The Japanese Gennou Hammer & Handle Part 22 – Tasting the Pudding

True perfection is unattainable, but if you chase perfection you will catch excellence!
Vince Lombardi
In previous articles in this series about a craftsman-made gennou hammer handle, we discussed how to design and make a handle to fit Beloved Customer’s body and way of working. This article assumes you’ve mostly completed your handle, attached the head, and are now ready to test it. So let’s get started.
Why Testing Matters
I don’t know about you, but after all the research, design and fabrication work we’ve invested in your gennou handle, I need to see how it performs and determine if its performance is superior to a Minion impaled on a stick. Being a Beloved Customer and therefore highly intelligent, you’ve asked yourself the following three indubitably perspicacious questions about testing.
- What can I learn from testing?
- Against what performance standards should I compare my most excellent new hammer handle (besides to a Minion on a stick)?
- How should I conduct that evaluation?
To perfect your hammer, you will need the answers to these questions and more. You can get them over years of use, or get many of them now by testing it in a methodical manner and paying attention, but one way or another, you must get answers, bro.
Desired Testing Results
We can learn several things from testing our gennou with its new handle, but I encourage you to do your best to ascertain the following two things at minimum.
The first thing, of course, is whether or not the hammer with its new handle is comfortable and stable to use, and if possible, what needs to be improved to make it more stable and comfortable. This may entail many small details depending on your requirements and powers of perception.
Whether it’s comfortable in-use or not is subjective and entirely up to you, but you can probably identify problems easily through this testing process. Pain, soreness and blisters and the lack thereof are solid indicators (ツ).
Whether or not it’s stable in use is another important thing to determine early. Does it tend to track straight on the downstroke, or does it want to twist off your intended path of travel striking chisel handle or nail head erratically? When it hits the chisel or nail, does it convey its energy into the target smoothly, or does it wiggle like an eel on a hook on impact?
An unstable head and handle combination may perform well for one or two consecutive strikes, but because Murphy’s Law of Buttered Toast irrevocably dictates that small errors accumulate to maximize damage, an unstable head will often wiggle off-line enough for the third swing to hit weakly, even miss entirely, ruining your rhythm, damaging your confidence, and eliciting snide looks from resident bench cats. Oh, the shame…
A second thing you need to learn is whether or not the face of the hammer is striking the chisel/nail squarely and if the center of mass of the head is aligned with the vertical axis of the chisel handle or nail. Please make sure you understand the meaning of the previous sentence.
With this experience and the answers to these questions under your belt, you will be in a position to adjust the handle to perform its best for you and the way you work.
Testing Procedures
Out of an abundance of well-deserved humility combined with a strong desire to avoid looking even more the fool, your humble servant will refrain from suggesting any specific objective tests, or urge you to use quantifiable standards, or seek concrete empirical results because that would be too silly to even contemplate. Unless, of course, Beloved Customer will conduct these tests in your super-secret laboratory, possibly located at the heart of a dormant volcano on an uncharted South Pacific island, maybe covered by coconut palms with cold beer taps, probably surrounded by hundreds of horny bikini babes, likely frolicking in crystal surf. BTW, if you do have such a lab, please text me the address!
In this super-secret lab you will probably have access to equipment and software suited to more scientific, empirical, replicable methods of comparison, such as those developed for analyzing and improving the apparent performance, marketability and profitability of mass-produced sports equipment such as baseball bats, golf clubs, and green dildos (シ). Sadly, while your humble servant does not possess such equipment, most (but not all) humans own and operate one of the world’s most refined super-computers and sensor networks: our bodies and brains. I therefore propose you focus these formidable tools on this analysis. (brains and bodies, that is, not dildos).
Below are four absolutely subjective tests only you can perform, the results of which only you can evaluate.
Incorporating Test Results
To thwart the confusion promulgated by Murphy and his multitudinous malevolent minions, I strongly recommend you use the results of your analysis to guide you in making incremental improvements to your handle over time rather than large changes immediately, so to that end, please plan to remake your handle, once, twice or even thrice, improving it a little each time. Such is the true path of the craftsman.
Please update your handle drawing each time to record the improvements you’ve made and ensure no “increments” are misplaced.
In scobe veritas. (“In sawdust, truth”).
The Grip
As you are aware, for any testing other than drinking beer or women choosing wall paint color to be meaningful, some basic techniques must be established and followed to reduce variables to a manageable degree. How you hold the gennou handle to be tested is just such a basic technique.
The handle design presented in this series of scribbles is intended to work best when gripped in a particular way, so when performing the following tests, it’s important that you grip the hammer correctly thereby removing one huge, often-problematic variable.
Of course, I’m describing a particular grip here as being “correct,” but that’s just my well-informed opinion. In any case, I promise your hammer will work more efficiently if you abandon the so-called “hammer grip” (what I call the “Hobbit-killer” grip with the handle grasped in your fist) right away and switch to this more advanced grip.
I didn’t invent this grip, BTW, but observed and consulted with craftsman I respected in the USA and Japan who used it for many decades, all of whom are now working overtime in the big lumberyard in the sky. I later came to call it the “Sam Snead grip,” after the extremely successful pro-golfer of the same name who made it famous, and him rich, in tournaments and in dozens of books he wrote on the subject of using golf clubs skillfully.
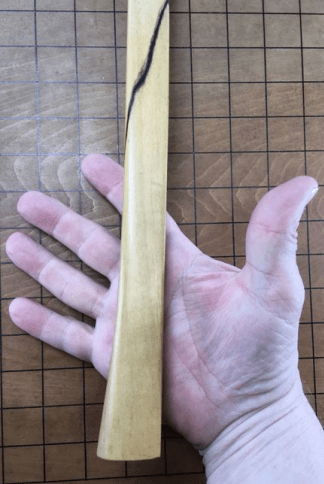
We’ve talked about this grip in some detail in Part 13 of this series, but please review the photos below to confirm your understanding.
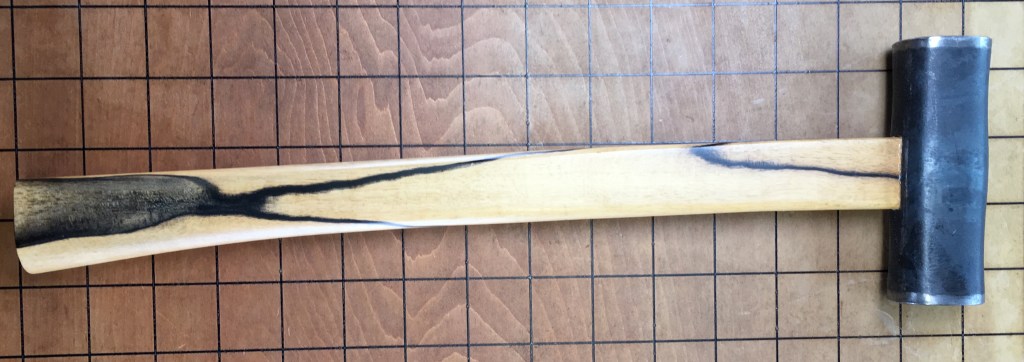
The first photo labeled “Bridging the Palm” shows how the hammer’s handle is NOT held in a fist, but is angled diagonally across the palm, supported on the first joint in the index finger, as well as the heel of the palm.
You can see how the index finger wraps around the handle while the thumb is pressed against the side so that the handle is strongly clamped between index finger and thumb, but can still pivot the handle if the operator so desires. This grip affords the joints of the forefinger and thumb, digits accustomed to fine motor control (unlike the fist), absolute control over three critical surfaces of the handle.
This grip also provides better control, more power, and greater reach without forcing the wrist to do the strange, unnatural contortions the Hobbit Killer grip does.
 Bridging the palm
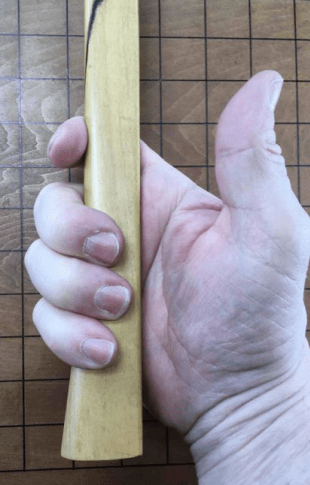 Index finger wrapped around the handle with the tip pressing against the rounded front edge of the handle.
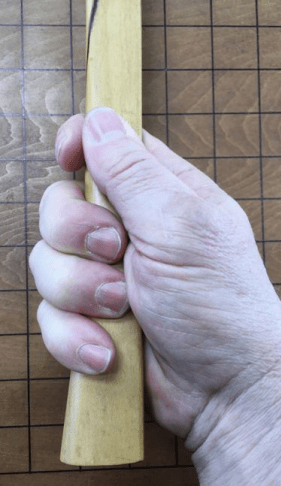 Handle pressed between tip of the thumb and first joint of the index finger. The tip of the index finger presses against the rounded front edge of the handle, and applies most of the force required to return the handle to battery.
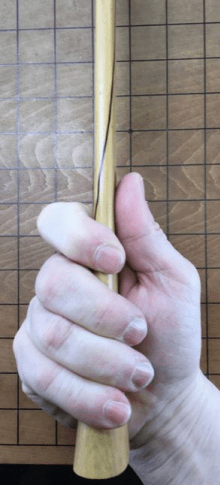
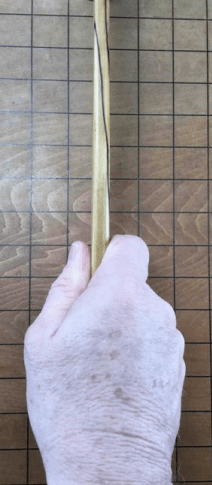 Notice how the handle is pressed between the pad of the thumb and the side of the index finger in the famous “Sam Snead” grip.
The Three Tests
Following are three tests to help you ascertain how well your new gennou and its handle suits your body and your work style.
Before attempting these tests, however, it is important to use your new handle for a time to establish a connection between it, your hand, and your eye (using the proper grip, of course).
Besides moral virtue and a sense of humor, you will need a few things.
- A wood chisel suitable for cutting a mortise hole, around 24mm.
- A piece of light-colored scrap wood for cutting a test mortise hole;
- A stick of light-colored wood approximately the size and shape of the handle of the chisel you would normally use for cutting mortise holes:
- An ink pad, wide-tip marking pen, or Dykem.
- A lab assistant. I recommend a buxom, young lass with a cute giggle wearing a sexy lycra lab uniform (Warning: bad stuff may happen if you let She Who Must Be Obeyed meet, or even see, this assistant!)
So, now that we have our supercomputer and its sensor suite warmed up and focused, our tools laid out, and a bubbly lab assistant standing by, sound the trumpets and let the testing begin! We who are about to dye salute you!
Test No. 1: The Blind Retrieval Test
After you have used your gennou with its new handle for a few weeks such that your hand has become accustomed to it, please give your bench dogs a few treats, shoo away any arrogant bench cats, set it on your de-cluttered bench, step back a few steps, close your eyes and turn in-place once or twice like a ballerina with hairy legs. Now, have your lab assistant, perhaps a child, a friend, a neighbor, your girlfriend, or wife, or even a clever bench dog (but never your neighbor’s girlfriend’s wife’s cat!) change the gennou’s orientation on your benchtop by turning it over, switching it end for end a few times, spinning it, or whatever. Random orientation is what’s needed.
Next, with your eyes still closed, grab the gennou with your hammer hand in a proper grip ready to rock-n-roll. Notice how easy or difficult it is to grip the handle correctly, without fumbling and without opening your eyes. If it’s not easy to do, however, you need to know it now. It may be simply that you’re not accustomed to the chisel, more importantly, it might mean the geometry or details are out-of-wack.
By “correctly” in the previous paragraph, I mean (1) the flat striking face of the head is facing away from you and toward the chisel or nail; (2) the head is aligned straight in your hand, and not twisted, (3) the heel of your hand is pressing against the flat spot on the handle adjacent the butt; (4) the distance from the center point of the face to the heel of your hand is located precisely the distance shown in your design drawing.

BTW, whether you picked up the habit from your daddy or some internet guru, choking-up on the grip is an inefficiency you should discard simply because it’s counterproductive and silly, like a powerful cane corso dog wearing flower brocade.
If your grip is shaped as shown in the drawing with a flat back edge and sides perpendicular to it, a radiused front edge, and a flare beginning at the grip area, it should be easy to instantly grip the handle in precisely the proper place, with the intended striking face oriented properly, without opening your eyes and without any fumbling whatsoever.
If, on the other hand (the one with six fingers (ツ)), your hammer doesn’t leap into your hand in perfect alignment without argument or eyeball action, some adjustments to the handle are called for. For example, a frequent cause of disagreement between handle and hand is the leading edge of the grip being square instead of rounded. Or the sides and butt of the handle being angled wrong. These details can all be adjusted once you know they need to be adjusted
A gennou that naturally orients itself in your hand with the striking face in the right direction, the same distance from the striking face first time every time without your having to look at it, will provide you a tremendous advantage in speed, efficiency and confidence. It will become a good friend and companion.
BTW, just for gits and shiggles, try this test with any name-brand one-size-fits nobody nail bender you have laying around. The virtues of your new handle will become immediately apparent.
Test No. 2: The Blind Swing Test
This test will teach you something about handle length and other details.
Once again, perform this test after you have used the gennou with its new handle for some time and have become accustomed to it. A sexy lab assistant (one who doesn’t talk too much) in slinky woodworking togs is optional (ツ).
Grip the gennou properly in one hand and the stick shaped like your chisel handle in the other just as you would an actual chisel. But instead of placing the end of the stick against something as if you might cut it, please keep the stick in the air without butting it against anything. Now, with your eyes still closed, swing the gennou at the end of the stick of wood.
You should be able to strike the stick with the flat end of the gennou solidly and squarely on the first, or perhaps second try. Success in this test is common.
If your hammer misses the stick consistently, it may be because you are not yet accustomed to the handle, or it may be that you are chocking-up up on the grip, or maybe you need to make it shorter or longer, or the grip shape needs to be adjusted. Or it may be that Murphy keeps distracting you by sending dick pics. It’s absolutely worth figuring out.
Once again, if you consistently miss the target, pay attention to why and where you are missing. Is the handle too long? Is it too short? Are you missing off to the side? Make notes recording the results and your observations on the design drawings to incorporate in your Mark II handle.
If accuracy can be improved by shortening the handle or modifying the grip, go ahead and make the necessary changes a little at a time. It’s easy to shorten the handle, but lengthening one requires an ACME Wood Stretcher Mark 2. I can lend you mine if you don’t have one (ツ)
Test No. 3: The Ink Test
Never fear: this test has nothing to do with gossip screeds or crime scene investigation. It will help you determine if the handle of your gennou is the right length, if it is cocked at the most effective angle, and whether or not it should be canted to the left or right, and all without pulping an innocent tree.
This test works best if preformed after the Blind Retrieval Test and Blind Swing Test.
Begin by coloring the striking face of your gennou with an ink pad or by applying dark marking pen ink or Dykem to the gennou’s striking face (the flat face). Clean or sand the end of your chisel’s handle to produce a clean, white surface. Then cut a mortise using this gennou in the same posture you assume when cutting most of your mortises.
For instance, if you mostly cut mortises in wood located at a constant height on your workbench, such as drawers and furniture parts, you should employ that position. Or, if you tend to cut mortises in timbers while sitting on or straddling them using the venerable butt-clamp, please assume that position.
The impact with the chisel’s handle will wipe ink off the face of hammer and deposit it on the end of the chisel’s handle at the same time. This ink transfer will print the story you need to read. Check the ink on the gennou’s face and the end of the chisel every two strikes.
This is a time-tested technique professional golfers use to select/design golf clubs, BTW.
If the ink at the center of the striking face is scrubbed clean first, and the center of the chisel handle becomes inked first, then you have made your handle the right length with the head angled correctly. If not, you should make notes describing the results in the handle drawing you made earlier, and adjust the design of your next handle accordingly.
Again, you may find it enlightening to perform this same test with conventional hammer with a standard handle.
When your done testing, be sure to record your conclusions. Either erase and adjust the drawing, or trace over it to make and date a new drawing with your revised details. Tracing paper is our friend.
In either case, be sure to add a date and/or revision number to the drawing to ensure you don’t confuse it with older, superseded drawings. Don’t put this off but do it right away before you forget. This applies to all the tests described herein.
Adjustments to Your Handle
You should use the results of these tests to make small, incremental adjustments to your handle, as you deem necessary, rather than big, drastic changes.
For instance, you may need to shorten the handle. This is easily done if your handle is a little long and you’ve made the neck as I recommended. Worst case, make notes, adjust the drawing and remake the handle with as few changes as possible to avoid confusing over-complication.
A common correction you may want to try is, after becoming accustomed to using the hammer, to reshape the grip area to distribute pressure more evenly over the hand, and to reduce stresses induced in skin, muscle, tendons and bones by easing edges and corners while maintaining control and indexing. Most importantly, you should shape the handle so it doesn’t twist in your hand stretching your skin in uncomfortable ways, a common cause of blisters, especially in plastic-handled one-size-fits-nobody hardware store hammers.
If I may share an example from my experience, every new hammer handle I make tends to produce a blister on the first joint of my right hand index finger. Obviously a lot of pressure focus on this location on my hand. So I know to smooth the transition from back edge to the side just where this joint bears to avoid blisters.
This modification creates an obvious dent in the smooth lines of my handles, but your humble servant is resigned to sacrificing beauty for performance when necessary. Just look at the sorry state of my career as a fashion supermodel.
Another less-common problem is the hammer’s face striking the chisel handle or nail head at an angle instead of being centered on, and at a 90˚ angle to, the long axis of the chisel handle. The ink test will reveal this impish behavior.
This tendency usually improves with practice, but you can adjust for it by making a new handle with the head skewed to the left or right as necessary.
As a way to determine how much skew is required, you can plane down the sides of your test handle, glue on slips of wood, shape them as you see fit, and test the results. Once you’ve determined how much total correction is necessary, you can remake your final working handle accordingly.
Once again, work patiently to achieve small, incremental improvements, and be sure to record the results on your drawings.
Don’t hesitate to methodically scrape, shave and experiment with this first handle.
The design of this handle, and the process your humble servant has described for making it, is suited not just for Japanese gennou hammers, to all short-handled hammers and axes. Give it a try and you’ll see what I mean.
In the next article of this series we’ll apply a protective, and maybe even tastefully elegant, finish. Please remind me to call Ramon and beg him cater the unveiling party! I simply love his cheesy shrimps on crackers, don’t you?
YMHOS
If you have questions or would like to learn more about our tools, please use the questions form located immediately below. To see a list of our tools and their pricing, or to contact us, please click the “Pricelist” link here or at the top of this page.
Please share your insights and comments with all Gentle Readers in the form located further below labeled “Leave a Reply.”
We see data miners and their bilious bots as dastardly sneak thieves and so promise to never share, sell or profitably “misplace” your information for any reason. If I lie may the heads of all my hammers fly away to Valinor!
 Brother Saint Martin and the Three Trolls by John Bauer. Supernatural creatures are everywhere, if you have eyes to see.
Leave a comment Cancel reply
Previous Posts in The Japanese Gennou & Handle Series
- Part 1 – Introduction
- Part 2 – Ergonomics
- Part 3 – What is a Gennou?
- Part 4 – The Varieties of Gennou: Kataguchi, Ryoguchi & Daruma
- Part 5 – Kigoroshi
- Part 6 – The Ergonomic Anaya
- Part 7 – The Unblinking Eye
- Part 8 – Head Style & Weight
- Part 9 – Factory vs. Hand-forged Gennou Heads
- Part 10 – Laminated Gennou Heads
- Part 11 – Decorative Gennou Heads
- Part 12 – The Drawing: Part 1/6
- Part 13 – The Drawing: Part 2/6
- Part 14 – The Drawing: Part 3/6
- Part 15 – The Drawing: Part 4/6
- Part 16 – The Drawing: Part 5/6
- Part 17 – The Drawing: Part 6/6
- Part 18 – Wood Selection
- Part 19 – Laying-out the Handle
- Part 20 – Making Sawdust
- Part 21 – Installing the Head
The Japanese Gennou Hammer & Handle Part 21 – Installing the Head

No one should be ashamed to admit he is wrong, which is but saying, in other words, that he is wiser today than he was yesterday.
Alexander Pope
In the previous article in this series we finished fitting and shaping the handle of our gennou hammer in accordance with our design document. Some refinements may be pending the results of testing, but in any case the time has come to attach the head.
This is an important task, perhaps not as easy as it sounds, because this is a craftsman’s handle, made with love and skill, not a mass-produced cockroach killer ground out by barefoot Bangladeshi farmers and secured with crude wedges. It’s not a typical tool of the sort sold at Home Despot designed to fail quickly and be tossed into a landfill soonest. And because the head is not secured with barbaric wedges but relies entirely on the extremely tight fit between the eye of the steel head and the tenon Beloved Customer cut on the end of the handle, some careful, but nonetheless violent action is required to successful connect head and handle. The purpose of the article, therefore, is to help you install it carefully with all due violence.
Installing the HeadBeloved Customer can install the head either before or after sanding and finishing the handle, but in this example we’ll attach the head before testing and finishing the handle. This approach will be most efficient if you decide to adjust or rework the handle after performing the tests I recommend in the next article.
In this case, I use the word “finish” to mean to apply a chemical “finish material” to the wood, not to “complete” the work or “conclude” the job. This difference in definition matters to me because confusion regarding the dual, even treble meaning of the word “finish” has caused problems for me in the past. So there you are.
Preparing the Tenon
First, remove any tape remaining on the tenon and, if necessary, use a solvent such as lacquer thinner to remove any adhesive residue. DO NOT USE soap, water, or any water-based chemical as this will make the tenon swell! After cleaning there should be no finish material, wax, oil or unicorn wee wee left on the tenon.
Depending on the relative humidity the handle is acclimated to, it may be advisable to make an effort to shrink the tenon a bit by placing the handle in a low-humidity environment for a time. Please do NOT microwave your handle, cook it in your oven, or heat it in your toaster, not even with cheese and Tabasco Sauce.
There are several ways to remove moisture from the tenon in order to shrink its width and thickness a bit without ruining the handle or burning down your workshop. Perhaps the safest way is to store it for a time in a tightly-sealed plastic container with packages of silica desiccant. Other ways include placing it in a warm spot close to an operating gas furnace, or indirectly exposing it to an electric room heater for a day or so.
If you use any method that involves heat, make sure you are nearby to monitor progress and deal with scorching and fires.
Orienting the Tenon
You’ve already shaped the handle, and shaved and lightly chamfered the tenon so it should partially fit into the head’s eye almost as deep as the chamfer, but should go no further using only hand pressure.
Please keep in mind during this process that it’s extremely important to get the tenon started in the eye straight, and to keep it straight, without allowing it to become cocked.
It’s also important to install the head in the correct orientation. This usually means it’s flat striking face is oriented towards chisel or nail, and with the brand oriented towards the handle’s butt.
Some people like to orient the head’s brand so it faces up (away from the butt) when using the hammer. I can understand this compulsion, and while it makes no difference in performance one way or the other, you should be aware that it’s seen as bass-ackwards among professionals in Japan.
Starting the Tenon
Of course, in accordance with your humble servant’s advice in previous articles, you’ve already created an elegant dome on your hammer’s butt to prevent these taps and strikes from damaging the handle.
I like to place the head on a working surface such as a benchtop or a softwood board like pine or cedar resting on the floor/ground cushioned by a piece of leather or rubber to prevent slipping.
Insert the tenon into the eye, and, after sighting the handle and head from multiple directions to check alignment, when you are absolutely certain the tenon is poised to go into the eye straight, tap the handle’s butt with a flat-faced hammer, genno (not a domed-face hammer) or mallet. After a few taps, stop tapping, check your progress, and make sure the tenon is going in straight and not cocked.
Although the tenon should not have entered the eye more than a millimeter or two, it should be an extremely tight fit, with each tap making barely any progress.
I can’t describe the sensation in writing, but if the fit is too tight at this point in the process, you may need to scrape or sand the tenon a little.
Driving the Tenon Home
This is where the “violent” part of the job I mentioned above begins.
With the tenon properly aligned and started in the eye, stand up, hold the hammer in a fist with the head hanging straight down, and strike the butt of the handle with your hammer or mallet paying attention to its progress into the eye with each strike and the friction created. Gradually adjust the impact force of your strikes accordingly. Don’t be surprised if it takes literally dozens of extremely hard strikes to install the handle completely. If the tenon just slips in, however, we have a problem, Houston.
If you find that the fit is too loose, however, don’t despair, simply shim it with quality paper as described in the last section of the previous article. Remember, most people find it difficult to get the tenon/eye fit right the first time. Such adjustments to a new handle are nothing to brag about, but neither are they something to be ashamed of. It’s more the rule than the exception until experience is gained.
Some people like to make their tenon extra-long so it projects out of the eye 6-12mm or so. Nothing wrong with this approach, but it looks silly to me in the case of a new handle. Once again, beauty is in the eye of the bean holder.
I was taught that the ideal is for the tenon of a new handle to remain recessed inside the eye a few millimeters. The purpose for this goes back to one of the reasons for the gennou handle design described in this series of articles, namely, that the handle does not have a tumorous swelling below the head but the neck is approximately the same dimensions as the eye for a portion of its length to permit the user to tap the handle further into the eye should it loosen. By leaving the end of the tenon short of the end of the eye in the case of a new handle, one provides visual evidence that (1) the handle is tightly fitted and; (2) that plenty of tenon length is available for making such adjustments.
Accordingly, a tenon projecting a long way out of the eye indicates to the knowledgeable observer that either the handle is either old and has been adjusted many times, or the tenon fit was sloppy from the beginning. In my humble opinion, a tenon of a new handle projecting from the eye a significant distance looks odd, but in practice, it doesn’t make much difference. The choice is yours.
In the next article in this series of articles about danger and violence, we’ll test you’re new handle. How exciting!
YMHOS
If you have questions or would like to learn more about our tools, please use the questions form located immediately below. To see a list of our tools and their pricing, or to contact us, please click the “Pricelist” link here or at the top of this page.
Please share your insights and comments with all Gentle Readers in the form located further below labeled “Leave a Reply.”
We see data miners and their bilious bots as dastardly sneak thieves and so promise to never share, sell or profitably “misplace” your information for any reason. If I lie may all my hammers swim away from me!
 Title: Cormorant. This ink drawing was made by Japan’s most famous swordsman, Miyamoto Musashi (c. 1583 – 13 June 1645). This style of art (suibokuga) is not well-known outside Asian countries, but despite the few materials used (paper, ink stick, inkstone, brush and water), it’s an extremely difficult art to master. Why? There’s no pencil layout to follow, so the artist must have the drawing planned down to the last stroke in his mind’s eye. Each stroke must be made precisely but without hesitation or mulligans. The ink is black, so color gradations can only be achieved by altering the speed of the brush and the ever-changing water/ink balance contained in the brush. High-speed, high-precision, powerful lines, no wasted strokes. Very much the work of a swordsman.
Previous Posts in The Japanese Gennou Hammer & Handle Series
- Part 1 – Introduction
- Part 2 – Ergonomics
- Part 3 – What is a Gennou?
- Part 4 – The Varieties of Gennou: Kataguchi, Ryoguchi & Daruma
- Part 5 – Kigoroshi
- Part 6 – The Ergonomic Anaya
- Part 7 – The Unblinking Eye
- Part 8 – Head Style & Weight
- Part 9 – Factory vs. Hand-forged Gennou Heads
- Part 10 – Laminated Gennou Heads
- Part 11 – Decorative Gennou Heads
- Part 12 – The Drawing: Part 1/6
- Part 13 – The Drawing: Part 2/6
- Part 14 – The Drawing: Part 3/6
- Part 15 – The Drawing: Part 4/6
- Part 16 – The Drawing: Part 5/6
- Part 17 – The Drawing: Part 6/6
- Part 18 – Wood Selection
- Part 19 – Laying-out the Handle
- Part 20 – Making Sawdust
- Part 21 – Installing the Head
Leave a comment Cancel reply
The Japanese Gennou Hammer & Handle Part 20 – Making Sawdust

Woodworking minus patience equals firewood.
– Author Unknown
In the previous article in this series, we selected and prepared the wood for our gennou handle and layed-it out in accordance with our design drawings.
The next step in the process is to gather our tools and begin the fun work of making sawdust. Yeeehaaaa!
Tools
I prefer to use the following tools when making a gennou handle. You will need to have similar tools on hand for layout and fabrication, but the specific choice is entirely yours.
- Divider with sharp points (transferring dimensions and tenon layout);
- Sharp pencil (making pencil marks (ツ);
- Small try square (laying out and checking tenon);
- Marking gauges (Titemark and kama kebiki. Marking tenon and centerlines) ;
- Marking knife (layout);
- Rip handsaw for roughing out;
- Hozohiki rip saw and/or dozuki crosscut saw and/or rip saw for cutting the tenon (in hardwood, a sharp hozohiki rip saw frequently makes both rip cuts and crosscuts cleaner and more precisely than a crosscut dozuki saw);
- A fine saw such as a fret saw or coping saw with a fine blade for making curved cuts;
- Auriou cabinet rasp (Lie-Nielson) (optional);
- Bogg-pattern flat-sole spokeshave (Lie-Nielson) (optional but really handy);
- Sandpaper;
- Satin Polyurethane finish (optional);
- Mineral spirits (optional.
- A board to support the handle-in-progess. I suggest dimensions of 300-400mm long x 50-60mm wide x 40-50mm thick, with a “V” groove cut full-length and a cross-stop inlet about 2/3 its length. The handle will rest, more-or-less securely in this groove, and be restrained at one end by the stop when using spokeshaves and rasps. This support board can be clamped in a vise, or clamped to a workbench with a C clamp. I also find it most efficient to place this board on my benchtop with the gennou handle resting in the v-groove with one end touching my chest, perhaps cushioned by a rag, and use rasps and spokeshaves pulled towards me to shape the wood.
The Tenon and the Unblinking Eye

Let’s start by cutting the tenon and fitting it to the gennou head’s eye.
You’ve already layed-out the tenon, so use a fine precision rip saw like or 210mm hozohiki to cut the four cheeks being extremely careful, like a big-eyed kitten stalking a grasshopper, to stop short of the layout line. Be careful to work very precisely with your saw to not cut too deeply as any excess meat removed from the tenon, or sawcuts left in the tenon, will fatally weaken it. I’m not kidding!

I’ve made this mistake more than once, ruining all my work to that point and wasting some nice wood. Indeed, it may be best to cut the shoulders shallow and trim with a chisel, once again being careful to not cut too deeply. Ruthless, merciless, unrelenting control of your naughty inner-badger is critical!
At this point, the handle is a chunky, graceless block with square edges and flat surfaces. That’s alright. There’s no need to contour the handle yet.
Cut itsy-bitsy teeny-weeny chamfers on the end of the tenon to help guide it into the eye without cocking and binding. A big chamfer will benefit nothing and look ghastly.
Mark the reference face annotation on the corresponding tenon cheek because you don’t want to mistakenly force the tenon in bassackwards.
Test fit the tenon into the eye a few millimeters but without driving it all the way on. It should not start by hand pressure.
Although you shouldn’t have to try tried a full-power test fit, when you are satisfied that the tenon will fit into the eye of your gennou head without the driving forces shaving off much wood, and marked the reference faces, then tape the tenon with masking tape so you don’t accidentally knick or shave it. Don’t ask me why I know this risk exists.
With the tenon close to completion, let’s next shape the curved front, back and side surfaces to fit.
The Back and Front Edges
Cut the back and front edges (surfaces parallel with the long axis of your gennou head) to your design profile using saws, rasps and/or spokeshaves. The two guiding details in this process are the butt and the tenon, with the tenon being most important. These two surfaces should be shaped to smoothly connect the butt with the tenon, not the other way around.
However, leave the corners square for now to help guide you in shaping the critical back and side surfaces because, if you start rounding and smoothing edges and corners now, it often happens that the geometry which aligns the hammer’s face with chisel and nail will be compromised.
The tools you use don’t matter so long as when this step is complete the back edge is perpendicular to the reference face, the opposing side face, and is consistent with the layout lines.
I recommend you cut outside the layout lines plus a millimeter or two because accidentally cutting deeper than your layout lines will not only disrupt the even flow of the design but may damage the structural integrity of this elegant, minimalist tool.
Do not cut or shave the handle’s sides flush with the tenon yet, but leave them just a hair proud.
When done with the this, lightly remark the centerline and extended the eye’s lines.
The Sides
At this point in the process the right and left sides should still be flat and parallel, perpendicular at any point with the back surface, and have neat, square corners.
Use the paper/cardboard profile pattern from your design drawing to mark the handle’s layout on the back and front edges.
Just as with the back and front edges, cut the side surfaces using saws, a drawknife, rasps and/or spokeshaves.
The transition from tenon to butt should be uniform and smooth. As you approach the final dimensions, be careful to avoid tearout or gouging in the neck area since removing these irregularities may require you to reduce thickness too much.
Do not cut or shave the sides flush with the tenon’s cheeks yet, but leave them just a hair proud.
Smoothing and Rounding
I find it most effective to leave the back edge (opposite the flat striking surface of the head) flat with slighty relieved corners. Some people like to make the back edge of the handle oval or egg-shaped, but I recommend you leave it flat at first and then adjust it to fit your hand as you use the gennou.
Common sense will scream at you in a voice like a nazgul to round the the back surface or to make it oval-shaped, but while such surfaces might look better hanging on a peg in a hardware store, or feel better when using your hammer to kill coackroaches, it is counterproductive when doing serious work, I promise you.
Why? Because, despite what you may think, a flatter back surface does not bite into the hand in-use, but because of the greater surface area in contact with the hand it provides, actually reduces the pressure of impact reaction forces on the hand reducing fatigue and bruising. More importantly, it helps with quickly and unconsciously indexing the striking face of the head correctly.
With the back edge where it needs to be, next round the front edge into the design profile. I prefer this surface to be more-or-less a perfect radius at any point in the handle area, but some guys feel an egg-shaped cross-section fits their fingers better. Six of one half-dozen of the other.
In any case, this surface must smoothly morph into a flat surface with slightly radiused corners in the neck area, and finally with no radius as it approaches the tenon. Yes, you read correctly: no radius.
I usually round-over the flat on the back edge right where my index finger wraps around to the side just a little to avoid developing a blister. But keep in mind that the only way to tell what small details works best for you is trial and error.
Doming the Butt
The butt should be flat with sharp edges at this point in the process.
You may find a domed butt strange, but it has both a practical purpose and an aesthetical one.
Let’s consider the structural, practical purpose first. If the wood is adequately hard, and the tenon is not too skinny, you will need to hammer the butt like a son-of-a-gun dozens of times to get the tenon into the eye. Don’t start yet, but when the time comes you must be careful with the direction of your hammer strikes to avoid breaking the tenon.
If the butt is flat with crisp edges, unless you have perfect aim with every swing, your hammer might chip or even split the butt. A domed surface directs impact forces away from the edges of the butt and into the neck, helping to prevent chipping. Likewise, a curved butt will also reduce damage to the handle over many years of hard service.
With regards to aesthetics, a domed surface is more organic and, to my sensibilities, more elegant than a flat one because straight lines seldom exist in nature, are boring to the eye, and seldom please it.
A warning. Everyone has different opinions about what pleases the eye, as you know. Beauty is in the eye of the bean holder, or something like that, so I entirely understand if you dismiss the aesthetic reasons I’ve suggested. But please don’t ignore the practical, structural reasons if you want to avoid wasting your time and wood.
Assuming the butt is flat and its surface is more or less perpendicular to handle’s centerline, use a marking gauge set at ¼” to scribe a shallow line along the handle’s edges and sides. Lightly scratch another shallow line the same distance around the perimeter of the butt. These lines will be the limit of the chamfer between the grip and the butt.
Next, mark a cross on the butt using the front and back edge’s centerline, and a perpendicular line parallel to the back edge. This cross will be useful in profiling the butt.
Use a knife, chamfer plane, block plane, files or other tools to chamfer to the lines just scratched.
Next facet the butt using planes or a sharp kiridashi kogatana knife and remove all tearout and filemarks. The time for using sandpaper will come later in this adventure when we apply finish.
Fixing a Loose Head

So here’s the “I toljaso” in advance.
If you were not a clever little big-eyed kitten when fitting the tenon, you may find the tenon becomes loose and the head begins to wiggle with the passing of a few seasons. A Sergent Elias moment!
I won’t say it out loud, but just between you and me and CCP you can remedy a loose head by removing it and shimming the eye with quality high-rag-content typing paper. Don’t have any such paper in your bat cave? Don’t tell the Secret Service I said so, but a strip cut from a dollar bill works best. Crane Stationary makes the best paper in the world.
In the next post in this series we will attach the gennou head to the handle.
Until then, I have the honor to remain,
YMHOS
 Lena Dances With the Knight by John Bauer 1915
If you have questions or would like to learn more about our tools, please use the questions form located immediately below. To see a list of our tools and their pricing, or to contact us, please click the “Pricelist” link here or at the top of this page.
Please share your insights and comments with all Gentle Readers in the form located further below labeled “Leave a Reply.”
We see data miners and their bots as dastardly sneak thieves and so promise to never share, sell or profitably “misplace” your information for any reason. If I lie may the heads of all my eyes become egg-shaped!
Leave a comment Cancel reply
Previous Articles in The Japanese Gennou & Handle Series
- Part 1 – Introduction
- Part 2 – Ergonomics
- Part 3 – What is a Gennou?
- Part 4 – The Varieties of Gennou: Kataguchi, Ryoguchi & Daruma
- Part 5 – Kigoroshi
- Part 6 – The Ergonomic Anaya
- Part 7 – The Unblinking Eye
- Part 8 – Head Style & Weight
- Part 9 – Factory vs. Hand-forged Gennou Heads
- Part 10 – Laminated Gennou Heads
- Part 11 – Decorative Gennou Heads
- Part 12 – The Drawing: Part 1/6
- Part 13 – The Drawing: Part 2/6
- Part 14 – The Drawing: Part 3/6
- Part 15 – The Drawing: Part 4/6
- Part 16 – The Drawing: Part 5/6
- Part 17 – The Drawing: Part 6/6
- Part 18 – Wood Selection
- Part 19 – Laying-out the Handle
The Japanese Gennou & Handle Part 19 – Laying-out the Handle

Not all those who wander are lost.”
J.R.R. Tolkien, The Fellowship of the Ring
Introduction
In previous articles in this frightfully sexually-charged series, Beloved Customer produced a design drawing for your gennou handle based on the parameters of your actual gennou head and your body. You should have also selected, or at least rolled out of bed onto the floor, opened on eye, and seriously considered, an appropriate stick of wood. Assuming you’ve procured said stick, let’s get to the layout.
Tools
There are as many ways to layout the shape of a hammer handle as Carter has pills. I won’t tell you how to do it or what tools to use, but after making dozens of gennou, hammer, and axe handles for myself and customers, I prefer to use the following tools. You will need to have a similar set of tools on hand for layout and fabrication.
- Divider with sharp points;
- Sharp pencil;
- Small try square;
- Marking gauges (Titemark and kama kebiki);
- Marking knife;
- Rip and crosscut handsaws for roughing out;
- Handplanes for creating the flat sides and edges in preparation for layout;
- Dozuki crosscut and/or rip saw for cutting the tenon;
- Auriou cabinet rasp (Lie-Nielson);
- Bogg-pattern flat-sole spokeshave (Lie-Nielson);
- Bogg-pattern curved-sole spokeshave (Lie-Nielson);
- Sandpaper;
- Satin Polyurethane finish;
- Mineral spirits.
Can you get by with fewer tools? Of course. A pencil, handsaw, hammer, marking gauge, dividers, and pocket knife are a minimum set. Will this minimalist set take more time, produce more blisters, prove frustrating, and produce an inferior handle? Absolutely yes. But it can get the job done.
Layout
Select a board or stick with dimensions a little greater than the length, height, width, and thickness of your handle design, with 6 flat, parallel, square sides.
You can prep this board or stick using electrical tools, but if you can’t do it with handtools alone, I strongly encourage you to work on your basic skills. In this age, surprisingly few have these skills.
Looking back on the old texts, one of the first tasks assigned trainees in cabinetmaking technical schools and apprenticeships was making a number of sticks or boards like this because this job combines many of the essential tools skill while developing an understanding of the material. I can attest to the bullet-proof validity of this concept.
- Begin your layout by selecting and marking a flat and wind-free side of the selected board corresponding to a profile view on the drawing to be the “reference face.” Don’t forget to label this critical surface somehow so there will be no confusion moving forward.
- Plane the surface of the board that will form the handle’s back edge (seen from above in plan view) flat and perpendicular to this reference face. All further layout will be indexed from these two faces.
- Mark the maximum thickness of the handle on the surface opposite the reference face, as determined by the widest dimension of the butt, using a marking gauge against the reference face.
- Plane all the surfaces flat, free of wind, and where appropriate, planar. This needs to be done pretty precisely.
- Use a marking gauge to draw the appropriate centerlines on both sides, edges, ends of the board/stick.
- Use dividers to measure and layout the width of the eye, centered on the centerline you just marked, and spin this around the eye, butt, back edge and front edge.
- Make paper, cardboard, or wood patterns based on your design drawing of the handle’s elevation and profile views. Paying close attention to minimize grain runout, especially in the tenon and neck area, position the patterns and mark the board.
- Using these cardboard patterns, carefully layout all the tenon’s dimensions on the board, measured from the reference face and back edge. Be sure to make the tenon a half-sheet of copy paper too large in width and thickness. This can be trimmed down later if the fit is too tight.
- Adjust the lines of the handle design to meet your requirements for beauty.
In the next post in this series we will begin making sawdust. Oh joy!
YMHOS
 Two Trolls by John Bauer, 1909. Not wanting to pay for the bread oven your humble servant has just installed, Granny Troll is trying to convince me to climb inside and do a closeup inspection. Will I fit? Do you like my fetching new shoes?
If you have questions or would like to learn more about our tools, please use the questions form located immediately below. To see a list of our tools and their pricing, or to contact us, please click the “Pricelist” link here or at the top of this page.
Please share your insights and comments with all Gentle Readers in the form located further below labeled “Leave a Reply.”
We see data miners and their bots as dastardly sneak thieves and so promise to never share, sell or profitably “misplace” your information for any reason. If I lie may the heads of all my hammers fly away to Valinor!
Leave a comment Cancel reply
Previous Posts in The Japanese Gennou & Handle Series
- Part 1 – Introduction
- Part 2 – Ergonomics
- Part 3 – What is a Gennou?
- Part 4 – The Varieties of Gennou: Kataguchi, Ryoguchi & Daruma
- Part 5 – Kigoroshi
- Part 6 – The Ergonomic Anaya
- Part 7 – The Unblinking Eye
- Part 8 – Head Style & Weight
- Part 9 – Factory vs. Hand-forged Gennou Heads
- Part 10 – Laminated Gennou Heads
- Part 11 – Decorative Gennou Heads
- Part 12 – The Drawing: Part 1/6
- Part 13 – The Drawing: Part 2/6
- Part 14 – The Drawing: Part 3/6
- Part 15 – The Drawing: Part 4/6
- Part 16 – The Drawing: Part 5/6
- Part 17 – The Drawing: Part 6/6
- Part 18 – Wood Selection
Please Leave a Reply Cancel reply