Hand Tool Headlines
The Woodworking Blogs Aggregator
“Glory to God in the highest heaven, and on earth peace to those on whom his favor rests.” - Luke 2:14
Norse Woodsmith Blog Feeds
What Winter Hath Wrought II
Or as the distinguished Congresswoman from home state of Minnesota might say. “What Winter Hath Wrought, Eleven.”

Once things finally melted off from this past Snowzilla, I discovered another severe after-effect.
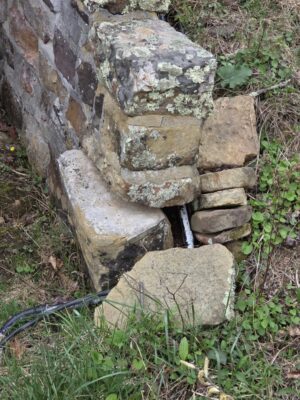
The stone foundation walls leading to the underground root cellar were pretty much wrecked by the ice-rain-sleet-rain deep freeze in late January. After more than a hundred years of being in place the base rocks were literally pushed out of place by the block of ice accumulating behind it. Yikes.
I’m hoping my brother is feeling strong as I plan to excavate and reinstall several hundred pounds of rock wall during his scheduled fall visit. It can’t be all firewood fun and games.
Leo's desk pt VII........
 |
| Miles's frame |
The front face has only one coat. I was surprised at the coverage too. I'll bet the ranch that I can get away with two coats. A couple of coats of shellac, I'll be able to get this to the Frame it shop by saturday at the latest.
 |
| Leo's desk top |
Just did a quick flush of the glue joints with the #3. I only did this side which will be the face. I'll do the back side when I am ready to get it to final size.
 |
| hmm...... |
Ready to flush/plane all the epoxy on the side rails. All of them were still overfilled, no sunken areas anywhere.
 |
| sigh (blurry pic again) |
This is the biggest epoxy spot and after I got it flushed, a hole popped out. Not a bubble hole and it is visible despite the small size of it. I'll fill it in later.
 |
| lower right corner |
I like the reddish background against the black epoxy.
 |
| done |
All four side rails flushed. Another small hole shook hands with me that I'll have to deal with. Three of the rails are about the same - the 3rd one down from the top - doesn't have a 'circle' but it is what it is.
 |
| drilling the side rails |
Got all the side rails holes drilled. As I was doing the last one a thought occurred to me, maybe I should have waited before drilling the holes. Would they change size before I glued them? I will be finding out that mystery shortly.
 |
| hmm....... |
This was going to be the edge where I chopped the mortises for the slats. I'll be swapping the edges - the other one doesn't have any of these fissures.
 |
| hmm...... |
Tried a new way of doing the mortises. Instead of doing each one at a time, I chiseled the outline of each one first. Then I started chopping the mortises one at a time.
 |
| one done, 5 to go |
Did a better job chopping this set. I only had to glue one chip and one split.
 |
| back rails done |
I got the 2nd one done five minutes before quitting time.
 |
| oops |
Both of the back rails are the same size. All the top rails are 5 1/2" wide and the bottom ones are all 4 1/4". I ripped this one to match the other bottom rails.
accidental woodworker
Making the Paul Sellers' Marking Gauge Part III
Making the Gauge Stock

Episode three is out on Woodworking Masterclasses if you want to go that route too, but all of the details are below here as well for those who like text and drawings. Here is the link. https://woodworkingmasterclasses.com/dashboard/
The stock of the gauge might seem complicated by sight, but systematic layout and steps for working brings the whole into sharp focus in the process of doing it. Keep the stock square until you've fully chopped the five-sided centre reception hole and bored through with the side hole into it; this receives the threaded insert and its easier to gauge squareness and perpendicularity from right-angled pieces of wood. This way, the layout and making becomes very mechanical.

A piece about 6" (60mm) by 2 5/8" (67mm) by 1" (25.4mm) will make two gauges. Probably a good start too if you don't have enough gauges and you want/need some practice.
Using the grain orientation as shown to guide you, mark a centre mark in pencil.

Square the line across the centre of the workpiece...

...and then onto the adjacent edge.

We need two parallel work lines running either side of the centreline to establish the position of the short flat side in the five sided hole. I find it best to eyeball this from a digital vernier set to 8mm. It's surprisingly accurate.

Make a mark 30mm in from the edge and square it across to the two lines. This designates the fifth, narrow wall of the five-sided hole to cut to.

We use the intersecting of these two points as reference points to register the adjacent 45º aspect of the hole. Using the combination square on 45º, start laying out two of the four sides.

Now use the actual end of the stem to establish the other two positions.

We must transfer cut lines from one side to the opposite face. Go over the pencil lines with a sharp, pointed knife to create the knifewalls you need.

Keep the square registered for each wall as you go, and use the knife to mark the outer corner of the workpiece for each one.

Square this point onto the adjacent edge using a sharp-pointed pencil.

And now the diagonal from this reference point onto the opposite face. Each of the cut lines will be established this way.
In this blog, I am drilling a pilot hole to take the snail of an auger bit but in the video I did not drill out the waste as it is my least favourite method and is not significantly faster, if at all.

Drill a pilot hole with a small twist drill to guide the subsequent larger hole with an auger bit. This will reduce the risk of splitting with the steep cone part of the screw on the auger bit. It's best to mark the centre point on both sides and drill from the two opposite face sides. You will feel the holes align in the drilling.

Boring out the bulk of the waste with an auger bit is optional, but you can use a 5/8" auger bit or a Forstner bit to bore half way or more through from each side. This may or may not make chopping the interior walls easier.

Chiselling into the knifewalls establishes a perfect start point for subsequent chopping with the chisel. Work from both sides to the halfway point to meet in the centre.

Deepen the recess.

In the video, I showed laying out these outer curves before the hole was chopped through. It's up to you and both will work. With the hole cut through and trimmed, lay out the curves on the outer corners according to the drawing.

I used both the plastic circle template and a pair of compasses to establish the radii guidelines.

These are the various radii that work for this marking gauge stock. You can work to these and then alter them to fit your hand as needed or preferred.

Saw off the bulk of the waste first...

...and then refine to the lines further with the saw rasp...

...the flat file refines the surface to a shine.

Ease the corners with the file, evenly. It will look neater and the new tool will feel more comfortable in use.

You must now lay out for boring the hole through the edge. This is the edge with the narrow parallel side 30mm in from the edge.

It's best to drill a pilot hole with a small bit. Make sure that the hole is small enough to take the auger bit threads if boring by brace and bit. This pilot hole is critical, as the conical shape of the auger bit is steep and can split the wood because of its steepness.

This bit size matches the rim of my inserts perfectly. They will vary. The brace with the 7/16" bit takes a single rotation to establish the exact depth I want once the two outer spurs reach the wood surface. It might be different for your inserts, so try out first and choose accordingly. It's good to know that the threads on the auger bit snail control the depth of cut.

The rim of the insert fits neatly.

Now step drill down through the same centrepoint with an appropriate sized bit that allows the threads of the insert to bite into the wall of the hole. In my case, it is 5/16".

I use wax polish to lubricate the threads of my insert. This makes inserting smoother with less resistance.

The Allen key (hex-wrench USA) sends the insert home and seats the rim nicely level.

The knurled screw is threaded in almost all the way.

I cut a 1/4" (6mm) bolt shank to sit between the end of the screw and the brass in the stem. This distributes the pressure evenly on the brass plate.

By drilling a recess 3/16" (4mm) deep, and placing the steel insert into the recess, I can file the faces of the steel.

The knurled screw seats nicely near to the stock, with enough space to lock the stem to the stock.

I applied two coats of hard wax oil finish after light sanding to 240-grit.

The end result is so pleasing. Now I am working on an adjustable mortise gauge version, so I will let you know.
The Return of The Lost Scrolls of Handwork
Journeyman’s Journal has always been the ongoing record of work at the bench, notes, reflections, and lessons gathered over more than thirty years of hand tool woodworking, and still continuing.
Separate to this, Wooden Wares Handwork continues as an ongoing venture. That side of the work is focused on making, and stands on its own. It is no longer connected to the blog.
Some of you will remember The Lost Scrolls of Handwork. That name belonged to a magazine we ran alongside the work, carrying forward the same philosophy: sharing knowledge gained over time spent at the bench. The magazine eventually came to an end, but the idea behind it never disappeared.
Now, The Lost Scrolls of Handwork returns, not as a magazine, but as a broader extension of the work at the bench. It will be used as the title for future books and podcast material, while the main blog continues under Journeyman’s Journal.
The two are connected, but distinct:
- Journeyman’s Journal remains the ongoing written record of woodworking.
- The Lost Scrolls of Handwork becomes the written form for books, and the voice for the podcast.
The podcast
Alongside the written journal, I am introducing a podcast. The plan is to release episodes monthly, though it may settle into a two-month rhythm depending on time and the demands of my own work.
It will follow the same principles as everything else here: woodworking by hand, the thinking behind it, and what is learned at the bench. Available in two forms, on YouTube as video, and on Spotify as audio only, which can be listened to anywhere without needing to watch. Something you can have playing while you’re in the workshop or driving your car.
The most challenging part so far has been the realistic 3D lip-sync work. The available tools tend to be expensive, and the results only marginally better than free alternatives. That part is still being refined.
The first introduction is live
An introduction to the podcast has already been released and can be found here: https://open.spotify.com/episode/036WosfvejMFAeRH4x5Pbz?si=0bUSZZafQnWwc7T7eNCB6A
This is a continuation rather than a restart. The names may shift slightly in how they are used, but the intent remains the same: to record what is learned through time at the bench, and to pass that on in a way that stays close to the work itself.
Here is a video I just uploaded to youtube. This is a short introduction to the podcase using a realistic 3d animation. Hope you guys like it and support the channel.
Don't Forget to Tip Your Guide
 Olive Bread from Vesuvio
One of my great joys at Tools for Working Wood is steering our visitors to great local places, whether great Mexican food in Sunset Park or worthwhile museums they might have otherwise missed. In that spirit, let me tell you about some of the food shopping I did with my son over the weekend.
We built up our fortitude for errands with a falafel at one one of my favorite falafel spots, the original Mamoun's on Macdougal Street in Greenwich Village. According to their website, the restaurant, which was founded in 1971, is "the oldest falafel restaurant in New York and one of the first Middle Eastern establishments in the United States." (This isn't exactly true - Mamoun's may be the oldest falafel shop in NYC, but from the late 19th century until its relocation to make way for the Brooklyn-Battery Tunnel and what would later become the World Trade Center site, New York had "Little Syria," a vibrant Middle Eastern neighborhood in downtown Manhattan.)

When we finished my meal, we headed to Pino Prime Meats for some lamb sausage. The shop makes the sausage fresh everyday, and I don't know a better supplier of lamb sausage anywhere. It's great with many things, including a side of robustly spiced pasta. This shop is tiny! There's a single corridor for customers and butchers, and the shop was pretty mobbed. (I generally have been at the shop on Saturdays, and it's always busy on Saturdays.) Just as noteworthy as the quality of the meats: Pino takes cash only. The trend in the past few years was to eliminate cash payments - with sufficient pushback that NYC passed a law mandating that stores are legally required to accept cash if their customers choose that method of paying. Well, no need for that intervention at Pino, which is a traditional store in this and so many other ways. The current family that owns Pino Prime Meats has been operating the store only since 1990, but the butcher shop has been operating the neighborhood (though I am not sure if it's at the current address only) since 1907.

Then it was off to Vesuvio Bakery for a snack, in this case some olive bread. Let me say they do not stint on the olives at this bakery. Vesuvio has a long history in the neighborhood as well. The original bakery was opened in 1920 but closed around 2009 - and then was reopened by a fan who was inspired to renovate the bakery's storefront and restore its operations.
 Raffetto's Fresh Pasta
And then we finally headed to Raffetto's Fresh Pasta on Houston Street. Raffettos too has a storied past: it was founded as M. Raffetto & Bros. in 1906. As the shops website says, In its early years, M. Raffetto & Bros. made three basic products: egg noodles, meat & spinach ravioli (Genoa Style) and, a little later, cheese ravioli (Naples Style). Since refrigeration was the exception more than the norm at the turn of the century, we produced and sold dry egg noodles much more than fresh egg noodles, made with the one roller machine our grandfather bought in 1916 (that machine is still used today). From the 1970s on, the popularity of fresh noodles and having only one machine to roll out the dough made us discontinue making dry noodles. Today, Raffettos produces about 50 different kinds of pasta. We often wonder what Marcello would think about our range of homemade creations that include pumpkin ravioli, black squid ink linguine and rosemary pappardelle. Regardless of whether it is a classic pasta or something a little new and creative, our family still chooses to follow the same principles that has guided our familys philosophy since 1906: use the best quality ingredients to produce the best quality pasta.
We bought some ravioli for dinner later in the week and headed home, snacking on the olive bread.
Probably the best part about dealing with these stores is that they're all owned, run, staffed by people I can identify with. They know the product, they know their business. They care. They make the best products they can. They engage with customers. Food in these stores isn't a commodity designed for easy barcode scanning. It's a craft and making a living at any craft is an achievement. Fewer people on any given day need a wonderful hand made chair than some sausages, but the principle is the same and needs to be encouraged.
As I was enjoying the olive bread reflecting upon my shopping experience, the thought occurred to me that this is what craft is about. Almost anyone can make olive bread, but actually making the bread, and doing so in such a way that the bread is stuffed with olives, and sold to a sufficiently appreciative customer base to pay enough to make the profit that enables you to pay the rent and the staff - well, that is about mastery of craft. Same with making lamb sausage every day, at a price that is in the sweet spot of affordable-profitable, etc.
My enjoyment of woodworking is really about the enjoyment of craft, appreciating the skill it takes to make something. And respecting the lifetime of skill it takes to master a craft effectively.
Leo's desk pt VI.........
 |
| 1/8" router bit |
It is solid carbide with a 3/4" long cutting length. I like how easy it was to make the slots for the table clips with my plunge router. Hopefully I'll remember to do it before I glue the rails up.
 |
| hmm...... |
Missed about one inch on the first pour. In my defense it was covered with tape. Filled it in and all the other sunken holes.
 |
| not expected |
If I had known I would have stuffed in cherry shavings before filling them with epoxy. Fingers crossed that the 2nd pour will fill them.
 |
| done |
30 minutes after I filled them, all the holes were over filled. Looking like a win for the home team.
 |
| gluing the top |
The middle and right board are carved in stone. The far left board is one of two that I will marry to them.
 |
| still working |
I worked through all the ways I could use these two left boards and it took a while to make up my mind. There is no way I could get a color/grain match with the other two. I started by sawing about an inch off of the two right boards. I did that so that the third board would be wider than 6". I didn't like the look of two 11" inch boards with a small 5" wide board.
 |
| two boards |
Dry clamped the first two boards together. I had a nice, tight joint line from R to L. It came together with minimal clamp pressure.
 |
| dry clamp run |
I had thought about using dowels on this glue up - 3 in each board. Didn't need them as the boards were easy to align within a frog hair or two.
I smiled looking at this because it brought back a memory. When I first started woodworking I couldn't glue up stock to get wide boards. I would limit myself to making things that didn't need anything wider than a 1x12. I've come a long way in the past 51 years.
 |
| hmm..... |
One clamp and everything is still together. The ends didn't shift up/down and the joint lines were still tight. The glue up went off without a hitch. One end had the ends shift by with the glue and I had to put a clamp on them to flush it.
 |
| nice touch |
This doo da lets you keep going with the doweling jig. You insert this 1/4" aluminum pin in the last hole drilled to keep drilling holes. I also have one that goes out 12'(?).
 |
| eight holes |
This is one of the back rails. Drilled 5 holes, put the pin in, and drilled 3 more holes.
 |
| Miles's frame |
He wanted red and this was the brightest red I found at the paint store. Got good coverage with one coat. I'll get a second one today and start on the front in the AM.
 |
| mortise layout |
Laying out the mortises for the slats. I'm sticking with the same number that I did on Miles's desk. I don't want any blaring differences between the grandson's desks.
 |
| story stick |
I couldn't layout the mortises for the side rails (epoxy is still setting up). I will use this to lay them out once the epoxy is dry.
 |
| started |
Got the outline of all the mortises chiseled and the center one outlined. This is where I stopped for the day. I need to sharpen the 3/8" & 5/8" chisels. I didn't feel like doing that now so I'll pick it back up in the AM.
accidental woodworker
Itty Bitty Carving, or “My 1mm Veiner Saves The Day”
One of Mrs. Barn’s favorite things is the annual visit from “Eddie the Spoon Guy” at the craft market during our local celebration of all things pertaining to maple syrup. She stocks up on a multitude of wooden spoons, spatulas and similar items to use and to give as gifts throughout the year. This year Eddie had some teensy spoons that she thought would be perfect as gifts for each of the grandsons.
Once she had them home she asked, “Wouldn’t it be nice to have their names carved into the handles?” What could I say, other than, “Of course.”

Sorry, just can’t seem to get this image to load horizontally.
Givin the diminutive size of the workpieces my first task was to find a good work holding system, something that would hold these itty bitty pieces solidly yet allow me to have access to the surfaces to be worked. Fortunately, I have a jeweler’s bench top rotating vise with movable jaws, allowing a close fit for the round a tapered handles. To maximize the grip and eliminate the risk of damage I used abrasive pads to cushion the jaws. That solution worked perfectly, padding the wood yet gabbing the spoons hard and steady.
Then the question was, “What do I use for the incising?” Using a chip carving knife was not within my ken as the pieces were like carving names on a round pencil. In other words, beyond my confident skill set. I thought about using one of my engraving burins or a tiny chasing tool, but practice with them was not encouraging. Looking through my box of carving tools I came across a 1mm veiner from a project I cannot even remember now. That was just the ticket.

The end result was great. I won’t show that as I strive to protect my loved ones from the netbots.
Leo's desk pt V.........
Found some sinus medicine that almost cleared my snot locker. 95% better than what it was without it. Got a good night's sleep and only got up twice for the toilet trots. I still had to empty it through out the day but less frequently and with a lot less snot.
 |
| it is full |
The house shit can holds two boxes of snot rags. This is after 2 1/2 days.
 |
| happy face |
Both of the leg blanks are laying flat and straight on each other. Happy that I don't have to deal with any stupid wood tricks.
 |
| reference edge |
The plan was too establish one face and one long edge as references. Then I would run them through the lunch box planer to thickness. It wasn't necessary at this point but I like planing cherry.
 |
| hmm...... |
Used my catch all bench chisel to remove all the nicked blade ridges on the faces of the two boards.
 |
| last one |
Made the long edge square to the face I planed a couple of days ago.
 |
| moving along |
Got the leg blanks planed to thickness - not quite 1 7/8" thick. Next batter was sawing the legs out of them.
 |
| hmm...... |
The tablesaw was struggling to rip out the legs. I did get one done with the blade high enough to rip it out. All the subsequent legs I ripped out half way from one face, flipped the boards 180, and ripped the leg off. I had to go slow because the saw bogged if I pushed too fast.
 |
| drawer guides |
These are all that are left over. I think I can get all four side drawer guides from them.
 |
| two extras |
I ripped out two legs first, one each from each outside edge. I ripped another leg from the middle portion left. The four faces aren't straight grained but swirling with some cathedrals. I got 3 legs out of each blank.
 |
| the four desk legs |
This leg on the left only has straight grain running vertically on three faces. This one has some cathedrals and I'll put this at the back. The other three legs all have straight grain running vertically.
 |
| time to relax |
When I sawed out the legs only one of them curled a bit. It didn't pinch the blade and the legs are over length by about 6-8". I can saw off the bit of bow. I'll let these hang out on the table for a few days to make sure they don't do any stupid wood tricks. After that I will run them through the lunch box planer to square them up. I think I can get them at a minimum of 1 3/4" square.
 |
| rail stock |
Next up on the A list was sizing the rails to width and length. The top rails will be 5 1/2" wide and 31" long.
 |
| finally |
See the rough spot left here? It was originally almost 12" long and it was a valley. It took me 10 minutes to plane this edge straight and flat. It also made the width of the board a few frog hairs less than 5 1/2". Didn't know that yet.
 |
| side rail |
Rather then work around the knot holes and pockets, I am leaving them and I'm going to fill them with black dyed epoxy.
 |
| hmm...... |
I used putty to fill in a couple of defects in the splines. With shellac they will pop out and I don't like that. So I asked daughter #2 to ask Miles what color he wanted me to paint his frame. I'll find out tonight what the color will be. Amanda said it will probably be red.
 |
| side rails |
The defects are more prominent on one one side than the opposite one. At least both will have something visual to look at.
 |
| helping hand |
I'm trying to avoid the me-steak I made with Miles desk twice or was it three times? Anyways I laid the rails out as they will be and marked the edge with chalk that will get the mortises for the slats.
 |
| 2nd bite |
I had to remove the screws on the front to rip it to the new width. When I put the screw back in, it cracked the block again. Glued and clamped again and set it aside to cook. Sigh. If the screw cracks it again I'll have to replace it somehow.
 |
| I like |
Used the Dowel Max to check drilling holes in one of the side rails. I love the spacing of the holes, it almost perfect on the two outside ones.
 |
| hmm....... |
Filled in the defects with black dyed epoxy. It is going to need a 2nd round because a couple of them are sinking. Some of them were a surprise because they didn't look deep enough to suck in that much epoxy. I'll do round 2 in the AM.
 |
| the legs |
I was a roll so I planed a reference face on two edges. That is all I need to run through them through the lunchbox planer. I might be getting ahead of myself but I was feeling good about the legs behaving.
 |
| not working |
I need a 1/4" drill collar to set the depth for the doweling jig but none of these fit the 1/4" drill.
 |
| this explains a lot |
I had bought these a bazillion years ago and I remember having the same problem - they didn't fit the drill bit. It didn't occur to me then that they weren't imperial. I checked three of the collars with my metric drill bits and they fit. Big sigh. I'll check Amazon and get some imperial ones on order.
Had a good day. Got in a full AM & PM session and I made a serious dent in Leo's desk. Fingers crossed that tomorrow will be as productive too.
accidental woodworker
definitely sick.......
Spent another fitful night trying to sleep. Besides getting up for two toilet trot races, I got 7 times total to blow my nose. There was absolutely no position where I could sleep for more than an hour or so. I hope this blows over quickly because it sucks pond scum feeling like this.
 |
| I was hopeful |
Took the clamps off and nothing moved or groaned. All the miters were still tight and passed the wiggle test. Felt good about the frame here.
 |
| last test piece |
Trying to set this jig makes feel as smart as a box of pointy rocks. I thought I had it set correctly - I had measured from the plywood to saw blade - but it took me 7 attempts before I got it.
 |
| miters still suck |
Two of the miters let go while putting the splines in them. I think the other two stayed together only because I already had splines in them. I had to use bar clamps to close up all the miters.
 |
| cleaning up the back frame parts |
Working in the shop today was difficult. I had the desire to be there but with the snot locker jammed full it was a chore working. I spent the AM session working in spurts which kind of worked in my favor. The frame shook hands with me several times before I killed the lights for the day.
 |
| 2nd one |
I had to replace the first spline because it was too thin. There were gaps on both sides of it. Without glue I was able to push the splines and seat them fully by hand. With glue, two of them locked solid before being fully seated. So I made the last two splines looser by sanding them. One filled/swelled the groove with glue but this one didn't.
 |
| sigh |
Screwed up on the length of these, again. I've done this twice before but I thought I was done having that brain fart. It ain't so boys and girls.
 |
| new set |
An hour later I made a new set for the back frame. I made the length a 1/4" over to allow for planing the miters and fitting.
 |
| almost done |
Nailed and glued the back frame, set the nails, and filled them with putty. Thinking of using shellac on this frame. But if I change my mind, I'll paint it black.
 |
| hmm....... |
I am leaving the frame as is. No chamfers on the inside and outside edges. I'll get this to Maria on tuesday so I can get it done as quick as possible and get a pic of it to Miles.
Hoping to feel better so I can get started on Leo's desk. I want to get it done ASAP. Been thinking of renting a U haul to bring the things I made for Amanda to her. Waiting in the boneyard are Leo's dresser, Miles' desk, the small cherry table, and the bookcase. Leo's desk will be joining it in a couple of weeks. My wife can only bring one at time when she visits. Depends on the cost which is probably cheaper than having it shipped.
accidental woodworker
New Substack - Building a Guitar Without Instructions
Check out my latest Substack post!
New steel string acoustic guitars in progress, will be available for sale by the beginning of summer!
Stayed tuned for updates!


Leo's desk......
Starting feeling like crap yesterday afternoon. I couldn't sleep last night for more then an hour. My snot locker was stuffed full and I couldn't breathe with the CPAP machine lying down on my side. I spent a fitful night sleeping propped up against the headboard. Didn't feel much better in the AM.
 |
| broken dog |
I lost the doo hickey at the top of the dog. Found this on the deck when I came to the shop in the AM. I would have just made a new one but as usual I couldn't find something. The something I was searching for was the bullet catch on the side of this dog. So instead of a replacement dog, I glued a new doo hickey on at the top.
 |
| checking the leg stock |
Both boards behaved themselves over night. They looked to be still flat and straight. Neither one grew a hump back too. Cleaned one short edge on both boards. I'll make them 90 before I run them through the lunch box planer.
 |
| happy face on |
Both boards passed the flat test with flying colors.
 |
| both for $6 and change |
I couldn't resist the miniature bin. I like that it is clear so I can see what I have in it. The 5gal bucket was a lot cheaper than I expected. Lowes even had pink buckets for the ladies.
 |
| pic frame coming |
I sent a pic of the frame I made for Leo's drawing and he remembered doing it. I didn't want Miles's to feel left out so I'm making a frame for a pic he sent me before my CT biopsy.
 |
| done |
After I got back from Lowes I finished the fitting the doo hickey on the dog. The dog is maple and the doo hickey is too. It keeps the dog from falling through the dog hole in the bench.
 |
| flushed the top |
I still have the original metal dogs from when I built this desk. I switched to wooden dogs the last time I nicked a iron on them. I haven't noticed any difference in gripping power between the metal and wooden dogs.
 |
| shooting the miters |
I'm making Miles's frame the same size as Leo's but Miles's is 3/4" thick. I didn't have any 1/2" thick stock but I don't like making the exact same thing for the grandsons.
 |
| sigh |
Gave up on this again. The slip nuts were nice with adjusting but I couldn't get all four miters closed and gap free.
 |
| hmm..... |
And this slip nut wouldn't tighten, as it got close it slipped. Go figure on that. I switched it with another one and the same thing. I didn't feel like playing with it to find what went south. I won't be playing with this clamping method for the foreseeable future.
 |
| nope |
I was able to get 2 then of the 3 miters to close up tight. I fiddled and faddled with it and then gave up. I went back to the miter shooting board and touched up the miters again. That didn't improve it and one miter was still open a frog hair.
 |
| sigh |
I was expecting this to be the winner. I even tried sweetening the miter heels with a block plane. It worked for one but with the 2nd one I started chasing my tail around the frame.
 |
| this surprised me |
This is the first time I can remember all four miters closing up tight with these miter clamp doo hickeys. I took it apart and repeated it with the same results. Decided to glue it up with these. If this hadn't worked I was going to try my metal band clamp.
 |
| success |
Clamping this up wiped me out. I didn't feel winded or tired, just spent. Like I had nothing left to give. I think I'm coming down with a spring cold because my snot locker fills up quicker than I can empty it.
Didn't go back to the shop for a PM session. Instead I sat at my desk and watched Unforgettable on Amazon prime.
accidental woodworker
New Model Mandolin: 4
The body of the mandolin is now together, so what’s next? In this video, I look at routing the rebate for the purflings and bindings. The purflings take quite a while to fit as there are tricky mitres to cut and the bindings (made from walnut) need to be bent on the bending iron to fit exactly. All good fun! Oh, and a bit about the fretboard too!
Cheers Gary
Making a Potting Bench
This is a project I've thought about for a long time. We don't do a whole lot of gardening here at the humble abode, but when we do get a new plant it would be nice not to have to re-pot it on the ground or at the kitchen sink.
 |
| The completed project |
It started with an internet search for some ideas and then later a Sketchup drawing.
 |
| Sketchup drawing |
I did end up changing a couple things from the drawing, most notably I didn't use the shelf supports that are shown with the upper two shelves.
This project is far from "fine woodworking". The lumber is just common pine 1x4s, with 1x6s for the upper shelves. None of the boards was straight and there were lots of knots, but I wasn't looking for anything more.
 |
| 18 1x4s, each 8' long |
The construction was fairly simple. The 36" front legs and 64" rear legs are each made of two lengths of 1x4, glued together at right angles. I planed the edge on one piece, but did not bother planing the face of the mating piece. The two main platforms, one at 8" off the ground, the other at 36", were basically boxes glued and pocket-hole screwed together. Each was 20" x 47 1/2". I added slats that were supported by a piece that was glued and screwed to the inside of the long sides of these boxes.
 |
| The two "boxes" roughed out and screwed together |
 |
| I got to pull out the miter box to cut the 24 slats. There's a board clamped upright in the end vise acting as a stop for repeat cuts. |
 |
| Here, I'm checking the fit of slats in one of the boxes |
 |
| I got to use a variety of hand tools for screw holes and screws |
 |
| Attaching a slat to the support piece |
The gap between slats was 3/8". Twelve fit into each box, with the first and last slat made less wide to fit the space and leave a 1/4" gap at the end.
To support the boxes on the legs, I glued and screwed small blocks to the inside of the legs. The boxes rest on those blocks and are later screwed to the legs.
 |
| Starting to come together. Here it is dry-clamped. |
I fit the two upper shelves similarly with blocks glued and screwed to the inside of the back legs. I cut those shelves for a good fit between the legs and they are also pocket-hole screwed to the legs.
 |
| View from underneath an upper shelf. You can see the support block and also the pocket screws from shelf to leg if you look closely. |
The back edges of the upper shelves were planed straight so that I could glue on a strip to keep things from falling off the back of the shelf. Those pieces were glued to the back edge of the shelf and also pocket-hole screwed to the legs.
 |
| Back view showing the strips glued to the upper shelves and pocket-hole screwed to the legs |
I thought I would glue and screw the main boxes to the legs, but after just screwing them together without glue and feeling how solid it was, I decided the glue was unnecessary. This will allow me to disassemble it later if the need ever arises.
For the moment, I'm thinking there will be no finish applied. It will reside under a balcony and will rarely, if ever, get wet. I might change that decision later. Maybe BLO or a poly on the main work surface to make it easier to clean off the dirt and cuttings. Oh yeah, I might still add a shelf just below the right side of the main work surface. The shelf would hold a plastic bin to catch dirt that falls between slats.
That's it. A rough project, but I like the way it looks. And it should make it better for us to do some gardening work.
Leo's desk pt III(?).......
Made the trip to Highlands today and now I'm thinking maybe I should have waited a few more days. A lot of the cherry shorts were rough sawn while last month when I got wood for Miles's desk the cherry shorts bin was stuffed full with S4S. Not so today. But I still managed to get what I needed for his desk. Albeit it is going to take more time to prep it.
 |
| rough sawn 8/4 cherry |
There was no S4S 8/4 cherry to be had. There also wasn't any wide rough sawn 8/4 cherry (for four legs). I picked these two out to get the legs from.
 |
| 4/4 cherry |
The S2S 5/4 and 4/4 cheery bins were full. The two stacks on the right here are 4/4. The wide boards are for the miniature cherry chest that is coming after Leo's desk. The thinner width 4/4 boards are for the rails. A lot more than what I need but the extras are for the cherry chest.
 |
| 5/4 cherry |
I bought two 10 foot boards for the top and had them sawn in half. I only need 3 with one orphan board.
 |
| hmm..... |
Both of the 8/4 cherry boards are cupped. I am going to flatten one face on both first to allow them relax for a few days. I always start by knocking down the hump side of the board. I will flatten and straighten that face first and then ran them through the lunchbox planer.
 |
| legs? |
The plan is to get the legs from each outside edge. They are mostly straight grain which is what I want for the legs.
 |
| hmm....... |
Might have some trouble with this board. The outside edge straight grain on the right is a little thin. I'll put these two legs at the back.
 |
| comparison |
Cherry is a pretty wood off the plane. The right board is almost there. It has a wee bit of twist and I still need to smooth it out from the #6 plane.
 |
| still some twist |
Along with the twist there was still a hump. I traversed this board at an 45° and a 90° several times but it was slow going.
 |
| hmm...... |
I like this plane because it works equally well pushing or pulling it. Here I pulled over an area that I identified as high. It took a lot of back and forth before I got this one flat and straight end to end.
 |
| 2nd board |
Wash, rinse, and repeat. Of course this one had a hissy fit and went into camera shy mode.
 |
| no twist |
After the first 4 planing runs over the board I checked it for twist. There was none and it stayed that way until I got it flat and straight.
 |
| sigh |
This board was a pain to flatten. The hump refused to cooperate and go away. I attacked it with 5 different planes but it was as stubborn as a mule. The first board took about 45 minutes and I was already well past that with this board.
 |
| wow |
Time flies when you are having fun. I stayed until I got the 2nd board done. I wanted to have both of them relaxing over night.
 |
| LN #4 |
This plane got a work out on the 2nd board. It was only plane that seemed to be knocking the hump flat. I spent a lot of time pulling the plane vice pushing it.
 |
| finally |
This check is the last one I do - checking it for flat. I grab the far end of the straight edge and move it left/right and watch for where it pivots at the opposite end. For the longest time it was pivoting about the 1/2 way point - still had a hump.
Here the straight edge pivoted around the pencil mark from this diagonal and the other diagonal. That proves the board is flat. I got this tidbit from watching Keith Rucker at the vintage machinery website. Anyways it took a lot of time and calories before this board got flat and straight.
 |
| final check |
Still twist free which surprised me. With all the back and forth I did planing the hump flat I was expecting some twist to shake hands with me.
 |
| before I left the shop |
The left and middle boards are 11" wide and the top needs to be about 26-27 inches wide. I got two boards with a partially open knot/gum pocket so I can match Miles's desk. The far right board is 10 inches wide and I only need about 5" of that one. Not sold on this but I won't probably get to the table top until next week, maybe monday.
accidental woodworker
take it easy day .........
The foot was a wee bit sore when I rolled out of the rack this AM but it was so much better feeling than yesterday. No problems walking or standing but I took it easy nonetheless. I wandered up down to the shop several times but I didn't exert myself. I think the most strenuous thing I did all day was to sweep the deck in the shop.
 |
| sigh |
I can't bring myself to shitcan these cherry scraps. Went searching the shop for something to put them into and nada. I'll have to make a Lowes run and buy a 5 gallon bucket.
 |
| hmm........ |
Thinking about doweling Leo's desk. I read the literature again on the Dowel Max and tests showed that doweled joints were stronger than mortise and tenon. I had no problems doweling the small table. I don't anticipate any headaches with the desk. I checked and I can get 7 dowels on the ends of the top rails.
 |
| only one |
I put 2 1/4" long screws in the top - one at each block. On the bottom I put one screw at each end and two in the middle block. On the bottom I don't have to allow slots for the table top clips.
 |
| ouch |
The screw I put in at the top split the end block. It wasn't a complete break and it closed up nicely when I glued it. Instead of putting a 2 1/4" screw back into it, I put a 2" screw. It held and the block didn't split, break, or crack again.
 |
| youngest grandson is an artist |
I am going to hang this one in the shop somewhere. I will have to do some rearranging but I'll find a hole for it.
 |
| for my wife |
My wife is fascinated with old township/district maps from the late 1700's to the middle 1850's.
 |
| proof |
This is one of five frames that I made for my wife. All of them are still together. All the miters are tight still and zero evidence that they are planning to go south.
 |
| Union #3 |
Because I am brain dead I pissed away a couple of hours trying to get this spit a shaving that was the full width of the iron. After the umpteenth time putting it back together I noticed that when I screwed down the right screw in the frog, it titled backwards pushing the bottom edge at the mouth up.
Screwing down the left screw wasn't the same - no tilting or movement. With that one screwed down first the right still cause movement in the frog. But it wasn't as bad as when the right one was done first.
 |
| unbelievable |
I put the plane together for the last time intending to put it on a shelf and forgetting it. However, I tried to make RML shavings one last time. I couldn't believe what I saw. The last time I had made RML shavings the lever adjust was fully over to the left. Today it is full over to the right. ????????
 |
| RML shavings |
All three are the same thickness but the right one isn't as long as the other two. I made two more runs and I got RML shavings that were all about the same. The right ones were a wee bit more wispy than the RM ones.
I'm done with plane. Now that it is together I put it on top of my shop cabinets to gather dust.
accidental woodworker
New Videos On My YouTube Channel!
Hi, Everyone!
I just added two new shorts to my YouTube Channel, that feature the wonderful guitarist, Juri Yun.
I attended the 2025 Denver Guitar Festival as a vendor and Mr. Yun stopped by my table to try out the guitars I brought to the festival and he was very impressed with my work!
Go to my YouTube Channel page on this blog to see videos of other great guitarists playing my guitars!

Melancholia
In my never-ending quest to organize and reorganize the barn, I often find myself in a Christmas moment; “Wow, I forgot that I had this!” or more likely, “Oh, so that’s where I put this.” Four floors of tools, books, and supplies to sort will do that to you.

I recently had an instance that was and was not one of these times. I found myself relocating a chair frame I commissioned Philippe Lafargue to make for me probably more than three decades ago. It served for so many years as my reading and writing chair at S.I. and for some time at the barn.
Being a classically trained chairmaker at Ecole Boulle this project was like falling off a log for Philippe since virtually all of his fabrication work was curvy fancy French chairs. This severe boxy form was no challenge for him.
He was there long before the beginning of the Roubo Project, he translated the Table of Contents for me around 1987 when he was a post-graduate Fellow with me in the Furniture Conservation Studio. That ToC burned brightly for me, and when Michele Pagan and I started the project for real more than a decade later we knew that Philippe had to be part of it. Philippe was a classically trained 18th Century Ecole Boulle craftsman, where he completed the full four-year curriculum, simultaneously conversant in 18th craft technique and lexicon, a native Francophone and fully conversant in vernacular and academic English.
For the years of the project until his untimely death a few months ago (somewhat unnerving to us since his fatal illness was the same one that took Mel Wachowiak from me a decade earlier) his contribution was a vital connection to reality.
I am now diligently searching for someone to take up his portfolio. If you know anyone who fits the job description above, let me know. Really, let me know.

This was the last time Philippe and I were together in person, at the premier of the Deluxe version of Roubo on Marquetry during the 2013 Woodworking in America shindig. He eventually wound up back in France, fleeing his domestic life here in the States.
partial work day.......
I didn't sleep that well last night. My right foot was sore and achy. It woke me up a couple of times to shake hands with me. When I got up the foot really said hello to me. It hurt like hell to walk and I limped for the entire day. The pain lessened a little but it flared up off/on all day. Something is not right with it and I'll be calling the foot doc for an appointment.
I thought of going to Highlands today because it turned sunny before lunch but I didn't. I'll be going on friday which is supposed to be partly sunny/cloudy here and sunny in New Hampshire.
Getting ready for that trip I filled up the pickup and I was less then a second from having an involuntary bowel movement. I had gotten gas less then two weeks ago for $3 and change a gallon. Today the same gas was $4.17 gallon. The trip to NH is going to be expensive I have fill up before I leave (done), fill up again before I leave NH, and one last time after I get home. Ouch - it was $45.87 to fill up from a 1/2 tank today.
 |
| forgot this |
This pen box was the third thing I worked on yesterday but I forgot to include it in that post. It is done - four coats on the inside and outside. Tomorrow I'll rub it down with wax and ship it off to my sister.
 |
| glamour pic |
Plain and simple with little adornment or embellishment. Just the way I like it.
 |
| done |
Don't know what I'm going to do with all bookshelves I made in the past couple of months. I have 12 of them - one is being used (my shop books), two are going with Miles's and Leo's desks, and one to Maria tomorrow. The other eight are waiting adoption.
 |
| rejects |
Worked on sawing the slats to width and thickness. These are the rejects from thicknessing. I added 8 more when I sawed the slats to width. I had to do this in batches because standing wasn't that comfortable. Surprisingly going up and down the stairs was easier than walking and standing.
 |
| plenty |
I might have to make a new 2" wide slat. When I measured it after cleaning it up with the 5 1/2 it was dead on 3/8" thick. All the narrow slats are 1/64 more than 3/8". I'll check the fit of it after I chop the first narrow slat mortise.
 |
| the drawer runners |
Went to Lowes to get some 1/2" maple for the drawer runners but nada. What they for sale was all twisted, cupped, or bowed. Bought some New Zealand pine instead. I'll let this relax in the shop until I make the drawers.
 |
| more drawer stock |
The prefinished plywood will give up the two drawer bottoms. I have enough poplar to make one drawer. I have my wood list for Highlands and it includes two six foot 1/2" poplar boards.
I might be taking it easy tomorrow too. Maybe the walk I went on yesterday is the cause of my current foot headaches. I could check up on my reading because the pile isn't shrinking at all.
accidental woodworker
Keeping wood in place to work on it

Spear and Jackson Concerning Handsaws
I have read many books on saw sharpening and watched various videos on the subject, and most of them tend to repeat the same information. However, the Spear & Jackson handbook goes that little extra mile by elaborating on certain points. For example, when topping (jointing) the teeth, it recommends doing the work in stages: make a pass, file the teeth, then joint again, repeating the process until all the teeth are of uniform height.
Most other books simply state that the teeth should be jointed until they are all the same height. Many of us have likely done exactly that during a restoration, only to become frustrated at how long it takes to shape and sharpen the teeth afterwards. I think Spear & Jackson provided an excellent method that saves a great deal of time and frustration.
I am providing the pages that I felt would be of most interest to you, as the remainder is largely marketing material. The booklet appears to be fairly old; although I could not find a printed date, based on the art style, typography, and layout I would estimate it was produced sometime between the 1930s and 1940s.


