Hand Tool Headlines
The Woodworking Blogs Aggregator
“Glory to God in the highest heaven, and on earth peace to those on whom his favor rests.” - Luke 2:14
Norse Woodsmith Blog Feeds
The New Peter Galbert Workshop
which one is it?........
Still applying the finish to the tool and steam iron boxes. Not done with either one yet. I had a physical therapy appointment and that ate up the entire PM session. My left leg is weak and I don't have the ability to lift up my right leg up while sitting. The PT tech spent over an hour going over some exercises for me to do at home along with 10 pound ankle weights. I have a follow up in 4 weeks and check my progress.
 |
| hmm..... |
When the internet went out last week I had to surf with my cell phone. It was awkward and a PITA to hold it while watching/listening to it. I thought of making this stand to hold it if and when that need may arise again.
This is the 2nd concept for it. The first one consisted of only one upright and I like the look of two. It makes it look sturdier and stronger with twin uprights. There is more shaping etc etc to come but this gives a starting point for it.
While I was playing around with this I came up with another use for it. I could use it to hold a picture frame. I like the 2nd use more than the intended purpose.
 |
| 2nd base choice |
I was thinking of making a thinner width with a slight arc on the front edge. This scrap of cherry is too thin for that but it would work for leaving it as is. And I have two more uprights to left front of it.
 |
| the winner |
I like the defects in this piece of cherry for the base. I still have to play with the placement of the uprights to maximize the defects. So far placing the uprights behind it is at the head of the line.
 |
| shelf |
The uprights are roughly 3/8" thick and the shelf is about 5/16". Working on how to position the shelf into the uprights. Put it in straight and angle the bottom of the uprights? Or angled both the bottom of the uprights and the shelf into the uprights. The uprights will have angled front faces so that will have to be taken into account too for placing the shelf across the two uprights.
I'll start on that in the AM. I am thinking that I will make at least two of them.
accidental woodworker
A Simple Tray Quickly Made

a no title post....
Slow day in the shop - slapping shellac on the tool and iron boxes. Made a lot of trips up and down to shop but I didn't complete either one. Maybe tomorrow. Don't know what is next in the queue. I thought about it but nada. I'm running out of holes to stick the things I make into. Spent a lot time catching up on my reading.
 |
| needed more shellac |
I had enough Everclear to mix up a new batch of shellac. I buy empty quart cans and I usually mix up 2 cups but not today. I should have enough (fingers crossed) to do the two.
 |
| two more to go |
I got four coats on the bottom and one on everything else. I might be done with this by tomorrow if I go back to the shop after dinner.
 |
| not as quick |
I initially was going to leave all the layout lines in pencil but I nixed that. Used alcohol and 120 grit to erase them. Doing the bottom of the lid and the bottom of the toolbox along with the ends first. This won't done today and maybe not even tomorrow.
accidental woodworker
Latest Gabfest (Definitely *not* Woodworking)
Sharpening logic

Toshio Odate toolbox is done!!!!
The toolbox build didn't go smoothly even though the finish line was in view. All the woodworking is done and I'm thinking of a finish for it. Toying with the idea of painting it? However, that is one finish I haven't seen on line with any japanese toolbox. Another idea is BriWax. I used it on a couple of boxes a few years ago and they still looked good when I recently checked them. Or I could default to my favorite - shellac.
 |
| comparison diagonal |
Before I settled on which one to use, I needed to make a 2nd one.
 |
| not as wide |
This diagonal isn't as wide as the first one but it is wide enough to compare the two.
 |
| hmm..... |
This kills it for me. I don't like the toe of the diagonal extending past the side. I am sticking with the first one.
 |
| sigh |
I am not going postal over this but I am upset with why I don't know how I did it. I had four of these saw cuts on two battens and 3 were good and this one is toast.
 |
| sliding locking batten |
Leaving this one long. I have found that a little extra length makes it easier to remove it.
 |
| got lucky |
Replacing the batten and it is the single one. I don't have to plane a compound angle.
 |
| link belt |
The link belt is 5 1/2 ft long which is more than enough for what I need.
 |
| not working 100% |
Made a me-steak with this belt. It is a 1/2" wide and the pulleys are 3/8" wide. The saw made a cut but it was bogging donw and actually stalled on me. I ordered a 3/8" wide one from Amazon and I'll have it saturday. This 1/2" link belt will be used on the bandsaw when I finally get around to swapping out the motors.
 |
| flipped it |
The marks came from the belt being flipped. I turned it inside out so the little fingers faced downward into the pulley. What a difference that made. It sounded better and stronger and the saw cut and didn't bog or stall. It felt stronger and lest resistant rip sawing a couple of scraps. Just pine and I don't know how well it will perform with a hardwood yet.
 |
| smoother |
The edge is not uneven and rough. The wood also seemed to more easily advance through the saw blade. The bonus is the finish on this edge is like night and day to what I have been getting on rip cuts. I wouldn't hesitate to edge glue two boards with this cut. This is also the replacement batten.
 |
| transferring screw holes |
Made a boo boo here that I glad no one was here to see. The screw holes didn't extend all the way through. I didn't catch that tidbit on the first go around trying to transfer the hole pattern on the new batten.
 |
| done |
I don't know for sure but I think I aligned the new and old screw holes with this replacement batten.
 |
| got it right |
I sawed the batten about a 16th longer on each end. Flushed it the blockplane.
 |
| glamour pic #1 |
The interior dimensions are 8 1/4" high, 14" wide, and 27 1/2" long. That is a lot of real estate for tools. No sliding till but that is subject to change with whim or boredom.
 |
| glamour pic #2 |
I think the lid and especially the built in handles make this toolbox special.
 |
| tapered gap |
This is from a supposedly no mortise hinge. This gap causes my OCD to go into overdrive.
 |
| made it better |
I fiddled and faddled with making the notch for the hinges for a bazillion years. I would chisel a wee bit and check the fit/gap. I got the hinges flush with the notches but the gap is still a bit tapered. Cut my losses and accepted it as is.
 |
| it is a locking catch |
I almost made a road trip to ACE to buy one of these. Saved gas and time by checking my bins and finding this one and 2 others.
 |
| for the iron |
1/4" plywood for the iron to sit in. I used the cardboard bottom as the pattern for making this. I sawed it in half to give the iron some wiggle room.
 |
| done |
The box is easy to pick up and put away. Here I had convinced myself that this didn't need a finish. After all it is just a shop box.
 |
| hmm...... |
The lid wouldn't fit both ways. This end had a slight hump in the middle and it wouldn't slide under one of the battens. After 3 swipes and checks the lid would go on either way.
 |
| changed my mind |
Decided to slap on 3 coats of shellac. Before I did that I put wood putty on this end of box which had a couple of teeny gaps. I'll sand and do the shellac tomorrow.
accidental woodworker
Workbench Wednesday – Planing Beam Base I
It’s pretty hard to get much more simple than a Japanese planing beam with its three components: the beam, the base, and the “X” legs. In my case I laminated two 11/4 pieces of vintage cypress (c.1840) for the beam and will use some of the same stock for the legs. But the base took a little more thought.


The answer came last year when my brother and I were processing firewood, in this case cutting up a large white oak that had fallen in a windstorm two years before, having been knocked down by two falling maple trees. It took us the better part of three days to trim and work our way down the twin trunks of the oak after doing the same for the maples. The main trunk was almost stick straight and as we neared the bottom I found by planing beam base. About four feet up from the root mass I cut a bole about 3-1/2 feet in length and about 22 inches in diameter, bark included.

It weighed about 350-400 pounds at that point and we wrestled it onto the truck and set it up on smaller bolts to let it dry for a bit on the ground underneath a piece of EPDM roofing placed over it.


Several months later I managed to get it upright and on to my hand truck and brought it into the barn, setting it horizontally on the floor in the unheated part for further seasoning. By the time I got to working it the weight had dropped perhaps 20-30 pounds but it was still really heavy. Nevertheless I wrangled it out of that corner with my log hook and rolled it out to the central room on the main floor where I began to cleave off the bark and majority of the sap wood with an adz and a slick, reducing the size to about 19″ diameter and reducing the weight further another 20+ pounds.


Afterward, somehow I wrangled it up onto my firewood-cutting cradle without injury, in order to clean up the surface mostly with a drawknife.
Mrs. Barn now has two trash bags of drawknife shavings to use for woodstove fire tending next winter.
In the end I wound up with a sublime section of tree, mostly straight and exceedingly dense white oak.
Stout, brother, stout.
Up next – cutting and fitting to the end of the beam.
Stay tuned.
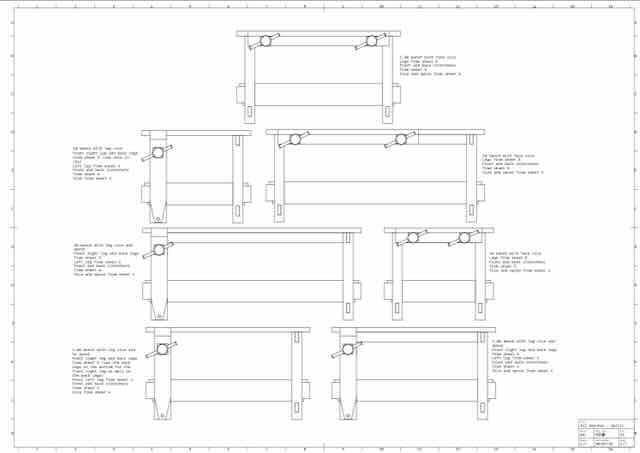
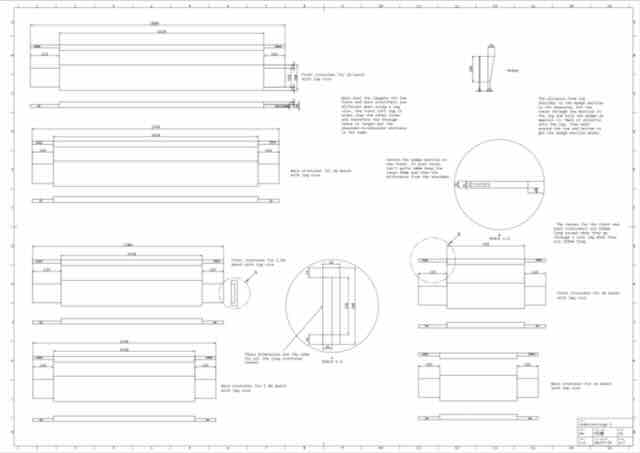
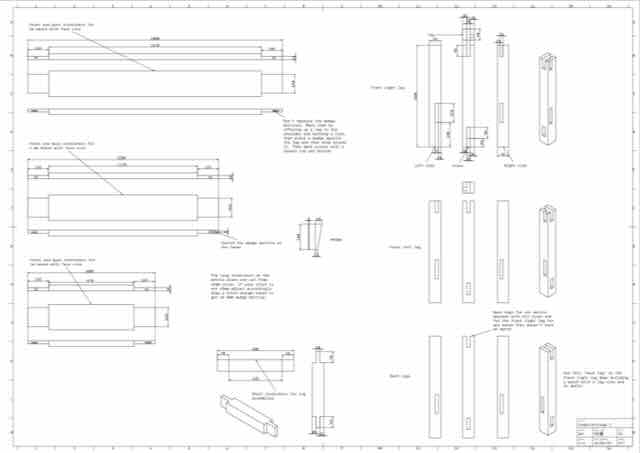
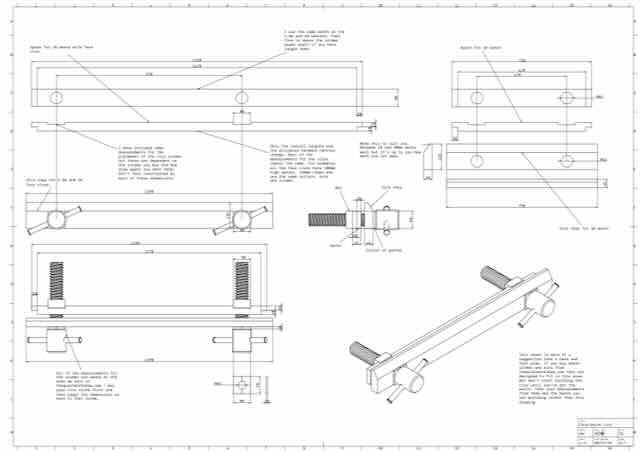
The Quiet Workshop Newsletter: Workbench Plans!

They’re here: Workbench plans!
By popular request (no really!) we’re delighted to announce the publication of our workbench plans.

We’ve drawn plans to build our rock solid, take-apart bench in 1m, 1.5m, 2m, 3 1/2′, 5′ and 7′ lengths with a choice of two different vices. You have the choice of metric or imperial measurements. They’re not just conversions of the measurements we usually work in, they’re designed from the ground up in each system. They’re available in our new shop here.
Each set of plans includes 6 A1 drawings, an A4 drawing and 11 pages of instructions. We’re now working on a series of videos for YouTube to support builders with the plans. The plans are currently available for download. Paper plans will be available very soon.


From the introduction to the instructions:
“Our garage used to be a coffin makers’ workshop; in it there is a 10’ bench that is older than any living woodworker. It is built from whatever material didn’t make the grade for coffins and is hammered together with the random selection of nails they had to hand.
Despite the apparent lack of joinery, low grade materials and optimistic approach to bracing it survived life in a busy professional workshop.
Your bench will be better. It will have better joinery, more carefully selected materials and a better design. And you will put more time and thought into building it. So there’s plenty of room for error. When building it live by the phrase “It’s a workbench, not a piano.” When you’ve finished it don’t point out the errors to friends and family and soon you’ll forget where they are. If you get tear-out when you plane it: don’t worry. If you pull out a lump as you drill a through-tenon: never mind. These scars will blend with the clamp marks, the saw cuts and the glue spots that will appear the moment you start using it. Remember: “It’s a workbench, not a piano.”
The design of this bench has been evolving for many years. We run chairmaking workshops and so have built a lot of benches. With each generation they get a little bit better and this is the result.
These benches are designed for woodworkers who have a small amount of space and time to practice their craft. Space that is probably shared with bicycles, a lawn mower and a jet wash. They need a rock solid platform for planing, sawing and chiselling but have to pack it up and share it with the rest of their lives.”
Don’t forget we’re taking part in Cambridge Open Studios this month so if you want to come and have a look round we’re here between 10am and 5pm on the 12th&13th and 26th&27th July.
As always, if you’re interested in coming on a course and you want to find out more please give us a ring (07778 397328) or drop us an email. You can book all of our courses through the links on our website. If our dates aren’t perfect for you or you want to book for a group give us a call; we can usually work something out.
Enjoy your time in the workshop.
StJohn & Bryony

Toshio Odate toolbox pt VIII.......
Had another VA appointment today and I had two big cysts removed from my back. One cyst had become infected a few months back but the VA ER didn't remove the cyst sack. They had just drained it. I didn't want to go through that pain roller coast ride through hell again so today it was excised. They also removed a 2nd one the doctor had noticed on the initial appointment on my spine. Wouldn't that be fun if it became infected? The small one was about an 3/4" in diameter and the other (on the spine) was about 1" in diameter.
It took the team (3 doctors, two were residents) almost 3 hours to dig the two of them out of me. It is now about 5 hours later and they feel sore especially so sitting at my desk typing up this post. During the short time I spent in the shop in the PM session I hardly was aware of neither one.
 |
| flushing the top and bottom |
Having the top and bottom on will provide rigidity and strength for the sawing off the lid which is in the batter's box.
 |
| separating the lid |
I've come a long way with hand sawing. I can still remember the times where I wouldn't have even considered doing this. I'm not perfect at it but so far I've been able to plane the two parts to fit ok.
 |
| done |
Took about 10 minutes with the #4 and a blockplane to get a flat, decent fit.
 |
| no mortise hinges |
Not my first choice, but they work. As for them being no mortise hinges, I'm on the fence about that claim. I set this aside after I got the hinges on and I will have to find a catch for closing the lid. No handles, I think this is small enough to not need them.
 |
| got lucky |
This chunk popped off when I broke this shutter apart. It broke off cleanly and in one piece. Glued, clamped, and set it aside to cook.
 |
| back to the toolbox |
Planing the width to be a 16th less then the inside width of the toolbox.
 |
| sigh..... |
3 dabs of superglue to temporarily hold this batten on. I initially had set it back from the edge one inch and then sawed it to length. Sawed it too short and the left side end was short of the top batten, but I got lucky - I just moved the fixed batten to 1/2". That gave me a 1/2" under each top end batten which should be sufficient to keep the lid in place. There is no stress or marriage between the lid and the toolbox so a captured 1/2" on each end will keep the lid in place when it is locked in place with the sliding batten.
 |
| #8-1 1/4" spax screws |
I love these screws. They don't need a pilot hole and I can only remember a few times where they split. I had bought a box of a thousand years ago and this is all I have left. I had originally bought them from Highlands but they no longer sell them and I'm having problems finding them on line.
 |
| #8-1 1/4" brass screws |
Not what I wanted (cost 3 times what a spax does) to use but they are all I have. No yellow glue (just the 3 dabs of superglue) to attach the battens. I shouldn't have to replace them but it is something that can be easily done now.
 |
| gap |
Don't like gaps and I popped off the fixed batten and pushed up against the sliding one tight to the top end batten. Marked the lid and reset the fixed batten again with superglue.
 |
| superglue isn't quick acting |
I tried to hold the batten with hand pressure for a few and nada. The glue wouldn't stick. I had to clamp it for about a minute before the superglue decided to play nice.
 |
| it is square |
The end top batten is square (ish) to the sides and the locking battens are square to it. And with no gaps.
 |
| hmm...... |
The lid was fitting a frog hair off of snug after I secured the fixed battens to the lid. I did 2 runs on the top and bottom long edges. That gave me a better fit with a gap that was a few frog hairs wider.
 |
| diagonal brace |
Rough sawed the angles and sweetened the fit with the LN 102. This is hands down my absolute favorite plane. I have its sibling LN 103 too but I hardly ever use it. I use its iron to swap out into the 102 when needed.
 |
| dry fitted |
I'm thinking of making another diagonal that is the same as the plans call for. Just so I can compare these two although I do like the fit and look of this one.
 |
| first 3 digit temp day |
Wow, 100F - 38C. It definitely felt like it along with the humidity even worse than the other day. As an aside if it was 100C it would be 212F which is the point at which water boils. The shop temp rose 2 degrees from 77F to 79F - 26C. Still a lot better than the outside temp.
accidental woodworker
what a day.......
Today was cloudy, rainy, overcast, and sunny. It alternated between all phases for most of the day. It was also humid, the oppressive, wet blanket slapping you in the face humidity. Made for a miserable day. I got nothing done on the toolbox with most of the AM taken up with a doctor's appointment. I'm headed for PT in 3-4 weeks. Made a bunch of road trips of which several were repeats because I forgot things on the previous runs. All and all it was day I hope doesn't repeat again anytime soon.
 |
| sigh |
The plywood I wanted for the top and bottom turned out to be too small. I had made 3 runs to Lowes today, the last one to get a 1/4 sheet of plywood that I forgot on the first two road trips to Lowes. I want the lid and bottom on and set before I saw the lid free.
 |
| oops |
I thought I was snapping a pic of these being done. I was wrong because I had assembled one small and large one wrong.
 |
| left one is toast |
I put the cross bearers on the wrong side. I got lucky as I able to bust it apart. That was not the first time I did this. Things got a wee bit frustrating and it took all the will power I could muster not to beat the snot out these shutters with a 3lb sledge hammer.
The first time I put it back together I did it wrong, again. Then I did it wrong again but on the 3rd attempt I finally got it correct. But boys and girls, I wasn't done because I repeated the same brain fart, left handed, idiotic hiccup with the large shutter.
 |
| ta-da |
It was very easy to confuse myself on this as evident by how many times I had to redo them. I had kept a correctly assembled short one as the pattern for doing the other ones.
 |
| nope |
I got this 'equivalent' belt from an auto parts store and it isn't any where near to being a replacement. This was another wasted road trip as I drove by the store each time I went to Lowes not stopping in to get it.
 |
| the pulley |
I have had this tablesaw for 20 years? I never connected half this pulley and nut falling off being a potential problem. I assumed the rough rip cuts were because the saw blade was dull. Based on how the belt looks and how much of it was shredded on the sawdust shelf, I can see now why the saw cut looked so rough.
 |
| ???? |
When I tightened the two pulley halves together, it was skewed. I tried moving it around to see if the two pulley halves were deliberately tapered but I don't think so after farting aground with this for 1/2 an hour.
 |
| WTF? |
Another hiccup I noticed was the shaft the pulley is on is keyed. But I couldn't find a key if there was one. I sifted through all the sawdust that was under the saw and found nothing. The right half of the pulley is fixed - I couldn't move or dislodge it even one frog hair.
A parts diagram was as clear as mud. And I wasn't even sure that it was the correct one. I bought a link belt off Amazon for $26. I am supposed to get it tomorrow. Fingers crossed that will happen because the current belt ain't looking too healthy anymore.
 |
| cooking |
Finally said No Mas after this. I was getting short tempered and I wasn't able to focus. I almost I sawed the top and bottom short. The little voice told me to take my head of out my arse and double check it. Glad I listened.
I plan on focusing on the finishing the the toolbox tomorrow. Or at least that is at the top of the hit parade list.
accidental woodworker