Hand Tool Headlines
The Woodworking Blogs Aggregator
“Glory to God in the highest heaven, and on earth peace to those on whom his favor rests.” - Luke 2:14
Norse Woodsmith Blog Feeds
Some 18th Century Bodger's Lathe Tools
 The set of five bedgers tools in a box
A few weeks ago I wrote about about the actual gouges and hook tools used for mainstream turning - as opposed to the scraping tools used mostly in ornamental turning on fancy hardwoods.
In that post I mentioned that I was unaware of any current manufacturer that makes hook tools today. Since I wrote that I have found a few specialty makers that make machined, beefier versions of traditional hook tools for turning the inside of a bowl. As it happens, while I have no practical experience with hook tools, I own a set of hook tools from the late 18th century made by Salt, a company based in Birmingham, England. Some of the tools look exactly like the images in the various books, and some are shapes that I've never seen illustrated anywhere.
So far I have been unable to track down any details about Salt. I think the tools themselves are probably a set (two of them are stamped Salt, but the others have no markings on them), the case seems a later addition. All the tools show a fair amount of wear - and are not sharp enough for use. The surface finish suggests that they were pretty rusty before they became a collectible. The handles are longer than average lathe tool handles because typically people would tuck them against their body and under their arm when using. The dealer who sold these tool told me that they were 18th century bodger's, or chairmaker's, tools. I have no idea if he is correct. Until I can track down the maker, I won't know for sure. Similar tools were used by chairmakers at least until before World War II.
 The three hook tools in the kit
Three of the tools are hook tools: a tight hook, a larger hook, and a third straight hook that are all right out of Moxon.
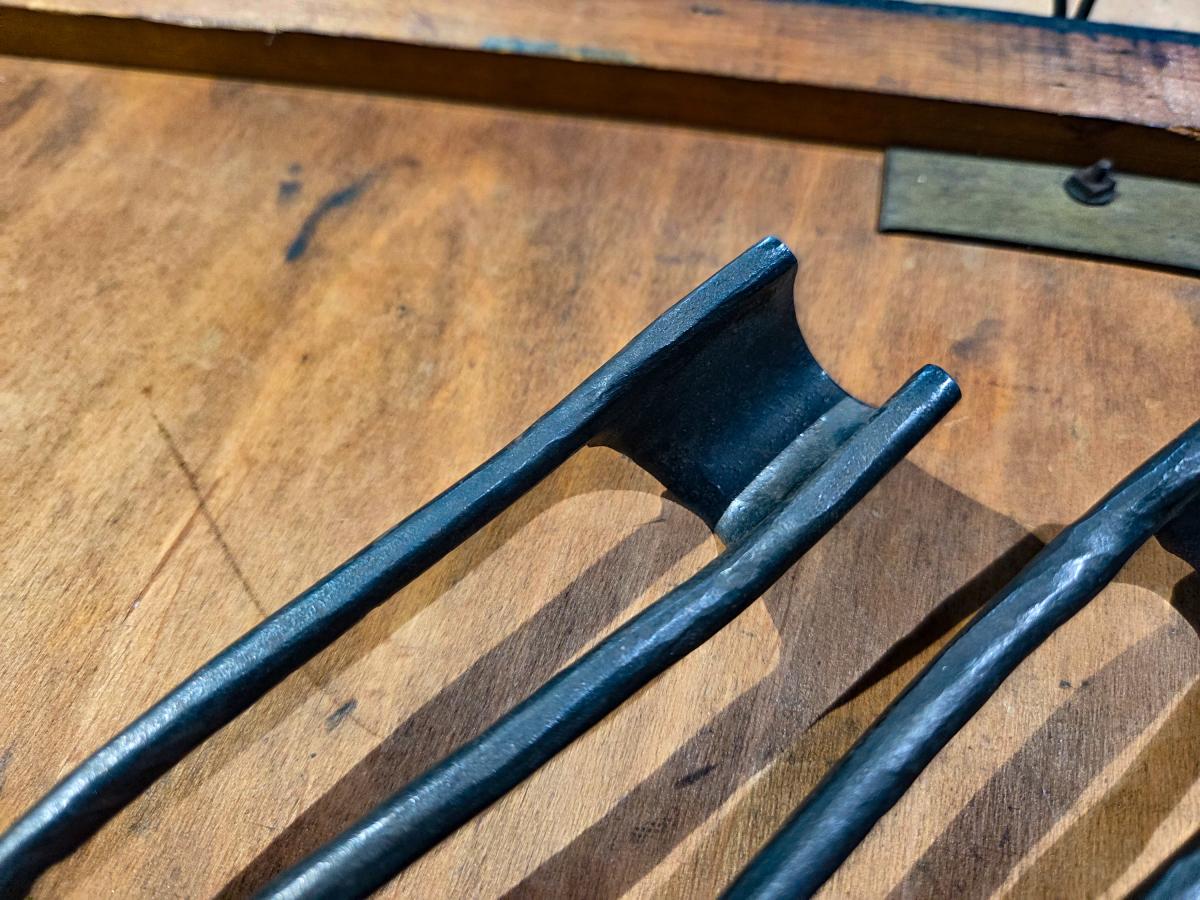 The two "gouges" in the set both have their cutting edges on the inside between the rods
 The other tools look like gouges, but the cutting edges are on the inside of edge of the blade, not the outside, and the insides show extensive sharpening. The general geometry of the way the tight and larger hook tools are sharped, and in particular how they curve down from the handle, suggests that they are designed to work with the shaft of the tool on the toolrest and the cutting edge dangling below the center line of the lathe, shaving wood upwards. Green timber would turn wonderfully this way.
These tools were designed for use with a pole lathe. On a powered lathe, or even a treadle lathe, the added speed could be scary. I haven't had the courage to sharpen them up to give them a try. Maybe when I am a better turning and feel more in control I will.
 This small hook tool is very elegantly bent
  The well worn middle size hook tool that's in the kit
 "Salt" of Birmingham - the maker
 started Leo's desk.........
 |
| done |
Leo's bookshelf done with 4 coats of shellac. Just needs his desk to put it on.
 |
| glutton for punishment |
Redoing the miter that failed with yellow glue. Shot the miters clean and glued it up.
 |
| fingers crossed |
Got a good dry fit. Miter closed up toe to heel. I'll find out in the AM how the hide glue performed.
 |
| hmm..... |
This has got to be a Guinness World record. I put the boards on the bench and liked what I saw. I didn't bother trying any other combinations. This will be Leo's desktop .
 |
| brown knot |
This one is loose I'll dig it out and fill in the hole with epoxy. Leo's and Miles's desk will both have a gum pocket on the desktop.
 |
| not easy going |
Two of the boards are bowed and I finally got to use my Horrible Freight deep reach clamps. It took me a while to get the glue joint line flat and straight. After that I expended more calories getting the glue line flush. I was thinking of using dowels but nixed it. I couldn't see anyway to flatten the two boards to engage the dowels in the two boards.
 |
| wow |
The bow is 1/8". The two glue lines are being a PITA but at least the bowing is the same direction on the two. I'll have to do the top glue up in two steps.
 |
| one hour later |
I only had two deep reach clamps and I needed more. Sawed a pine board to help out flattening the top.
 |
| finally happy |
Ignoring the bow and just looking at how the laid up against each other.
The goal I was shooting for was the joint line to be tight along the
entire length with no clamp pressure. That took a lot to accomplish. A
lot of in/out of the vise and eyeballing the joint line. Mostly used the
#8 followed by the 5 1/2.
 |
| good feeling |
Checking the 3 boards for twist. The first one was ok along with having a slight hump running the entire length. The 2nd one was twist free but the third had a wee bit which I planed off.
 |
| better then F clamps |
When I first started woodworking I bought a lot of C clamps. Mostly because I couldn't afford F or bar clamps. I bought most of these at yard sales and I doubt I paid more than a buck each for them.
I haven't used them in years. The F clamps popped off if I brushed them but the C clamps held firm and exerted a lot more pressure on the flattening cleats.
 |
| first dry fit |
I had dry fitted the other two board which went off with no hiccups. For the second one I made new flattening cleats out of a 2x4.
 |
| this surprised me |
As I was removing the flattening cleats I noticed that the boards remained as is. They didn't shift or move and the boards remained as flush as if they were still clamped up.
 |
| another surprise |
This one made me feel better about this upcoming glue up. The amount of the bow is half of what it was from the first dry clamp. This is my first time attempting to glue up 3 bowed boards.
 |
| glued and cooking |
I spent the morning prepping and dry clamping the top. Started a little after 0800 and quit at 1115. Decided to fill the pie hole before gluing it up.
The glue up went beautifully. I was expecting the the boards to slip and slide but that didn't happen. I removed the flattening cleats and the deep reach clamps to wipe the glue up from underneath them and the joint line remained nice and flat along the entire length.
Happy with how well this happened. No stress and the glue line looks real good. Fingers crossed that the 2nd glue up goes just as well.
 |
| checking |
Before I set this aside to cook, I checked that every clamp was laying flat and tight against the top.
 |
| leave it be until the AM |
I am still a wee bit out of sorts with not needing the flattening cleats and the deep reach clamps. I came and checked this several times before I killed the lights.
 |
| last two |
Got the layout done and the dadoes and mortises knifed and ready to be chopped out.
 |
| labeled |
Labeling is important on this because the slat mortises are individually knifed off the back slat. The same with the dadoes for the shelf.
 |
| 2nd one knifed |
I expected to get at least one of these at least dry fitted. However, I also didn't think that I would spend the entire AM session getting 1/2 of the top ready to glue up. Miles's desk top took me less than two hours.
accidental woodworker
Spring Firewood Finished

Last week I finally wrapped up processing all the windfall I’d harvested several weeks ago. The bounty was impressive, the cribs are three rows deep. The pile on the ground near the splitter are all the wonky pieces I will use next winter in the barn wood stove. The haul *should” get us through next winter when combined with the leftover wood still in the cabin firewood crib, but the harvesting and processing will continue through the summer and fall. When you heat with firewood, you can never have too much.
odds and ends day......
It has been a long time since I have posted a blog with this many pics. 30+ when I checked the upload. So that means I go lean on the keyboard diarrhea and rely mostly on the pics to tell my story.
 |
| out of the clamps and zero rocking |
 |
| Leo's on the left, Miles's on the right |
 |
| sigh |
Defect in a bad spot. Decided to saw an angle to remove it.
 |
| nope |
Dropped this on the bench from a height of 6" three times. I broke apart on the 3rd one. I'll try hide glue because I have seen miters in furniture older than me that are still tight.
 |
| oops |
I used the center punch on the wrong side of the line. I'll have to find a way to fill them in. Oh, BTW it had to be a blurry pic too.
 |
| clipping the corners |
 |
| looks like crap to me |
Initially I had just sawed angles on the front and that looked worse to my eye than this did.
 |
| better |
I rounded over both the front and back angles.
 |
| checking/adjusting for square |
 |
| whizzing shavings |
This didn't work as well as I thought it would. Less than half turned into dust. I had to sand a piece of cherry with 80 grit to get the sanding dust I needed.
 |
| hmm...... |
I balled up a bunch of old T-shirts to apply a coat of shellac to the pic frames.
 |
| better |
This worked - The T-shirt ball eliminated 90% of the brush strokes on the frames. I'll repeat this in the AM and call them done.
 |
| hmm....... |
Super glue and cherry dust.
 |
| fake gum pockets |
The filled in center punch holes popped and looked out of place because they were directly above the Miller dowels. This black pen is not alcohol based and shellac covers it without streaking or erasing it.
 |
| thought I had but..... |
I didn't fully seat the shelf against the back of the dado. Filled it in with superglue and cherry sawdust.
 |
| hmm...... |
From 2 feet away I couldn't tell that these weren't real.
 |
| one coat of shellac and the fake gum pockets look good |
 |
| the other end |
I like this one better than the other. This end I only had one center punch hole to fill.
 |
| proving it wasn't a fluke |
 |
| chamfed the holes |
 |
| wasn't a fluke |
I still get over the simplicity of using this doweling jig and the results. The joint line isn't dead flush R to L, but it is barely a frog hair off here and there.
 |
| 3 coats |
Leo's bookshelf might be done today if I go back to the shop after dinner.
 |
| Big Red says it is square |
Found this under of pile of crappola. Remember making it but never using it.
 |
| from 2013 - on the list to redo |
Nine different joints (?) - interested in seeing how well I do it this time.
 |
| one square on the right |
The middle and right ones are used with a plumb bob. I didn't see/find any blobs with these two.
 |
| square needs helps - wee bit out |
 |
| twisted on both legs |
 |
| 2 more cherry bookshelves - on the list for the AM |
 |
| taking inventory |
I have enough 5/4 cherry for Leo's desk top.
 |
| hmm..... |
I don't much stock. I need more poplar for the drawers and a couple more 4/4 boards for rails and slats. Don't need much for Leo's desk.
 |
| sigh |
I need another board of 8/4 cherry for the legs. I can only get three legs out of this.
 |
| wash, rinse, and repeat |
Tried the T-shirt ball on the Miles's desk top. I am not trying to french polish it, just knock down the brush streaks (which drive me postal almost as much as gaps do). It worked but it is going to take a few more outings to get it to my level of satisfaction. Did I mention it is tiring doing a wax on, wax off routine?
 |
| why not |
Found this board on the drill press and I'm adding to two I glued up an hour ago. I don't have a need for this, just playing around with the doweling jig.
 |
| definitely not a fluke |
Had a good day in the shop with most of it spent getting Leo's bookshelf ready for shellac. I'm thinking now that maybe I'll check Koszelas lumber before motoring on up to Highlands in New Hampshire.
accidental woodworker
Leo's bookshelf.......
 |
| hmm..... |
I was leaning towards painting these two frames but maybe not now. They have two coats on them and the poplar isn't white. There is a slight greenish tint to them that I like. A couple of more coats to go before the command decision hammer drops.
 |
| Leo's bookshelf |
I thought I had made Leo's bookshelf already but if I did I can't find it. The size of the cherry matches the one I made for Miles. There wasn't anything else on the workshop plate so I did this.
I'm going to try and go to Highlands this week to get the cherry for Leo's desk. I'm hoping the weather cooperates because it has been nice for the past few days. Hoping that Mr Murphy doesn't want to shake hands with me.
 |
| layout |
The ends have some sapwood on them but one has twice the other one. I am positioning that towards the back inside. If they had been about the same I would have put it on the front outside faces.
 |
| ready for chopping |
Got the dadoes for the shelf knifed and the mortises for the back slats. I was concerned with the mortises because some of the back slats for the desk came out looser than I liked. The goal was to not repeat that with this.
 |
| first one |
I would guess the first goal is to make it self supporting. The 2nd would be a gap free fit. Achieved both on this one.
 |
| first two |
Self supporting, clean, tight, and with snug fitting tenons and mortises. Happy face on. Went 4 for 4 on the mortises and 2 for 2 on the dadoes.
 |
| hmm...... |
The mortises are not long enough to get a router to do the depth. I had to do them with just a chisel. It turned out not to be the nightmare movie I had floating around in the brain bucket. Did them by chiseling lightly and then scraping the mortise flat with the same chisel. Check the depth, wash, rinse and repeat until it was a 1/4" down.
 |
| dry fit |
All the joints were snug and I was able to seat everything with some gentle mallet blows. There is something about doing this - layout, chopping, and fitting that revs my motor. Seeing what I did by hand fitting up as it should is incredibly satisfying no matter how many times I do it.
 |
| small cutout |
There wasn't much room for a cutout but I had planned for it. This cutout is about 5/8" at the highest point but it still has 4 small feet.
 |
| glued and cooking |
Started at 0800 and it was glued up before lunch time. A pretty good AM session IMO.
 |
| first time (dry fit) |
I have had these bessey corner clamps for almost 20 years and this is the first time I have ever had a miter close up in it. I had four of them but one crashed and burned during its first free flying lesson many, many moons ago.
 |
| sigh |
The miter broke way too easily. This is one of the miters I glued up yesterday that was going to be a setting jig that I didn't use. My miters are getting better but what isn't improving is the glue bond. I didn't size this but that doesn't seem to matter.
 |
| glued and cooking |
I got a good tight fit on the miter, toe to heel. The experiment is to see how well the glue bond is. You're saying maybe I should try hide glue. I have and the results were the same as with yellow glue. I will find out in the AM how this one turned out.
accidental woodworker
Miles's desk is done.......
 |
| out of the clamps |
Both frames are laying flat on the tablesaw with zero rocking. The 5x7 frame is spoken for and the larger one is in stand by. My wife changed her mind on buying the map but it is ready for whenever.
 |
| none worked the best |
I used all of these gizmos to screw in the table top clips. The four clips under the drawer guide rails were the worse. I had to use the offset screwdriver to do them. Those four took me a bazillion years to do.
 |
| this one took the longest |
This one was the most awkward one to do. I just couldn't maintain downward force along with a good grip on the offset screwdriver. Note to self - on Leo's desk screw the top on before I do the drawer guides then unscrew it.
 |
| glamour pic #1 |
This is based on the desk I use everyday. The only quibble I have with mine is that it is too small. But with a bigger desk top I would just have a ton more crappola on it. This should be more than adequate for an eight year old.
 |
| glamour pic #2 |
I really like spindles/slats. Thinking ahead to Leo's desk maybe I should do a wide center slat like I did on the back, on the sides.
 |
| glamour pic #3 |
I am glad now that I got the epoxy filled knot hole facing out. Now that it is done it compares favorably to the epoxy fill knot hole on the desk top. IMO it looks like it is a natural occurrence in the wood.
 |
| final glamour pic |
I am going to give Miles the bookshelf along with the desk. If Miles doesn't want to keep it on his desk that is his choice.
 |
| hmm...... |
Too big for the desk, it eats up a wee bit too much real estate. However, after seeing this, a gallery with drawers might work. I am making another cherry desk for Leo but I don't like giving the boys the exact same desk. Thinking now of making a gallery for his desk. Just something a little different between the two.
 |
| spline groove |
Working on the two new pic frames. Got the spline groove done on each corner. I used cherry for the splines because I didn't have any poplar.
 |
| back frame |
Nailed and glued the back frame on. This creates the rabbet for the glass, mat, and pic to sit in. I like having whatever is framed set back toward the rear of the frame. I don't like having the pic up close to the front face of the frame.
 |
| chamfer |
I hadn't planned on doing a chamfer on the frame but I had to. The small frame fell off the bench and one corner got dinged. The chamfer removed it.
 |
| shellac |
Thinking of leaving the frames natural to highlight the cherry splines. If I don't like how they look I can paint them. The shellac can be a primer coat for the paint.
accidental woodworker
Record #2506 Side Rebate Plane

I didn't own one of this particular side rebate planes before this week, but this one arriving made me realise the demise of certain Sheffield makers post-war was for good reason. Record was a company sold back and forth a few times throughout its dying death knells. It wasn't lack of sales that caused it to lose value but lack of care and quality in workmanship. A tool like this, or a bench plane or a saw, would likely need only three or four more minutes of finishing care to have substantially improved it, but who cares anyway, certainly not Record. Why did they end up with such a lacklustre approach of complacency in most British tool making over a period of a few decades? Yes, they relied on their daddy's reputation, I get that, but with such a strong and resilient foundation, why did the owners not realise that with a minor amount of extra input engineering wise they could have been up amongst the very best?

And I looked at the tool and I thought, well, it is a brilliant woodworking device. The design itself lacked nothing. I began to let my mind rip along a zip wire, imagining the tool made in brass or better still bronze all the more. They already had all that they needed in place to make the better tool become that very best, the mould models for casting, the casting equipment to make hundreds, tooling equipment, the workshop building was already paid for ten times over and then too all of the skilled workmen knowing all of the safety practices and protocols. How come they were so very, very blind. Well, I suppose we already know, really. Complacent arrogance soon sets in when you think you've arrived, think you are the best, think you no longer need to try; pure arrogance and pride will always blind the next generations and then the potential dies in their hands.
This side rebate plane was just minutes away from working, but whoever owned it before me had bought it fifty or sixty years before me and had never used it. The box was still intact, and the tiny leaflet lay at the bottom, beneath the plane when I took the plane out. Everything was there except care.

Not needing a plane does not mean not owning one. My passage of discovery was part of the package. I wanted to know the plane, even if I didn't need it and most likely would pass it along or sell it.

The leaflet was really quite vague and unhelpful and pertained to general cutting edges rather than this unique tool with its uniquely angled cutting edge. There was no mention of any angles that would be helpful, not at all how you would get the exact angle you needed?
It was this kind of laziness that began to permeate British tool manufacturing over the postwar decades. It would have taken no more than half an hour to write a proper and decent leaflet with together drawings, and they should have been ashamed for not doing so, but they weren't.
My Plastic Insert Guarantees Accuracy
This could be cardboard but plastic sign material, 1mm, snaps to a knifelike and works and lasts.
First I established the angle I needed for the bevel by cutting a strip of plastic to width and then inserted it into the plane body to get the angle.

The angle is as close to a 30º off a 90º so I used this to create a wedge shaped piece to fit into my honing guide.

From there, I used an angled protractor to establish my cut line onto as bigger piece of plastic.


This then inserts into my guide.

And my blade butts up against the plastic.

The flip-out, flip-over plastic extender gives me the 30º bevel pitch I need to abrade and hone to. I don't usually go for secondary or micro bevels to cutting edges. No real point to it, and too pernickety. But my angles did result in a secondary bevel which because it is a bevel-up plane with the bed angle the lowest of any plane ever, a mere 7º, I felt needed a steeper bevel to enhance the residual strength of the bevel.

With the plastic set up done, offer the guide to the abrasive, no matter the type, and a few rubs establishes the double 30º both ways. Go through the grits to superfine and you are nearly there.

Flip over and remove the wire edge whilst at the same time polishing out the flat face for the first and last time, and the blade is ready for installing again.
Installing the Cutting Irons

Place the plane on a decent flat surface, keep the plane body firmly pressed down and take up the slack on the thumbscrew holding the pressure bar, not too tight so as to allow moving the blades. Now, gently slide the cutters until they just nestle up to the flat surface, aligning the cutting edge with the face of the plane. In this position, cinch down the thumbscrew; the irons will flex slightly past the face of the plane as needed. Slight hammer taps will set deeper, or move them slightly laterally, but I mean slight taps and not blows. There is a little wiggle room in the channel if the blade needs tweaking for alignment and parallel shavings.

Restoration Work
My plane had the 1960's expected flawed workmanship in the plane as well as the neglect that comes from simply being left in a box unused. The blades had a little surface rust, nothing much, but the nickel plating had bulbed up because of minor rust beneath and that needed abrading away. Also, the bull nose front had fused the two parts together immoveably so that needed resolving too.

The leading edge is the top edge and this area has a slight bubbling in the nickel that will mar the wood I am planing, so I want to remove it. You can also see the general roughness in the nickel plating. Generally, this main surface roughness doesn't altogether affect the functionality of the plane, but it looks and feels rougher than it should to pick up, use and put down. The benefit of the plating has proven good, though; there really had been no real rust to speak of. From now on, the best answer to preventing rust will be my daily use, a dry workshop, and a good environment.
 My engineers block beneath the tight abrasive paper works well for flattening, even though that is not my goal here.
Light oiling with my rag-in-a-can oiler or some Boeshield T9 will inhibit future rusting. Also worth mentioning; Boeshield T9 is a high-performance, paraffin wax-based lubricant and rust preventative developed by Boeing for long-term metal protection on their planes. It is a remarkable treatment that works well as a rust inhibitor on tools you might use less frequently than others, and especially useful where you have had to abrade through faulty nickel plating. Also, it works as a lubricant too. Super slick.
 You can see the protrusion of rust and nickel plating.
How flat do these planes need to be? Well, we only use the half-inch on each side of the plane, as the cutting edges are only half an inch wide.
 Light oiling coats the surface to reduce the possibility of rusting again.
At this point, the plane works perfectly well and both of the cutters took off an even shaving straight away. Because of the single securement point for two blades, it can be tricky if one blade works well and the other needs tweaking because, of course, you are loosening the pressure on both blades at the same time.
 Already the plane works well, but a little more refinement makes it feel like it is now mine.
I am suspicious that the bull nose might need some help, and when I tried to remove the front piece, it wouldn't budge. I knew there would be some rust between the components.
 The rust was inevitable from the drilled holes and then too the tapping of the threads and the steel set screw.
The wire brush took care of all of the rust, and drizzling oil into the screw cavity took care of protection. This set screw was inserted 70 years go and had most likely never been removed since.
 The two pins are drilled all the way through the front piece into the second and so everything aligns up perfectly with no slippage.
The last component is the depth shoe. Again, bubbling rust beneath the nickel plating needed abrading away. You can DIY new nickel plating, but that's not really helpful in the case of this plane.
 The roughness of the casting and the nickel plating attests to the lowering standards of tool making in some quarters of Sheffield tool making.
Two seconds on abrasive paper again took out the rust, the nickel plating and gave me a decent surface.
 Half a dozen thrusts will make the shoe smooth and level.
I also filed off the two leading edges with a file to create slight bevels, that way the show will never snag.
 The abrading to 250 grit is plenty smooth enough. Wood is highly abrasive and after use it will never look any better than this.
I am happy with my £42 plane. Thrown in with my other side rebate planes, I will find out which one or ones I reach for over the coming years.
 This is a deeper setting and removes stock fast. And remember, you can cant the plane over for a sloped wall to the rebate if you want or need that.
The other use for a side rebate plane is on grooves that might be a touch too tight. This for me makes the plane invaluable, as grooves by hand are difficult to enlarge with any degree of accuracy.
 For increasing the width of a groove, any of the side rebate planes know no equal. I am glad to introduce this use here, as I have never seen nor heard of anyone else ever using the plane for this.
It's a neat and compact all-in-one tool altogether. The corner points on these plane types are pretty extreme when it comes to sharpness and using them as your hands are close to the points when in use.
Miles's desk pt XXIII.........
Getting awfully close to the finish line on the desk. The slats are done and I got 4 coats on the base. I'm happy with how it looks with that many too. After dinner tonight I'll get the final coat on. In the AM, first thing, I'll attach the top to the base. I'll be done with it by sunday at the latest (fingers and toes crossed).
 |
| done |
Got two coats of shellac on the frame. I brought it to the Frame it Shop after lunch today. Don't know when it will be ready but no one is holding a gun to my head on it neither.
 |
| shoulda, coulda, woulda, but didn't |
I have this miter frame clamping gizmo and I forgot all about it. This could have been used to clamp up my wife's map frame. hmm.... since I am waiting for the base to dry I might as well try this while I'm standing around giving everything my best goofy looks.
 |
| hmm...... |
First thing that shook hands was what a PITA it is to spin the wing nuts down the threaded rod. I was tempted to cut the rods down but I resisted. I don't make the same size frames so that wouldn't advantageous. I got the rods set loosely to the size of the frame I just made.
 |
| new frame |
My wife mentioned that she was thinking of buying another reproduction map so I'm getting ahead of the curve. Made another frame and shot the miters on the shooting jig. Now I'm running into a storm of hiccups.
There is going to be a bit of a learning curve on how to use this type of clamping setup. I fiddled and faddled with it for almost 30 minutes and nada. I couldn't get the frame to square up. This set up is not self squaring as far as I can see. It has to be square to what is being clamped up and each corner tightened individually but in unison. I got a wee bit frustrated with it.
 |
| not aligned |
This was the 3rd time I tried to dry clamp this frame and failed. So far one corner has been off on the toe to heel. One a brighter note this was the best I did so far. I kind of figured out after this about getting the clamp frame kind of square before tightening it down.
I gave up on trying to get the clamp frame work. The frame came together dry almost perfectly. So it should have clamped up without any hiccups. I even set the clamp frame by measuring the diagonals to be the same. That worked but I still couldn't get one corner's heels and toes to align.
I'll try this again because I refuse to let it win. I bought four 1/4-20 slip nuts from McMaster-Carr (~$12 each) and I should have them monday or tuesday. Slip nuts will definitely speed up getting the nuts on/off the threaded rods.
 |
| hmm...... |
Clamped up without so much as a whimper in the Sears Craftman clamps. This 2nd one looked better then the first one I did yesterday - all the miters were tight and gap free on both sides.
 |
| my band clamp |
This clamp can be fussy but I was able to clamp it and get all the miters closed up. It has the same problem I had with the threaded rod clamp but this one was easier to get and keep the miters aligned toe to heel.
This frame came from the off cuts from the frame above. It is big enough for a 5x7 pic.
 |
| helping hand |
This clamp tends to pull up on one corner - one closest to hand screw. Placing a heavy thing on it flattens it and keeps it that way while it cooks.
 |
| getting there |
I put the moving blanket on the workbench to keep the base clean. I had noticed that my dirty workbench top was getting on the legs. Should have done this before I first put it on the bench.
 |
| oh.... |
I didn't think this all the way through. The intent was to put a spline across the miter face. My spatial thinking said this would work. I was wrong and I blame the spatial hiccup. This is going to be a jig for positioning the table top. This is part one and part two will be two pieces of plywood that will set the offset between the base and the outside edge of the top.
 |
| ready for the last coat of shellac |
One more on the bottom of the legs and then the legs and rails. Happy face on. The base looks good and the slats don't look any different the rest of the base.
accidental woodworker
Woodworking in Estonia: From Ants to Meelis
Miles's desk pt XXII........
 |
| ready |
The frame has been sanded smooth, front and back, and it ready for paint. It is laying dead flat on the workbench - no rocking at any corner.
 |
| needed |
The spray shellac is working fine. It is laying down smooth and drip free on the slats. However, the aerosol spray lingers like a fog in the shop. The fan does a good job of airing out the shop in just a couple of minutes. Glad for that because is it sill only in the middle 40's F/7C outside.
 |
| 4 coats |
I should be done with the slats today. The can says it dries in minutes which I assumed was 4-5. It stayed tacky for almost 20 minutes and not dry to the touch for almost an hour. I got time but I'm getting impatience waiting until I can apply the next coat.
 |
| missed it |
Glue squeeze out and it isn't the only spot I missed. I started applying shellac to the base because I didn't want to leave the shop. The shellac made it pop, because without it the glue blended in with the cherry. I removed it here and 2 other spots with a chisel.
 |
| the base |
There aren't any glaring differences between the spray shellac and the batch I mixed. There is only one coat on the base, 5 on the slats, but they look the same.
 |
| 2nd coat |
On the first coat I tried to paint the whole frame. That kind of worked and kind of didn't. The biggest headache was holding the frame to lay the paint down. Decided it wasn't worth it and I only put a 2nd coat on the back of the frame. After dinner I'll put a 2nd coat on the front and that should do it.
 |
| 2nd can of shellac |
Got my answer on how much shellac per can before it is empty. I got four coats on the slats from one can. Noticed that the weight of the can went down after each spraying and it was as light as a feather after the 4th coat.
Getting real close to getting a check mark in the done column with this desk. I should be done with it next week hopefully. Won't be too soon and I'll have to motor up to Highlands to get cherry for Leo's desk.
accidental woodworker
Holding wood by the edge of the bench top, part 3

Miles's desk pt XXI.......
 |
| hmm....... |
To my eye it looks like a design element of the desk. (the little doo hickey things on the underside of top rail against the legs). It hides the end grain of the front rail from being seen. Note to self - on Leo's desk make all the top rails the same width .
 |
| happy face on |
Out of the clamps and all is fine in Disneyland. All the miters are tight heel to toe on this side. On the opposite side it is the same except one miter is a 1/2 of a frog hair open at the top. Overall happy with the outcome and the frame withstood me scraping the miters on both sides.
 |
| )(&@%)Q&@*_Q |
Made the first batch of splines too small. Only one might have been usable but it had zero wiggle room. Made a new batch oversized more than I allowed on the first ones.
 |
| not my fault |
I know this spline was loose because I checked it dry. When I applied glue it froze about 1/8" shy of bottoming out. Glued in a shim from each side to close up the hole. Clamped all the splines and set it aside to cook.
 |
| PITA |
Got the rails and legs sanded and ready for paint without any hiccups. However, the slats are proving to be a massive PITA. I had planed all of them before gluing them to the rails and now after the first sanding with 120 all kinds of ugly tear out are popping up to shake hands.
I worked on resolving that until the dinner bell rang. Got one side and the back done but left side still needed attention. I dealt with that after I filled the pie hole.
 |
| better |
Got 6 spray coats on the test piece and it matches the top pretty good. Even the depth of the finish looks about the same. It looks like 6 spray coats on the slats will do the job.
 |
| prepping the frame |
Used the #3 to smooth and flush the miters. I am keeping the frame as is. No chamfers or any other molding edge detail. The map is a formal document and the frame will match it.
 |
| back rabbet frame |
Glue and nailed 3 sides first. Then I fitted the last one to it. Filled in the nail holes with putty. I'll be painting it black in the AM - not milk paint but a latex black paint.
 |
| hmm..... |
First spray coat on the slats. I did that so I could if any spots of tear out were missed. Cherry is a pretty wood with a finish applied. I will spray on 6 coats before I brush shellac on the rest of the base.
accidental woodworker
A Fray Brace with Different Style Chuck
When I found this brace a few weeks ago, I grabbed it because I didn't have a 6" brace. And because it's a Fray.
 |
| John S. Fray 6" brace |
John S. Fray was in business from the late1850's to 1909 or 1920 (accounts differ), when they were bought by Stanley. But Stanley continued to use Fray-marked components after the purchase, so it's not clear when this brace was made. There's some evidence below that it's post-1932. I'm sure there are some people out there that could nail it down, but I'm not one of them.
 |
| THE JOHN S. FRAY CO. |
 |
| BRIDGEPORT, CONN U.S.A. |
 |
| The only other marking is this "7" on the ratcheting area, but it's a 6" swing! |
I'm not certain, but the handles might be rosewood - I saw examples on the web that had rosewood and some with walnut. Either way, they're in great shape and I did nothing to clean them up.
The part of this brace that I want to point out is the chuck, or bit-holder.
 |
| Jaws opened |
 |
| Jaws closed |
I found a website by George Langford that had a list of patents related to Fray braces. One of them, applied for in 1928 and granted in 1930 or 1932, shows a bit holder very similar, if not exactly like this one. That's several years after Stanley had bought Fray. Apparently it took a long time to use up the Fray parts that they had purchased.
The chuck jaws were like none other I'd seen before. It is a two-jaw chuck and after wrestling with them for a while, I got them removed from the housing.
 |
| Pointing to what I think is an oil port. Loosening the screw to the right allows the jaws to come free. |
 |
| The jaws removed and cleaned up |
 |
| Looking down into the chuck where the jaws go. The bright spot is part of a threaded section on the inside wall of the knurled outer shaft. |
In the picture of the jaws above, you can see a threaded section on the jaws, just next to the leaf springs on the right end. These engage with inside threads deep inside the chuck. When the knurled section of the chuck is turned, the chuck pulls the jaws inside and they clamp on the shank of an auger bit and grab it tight. That little screw on the knurled part of the chuck's housing somehow keeps the jaws in place. I can't quite see what's going on in there, but the screw does it's job.
Here's another picture looking down inside the chuck while the jaws are in place. Down in the bottom, there is a recess shaped to accommodate the square tapered shank of an auger bit.
 |
| Tough to get a good picture of the recess where an auger bit sits |
After a bit is set in that recess, the knurled shaft is turned and the jaws grip tightly on the auger bit. And I mean it REALLY grabs tight!
 |
| Here's a bit tightened in the jaws |
If it helps to understand the mechanism, here is a picture from the original patent (thanks to DATAMP and Google Patents).
 |
| I hope this pic comes out OK. It downloaded as a PNG file rather than JPG |
Here's a link to the Patent picture, if the above doesn't show up well in the blog.
The tough thing about this brace is that I can't remove the chuck to clean the innards. I cleaned what I could with dental tools and small brushes (and I pulled out a lot of crap), then oiled it generously. It worked as found, but it works more smoothly now.
To clean up the brace, I wire-brushed most of the metal parts fairly lightly just to clean off the grunge. And I left the wood parts alone - they were already in pretty good shape.
 |
| And there she is |
It's always nice to see different mechanisms like this. I don't necessarily get all there is to understand about it. For example, what are the leaf springs on the ends of the jaws for? And why is that little screw in the knurled section needed? Well, it's good to learn about these things anyway.
Shoulder Planes
 This exemplar to refined and skilful door making will never get a mention. I could write a whole book on this one door alone. It has raised and fielded panelling, mortise and tenon joinery throughout, crisp hand carved mouldings inside and out and the man that made it remainsanonymous.
We tend to buy these planes because they bespeak of the ancients and ancient craftsmanship excelling in a pre-machine age when the finest woodworking in any period of history in a range of diverse cultures came together to predate machines that could never create what the human hands created. Yet, these planes are not so old when it comes to the all-metal version that stand out. Obsolescence spanned only four decades before the planes lay abandoned amongst others in the bottoms of tool chests, toolboxes, on shelves in cupboards and so on. The more ancient versions, those made of cast bronze and infilled (stuffed) with ebony or rosewood, whatever offcut lay abandoned from some rich dude's stately home work, evolved as rich individuals, businesses and corporations used buildings as homes and places of businesses were used the more to, well, show off their status in architecture and art forms. There is no doubt that rich people bought the work of manual workers to own them through the work that they bought. It's true, too, that without these rich empire dominants, the equivalent of Musks, the Bezos and so many other empire builders, no such fine woodworking would exist. Buying people as units, whether it's politicians and supreme leaders, business tycoons, is all part of the world's global dominants. Greed buys art to hand and stand in private places where they alone, with a few friends, walk past them knowing they owned the man or the woman that made them just for a short time.
 Made from wood and sand-cast to take molten metal in a flask. The body of the plane was sold to people like me in the old days and it worked for a century.
Ultimately, the glorious facades emerging exemplified they who really never made anything with their own hands, status expressed by their rich holdings but only by their using the work of the common man and woman to create. Imagine how we too admire the rich people thinking they are something remarkable when all they mostly did was buy people for their own extravagance; incredible works of creative art purchased from skilled artisans, but they never once lifted any tool themselves to work with. Buying in creativeness influenced makers. Makers developed their skills and further refining abilities to serve their masters by making many of the tools we still use today. Shoulder planes are very much the luxury planes of our age, despite the reality that they are only minimally useful.
The Maker Lifts His Soul in the Making of a Tool
'And then, when the day grew dim, the workman reached down beneath other scraps of wood in the scrap bin to retrieve a piece of darkest black ebony he'd secreted there two days before. It wasn't truly scrapped, he was stealing this usable chunk, knowing he's hidden it below common beech and oak to retrieve in the evening's dark when the lights were dimmed into twilight and others had left for home. His friend, a worker in metal, had sand cast the sole of bronze, hollow in body, rough cast on the innards but now square and angular on the outsides. They traded firewood for the casting. A fair exchange for the working classes.
The day had long grown dim as he cut into the dense-grained heartwood of purest black where no grain direction was visible, and even the sharpest chisel glanced of the wood surfaces if the slightest hesitation was sensed. The work continued by candlelight. A small globe of light filtering into the dark blackness of the workshop. There was nothing furtive about the man making his shoulder plane. He knew he would be using the tool for the work in the workshop soon. The refining of shoulders to tenons would improve his work, and he would use it for decades to come. But his master would never have allowed him to own a piece of pure ebony for his ownership of the tool itself.
The main body of wood all but disappeared within the walls of the bronze casting. The channels needed for wedges were all hand filed, cut true with paring chisels, measured by eye and angled perfectly to match the wedge that held the hand made cutting iron. By morning time three days later, the plane was complete. The other men gathered to look at what he had made, each knowing how the ebony had come to him by their having done the same years ahead. Another man produced his work, and then another. Each piece was slightly different. He'd seen them before, used them occasionally, but never owned his own until now. The union of this kind of inclusivity was a scarcity amongst working people kept low and in their station. For the weeks and months ahead, there was a celebration in the heart of a man that made a tool he needed to make for others with.'
 The Veritas range of woodworking planes is a remarkable achievement. The knob top left can be removed and used in the top hole on the side of the plane either side depending on the need. The rear knob swivels 190º to either side for using the plane on the left and right of tenons or whatever. The small set screws in the side allow setting the cutting iron in relation to the sides of the plane. What a remarkable shoulder plane.
I own three shoulder planes, though I rely on them only very minimally. We have become nations without the broad shoulders makers once relied on. We no longer bend our backs to carry burdens, lift and struggle with in the day-to-day of making, and we don't want anything to disrupt the comfort of ease in work. With the demise of wood in door making, the architects of design now rely on boxed steel box sections, aluminium and plastic to make our front entryway facades from. We have become highly controlling and wood has been an unruly rebel to become all but actually banned. Wow, so much opposition to our once highly sought after wooden doors. That's what we call progress. But there is nothing more annoying than a sticking door. The doors to my garage are four feet wide and made from European redwood. In the height of any drier season they each shrink 3/8" (10mm) and in the humid times, rainy periods and such, they expand fully to stick at their meeting point. If I ease the one door, there is a gap. Hardwoods do the same. Both the doors are rebated at the meeting point, and an additional cover strip inside and out resolves any gap issues.
Eighteen years ago, 2007, or so, I saw massive doors being made for the Russian Embassy here in the UK. They were solid enough. You know how heavy and solid MDF is, right? Yes, these doors were made from massive slabs of 2 1/2" thick MDF, and were 12 feet tall and 3 feet wide. The two-tone veneer hid everything inside, and no fibres of MDF could be seen once the doors were hung. That's just another aside.
 And then you pick this up, and you stand and stare with admiration. This not someone hitting a ball through the skies with a bat or another knee-sliding on astroturf with his or her jaw giving out a primordial roar with two fists clenched. The manufacturer's name is on the plane yes, but the actual maker will never be known. He never expected any more than that. He rode his bike home and was grateful he could sell his skills to feed and clothe his family.
Writing about the lost planes is important to me. Shoulder planes are obsolete entities in our woodworking world, and positivity of any kind will not reverse the reality, since such cabinet work is now wholly done by machines that cut panels in seconds rather than half an hour apiece. I don't crave that past life, eras gone, neither do I take part in so-called living history to dress up and act out roles. I simply and pragmatically encourage woodworkers making individual pieces for themselves, family and friends and then lone independents who live their woodworking experience off the conveyor belts using mass-making methods and systems as mini-factorial setups in their domestic garage or shed. I tried explaining the redundancy of shoulder planes to two friends and the one said that she thought that crafts were on the comeback, saying, "...crafts are coming back." her eyes danced some as did the smile that answered the demise by her thinking saying something positive like that would suddenly reverse the trend and reality by just the simplicity of simplistically saying something positive. I decided not to pursue this. How often is it that people say, "But the colleges and the Prince's Trust are working to reverse this trend." or "I hear that crafts are coming back. There's been a resurgence!" And all because of a TV show here and there where producers and talking heads, knowing mostly absolutely nothing about anything art or craft creativity wise, try persuading people they are the influencers that will change things by simply producing half-hour episodes for a TV channel.
 I doubt that I have made less than 100,000 hand cut woodworking joints throughout my lifetime.
 The trend toward a craftless society is fully on and will never be stopped nor reversed because, well, simply put, we cannot stop it–it's simply too big. No so-called professional woodworker will ever be able to rejig their work because they started on machines and cold never do what we amateurs do in their professional and competitive worlds. But for us in our own personal driving seat, the quiet of our daily making, hand tools lying in wait and such, we can enjoy what many of the ancients did. We can quite easily disengage, reinvent ourselves, engineer our future to include certain aspects we once thought to be beyond our reach.
 A panel raising plane creates a step-down which then raises the field. That top flat face is referred to as the field, the slopes are referred to as raised and so the combined outcome is referred to as a Raised and Fielded Panel.
The luxury of owning my shoulder planes reminds me of the value and inheritance of fine woodworking and cabinet making we from past years–that's decades and centuries of the absolute finest handwork we almost know nothing of today without visiting the past. We in the UK and Europe especially have this inheritance, even though it was from a somewhat nefarious past in what was then no more than slave labour.
 It's not old. It's quite new. It raises the panel and creates a field, completes pristine dead square and planed shoulders to a crisp edge, and it is by far an exceptional plane..
 The true intent of shoulder planes is this and was this alone.
I pull my shoulder plane to task on work that might just need that extra effort. I perfect a rebate or shoulder by passing it along a surface previously sawn, or refine this and that with a very quick but single swipe. Seeing it as a luxury plane, I might name it so, but mostly not. Tools we use become essential to our personal us for a variety of different reasons but mostly because of their refining qualities. My tools are essentially mine and became essential to me by functionality in refinement. Even so, it's my hands and body that make them work. Nothing is fixed by it; I often pain my body with awkwardness to make the tool work efficiently and well.
 The shoulder plane can be used on long grain, though it was fully intended only for cutting across end grain as in tenon shoulders.
Why have you never seen me use this and other types in my video work? It's because 99% of my work doesn't need them. I teach methods that keep specialist tools out of the mix because I cannot send people out to buy special tools if I can teach methods that deliver what they need. I see woodworking gurus with pristine rows of tools in shops that look like a chemist's lab or a professional commercial kitchen. When did such a thing come in. Rows of three and four hundred dollar planes racked up. It gives the wrong impression of richness rather than reality and real woodworking. We've become collectors of wealthy tools to show off our prowess, I'm afraid. I don't really mind. We do it with the status cars and our clothes, shoes and so on. Why not tools as decorator items on the backdrop of our machine shops in so-called man-caves. That's not me, no, not for me.
 I will end up like this five times a day. I stop five times, put tools away, and start over afresh. Was it not Albert Einstein who said: “If a cluttered desk is a sign of a cluttered mind, of what, then, is an empty desk a sign?” I apply this to my productivity rate of high-quality woodworking for over sixty years, with never a single day where I did not have productive work. No apology needed or given!
Watching me, my videos, really, reading my blogs from the past couple of decades, people, friends following for long enough will have established knowledge and skills by which they can then make their seriously educated choices. I will never influence people to buy into excesses, hence a #4 Stanley bought by me, aged fifteen, will take care of 99.9% of my everyday surface planing and trimming needs and a knifewall establishes dead square shoulders, that generally takes shoulder planes out of the equation. Also, and it is worth noting here, a fancier plane made by so-called premium plane makers nowadays, you know the names dropped into conversations, do no more than my common or garden Stanley #4 bench plane, and they never will. Also, and it is no small thing for my audience around the world, luxury planes costing hundreds of whatever currency they live with are usually just flat 'plane' out of the question. A shoulder plane the size and quality of this one will cost £300 and on up to not quite £400, depending on the manufacturer.

But narrow shoulders to tenons, as in the width of the rail and not the depth of the shoulders from outside face to tenon cheek, do not offer enough length of runway to register and land the plane on and take off the shaving I need. I'd go to a knife and square to perfect a shoulder, rather than a shoulder plane.

I am not sure if people altogether believe me, but a Stanley, Record or Woden #78 type plane will work quite well enough to trim shoulders, despite the shortness of the forepart of the plane's sole. Assuming you are working on wide rails, simply start halfway along, embed the blade into the shoulder by pushing down to seat the plane sole to the shoulder, push forward and remove the shoulder into a sacrificial piece on the out cut. Turn the plane around, end-for-end, set the plane to the previously started point and work the opposite way. Oh, you must take time to refine setting the plane and making certain to sharpen up before you start.

The luxury of pare cutting tenon cheeks became completely unnecessary on the majority of any tenon fitting when I put out my technique of using the router plane to perfect tenons paraplanar to the external faces of tenoned rails. That's not to say you cannot do it, just that generally it will be utterly unneeded because of the added advantage of complete control of surfacing by router plane use and the depth of cut that's established by registering the sole of the plane to the adjacent immovable face. No other hand tool method comes close, and that is why people have unquestioningly adopted my technique in their handwork.
 This ancient plane worked so well it was never replaced by any other for its hundred years of weekly use. `the users and makers were content
I give credit to inventions of the past and now too the present when people like Veritas invent the new from an acknowledgement to past designer-makers.
 This has to be the most sophisticated rebate plane ever. Micro-adjustable to thousandths in every way you care to think of, had it had a skewed mouth and blade it would have been absolutely perfect. Would it do what a primitive panel raising plane does? No. It's a luxury plane, altogether, but still the admirable quality of Veritas who do invent their planes.
 Gone Bowling
 My first bowl I made that I like
I'm catching the wood turning bug. The biggest issue for me is developing automatic skills. When I cut up wood, I cut square by hand automatically: I don't have to think about it. When I'm turning I still have to think about it. But I am thinking far more automatically than I was even a month ago.
Above is a picture of my first bowl. It's the same bowl that I was working on last week - but finished. It's made out of cherry, and I think it's a little thicker in section than I would like, but I'm new and I didn't want to press my luck. Producing it took me about two and a half hours plus breaks on the treadle. I worked up a light sweat and a heavy heartbeat, and that was very good news. I saved a trip to the gym, which for me is a big part of the appeal of a treadle lathe. My knees are also in much better shape than they were a few months ago.
Learning to turn has been a wander at my own pace, up to learning curve. Technically this is not my first bowl; it's actually my fourth. And the picture below shows the progression. I was skimming YouTube for turning videos a few weeks ago and I came across this "Make a bowl out of a 2x4" video. There are actually a lot of these types of videos out there - this is a common, popular project that seemed easy enough. So I took a 2x4, cut off four inches of it, and away way I went. On the first one (back), I had real trouble cutting the foot to attach it to the chuck. On the second one (left), you can see there are huge chunks out. There's two reasons for that: pine is a rather brittle wood and if you hit something the wrong way you get cataclysmic problems. I did not know how to use my tools correctly at this point and I was using a 3/8" spindle gouge. For the third bowl (right), I reground the spindle gouge to a bowl gouge and that was a big improvement.
I have my quibbles with the finished bowl, but I can at least say it's a bowl-shaped object. If I were a better turner, a bowl or spindle gouge wouldn't have made much of a difference, and the pine would have been fine. For a beginner, these factors can pose real challenges. Last week when I ordered some wood, I also got a 2x6 cherry board to make some more bowls and I tried again.
Originally the bowl was just going to have a smooth outside, but then when I was turning the outside, I ended up having sort of a ghost of a beginning of a lip. I really liked it, so I made the lip a feature. The inside was as deep as I dared going. I'm pretty happy the way this came out even with some tear-out on the inside. My next bowl is on the lathe now (see last picture below)) made of the same material. I just finished rounding the square stock.
In related news: Most of the first round of pre-orders for the lathe have been shipped. We will be contacting the remaining first-rounders to arrange delivery very shortly. The second batch is probably two months down the road.
 My first bowl with failed attempts
 My second bowl in the works
 Miles's desk pt XX & Leo's dresser.......
 |
| sigh |
I kind of thought this might go south on me. The saw blade had slipped so the slot mortises and the tenons were different lengths. Being brain dead, I glued it up anyways and hoped for the best. Well boys and girls, it bit me on the arse and drew blood.
 |
| new frame |
I am going miter this frame. I didn't feel like digging into the saw blade height hiccup. Besides I have to master making mitered frames in spite of how much I dislike miters.
 |
| hmm...... |
The mitering was going fine. No hiccups other than a little see sawing with getting the sides to be the same length. I allowed a 1/4" of wiggle room on the overall length to plane the miters.
 |
| encouraging |
Planing done and the frame dry fitted with all corners closed up.
 |
| no expletives said |
Dry fitted the frame with my Sears miter clamps. No hiccups and all the corners look good. Three are dead tight and one has a bit of a gap at the toe. Other than that I'm happy with how well the clamp up yet.
 |
| survived |
Of course with glue applied all the miters tried to out do each other with slipping and sliding in/out and up/down. I got it done without the urge to give it free flying lessons. Added the extra clamps to pull the miters together tight from heel to toe. I will let this cook in the clamps until the AM.
 |
| fixed and ready to go home |
Happy with the paint job but it isn't completely done. I wasn't going to paint the drawer unit on the top. However, I noticed that there were a few dings with some white showing. But there is a color difference between the drawer unit and the dresser. I have time to paint it to match the dresser.
 |
| so far, so good |
The three rails I glued back in place appear to be secure for now. I have manhandled this quite bit since I glued it and nada. When I first shipped this down to North Carolina, one of the rails popped loose putting it in the car. I tried to replicate that stress/strain and the rails have behaved. Fingers crossed that it stays that way this time.
 |
| back rabbet stock |
These are off cuts from making the first frame. I'll add them after the 2nd frame is done and splines are installed in the miters.
 |
| came last night |
I don't have any experience using spray shellac. I am not sure how many cans I will need to do the slats. I'll be finding out later this week.
 |
| hmm..... |
The top has 6 coats on it and it looks good but I'll be adding a few more. For now this is good enough to set aside as is while I sand the base.
 |
| left drawer |
At the end of pushing it in the drawer stuck a little. I was still able to push it fully but there was a bit of hesitation I didn't like. I planed the top a couple of times and that cured it. Easily pushes in fully without any binding or hesitation.
 |
| done |
Both drawers are done, well almost done. I'll have to put a couple of coats on the top of the left drawer before it is a 100%.
 |
| I like |
IMO I think the oil bronze pulls look good. I thought of using brass but nixed it after seeing a knob on the cherry. The almost black color of the pulls matches the black gun pockets perfectly.
 |
| hmm...... |
I was on the fence about doing a small chamfer on the outside edges of the legs, specifically just these edges. There is a ding on the back left leg edge that was driving this decision. A chamfer would hide it and wouldn't look out of place. Putting chamfers on the other 3 edges is doable but not as easy. Plenty of time to kill some brain cells thinking on it.
 |
| sigh |
The bottom of the front rail bottom is visible from the side. It looks unsightly IMO although I doubt anyone other than me would notice/pay attention to it.
 |
| the fix |
I'm going to glue a small block on the bottom of the side rails at the front and back. Don't need it at the back but it balances it.
 |
| the top |
The top has a shine that I like but it also has a depth to the finish. It will live here until it comes time to marry it to the base.
 |
| I hate sanding |
I am using 3 grits to sand the base - 120, 180, and 240. After starting I had to add the Stanley #112 and a card scraper. One of the back legs had minor tear out on squirrely grain that the sandpaper did nada on. The #112 and card scraper removed it.
 |
| hmm...... |
3 coats of the spray shellac. I can see a difference between the two. I'll spray on 3 more and see how it looks than.
 |
| hmm...... |
I thought I was done but one more leg wanted to shake hands with me. With the flashlight and the pencil I high lighted several problem spots on the legs. The #112 wasn't working well and neither was the card scraper. Sanded it first with 80 grit and that took three attempts before they disappeared.
Followed the 80 grit with the other three and they were history. Smooth leg with no tear out anywhere on it. Went dead in the water here because of the blocks I had clamped. It restricted how I could position the base for sanding. I'll pick it back up in the AM session.
 |
| ugly looking |
I shoulda, woulda, coulda, but didn't clean up the glue squeeze out when I clamped it. Out of the clamps and I removed the glue squeeze out with a carbide scraper and it torn out chunks of wood along with the squeeze out. It is tedious work but I'm making slow progress using a chisel as a scraper to clean up the damage.
accidental woodworker
Three Shrinkpots and a Bowl Available
Miles's desk pt XIX........
 |
| underside |
Three coats and I'm calling this part done. Three coats is sufficient for the underside IMO.
 |
| topside |
No evidence of the indentation but the chamfer and the end grain needs a touch up. Sanded them with my sticks from 100 up to 220 grit. After that I was read to apply the shellac. Spent the rest of the AM session applying said shellac on the top and the drawers.
 |
| new pic frame |
My wife bought a reproduction of a 1689 map of the Plymouth Colony. I was asked to make a frame for it and this is it. 1/2" poplar frame that I use bridle joints to join the corners.
 |
| glued and cooking |
I'll let this cook until tomorrow. I'll bring it to Maria after I get it painted.
 |
| 4 coats |
This batch of shellac is super blonde and I can see a difference in this compared to my last batch which was blonde. This is a lot clearer without a hint of a yellow/orange tint.
 |
| my OCD was in overdrive |
I had to replace the left drawer tilt rail. Super glad that I didn't use glue on this.
 |
| hmm...... |
The pine drawer tilt rails are strong enough for this purpose but I am concerned about the poplar wearing against the pine. There is over an 1/8" of clearance between the tilt rail and the top of the drawer. I'm going to glue a 16th inch thick cherry strip to the underside of the tilt rail. Cherry should wear better than the pine would.
 |
| done (almost) |
Wear strips glued and cooking. I had tested the wear strip clearance and the drawer slid in/out smoothly still. It knocked down the slight tilt the drawer I had to almost nothing.
 |
| much better |
Better fit with no gap this time. Installed it the same way as the original, no glue and one screw.
 |
| hmm....... |
I'll let this cook until the AM to ensure a good bond. It is only a glue connection, no nails or screws to help out.
Got the spray shellac from Amazon so I can't put it off anymore. I will be done with the applying shellac to the top by tomorrow. The next batter is sanding the base which I ain't looking forward to.
accidental woodworker
Miles's desk pt XVIII........
 |
| couldn't wait |
Went back to the shop after dinner to check on the dent. It had been a couple of hours since I steamed it and it looked good. It was flush - I couldn't feel it at all with my finger tips. Happy with that but I could still see the outline of it.
 |
| twenty minutes later |
Scraped and sanded the indentation outline until it disappeared. I wiped down the area with alcohol and 99.9% of it was gone. One small spot could be seen in raking light but I stopped here. Made a command decision that this was good enough.
 |
| surprise |
UPS delivered the drawer pulls at 2034 on saturday. I can't recall ever getting a saturday deliver from Lee Valley. The pulls are smaller than what I thought they would be. The under grabbie space is adequate - my fat fingers fit - so it will definitely work for Miles/Leo.
 |
| checking the indentation in the AM |
The work I did on it after dinner last night still looked good in the AM. Even the small spot I saw in raking light was hard to find this AM. The final check mark will be what will happen once shellac goes on.
 |
| hmm..... |
Wiped the area where the indentation was first with alcohol. Nothing popped out with the alcohol. I then wiped down the entire top with alcohol to see if there were any other holidays.
 |
| fingertip test |
Ran my fingertips all over the top to feel for any rough spots. I had sanded the top after wetting it with water and I found a couple of raised rough areas. The indentation was no where to be seen. I think I'm finally done with the top.
 |
| template |
The screw holes on the pulls are on 3 1/4" centers. Which means the holes are 1 11/16" on either side of the center line. Used this to transfer the screw holes to the drawer front with a center punch.
Editing update. While proofing the blog I saw that I had lost a 1/3 of the blog post. It was going nutso trying to save it and it went south into the black hole. Stercus acidit. This is the second time in the past couple of weeks that this has happened. Another annoying quirk to deal with?
Recap of what blogger shitcanned on me - got 3 coats of shellac on the drawers except for the fronts. Three coats of shellac are on the bottom of the top. Mixed a fresh batch of clear shellac that I'll use for the rest of the desk.
To help with applying shellac on the slats I bought 3 cans of spray shellac from Amazon and I'll have them today. From past experience, applying any type of finish on slats is difficult and time consuming. It is maddening trying to keep drips and runs from happening. I'll brush shellac on all the drawer fronts, rails, and legs.
accidental woodworker
Two Wooden Planes in Detail

There can be no doubt, wooden planes might just feel heavy in the hand when you first pick up say one of the longer jack planes or longer 22" version on up, but on wood the weight suddenly disappears; it happens to such a point that their near weightlessness can barely be felt as you push it forward. Take a small step further, add a zigzag of candle wax from an old stem candle or a dab or two of furniture polish to the sole, and it's the gentlest parachute drop as in a canopy-type (ram-air/square) that creates a soft and controlled descent to a supremely gentle landing. Did you know that parachutes don't fall, but fly? So too a wooden plane merely floats and glides with free-friction ease. No muscling to task or "bearing down" overhand. No matter what you do with steel or bronze, cast metal type planes of any maker you care to name, they can never come close to a wooden plane, no matter how you slice it.
Two of my half a dozen wooden bench planes. They look very, similar, but the tell-tale is in the skewed wedge in one and square across one in the other. The square across one on the right is simply a longish bench plane used for straightening and levelling boards on the face and adjacent edges. The left one is called a badger plane, and we use this plane for planing inside or creating rebates. More below.I own more than enough wooden planes, currently around 200. Most of them are not bench planes but a variety that will come under the general heading moulding planes, but a quarter of which would never make a mould in their life. I'm mentioning these two planes because they are mine, they are always at the end of my bench, and when I am tired of working with other planes, metal ones, I reach for one or the other of these to help me out. Why do I not just use them in my videos and advocate using them for all? Availability, problem-solving, knowing what to buy, excessive wear and more. But it is worth knowing that, contrary to popular belief that metal versions last longer, have better adjustability, are less expensive and just work better, there is no evidence that metal planes outlast wooden ones whereas there is plenty of evidence that wooden ones have and do often last in excess of 200 hundred years. Also, for good reason and not trying to halt progress, woodworkers in every category from barrel making and carriage building, furniture making and every other woodworking craft, refused to use all metal planes for half a century. It was to do with the ugly heaviness and the fact that they stuck to wood like molasses, compared to the wood-on-wood experience of wooden soles on planes.
Looking back in investigative way of researching the history and the development of hand planes is very interesting. Here we find the reason that most all-metal planes were well over 95% obsolete after a short 50-year lifespan of woodworking at least. Wooden ones had a much longer lifespan of centuries but even holding their own for so long a period, ultimately resulted in decline in the same period of the first half of the 1900s that the metal ones died out. The wonders of industrialised woodworking progressed from hand work to machine work. The outcome of decline on the one hand and incline on the other, influenced domestic home workshops, where we now see the most prevalent way of creating things from wood is machining it; this is generally seen as highly innovative, progressive and cost-effective in time, skill level and financial investment even though for the main part it is quite deceptively presented. For experienced men like myself, it is generally true that my skills enable me to work more efficiently to produce the quality work I need. Did you know that furniture makers rarely laid out 90% of their dovetails, but freely cut them solely by eye and a few pencil lines? My trained and capable abilities make my work as fast and faster in many areas of woodworking. But people give up far too soon and fail to really establish the substantive skills and knowledge and speed needed and believe machines are the better way forward, and, well, who am I to contradict the beliefs of others? Actually, there is no doubt that this is true in many areas of stock prep and more, but please factor in the elements that most machine advocates ten to always leave out. We dive deeply into the benefits of physical and mental high demand, but I will park that here.
 L. COOK kept things simple. Short name no frilly edges, and he never passed the plane on to others yet used the plane for half a century of daily use going off patination.
My 22" wooden plane made from 3" by 3" beech is a fine example of an English plane made by W. GREENSLADE of BRISTOL, ENGLAND in the mid-1800s. It's one that was worked with and worked well for its former owner, L. COOK. The name stamp tells me that there was likely just one owner before me. This plane seems always to pull itself to task and when people advocate low benches to power-down on their planes to make them cut, I understand all the more that they simply do not know what they are talking about or worse still, how to sharpen and use their planes. I push forward with a firm but not excessive push, my fingers around the tote and my forehand wrapped in an overhand hold, and up comes the shaving, rising effortlessly like wispy camp-fire smoke from oak, cherry, walnut ash and even knotty elm. The shavings, one after another, after another, spiral up from the throat as if each one pulls the other. Setting the depth of cut comes from slight hammer- and bench-taps in a split second, and so too aligning the cutting iron's cutting edge to the sole of the plane. A bump here and a tap there governs the plane's passage, and all of this rubbish about bearing down does not bear thinking about. Of course, you might just not know what you are doing, so I am careful here. Unless some laziness has set in, and then not finely adjusting your plane accordingly, or worse still, refusing to sharpen the dull one you are forcing to submit, your experience will be less positive altogether.
 Some people will consider this a crude way of setting any plane, and we in our ignorance might consider ourselves to be superior, but it was superbly effective and fast in the hands of a master. In many cases, it was a side tap on the edge of the bench for alignment, a nudge on the nose or heel for a deeper or withdrawn depth of cut.
 We once called it "hammer ash". The end grain of beech takes shock well, hence few other woods in the UK were ever used for plane making for three hundred years.
Don't be shocked by the hammer marks on the fore end, top of the plane or its heel. For that is exactly what they represent, shock marks. The blade and wedge are shocked out by quite swift and severe hammer blows with a steel hammer. Nothing prissy about this. A swift whack dislodges the wedge and cutting iron assembly altogether or, with light taps, the iron is retarded to lighten the depth of cuts.
 I could take a hundred shaving to spill from the plane without any jamming and without stopping or adjusting. What a remarkably designed and made plane this is. No plane made today compares to these once commonly made and used planes and that is not nostalgia but pure truth.
 Badger Plane
Badger planes are a different breed of plane altogether, though at first glance they might look the same to the uninitiated. This plane offered above and top is commonly called by the English name Badger plane. It's a rebate plane that's often worked adaptively against a strip of wood clamped to the workpiece for rebating or to refine existing rebates by taking of a shaving or two to take out plane and shaper marks left by machines, but mainly it was used for creating raised panels for panelled doors, solid wood panels installed into grooves and rebates.
 Looking at the plane over the mouth and from above, the complexity of a skew-mouthed plane becomes far more complex in every way. There are no square angles to it anywhere. The bed is skewed, and the wedge recesses are all angled, necessitating angled recesses throughout.
Often, gurus describe the reason any plane that was made with a skewed cutting iron was to make the plane cut better; more efficiently. That was merely a byproduct of the real reason, and far from the main reason at all. Think this differently and the answer makes tremendous sense. The point of the skewed iron tucks tight into the internal corner. The push engages this point and the skewed iron keeps the plane pulled-in tight to the inside side of the rebate as the plane deepens the rebate and so prevents the plane from slewing off course. The plane then needs no steering to keep it 'on point' and tracked. A squared across cutting iron always drifts from its path. In regular planing, this is easier to control. In rebating, you want accuracy to keep the internal corners sharp and crisp.
And here is another unspoken reality. Every bench plane we use is automatically skewed and that's because when we need to hold bench planes, our two-handed hand holds on the plane fore and aft forms a triangular pattern from the wide part of our shoulders which are 18-20" apart down to our two hands centralised on the plane to power through. This triangulation skews the smoothing planes and the longer bench planes in action; it is not so much an intentional skewing, but a practical application to present the plane according to a more comfortable angle for our body moves. The badger plane needs the pull of the advanced point at the cutting edge to pull the plane into the corner as the rebate is formed. All the more do we need this because of the bias presented by our body stance in upper shoulder wideness to our hands on the plane forming the triangulation. Physiology in every aspect of hand tool woodworking must be considered, and it's this, mostly, that makes hand tool woodworking ultra-different to machining wood where only minimal physical work involving our dynamism is necessary and used. Dynamism is the theory that phenomena of matter or mind are due to the action of forces rather than to motion or matter.
 The two inside faces are chased out at an angle and so are not parallel to the outside faces. This corner tapers from zero to 1/4" and the opposite groove on the far side runs exactly parallel to the bottom of this groove. These grooves receive the cutting iron assembly and the wooden securement wedge
This mouth looks square across in the image, but it is drastically skewed, with the point being the most forward point. The cutting iron protrudes slightly past the side of the plane when set correctly.
 See how the blade is not parallel to the mouth; it's more important that the blade lies perfectly parallel to the face of the sole so that an even thickness of shaving is removed. Notice, though it might be less obvious, that the corner of the blade protrudes past the side face of the pane by a paper thickness. Without this, the plane will move away from the side of the rebate with each stroke, leaving the wall sloping. Not what we want at all.
 Many people theorise about hand tools in the same way they have about low bench heights, but rarely present from experiencing tools and benches through decades of use. Well, too low, low bench heights and the modern advocacy for them revolves around poor teaching saying you need to bear down on and over the plane and the wood to effect a cut. Totally erroneous. Sharp planes always, always pull themselves to the surface, whereas dull planes push themselves off and away. Dead simple, really.
 It's the upside-down name and logo in the centre that is the name of the actual maker, the other names are owner names, stamped to identify planes that might otherwise get mixed up with others. Varvill and Sons were prolific plane makers from York, England, and made excellent planes.
This plane had three known users and possibly others who did not own a name stamp. Ed Campbell and E. Campbell were likely related, but not one and the same. Possibly father and son, Ed Campbell being the senior. C. Laseby and J. Goodwin were earlier owners, going off the patina in the name stamps. Rhykenology, the study of hand planes and their history, evolution, etc is an interesting study though I only researched and studied as part of my using and use for planes.
 The skewed cutting iron facilitates a particular action in rebate planes. It is not to make the planing action easier. Not at all. It is purely to keep the plane tight into the corner of the rebate. Sharpness right up to the more fragile corner is critical.
These planes are very much a joy to use when sharp and set up correctly, tuned to the particular wood and such. They remove material rapidly with zero friction-rebellion or stubbornness, even facing the intermittent rise of opposing and awkward grain that every other all-metal version of planes generally balk at. Set quite deeply for initial rebating and then lightly for the final refining strokes. By running a saw kerf across the grain, they can raise a raised field and panel very succinctly by simply tilting the plane against a clamped on fence until enough depth establishes a wall to work to. And this is where the skewed iron works really well too.
 This slot receives the head of the set screw so that the cutting iron rests fully supported on the bed incline. Though now old, the crispness of the final cuts are pristinely made. Then see the two channels either side of the slope. Both tapered, they receive the cutting iron assembly and the wedge. The whole escapement is pristinely cut by hand and eye. There are hardly any square edges to this Badger plane. It's a remarkable and outstanding piece of woodwork that never gets noticed and is never mention in these terms.
Another note worth mentioning because of erroneous comments is that the bed angle is five or more degrees steeper, or so it might appear to the uninitiated. Skewed badger planes have a steeper bed because of the skewed presentation of the cutting iron. Presented as it is, the skew directly affects the angle and because of the skew, the angle parallels that of the common bed angle used in square-across plane irons. The skew lowers the angle; the more the skew in relation to the long axis of the plane, the lower the level of resistance; if you were to turn the angle to say 90º, I know, ridiculous, the apparent and now compound angle of cut or bed angle would be the equivalent of zero.
 This brass dome, attached to the cap iron, extended the thread area for the set screw to better fasten to in a metal that tapped well and was less brittle. And notice the neat chamfer around the top of the cap iron, too. The small details of a content creator creatively taking his work seriously.
This plane is 150 years old; it comes from the bygone, never to return, age when every component was hand hammer forged, hand trued by hand planing, hand chiselled, mostly but not necessarily hand sawn, metal hand tapping threads in steel and brass, hand shaped when no power routers working according to CNC programming, in fact, and I mean, in fact, utterly hand made. The cutting iron and components are shaped and consolidated using hammers on an anvil by eye and also forging using a hand made trip hammer. Under intense heat, 2,300º, the two pieces of metal, lie in wait in the full heat of the forge, heated by coke or gas, and using no more than household cleaner, borax (to prevent oxidation), a naturally occurring high-alkaline white mineral powder, intense, repeated hammer blows in quick succession, welds the soft (mild steel) and hard (high-carbon tool steel) steels together so that you have the resilience of a shock-resistant body metal combined with a durable (hardened steel)cutting edge. I have a Stanley plane iron that was made using these two soft and hard metals, and it is vastly superior to any plane iron I have come across bar none. Alas, the blades made this way were discontinued after a short-lived production run.
 When the set screw is loosened, the gap opens and there is no tension between the cutting iron and the cap iron . . .
 . . . when it's cinched tight, the gap closes and creates tension between the two. It's a dynamic, physical phenomena in the diametrical opposition of two metal parts.
From the outside of a fully assembled and set wooden plane, it's easy to miss the incredible fine work of the wedge itself. How remarkable is this hand made component. The fineness of wedge ensures that there is no vibration and no snagging to the shavings rising in the throat of the plane.
 The wedge finds its perfect mating to the grooves in the inner faces of the plane.