Hand Tool Headlines
The Woodworking Blogs Aggregator
“Glory to God in the highest heaven, and on earth peace to those on whom his favor rests.” - Luke 2:14
Norse Woodsmith Blog Feeds
tiny japanese toolboxes pt I.........
Had an appointment at the VA today to check up on my back cyst surgeries. In spite of jacking the volume up on my hearing aids I still had trouble hearing the doc. I don't know all of what he did but he said they looked good with one a little worse than the other. He bandaged them and told me to remove them in 3 to 5 days. They feel a lot better now sitting back in a chair. The bandages provide a nice cushion. Looking forward to sleeping on my back tonight without them waking me up.
 |
| hmm..... |
Overall the bandsawn pieces looked ok to the eyeball. There was a slight taper to each individual board - enough to be a potential hiccup putting the boxes together. I ran a knife line 360 on each board and planed down to it.
 |
| surprise |
I have enough stock to make 7. I was thinking maybe 4 or possibly 5, not 7.
 |
| ???? |
Went on line and got the scoop on how to install a link belt. Supposedly there is an arrow every tenth link denoting the direction of the belt travel when installed. I checked every single tooth and nada. I found no indications or markings and I checked on both sides.
The flat side of the belt faces up and the other side with the 'fingers' is down in the vee of the pulleys. I had to remove a couple of links because initially the blade didn't ramp up quick. Removing two links did the trick.
 |
| sigh |
First box glued and nailed together. Along with a split. I have not had good luck with these cut nails. No matter which way I have nailed them I get splits. It is frustrating and incredibly annoying.
 |
| 3 on each end |
I have more nails on order from Lee Valley. I'm not sure if I have enough to do all the boxes but there is enough to do the 3 I need to give to my sister.
 |
| sigh |
While clamping one split I noticed a 2nd on the opposite end. The 2nd box came out split free.
 |
| predrilling |
I predrilled the holes in the sides and then nailed the long sides to the ends. What I didn't do for the first two boxes was to drill through the long sides into the ends. For some brain dead reason I didn't think it was necessary. I was wrong again.
 |
| #3 |
Box #3 came out split free. BTW, I was only getting splits on the two outside nails. I drilled through the sides into the ends which seems to eliminate the threat of splits. I had continued success with box #4 coming out split free.
 |
| batten stock |
Went nutso sawing out batten stock. I had a pile of scrap 3/4" thick pine that gave up this pile. I ripped it off and it was slow going. The saw was bogging down and I almost stalled the blade several times. The arbor pulley nut is still tight and the pulley is uniform when I move it 360. No taper or wobbling so that wasn't the hiccup. I'll be removing a few more links tomorrow.
So far the boxes are turning out uniform in dimensions. The OD and ID dimensions are almost dead nuts on. Feeling good so far about the assembly line boxes. Should be quicker and easier to finish them.
accidental woodworker
Holztechnisches Museum Rosenheim
Behind an ice and coffee restaurant in the centre of Rosenheim hides the Holztechnisches Museum Rosenheim. Christopher Schwarz from Lost Art Press brought it to my attention and as I passed Rosenheim on my way from Slovenia last weekend I visited it with my long-suffering and not so much complaining wife. (Had to invite her to a Wurstsalat afterwards.)
It is a kind of old fashioned Museum, with a lot of Show cases, some very detailed miniatures of saw mills and some screen with videos. There are very few interactiv place, but you can try a plane and pull a log by hand.
I concentrate on the displayed saws.

The teeth of a two man crosscut saw. You can see the trces of the flat or fether file used to sharpen each surface of the tooth seperatly.

Simple tow man pit saw. (To saw boards from logs.)

Drawing and picture of a sawing pit. Shown used with a 3 man frame saw.
Next object is this giant fram saw. I can not imagine that it was designet to be use by hands. I think it was oart of a water or animal driven saw mill.


The direction of the teeth changes in the middle. Lot of space between the teeth to clloect big amounts of shavings.


There is a lot more in this museum, but I think I will not show all the pictures I made. You will have to go on your own.
But this one I cannot keep to myself: Never saw a holdfast in Germany before:


More Oakum and lime mortar and other hot things.
Today's installation. 2.4 x 1.9m window in Accoya. 28mm argon-filled DGUs. It's not listed, but it is a traditionally built barn, with lime mortar masonry, converted to a house. When it was converted, the window that was put here, was sealed with expanding foam and portland cement, causing the window to rot and damp problems inside. This new window has been sealed with Oakum and lime mortar, which should help with the damp issues. Wet hessian outside curtains, to protect the mortar while it cures.

Draining beads to give the window it's best chances against the weather. Osmo + to protect the dark oak stain.
In the main worksshop this week, with the window in production, and a few other jobs on the bench.

My new(old) Multico morticer. If you need to use a machine, use an accurate machine...

....do it once..........and free yourself up for handtool work!
If you use old machines, you need accurate hand tools to maintain them. I love this adjustable spanner, all the way from Buffalo, NY. It stays where you set it!


Talking of tools, making some is getting closer. The forge is now up and running, and what a forge it is! Gas with the possibility of using coal, and with the lid on, a kiln.

cell phone holder pt VI.......
 |
| almost |
The shelf is a few frog hairs being shy of fully seated. Checked the notch for the charging cable was good and it was.
 |
| fitting the shelf |
Trying to plane the notch area with the blockplane wasn't working. The notches were playing havoc with evenly pushing the plane over them. Sanded the shelf with 100 grit until I got a snug fit.
 |
| sanded up to 600 grit |
I wasn't sure how the epoxy would look like just being sanded up to 220. I added 320, 400, 500, and 600 grit. Would have done more but 600 is the highest grit I have.
 |
| the finish |
I like how easy it is to apply this finish but more so how it looks. I did a couple of small japanese boxes with it and 2 months later they still look good.
 |
| pre test |
Before I committed to using the finish I applied some to same cherry as the stand. It looks wet and different against the natural unfinished wood.
 |
| first coat |
I'm happy with how the first coat looks. The epoxy came out looking fine. No scratches and the finish didn't cloud or obscure it. Big difference between the finished wood and the natural unfinished raw state.
 |
| plastic feet |
I like these for two reasons - one they elevate it about an 1/8 inch and two they keep it stationary. The feet act like 'anchors' keeping it where you set it. As a bonus I can apply the finish to the bottom at the same time as the rest of the stand.
 | |
| next project |
My oldest sister is staying with her daughter in Norwich. When I went there to pick her up I brought a load of boxes I made to give to my nieces and nephews. Donna liked the japanese boxes and asked me to make 3 more of them for her son's children. Started by resawing a bunch of scrap pine to about 3/8" thickness.
 |
| for the sides and ends |
These are slightly thicker than 3/8" which I will thin down when I plane the band sawn faces.
 |
| hmm..... |
Thought about using these for the bottoms and lids. I changed my mind because I don't like gluing up sock for lids/bottoms. I will stick these in boneyard and I'm sure I'll find a use for them.
 |
| 1/4" poplar |
This is what I am using for the lids. The bottoms will be 1/8" plywood.
Looking forward to some assembly line work. I think I have enough stock to whack out 4, maybe 5 of these. Depends upon whether or not I run into any hiccups. Doing the locking batten kicked my arse on the two small ones I've already made.
accidental woodworker
Before I Forget… A Few Things
cell phone holder pt V.......
 |
| hmm..... |
This ain't going to work. This is bigger than an 8x10 but that wouldn't fit neither. The option as a frame holder is out and this is strictly a cell phone holder/charging station now.
 |
| enough already |
I already made a blood offering and I still found another split. This is on the opposite side of the ones I glued yesterday.
 |
| cooking |
Got the uprights finally glued in. The shelf is in dry keeping its place for when it is glued next.
 |
| )%&@Q)%@Q gap fixer |
It isn't much of a gap but it is wide enough to throw me into a tizzy fit. I will fill it in with that piece of cherry veneer.
 |
| need a notch |
I have made cell phone charging station but without a notch/hole for the charging wire. Old dogs can still learn/remember sometimes.
 |
| gap gone |
This was the best match I can get with the small scraps of cherry veneer I had. I will secure it with a few dabs of superglue.
 |
| nope |
The width of the notch is spot on but the depth from the back is short. I had thought initially that I had made it extend into the shelf too much.
 |
| sigh.... |
This came this close '' to getting free flying lessons. Noticed this before I was going to glue the shelf on.
 |
| fits but..... |
I moved the notch in further another 1/2" but the plug wire end was up tight against the end of the notch. I had to drill it out another 1/4" to get some wiggle room.
 |
| gone somewhere in..... |
Got flying lessons here because I was done fixing splits and pieces popping off. This is now somewhere out in the wide blue yonder.
 |
| shelf #3 |
Laid out what I hope is the final shelf for a one day project that has morphed into several days now.
 |
| too snug |
I got a bit of blowout on the end when I sawed it square. The notches are too snug but I am ok with that. The important thing is that there aren't any gaps on either notch.
 |
| almost there |
Checked the notch and it is good. Lots of empty space and wiggle room. Not fitted yet or glued yet. It'll be another day before it is done. Then I get to pick a finish and I'm not thinking of shellac this time.
 |
| came today |
This is the awaited tenth anniversary edition. Got some reading material for at least one day.
Today was sweltering and humid. The temp get up to 97F -36C. A wee bit toasty and I soaked my T shirt on my post lunch stroll. In spite of the heat I did the walk with zero discomfort. I took my time, going slower than I normally do, and I got a Dels lemonade (a slushy ice lemonade) for the last 20 minutes walking back to the barn. It doesn't look like this weather is going away time soon neither.
accidental woodworker
A few more sharpening tricks

Workbench Wednesday – Too Many?
Several years ago, probably at one of the French Oak Roubo Project builds, Benchcrafted’s Jameel Abraham and I were chatting about the massive weight of good workbenches and good vises.
“Why couldn’t we collect carved thimble boxes instead of cast iron hunks?” he groused. “Instead we acquire stuff by the ton!”
At least he has the sense to only keep a couple benches in his studio. I, on the other hand, have not been so restrained. In great part due to my plan to host classes and workshop at the barn, I wound up with a dozen-and-a-half hefty benches scattered around, more than enough for every student who might come. (The cessation of that plan for a couple of reasons has made that situation non-optimal.) This preparation was exacerbated by my own fascination with workbenches, and plenty of space to put any that I bought or made.
I’ve reluctantly(?) come to the realization that I have too much real estate occupied by benches I do not use, at least as workbenches. I still have about 15 benches, but only use (at most) five of them as workbenches with any frequency, i.e. more than once a year. The rest are little more than really, really stout work tables.
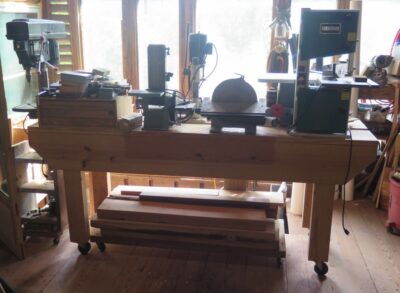
So I’ve taken the first small steps to eliminating or repurposing the inventory. I’ve sold two, and last week repurposed an eight-foot Nicholson as a rolling bench to hold benchtop machines. Obviously this is not a permanent nor irreversible arrangement — I can flip and remove the casters in about ten minutes — but it does provide a glimpse of what is possible, especially as I continue to explore the world of different workbench forms a la the ongoing Japanese planing beam build.
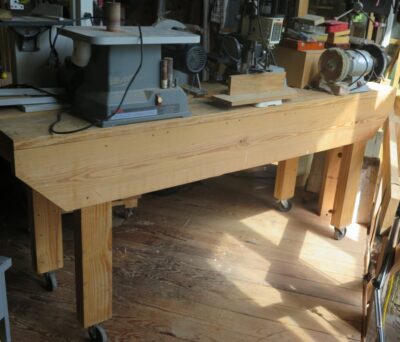
Rather than a hodgepodge of little rolling tables I now have all my main benchtop machines on one surface, easily accessible from both sides as the oversized casters make it a snap to wheel it out and around.
Toshio Odate toolbox done.......
Spent most of the day with my sister in and around Norwich Conn. We went out for fish 'n chips because she can't get seafood in Avila Indiana. We got stuck in traffic 4 times along with the usual slow downs due to it being tourist season in this part of south eastern Connecticut. In spite of that I got it toolbox done. I had applied the last of the shellac last night after dinner and in the first part of today's AM session. It was ready for glamour pics when I returned to the barn.
 |
| first glamour pic |
One of five knots visible on the toolbox. This one and one on the diagonal brace are brown knots - both reinforced with superglue. There are 3 reddish knots on the opposite long side, all stacked vertically.
 |
| 2nd pic |
The simplicity of the built handles is stunning IMO. No hardware required for the handles and the lid. Brilliant.
 |
| pic #3 |
This toolbox will transport a lot of tools. Still trying to wrap my brain bucket around this being just a box to transport tools, not to stow them.
 s s |
| locking batten |
I like this even though it isn't necessary. Gives me a warm and fuzzy about securing the lid.
 |
| without the locking batten |
It isn't needed nor necessary to secure the lid and keep it in place. However, if it isn't employed only one batten will be up tight against one of the top battens. There will be a slight gap with the other lid batten. I like the the look of having all the battens up against each other when locked in place.
 |
| hmm..... |
This is the one that was superglued. It didn't hold up. Popped off when I tried to fit the shelf and upright notches. Glued and clamped it while I visited with my sister.
 |
| looking slanted a wee bit |
Took care of that with a few extra raps on the high upright.
 |
| sneak peek |
I like how this is coming out. Definitely too large for a cell phone holder/charging stand but perfectly sized to hold an 8x10 (or smaller) frame.
 |
| not glued yet |
The right notch fit is loose and the left one is a snug fit. The uprights are square to the base and the shelf eyeballed parallel to it. When I do glue this I will dry fit the shelf and just glue the uprights. After those are set I'll repeat for the shelf.
accidental woodworker
And with a few adjustments.
This chest is being designed as I go. The panels to each side need something else to the carving. It's only now, with the trial assembly, that I realise what it is.

Not a huge adjustment; the leaves in the top part, needed more definition, and detail. And of course, having raking light, with the chest front in it's intended, vertical orientation, helps a lot.

And just another gratuitous photo of the central panel.

Carved boxes available for sale
If you follow my substack blog then you’ve already seen these two boxes. But I post frequently there, which bumps the post with the boxes off the top of the order. So I’ll put them here for a while.
Small carved oak box
 small oak box, July 2025
It’s based on some Thomas Dennis boxes, one of which I’ve seen, the others I only know from photographs. It’s made just the same as a period box – in this case, riven red oak with a millsawn pine board for the bottom. It’s small – 6 1/8” high, 9 1/4” x 13 3/4”. But it’s made just the same as my other full-sized boxes – all the oak riven and planed by hand, corner joints fastened with glue and wooden pins. This time it has iron hinges – these small-scale examples from Horton Brasses (although the hinges are iron.) A lidded till inside.
It’s available for sale – $1,000 – including shipping in the US. If you’re interested, email me and we can sort out the details. These days I add Paypal’s fee onto the price if paying that way. A check, though old-school, avoids the fee. My email is here Peterfollansbee7@gmail.com
a gallery of images


…………………
Carved oak box with lock
 carved oak box, pine lid & bottom. Lock by Peter Ross
There’s a story to this one – I made it several years ago – and a customer bought it and two other pieces. The story I heard is that someone didn’t like them, so they went into storage. I bought them back this summer – in the exact same condition they were in when they left here. This one’s not a copy of an existing box, but it’s typical in most of its features. Red oak box with white pine for the lid & bottom. The carvings are based on the works associated with Thomas Dennis of Ipswich, Massachusetts. The scrolls on the front appear in dozens of pieces from his shop. This box is nailed at the rabbeted corners – with what we often now call “T-heads” – wrought nails whose heads are flatted to form a narrow, wide head that buries nicely in the oak.
 detail showing T-head nails, escutcheon, etc
A till inside, oak lid with pine bottom & sides. In this view, you can also see the iron “gimmal” hinges- better known today as snipes/snipebill hinges.
 till, hinges, lock
These are the most common hinges on carved boxes in the 17th century. I only use them once in a while – I more often make a wooden hinge. These are simple and quick. But setting them just right takes a deft hand.
H: 7 1/8” W: 21 3/4” D: 13 3/4”
linseed oil finish
$2,000
Email me at PeterFollansbee7@gmail.com if you’re interested in purchasing this box (or ordering any of my oak furniture…)


cell phone holder ptIV.......
 |
| hmm...... |
Shelf #2 is long enough but it is only a 1/4" wide than the original. I want the replacement shelf to be at least a 1/2" wider.
 |
| better |
This is better choice. Still long enough (R/L) with plenty of wiggle room in the width.
 |
| just right |
I thinned this down to a knife line laid 360 and it is a few frog hairs thicker than the notch in the uprights. I will plane this edge to fit after the uprights are glued and set.
 |
| expected |
No problems planing the excess epoxy but there were planing the wood. Got a ton of tear out around the epoxy mostly in the area out toward the curved end. Sigh.
 |
| sigh some more...... |
Tried to plane it away first coming at it from every conceivable angle without any success. This is the third card scraper I tried to remove the tear out with. The first two sucked but this curved one got 90% of it. It wasn't easy and it took a lot of calories and time and in the end I couldn't get 100% of it.
 |
| shortened the belt |
I remember having to do this on my previous tablesaw. It took me 3 tries before I got it to work. The blade ramped out quickly and the sound changed too. I didn't have the low whooshing sound anymore. Now it was more high pitched.
 |
| feeling better |
Rip cuts in pine and cherry. Neither one bogged or stalled and I was able to push them both through the blade at the same rate as with the rubber v belt. I think I got it but the belt may stretch with continued use and I'll deal with that by removing another link(s).
 |
| almost done |
I thought I was and was shooting the first glamour pic when I noticed that I hadn't finished applying shellac to the sliding lock batten. One more day before the glamour pics get posted.
 |
| yikes..... |
Both sides of the left notch split. The left side a clear break and the right just split/cracked. Yellow glue for the left and super glue for the right.
 |
| layout |
Before I glued the boo boos, I laid out the arc on the shelf.
 |
| last step |
I was hoping to get the uprights glued today but that didn't happen. Maybe tomorrow in the AM session.
Got a new routine this day. On mondays I walk to Johnny's Chalet for breakfast. When I get back to the barn I do my sudoku and crossword puzzles. What got added today was doing my exercises I got from Physical Therapy. Those took over an hour to do. For this first week I will do them every other day. Next week I will try to do two days in a row and one day off. That is all dependent upon how I feel after doing them. Still did my post lunch stroll and didn't feel any odd or unpleasant effects during or after it. That is a good sign.
accidental woodworker
Fun On Labor Day Weekend
Again this year I will be one of the hands-on demonstrators at the 18th Century Trades Fair down in center county. The number of confirmed craftsmen is around 35, working in a magnificent Highland County setting. If you are so inclined it would be a grand day to spend with the family.

Despite having done this twice before I’ve still got a lot to do to get ready.
Stay tuned.
cell phone holder ptII.......
 |
| done |
The steam iron box is done. 4 coats of shellac? I am going to leave the stick in the lid to give the shellac a week or so to harden.
 |
| 3/8" link belt |
This one fit within the vee of both pulleys. However, it bogs down when ripping boards. It also hesitates when I first turn it on. It takes longer for the saw blade to ramp fully up to speed. Wasn't expecting this at all as I had used a link belt successfully on my last tablesaw.
The original belt even though it has the snot beat out of it and it is chewed up in few spots, it still works. It doesn't bog at all in rip cuts and instantly comes up to full speed when turn on. I'll take a few more links off the belt and see what that does. It should increase the tension which should increase power transmission.
 |
| uprights |
Laid out a ten degree angle for the uprights. After I sawed and planed it smooth, I cut a notch in them to hold the shelf.
 |
| two mortises |
Took my time and chopped out two mortises for the uprights. Self supporting and no gaps. The uprights aren't shouldered neither.
 |
| hmm..... |
There isn't enough lean back on the uprights. I eyeballed the second cut by eye - didn't use a bevel gauge this time.
 |
| better |
That should do it for lean back. The first one was too close to zero on vertical.
 |
| filled in with epoxy |
I got this epoxy from my wife - don't know why she had bought it. I don't know what type it is but it is slow set. It has a 40 minute open time.
 |
| bubble killer |
I stirred a lot of bubbles into this and the heat gun appeared to 'pop' every single one of them.
 |
| Yikes |
So glad that this epoxy has a 40 minute open time. I had watched the dark spot at the top right slowly soak up all the epoxy. This was the spot that was soft and spongy too. The second application of epoxy did the trick. When I checked it after my post lunch stroll, it was still proud of the surface. Dead in the water with this now as I'll have to wait until tomorrow to proceed working on it.
 |
| sneak peek |
After seeing the shelf where it will call home I'm thinking maybe I should make another one that is wider. I plan on matching the arc from the base onto the shelf. It doesn't appear to my eyeball that it is wide enough for that.
accidental woodworker
cell phone holder.......
The start of today was total overcast (no rain) but it was supposed to be sunny in the PM. So based on that I took a chance and went to Gurney's Sawmill. I had my doubts because on the way out it sprinkled a few times. No rain drops fell but I was a bit apprehensive but I survived. On the return home by the time I was close to the Rhode Island border, the sun was out and the sky was blue.
I was disappointed in the D select pine that got. The same 1x12 I had marked sawing in half a few weeks ago was still available. There were only four 1x12 boards for sale. I only bought three of them and a few 1x10's. I should have called ahead to check but I assumed that stock would be replenished within a week. It would seem that I ass-u-med incorrectly.
 |
| mixture |
I bought one 1x12 that was 12 feet long and a second one that was 16 feet long. I also got same length with two 1x10's. Disappointing that I'll have work with thinner width stock. As an aside the 1x12's were 11 1/4" wide and the 1x10's were 9 3/16". Why fart around like this and just sell 1x1's as 1x12s?
 |
| 1x10s |
The 1x10's were mostly clear, a lot clearer than the 1x12s. The grader for the 1x12 stock should go back to school and learn how to measure diameters. D select allows for 1/2" diameter knots but I got one board with a 2" diameter one. But there wasn't much room to quibble due to what was available.
 |
| still on the fence |
I am now leaning in the direction of turning this into holding a frame. I think that is a better use for it. I can make the cellphone holder with a much smaller base and differently styled uprights. Laying out a large arc on the front edge.
 |
| base roughed out |
I have to mortise for the uprights next. Once that is done I will make a chamfer on the front and the two sides. Not sure if I'll continue it on to the back edge but.....
 |
| hmm..... |
I was going to leave this as is but I changed my mind. The defect is a little loose and spongy in spots. I am going to fill this in with clear epoxy to consolidate it and keep it intact.
This is all I got done for today. My oldest sister came up for a visit and landed today in Norwich Conn. Spent time with her on the phone and we're going to do lunch on tuesday or wednesday. Excited about having her all to myself for lunch - it has been a bazillion years since we have filled the pie holes together.
accidental woodworker
Masking Tape & Superglue
Bottom rail. In the flow.
On with the bottom rail. Chalked out first, with charcoal to show where the joints will be.

In with v-gouge.
Giving us this.

And grounded.


A few adjustments to make, but you get the idea.

The New Peter Galbert Workshop
which one is it?........
Still applying the finish to the tool and steam iron boxes. Not done with either one yet. I had a physical therapy appointment and that ate up the entire PM session. My left leg is weak and I don't have the ability to lift up my right leg up while sitting. The PT tech spent over an hour going over some exercises for me to do at home along with 10 pound ankle weights. I have a follow up in 4 weeks and check my progress.
 |
| hmm..... |
When the internet went out last week I had to surf with my cell phone. It was awkward and a PITA to hold it while watching/listening to it. I thought of making this stand to hold it if and when that need may arise again.
This is the 2nd concept for it. The first one consisted of only one upright and I like the look of two. It makes it look sturdier and stronger with twin uprights. There is more shaping etc etc to come but this gives a starting point for it.
While I was playing around with this I came up with another use for it. I could use it to hold a picture frame. I like the 2nd use more than the intended purpose.
 |
| 2nd base choice |
I was thinking of making a thinner width with a slight arc on the front edge. This scrap of cherry is too thin for that but it would work for leaving it as is. And I have two more uprights to left front of it.
 |
| the winner |
I like the defects in this piece of cherry for the base. I still have to play with the placement of the uprights to maximize the defects. So far placing the uprights behind it is at the head of the line.
 |
| shelf |
The uprights are roughly 3/8" thick and the shelf is about 5/16". Working on how to position the shelf into the uprights. Put it in straight and angle the bottom of the uprights? Or angled both the bottom of the uprights and the shelf into the uprights. The uprights will have angled front faces so that will have to be taken into account too for placing the shelf across the two uprights.
I'll start on that in the AM. I am thinking that I will make at least two of them.
accidental woodworker
A Simple Tray Quickly Made
