Hand Tool Headlines
The Woodworking Blogs Aggregator
“Glory to God in the highest heaven, and on earth peace to those on whom his favor rests.” - Luke 2:14
Norse Woodsmith Blog Feeds
last new project to end 2025......pt XIV
 |
| fitting the back panel assembly |
I laid the pattern on the back, adjusting it until it looked ok and I marked where I had to remove and where I had to add. I had to add fillers on two opposite edges.
 |
| haircut day |
It still surprises me with how much dark hair I still have on the roof. I have some distinguished gray at the temples but the rest of the rest is black. It is winter so I cut my hair to a 1/4", the other 3 seasons I mow it down to a 1/8".
 |
| ready to plane |
Fillers cooked and I laid the pattern on the back and penciled its outline onto the it.
 |
| sigh |
One side of the coin has the back fitted. It is a snug fit with no large gaps, a few teeny slivers. On the other side this is a boo boo. This side should be facing into the interior.
 |
| the brain fart |
I hadn't thought this all the way through. The pattern fits the back perfectly but the rub is I penciled the the pattern the wrong way. I should have penciled the pattern on the back of the panel assembly.
 |
| fitting the back |
I was oblivious to this being wrong at this point. All my OCD attention was focused on fitting this. Started by getting the bottom first, then the right side, followed by the top, and finally the left side.
 |
| found out my boo boo |
This is the unfinished side of the plywood panels. It doesn't look that bad. There is one white spot on the right panel that I could paint/blend to hide.
 |
| this is a no no |
This splintered edge is not what I want to see. It looks like crap. I now had two choices, make a new panel assembly or start over from square one with this.
 |
| chose option two |
I double, triple checked this a bazillion times. I checked that I was laying the pattern correctly on the back face several times before I committed to tracing the pattern on it.
 |
| two more fillers |
I had two large gaps on the frame - at the top right and the bottom left. My plan was to fit the bottom, right side, and top first. After I got them fitted I would glue the final filler on the left side and fit it.
 |
| gotta love McMaster Carr |
They are wee bit expensive but they are worth. Ordered these yesterday and got them at 1320 today. These will be used for hinges mostly. A hundred screws in each box for about $10 each.
 |
| 3 sides fitted |
It took a while but I found it relaxing sneaking up on the fit. And I got it correct this time.
 |
| last one |
I think, at least for me, this was the way to do this. Trying to get all 4 in one shot would too much. The large gap at the top is a frog hair shy of a 1/4". The right side large gap was just shy of 3/16".
 |
| maybe tonight |
It is looking like this will be done probably before xmas. I might be able to squeeze in another last minute project to close out 2025.
accidental woodworker
last new project to end 2025......pt XIII
 |
| came yesterday |
I was tempted to start on these last night after dinner but I didn't. That aside, these 2" hinges will do the job. Nice touch with brass and steel screws but I won't be using either of them. Both are philips head screws and I don't like them. For nice brass hinges like these I want slotted brass flat head screws.
 |
| sweet |
These hinges cost $34 a pair and they are well worth it. Ball tips are the cherry atop the sundae.
 |
| fitting the panels |
Laid out the pencil line and planed down to it.
 |
| hmm...... |
The center stile wouldn't align with the dry fit tic marks. However, it is square, on both sides, at the top and bottom. I got both panels dry fitted and I'm happy with how it looks. Forgot to snap a pic of it for proof.
 |
| dutchman glued on |
I had seen on a YouTube vid where he applied yellow glue to one side and superglue to the other side. No attempt to have clear spots for either glue. I decided to give it a try and see what shook out.
 |
| planing the waste |
I didn't want to risk sawing any of the waste off. It would have been a awkward working around the clamp and sawing with my non master hand. There didn't seem to be any headaches or hiccups with the mixing of the two glues.
 |
| done |
This repair will be at the upper left corner of the bookcase. It doesn't look that bad this close and once it is in the bookcase it will be invisible.
 |
| glued and cooking |
I got the tic marks on the center stile to align. The right side stile ended up a bit proud though. It won't be problem because I still have to plane this to fit the back.
 |
| hinge layout |
I have come a long way with installing hinges. They don't fill me with dread anymore. I just treat as another step to complete the build.
 |
| not perfect yet |
The leaf wasn't flush on the left side. Flush on the right though. A piece of cherry veneer brought it up flush.
 |
| needs a #5 screw |
Not only were the supplied screws philips head, they were too long. They would have been ok in the carcass but not on the door. They were a few frog hairs longer than 3/4" (metric ?) - they would have poked through.
I didn't have enough screws for the 4 hinges. Blacksmith bolt were I usually buy my screws didn't have any #5x5/8" in stock. I ordered them from McMaster Carr and I should have them tomorrow.
 |
| sigh |
I blew out the back twice. I only waited the first time a few minutes (used super glue) but this time I let it set for over 30 minutes.
 |
| insurance |
I clamped a backer at the back and it worked. I didn't blow it out again.
 |
| one down, one to go |
Left door swings easily in/out. The margins aren't even, the bottom is thinner than the top. They are parallel and consistent though.
 |
| nope |
The bottom is beyond snug. There is no way this will close. Glad now that I didn't go nutso fitting the doors earlier.
 |
| done |
Both doors swing in/out freely. No hang ups top or bottom but the doors won't meet/close on latch side. The right door overlays the left one about 1/8".
 |
| why they won't close |
The gap on the hinge side of both doors is too wide. That is because the hinges aren't swaged. The hinge leafs don't lay flat on each other. I knew that going into this and I expected this. I will break out a router and use it to increase the depth of the mortises on the door and the carcass.
 |
| yikes |
I was playing around with fitting the back when I stepped away to get something off my workbench. The back fell out of the carcass and on the floor (failed the bounce test). This corner broke. I glued it back together and I'll let it cook until tomorrow.
 |
| for tomorrow |
Fitting the back into the carcass is going to be a huge PITA. The back is out of square by a 1/4". These glue ups will be used to facilitate making the fitting a wee bit easier.
accidental woodworker
Learning to Turn, Exercise, My First Accident, and a Progress Report

Every day I am at work I spent at least 15 minutes - more like 30 minutes -a day using the showroom treadle lathe. I would do more but I don't have time. And this was the point of designing the lathe in the first place: I need the exercise. Using the lathe, I break a sweat; I can feel my heartbeat go up; and I can feel the improvement in my stamina. I hate going to the gym, and at this point I don't pretend that this New Year will be different. But this is different. I focus on my goal of learning to turn properly and the time just slips by. Eventually my goal is to make certain items. I have a list but I am not skilled enough yet.
And this is what will bring me to the lathe in the future - interest in turning. The important physical benefit is frosting. Consequently I don't have to negotiate with myself, resort to post-workout bribery or make complicated podcast or music playlists to distract myself from (what I experience to be) the monotony of gym exercising.
But there is a learning curve.
Turning in general has a learning curve, but I am also learning the important aspects of turning on a treadle lathes. Pedaling is one example. I am now at the point where I routinely switch feet. I am learning how to position my body so that I am not in the way of moving the tool in a cut - yet still be able to pedal comfortably. I am is getting better, but I am not yet where I need to be, or where I hope to be within a few weeks.
I also had my first accident today. It was pure stupidity and carelessness, as accidents sometimes are. If I had been using an electric lathe, I might have lost a thumb. I was rounding out square stock and stopped pedaling so I could see where I was and I touched the wood to see if it was round. It was far from it and my thumb was dragged and stuck between the work and the tool rest. This was totally avoidable mistake and it served as a real wake-up call. Fortunately instead of causing an emergency trip to the hand surgeon, the accident just caused a mild pain at the base of my thumbnail. I don't even think I will lose the nail.
I counted myself lucky and finished roughing out.
Update on manufacture: We are basically done assembling all the bits and bobs that go into the lathe. The Treadle Lathe is the largest and most complicated hand tool project I can think of by any manufacturer in several generations. We are dealing with multiples of over 100 different parts. All of the parts with three exceptions are sitting here waiting to be assembled. The parts that are missing are a few of the headstocks - we had a CNC milling crash last week and we lost a few days waiting for the machine to be repairs. That's done. We don't feel comfortable finishing the tailstocks until we have assembled a production machine and double- checked the actual center distance from the ways. (It would be just foolish to make an assumption.) And finally the welded frames were supposed to be shipped to us last Wednesday but the trucking company confused bills of lading, reported our shipment picked up and on schedule when in fact it was just sitting at the fabricator. In theory, by the time you read this we will either have frames or we will be waiting for a truck to pull up, which will be followed by a mad dash to assemble the machines. If you have signed up as a pre-sale buyer, you will then get your call to arrange delivery, although that last bit may not happen until January because most of our shop people are on vacation Christmas Week.
We still have lots of work to do on manuals and videos.
All of this is a roundabout way of saying: I expect to spend more time turning and be a better turner in better physical shape starting now.

last new project to end 2025......pt XII
 |
| dipped below 60F |
It has been cold for the past couple of weeks, especially the past week and the start of the current one. Through it all the shop temp has hovered between 61F and 63F. I haven't seen 62F at all. The shop is still ok - ish to work in, I'll start wearing sweatshirts if the temp dips any lower.
 |
| setting pin sleeves |
This gizmo sets the shelf sleeves with a tap from a mallet. I got it from Lee Valley and it sets 4 different size sleeves. I have 3 of the four. I secure my sleeves with super glue.
 |
| done |
Before I make the shelves I will get the back installed and the doors hinged. Those being in place will determine the width of the shelves.
 |
| brain fart time |
The shellac I had ordered a few weeks ago finally came in. I made a stop at the paint store to get 4 empty quart cans but they only one. That was all I needed to mix enough shellac for the bookcase.
 |
| the huge brain fart |
I can't mix a quart of shellac - the can is too small. So what I usually do is mix three batches. The mistake I made was using way too many shellac flakes - I used 9 ounces instead of 4.5 ounces.
Ran out of alcohol but I did have enough to get the mountain of shellac dissolved. I have no idea what pound cut of shellac I have. The plan is to get two more cans and distribute the shellac I mixed into the four of them. I'll add more alcohol, guessing what looks good, and go from there.
 |
| road trip |
The only 6mm birch plywood was a 5 foot square panel that had smashed corners and was warped. So I got these two plywood panels - 2' x 4' with one face prefinished for $19 each. That is cheaper than the Lowes.
 |
| hit or miss |
I picked up a bag of these 1/4" dowels for my Dowel Max doweling jig. I have bought 1/4" dowels before and they were too loose. It is a crap shoot IMO because the pins will swell and shrink and you have to deal with it.
 |
| hmm...... |
Both of the openings are not square. The left side top right is out. The right side is out of square on the top and bottom corners on the right. I'll make the panels to the size of the larger measurement, and plane them to fit.
 |
| story stick |
There is over a 1/8" difference at the top and bottom.
 |
| yikes |
Didn't expect this to splinter out like it did. The face veneer is thinner than a piece of paper.
 |
| panels rough sized |
Did better with the splinter BS on the right panel. On the right one I knifed the cross cut line. Even the waste side of the cut, which I hadn't knife, came out splinter free.
 |
| hmm.... |
Labeled the joints because I sized the panels to each opening. Both of them are slightly different. What I don't understand is the out of square but all the shoulders lay up gap free.
 |
| sigh |
This is supposedly a 1/4" panel and the groove is 6mm wide a 1/4" deep. 6mm (0.236) is less then a 1/4" (0.250). The plywood is loose in the groove. There is a healthy gap that I wasn't expecting. I plan to glue the plywood in the grooves so it won't be a problem.
 |
| future fix |
This was the result of sawing the stile to length. This will be facing into the interior of the bookcase so I'll have to dutch it. I'll do that before I glue the frame and panel up tomorrow.
 |
| not that bad |
The left side frame joints are all tight. The right side and the top of the center stile aren't seated. This is looking like it is going to be a fun plane and fit exercise.
accidental woodworker
Make Your Own Ribbon Bookmark
Who doesn’t love a nice ribbon bookmark? Older bibliophiles will remember when many fine hardcover editions of literary classics came with a ribbon bookmark. I always loved them, though I’m afraid they aren’t as common as they used to be.
Fortunately, even if your favorite hardcover or leather-bound book doesn’t come with a ribbon bookmark–or if it doesn’t come with enough ribbons–it’s very easy to make your own ribbon bookmarks.
I learned how from a guy named Justin, who was a student of mine. A few years ago, we were both part of a theological discussion group at our university, and one day somebody noticed that Justin’s Bible had probably half a dozen ribbon bookmarks, all different colors. We were a little envious and wondered where he had gotten a Bible with so many ribbon bookmarks. He smiled and showed us how he had made them himself out of some very simple materials.

First I’ll show you how you can add the ribbon bookmark(s) to your book, and then I’ll show you how to make them.
Pretty much every book that’s not a paperback has this handy little gap at the spine. You’re going to attach your ribbons to something long and thin that you can slip into this gap.

Here’s how you do it.
First, make the slip.Use stiff poster board or a sheet of vinyl, just something thin you can punch a few holes in. You can even use a cereal box or something like that. Cut it into a long slip that will fit nicely into the book’s spine. The exact dimensions aren’t important, but if you make it about half as long as the book is tall, you can adjust the length of your bookmarks by moving it up and down inside the spine.
Now get some ribbon. I recommend the 1/4″ wide ribbon that you can get at any fabric store. You can get the wider 3/8″ size if you prefer. Be sure to choose a color and texture that you really like. I prefer plain, smooth polyester ribbon, which is soft and flexible and feels nice in the hand. Other kinds of ribbon are quite stiff or have a lot of texture, which is not ideal for a bookmark. Ribbon is not expensive, so you can get several different colors if you like.

You can attach the ribbon to your slip in many different ways. I decided to punch holes, fold the ribbon through the hole, and superglue it to itself. (I pressed it between a couple pieces of waxed paper while it dried.) You could also put the ribbon through the hole and staple the ribbon to itself. Or you could just tie it off in a little knot, which is how my student had attached his. Just make sure the ribbon can’t pull free if you tug on it a little bit.
With the ribbons attached, cut them to the proper length.

Just make sure you leave enough on either end to drop down into the spine and stick out from the pages.
I was making several of these for Christmas presents, so I put down some tape on my table to help me cut every ribbon to the same length. You may want to customize the ribbon’s length to your book’s size. And you can always leave it a bit long at first and trim it to final length once you’ve installed it in the book.
Don’t forget the singe the ends of the ribbons with a flame so they don’t ravel.

Now slip your new bookmark into the book’s spine, and you’re done!
After just a few minutes’ work, you have made a fine ribbon bookmark to mark your place in your favorite book.

But since these are so quick to make, it would be a shame to make just one. Why not make a few for your other favorite hardcover books. You could even make some as gifts for your bookish friends!
Or maybe it’s time to sit down in front of the fireplace and enjoy your favorite book, enhanced with a ribbon bookmark you made yourself.

Lectio felix! (Happy reading!)
2026 Chair and Wheelbarrow Classes
I just finished teaching my last class of the year, on 18th Century Chairmaking. A highlight for me was a trip to our local auction house to view a turn-of-the-19th-Century bow back chair made by the McKim Brothers of Richmond, Virginia (photo from the Leland Little website):

The auction-house folks were gracious enough to allow me to trace the very nice, sculptural seat:

I made a copy of the seat during class the next day and intend to offer it as a variation for future students in this 18th Century Chairmaking Class. Teaching this class was fun, and I’m fired up to do it again. Here’s a few classes for next year (there will probably be more next summer and fall, but this is what I’ve got for now):
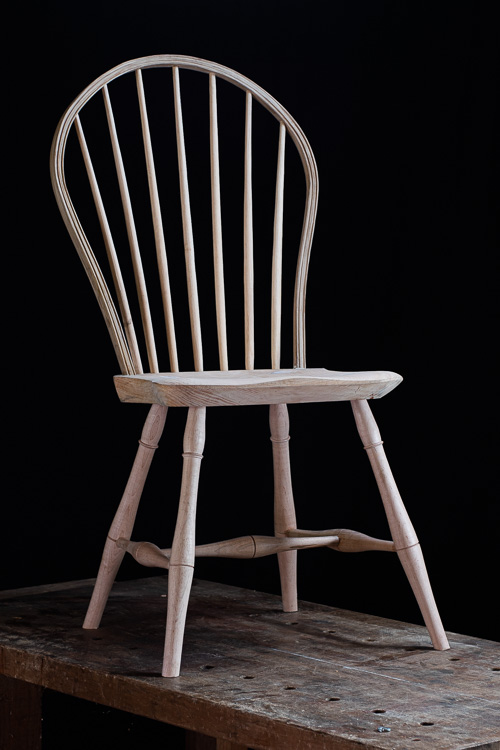
18th CENTURY LOOP BACK SIDE CHAIR
March 23rd to 28th, 2026 (at my shop)
May 4th to 9th, 2026 (at my shop)
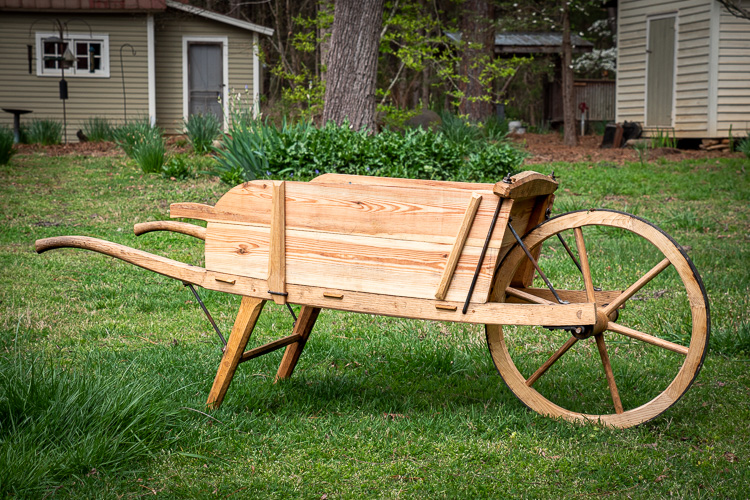
TRADITIONAL WHEELBARROW w/ PETER ROSS & ELIA BIZZARRI
October 5th-10th, 2026 (at my shop)
I’m doing the lottery system again: email me by 8am on Thursday (December 18th) to be entered into the lottery for the class(es) you want. After that, any class opening will be available for purchase through the website shopping cart.
Hope to see you next year!
The post 2026 Chair and Wheelbarrow Classes first appeared on Elia Bizzarri - Hand Tool Woodworking.Hal Borland on Snow
last new project to end 2025......pt XI
 |
| first snow this year |
This is what fell over night, maybe a little more than an inch. I didn't go to Woodcraft today because of it. Wimped out but maybe I'll bite the bullet and go monday or tuesday.
 |
| hmm...... |
I have enough of this plywood for the panels but I'm not crazy about the grain pattern on it. The opposite face is white. IMO, neither one compliments the pine. So I'll wait to get the birch plywood from Woodcraft.
 |
| doing piddly things |
Filling time in the shop doing little things. Made a new drilling block for the shelf sleeve for the pins. I don't save these because they get trashed - the hole gets enlarged and eventually won't drill plumb holes.
 |
| done |
Got the remaining 6 screws installed. I couldn't think of any reason that I would have to detach the base from the carcass.
 |
| last set of holes |
Got smart this time and added a 3/4" scrap on the edge - the thickness of the back frame ass'y and the doors. Missed doing this on past drilling ops and it interfered with the notches for the shelf pins on the underside.
 |
| ugly gaps |
Filled in the few gaps I had with pine sawdust and yellow glue. I got a pretty good color match which surprised me. When I mix pine sawdust with hide glue, it always comes out dark.
 |
| sigh...... |
The gap is/was filled with hide glue. I tried to dig some of it out with a pick but it wasn't working in my favor. I filled what I was able to pick out with pine sawdust and yellow glue. Of course this is the top and regardless of the homemade putty, they will still probably pop like neon lights.
 |
| yikes |
I thought I had a huge hiccup on my hands. Initially I thought this gap was due to the 6 screws I installed to attach the base to the carcass. Made me regret that I had planed the doors to quasi fit yesterday. Turned out to be favorable to me.
 |
| happy face on |
I had the doors switched, L for R, and the door was also upside down. Didn't notice that in the above pic. Got the fit I had yesterday so the screws hadn't pulled or twisted anything.
 |
| hmm...... |
Not entirely thrilled with this back stop thing. The curves at the ends match the cutout in base. I used the cutout from the longest one to make this. I wonder if anyone would even pick up on the match between the two.
 |
| prepping the knobs |
The tenons on shaker knobs varies a lot. One of these is a 64th plus over 3/8" and the other is a 64th under 3/8". The first step is drilling a hole in the tenons so the wedges don't split the tenon.
 |
| holes drilled |
2nd step it sawing the slot for the wedge. I have tried to do this with a handsaw but the results have always sucked pond scum for me.
 |
| bandsawing the slots |
Doing the slots on the bandsaw works the best. The only headache I have with it is making the slots in the right orientation. This time I got it right.
 |
| done |
I started wedging shaker knobs years ago. I have had too many of them fail and fall out. I haven't had any problems since I've been doing it this way. The only problem I have with knobs is chips breaking off around the rim of the knobs.
 |
| 3 times is the charm |
Made one extra wedge - used cherry because it was the only hardwood I had scraps to get wedges from. The first two sets I made were too small or not wide enough.
accidental woodworker
Moulding Plane Cubby
last new project to end 2025......pt X
 |
| fitting the doors |
With the back I moved on to fitting the doors. Not 100% - just fitted them loose and get an even margin on the top, bottom, and hinge sides. Started with the left door by fitting the bottom first, then the hinge side, and finally the top. Took a while because I was fighting the urge to take just one more swipe the entire time.
 |
| done |
Fitted the right door next and then planed the shim on latch side of the right door. There is roughly a 16th gap on the top and bottom on both doors.
This is all I got done today. I didn't feel like driving to Woodcraft today and I'll do it tomorrow.
 |
| came today |
I ordered these off Etsy and they came from England. I assumed they were coming from the USA but I was wrong. They came surprisingly quick considering they came across the big pond. These would have been a better fit for the chest I made for my sister.
Spent most of the day reading. I made a small dent in the pile of books awaiting me, finished one and continued another I've slogging my way through for a couple of months now.
accidental woodworker
Winter Wonderland
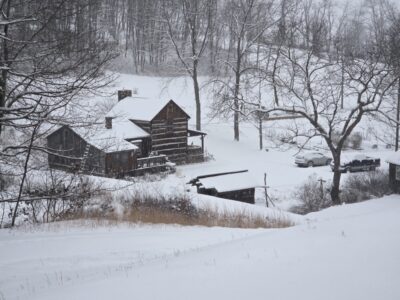
In a recent eight-day stretch here at Shangri-la we had more than a foot of snow, much earlier than normal for us in the Virginia (!) highlands. My pal MikeM lives in upstate New Tork and we note that our weather is basically similar, just one day earlier or later depending on which way the fronts are moving. Tomorrow night I think the overnight low will be approaching zero. That usually does not happen here until late January or early February.
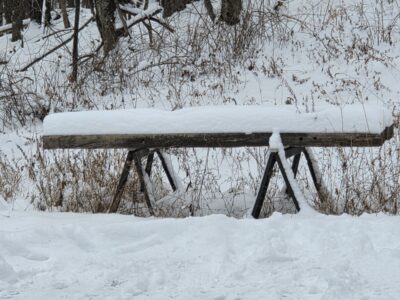
Just for reference — the snow buildup on my shooting bench of 6″x8″ timbers.
It made me all the more thankful I have a mondo snow blower that can clear the driveway with three passes. On the other hand, even though it is power-drive it still requires rasslin’ a 350-pound machine on slippery ground. It took about an hour to clear the driveway from the front gate up to the barn. It took two days for my shoulders and hips to quit barking at me.
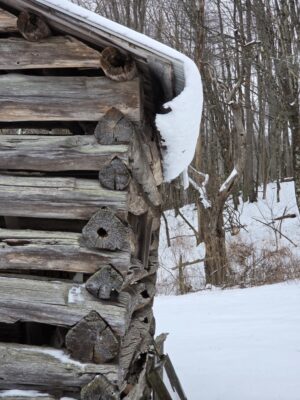
Last night as I was heading down the hill for supper I noticed this fascinating formation on the edge of the log barn roof. I’ve never seen anything quite like this.
Definitely time to get back to processing next winter’s firewood.
ICDT Contemporary Shelves 1

I am making this project with my daughter. I have a book from Popular Woodworking's I Can Do That series that is good for beginner projects. We looked through it and decided on the Contemporary Shelves. I think there's more than one project with that name. The one we picked looks like this:
 photo from book and adapted drawing
It is made from 2x12 construction lumber. In my plans I made it less wide and removed one of the shelves to decrease the total height. I also carried the sides down to the floor rather than using scrap for feet.
 2x12s, marked which side to face up when going through planer
Luckily I had three 2x12s and some offcuts. At the store I try to select ones with minimal defects, but they're never perfect. I try to avoid getting the pith (center), but I missed it on one or two of these as it was only visible on one end.
I wanted them noticeably thinner than basic 2x lumber, but I don't think I achieved that. I ran them through the planer several times until I was tired of it and they were 1 1/8" thick. Planing made them thinner but didn't remove all of the cupping and twisting.
 the planer found a staple
 I put this stuff around the bushes
For crosscutting I used a sled on the bandsaw. This only works if the cut on the left is less than 13-14 inches. So I handcut some pieces until they fit. There's lots of imperfections here that add up. The faces and edges may not be flat or square, the sled has some wobble, some long boards are too heavy hanging over the right side, etc. It's quick and rough.
 push the sled through
 rough cut edges
For joinery I considered long nails or screws. Those would work going through the sides into the shelves. But I couldn't figure out how to fasten the uprights going down the center. Pocket screws would work but leave ugly slots. I decided to domino those pieces, which progressed to using dominos for almost everything.
 lining up where the shelves will fasten to the sides
 domino the center uprights to the shelves
 dry fit, upside-down
The bottom will have pocket screws going into the sides. I think that will be more secure, as all of the other joints are 'trapped' but the bottom-to-side joint could actually spread apart. Also they won't be visible. Also I wouldn't have to worry about carefully measuring and aligning the domino locations.
 pencil line shows where I expected the bottom to line up vs where it actually ended up
 the top will overhang the sides about 1 1/8"
So I've been paused at that stage for over two weeks. So far my daughter's had more of an executive supervisory role than a participatory role. I've been using noisy, dusty tools. Now I think she can help more with hand sanding, gluing, clamping, and finishing. But it's below freezing in the garage so I will have to find a suitable area indoors.
last new project to end 2025......pt IX
 |
| sigh.... |
The thing I was worried about happening, happened. While tapping the tails home with a mallet it split from the base of the tail outward to the cutout. Forced glue into the split and clamped it. I'll be putting this facing the back.
I've noticed in the past with case hardened stock that it splits along the grain easily. I got lucky with only one hiccup to deal with.
 |
| hmm..... |
The ends are short and I was thinking of skipping bearers there. The bearers are set down from the top of the base a 1/8".
 |
| sneak peek |
I like the height of the base. It will make it easier to access the bottom shelf contents. Potential problem is the carcass and the base aren't laying flat against each other.
 |
| option one |
Cove molding - don't know the size but it looks appropriate.
 |
| option two |
I am pretty sure that this is a 1/4", quarter round. Don't like this as much as the first one.
 |
| option two on the front |
There is a margin between the quarter round and the top of the bottom of the shelf.
 |
| option one on the front |
There isn't much of a margin with the cove molding. This one is the loser. Option two is the winner with the wider margin.
 |
| changed a wee bit again |
I screwed the carcass to the base. No more misalignment, or any twist between the two is gone too. The door fit changed a wee bit but overall they were still square in the opening. The left one got snugger at the top left corner and the right one a wee bit looser. I will make any final adjustments/fitting once I get the hinges installed.
Speaking of hinges I ordered them today from Horton Brasses. I ordered two sets of 2" hinges for $75. I wanted the 2 1/2" hinges but the 2" were $5 cheaper each.
 |
| thinking ahead |
I only have 4 screws holding the carcass to the base for now. I'm not sure if I'll have to take the carcass off again. I am also rethinking the back for the bookcase. I am mulling over 3 options. Option one is to rout a rabbet and put in a 1/4" plywood panel. Option 2 is rout a rabbet and use 1/2" or 3/8" thick solid wood boards. Option 3 is a frame and panel, with the panels being 6mm birch plywood.
 |
| door astragal layout |
Three sizes of shaker knobs for the doors. All three will fit without looking crowded with an astragal that is 1 1/2" wide. Top and bottom knobs are maple and the middle ones are cherry. The bottom ones are the winners so far
 |
| and the winner is.... |
Option 3 won the brass ring. I like the options 1 & 2 because they protruded less into the bookcase then option 3. However, I like the look of the option 3 more than the other 2. Plowed a 6mm groove in the rails and stiles.
 |
| fitting the rails and stiles |
Sawed the shoulders with a dozuki, split the tenons with a chisel, and fitted them with the rabbet block plane.
 |
| dry fitted |
I had to use a center stile because I can't get 6mm plywood large enough to fit the opening. I like the center stile and the two smaller panel openings. All the joints line up pretty good but I will have to plane them flush after it is glued up.
Road trip to the Walpole Woodcraft tomorrow or sunday. Most likely sunday because the traffic will be less.
 |
| better choice |
While working on the bookcase I saw a boatload of 1/2 round maple stuck in the joist bays.It is 7/8" wide and I will using it as the astragal. This will also blend in with the 1/4 round on the top of the base.
 |
| door catch |
This will go on the bottom inside of the left door. The right door will have the astragal attached to it and it is the door that you open first.
accidental woodworker
Comments

last new project to end 2025......pt VIII
Today I had my post hospitalization check up. I still have the cough and the snot locker filling constantly but I do feel a lot better. The bitter, biting cough I had before is gone. The one now I feel in my chest with hacking up phlegm by the bucket. The cough is gentler and I don't feel like putting a gun to my head when I do cough.
The doc gave me a Rx for a cough suppressant and something to help with the phlegm. On the 29th I have a pulmonary function test and on Jan 9th I have another MRI. That is the one I'm anxious about because it will reveal whether I had pneumonia or lung cancer. The important thing in my mind is that I had an improvement in my condition be taking the pneumonia antibiotics. Fingers crossed till the tell tale MRI.
 |
| happy face on |
The base stock behaved over night. I was expecting to see the long ones to be curled up like pretzels. The right long has a bit of bow to it but I can easily work around that.
 |
| new template |
Not much difference in them. The bottom one is only an inch taller than the top one.
 |
| one down and one to go |
I put the tails on the short ends so the from the front the view will be square - ish tails vice triangular pins. This is where I killed the lights to go to the VA. New traffic patterns/construction on RTE10 made that a fun ride. Glad that I left early.
 |
| filler on the latch side |
This had been cooking in the clamps for two days. Unclamped it and sawed the ends flush. I will leave the shim full width until I get the hinges installed.
 |
| hmmm....... |
Both doors would not lay in the opening square. Penciled the shim overlay and it was tapered. Realized that I had fitted the doors to fit with the carcass in a specific orientation this way wasn't it. Flipped it 180 and both doors laid up square in the opening. The gap on the latch side was now parallel top to bottom. Labeled the top/bottom along with the L and R.
 |
| last three |
No surprises chopping the pin waste. Another thing I was bit apprehensive about due to the case hardening I saw when ripping the stock.
 |
| fits |
This baser is snugger than the first one I did. It was a frog hair or two too snug but I managed to get it on. The length has about a 1/8" of wiggle room while the width has none.
 |
| base cutout done |
I double, triple checked this before I bandsawed out the waste. I have done this in the past with one leg cut out in the wrong direction. Tends to suck the wind out of the sails in a heart beat.
 |
| tricky cut out |
I couldn't bandsaw the waste in one continuous cut. However, I could gang them together and rasp the cutouts even and smooth.
 |
| different op for the long ones |
I ganged the two long ones together and rasped the ends together. The long straight run between the ends I did individually.
 |
| one more dry fit |
I sanded the insides of the base with 80 grit and that helped a wee bit. It was still snug but was easier to get it started. Glued it and put it back on to cook in place. The clamps are there to keep it from sliding down.
Tomorrow I'll get the bearers installed and eyeball how the bookcase looks with the base attached. I should be able to finish this before the new year shakes hands with me.
accidental woodworker
last new project to end 2025......pt VII
 |
| came too late |
Whenever I see these I usually buy them, especially the war time publications. This one is packed with wood characteristics, plans, and repair procedures. I wish I had gotten it before I started the last project for this year.
 |
| look familiar |
What struck me was the door stop detail at the top and the bottom. The top stop is something I haven't seen before and it would have worked perfectly for my two door bookcase.
 |
| after dinner |
I went back to the shop, chopped the pins, dry fitted the base, and checked the fit on the carcass. It was a little snug on one corner but I moved the opposite corner until it slipped over the carcass. I didn't bother squaring the base - I used the carcass to set the fit.
 |
| template |
None of the templates I already had looked good to my eye. Once I'm done using it I'll put with the other templates.
 |
| done |
Got all four cutouts done with one continuous saw cut on the bandsaw. After cleaning the saw cuts with planes, spokeshaves, and 100 grit sandpaper, I was ready to glue it up.
 |
| big sigh |
Got the base glued up and all the tails fully seated. The plan was to use the carcass to hold the base as it cooked. However, it dawned me here that I had done a huge brain fart that still the smell still lingers in the shop. I made this base way too big. If fits in this orientation but it is the wrong one.
This is without a doubt one of, if not the #1 bone head me-steaks I have made in the shop ever. I don't know how I hadn't seen this the previous night. I only saw it after the base was glued and on the carcass and I was thinking of the doors. That is when the bells started to ring and echo in the brain bucket.
I don't think this me-steak is something I will be able to recycle into using on something else. But just in case I will stow it in the boneyard after it has cooked.
 |
| new base |
After the base screw up I left the shop. I got all my xmas shopping done and everything wrapped and ready to go. Stickered the new base stock but I don't have a good feeling about it. The pine seemed to be case hardened a wee bit. I had a devil of time ripping the long pieces. The blade pinched on the kerf for the first 1/3 of the rip cut. Got it done and I'll find out in the AM if this had stupid wood tricks up its sleeves.
 |
| one of the first base cut offs |
Cleaned up and ready to layout for the shelf pins.
 |
| layout done |
Didn't plan it this way but it worked out in my favor. The last position on the drill guide is 7" from the bottom and the top one is 7 1/8" from the top.
 |
| almost 6" |
One good thing about the screw up is the base is now almost at the 6" I originally wanted. I will have to make a new template as the original is 4 1/2".
Found some brass hinges from Horton Brasses that I like -$83 shipped. I'll dig into my wood stash $$$ and buy them probably next week. But now I have the problem of knobs for the doors. The added headache is I will have to work around the door astragal. There isn't a lot of real estate to play with between the astragal and the knob size.
accidental woodworker
Investing More – Less Cost

Chairs for Sale (At a Discount)
I’ve accumulated another attic full of chairs since my previous chair sale four years ago. Many were built in classes – both online and in-person – while others came from changed orders. Most of these chairs are unfinished and can be painted to your specifications. I am offering a discount on them for the month of December. I can ship them anywhere in the US. Details below:

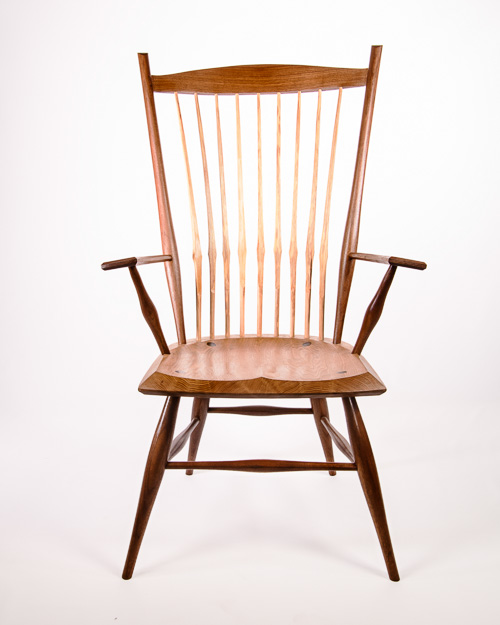
I have three loop back side chairs with baluster turnings that I made in classes that I taught this year. But things don’t always go according to plan in a class: one chair is first-rate, one has a seat that cracked during glue-up and I fixed with glue and three walnut butterflies on the seat bottom, one has a back that’s a few degrees more vertical than the plans call for (not sure how that happened!). The cracked seat is perfectly sound now, and the upright chair is quite comfortable if you like sitting upright. All are ready to be painted to your specifications. $1200 each (usually $1400)
I built this Velda’s chair in my online class with Curtis Buchanan. All the parts are white oak, except a butternut seat: I intended to paint it black-over-red, leaving the butternut seat showing through, but now you get the choice. I don’t have the right photo, so this one of a walnut and butternut version will have to do. $2700 (usually $3000)

A customer ordered four Pete’s Stools, then decided she wanted stools with backs. So I have four Pete’s stools ready for paint. $600 each (usually $700).


I made this birdcage side chair ten or twelve years ago. I put flats on some of the parts, intending to get a decorative painter to do fancy things to it. But the decorative painter disappeared and I threw it in the loft half finished. I finally got the back on it a few weeks ago and it’s ready for paint (but you’re stuck with my limited skills). $1600 (usually $1800)
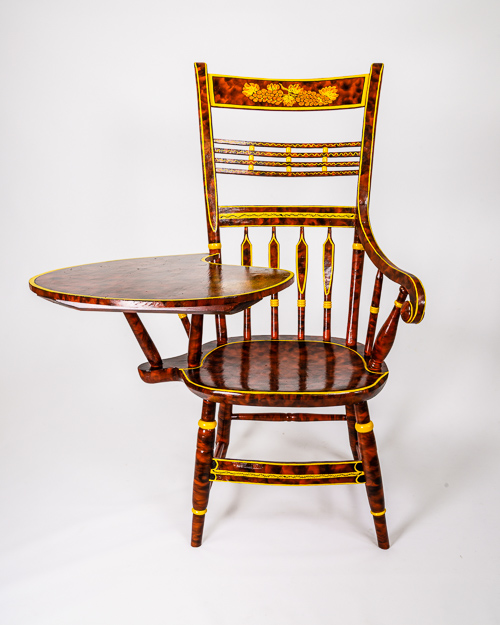
Reproduction of an early 19th Century writing arm chair in the Dewitt Wallace Museum at Colonial Williamsburg.
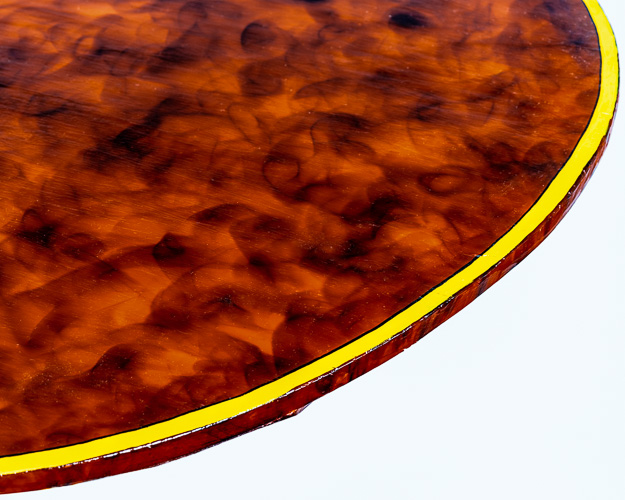
I’ve saved the best for last. This is a copy of a chair in the Colonial Williamsburg collection, attributed to William Challen of Lexington, KY (he was in NY before that, where he has the first known ad for a fancy chair, a style of early 19th. chairs that became intensely popular). Seth and I spent two days measuring the chair, we came home and spent a couple months learning how to build it, then we did a presentation on it at the Working Wood symposium in January 2020. I turned everything on a pole lathe, bored all the holes with spoon bits, then Williamsburg’s conservator Chris Swan spent a couple weeks finishing it with period paints. The black marks are called smoke graining – you hold the chair, painted in half-wet paint, up to a candle and the soot adheres to the paint in swirling clouds. I signed a contract that I would not make any more of these, so this chair is truly unique and will remain so. $5000 (usually $6500)
today sucked........
At 0730 I tried to start my truck to go to the grocery store. The temp was 15 F - 9C then and the truck would not start. It coughed briefly and then the starter continually clicked. The truck had been hard starting for a few days but I assumed it was because of the cold temps lately. The voltage meter on the truck was barely above 10 volts, hadn't noticed before. Not enough to turn the engine over.
A new battery was $161 to replace the one I had bought barely two years ago. The fun part commenced when I removed the old one and put in the new one. There was a shitload of battery acid residue all over the battery terminals and the clamp. Cleaning that up ate up a ton of time and calories.
The fun part was dropping the nuts for the battery clamp. Dropped them twice and both times I had to remove the new battery to find them. Took me over 30 minutes to find the 2nd dropped one. Did I mention that I was doing this in my driveway with the temp at 18F -7.7C. It was #()%&@#)%*#@_)% cold and I was not a happy camper. I had to make a bazillion trips to my shop to get tools - tons of headaches trying to find metric wrenches. Ended up using combination wrenches and slip joint pliers. Eventually I got it done and voltage meter was reading in the normal range.
The truck started up without a whimper several times as I checked it and the voltage meter each time throughout the day. Tomorrow I'm bringing the truck into the shop to have the alternator checked. I want to eliminate that not working at 100%. That was almost 2 hours I'll never get back.
 |
| last night after dinner |
Before dinner I had the long and one short glazing bar glued. After dinner I glued on the last one.
 |
| 2nd door |
I glued on all three glazing bars on the 2nd door. The doors will be done come the AM.
 |
| flushed |
After eyeballing the glazing bars I decided to flush them. The end of one of them got squished a wee bit and that drove flushing them.
 |
| hmm...... |
The right hand door tapered gap is the same. I thought that maybe the glazing bars might have been a magic fix.
 |
| good sign |
The vertical muntins in spite of the gap, are still aligned L to R and R to L. The left door is snug and the right one also is loose fitting along with having a gap. I need two sets of hinges but that may take a while. A decent hinge set runs about $30 or more. Might have to wait until after xmas before I buy them.
 |
| penciling the gap |
The gap at the top is just shy of 3/16". I lined the rule on inboard edge at the top and at a tic mark at 1/8" inboard at the bottom. I want to sneak up on the fit by taking as little as possible off the hinge side of the door.
 |
| happy with this |
It took three plane and checks before I was happy with the fit. It isn't perfect but I still have to fit the hinges. They tend to move the door a wee bit and I'll make any final adjustments then.
 |
| even gap |
I was glad to see the even gap (top to bottom) on the latch side of both doors. I wasn't sure if correcting for the tapered gap would show up here afterwards.
 |
| flushing the tails/pins |
This setup worked well for this planing operation. I had to move it 8 times to plane the corners but no hiccups doing it.
 |
| shim glued and cooking |
The first shim I couldn't use because it wasn't wide enough. Didn't notice it when I sawed it out. This one is twice the thickness needed but it gives me a lot of wiggle room for adjusting. It will also be hidden under the door astragal yet to come. Can't think of one that fits in with the overall Shaker look of this bookcase.
 |
| base stock |
My original plan was to make this 6 1/2" high but nixed it. That would have used up two 6 foot 1x12's. Instead I made it 4 1/2" high and got it all out of one 6 foot 1x12.
 |
| ready for dovetailing |
The four small pieces are the bearers that the carcass will rest on. They are 3/4" x 3/4".
 |
| sawing the tails |
Joining the base together with through dovetails. I thought of doing half blinds but went with through. I don't mind the look of seeing the tails and pins.
 |
| stayed late |
Tails are done and I got the pins sawn. Stayed in the shop until 1530 to get them to that point. In the AM I'll chop the waste and dry fit the base. I made it a 16th wider and longer for wiggle room. I will cover any gaps with a cove molding.
accidental woodworker
Some shop doings
 box parts, for 2026
Every winter there’s a few days it’s too cold to bother trying to heat the shop with my small woodstove. It works out, there’s always some other stuff to do. Today, which started at about 10 degrees F/-12C provides an excellent chance to take a moment to post to this blog. Since the middle of 2023 I’ve mostly concentrated my writing on my substack blog – https://peterfollansbeejoinerswork.substack.com/ which I still think of it as the “new” blog. Here’s some of what’s been going on in my shop lately.
First – a detour related to the cold and the time of year. My wife Maureen and daughter Rose have been knitting & crocheting away and have updated their Etsy site –https://www.etsy.com/shop/MaureensFiberArts


All right, on to the woodworking. A customer ordered a copy-as-close-as-I-can-get of a box at the Metropolitan Museum of Art in New York – and that included a lock with hasp. My friend Mark Atchison finished the lock recently and two days ago I spent time cautiously chopping into the carved box front to house the lock. Whenever I do this, I first cut a practice housing in some scrap.
 time spent practicing this is worth it
that gave me enough to go on – and I set out with the carved box front, starting with some depth holes bored with a spoon bit. Most of the modern bits I have include a lead screw that would poke through the board.
 depth gauges
From there – chisel work.
 chisel work
I did all the practice, then the real thing, then tested the fit of the lock, turned the key this way & that many times to make sure all was right. Then bored some small pilot holes and clinch-nailed the lock in place.
 on it goes
Boy did that feel good. Every stroke perfect. Centered, tight. Too bad it didn’t work! The test-fits had just enough slop in the fit that the key threw the bolt easily enough. Once it was so tight onto the box front, it was pinched against the housing and there wasn’t enough space to throw the bolt. The key wouldn’t turn. I had to pry those nails out – and today was going to be the necessary trouble-shooting and re-fitting. Now I know what I’m doing tomorrow.
The box itself is a bit different for me – no till for one thing. That makes things easier. No rabbets at the corners – just four boards butted up to each other & nailed. I know many boxes were done that way in 17th century England.
 LB carved box begun
Most New England examples are rabbeted. I think rabbets help line things up.
 rabbet corner
This was the first time I’ve done one without rabbets. It was like first riding a bike without training wheels – a bit nerve-wracking.
There’s some ladderback chairs underway, also to fill orders. I finished one of the hickory bark seats last week and have one more to finish off later.
 white oak chair, hickory bark seat
And I took a couple of days out to make some birch-bark containers, something I’ve dabbled in now & then. Anissa Kapsales was here to shoot the process for an article coming up in Fine Woodworking – or is it Fine Bark-working? I don’t know how “fine” my work was, but it was fun…amazing material.
 outer layer wrapped up