Hand Tool Headlines
The Woodworking Blogs Aggregator
“Glory to God in the highest heaven, and on earth peace to those on whom his favor rests.” - Luke 2:14
Be sure to visit the Hand Tool Headlines section - scores of my favorite woodworking blogs in one place.
General Woodworking
official snowfall is 32.8 inches.......
I don't know where this official level was done, but it wasn't in my part of the universe. The drifts here might be that high but the actual amount of snow on the ground is probably less than a foot. The wind blew all day long blowing snow into drifts and then blowing them away into a new drift. I didn't shovel at all today because of the wind. I'll do the shoveling tomorrow, as long as the wind has died down.
 |
| hmm..... |
The two walnut bookshelves side by side. Initially I was going to leave the left one with flat feet. Nixed that in favor of having the shelf tilted backwards. There are slight differences between the two of them as I didn't want to make clones.
 |
| back slats |
With the angled fronts this design allows for the back slats to be positioned higher. With the rounded ends I have to be careful about how close I place the top one to the round over.
On Miles cherry bookshelf I put the top back slat a wee bit too far down. It has no effect on the bookshelf's function it is more of an aesthetic option.
 |
| needs help |
I sawed the front and rear legs with a dozuki saw. First look was good but it was rocking some. Trying to plane the front leg was difficult and I switched to a 80 grit sanding stick.
 |
| 99% |
Took 5 sand/plane and check steps before 99% of the rocking disappeared. Called it done here.
 |
| yikes |
The holder for the saw went south on me. I stapled the heel of the plastic for now. If it fails again I'll go to plan #2.
 |
| sweet |
Wow. This came out much better than I expected it to. The cup on this end was more than an 1/8" at the middle. Now it is about a 32nd and to the eye it looks flat. I'll try this again hopefully with the same results.
 |
| not square |
I should have planed the angle on the ends before I glued the bookshelf.
I didn't and it was awkward trying to hold the bookcase and plane the
angle. Got it done but it ate up a lot of calories and time.
 |
| no twist |
The bookshelf was rocking again. )@&#Q%_*_^_)*(^@%& Checked for twist and there was none. On the workbench it was, with the back left foot a good 16th shy of it. Did I cause it by planing and sanding it after I did it the first time?
 |
| done, again |
No plane this time. I got it done with a 80 grit sanding stick.
 |
| double, triple checking it |
Tried it for rocking on the tablesaw, the out feed table, and the workbench. This time I installed the Miller dowels before I sanded the feet. That added a more rigidity to the bookshelf.
 |
| new batch of shellac |
Used the last of my shellac flakes and I'll have to order some more. I think I have enough to finish the current 3 bookshelves.
 |
| why I'm banding it |
I have to cover the screw holes I plugged because they look like crap. I have enough of this banding left to do the top of the bottom and the bottom of the lid. I am using super glue to attach the banding.
 |
| hmm..... |
The end that wasn't cupped, decided it wanted some attention too. I heated both ends with my heat gun and clamped it again. This time I'm going to leave it clamped for a few days.
My wife just emailed the snowfall tallies for Rhode Island. Warwick, where I live, had 30 inches fall. I just looked out at my driveway and I still don't see 30 inches. The wind is still blowing and drifting the snow.
accidental woodworker
bracing for the big one........
The snow fall dump forecast has increased. It now stands at 18" to 24" with drifting up to 4 feet. Sounds like lots of fun will greet me in the AM. The governor has declared a state of emergency. There is a ban on driving after 1900 today into tomorrow. Fingers and toes double crossed that it won't be as bad as the weather seers are saying.
 |
| oh what a relief...... |
The epoxy has hardened and set up. The color is fantastic. I have used liquid dyes and stains before with epoxy with mixed results. This pigment color is rich and deep. There are zero occlusions and no dead spots in the epoxy. Very happy with how this came out.
 |
| sigh |
This pine board is cupped but only on this near end. The other end is dead flat. Why I don't know. I had clamped this end yesterday and it didn't take out the cup. Helped a little but still too much to be usable.
 |
| worth a try |
I remember watching a japanese woodworking You Tube vid where he ran a cupped, bowed, and twisted boards over a kerosene heater to straighten out the board. The boards were used to make a 4 drawer dresser with doors. I don't have a kerosene heater but I do have a heart gun. I warmed up the 4-6 inches on this end on all four edges for about 5 minutes. After that I clamped it again. I'll check on it in the AM.
 |
| 2nd walnut bookshelf |
Got the layout done on the 2nd one. Having a lot of squares was helpful with each one set to a specific measurement.
 |
| looks good |
There is still a gap but I did get the larger part of it plugged. Not sure what to do with small gap. The cherry putty I have is too red to fill it. Hide glue and cherry sawdust sounds like a better choice.
 |
| self supporting |
Ok with that but having no gap is much better.
 |
| hmm...... |
Tried this and it worked. This is my small saddle square. I used it to ensure that I had the last 1 1/4" (the chisel width) at the end was square. I didn't use it on the rest of the dado.
 |
| first one dry fitted |
Two left side back slat mortises were loose on the cheek walls but snug on the top/bottom. The clamps didn't have any issues with fully seating the shelf in the dado leaving the front gap free.
 |
| wow and wow again |
Not at all what I was expecting. I put the 3/8" blade on the bandsaw and I prayed it would stay sharp for the two cuts I had to make on the bookshelf. It was like a hot knife going through a tub of butter. Smooth, effortless, fluid, and with zero hesitation. I have never made a continuous round cut like this ever on this bandsaw. It didn't bind and easily made the curve all in one stroke. Did I say wow already?
 |
| sneak peek |
Eyeballing the cheery shelf against the walnut. Decided against staining it and I'll leave it natural. As this bookshelf ages the cherry will darken and the walnut will lighten another reason to leave the cherry natural.
 |
| caught it |
Went to adjust the depth on the router and noticed that the depth stop doohickey was MIA.
 |
| got lucky |
 |
| 2nd walnut bookshelf dry fitted |
It was looking pretty good that I would get two bookshelves glued and cooking before 1500 roll around.
 |
| hmm........ |
A lot closer to the dado bottom than I would like to be. At least with this one I remembered to saw the angle on the bottom. I think I should be ok with the shelf and the dado, there will be Miller dowels helping out too.
 |
| Besseys suck |
I rarely use the big Jorgensen bar clamps. I had to because the Bessey wouldn't pull the ends in to fully seat the shelf in the dado. The bar clamp did with with barely a 1/8 of a turn of the handle. The 'J' bar clamps have a large clamping head - bigger than the clamping head on my aluminum bar clamps
 |
| hmm...... |
The glue is bleeding through the saw cut out. Not a lot just a few little beads of glue. I'll clean them up when I take it out of the clamps.
accidental woodworker
big storm coming..........
The weather seers ain't giving out good news. Snow starting on sunday with a blizzard on monday. The predicted snowfall for the two days - 12-14 inches. This is the lowest estimate from the three weather stations I checked. I have a plenty of projects on my plate to wait out anything Mother Nature throws at me in my part of the universe.
 |
| done |
Kind of like this one considering it went south and came back up north.
 |
| cooked overnight |
No hiccups when I took the clamps off. The headaches come from it moving as you loosen the clamps - not a good sign. Creaking and moaning could go either way. None of those symptoms today.
 |
| done |
12 Miller dowels, 6 on each end. I will need to buy more cherry dowels, I have enough to do the remaining 3 cherry bookshelves.
 |
| Yikes |
Blew out a big chip rasping the cutout. Put a damper on getting this ready for shellac.
 |
| small cutout |
The important thing is that it isn't rocking. I don't understand why this cutout is so much smaller than the previous ones.
 |
| sigh |
When I had clamped this I didn't see a gap on this side. Out of the clamps and the gap was shaking hands with me. Used the cherry in the vise to saw off a shim to fill the gap.
 |
| filled |
This was the second shim. The first I did had the end grain facing up. This one has the face grain up.
 |
| 2nd walnut bookshelf |
Prepping the stock for the next walnut bookshelf. Thinned the back slats to 5/8" and planed the four edges smooth.
 |
| cherry shelf |
I went to Kosezla lumber this morning to check out the black walnut. They only had two 4/4 boards but both were only about 4" wide. There was a lot of 8/4 but I wasn't interested in resawing stock that thick. She told me more walnut was coming next week but I don't want to wait. This bookshelf will be cherry and there is also the possibility that I could stain the cherry walnut.
 |
| black pigment |
Trying out the black pigment mixed with epoxy. Not sure how this will look. I don't have doubts about it mixing well with the epoxy.
 |
| wow |
This color is incredible. It is a deep, edge of space, rich black. I filled in the voids/defects in the back slats. fingers crossed on this epoxy setting up because the last time I used it, it didn't harden. I put the two back slats on the furnace to help keep them warm.
accidental woodworker
one a day.......
One down and five to go on the bookshelves. If I keep up this rate I will whack out one a day woodworking wise. Applying the shellac will take a couple of days. I can see them piling up in the shop as wait to finish them. And it will be something else to find a hole to stick them in. Of the eventual eleven of them, only 3 have been adopted.
 |
| Highland Hardwoods haul |
I'll start on Miles desk next week sometime. Until then I'll let the haul hang out and relax. That will give it a chance to acclimate from Highland to my shop.
 |
| done |
Happy with the shine on the end grain. I had slapped the last coat of shellac on it last night after dinner.
 |
| 2nd glamour pic |
All of the bookshelves are finished 360. They can be viewed and placed without regard to the back of it being seen.
 |
| 2nd cherry one |
Got this one laid out, chopped and dry fitted before lunch. I couldn't close it up with hand pressure on the shelf. The back slats fitted ok and all four, including the shelf, fit in their respective spots snug.
 |
| hmm...... |
This left side isn't bottoming out even with clamp pressure. After playing with for a while and clamping it with different clamps I got nowhere with closing it up. I was getting frustrated so I left it be to go have fish 'n chips. That gave me while to think about what might be the problem.
 |
| came today |
These walnut dowels ain't cheap. With S/H, 200 dowels are .36 cents each. You can do the math to get the cost.
 |
| better |
The wall on the bottom of the dado was a wee bit off 90°. Straightened that out and got it to close up. Fingers crossed that I can repeat this when I glue it up.
 |
| hmm....... |
No round overs this time. Instead I put a small angle on the front. I used the cherry bookshelf I keep by my desk for the pattern.
 |
| glued and cooking |
Had a senior moment aka, a brain fart. I forgot to do the cutout for the legs/feet. Oh well, I'll have to put on my big boy pants and do it after it comes out of the clamps.
 |
| hmm...... |
Got the walnut for the first walnut bookshelf prepped. The back slats look too thick to my eye. As is they are 3/4" and I planed them down to 5/8". That thickness looked like the winner IMO.
 |
| not easy |
Doing layout on the walnut was a bit difficult. Lead pencil doesn't show on the walnut and my 71 year old peepers were almost useless. I got it done by using a different square for each layout line. Took me twice as long to do as the cherry and pine ones.
 |
| layout done |
It was past quitting time when I got the layout done. I'll chop on this in the AM.
 |
| hmm...... |
There is some wane on the left end but that will be removed when I do the angle on it. Decided to nix the round over and do an angle like I did on the cherry one. The defect on the back slat I'm keeping. I will fill that in with epoxy and black pigment. I just have to remember to keep it facing up when I do the glue up.
accidental woodworker
Highland Hardwoods........
Rolled out of the rack at oh dark 34 and I was headed north to New Hampshire at 0501 I arrived at Highland at 0734. It took a little over 2 1/2 hours which was dead on with the google driving estimate. Traffic going up on 95 was busy and thinned out a little on 495. Not bad for a weekday.
I went to the McDonald's about a mile from Highland and got a coffee and an egg Mcmuffin to kill the 20 minutes until Highland opened. When they opened I went nutso buying cherry for Miles desk. Added poplar and shorts of walnut to round out the bill. I left Highland $460 lighter.
I got back to the barn at 1130 which was about right for the round trip. I haven't been to Highland since COVID shut things down. Memory muscle kicked in and no problems driving up and back. Other than the exit numbers being changed there wasn't anything to throw me a curve ball. Decided to buy the wood for the desks one at a time, so I'll be making a 2nd trip up north for Leo in march/april?
 |
| what $460 looks like |
From left to right - 1/2 poplar for the drawers, should be enough for Miles and Leo's desk plus extra. Next is 8/4 cherry for the legs (again for Miles and Leo) with the walnut shorts on top of it. The walnut came from the shorts bin and it cost over $50. I got it to make a walnut bookshelf. The next batter is 5/4 cherry, dressed to 1" thick. This will be used for the desk top. In the clean up slot is 4/4 cherry for the rails and slats. I went overboard on this getting much more than I'll need. Whatever is left over will go to Leo's desk.
 |
| breaking down the poplar |
I sawed all the poplar into 2 foot lengths for the drawer stock. I was shocked at the BF price for 1/2" poplar. I should have looked at it before I bought it ($62 for six, 6 foot boards).
 |
| cherry back slats |
I found some left over 1/2" cherry to give up the slats I needed. I sawed them to 7/16" on the tablesaw and planed it smooth.
 |
| hmm....... |
I kind of like this uneven width between the back slats. It is a few frog hairs less than 1/8". The wider one will go on the bottom and thinner one on the top.
 |
| walnut |
This is long enough to get two sets of ends from. There is some wane but I can saw it off and still have the width I want for the ends.
 |
| reference edge |
I planed one rough edge flat and smooth. The opposite face it still rough sawn. I'll have to thickness because as is it is about an inch thick.
 |
| hmm...... |
There was enough walnut to get two bookshelves. When I got it at Highland I thought I would get one from it.
 |
| sigh |
This chunk of wane puts a damper on this piece of walnut being used as a shelf. I want a shelf that is a minimum of 5" wide. Sawing off the wane would leave a width of roughly 4". I ain't driving back to Highlands to buy another walnut short.
 |
| oops |
Need two more slats for the 2nd bookshelf. Don't know how I zoned that out.
 |
| going nutso again |
I have whacked five bookshelves already. I have 6 more waiting for me to build.
 |
| why not? |
Thinking of using this piece of cherry as the shelf. Cherry and walnut have a good contrast between them. Another option is to go to Koszela lumber which I might do. I really would like these two to be all walnut if possible.
 |
| milk paint dyes |
This is for another project I have in the queue. I want to make another miniature chest and use these to color the milk paint. I need to get a few more colors, red and yellow being on the top of the list. I couldn't find these on Amazon where I got these 3. I'll search again tonight.
 |
| hmm....... |
No more Gurney's sawmill pine left excepts for small scraps. This is Lowes pine and I'll have to make another run to buy a couple of more boards. The EWP (eastern white pine) bin at Highlands was empty as in no pine at all.
 |
| hmm....... |
The top board will give up the sides and the bottom board can be a front, back, or lid. The current project queue is full to bursting. I'll be busy for a while.
accidental woodworker
busy day.......
Still haven't finished the 'extra' cherry bookshelf. It might be done tomorrow though. fingers crossed on that. Wandered down a one way street and I played with making two more small cherry bookcases. Spent most of the afternoon shift in the boneyard cleaning up and organizing what is staying, what it going to the dump, and what is going to my sister Kam. I have to have all this sorted out before the wife comes home from North Carolina.
 |
| forgotten pic |
This was the one thing I said I got done yesterday but forgot to include pics of in the post. Kind of large but it fits in the drill stand cabinet - I am slowly smarting up and putting drill related things in that cabinet.
 |
| good fit |
I wanted to make the box out of solid wood but I didn't have any thin wood in this width. The lid is a decent fit with a consistent gap 360.
 |
| 2 1/2" |
The OD is 2 1/2" and I was mildly surprised by the quality of it. Not what I expected from China.
 |
| unexpected |
Came with a replacement center drill bit and the allen wrench.
 |
| hmm...... |
Don't know what the purpose of the spring.
 |
| nice fit |
I really like this fit - it is just a couple of frog hair worth of clearance. Seriously thought about removing the insert and redoing it. Nixed that because I glued the insert in with hide glue.
 |
| 1/8" dowels |
They ain't a 1/8" diameter, they are a 64th under. An 1/8" drilled hole is too loose and I want these to be snug.
 |
| done |
Got two dowels in each pad. I was nervous about the thinner back one possibly cracking/splitting but they didn't. I drill the dowels at a slight angle too.
 |
| sneak peek |
This will work well for DVD/CDs. I don't have any paperbacks to check how they would seat on the shelf.
 |
| hmm...... |
This is the left over cherry from the 3 other cherry bookshelves. These are the two boards from resawing one in half. There is one divot on the left one and two big and one small one on the right one. The plan was to thin the boards to 1/2" and hopefully that would remove the divots. The thickest part of either board is wee bit more than 9/16".
 |
| gone |
Wasn't sure that I could get this to a 1/2" and remove the divot. Got lucky and I have a 1/2" thick cherry board for a shelf.
 |
| wash, rinse, and repeat |
The right board was a bit dicey IMO because one divot was deeper than the other two. The divots on this board planed away smoothly with no headaches.
 |
| the problem divot |
This is the before pic of the big divot on the right board. The only problem I had planing this to thickness was planing it down to the gauge lines. The left side ate up a lot of calories and time before they disappeared.
 |
| about 32nd more |
I planed a ton of shavings off this side seemingly without lowering the face. Eventually I got it. The divot disappeared long before this gauge line did.
 |
| gone |
Extremely happy that I planed the divot away and didn't dip below the 1/2" thickness.
 |
| hmm...... |
Planing to thickness for the ends, one I had to plane 3/16" off and the other a 1/4". The plan is have the ends at 5/8", the shelf 1/2", and the back slats 3/8".
 |
| done |
This board I was expecting some tear to happen but none did. Got zero tear out using a #6, #7, #5 1/2, and #4.
 |
| my LN 4 1/2 |
This isn't a plane that I use that much but I needed it today. The second board I planed to thickness for the ends tore out. The grain on it ran almost dead straight end to end except for one little curly Q spot. The 4 1/2 plowed through it without a whimper and dead smooth. I keep a 55° frog in this plane just dealing with wonky grain.
 |
| done |
I still have to plane the back slats from a 1/2" to 3/8" but I didn't do that today. Playing with the shelves and ends had me sweating by the time I stopped. A little over 2 hours start to finish. As an aside the shop temp is hovering at a comfortable 63F/17C. The temp in shop has risen 4 degrees in the past 3 days.
 |
| final prep |
Sanded the end grain on the ends up to 220. Almost forgot to do and caught it as I was ready to slap shellac on it.
 |
| fanned out |
Don't know if I mentioned this before but in case I didn't here goes. When I'm done with my shellac I manually fan the brush out. It holds this shape well until it is time to use it again. I have found that it dissolves in alcohol much quicker than if I didn't do this.
 |
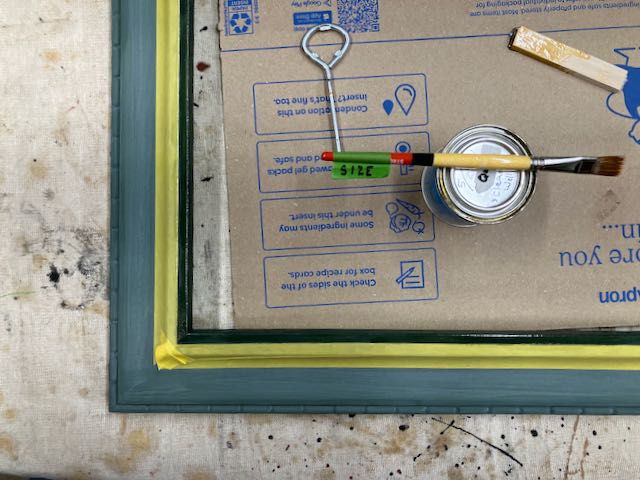
| shellac time |
The cherry one is awfully close to be done. The pine one is just starting out. I do the bottom first 4-5 coats before I do the rest of it.
 |
| the problem spot |
It raking light the end grain looks a bit dull IMO. Since I'm applying shellac to the pine one I'll keep putting shellac on this area until I'm happy with it.
 |
| made in Germany |
This belonged to my wife's grandmother and she doesn't want it. Typical german engineering because it is built like a tank. The drive belt is all metal - no rubber at all. If anyone wants it let me know - it would be just the sewing machine and accessories. The cabinet has water damage and rot so it is toast.
 |
| nice touch |
That is the original oiler for the machine along with the instruction booklet. It is a small instruction booklet, I would have expected something closer to 8" x 11".
 |
| nice haul |
I saved the hardware for just in case. I might not ever have the need for it but you never know. This do dad thing was for locking down the lid.
 |
| hmm....... |
Found this in the boneyard - box I started and stopped. I had applied hinges but removed them and plugged the screw holes. Never progressed beyond that. Thinking now of applying the banding on the box bottom and lid bottom and top. I ordered more banding today and I'll leave this on the workbench so I don't forget about it.
 |
| boneyard find #2 |
This is a jewelry box I made a bazillion years ago. It is a pine box with a floating cherry panel in the lid. Because it is mostly pine it really hasn't resonated with me as being worthy of a jewelry box. That changed and I'll be finally finishing this. All it needs is for me to slap a few coats of shellac on it.
 |
| the interior |
The hinges took me several years to install. I used Brusso hinges and I epoxied the screws in the lid. Because of the thin lid I couldn't use a full length screw. Maybe this would be good enough for one of my young nieces?
accidental woodworker
Dunlap #3726 Bench Plane - I Think
I was given this plane in pretty rough condition by a guy who really didn't know anything about planes. One telltale sign was that the iron was upside down when I got it (bevel up). And while I know a fair bit about planes, I knew little about this particular brand when I started on this one.
 |
| The plane as found |
 |
| Something look funny here? |
 |
| Maybe the upside down iron explains why the cutting edge was so chewed up! |
It's an oddball size - it has a 9 1/2" long sole similar to a Stanley #4, but the sole's width is 2 1/8" and the iron is 1 3/4" wide, like a #3. Initially, the only identifying mark I could find on the plane was the remnant of a DUNLAP decal on the broken tote. From a Dunlap type study that I found online, a #3 size plane has the 1 3/4" wide iron, but the plane should be only 8" long (or 9 1/4", depending on the source of info). Go figure.
I found two websites that were very helpful in researching this plane. According to justtheplanefacts.com and aplanelife.us, Dunlap planes were manufactured for Sears by either Millers Falls, Sargent, or possibly at one time by a West German maker. Some details point to this plane being made by Sargent in the 1940-41 time frame, but I think it is probably a bit later than that - maybe the mid 1950's (reference the Dunlap type study on the A Plane Life site).
 |
| Here's the plane fully disassembled, complete with broken tote and bent tote screw/post |
Initially, I could find no identifying marks on the casting, iron, cap iron or lever cap. The only marks I could find are a casting number on the frog (5272) and a raised "MADE IN USA" mark on the main casting just below the adjuster knob. However, since I started writing this, I cleaned up the iron and it's got DUNLAP APPROVED BL stamped clearly at the top.
 |
| DUNLAP APPROVED BL |
 |
| Here's the iron all cleaned up, but not yet sharpened. Note the hole for the cap-iron screw is at the top, unlike Stanley plane irons. |
 |
| I had to grind back to the blue line before grinding a new bevel and sharpening |
According to the sites I referenced, the "BL" and the cap-iron screw hole location are indicators of a plane made by Sargent. So is the upside-down U-shaped lateral adjust lever.
As for the plane's casting, I took sandpaper to the sides and sole. They looked horrible, but cleaned up fairly easily. A wire wheel in the drill was used to clean up all the hardware.
 |
| The body was really grungy and the sole was horribly rough |
 |
| But it cleaned up nicely |
The tote was broken, so I cleaned up the mating surfaces and reglued it. I'll have to see if that fix holds over time. Originally, the tote had a decal or two on the left side. Unfortunately, more than half of it was gone. It looked like there was once another decal up where the middle finger grips the tote, but it was missing completely.
 |
| The still-broken tote showing remnants of a decal |
Here's another interesting tidbit. The yoke was a two-piece construction, as opposed to a casting. It still works fine, but it's interesting that the two "fingers" of the yoke can move independently. That's no big deal; when the plane is assembled, the adjuster nut keeps them aligned.
 |
| The two-piece yoke |
 |
| Here showing how the two "fingers" can be misaligned with each other |
When I finally had the parts cleaned up and the iron sharp, I put it together, adjusted the frog to get a reasonably tight mouth, and tried it out. It made a shaving, but the shaving was like an accordion.
 |
| First shaving all crinkled up |
I'm aware this could be caused by the cap-iron being too far forward. Some adjustment helped, but not enough. I also noticed a rippling effect when face planing.
 |
| You can see the ripples |
So there was some juddering of the plane as I planed along the face of a board. To me, that points to issues with how well the frog and plane body keep the iron firmly in place. Here's where I really had to do some work. The surfaces of the frog and plane body where they meet were painted or japanned, and were not level, so the contact between the two was poor.
 |
| Pointing to one of two spots where the frog sits. These needed to be filed/sanded level and flat. |
 |
| Same with the frog seat |
 |
| Frog seat filed flat |
After this, I was able to get a better edge shaving, but there was still a big problem.
 |
| Got a much better edge grain shaving ... |
 |
| ... but when planing the face grain, CLUNK! The plane stopped in it's tracks and dug in hard! |
Here's the problem with this plane and it's a serious design flaw. And it's also why I think the plane was made in the '50's - you know, after plane makers "forgot" how to make planes that worked well.
The frog of Stanley planes has two flat areas that mate with two flat areas on the plane body. The frog "seat" and the frog "toe" both should be milled flat and mate precisely with corresponding spots on the plane body.
 |
| Locations of the frog seat and toe |
In this plane, not only is there no milled spot on the plane body for the frog toe to mate with, but the frog toe doesn't even come in contact with the plane body at all! It's basically cantilevered out over the plane body, just behind the mouth. Without support there, it's no wonder that the frog and iron don't have enough support to plane face grain.
 |
| This is a piece of cardboard, probably about 1/32" thick |
 |
| Sliding the cardboard under the frog's toe. I could have fit 3 or 4 of these cardboard pieces in there. And this was with the frog bolted firmly in place! |
I've started trying to make a piece of wood that will fill that gap, but I don't hold out hope that it will fix the problem. But for this plane to work, I believe there needs to be firm support for the toe of the frog.
Summarizing, there are a couple of details that gave hints about the maker and age of this plane, thanks to the type study provided by A Plane Life. The position of the iron's keyhole, the "BL" on the iron, the inverted U-shaped lateral adjust lever, and the two-piece yoke all indicate a plane made by Sargent. The lever cap had been nickel plated, though the plating was removed when I cleaned up the plane. The nickel plating indicates a plane possibly made in the 1940-1942 timeframe. Other details include the double threaded 12-20 rods that hold the tote and knob, the brass waist nuts holding the stained hardwood tote and knob, and the three-ridged knurling of the adjuster knob. But even with these clues, I can't help suspect that this plane was made in the mid-1950's due to the shoddiness of the design.
This is an odd plane for sure. If there are any collectors of Dunlap planes out there and you're interested in this plane, please let me know and I'll be happy to mail it to you free of charge.
What Do the Words "Modern Design" Mean? Asking for a friend.
 Edo period, late 18th century
Last week I visited the Metropolitan Museum of Art - the first visit in awhile. I had a good experience (aside from a supposed upgrade to the coat check that entailed a time-wasting data entry session on an iPad rather than the give-a-jacket-get-a-number standard method).
One of the exhibits I had wanted to see was on "The Infinite Artistry of Japanese Ceramics." As expected, the exhibit was full of pottery, fabrics and wood prints. I was struck by one very nice-looking modern piece. Being open minded, I said to myself, "That's great, they're having some modern stuff along with the old stuff. It's a really wonderful contrast between old and new." But then I took a closer look at this "modern" pottery and discovered, much to my surprise, that was 250 years old! A lot of pieces on display were just like that: modern design in appearance, but in fact actually centuries old. This phenomenon can be a real source of double-takes, because it turns on its head what it means to say "modern" as opposed to "new." After all, usually when talking about design, when someone says, "This is a very modern piece," they also mean it's new and cutting edge. Certain designers like Gerrit Rietveld have designs from the 1920's that don't look dated. But I wouldn't exactly call them "modern." I would say Rietveld's furniture doesn't look like most current furniture that would be considered modern today. In the case of modernist Danish 20th century design, Ikea has commonly co-opted everything, and increasingly anything that's sort of Danish style is assumed to be mass-market and probably cheap junk. But it's not, and it doesn't have to be.
But seeing this Japanese pottery and not identifying the style as modern makes no sense to me. Sure, you can say it's from such and such a period, and such and such an artist, but it still looks modern. Also notable: this style didn't really catch on. Most of the other pieces in the show, some quite beautiful, certainly look of their time period. NYC has several Japanese supermarkets (and Korean and Chinese markets that stock Japanese items) in which some of the same patterns of the not-so-modern goods are still on offer. But we wouldn't call those designs "modern." Is it possible that the word "modern" means "different from the standard of the time" rather than new per se? If the style catches on and everyone copies or riffs upon it, then the style will get its own name. For example, "mid-century modern" defines a specific genre in a specific style. Eventually the style became more accepted, and then more simplified, until it became (in the popular consciousness anyway - and I say this as someone who once owned a Wim & Karen bed) as "Ikea" or "Ikea-style." Rietveld's furniture, nearly a hundred years on, still looks pretty avant-garde. But it never really became a thing. The Bauhaus design movement (1919-1933), which eventually evolved in many respects to mid-century modern Danish furniture, was designed from the get go be be factory made and lent itself to a popular genre - even if later designs aren't directly connected with the Bauhaus. (And perhaps Bauhaus nowadays is best known as the name of the British goth band.) Reitveld, on the other hand, designed his furniture to be made largely by hand so anyone could built his designs from common wood materials. But most of his work would be fussy on an assembly line and his style never caught on.
I'm wondering if 300 years ago in Japan, a potter produced a pot, and his friend said "That's a really modern pot!" and the potter replied, "Yeah, shame nobody likes anything new." That potter used a design vocabulary of his region and most of what he made would be in that design vocabulary because that's what people wanted - the definition of a popular style. Doing anything new and different would make the creator an outlier - and outliers are the modernists of their time. And it seems that, at least back then in Japan, a potter's idea of a modern design would be pretty much what we would call modern today. And now, like then, people still mostly prefer traditional designs (simplified for manufacture) not modernism.
 Early 17th century
Changing anything for anyone making products is always a risk. You need to convince people that the conventional style, which is by definition what is popular, is just one option, and other options are different and better in a meaningful way. That's not easy to do and this problem has been true from centuries.
N.B. Before you accuse me of drawing conclusions without enough evidence, let me remind you that for centuries archeologists have been postulating civilizations and taxonomy based on the survival of a single bone. So I am in good company! The furniture in museums isn't usually representative of what most people had. Rather it represents what donors and other rich people used - and what managed to survive.
 Edo period, ca. 1670-90
 Cast iron and Bronze. Onishi Gorozaemon mid-17th century
 one done, one almost done........
Got my truck back today and the driver who picked me up said we are getting an inch of the white stuff tonight. There is snow, freezing rain, and sleet in the forecast for the next week. Thursday is supposed to be partly sunny and it is looking like the only day for a while that I can make the trip north to Highlands Hardwoods is then. hmm......
 |
| nope |
The pkg says 350 dots and there is no way this pkg has 350 dots but that isn't the problem. The problem is the thickness of the dots which are almost an 1/8" thick each. I'll have to search Amazon and buy something else for attaching the photos.
 |
| changed my mind again |
I like how the wedge cures the shelf tilt headache but I don't like length of it. The wedge also negates the cutout for the legs. Going back to the drawing board to come up with plan #2.
 |
| signature change |
These are the initials I have engraved on my bench plane lever caps. Decided to go from cursive initials to print ones.
 |
| hmm..... |
Rasped a small chamfer on the feet. This shouldn't get dragged around like a chair so the small chamfers should suffice. Fingers crossed on that.
 |
| shellac time |
Getting 4-5 coats on the feet first. Then I'll do 4-5 on it with it upright.
 |
| the oops bookshelf |
Chiseled the Miller dowel flush with the back slat. It isn't visible at all looking at the bookshelf in situ.
 |
| hmm...... |
This is better. Not exactly what I prefer but it fixes the oops better than the full length wedge.
 |
| gap filling |
This shim has the long grain facing up. Made it a wee bit dicey hammering it into the gap and filling it.
 |
| gap on the left |
I wasn't going to fill this one but I had a lot of shim material left so why not? I went with solid wood because wood putty stands out with shellac applied to it.
 |
| one more gap to fill |
The bottom of the dado really sticks out with the left side gap filled.
 |
| first step |
Sized the bottom of the legs with super glue. After it had dried I super glued the 'pads' to the legs.
 |
| almost done |
The edges on the ends and the shelf only have two coats. The rest of the bookshelf has 4 coats. Won't be done today but it should be fini in the AM.
accidental woodworker
just me and the cat......
My wife left for North Carolina on sunday to keep daughter #2 company while her husband is away on a business trip. The bookcase didn't go but the glass door cabinet did. Supposedly the bookcase is going south on the next trip south. Now I have to get it out of the shop and into the boneyard but that may be a headache. My wife is turning it into a reading room. Translation - I can't use the boneyard anymore for projects.
 |
| hmm....... |
From China and there are three 93 1/2" long bandsaw blades. The current blade on the bandsaw burned the cherry bookshelf badly. I had to expend extra calories to rasp and sand it away.
 |
| hmm...... |
This sat overnight on the front porch step in below freezing weather. Before I try and use them I'll let them warm up for a few hours.
 |
| nope |
Decided to put this away for now. Ace has 2 1/2" hole saws from $30 to $52 which were too much but I did find and order one on Amazon for $10. I'll have it tomorrow.
 |
| might be toast |
The burning hole from yesterday may have drawn the temper out of this. I sharpened it and put it away. Two days ago I found a pkg with two of these cutters but I can't find where I put them down.
 |
| look at what I found |
I didn't know I had this big ass bit - it is a little more than 2 5/8". That is close enough to the 2 1/2" diameter I need. Before I used it I sharpened it again with my diamond stone paddles. You can see that the machining on this isn't something to write home about.
 |
| new insert |
This piece of pine is between rift and quarter sawn, perfect for the insert.
 |
| ok.... |
There is about a 16th clearance all around the guide. A little sloppy IMO but I won't have to worry about it binding in the hole.
 |
| insert ready |
The bushings fit in a 5/8" hole. The top of them is shouldered and that is acting like a stop for them.
 |
| sigh.... |
Put the cart before the horse. I missed sawing the insert to length before drilling for the bushings. On to insert #2.
 |
| got it |
The fit is snug. After I drilled all the holes, planed it for a drop in fit.
 |
| lid |
I sized the lid to be almost a dead on flush match with the outside of the box. I did this because the plan is to put a rabbet on the underside of the lid to fit in the inside of the box.
 |
| Lie Nielsen skew block plane |
Ran a knife line 360 and planed down to it until I removed it. Did the end grain ends first and then the long grain sides.
 |
| not an oops |
The length fits well. It dropped into place with no binding and no slop neither. However, the width doesn't fit. I planed the rabbet shoulders with my 1/2" shoulder plane. The pencil line on the lid is what I thicknessed the lid down to - 3/8" after fitting the lid.
 |
| hmm...... |
I chamfered the edges to soften them. As of now, I don't plan on putting a knob on the lid or making a finger access divot.
 |
| lid is done |
Didn't like the chamfered look so I sanded them to a round over.
 |
| not enough |
I wanted to use walnut dowels for the contrast with the cherry but it ain't happening today boys and girls. Thought of using birch but went with cherry.
 |
| finishing the ends |
I had sanded the outside of the ends up to 220 but there were scratches left from the flush cut saw. Scraped them away with a card scraped.
 |
| gotta save this |
I was going to cut the back slats and the shelf off but nixed it. The shelf would have ended up with a width too narrow but the length would have been ok. Decided to try and salvage it somehow.
 |
| hmm....... |
Sawed two 7° wedges and put them under the feet. The shelf is tilted up and back and the sneakers on the legs don't look wonky IMO. It is just a concept and the only hiccup I see is the back sneaker is a little on the thin side. That could be a potential breakage point.
Another headache is the orientation of the grain on the sneakers. The end grain side is against the feet. I had to make two more sets that had the long grain facing up against the feet. Doing that was bit of pain in the arse. None of the do dads I had for setting an angle worked - the 3/4" thick stock wasn't thick enough to lay out the angle.
 |
| better |
I don't know what this angle is - I laid it out from the left bottom corner with the angle going up to a end point 6 1/2" away. This fix is growing on me and I'm thinking of keeping it.
 |
| squaring it off |
This almost gave me a headache trying to figure out how to square this end off to saw. I could have sawn the angle to match the front edge but I wanted it squared off.
 |
| hmm....... |
I think this is the way to go. The sneakers on the bottom look deliberate.
 |
| that is an option |
As I was getting ready to kill the lights this popped into the brain bucket. Cut/saw the sneakers to match the length of the back and front feet plus a 1/4". Maybe even follow the curve of the cutout into the sneakers. Time to think about it over night.
accidental woodworker
a link to the woodworking stuff, otherwise birds
I’ve been carving stuff in the shop, some panels and the beginnings of two more strapwork boxes, one white oak, one walnut. All sawn stock, my riven oak is just beginning to poke out from under the snow. Today’s post on the substack blog is free-to-all subscribers (paid & free) – there I talk about some period carvings and post a couple of carved panels for sale…
https://peterfollansbeejoinerswork.substack.com/p/more-about-carved-panels-plus-video
 black walnut box front underway
But I’ve been wanting to work some recent bird photos into my everyday blog, just haven’t had much room. I have too much to say about the woodwork. The winter weather has brought some of the raptors in closer, some of them have a hard time finding food in the snow, so the bird feeders bring possible prey into view for them. That’s how I read it anyway. I know it’s true of the cooper’s hawk (Astur cooperii) – this one snatched somebody from around the bird feeders, then fed up in the top of the apple tree.
 cooper’s hawk
While I photographed this bird from the open back door, I saw a larger raptor swing by – just turned the camera quickly, thinking “I’ll get this red-tail…” – turned out to be a bald eagle (Haliaeetus leucocephalus) –
 bald eagle
we don’t often see them here, but the river was open water – most of the ponds around here are frozen over. He was gone in an instant.
Another day another raptor. Thought I saw two more red-tail hawks flying over the house…they too were gone in an instant. Then half-hour later, saw two hawks perched in the sycamore tree next door – but they were red-shouldered hawks, not red-tailed hawks. (Buteo lineatus) – I couldn’t get them both in the same shot – this one posed more cooperatively than the other.
 red-shouldered hawk
Down in the river one day saw these buffleheads – the smallest duck. (Bucephala albeola) –
 buffleheads
these are females and for a little while I worked myself into a state of confusion by mis-reading Sibley’s book about the bufflehead. What I thought I read was that the male doesn’t show his breeding plumage in the winter…which is not the case. Doubly-so. Not what the book said, not what the duck does. I know I’ve seen many breeding-plumage male buffleheads over the years – but they breed far north & west of here. Far. Below is a shot from the same river, same backyard, almost exactly a year ago – one male, two females. These birds are pretty skittish, I can never get close to them.
 male & female buffleheads
My birding mentor Marie helped sort me out. Momentary collapse of reading comprehension. It happens.
The red-tail hawks (Buteo jamaicensis) are around regularly – this one, a juvenile – tried to snatch someone from the feeder-crowd. Missed, then perched in the catalpa tree right outside the shop. Often you can get near juvys for good shots –
 red-tail hawk, juvein
Every snowy winter we try to get a good photo of the northern cardinal male in the holly tree. I didn’t get it just right this year, but got a consolation nice shot of the female – (Cardinalis cardinalis)
 female Northern cardinal
In the winter, there’s often 10-12 cardinals here at once, but I can’t seem to get a group shot that’s worth a damn…so here’s a male portrait from quite a few years ago – next to the holly tree…
 male cardinal
one down, two to go........
 |
| layout |
Took my time and got it right. What I have to watch for is the back slats. I have a bad habit of laying them out on the wrong edge - the layout on the ends are mirror images. It is very easy for me to wander out into La La Land doing it. However, I haven't had chopping out brain fart for quite some time. I have caught my layout me-steaks by double, triple checking myself.
 |
| left or right end????? |
It is self supporting but I was working on getting the front end of the dado gap free. Noticed that my walls weren't dead on plumb and it was keeping it from being gap free.
 |
| bit of a gap |
This is the end panel where the dado wall wasn't plumb. It took me a few chisel/trim and checks before it closed up. I was shooting for it to be gap free with hand pressure but that didn't happen. It easily slammed shut with clamp pressure.
 |
| helping hand |
I try to avoid using these clamps because they are a ROYAL PITA. I have problems with tightening them fully before running out of screw length. However, for this application they are a perfect fit due to the clamp head staying parallel to the clamp bar. And they closed the gap nicely.
 |
| first back slats fitted |
Happy with how well this fit. I laid out the notches a wee bit undersized so I would get a snug fit. I was shooting for a seamless fit between the slats and the notches. I didn't want to do shouldered tenons - I like this look more.
 |
| the left one |
Three of the slats fit snug/tight and this one is kind of snug. It is self supporting but it is looser than its siblings. I think it will be ok and I expect the glue will swell the joint tight.
 |
| dry fit |
Happy with this and especially so with the fit with no hiccups to rant about.
 |
| view from the back |
Thinking of leaving the ends as is and making the top parallel to the bottom. Initially I was going to do them like the pine bookshelves but I came to a fork in the road.
 |
| hmm..... |
I was going to round the two outside corners on the shelf but I changed lanes again. I like the look of the corners clipped more than them being rounded. I was going to round them because I did the tops of the ends like the pine bookshelves.
 |
| glued and cooking |
I didn't forget to drill holes first for the Miller dowels. Been running through the brain bucket whether to use cherry or walnut dowels? I had to swap clamps because I couldn't get the Besseys to close the gaps at the front. Used a 24" bar clamp to do the job.
 |
| look at what I found |
Came across these and I had totally forgotten I had it. 90 degree drilling guide for flat and round stock. 6 bushings, three imperial 1/8", 3/16", and 1/4". Three metric at 3mm, 5mm, and 8mm. It is something I could have used recently. Since I had time on the clock before the quitting bell rang, decided to whack out a box to keep it in.
 |
| still kicking my arse |
I have had this circle cutting jig for 40 years. For years it has made me feel like my IQ isn't in double digits. I still haven't figured out how to orient the cutter in the arm. But the biggie is determining the diameter of the circle. There is a scale on the arm and I set it for a 2 1/2" diameter circle and I ended up with one a little over 2 3/4".
 |
| first hole |
The empty part matches the diameter of the guide spot on but the overall diameter of the hole is a 1/4" too much. On the 2nd attempt, I got a burned out hole. The insult was it was too small.
 |
| hmm...... |
I drilled this one coming from both sides, and both sides burned equally bad.
 |
| heebie jeebies setup |
I'll be doing the next hole drilling differently. I will use an oversized board (length wise) with that one. I am also contemplating using a 2 1/2" diameter hole saw. I have a 2 1/4" and a 2 3/4", sigh. But that depends upon the cost. If it is too much I'll expend the calories and figure out how the circle cutter jig works once and for all. If that doesn't happen free flying lessons might be in its future.
accidental woodworker
cherry bookshelves........
The plan today was to thickness the cherry for the new set of cherry bookshelves/CD/DVD holders. That didn't happen boys and girls because of two hindrances. The first was the snow between me and the stand for the lunchbox planer. It would have probably taken me a bazillion years to shovel a path to the garden shed] to get it.
The second one was the weather. It was supposed to be partly sunny but the entire day was cloudy. To me there was a threat of rain or snow but the weather seers predicted neither would happen. I wimped out and opted not to plane the cherry today.
 |
| close, but no cigar |
Only got 3 coats of shellac on these. My limited attention span took a left turn to concentrate on thicknessing the cherry. The photo dots aren't supposed to be here until tomorrow. I have plenty of time to finish them up.
 |
| the extra bookshelf was the lead off |
Decided to thickness the cherry by hand. I only had to do a couple of pieces with the 3 sets.
 |
| not quite |
I used the tablesaw to saw the cherry as deep as I could. There was a 1/2" web that I used hand saws to separate. Started with the Ryoba and switched to a 7pt rip saw.
 |
| sigh |
The two halves have divots on this end. The right board has another one on the opposite end. I planed and smoothed the two but the divots remained. To plane the divots even would leave them too thin to be shelves.
 |
| hmm...... |
Thought of putting this face down but I nixed that. The shelf tilts up and it could be visible. These two are toast but I can use them for a box or something else.
 |
| the fix |
This is for the extra bookshelf and this is the new shelf for it. I needed to plane a little more than a 1/8" off to get to finished thickness.
 |
| done |
Planed the ends a wee bit to thin their thickness too. Got the shelf and ends done (after I saw them to length) and they are ready to go.
 |
| looks good |
Eyeballing the thickness of the shelf against the thickness of the ends. I made the thickness difference between the them all 1/8". The ends are 7/8", the shelf is 5/8", and the back slats are a 1/2".
 |
| the grandson's bookshelves |
These two are ready to layout and start chopping dadoes and notches. I will make the extra one first and then attack these two.
 |
| sigh |
I didn't know that one of the cherry boards still had a rough sawn face. I knifed a line 360 and planed down to it.
 |
| finally done |
Planing cherry to thickness isn't difficult but not as easy as pine is. It seemingly took me forever to plane down to the knife line. Glad this was the last cherry board to thickness. It took me almost all day to do this. Pleasant way to eat up the hours.
 |
| the extra bookshelf |
I like the slight graduations in the stock. I wavered a wee bit with the ends thinking they were too thick. I thought they might be clunky looking because they aren't that tall. Seeing all three together squashed that.
 |
| confirmation |
This looks good to my eye. The back slats won't be visible with a fully stocked shelf so they don't matter that much. However, the 1/8" difference between the ends and the shelf is just right IMO.
I ordered new bandsaw blades - that is why I didn't try to resaw the cherry on the bandsaw. The blade on it now is having trouble sawing wet paper. I bought 3 of the cheapest blades I could find on amazon. As long as they last to do the sawing for the 3 bookshelves I'll be a happy camper.
accidental woodworker
A bit of Whimsy and Milk Paint: Frame #280
 Once Upon a Time
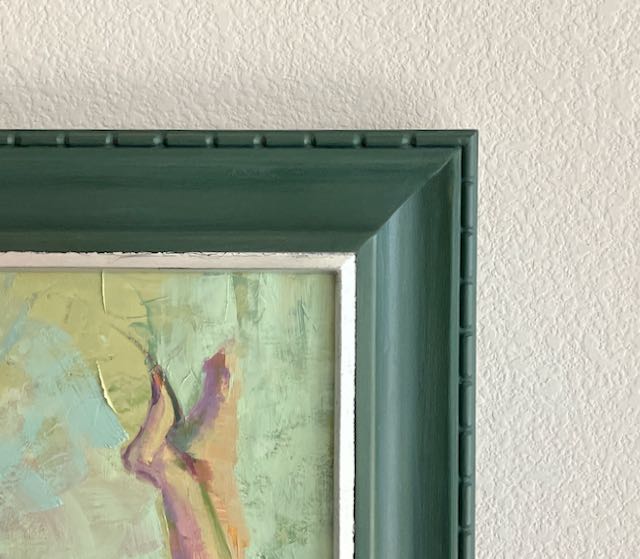 Corner Detail
Here’s the most recent frame from my shop and it was fun to create so thought I’d share the story! It’s oil on canvas measuring 12″x16″ and by my wife, Diane Eugster. When I first saw it in her studio my mind went to a wood nymph; whatever that may be! This painting needed something other than a traditional black/gold frame, something more fun and maybe with a bit of whimsical carving to enhance it.
Creating the Profile
Creating the profile began with my typical Basswood sized approximately 1″ thick by 2 7/8″ wide. The process begins by cutting the backside each pieces at 15° to create a profile that angles the frame away from the wall leaving plenty of room to install a 3/4″ thick canvas. I refer to this as my 15° Profile and it’s a way to angle the frame. I wrote a BLOG about it some time ago. I’ve modified the process somewhat since then but that blog gives you the basic method to do it. It took me less than 2 hours to profile this frame, carving took much longer than that.
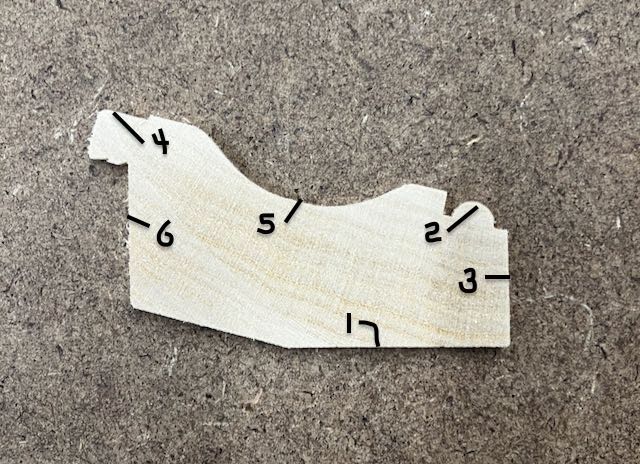
The process began with cutting the 15° angle on the back of the piece, that’s #1 in the picture, this will become the outside edge of the frame. If you do any beading on the frame it’s important to do that before cutting the outside edge 90° to the angled cut. This makes it easier to clamp when gluing the frame together. For this profile I cut a 1/4″ bead on the outside edge, #2 with a small plow plane. Draw a 90° line (#3) from the angled cut to locate the outer edge of the bead. This piece will be cut off after the bead is complete. For this profile I wanted a flat section at the sight edge for gilding, this is #4 and was created with a skewed rabbet plane. To create more interest to the frame I also cut a cove; #5. This was done with a tablesaw, it’s an interesting process and I wrote this BLOG explaining my process. The final cut is #6, the rabbet. This is somewhat tricky so check my blog on how to do it. Very important to note that I always have at least one extra piece of stock about 10-12″ long to set up the tablesaw for all of these cuts.
Carving
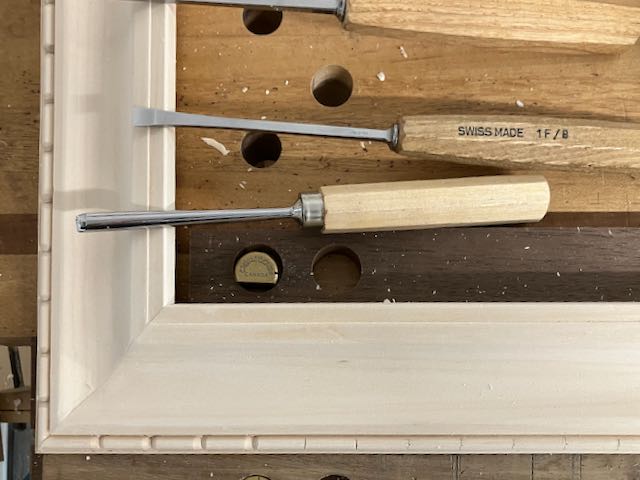
Not exactly sure what these are called, they look like an elongated bead or a sausage but I’ve seen them called either billets or reels. To figure out the spacing it’s easiest to use a set of dividers and step the divisions off once you decide their approximate length. Do that on a piece of masking tape, not your frame because there’s a lot of trial and error involved and your bead would have all the markings from the divider. Once you’re satisfied with the spacing put the markings on the frame. My preference is to start at the center and work to the ends. Any slight error will show up at the ends only. I used a 1F/8mm skew to divide them, then a 8/6mm gouge to create the rounded ends. Finally a 1S/5mm removes the bits between the reels.
Finishing
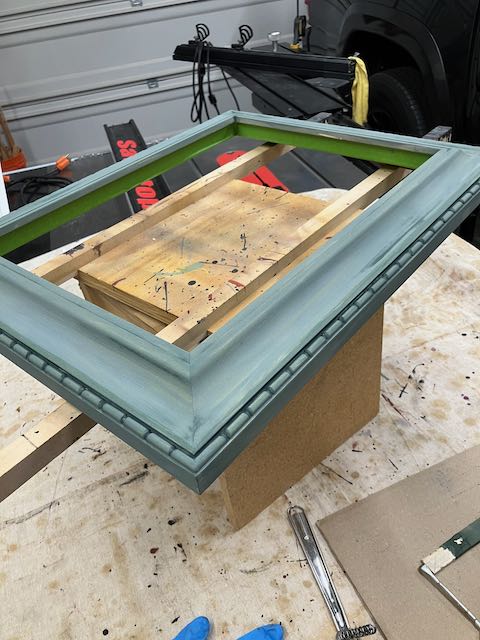
I’ve been using milk paint from RMPfinishes (formerly Real Milk Paint) lately to finish some of my frames. I like the effect of it and it comes in a powder form. That means I only mix up a small amount as needed and the powder will keep forever unlike paints that come in a can. For this frame I chose Blue Spruce. I mix 2 ounces of powder with 2 ounces of distilled water and that’s enough to complete the frame. I’ve found that the foam brushes they sell work great, much better than those available from my local big box store. I lightly scuff between coats (2 usually) with a Mirka 1500 pad. This frame has a gilded, silver sight edge so that was taped off and applied with quick set size. Milk paint should be sealed and I’ve used wax, OSMO #3043, and also Platinum Blonde Shellac which I spray on with an air brush. That’s how this frame is sealed, the shellac also seals the imitation silver leaf. The final step is rubbing out the shellac with Liberon wax to take some of the sheen off of the shellac and even out the spray pattern from the air brush.
 Blue Spruce Milk Paint
 Quick set size for gilding
That’s the process for this profile; in my opinion, adding the cove and the carving creates many shadows and patterns that brings interest to the frame.
good day's output.......
My wife had a paving contractor come to the house today to give us an estimate on getting the driveway repaved. 30 minutes later we had a contract and he had a check for $2100. That deposit locks in the cost of the base stone and the paving. We are scheduled to have it done in the 3rd week of April. It is a one day service and we can walk on it right away but can't drive on it for 3 days.
 |
| checking the cherry |
I had flattened/thicknessed all the cherry before but I am starting over with it again. Most of the boards were still twist free, a couple had a wee bit that I dealt with. The only other hiccup were a couple of them had a hump in the middle.
 |
| yikes |
I was holding the off cut side too but it still decided to be PITA. This board was giving up two shelves.
 |
| hmm...... |
This is too big of chunk to saw off as it would shorten the length of the shelf too much. As is the shelf is 16". If I cut off the boo boo it would about 12" which I think is too short. I glued and clamped it and set it aside to cook. I was pretty happy with how well the it fit when glued.
 |
| hmm....... |
This board will give up the four ends for two bookshelves. Used the japanese saw - cross cut went smoothly and easy peasy. No break out on the exit cut. On the one above I did the cross cut with a big sash saw.
 |
| almost complete |
Got the 4 ends and two shelves. Just need the four back slats.
 |
| hmm....... |
Eyeballing the left over cherry I can see I have enough for one more small bookshelf/CD/DVD holder. In for a penny, might as well be in for a pound, eh?
 |
| back slat stock |
I could just plane this stock to thickness but IMO that would be a waste. Two boards are 7/8" thick, one board is 1" and the last one is 3/4". If I can resaw the 1" board in half that you give me two 1/2" thick ones, I can get eight back slats from it.
 |
| resawing is next |
The board is two frog hairs thicker than 1" so if I behave I should get two 1/2" thick boards out of this. I will be happy with stock that ends up 7/16" strong.
 |
| sawn in half |
I wasn't going to attempt sawing this board in half whole - the length was 32".
 |
| not good |
There are some fairly long end checks here to deal with. The longest crack/split ran a little over 3". The checks only appear on this face, the other one is clear and clean.
 |
| nope |
I tried to resaw it with the Ryoba but it wasn't working in my favor. The back/exit of the saw cut was wandering. I tried to correct for it but couldn't. Resawed them on the tablesaw and saved it. The tablesaw blade sawed right through the wandering handsaw kerf and erased it.
 |
| the result |
Got two at 3/8" thickness and two at a 1/2". I won't have to run these through the lunchbox planer neither. The thickness is a frog hair under a 1/2". Should be more than stiff enough to hold its shape - the length of them will about 14" - 15".
 |
| resawed one more board |
Got enough stock here to make eight back slats. I need 6 with two extras for any potential oops.
 |
| complete |
This will do for making the grandson's bookshelves. I'm leaning towards making the R/L of them smaller than the pine ones. Maybe 14-15" - there isn't much call for reference books anymore because of Google.
 |
| the one more |
It still is a little surprising to me that it takes very little stock to whack one of these out.
 |
| where is it? |
I eyeballed this for several minutes and I can not see the glue line on this. Nothing shifted on me when I clamped it up.
 |
| the side edge |
Couldn't pick it out the edge neither. This edge blowout had two long, thin pieces and it glued back together seamlessly. The board is 3/4" thick and the plan as of now is to plane it down to less then 5/8" and more than 1/2".
 |
| not too bad looking |
I have some photo dots coming from Amazon. They are basically dots of double sided tape made specifically for securing photos.
 |
| almost done |
Need to slap 4-6 coats of shellac on the backs. Got two on before I killed the lights for the day. I will come back after dinner and get at least one more. I'll finish up the shellac in the AM.
accidental woodworker
it's warming up.......
Don't have anything in the pipeline, not even a thought. My truck is going in the shop for repairs on monday and tuesday so I'll be without a vehicle. The plan as of this typing is that I'll be motoring up to Highlands Hardwoods in New Hampshire on wednesday or thursday. That is weather dependent too. I am going to make the grandsons their desks one at a time. Hesitant to buy enough cherry for two but on the other hand it will mean another round trip up north. Decisions, decisions.
 |
| done |
Six coats of shellac before the shine was acceptable to me.
 |
| hmm...... |
Rethinking the bookshelves I just made for the grandsons. I have enough cherry here to make two bookshelves. The pine might be too much of a contrast against a cherry top. Looking ahead two smaller cherry bookshelves would melt into the cherry desks. I can plane the cherry to thickness with the lunchbox planer on monday.
 |
| hmm...... |
Found out today the bookcase ain't going to North Carolina this sunday. My wife is only taking this wall cabinet with her. I noticed that one of the shelf pins wasn't seating in the notch. I widened all the notches in both of the shelve boards just in case - expansion/contraction is different in North Carolina.
 |
| huge difference |
This bottom slat is the one I wanted to add a veneer shim to. No need because it swelled almost shut with the glue.
Didn't get much shop time today. Spent a good portion of it running errands and helping my wife with dead people stuff. Just as well as I didn't have anything to make wood dust with.
accidental woodworker
Some New (To Me) Tools from the PAST Show
At the end of January, I went to the PAST tool collectors show in Fremont, CA. Usually I don't come home with anything, but this time I did grab a few things. I'll show them below, but first let me show this router plane display that one of the guys brought!
 |
| A collection of mostly craftsman-made router planes |
None of these planes was made by Stanley or Preston or Millers Falls, or any other maker that we typically think of when we think of router planes. These were mostly user-made tools and they were pretty dang cool. The longest one was 14" long.
On the same table was also a display of an unusual Disston saw - a #196 "docking" saw.
 |
| Disston #196 Docking Saw |
There's nothing about it on the Disstonian Institute site, but some other search results indicated it was used for heavy construction, like timber framing or railroad work. It has crosscut teeth and a heavily breasted tooth line. Someone at the tool show suggested the name came from its use on the docks, perhaps crosscutting dock boards to length. The metal handle was interesting - possibly due to its getting rough use.
Anyway, moving on to what I picked up ...
A couple years ago I bought two larger auger bits - 1 1/8" and 1 1/4". I found a 1 1/2" bit at the show and grabbed it for $10. It's a Snell's-Jennings bit, no idea when it was made, but it was in near perfect condition. It was already sharp - both spurs and both cutting lips. And when I got home and made a test hole I was very impressed at how clean the entry rim was. This was a great find because I have had some trouble using expansive bits for larger holes.
 |
| A beautiful, clean 1 1/2" hole |
 |
| SNELL'S JENNINGS' 6 |
 |
| That's a really clean hole! |
I'm a sucker for incannel gouges. One of the sellers had a table where everything was $8. There was a box filled with chisels of all types and I grabbed four - two small incannel gouges (that will add nicely to the larger ones I've got), a bent gouge, and a 1" bevel edge chisel.
 |
| The lineup |
The two incannel gouges were from Spear & Jackson and New Haven Edge Tool Co. I just need to clean and sharpen them and I think they'll be a great addition to my shop.
 |
| SPEAR & JACKSON SHEFFIELD |
 |
| The S&J was about 9/16" wide |
 |
| S&J curvature approx 9/16" radius |
 |
| NEW HAVEN EDGE TOOL CO. |
 |
| About 7/16" wide |
 |
| Curvature of 9/32" radius |
The bent gouge is from Ulmia. It's 13 mm wide with an approximate 1/4" radius curvature. I don't do much carving, but this one will be a nice addition to the carving set.
 |
| ULMIA |
 |
| It's about 1/2" wide |
 |
| This shows the amount of bend |
Finally, there was this 1" socket chisel. I don't need another 1" chisel, but this one is a T. H. Witherby. If their chisels are as good as I've heard their drawknives are, this will be a real winner! It's got a little pitting on the flat side, but I think I'll be able to get that out. I found a good article about Witherby by Brian Welch here.
 |
| T. H. WITHERBY WARRANTED |
 |
| You can see the pitting here |
 |
| Not sure why, but I do prefer socket chisels |
That's it. Some nice additions to the shop. Now I have a little work to do to get them up to working condition.
long day......
The day started with me finding it had snowed again overnight. Because of that the driver for the shuttle to West Roxbury was late and we didn't get on the road north until after 0600. In spite of that and the crazy Boston traffic, I was only late for my appointment by 4 minutes.
PET scans are easy but they take time. First I had the zoomies IV'ed into me and that took 46 minutes. Then I got to ride the big donut scan for 16 minutes. They stuck something under my legs and had to keep my arms out stretched straight back. That hurt and I had an incredible urge to cough that I had trouble suppressing, but I did because I didn't want to repeat the donut ride.
My shoulders were aching and my hip was humming arias. The nurse had to help sit up and get off the bed. Other than these minor annoyances the PET went flawlessly. Hopefully I won't have to go back to the W Roxbury VA for another PET scan.
I got back home at 1440 and got the garbage ready for pick up in the AM. After that I headed to the shop because I had 20 minutes before the quitting bell ringing at 1500.
 |
| from leave book, take a book at the VA |
I had read a couple of articles on this lady code breaker. Since I didn't get picked up to return to the Providence VA until 1250, I started reading it. I got through 80 pages before pickup and I brought it home. Biographical novels are my favorite books to read. I'll be finished with it before the weekend ends.
 |
| why not? |
The idea at this time was to steel wool the two bookshelves and apply shellac after dinner.
 |
| hmm....... |
I got 4 coats on the bottom and the ends. All that is left to do is the interior. I applied another coat on the bottom and ends again. I did that because the bottom didn't look shiny enough to my eye.
 |
| quit at 1538 |
I kept on going boys and girls. I applied the first coat of shellac on the interior. And I will return after dinner and slap another one.
accidental woodworker
Roughing Out
 Even on a treadle lathe, the roughing gouge throws off tons of thick shavings
Roughing out is the first thing you do on a lathe project, when you take a square piece of wood and turn it round. You want to do this fast. Surface finish is not that important, although you don't want a disaster. Since the wood is square, you are at least starting with interrupted cuts.
 l-r: 1" Continental Gouge, 3/4" Roughing Gouge, 1/2" carbide insert tooling
I have three tools that I can use for roughing out (above).
A continental gouge. If you look at early catalogs, you'll see that essentially they offered two kinds of tools: what we now call the continental gouge, and a typical spindle gouge. Mine is a 1" continental gouge.
A roughing gouge. This is the standard tool people use for roughing nowadays. I have a forged 3/4-in roughing gouge. I also have a much larger one that is really overkill and too big for a machine of this power. This tool is forged because of its size. Ashley Iles and other companies also make machined roughing gouges in smaller sizes.
Insert tooling carbide square edge scraper tools that can be used for roughing as well. Many people prefer the insert tooling carbide scrapers because the learning curve is easier. I bought this tool and a few other carbide insert tools because I've gotten a lot of questions about whether they could be used on a treadle lathe.
In truth, I have a fourth tool that can be used. If I wanted to, I could use a regular spindle gouge and it would work fine - though slower. I left the spindle gouge out of the demo because I would use it only if it were my only option.
A roughing gouge is the most popular tool for this purpose but the question is: for a treadle lathe for which makes the most sense.
 l-r: scraper, continental gouge, roughing gouge
 In the picture above, you can see the results of all three tools with the tool used underneath it. All this work was done with each tool in under a minute - maybe even under 30 seconds. I developed a sense of how fast they cut - and we can see the quality of surface they leave behind. I used all tools with about the same amount of pressure and force. But not enough to overwhelm the machine. The wood is soft maple.
From left to right:
The carbide scraper. My least favorite tool of the three, because it leaves such a rough surface. But it was dead easy to use. You take the tool, you hold it horizontally, and just feed it with moderate pressure, and it wastes away the material. It's exactly what a roughing tool is supposed to do. My only complaint is that there are splinters on the edges of the cut. On harder materials, I would guess it works better; on softer materials you would have a worse, rougher surface.
The continental gouge is historically the oldest design of the group. It is basically a wide, shallow gouge with a slight curvature to the face of the gauge. This particular one is one inch wide and a joy to use. The tools roughs out well and is very easy to control. While not as fast cutting as a roughing gouge, it allowed me plenty of control. The final surface was pretty good. It's also a versatile tool because you can do a lot of finishing cuts with it.
The three quarter inch roughing gouge on the right differs from both a spindle gouge and the continental gouge in that its front is sharpened straight across and the sides go up high and vertical, so they can slice interrupted grain cleanly. The tool profile is more of a "U" than a gentle curve. What you get is a tool that produces very thick shavings very quickly, and makes short work of turning a square billet round. It also is a very reliable tool in that you don't have a sense that you're about to fall off the edge of the Earth or anything like that. It certainly cuts faster than the continental gouge. As you can see, it leaves a reasonably clean surface.
I think the Continental gouge is a very versatile tool. Even when you're not roughing, it takes nice wide shallow cuts. But in terms of actual roughing, the roughing gouge is the winner. I just didn't like the square scraper: the surface it left is rough. I didn't feel the need to use a scraper since I didn't have trouble with the gouges.
If I were a more experienced turner than I am, I would follow the roughing gouges work with a skew chisel to create a perfect cylinder with a perfect surface. Neither the continental or roughing gauges really chew up your surface, so there's not much material to remove to get something perfect. Since I'm less than experienced turner, I find having a fairly decent cylinder from the Continental gouge to be actually quite nice.
If I were doing smaller work, my guess is a less aggressive Continental gouge might be a better choice, although all of these tools come lots of sizes, including pretty small tools meant for pen turning. If I only had one roughing gouge, I wouldn't want one too much smaller.
The most important takeaway from this experiment is that - as in most areas of woodworking - many different options work, provided that the tool is sharp. While there are cases in turning where something won't work well - for example, using a spindle gouge inside a bowl - overall you could do an awful lot of turning with just a spindle gouge and either a roughing gouge or continental gouge (just make to it easier). The most important thing I did during this test wasn't learning some secret technique handed down by turners since 1642. Rather it was making sure my tools were sharp and of the correct geometry when I sharpened them. I am spending time at the lathe nearly every day and as my experience grows and my technique gets better, my turning is naturally improving. I am going faster with far fewer catches and slip-ups.
 The continental gouge on the left is ground with the nose sticking out slightly. The roughing gouge on the right is ground square
done......
The bookshelves I made for the grandsons are done. I just have to apply the shellac. It won't be finished today. Tomorrow I have a PET scan at the West Roxbury VA at 0800. I don't think I'll be getting any shop time on wednesday. I'll have to get up at oh dark thirty (0430) to catch the shuttle from the Providence VA to the West Roxbury VA. Don't know zip about when the shuttle returns to Providence?
 |
| one down, one to go |
Came back to the shop after dinner and got all the Miller dowels installed. A final sanding, knock back the arrises, and this will be ready for shellac.
 |
| I like it |
I added another dowel on the shelf. When I had glued it up I had to clamp the middle of the shelf to pull the end in tight. Added a dowel in the middle to keep it that way.
 |
| surprise |
Got two 6mm fine nuts and one 6mm fine wing nut. I wasn't sure that ACE sold metric fine threads and the wing nut totally surprised me.
 |
| nope |
There isn't sufficient room for the wing nut. If I tighten the big screw down as far as I can, I then can't turn the wing nut. I liked this option because it is toolless.
 |
| 10mm open end wrench |
I have had this wrench for a bazillion years and I have absolutely no idea why. Finally have a use for it - it is the size needed for this nut. This worked and the iron didn't slip/loosen/change when I used it on the back slat mortises. I tossed the wrench in the box with the router.
 |
| not my best |
Three of the mortises were slightly oversized, it would seem I didn't reach under the back slats enough when I marked them. The back slats weren't snug. One back slat wasn't self supporting on the cheeks but was on the top/bottom. This one will definitely need Miller dowels to keep it together.
 |
| hmm....... |
The shelf was self supporting - the right one gave in to gravity. The clamp was to ensure that the shelf fully seated in the dado at the front.
 |
| the worse one |
A piece of oak veneer (the thickest I have) it just a frog hair too thin. The top/bottom of the slat will pick up the end but gravity wins. I'll glue this in when I glue up the bookshelf.
 |
| glued and cooking |
The center bar clamp on the shelf didn't pull in the ends as much as it did on the first one yesterday. In spite of the loose back slats I didn't have any headaches gluing and clamping this up.
 |
| chamfering the feet |
I let the bookshelf cook for a couple of hours before I took the clamps off and installed the Miller dowels. I forgot to put the veneer in but the back slat swelled and the gap closed up. Unexpected, but I'll take it and move on smartly.
 |
| done |
A little premature but they are done and will be ready to go when I make the desks.
 |
| pretty good match |
The sizes of the parts are all identical. I used the end of the first one to layout it out on the second one. The only thing that isn't the same is the back slats on 2nd bookshelf are a 1/4" closer to the back edge of the ends. On the first bookshelf the front edge of the back slats is aligned with the back edge of the shelf.
The three frames are at the Frame it shop. Based on what I saw in her shop, I'll check on them at the end of the first week in March.
accidental woodworker