Hand Tool Headlines
The Woodworking Blogs Aggregator
“Glory to God in the highest heaven, and on earth peace to those on whom his favor rests.” - Luke 2:14
Be sure to visit the Hand Tool Headlines section - scores of my favorite woodworking blogs in one place.
General Woodworking
A Life in Oak
The chance to see and touch and investigate so many thousands of square feet of Early Oak carving, in one place doesn't happen every day. So, I took the day today for a trip to Paul Fitzsimmon's - A Life in Oak auction viewing.

Every inch a joy. For a carver and furniture maker, like me, the opportunity could not be missed.

To see the backsides, the underneaths, the details which may not be shown in full photos. A few hours well spent.

Somewhat sad, but infinitely interesting were the lots I saw last; collections of parts. Spare bits from a life in oak. Maybe they will find their missing bits one day, or someone will make the missing parts once more.

Well done Paul, for all your hard work; collecting, researching, contributing so much to the understanding of Early Oak furniture!
it is melting.......
Over the last 3 days the snow dumped by the blizzard has finally melted down significantly. I can see about 20 feet of my front sidewalk. Tomorrow it is forecasted to be 63F/17C so I guessing my entire sidewalk should be clear. Looking forward to not having to shovel it. The good news is I think we won't have any more of the white stuff for about 7-8 months.
 |
| happy with this |
Got 3 coats on the new screw boxes. I separated the two of them - one has only flat head screws and the other has round and oval head ones.
I'm calling the miniature chest blue paint job done. The coverage still isn't what I wanted but stepping back, I am ok with it for being milk paint. Decided to go ahead and make up a batch of red milk paint for the lid. I am can be a wee bit stubborn about some things and I just can't walk away from this milk paint hiccup.
I plan on using the quark right away for the red and I am not going to obsess about how much water I use. The blue batch actually started to look and lay down like paint when I added water. Fingers crossed on that and I'll be trying that in the AM.
 |
| why not |
I measured each screw and put a tag in its compartment. I did it for all four of the #5 & #6 screw boxes. Thinking that I should also do it for the #4 screws. The rub on that one is that 16 of the compartments are flat head with two being oval head. hmm......
 |
| platform |
I keep the screw boxes on top of my version of Roy Underhill's multi drawer cabinet. There is enough room on top for the 4 boxes but not for the current 6. The two cleats on the underside will fit in between the top moldings and keep the platform from moving/shifting.
 |
| top of the cabinet |
This is where the platform will go. The platform is 16 x 19 and will easily hold the 6 screw boxes plus two smaller boxes. These two hold loose screws and brass brads.
 |
| done |
I didn't want the platform to overhang on the R/L. Instead I put the overhang out at the back.
Another slow day. It is getting easier to get my right shoe on but the right foot is still swollen. Walking is slowly getting better but not as fast I want it to. Some things I have zero patience for but I'm forced to have it with this.
accidental woodworker
Blue milk paint pt III........
Debating whether or not to do the red milk paint. After the results of the blue milk paint it ain't looking good for the home team boys and girls. I read the book again and I spent a lot of time on You Tube watching milk paint vids. Nothing I saw addressed the the paint turning it a big blob of jello milk paint. The only thing about the blue milk paint that I didn't have any hiccups with is the pigment dye. But that is only 1/3 of what makes up milk paint.
 |
| sigh |
The milk paint got underneath the grain and it lifted. Having this pop up here and now sucked the wind out of my sails. I don't want to plane it but I can't leave it as is. I'll try sanding it with 120 and give it an eyeball after.
 |
| surprise |
I was expecting to find a blob of blue jello but it is liquid. Not the the consistency of loose pancake batter, just a wee bit thicker. The shelf life of milk paint is short. Depending upon who you listen to it is anywhere from 24hrs to maybe 3 days if it is refrigerated.
I have to cover the spots I painted and I don't want to mix up a batch of new blue milk paint so I'm going to try and use this. I'm encouraged by the fact it is somewhat liquid.
 |
| hmm..... |
Of course the first coat sucks. I can't leave these as streaks so I'll wait until it is dry to the touch and lay on another one. Fingers crossed the paint stays liquid.
 |
| hmm...... |
2nd coat and it looks a wee bit better. The paint is covering just like it did when I painted the chest. I did notice that it covers just a little better if I brush it on against the grain. With the grain the paint appears to slide over it without covering.
 |
| nope |
The hinges I'm using for the new screw boxes requires a #3 screw. I have #3 screws but they are all flat head and I need a round head. I drilled out the screw holes on the hinges to accept a #4 RH screw.
 |
| one down, one to go |
I am becoming a fan of the 90° stop hinges I used. They are flush mounted and more than adequate for these screw boxes. I don't like flush mounted hinges but for shop projects my OCD stays quiet.
 |
| lid first |
I tried to clamp the box and the lid in the vise and apply the hinges to both. It turned into a real shit show on the first screw box from many moons ago. It is a lot saner for me to do the lid first, clamp the lid/box in the vise, and secure the hinge to the box.
 |
| done |
Both boxes are hinged and have the first of 4 coats of shellac.
Only made 3 trips to the shop today. My right foot blew up to the size of a watermelon and it did the same today. I know I should be resting and keeping it elevated but I can't sit and do nothing. But I did manage to limit my time in the shop and how many times I had to go up/down the cellar stairs.
PS - Who knew? I was totally oblivious to the time change. Wee bit of a shock when I got up this AM.
accidental woodworker
Blue milk paint pt II........
 |
| couple of hours later |
Went back to the shop after dinner to get a 2nd coat on the chest. It was about 3 hours after the first coat and the paint was not like it was for the first go around. It had the consistency of hard peanut butter - like it had been in the refrigerator for a while.
I stirred it but it didn't go back to the loose pancake batter consistency. I put a little water and stirred it in without much success. It got a bit better but was still too thick to apply with a paint brush. I doubt I could have spread it if I had used a trowel.
 |
| whizzed it up |
This and a little more water, got me back to the pancake batter. I wasn't expecting the paint to go into La La Land on me like this. Got it thin enough to apply another coat with a paint brush.
 |
| not a happy camper |
Not getting a warm and fuzzy with the 2nd coat coverage. It is barely better than the first one which was disappointing. In some spots, as you can see, the coverage was good but most of it is streaky. The paint just wasn't grabbing and laying down completely. The batch of milk paint, although it has a better color, isn't any better than the paint job on the first miniature chest.
 |
| hmm....... |
Milk paint on poplar. Thinking maybe the eastern white pine I've been using is the problem. The paint coverage on the poplar wasn't shouting back at me. It is streaky and the coverage was just as poor and spotty as on the pine.
 |
| cherry |
It is looking like to me that this milk paint doesn't give a rat's arse what it gets slapped on. The coverage and look is the same. So far the only thing giving me a happy face is the pigment - the color is good and without being splotchy.
 |
| this sucks pond scum |
It is the AM and the milk paint is a blob of a nice looking blue color. It wiggles like it is jello with the same consistency. I stuck, or rather tried to put a stick in it and nada. It was like it was rubber and I had to put some oomph into getting the stick inserted in it.
No way this could brushed on. I tried putting some water in it and got nowhere. Stirring did nothing and I just ended up with a big blue, rubbery blob on the end of the stick.
 |
| whizzing it again |
I started with 4 TBSP first and only a small portion was liquid. I had to dump in about a 1/4 cup more of water before it whizzed up into a smooth, but thick consistency.
 |
| better but...... |
I was hoping for a better build with this after the 3rd coat. I have had latex paint act like this milk paint but this sucks pond scum result wise. The coverage is still not at the level I want. It has some good dark coverage spots but still has way too many streaky spots.
 |
| screws came in from McMaster-Carr |
I don't have any room in my current screw boxes. Decided to make two more for #5 and #6 screws. These two boxes will be just for flat head screws. The current #5 & #6 boxes will hold round and oval head screws.
 |
| current screw boxes |
#2  (in one box), #4, #5, and #6 screws (atop the big cabinet).
 |
| hmm...... |
I'm using the original ends intended for the current miniature chest. They were 11/16" thick and I had to thin them down to 1/2". This chunk popped off when I planed the board straight across.
 |
| two boxes there |
The sides of the boxes are only 1 3/4" high so I'm using a single dovetail at the corners. I'll glue a 1/8" plywood panel on the bottom of each box. Got the dovetails done on each box. The next batter is doing the 1/2 pins.
 |
| 1/2 pin sockets done |
Next up is the part that always gets me revved up. How will it fit off the saw? I did both at the same time whereas I usually would do these one at a time.
 |
| first dry fit |
Good fit and after a few pulls and tugs, got the diagonals to agree dead on.
 |
| glued and cooking |
The dovetails were snug enough that I didn't need clamps. I had enough stock for the sides and one lid. The back box needs another piece. I'm not a fan of glued up lids but with my 4 other screw box lids, two of them are glue ups.
 |
| almost |
Found a scrap of pine more the large enough but I had to thin it down to a 1/2". I left it a wee bit proud and I'll flush it after the glue has cooked.
 |
| dividers |
I only did a groove for the two long dividers. The ends of the smaller cross dividers I'll secure with super glue. I already know that each of the compartments will hold more than a 100 screws.
 |
| one down, and one to go |
No hiccups or an oops with the first egg crate dividers. My other boxes have 18 compartments and these two will have only 15.
 |
| shooting for 2 for 2 |
I got the half lap sawn on the long ones. I set them down on the cross dividers as far as they would go and marked them.
 |
| mark both sides |
When I sawed the half lap I positioned the saw blade centered between the layout lines by eye.
 |
| two dry fitted |
Happy that this came out without any me-steaks. I can easily finish this in the AM with the exception of slapping some shellac on them.
Slow going today and I didn't get as much done as I had hoped for. A couple of days ago when I took the desk top out of the clamps, it fell off the clamps and smashed down on my big toe on my right foot. I hopped around on one foot, screaming expletives for 10 minutes.
The toe blew up and turned some rather interesting shades of purple, red, and black. It took me 5 minutes to get my boat shoes on the next day but I was able to do it without passing out. The day after I dropped the top I woke up to a huge blood blister on the big toe. Popped it and the toe felt a little better. Still walked with a slight limp.
Yesterday I repeated the dropped desk top exercise on the same right foot. Didn't drop it on the big toe again but on the next two adjacent toes. Now those are an interesting shade of purple and black.
The big toe swelled some more along with the two other toes. This AM it took me seemingly forever to get my right shoe on. The limp is more pronounced and I can't bend/flex my toes while walking. Walking flat footed very slowly and I had to rest and sit a lot while I was in the shop. Chopped the tails and pins sitting down which is a first for me.
I think it is going to be a few days before I will be able to do a full day in the shop. I will try to confine my movements/walking while in the shop as much as I can.
accidental woodworker
blue milk paint.......
 |
| from the boneyard |
After seeing the price of screws yesterday, I salvaged more from the sewing machine cabinet I broke apart. I took all the spare wood I had in the boneyard and loaded it into my truck bed. I'll bring it to the town recycling friday or monday. By filling up the truck it will force me to get rid of it.
 |
| over 2" thick |
This an ash glue up I did several years ago. The plan then was to make this into a sharpening bench but that never happened. I couldn't bring myself to toss it into the truck bed. Maybe I'll get inspired to use it in the coming months.
 |
| still mounded |
I got lucky and the epoxy fill didn't shrink over night.
 |
| flushed |
Got most of the epoxy flushed with a block plane. I still have a ways to go before it is done.
 |
| almost |
The black spot]on the right isn't part of the knot hole fill. I will have to plane that area until it is gone.
 |
| 99.99% |
The knot is flushed and within a frog hair of being done. The right spot is being stubborn. I hit both spots with the #12 and #122 scrapers. It is slow going but at least neither scraper was chattering on me. There is no need to get this completely done today but I was curious about how the epoxy fill would look done.
 |
| Wally World run |
Got some containers for the paint along with some spoons, I ran out of them last week. Getting ready to mix up a batch of milk paint.
 |
| hmm....... |
My quark turned out to be 8oz exactly. The quark is hard - ish. I used a quart of fat free milk plus one cup to get the required amount.
 |
| ta da |
This milk paint is so much better than my previous attempts. This one is smooth and has the consistency of a loose pancake batter. This batch matches close to what the author says it should be.
The quark didn't whiz up easily. I put a couple of TBSP of water in it and whizzed it again. Difficult but it smoothed out when I added the lime. Got a smooth consistency then.
Rinsing the quark this time yielded better results. I was more patient this time and rinsed it until the water ran clear. A lot clearer than my last batch for sure. I think for the next batch (red) I'll use the quark right away. I won't wait and let it set up overnight in the refrigerator. The paint should whiz up quicker and easier than doing it as hard as the quark was today.
 |
| so so |
The first coat of paint. Better coverage than the previous blue dye I used. Still not the coverage I was hoping for.
 |
| other two sides |
Kind of happy with the batch. I will slap on another coat after dinner. I don't want to see any wood with this milk paint. I want the chest to look like something close to if this was painted with latex paint. Fingers crossed I'll have a happy face on in the AM.
accidental woodworker
Mile's desk pt II.........
 |
| making quark |
Before I went to the shop I made a batch of quark for the blue milk paint. I will make the 2nd batch of quark for the red paint after I get this one done.
 |
| hmm...... |
The open knot on this face (the down side) is almost an inch and a half at the widest and 3/4" at its narrowest. Undecided about whether or not to fill it in on this side. It is on the underside and won't be seen - the drawers will cover it.
 |
| #4 1/2 with a 55° frog |
The proud was not quite a 16th and I couldn't flush it entirely with this plane.
 |
| #80 |
Got it almost flushed with the #80 within a frog hair. I had problems with the #80 chattering a lot more than I expected.
 |
| got a hump |
I got all 3 of the glue joints dead flush and it is flat on the opposite diagonal and there was a hump this way. The hump is right on the swirling bullseye grain. The 4 1/2" didn't have any problems planing this area without tearing out.
 |
| toothing iron |
This is the third time I've used this iron. I've had it for almost 20 years. Using the jack so I could feather out the hump area.
 |
| almost |
This wasn't as awkward to do as I anticipated it being. I have two stops on the workbench, one at the end and another on the left side. I pulled the planes toward me while standing at the end of the workbench. It took a while before the hump got flattened.
 |
| love the depth of the black color |
I stuffed the knot hole with a bunch of cherry shavings so I didn't have to use gallons of epoxy to fill it.
 |
| 2nd application |
About 20 minutes after I initially filled it I put some more on. One spot had dipped down below the top. Fingers crossed that come tomorrow it will be still over filled and not sunk down.
 |
| quark is 99% done |
I think I did better on this batch then I did with the previous ones. I know I did better with rinsing until it ran clear. I put this in the refrigerator to dry out and drain any remaining liquid.
 |
| hmm....... |
Got this yesterday from Amazon - 10 feet of plumber's chain. I wasn't sure here if it will work as a chain stay for the miniature chest.
 |
| not smooth sailing |
As I smoothed one set of chatter marks, I made a new set. Tried all the tricks I knew but without success.
 |
| stubborn spot |
I had smoothed this area of chatter marks but I had to take one more swipe. My reward? Three more lines of chatter. This one area was an absolute nightmare trying to smooth out.
 |
| the smoothing trio |
The scraper plane (Stanley #112) was the only one that didn't chatter. The Stanley veneer scraper (#12) chattered a couple of times. The #80 was the worse. The scraping planes left behind a glass smooth surface, much better than the #80 did.
 |
| ornery spot |
This area was a PITA to smooth out. It didn't tear out exactly but certain strokes left a fuzzy line.
 |
| been a while |
I thought I had two #112s but it is two #12s. The last time I used these was when I made the cradle for Miles. Hard to believe but that was almost ten years ago. BTW I only have one Stanley scraper iron in these three. After searching I finally bought replacement irons from Hock. I bought two toothed irons from Kunz - I emailed the US representative and bought two from him. Had to wait until Kunz in Germany made a batch of them. The fit with both the Hock and Kunz irons was perfect.
 |
| it works |
Setting the hinges using super glue. Two dabs on each hinge with a little weight for 10 minutes holds the hinges in place long enough to get screws started.
 |
| underside |
No leaks. The blue tape is still down tight and it isn't bulging neither.
 |
| two screws |
Got two screws in each hinge. Unfortunately for me, I didn't have any flat head, slotted, #6 screws in the length I wanted. I went to ACE but two things stopped me from buying screws there (and having an involuntary bowel movement). They had brass screws in the size I wanted but they were phillips head (a no no for me) and the cost took my breath away. 50 screws in 1/2" was $17 and the 3/4" size was $19. I don't remember screws costing this much the last I bought a pkg of 50.
I ended up buying the screws from McMaster-Carr. Bought two boxes of 100 each and the price was almost as much as the ACE pkg of 50 screws cost. I'll have to start watch vids on making without any fasteners like screws and nails.
 |
| hardware is done |
Got the chain stay installed without any hiccups. The hinges are all set to be reinstalled once the paint is done.
 |
| shellac time |
Got 4 coats on the interior of the chest (done) and two on the back doohickey thing. 3-4 more on it and it will be done.
accidental woodworker
25 Years of Changes
 Game Table. NY 1760-1790
A recent visit to the furniture collection at the Metropolitan Museum really emphasized how profoundly furniture-making has changed since my youth - and even in the 25 years since I founded TFWW.
I grew up reading Popular Mechanics, and I imagined that I too would engage in their home improvement projects when I grew up. Build a den; build a media center; build a kitchen cabinet; stuff like that. On top of that, the magazine offered tons of material on building reproductions of colonial style furniture, usually with the latest power tools. Home repairs, like car repairs, were within the grasp of ordinary people with mainstream skills and tools. DIYing was a popular hobby and for the average guy, (and I mean guy at this point in time) practical classes in Shop class in school gave you the foundation to make things.
I also began reading Fine Woodworking in 1976. (I missed the first two issues and started with Issue No. 3.) The magazines focus on fancy techniques like wood bending and a high valuation of the craft were real eye openers for me. Fast Forward to now. The major area of business for modern cabinet makers is in architectural woodworking - re-fitting kitchens, building interiors, stores, bookcases and other millwork. The popular expectation of dressers, tables, beds, etc. is inexpensive and disposable, made by IKEA and IKEA-like companies.
Fewer people now than ever before would consider themselves amateur woodworkers. The interesting part is that the ones who are doing it are doing it to a higher standard than ever before. They are no longer constrained by the mass market. If youre going to the trouble of making a colonial style high boy, youre probably doing it because you want to dive into that kind of piece, even if that means learning how to veneer, learning how to dovetail, learning how to carve details. All sorts of wonderful skills - which is where the challenge and interest lies.
Getting back to the museum: While the Metropolitan Museum of Art has the second largest collection of American furniture in the US (after Wintertur), most of the vernacular stuff they have is in the study collection, not in the fancy exhibition halls. The period rooms almost all have fancy rich furniture - items that highlight and show off wealth rather than comfort and function. The pieces are all beautifully made with great skill, but very few things are relatable nowadays. People aren't looking for a chair with fancy decorations and inlays. They want something that conjures up the image of a traditional chair - and the vernacular stick chair world does that in spades.
For most people interested in traditional skills, the direction seems not to copy the stuff in museums, but rather focus on the kinds of vernacular furniture that frankly was too downmarket to interest bigtime furniture collecting. I'm talking about stick chairs and other folk work. People are following this path for two reasons: first, while you need much fewer tools to make a stick chair, the craft demands the same rules of design and proportion so its still a fun challenge, and second, vernacular furniture is a lot more relatable in a modern house than the fancy furniture we see in museums.
Note: the Metropolitan Museum of Art has remounted a lot of works in their American Wing. They're mounting furniture in a way that asks you to look at it closely and see the details. They're trying to create an appreciation of the design of traditional furniture, or should I say, traditional high-end furniture that has largely vanished. I think a lot of people look at the furniture in the American Wing, and say, My word! That stuff looks dated! and never look past this unrelatability to the details. (This is especially true when whole rooms are preserved.) They therefore dont enjoy or appreciate the craft that went into making fancy furniture. Of course the museum pieces were expensive luxury items. But theyre still wonderfully proportioned; theyre elegantly made; and a pleasure to examine and well. A lot of them dont fit into a modern lifestyle, i.e. a place to put your laptop, a sofa you can watch TV from (and sadly nobody these days is coming over to play games). But this doesn't mean the works aren't extremely elegant in the context of their original use - and we can still learn from them.
Note: We stock a lot of detailed, accurate measured drawings by Carlyle Lynch of early American Furniture, some fancy,some not.
We also stock "Welsh Stick Chairs" a wonderful book and we have a few copies left of The Stick Chair Journal.
For a more philosophical look at chairmaking you might want to look at "Chairmaker's Notebook" by Peter Galbert.


Miles desk...............
 |
| hmm....... |
First change is with the top. This one will be about 36x24. I got four boards to choose for the top. That will be whittled down to a 3 board top. My desk top is 44x 25.
 |
| maybe not |
This is the cherry bookshelf I made for Mile's desk. It looks a wee bit
too big IMO. I pictured this being used for reference or school books
(CD/DVDs too). I'll be rethinking this - I have two smaller cherry
bookshelves waiting in the wings that might look/fit better.
 |
| took a while |
I went back forth with the four boards and I ended up using the one with a knot. I like how the grain flows with these three boards. The knot goes straight through the board. This face has the smaller opening with the opposite face over twice the size. I am going to fill it in with epoxy dyed with black pigment.
 |
| can't dutch it |
I was thinking of covering the the knot hole with a dutchman. I didn't have any cherry off cuts with a circular grain pattern like the knot has. First option was cherry and then I thought of using walnut. Nixed both because of the grain.
 |
| jointing the top boards |
This is about the only time I use my #8 Stanley - just for jointing boards for edge gluing. Checking for the edge square to the face. Used a 48" straight edge to check the edge was flat and straight.
 |
| hmm...... |
There was a slight gap here due to a hump. It took a few plane and check steps before the gap disappeared.
 |
| sigh |
I dry clamped the top 3 times before I glued it up. All three dry attempts I had problems flushing these edges. However, I didn't have any hiccups get it flush when I tightened the clamps. That changed when the glue went on. It was flush initially and when I finally got all the clamps tightened down, I saw this. By the time I saw it and tried to fix it the glue had already set. This is the major reason I went with 5/4 cherry for the top.
 |
| glued and cooking |
I used the Bessey clamps to keep the joint lines flush and tight to the clamps. Got a surprise when I checked the joint line from above again. It had closed up a little more. I should be able scrap away what it is now there with the Stanley #80.
Real crappy day here in RI. The weather seers said it would rain, sleet, and snow off and on all day long. Some rain, no sleet as of this blog typing but it did snow for about 20 minutes. The seers said that none of the precipitations would accumulate.
accidental woodworker
new miniature chest pt IV......
I haven't forgotten about Miles desk. I have decided to make a copy of the desk that I use. Mine is red oak and Miles will be cherry. For that matter, Leo's desk will be cherry too. I wanted to finish the current plate of projects before jumping into the desk build. Now that the miniature chest woodworking is done, the first thing on the desk agenda is making the top. I have the measurements of my desk but I won't be following them exactly. They will be subject to whim and what I think looks good.
 |
| hmm.... |
I applied wood putty to the dings and divots on the chest yesterday. The
chest will be rustic looking but I don't want to see all the boo boos
under the milk paint to come.
 |
| hinge mortises done |
I had three sets of these hinges, two in bronze and one brass one. The brass one was buried in the hinge goodie bin. Got the heebie jeebies thinking I was losing it again but I found it.
 |
| chamfer done |
I stopped the chamfer 1 1/2" from the back edge of the lid. I did this with my battery operated router.
 |
| looks a wee bit rough |
This is making my OCD tingle a wee bit but I'll try to get over it. The mortise is shallow leaving the hinge is 1-2 frog hairs proud.
 |
| prepping for milk paint |
The last milk paint I used the last miniature chest didn't cover/stick to the wood putty well. So I applied shellac to them and the end grain of the front and back. Not sure how milk paint will do on end grain but the shellac sealed it and it should act as a primer coat.
 |
| done, for now |
Decided on how the back doohickey thing will be attached. The lid will be painted red and the doohickey will be finished with shellac. I attached it with 5 screws and I will remove it before I paint/shellac it. Once the finish is done, I'll screw it back on.
 |
| finger grabbie thing |
The lid overhangs the front of the chest only about a 1/4". Decided that wasn't enough to ease opening the lid so I added this to help out.
 |
| ready for paint |
Spent about 30 minutes with my head buried in my arse searching the shop for some window sash metal chain. I know I had some left over but as usual I can't remember where I hid it. I'll search/order some from Amazon. I have time before I'll need it.
 |
| sigh |
Well, boys and girls, they ain't done yet. The cherry one was borderline but the two walnut ones needed some help with the top edges on the ends. After dinner I'll eyeball them again and more than likely they will get another thin coat of shellac.
I had to go the VA after lunch because one of my meds ran out. The doc will review it and I'll get the refill in the mail. In the interim I got a ten day supply. The streets leading to the VA were a complete mess. I thought the side streets were I live were bad but the ones in Providence were way worse. A 5 minute ride through them pre blizzard took me 20 minutes today. Thankful that I don't have to go to the VA for an appointment until next month.
accidental woodworker
Nava Electric Mandolin Part 5: Completed!
The electric mandolin (e-mando) is now complete! In this video, I give a “guided tour” of the instrument and a demonstration of how the pick-up system works.
And a few photos below.........


Cheers Gary
new miniature chest pt III......
 |
| now they are done |
No home for either one of these. I'll ask my sister Donna if she wants them. If not I'll give them to my sister Kam. I still have to get a hold of her for day to bring the boneyard goodies to her.
 |
| 3 more done |
The middle cherry one is for Miles desk. The two walnut ones are homeless for now. But I am thinking of gifting one of the walnut ones to Maria at the Frame it shop.
 |
| hmm.... |
Got the moldings in and the two long ones are a few frog hairs higher then the short ones. I had checked them and it looked to me that they were all the same height. I'm leaving it as is. I just nailed the moldings in place with no glue. I didn't glue the plywood bottom to the bearers neither.
I hand nailed one short molding and pin nailed the others. There was barely any room for the hammer head to hit the nail. Nailing it off with the pin nailer wasn't much better but I managed to get it done.
 |
| hmm...... |
Thinking about how to attach the back doohickey thing. Clamp and nail it, or use screws? Also, do I do it before the hinges are attached or do it after? Good place to kill the lights and head topside. This was all I got done today in the shop. Spent the rest of the day watching old Star Trek shows on Amazon Prime. I never saw the first few years of any of them.
accidental woodworker
new miniature chest pt II......
 |
| hmm......... |
These two were the original ends] for the miniature chest. The bottom one is dead flat and is the one I had clamped a split/crack in. The top one was flat but it ain't anymore. No problem flattening it with hand pressure. No idea what I'll use these for but they will be available in the scrap pile.
 |
| glamour pic |
I like how this turned out. Initially I wasn't happy with how the bandings were applied vice inset in dadoes/grooves. Now that I can eyeball it with the lid on, I like the look.
 |
| hmm..... |
I think the feet being applied and proud help to anchor the bandings. There is a lot of color and texture from all the different woods to look at.
 |
| oops |
Thought I was done with it but it ain't so boys and girls. I missed getting shellac on the inside of the top of the lid.
 |
| nope |
I had left the cupped, smaller doohickey clamped over night and most it was gone this AM when unclamped. However, I ripped out another one a 1/4" taller and a few frog hairs thicker.
 |
| got lucky |
The top has 4 coats on it and the pine has a light honey color that compliments the cherry insert nicely.
 |
| the after pic |
The lid had cupped slightly and no matter which way I put it on the top there was a gap at the front. Put the board on the bench and planed the hump flat first and then the cupped side second. I only lost a 16th on the thickness too - ended up at 11/16".
 |
| sigh |
Today the chest was rocking. Put the sticks on the legs expecting to see some twist and nada. The sticks told a tale of zero twist so why was it rocking?
 |
| the problem?? |
The miniature chest is on the tablesaw laying dead flat and zero rocking. On the blue outfeed table it was rocking. No rocking on the workbench neither. Looking back I think this table was causing the headaches I had with the walnut bookshelf. I had checked for rocking first on this outfeed table.
A quick check with a long straight edge showed this table has some twist/hump. I'll stop using this to check for rocking starting today.
 |
| molding choices |
I wanted to use the quarter round molding but it is too small. It would be a ROYAL PITA trying to nail or glue it in place. I am going to use the beaded molding on the right. This one I can press down tight to the plywood bottom and nail without any hindrances that I can foresee.
 |
| 3 coats of shellac |
Almost done. It looks ok with three but one or two more will raise the shine up a couple more notches.
 |
| one more coat to come |
I had to scrape waterfall drips on all three of the bookshelves. One more light coat of shellac and they will all get a check mark in the done column.
accidental woodworker
The Japanese Gennou Hammer & Handle Part 20 – Making Sawdust

Woodworking minus patience equals firewood.
– Author Unknown
In the previous article in this series, we selected and prepared the wood for our gennou handle and layed-it out in accordance with our design drawings.
The next step in the process is to gather our tools and begin the fun work of making sawdust. Yeeehaaaa!
Tools
I prefer to use the following tools when making a gennou handle. You will need to have similar tools on hand for layout and fabrication, but the specific choice is entirely yours.
- Divider with sharp points (transferring dimensions and tenon layout);
- Sharp pencil (making pencil marks (ツ);
- Small try square (laying out and checking tenon);
- Marking gauges (Titemark and kama kebiki. Marking tenon and centerlines) ;
- Marking knife (layout);
- Rip handsaw for roughing out;
- Hozohiki rip saw and/or dozuki crosscut saw and/or rip saw for cutting the tenon (in hardwood, a sharp hozohiki rip saw frequently makes both rip cuts and crosscuts cleaner and more precisely than a crosscut dozuki saw);
- A fine saw such as a fret saw or coping saw with a fine blade for making curved cuts;
- Auriou cabinet rasp (Lie-Nielson) (optional);
- Bogg-pattern flat-sole spokeshave (Lie-Nielson) (optional but really handy);
- Sandpaper;
- Satin Polyurethane finish (optional);
- Mineral spirits (optional.
- A board to support the handle-in-progess. I suggest dimensions of 300-400mm long x 50-60mm wide x 40-50mm thick, with a “V” groove cut full-length and a cross-stop inlet about 2/3 its length. The handle will rest, more-or-less securely in this groove, and be restrained at one end by the stop when using spokeshaves and rasps. This support board can be clamped in a vise, or clamped to a workbench with a C clamp. I also find it most efficient to place this board on my benchtop with the gennou handle resting in the v-groove with one end touching my chest, perhaps cushioned by a rag, and use rasps and spokeshaves pulled towards me to shape the wood.
The Tenon and the Unblinking Eye

Let’s start by cutting the tenon and fitting it to the gennou head’s eye.
You’ve already layed-out the tenon, so use a fine precision rip saw like or 210mm hozohiki to cut the four cheeks being extremely careful, like a big-eyed kitten stalking a grasshopper, to stop short of the layout line. Be careful to work very precisely with your saw to not cut too deeply as any excess meat removed from the tenon, or sawcuts left in the tenon, will fatally weaken it. I’m not kidding!

I’ve made this mistake more than once, ruining all my work to that point and wasting some nice wood. Indeed, it may be best to cut the shoulders shallow and trim with a chisel, once again being careful to not cut too deeply. Ruthless, merciless, unrelenting control of your naughty inner-badger is critical!
At this point, the handle is a chunky, graceless block with square edges and flat surfaces. That’s alright. There’s no need to contour the handle yet.
Cut itsy-bitsy teeny-weeny chamfers on the end of the tenon to help guide it into the eye without cocking and binding. A big chamfer will benefit nothing and look ghastly.
Mark the reference face annotation on the corresponding tenon cheek because you don’t want to mistakenly force the tenon in bassackwards.
Test fit the tenon into the eye a few millimeters but without driving it all the way on. It should not start by hand pressure.
Although you shouldn’t have to try tried a full-power test fit, when you are satisfied that the tenon will fit into the eye of your gennou head without the driving forces shaving off much wood, and marked the reference faces, then tape the tenon with masking tape so you don’t accidentally knick or shave it. Don’t ask me why I know this risk exists.
With the tenon close to completion, let’s next shape the curved front, back and side surfaces to fit.
The Back and Front Edges
Cut the back and front edges (surfaces parallel with the long axis of your gennou head) to your design profile using saws, rasps and/or spokeshaves. The two guiding details in this process are the butt and the tenon, with the tenon being most important. These two surfaces should be shaped to smoothly connect the butt with the tenon, not the other way around.
However, leave the corners square for now to help guide you in shaping the critical back and side surfaces because, if you start rounding and smoothing edges and corners now, it often happens that the geometry which aligns the hammer’s face with chisel and nail will be compromised.
The tools you use don’t matter so long as when this step is complete the back edge is perpendicular to the reference face, the opposing side face, and is consistent with the layout lines.
I recommend you cut outside the layout lines plus a millimeter or two because accidentally cutting deeper than your layout lines will not only disrupt the even flow of the design but may damage the structural integrity of this elegant, minimalist tool.
Do not cut or shave the handle’s sides flush with the tenon yet, but leave them just a hair proud.
When done with the this, lightly remark the centerline and extended the eye’s lines.
The Sides
At this point in the process the right and left sides should still be flat and parallel, perpendicular at any point with the back surface, and have neat, square corners.
Use the paper/cardboard profile pattern from your design drawing to mark the handle’s layout on the back and front edges.
Just as with the back and front edges, cut the side surfaces using saws, a drawknife, rasps and/or spokeshaves.
The transition from tenon to butt should be uniform and smooth. As you approach the final dimensions, be careful to avoid tearout or gouging in the neck area since removing these irregularities may require you to reduce thickness too much.
Do not cut or shave the sides flush with the tenon’s cheeks yet, but leave them just a hair proud.
Smoothing and Rounding
I find it most effective to leave the back edge (opposite the flat striking surface of the head) flat with slighty relieved corners. Some people like to make the back edge of the handle oval or egg-shaped, but I recommend you leave it flat at first and then adjust it to fit your hand as you use the gennou.
Common sense will scream at you in a voice like a nazgul to round the the back surface or to make it oval-shaped, but while such surfaces might look better hanging on a peg in a hardware store, or feel better when using your hammer to kill coackroaches, it is counterproductive when doing serious work, I promise you.
Why? Because, despite what you may think, a flatter back surface does not bite into the hand in-use, but because of the greater surface area in contact with the hand it provides, actually reduces the pressure of impact reaction forces on the hand reducing fatigue and bruising. More importantly, it helps with quickly and unconsciously indexing the striking face of the head correctly.
With the back edge where it needs to be, next round the front edge into the design profile. I prefer this surface to be more-or-less a perfect radius at any point in the handle area, but some guys feel an egg-shaped cross-section fits their fingers better. Six of one half-dozen of the other.
In any case, this surface must smoothly morph into a flat surface with slightly radiused corners in the neck area, and finally with no radius as it approaches the tenon. Yes, you read correctly: no radius.
I usually round-over the flat on the back edge right where my index finger wraps around to the side just a little to avoid developing a blister. But keep in mind that the only way to tell what small details works best for you is trial and error.
Doming the Butt
The butt should be flat with sharp edges at this point in the process.
You may find a domed butt strange, but it has both a practical purpose and an aesthetical one.
Let’s consider the structural, practical purpose first. If the wood is adequately hard, and the tenon is not too skinny, you will need to hammer the butt like a son-of-a-gun dozens of times to get the tenon into the eye. Don’t start yet, but when the time comes you must be careful with the direction of your hammer strikes to avoid breaking the tenon.
If the butt is flat with crisp edges, unless you have perfect aim with every swing, your hammer might chip or even split the butt. A domed surface directs impact forces away from the edges of the butt and into the neck, helping to prevent chipping. Likewise, a curved butt will also reduce damage to the handle over many years of hard service.
With regards to aesthetics, a domed surface is more organic and, to my sensibilities, more elegant than a flat one because straight lines seldom exist in nature, are boring to the eye, and seldom please it.
A warning. Everyone has different opinions about what pleases the eye, as you know. Beauty is in the eye of the bean holder, or something like that, so I entirely understand if you dismiss the aesthetic reasons I’ve suggested. But please don’t ignore the practical, structural reasons if you want to avoid wasting your time and wood.
Assuming the butt is flat and its surface is more or less perpendicular to handle’s centerline, use a marking gauge set at ¼” to scribe a shallow line along the handle’s edges and sides. Lightly scratch another shallow line the same distance around the perimeter of the butt. These lines will be the limit of the chamfer between the grip and the butt.
Next, mark a cross on the butt using the front and back edge’s centerline, and a perpendicular line parallel to the back edge. This cross will be useful in profiling the butt.
Use a knife, chamfer plane, block plane, files or other tools to chamfer to the lines just scratched.
Next facet the butt using planes or a sharp kiridashi kogatana knife and remove all tearout and filemarks. The time for using sandpaper will come later in this adventure when we apply finish.
Fixing a Loose Head

So here’s the “I toljaso” in advance.
If you were not a clever little big-eyed kitten when fitting the tenon, you may find the tenon becomes loose and the head begins to wiggle with the passing of a few seasons. A Sergent Elias moment!
I won’t say it out loud, but just between you and me and CCP you can remedy a loose head by removing it and shimming the eye with quality high-rag-content typing paper. Don’t have any such paper in your bat cave? Don’t tell the Secret Service I said so, but a strip cut from a dollar bill works best. Crane Stationary makes the best paper in the world.
In the next post in this series we will attach the gennou head to the handle.
Until then, I have the honor to remain,
YMHOS
 Lena Dances With the Knight by John Bauer 1915
If you have questions or would like to learn more about our tools, please use the questions form located immediately below. To see a list of our tools and their pricing, or to contact us, please click the “Pricelist” link here or at the top of this page.
Please share your insights and comments with all Gentle Readers in the form located further below labeled “Leave a Reply.”
We see data miners and their bots as dastardly sneak thieves and so promise to never share, sell or profitably “misplace” your information for any reason. If I lie may the heads of all my eyes become egg-shaped!
Previous Articles in The Japanese Gennou & Handle Series
- Part 1 – Introduction
- Part 2 – Ergonomics
- Part 3 – What is a Gennou?
- Part 4 – The Varieties of Gennou: Kataguchi, Ryoguchi & Daruma
- Part 5 – Kigoroshi
- Part 6 – The Ergonomic Anaya
- Part 7 – The Unblinking Eye
- Part 8 – Head Style & Weight
- Part 9 – Factory vs. Hand-forged Gennou Heads
- Part 10 – Laminated Gennou Heads
- Part 11 – Decorative Gennou Heads
- Part 12 – The Drawing: Part 1/6
- Part 13 – The Drawing: Part 2/6
- Part 14 – The Drawing: Part 3/6
- Part 15 – The Drawing: Part 4/6
- Part 16 – The Drawing: Part 5/6
- Part 17 – The Drawing: Part 6/6
- Part 18 – Wood Selection
- Part 19 – Laying-out the Handle
new miniature chest......
 |
| cooked overnight |
This was going to be the ends for the new miniature chest. Didn't know it here yet.
 |
| eats up a lot of real estate |
The bottoms are done on all of them. Next up is getting 4-5 coats on the rest of them.
 |
| yikes |
One of the ends and this decided to shake hands with me. There was a split/crack on one end what when I tried to open it up so I glue it, it split opened from end to end. It didn't separate entirely making it easier to fill it with glue and clamp.
I made another end but it was thicker than the other original one. I had the stock so I just made another end panel so the two would be the same thickness.
 |
| one miniature chest |
There is surprisingly little stock required to make this chest. Two ends at the front with the front, back, and lid behind them.
 |
| came yesterday |
This a 1/2" timber wolf wood slicer resawing bandsaw blade. I got it from Highland Hardware. Can't wait to see if this is the cats meow for resawing.
 |
| hmm..... |
The fence and the blade ain't square to the table. Fixed that boo boo before I tried resawing again.
 |
| big negative on that Houston |
The 3/8" chinese bandsaw blade had zero problems ripping through this pine. Unfortunately for me the cut was far from stellar. Parallel at this end (the entry) but angled on the exit.
 |
| this ain't good |
Again, the blade eased through this better than a hot knife going through a tub of cheap oleo. This cut is something new for me. I had tried to push the stock through the blade like I have seen on a bazillion You Tube vids. The saw cut had a mind of its own than this was what it wanted to do.
 |
| yikes |
This was the last resaw I attempted. I pushed the stock through the blade. I didn't go nutso pushing the stock tight against the fence as I pushed it forward. I have yet to see one You Tuber pushing against the fence as the stock is fed into the blade. Time to step back, resist the urge to give free flying lessons, and think about what the (*^)(_*(!@$^&*)_@(+$ am I doing wrong.
 |
| need a dutchman |
The grain is uplifted here and it will be a catch hazard. A dutchman will cure that hiccup.
 |
| good fit |
It is ready to glue with a few gaps. My initial knifing of the dutchman was faint and I had trouble refining them when I chiseled the outline.
 |
| glued and cooking |
No need to clamp this. The dutchman fit snug.
 |
| why????? |
One continuous cut, smooth with zero binding or hesitation. Why can't I duplicate this cut with resawing?
 |
| comparison |
Sawed these notches on the bandsaw. Smoothed one and the top one awaits its turn. The amount of scalloping wasn't effected by pushing it slowly or fast through the blade. Rough as it is/was, it was square to the face.
 |
| hmm...... |
The side panel is proud of the leg on the end. This is harder to fix then if the leg was proud of the side panel.
 |
| fixed |
The side panel and the leg are flush now. I used the same fix on all four legs.
 |
| the fix |
Planed four strokes with the LN 140 making a shallow rabbet. I wasn't too concerned about an exact depth. If it was a little too deep, a few strokes with a plane on the leg would flush it. Nailed the front and back on with 5 cut nails on each end with a wee bit of glue.
 |
| ledgers |
Nailed and glued the ledgers on that are for the plywood bottom to be secured to.
 |
| bottom in dry |
Thinking on whether or not to put a molding here to keep the bottom in place. I did that on the previous miniature chest and I like it.
 |
| lid and the back doohickey thing |
I like the proportions of this miniature chest more than the previous one. The length to width ratio looks better to the eye IMO.
 |
| hmm...... |
The doohickey thing has a healthy cup to it. I was able to clamp and flush it with the back edge of the lid. Not getting a warm and fuzzy with it in spite of the ease with flushing up. I would rather have doohickey thing be straight and flat from the git go.
I hadn't expected to get this far with the chest today. After I got the front and back nailed to the ends, everything else just fell into place. No hiccups or road blocks. This will be painted with milk paint and the pigment dyes I bought. Blue for the main body and red for the lid. At least that is the plan as of today.
accidental woodworker
a wee bit sore........
The old body isn't screaming at me but it is achy through my back into my upper thighs. What surprised me was my left shoulder didn't hurt. There was a wee bit of achiness but no rip your face off pain.
The plow truck came through overnight and it was expected. They blocked off the end of the driveway and the front door walk way. They also only plowed my side of the road. They made another run around lunch time. So I had to shovel twice more today but I lucked out because it wasn't nowhere near the blizzard level snow dump.
 |
| sigh |
Not too bad and it took me a little less then an hour to clear the driveway and the front door walk through. No hiccups with the left shoulder, I was expecting it to start singing arias within a heartbeat but it didn't.
 |
| hmm....... |
It is signed 2023 but I would bet a lung that it was older than this. I think I signed this when I hinged it. I know this sat in the boneyard for several years without hinges. This is the pine/cherry jewelry box and I'm slapping shellac on it finally.
 |
| sigh |
The banding is offset on this corner. It looked like crap and was setting off alarm bells in OCD central. Chiseled it off and glued on another piece.
 |
| wow, and wow again |
I can't believe how dark the legs and bottom banding on the small box popped after just one coat of shellac. I think this is ebony but I'm not sure. Regardless, I am in love with the color.
 |
| flattening |
I didn't go nutso on this. I planed the hump on one face and the cup on the other. Made no attempt to make the faces dead nuts parallel. No pain working with 3 different planes flattening this board. I wasn't sure if the left shoulder would protest or not.
 |
| done |
Happy face on. The board ended up 11/16" thick which was my target.
 |
| resaw time |
The blade is only 3/8" but it didn't protest resawing this scrap of pine. The blade effortlessly glided through the board with no binding or hesitation.
 |
| hmm....this sucks pond scum |
In spite of the ease sawing the stock it didn't come out okey dokey. The saw cut is angled. The outside cuts aren't usable but the middle one is.
 |
| why I was resawing |
This board will give the ends for the miniature chest. I am going to dutchman this pitch pocket but not the knots. Pitch pockets can bleed and run when the temperature gets hot.
 |
| second step |
Knife and the chisel the outline of the dutchman. I chiseled it out and checked the depth with an adjustable square.
 |
| good fit |
There is a bit of a gap on the top long edge. It isn't a big deal and
I'll fill it with wood putty. This is going to be painted and won't be
seen.
 |
| glued and clamped |
Tomorrow I plan to go to Lowes and buy a couple of 1x12 pine boards for the miniature chest. I'll whack that out before I start on Miles's desk.
 |
| two coats of shellac |
Two coats on the body and three coats on the feet. One more to go on them and they I can finish the rest.
accidental woodworker
Update on the Dunlap #3726 Bench Plane
I had been having trouble getting this plane to work properly. The front of the frog does not make contact with the plane's main casting; it is essentially cantilevered over the casting forward of where its seat mates with the casting's frog receiver.
 |
| With frog bolted down, can fit cardboard under the toe of the frog |
And this caused the plane to shudder as it tries to glide over a workpiece.
 |
| You can see the waviness of the cut |
I thought if I filled the gap under the frog, the cantilever would be eliminated and maybe the plane would be more stable and cut better. First, I stuffed a few layers of business card under there to see what the gap measured. Turned out to be about 0.052". I planed some maple to 0.056" thick - no small feat - and stuck another block to it to fill not only the space under the frog's toe, but also the space under the frog just forward of the casting's frog receiver.
 |
| The block and a piece of thin maple |
My intent was that the top of the block would be in line with the top of the frog receiver, the slanted part would match the roughly 45 degree angle on the underside of the frog, and the thin base would support the frog's toe. This turned out to be a major pain in the ass, as I had to fit the piece, bolt on the frog, test it out, take it apart, make minor adjustments and repeat - many times.
In the end I would have needed to whittle away most of the slanted part of the block to allow the frog to be far back enough to bolt it down. So I tried something much simpler - just go with a thin piece of maple, 0.056" thick, under the toe of the frog. In the following picture, you can see the piece of wood in place.
 |
| Looking at the sole from toe end - the white is the maple piece |
Well, time will tell if this fix works for the long haul, but for now, the plane seems to be working fine. I planed some pine with no juddering, then some red alder (a relatively soft hardwood) and some pretty hard red oak, all with a nice smooth surface finish.
 |
| Planing some fine shavings of red oak |
 |
| Nice smooth surface! |
Could it really be as easy as that? Maybe I'll keep this plane after all. But if there is anybody out there who collects Dunlap planes and would like this one (for free), please contact me and I'll be happy to let it go.
it wasn't 16 feet.......
I must have gotten some snow blindness because I was way off on how much I had to shovel. 16' didn't even make it to the end of driveway. I measured once I cleared it out to where the plow trucks dumped their stuff. From where I left off yesterday to the snow line in the road was almost 42 feet. I would have gladly accepted it being 16'. I started shoveling it at 0738 and I got done with it at 1248. I worked right through lunch because I just wanted it over and done with.
 |
| a little over 3 hours |
I still have a chunk of snow on the right to shovel. My shoulder was starting to hurt a lot here. To add an insult to injury, it snowed for most of the time I shoveled. It turned to rain briefly before ending. On a brighter note, Mr Sun said hello around 1400.
 |
| awesome helpers |
These are like football cleats that went on a super crash diet. Absolutely no slipping and sliding with these on. Because they slightly elevate your shoes they don't get soaking wet. I wouldn't have survived shoveling the driveway without them.
 |
| almost forgot to snap this pic |
The fruits of my labor. I am going to be sore for a while. I can't lift lift my arm up above my left shoulder. Can't remember whether to ice it or apply heat. I'll google it later on.
I went to Shaws to get some vittles and my street was barely a single lane. There is no way two cars could pass each other. I noticed that a couple of side streets weren't plowed at all. The main road going to Shaws was clear but the left lane (4 lane road) was a wee bit short on the width. That made for an interesting drive dealing with the morons in the right lane.
 |
| hmm....... |
This walnut bookshelf didn't want to get its pilot license. It isn't rocking here at all. No rocking when I checked on the tablesaw top neither. I'll be keeping an eye on it to make sure it behaves.
 |
| been two days |
I was too impatient to wait another day because I had to see how it looked right now.
 |
| about the same |
I really couldn't see any difference after this second heat and clamp. There is still a wee bit of a cup on one face and a hump on the other face. Still much better than what it was before I tried this. When it comes time to plane the hump/cup I shouldn't lose that much in the thickness. Hoping it will be about a 16th or less.
 |
| almost done |
This almost didn't get the final check mark today. My shoulder stopped singing arias and was screaming at me. I stayed in the shop long enough to get the last two bandings on and clamped. This was all I got done in the shop today. I don't expect to light the world on fire with shop time in the AM. That is dependent upon how much use my left arm will have to render.
accidental woodworker
The Flywheel, Lathes, and the Industrial Revolution
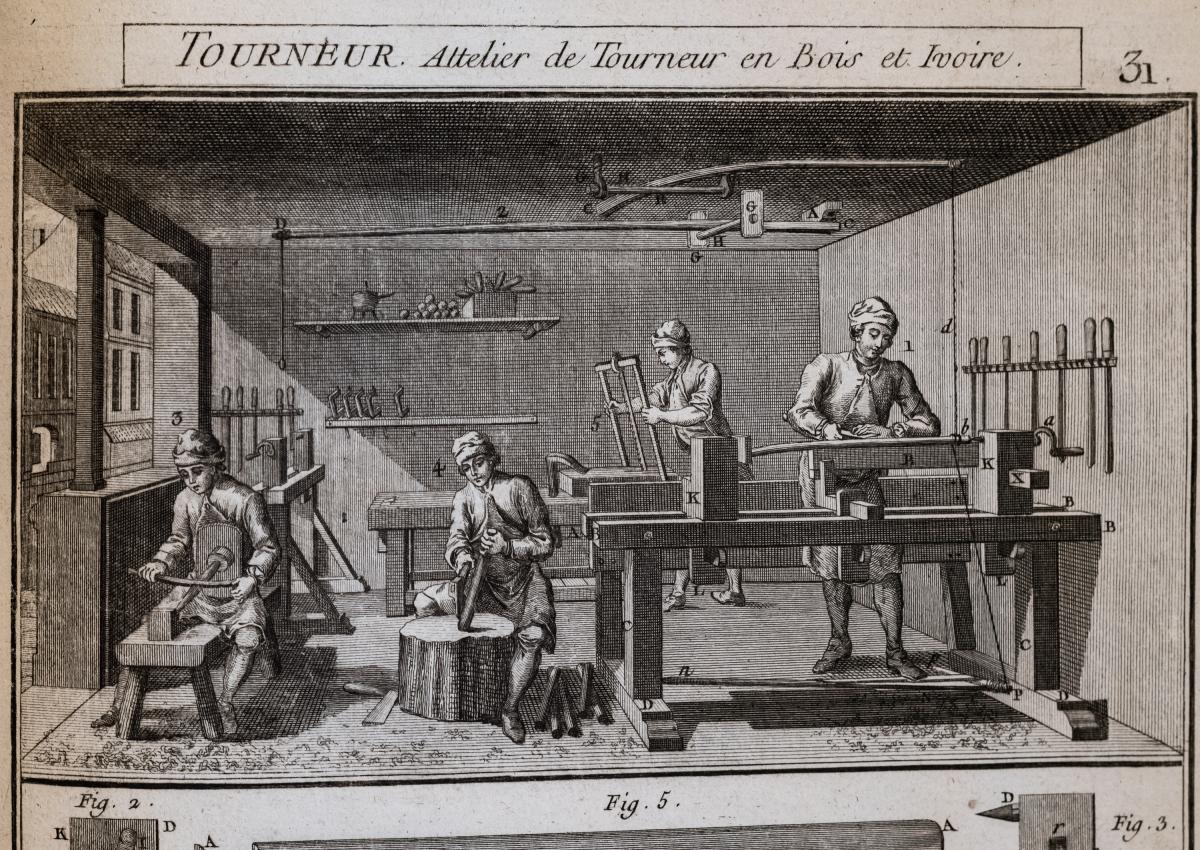 Hulot, pere "L'Art du tourneur mecanicien" 1775
Prior to the Industrial Revolution, the two most common styles of lathes were pole lathes and great wheel powered lathes. Pole lathes featured a string looped around work held between centers. One end of the string was fastened to a springy wood pole and the other was attached to a pedal. The turner would press down on the pedal and the work would rotate in one direction. The work would be cut and then the turner would let up on the pedal so that the pedal would be pulled up, rotating the work in the wrong direction, and concurrently resetting the string for the next cut. This method worked well -- and a pole lathe was very easy for a capital-deprived turner to afford. The image above features a pole lathe in action at a French shop for wood and ivory turning. Interestingly, while the person in the back is sawing out stock, two people, one looking pretty young, are roughing out stock before it gets turned. Pole lathes work with an interrupted motion, and rounding the stock saves oodles of time. The lathe itself, with a springy pole attached to the ceiling, was pretty standard. This image from 1775 isn't the earliest image of turning, but it is representative (and also makes for a great opening picture for this blog post).
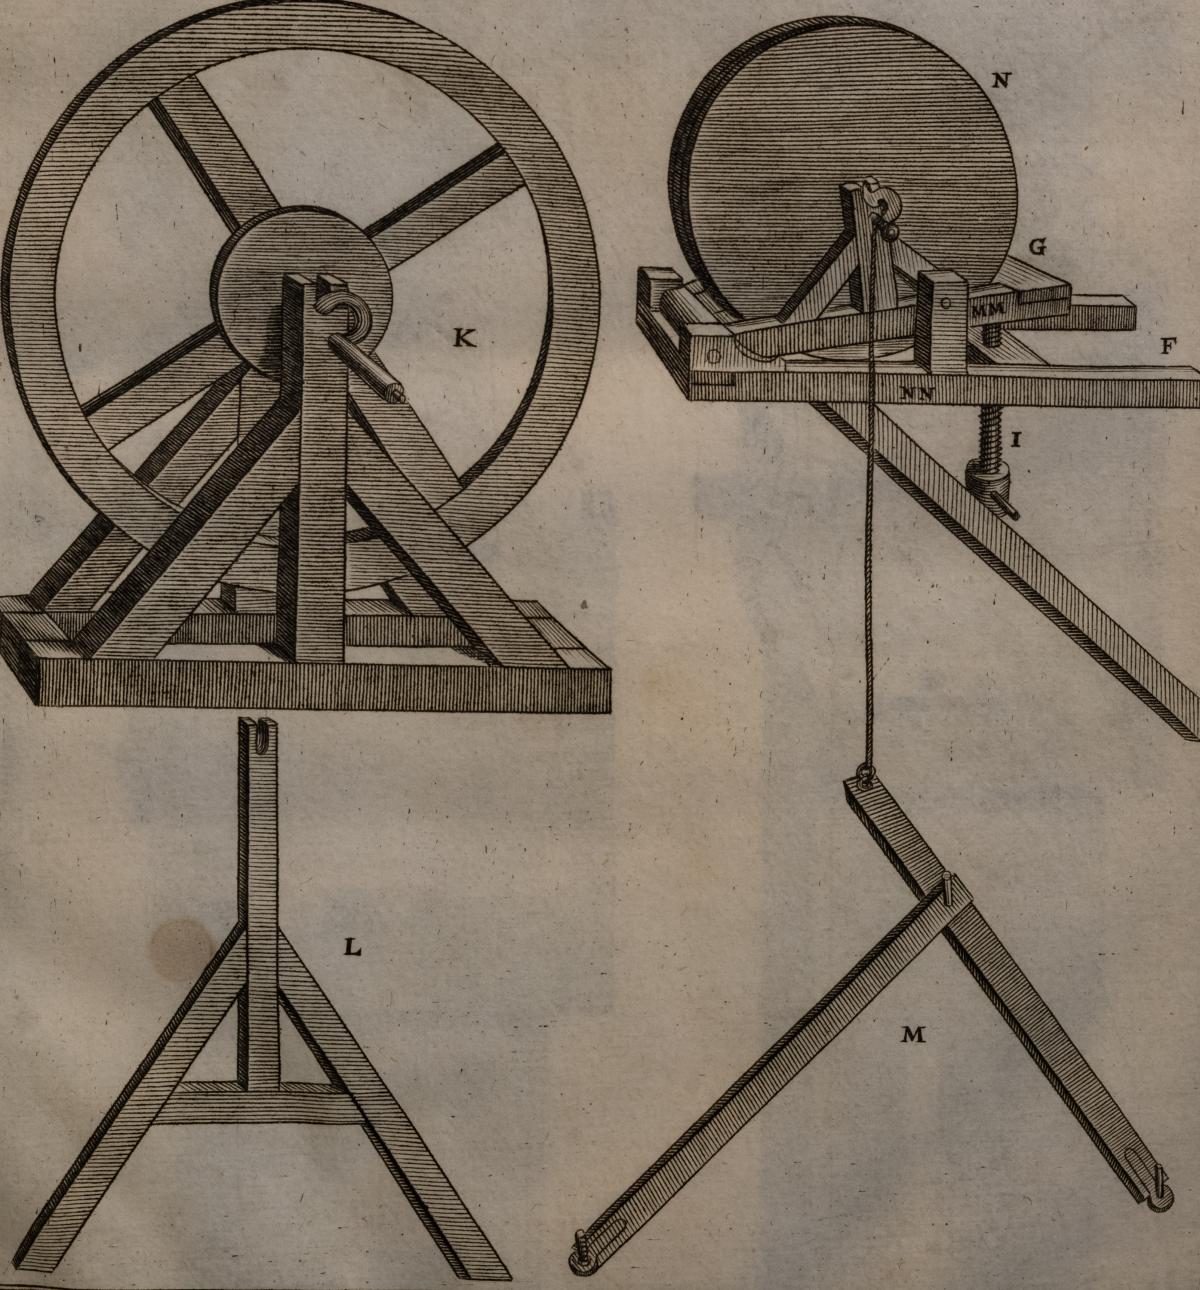
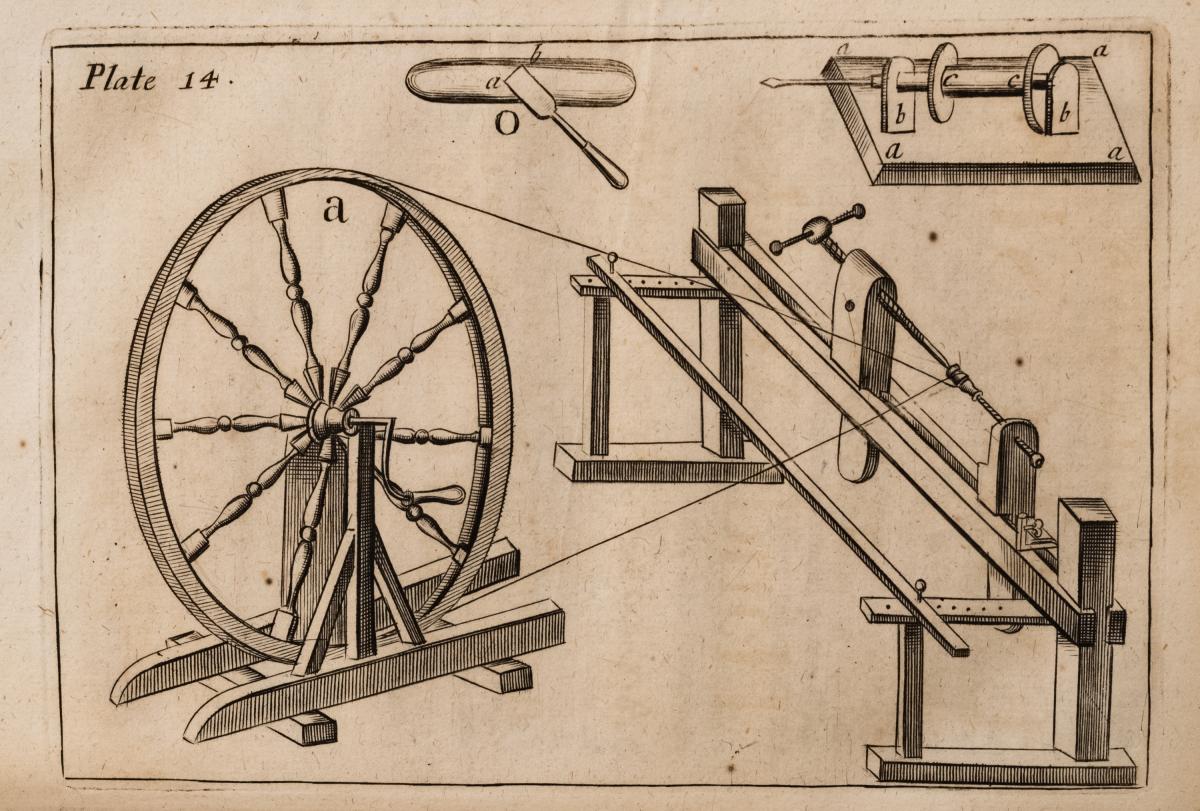 Joseph Moxon's "Mechanick Exercises" 1680
The second way of powering a lathe was using a great wheel (as in the picture above). A large wheel - as large as the turner had space for - was mounted in line with the lathe and connected with a string belt. A second person turned the wheel, powering the lathe while the turner cut wood. This model worked very well, giving the turner continuous motion, but had the downside of requiring a second person's involvement.
At the time of the picture (1680) water and water mills could have been used to gear up a wheel to power a lathe, as it was used for all sorts of larger machinery. I do not know know of a specific case where this occurred, and I am not sure if the mechanics at the time were precise enough to drive a line-shaft fast enough to be practical for a lathe.
Many permutations of the pole and great wheel lathes existed. The spring of the pole could be replaced with a bow, and all of the early books on lathes show pole type lathes with small crankshafts on the ceiling which could be pumped by a second person with the cord attached to the crank.
The main problem with a pole lathe was the interrupted rotation. The main problem with a great wheel lathe (and its derivatives) was the need for a second person. You could, I suppose, also use a treadmill apparatus for an animal, but I haven't found any examples of lathes being powered in such a way.
There exists a drawing from 1480 by Leonardo da Vinci that shows a treadle lathe. Was it something he saw, dreamed up but didn't build, or actually built what he designed? There is no proof one way or another for any of these options. The earliest image I have of a treadle lathe dates from 1680 and appears in Joseph Moxon's "Mechanick Exercises." That might be the first published image of a treadle lathe in literature, but I'm not sure. Considering how many pages are devoted to pole lathes and great wheel lathes in the few lathe books that exist from the 17th and 18th century, you have to make an assumption that treadle lathes were not that common. Moxon shows the treadle (below) on a special lathe for oval turning. It's doing fairly light work, but Moxon says that the treadle is useful for turning oval work, as is a great wheel lathe, because you needed continuous motion.
 Joseph Moxon's "Mechanick Exercises" 1680
 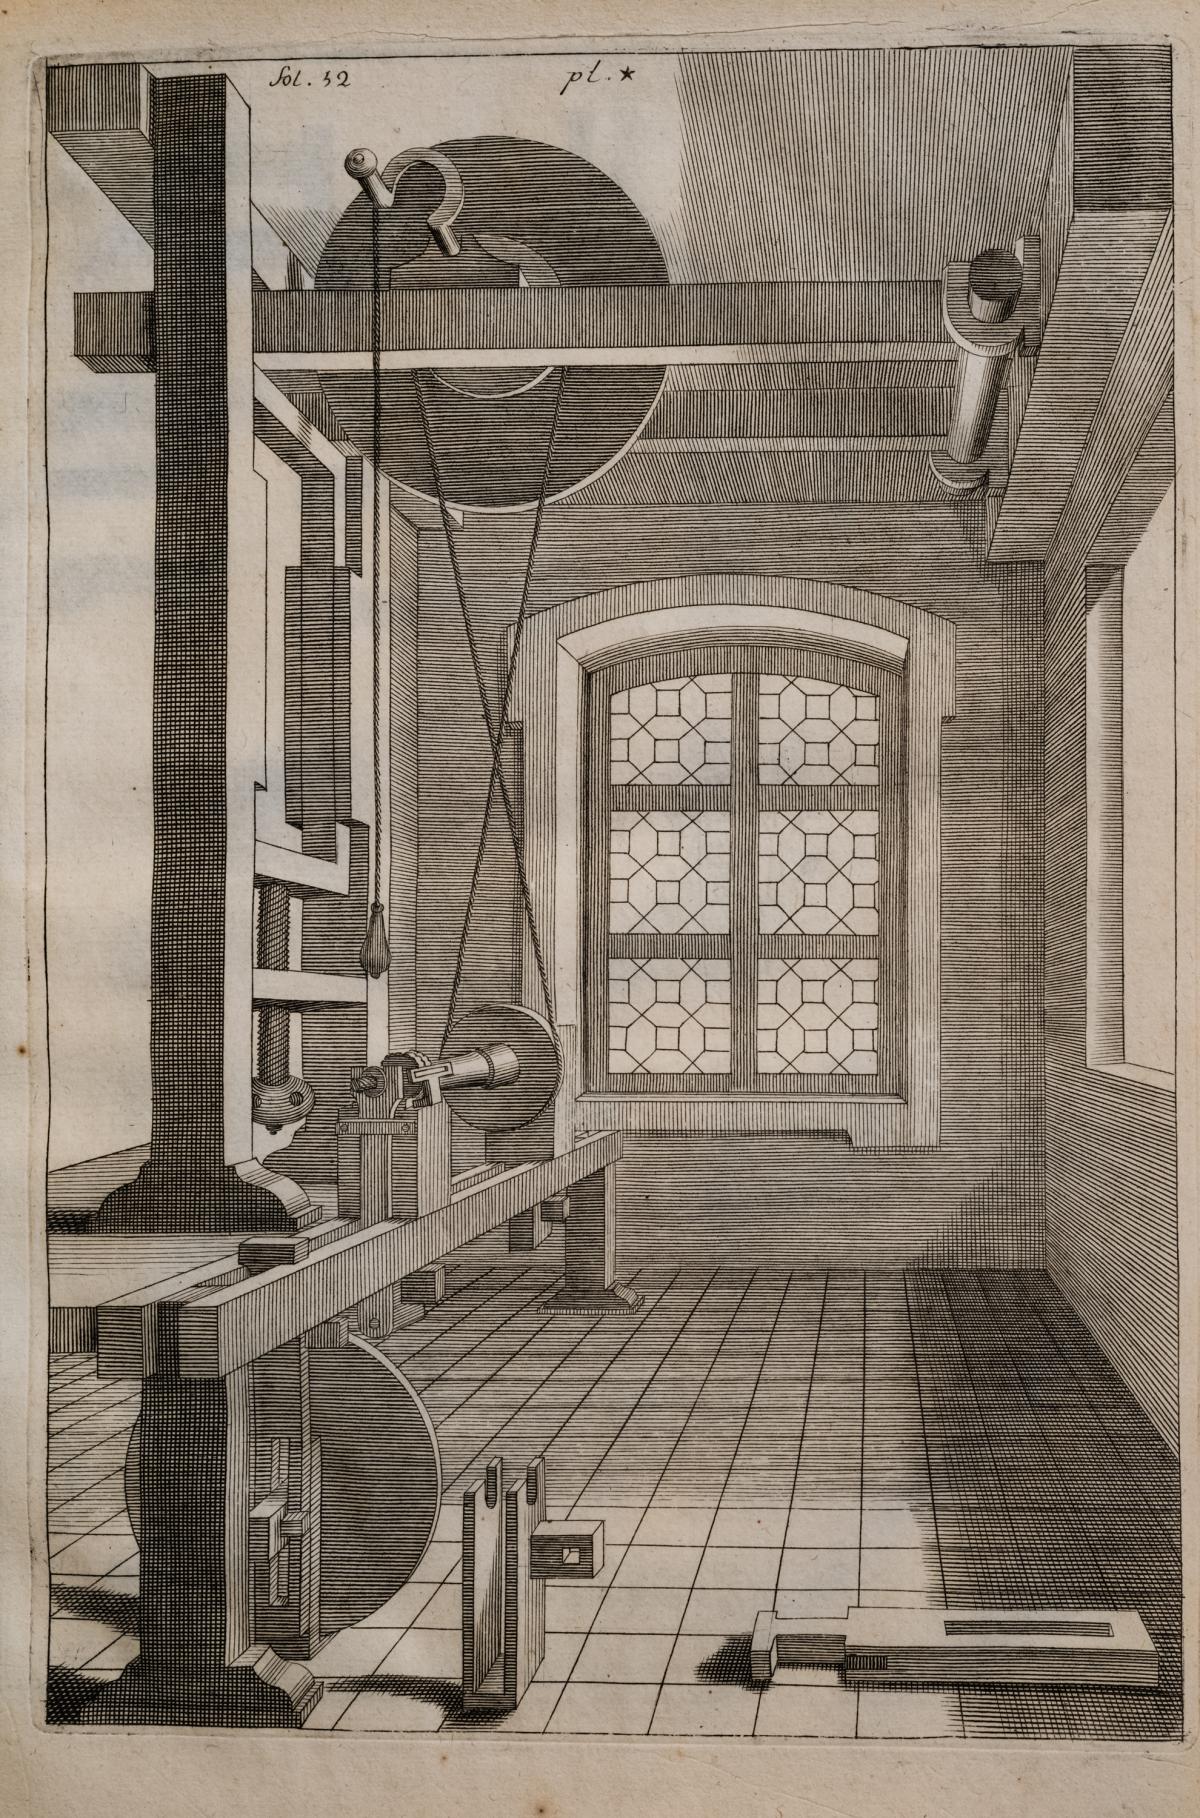 Charles Plumiers "LArt de Tourner" 1701
Plumier, writing in France in 1701, has drawing upon drawing of pole lathes, great wheel lathes, overhead drive mechanisms. The first illustration in his book is of a large lathe which has an overhead hand cranked wheel and a pole option. But a few pages later, a large illustration (above) of another main lathe shows the same hand-pumped flywheel mounted on the ceiling as before - but no spring pole option. Later in the volume, he detailed the parts of this lathe, and the detailed drawings shows something interesting.
 Charles Plumiers "LArt de tourner" 1701
Whereas in the main drawing the pull cord for the flywheel is clearly meant for hand action, the drawing above shows how to connect the flywheel on the ceiling to a floor pedal. As near as I can see from the drawings, the flywheels are just heavy wheels of solid wood and would work but are pretty light for a general purpose lathe. This is a big deal. Part of the advantage of a flywheel is that the flywheel stores energy and evens out the footwork so the lathe is powered all the time, not just on the downstroke of the pedal. The pedaler might be coasting on the way up, but the lathe is still drawing power throughout the entire stroke.
Later in the book, Plumier shows a light duty treadle lathe. This makes sense: a lot of the fancy work Plumier described required continuous motion and many of his readers were hobbyists who would want to work alone.
But these circumstances changed. By 1800 (and certainly by 1840), treadle lathes became all the rage - from the high end of Holtzapffel, to random low-end lathes for homeowners and hobbyists. I found many advertisements for these lathes. If you were a small shop or a hobbyist, the treadle lathe was the way to go. Great wheel lathes disappeared and factory line shafts appeared in mills. Pole lathes remained in use at least until the middle of the 20th century by bodgers working in the forest, where it was easier to turn chair parts in the forest then haul out raw wood.
What changed?
What happened?
It's easy to point to the nature of invention, to say that things have to be invented piece by piece by piece by piece. And the treadle is a natural evolution for small lathes. But I don't think that's the real case. If you're in a production environment, a great wheel lathe allows you to have continuous turning - as long as you have someone to do the powering. With the overhead drive motion seen in Plumier and Moxon and even earlier in Felibien (below), a turner could be very productive cranking the overhead crank if you had somebody else helping. In a production environment, a great wheel made a lot of sense. Pole lathes made a lot of sense as well because they entailed very little capital to build one, and they worked well for a one-man shop. Moxon's treadle lathe is a dainty little thing, with Plumier is not far behind. Plumier's overhead flywheel powered by a treadle could be operated by one person. The wooden flywheel could be big and store more momentum, but it would far from ideal. Plumier also illustrates a fairly lightweight treadle lathe, but it had a wooden flywheel.
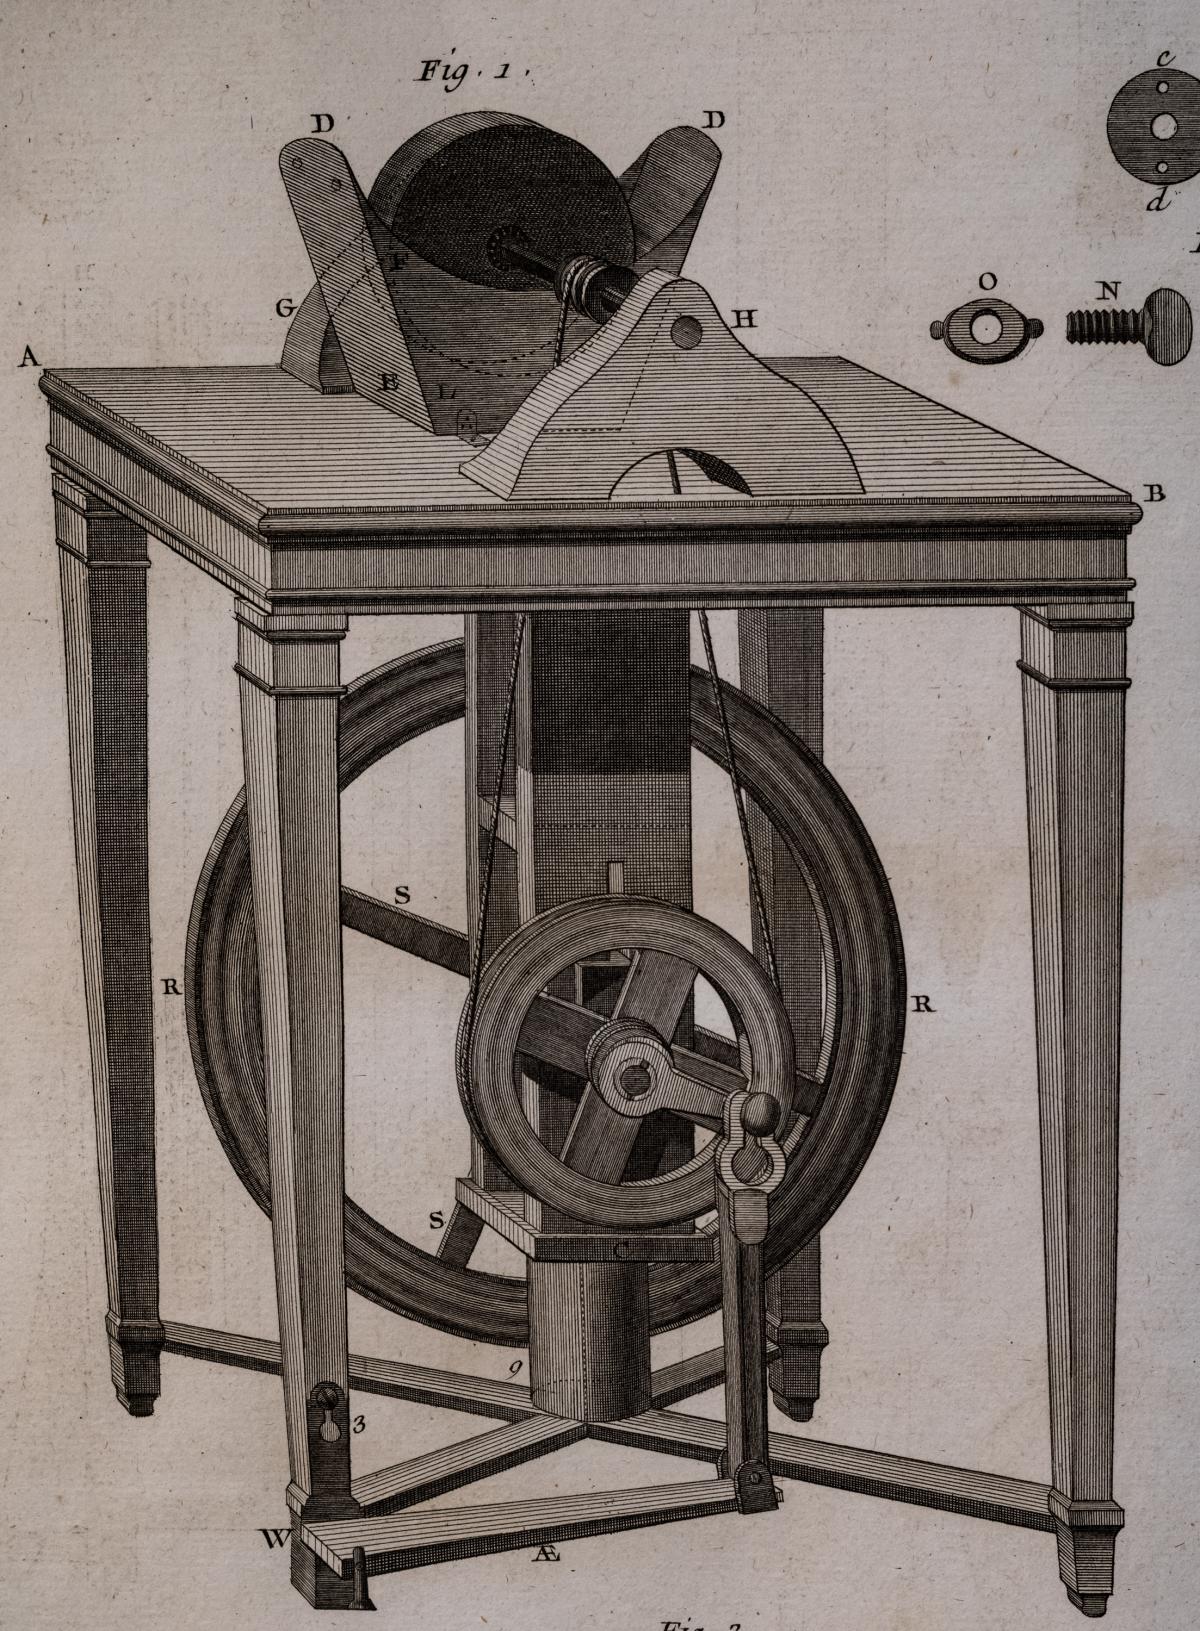
I think the key is that there's a technical problem with all treadle lathes before 1780. The flywheels that you see in Moxon and Plumier are of wood - and they are simply not heavy enough. Holtzapffel tells us that the flywheel should weigh anywhere between 30lb and 100lb (for a big metal turning lathe). The flywheel also has to be machined and balanced, otherwise the entire lathe would shake and wobble. The cast iron flywheel on our treadle lathe weighs about 30lbs. But the operative word is cast iron. Cheap cast iron is an 18th century invention, and the ability to machine the grooves easily is a very late 18th century invention. While a great wheel lathe can be huge and made of wood, it gets its momentum from its diameter, not its weight. A treadle flywheel that has to live under a lathe bed and has a maximum diameter. It gets its momentum from mass. While it was certainly possible, even in the 16th century, to make a heavy bronze flywheel, accurately machining and boring it would be very difficult before 1800. And if the flywheel isn't machined, it's useless.
Up until the late 18th century it was possible, but very difficult, to can make a balanced cast flywheel except on a onesie-twosie basis, so it wasn't until the 19th century that machining a cast iron flywheel was cost-effective.
We actually tested a wood flywheel in an early prototype of the lathe. It worked, but not as well as the same same flywheel did when we bolted some metal plates to it. There are of course tradeoffs in weight, and some basic physics involved. If you have a light flywheel, the lathe is easier to start and spin, but it doesn't hold a lot of momentum, so heavy cuts slow it down a lot. If you have a heavy flywheel, the lathe is hard to start and you have to pedal for a few seconds to get it up to speed, but then it can power through work and its overall performance is better. In other considerations, a heavier flywheel is harder to move around, and it and costs more. Flywheel design is a compromise between usability and cost.We thought the learning curve would be easier with a cast iron flywheel, ideally in the sweet spot of a good bit heavier than a wood one, but on the lighter side of the weight range.
Incidentally, there's almost no literature on the design of treadle lathes. Part of the interest fueling this project for the past 3 years has been understanding the engineering why something was done and then actually testing it out - i.e., reinventing the wheel.
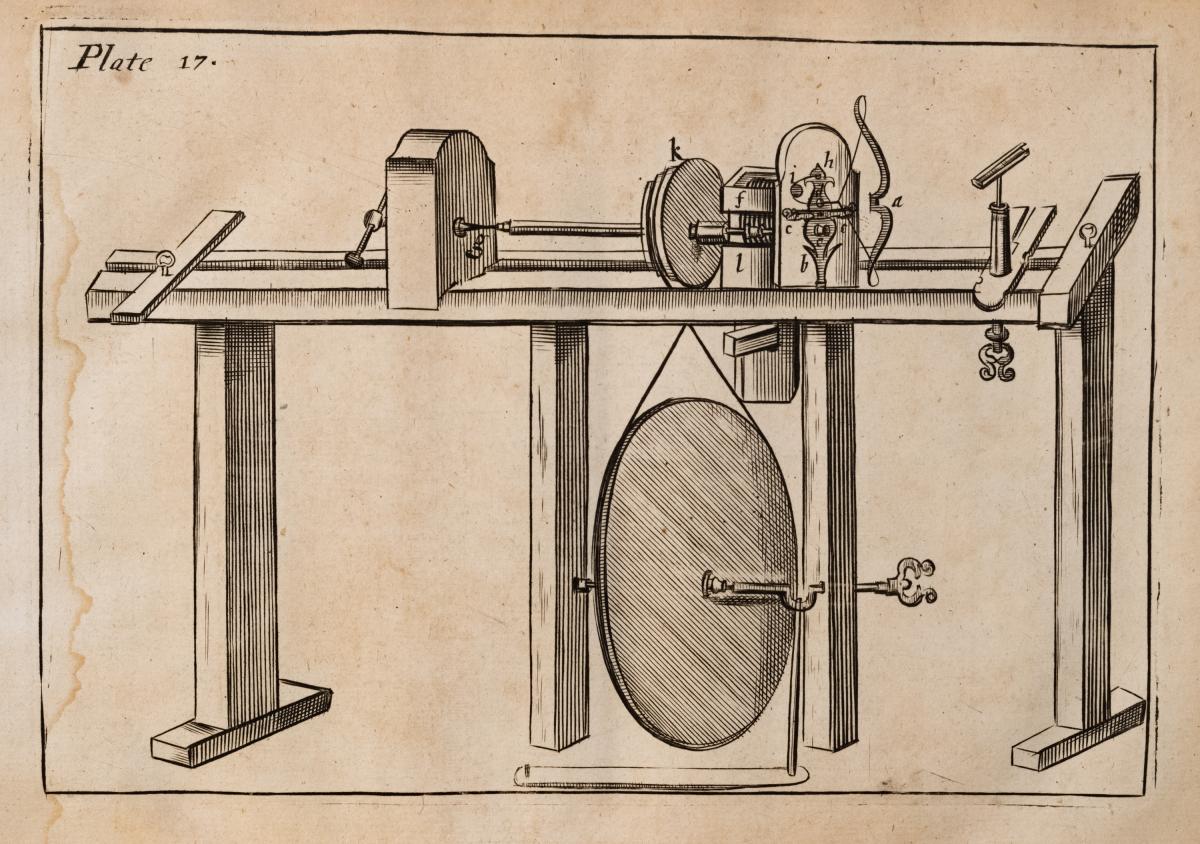
The drawing of a treadle-powered grinder (below) from Hulot is interesting. Chronologically, Hulot is later than the other references in this blog. The book published in 1775, with parts written very significantly earlier than that. But the grinder, unlike the traditional pole turning lathe at the start of this blog, is high tech. I can't tell if the flywheel is metal or not, but it looks metal to me, and in 1775 or earlier making it would have been quite a trial.
Lastly, Flibien's book is slightly earlier than Moxon's, but the lathe is nearly identical to the other lathes shown here. And we have the combo power option of pole or wheel. I originally thought that this was a drawing convention with a weird perspective, but I wonder if having a pole made it possible for one person to do pretty heavy turning, but having a wheel option allowed for faster, lighter work, if a second person were available to pump. (Lighter work because it's a wooden flywheel)
 Hulot, pere "L'Art du tourneur mecanicien" 1775
 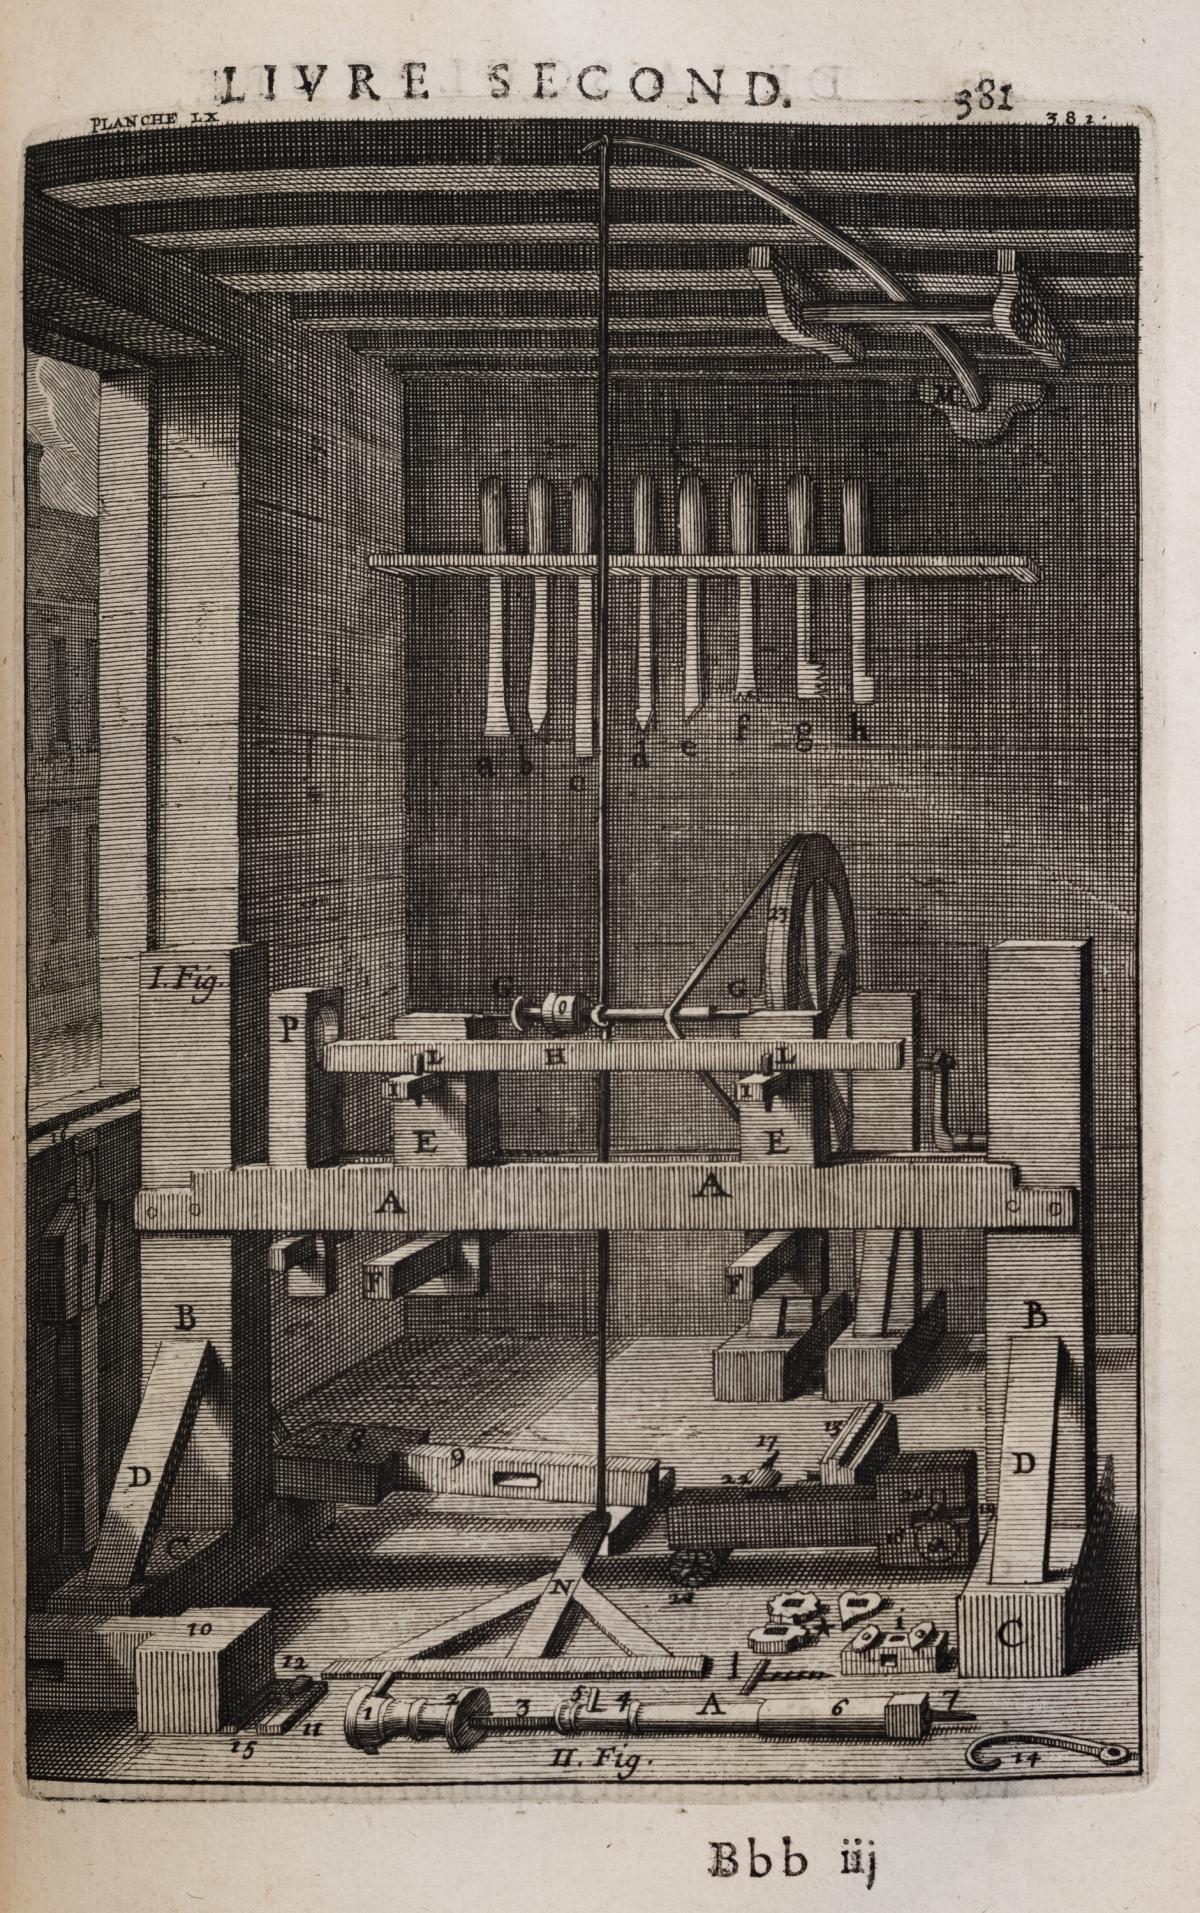 Andr Flibien "Principes de l'architecture, de la sculpture, de la peinture, &c." 1676
 record breaking blizzard.........
The last big blizzard was in 1978 and I missed it. I was somewhere in the north Atlantic onboard the USS Cavalla SSN 684. My wife had to deal with it but she survived, She had gone to her mother's house to ride out the blizzard. The snowfall from this blizzard was over 2" more than the 1978 one. Kind of wish I had gone to north carolina with my wife now.
 |
| this sucks |
I shoveled the spot in front of the truck and my wife's parking spot first. I waited until after I made a trip to the shop first.
 |
| this is going to hurt |
The city only plowed a single lane down the street. The end of my driveway has an extra 5 foot wide mountain of snow I'll have to shovel . The headache is there is ittle real estate to dump snow. On a brighter note, about a 1/3 of the driveway had almost no snow. The wind blowing pushed a lot of snow down to the end of the driveway.
 |
| hmm....... |
Starting the banding yesterday and before I went out to shovel all that white crap, put on two more pieces. I attached the banding with super glue and fingers crossed that it holds up over time.
 |
| wife's spot |
Shoveled the back stoop and this spot. The sun was shining and it was kind of warm, the temp was above freezing (0C). Almost 2 hours of my life that I'll never get back.
 |
| 21" |
When there is this much of the white stuff, this is close enough. The back right corner was over 24". This is the foundation of the old garage and it is where I park the truck. Shoveling my wife's spot and mine took me a little over four hours.
 |
| welcomed |
The bare spot was nice not having to shovel. This part of the driveway is a ROYAL PITA. The left side doesn't have any where to dump snow. So I have to shovel and walk it over to the right and dump it there. It was good work out. I quit here with about 16 more feet to go before I hit the road.
 |
| 90 minutes |
Cleared it from the front door to road. At least the postman and deliveries can be made. I didn't do the front sidewalk. I'm sure the plows will be coming through again to widen the road, or I hope they do. Then I'll shovel a path to walk in.
 |
| hmm...... |
Banding is almost done. There is one more going around the top of the lid. This would have looked better if I had inset the banding into the box. This being plywood, it would have been a nightmare plowing the dadoes for that.
 |
| WTF? |
The walnut bookshelf is rocking still. The left rear leg is a 32nd off the saw table. I am at a total loss as to what is causing this to lay flat on one day and the next day rocking again?
 |
| awkward |
I had to sand the left front leg to eliminate the rocking. Moving the bookshelf over the sandpaper and trying to hold it at the same time was difficult. I finally got it to lay flat on the tablesaw and not rock. Also didn't rock on the outfeed table and the workbench. There is free flying lessons available if this rocks on me in the AM.
 |
| done |
These were done a few days ago but I forgot to post it. I am going to have to figure out a stop of some kind for kickstand leg. As is it goes back to far, thinking of gluing a ribbon as a stop. Other than that I like how they turned out.
Didn't finish the shoveling. I will be back at in the AM. My back doesn't hurt right now but my arms and shoulders are a wee bit sore. How I'll feel in the AM is a question mark.
accidental woodworker
The Japanese Gennou & Handle Part 19 – Laying-out the Handle

Not all those who wander are lost.”
J.R.R. Tolkien, The Fellowship of the Ring
Introduction
In previous articles in this frightfully sexually-charged series, Beloved Customer produced a design drawing for your gennou handle based on the parameters of your actual gennou head and your body. You should have also selected, or at least rolled out of bed onto the floor, opened on eye, and seriously considered, an appropriate stick of wood. Assuming you’ve procured said stick, let’s get to the layout.
Tools
There are as many ways to layout the shape of a hammer handle as Carter has pills. I won’t tell you how to do it or what tools to use, but after making dozens of gennou, hammer, and axe handles for myself and customers, I prefer to use the following tools. You will need to have a similar set of tools on hand for layout and fabrication.
- Divider with sharp points;
- Sharp pencil;
- Small try square;
- Marking gauges (Titemark and kama kebiki);
- Marking knife;
- Rip and crosscut handsaws for roughing out;
- Handplanes for creating the flat sides and edges in preparation for layout;
- Dozuki crosscut and/or rip saw for cutting the tenon;
- Auriou cabinet rasp (Lie-Nielson);
- Bogg-pattern flat-sole spokeshave (Lie-Nielson);
- Bogg-pattern curved-sole spokeshave (Lie-Nielson);
- Sandpaper;
- Satin Polyurethane finish;
- Mineral spirits.
Can you get by with fewer tools? Of course. A pencil, handsaw, hammer, marking gauge, dividers, and pocket knife are a minimum set. Will this minimalist set take more time, produce more blisters, prove frustrating, and produce an inferior handle? Absolutely yes. But it can get the job done.
Layout
Select a board or stick with dimensions a little greater than the length, height, width, and thickness of your handle design, with 6 flat, parallel, square sides.
You can prep this board or stick using electrical tools, but if you can’t do it with handtools alone, I strongly encourage you to work on your basic skills. In this age, surprisingly few have these skills.
Looking back on the old texts, one of the first tasks assigned trainees in cabinetmaking technical schools and apprenticeships was making a number of sticks or boards like this because this job combines many of the essential tools skill while developing an understanding of the material. I can attest to the bullet-proof validity of this concept.
- Begin your layout by selecting and marking a flat and wind-free side of the selected board corresponding to a profile view on the drawing to be the “reference face.” Don’t forget to label this critical surface somehow so there will be no confusion moving forward.
- Plane the surface of the board that will form the handle’s back edge (seen from above in plan view) flat and perpendicular to this reference face. All further layout will be indexed from these two faces.
- Mark the maximum thickness of the handle on the surface opposite the reference face, as determined by the widest dimension of the butt, using a marking gauge against the reference face.
- Plane all the surfaces flat, free of wind, and where appropriate, planar. This needs to be done pretty precisely.
- Use a marking gauge to draw the appropriate centerlines on both sides, edges, ends of the board/stick.
- Use dividers to measure and layout the width of the eye, centered on the centerline you just marked, and spin this around the eye, butt, back edge and front edge.
- Make paper, cardboard, or wood patterns based on your design drawing of the handle’s elevation and profile views. Paying close attention to minimize grain runout, especially in the tenon and neck area, position the patterns and mark the board.
- Using these cardboard patterns, carefully layout all the tenon’s dimensions on the board, measured from the reference face and back edge. Be sure to make the tenon a half-sheet of copy paper too large in width and thickness. This can be trimmed down later if the fit is too tight.
- Adjust the lines of the handle design to meet your requirements for beauty.
In the next post in this series we will begin making sawdust. Oh joy!
YMHOS
 Two Trolls by John Bauer, 1909. Not wanting to pay for the bread oven your humble servant has just installed, Granny Troll is trying to convince me to climb inside and do a closeup inspection. Will I fit? Do you like my fetching new shoes?
If you have questions or would like to learn more about our tools, please use the questions form located immediately below. To see a list of our tools and their pricing, or to contact us, please click the “Pricelist” link here or at the top of this page.
Please share your insights and comments with all Gentle Readers in the form located further below labeled “Leave a Reply.”
We see data miners and their bots as dastardly sneak thieves and so promise to never share, sell or profitably “misplace” your information for any reason. If I lie may the heads of all my hammers fly away to Valinor!
Leave a comment Cancel reply
Previous Posts in The Japanese Gennou & Handle Series
- Part 1 – Introduction
- Part 2 – Ergonomics
- Part 3 – What is a Gennou?
- Part 4 – The Varieties of Gennou: Kataguchi, Ryoguchi & Daruma
- Part 5 – Kigoroshi
- Part 6 – The Ergonomic Anaya
- Part 7 – The Unblinking Eye
- Part 8 – Head Style & Weight
- Part 9 – Factory vs. Hand-forged Gennou Heads
- Part 10 – Laminated Gennou Heads
- Part 11 – Decorative Gennou Heads
- Part 12 – The Drawing: Part 1/6
- Part 13 – The Drawing: Part 2/6
- Part 14 – The Drawing: Part 3/6
- Part 15 – The Drawing: Part 4/6
- Part 16 – The Drawing: Part 5/6
- Part 17 – The Drawing: Part 6/6
- Part 18 – Wood Selection
Leave a comment Cancel reply