Hand Tool Headlines
The Woodworking Blogs Aggregator
“Glory to God in the highest heaven, and on earth peace to those on whom his favor rests.” - Luke 2:14
Be sure to visit the Hand Tool Headlines section - scores of my favorite woodworking blogs in one place.
General Woodworking
Cleaning up an E. C. Atkins Crosscut Handsaw
Last time I wrote about hammering out the kink that this saw had. When I was satisfied with the plate's straightness, I moved on to the handle, the cleaning of the plate, and then sharpening.
The finish on the beech handle scraped easily and after filing and sanding it smooth, I gave it a couple coats of BLO. I much prefer the feel of an oil finish over a varnish or poly finish.
 |
| The handle ready for finish |
 |
| A few days later after the BLO had dried |
I also took a wire wheel in a drill to clean up the saw bolts and medallion. They really shine up nicely when rubbed on a strop.
For the plate, I started with a razor blade to scrape off the heaviest rust and grime. Then I used sandpaper, eventually using a stick with sandpaper wrapped around it to help remove the rust and grunge that had built up over time. Sanding included grits of about 50 up to 220 (or 400?) and it looks pretty respectable now, though there are still some rough marks or light pitting. There was no etched maker's mark on the saw plate, so I didn't have to avoid any areas with the sanding.
 |
| The plate before cleaning |
 |
| Sanded in sections - a lot of elbow grease expended |
 |
| Still some light pitting |
 |
| But the plate looks so much better than before |
 |
| This pic shows the degree of curvature of the breasted tooth line |
I took great care in sharpening the saw. The breasted tooth line needed a lot of jointing to get down to a shiny bare metal spot on every tooth tip. I was very careful to file the teeth so as not to end up with alternating deep and shallow gullets (cows and calves). I used about 15 degrees rake and 25 degrees fleam. The saw was over-set by a lot, so I stoned the tooth line on both sides several times to knock down the set.
 |
| Looks razor sharp to me |
I shined up the brass screws and nuts and put it back together. The saw looks great and I'm sure it will be a nice user saw for decades to come.
 |
| Thar' she blows! |
Last thing: I didn't have a screwdriver that fit the saw nuts properly, so I made one from a piece of an old saw blade, a plumbing fitting, and a hunk of cherry. Last year I made a similar screwdriver for bench plane cap-iron screws and this one is almost identical but with a thinner blade.
 |
| The saw screws are much happier with their own custom-fit driver |
 |
| Fits well enough to stay in the slot |
Another nice saw in the collection. I've used the saw a couple of times now, and it cuts like a hot knife through butter. Sweeet!
two more checked off.........
 |
| a teeny bit |
Out of the clamps and on the flat reference surface with some rocking. Not enough that I am going to play with removing it. Now that this is done I'll have to find a hole to stick it in somewhere in the shop. It will hold all my reference books in one spot now.
 |
| reference line |
Laying out my reference line for the tapered pins. Ended up putting in 3 on each end. Two of them bled some glue and it looked like I drilled the holes for them at an angle rather then at 90°.
 |
| sneak peek |
The bookshelf is big enough for a couple of bigger reference books. The grey one is Robert Wearing's book the the next one is a shop reference book.
 |
| wood putty |
Decided to fill the gaps with wood putty over filling them with wood shims. Once books are in it the 'gaps' won't be seen anymore.
 |
| hmm....... |
Felt like I had no thumbs and an IQ ten points less than a lima bean. Couldn't figure out how the micro adjust thing work. Took a lot fiddling before I got it. But the big hiccup was turning the damn thing on.
The switch is built into one of the knobs. To turn it on you have to depress one part down and then squeeze another part of the switch. You have to do it in a sequence that initially escaped me. I was thinking about returning it because I thought it was defective. Finally got it to turn on but I couldn't duplicate it after I shut it off. Took a few but I finally figured out the push down and squeeze sequence.
 |
| one more to go |
Got the last coat on the back first thing in the shop. Two coats on the front until the final check mark goes in the done column.
 |
| this is surprising |
Instead of a stamped metal wrench, this one is actually cast metal. Metric too, rather than imperial. DeWalt is an american company but this router was originally made by Elu in Germany and now is made in Canada.
 |
| test cut |
This test cut took a while. Mostly figuring out how to turn it on and then setting the edge guide. I set the bit to be in between the pencil lines. I didn't do the mortising today but tomorrow for sure. I concentrated on getting the frames and the bookshelf done.
Found a new You Tube called Blond Mary. It is about a female automotive mechanic from somewhere in Europe. Not eye candy You Tube stuff but a competent mechanic who also does body work. So far it appears that she works mostly on Hyunda/Mazda cars and vans. When I was 16 I tried to get into an automotive tech school but I couldn't afford the tools. I like watching You Tube vids rebuilding engines and she does a lot of it. Not a lot of explaining and it is wordless.
accidental woodworker
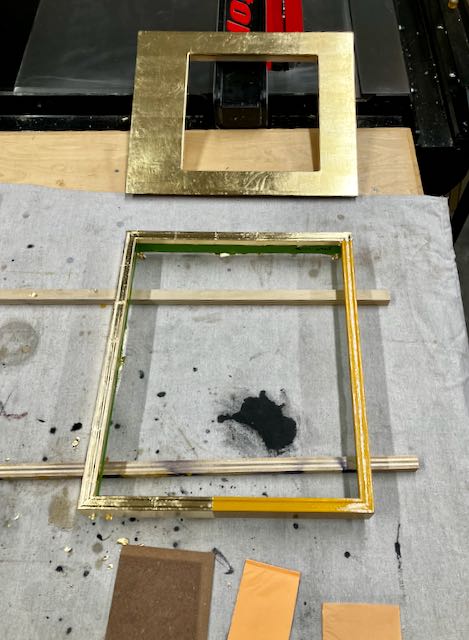
Imitation is the Sincerest Form of Flattery
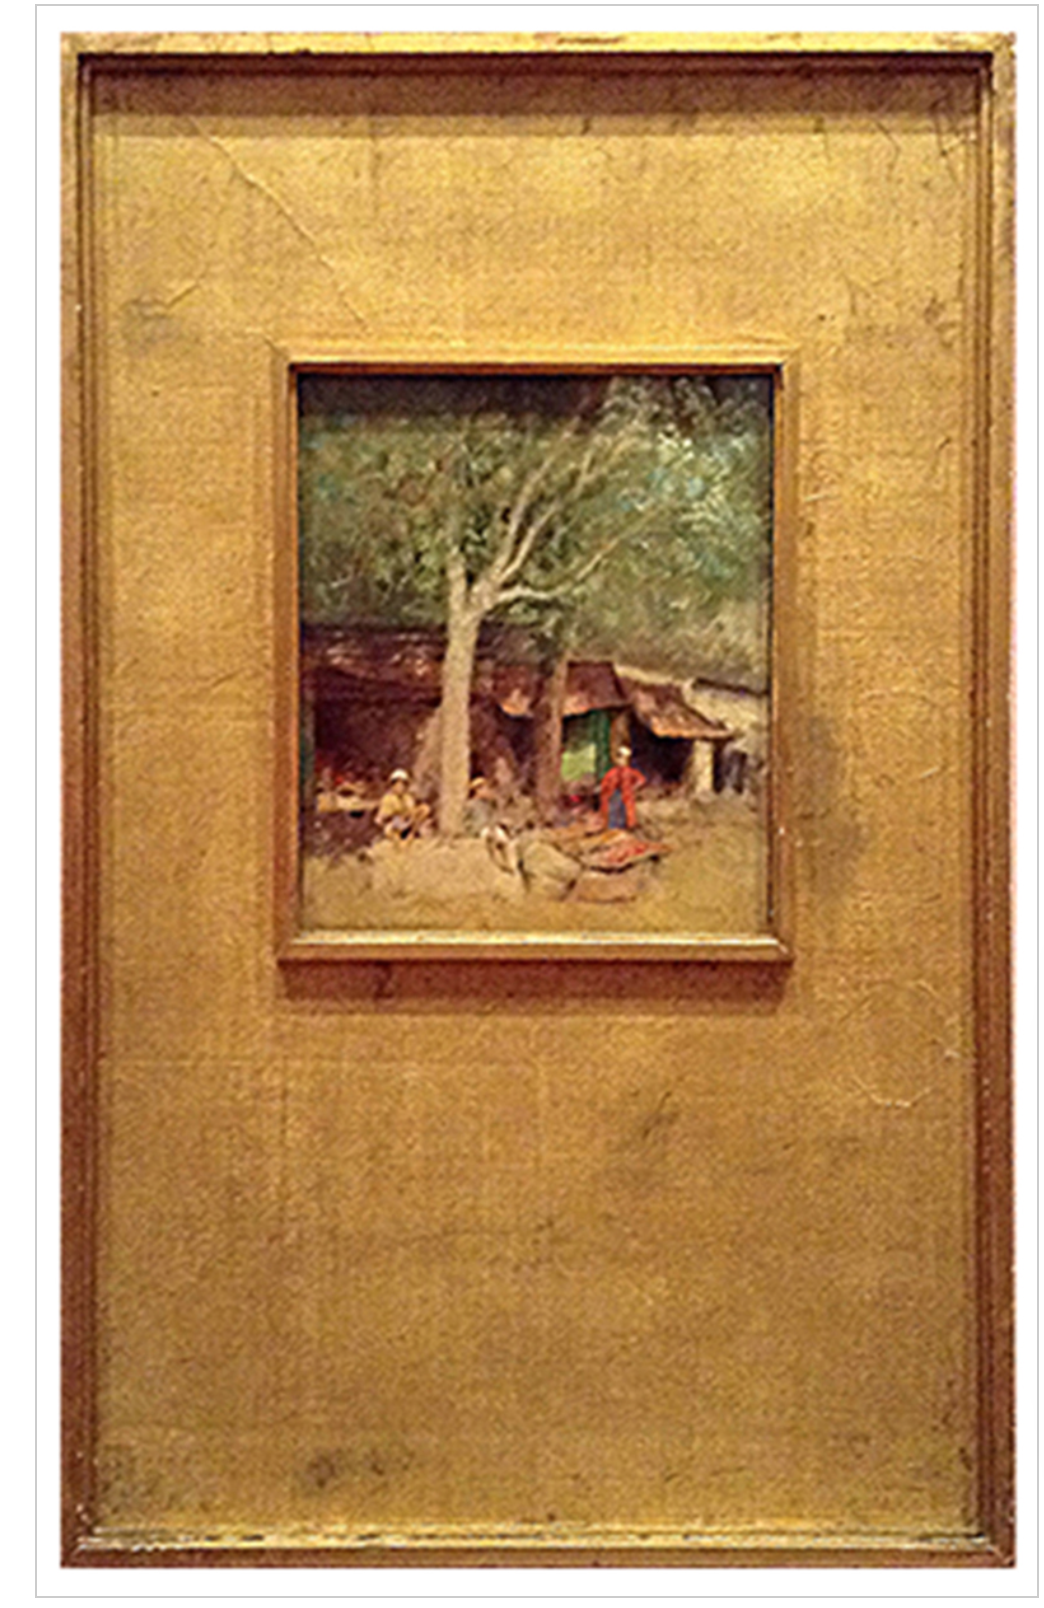

I’m betting that many of you have heard the phrase so that’s why I’m using it for this blog. It’s a phrase that has been attributed to many different people. This frame showed up on my Pinterest one day and it really appealed to me. It was originally from The Frame Blog which discussed Australian artists work from the late 1800’s. Those frames were made in Japan. The blog showed some of the construction details which consisted of the moldings assembled with miters and cross dowel construction. The framework was covered with paper or cloth. My wife recently completed a 10″x10″ figurative painting and I thought her painting would be a good fit for this style of frame. This work of her’s is going to her gallery, Meyer Vogl in Charleston, SC. It’s for their Ten Year Anniversary show the end of March.
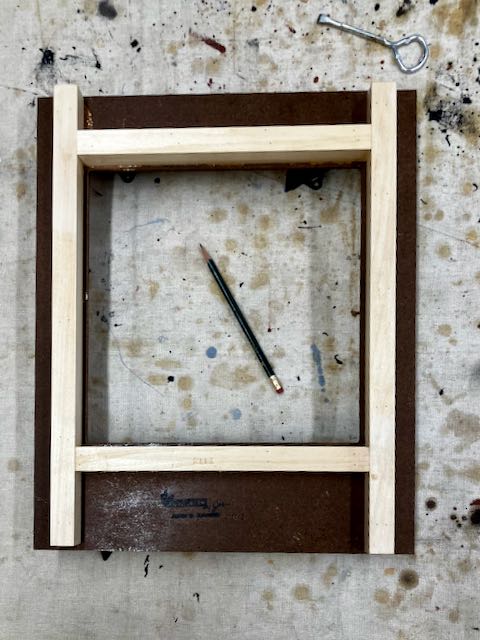
The first part I made was the spandrel. That’s the piece that is inside of the frame; for tabernacle frames they are often curved or arched at the top. From the blog I learned that this frame had a lattice like arrangement of wood which was covered by material or paper. I chose to use 1/4″ MDF for that but still needed to figure a way to support the painting inside of the spandrel. Unfortunately I neglected to take a picture of that before cutting it open but milled some pieces of Basswood 13/16″ square which were glued, pin nailed and clamped to the back of the MDF. The reason for 13/16″ is so that I could pin nail from the backside with 1″ nails and not go through the front — that would not have been good!
 Completed spandler
The exact opening in the grid on the back is 10″ x 10″ and was removed on the router table with a pattern cutting bit. However; the opening needs a rabbet for the painting to sit behind. I used 3/16″ spacers which were attached with double sided tape. The first step was cutting the opening with a pattern cutting bit on the router table. Next, a small roundover bit formed a radius. You can see the rabbet in the left picture after the 3/16″ spacers were removed. The picture on the right shows the completed spandrel sealed with 4-5 coats of Zinsser seal coat shellac. There was some debate in my mind about using the MDF for the spandrel since it can be affected by moisture. Since I had MDF in my shop and had success with a very large tabernacle frame commission decided to use it. In addition to multiple coats of sealing shellac the next step will be a yellow burnisher/sealer followed by slow set oil size, and finally imitation gold leaf.
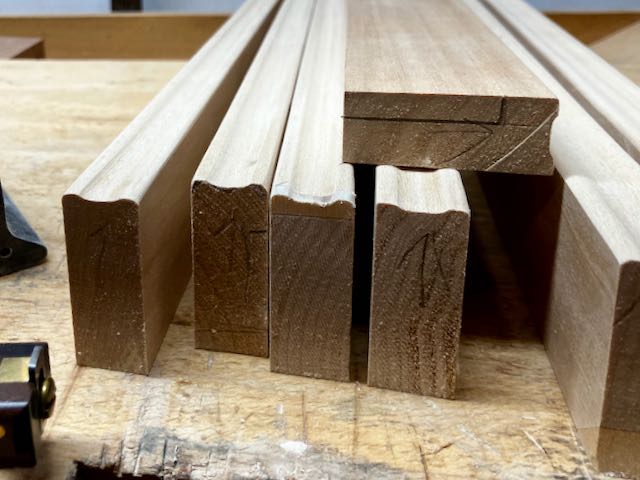
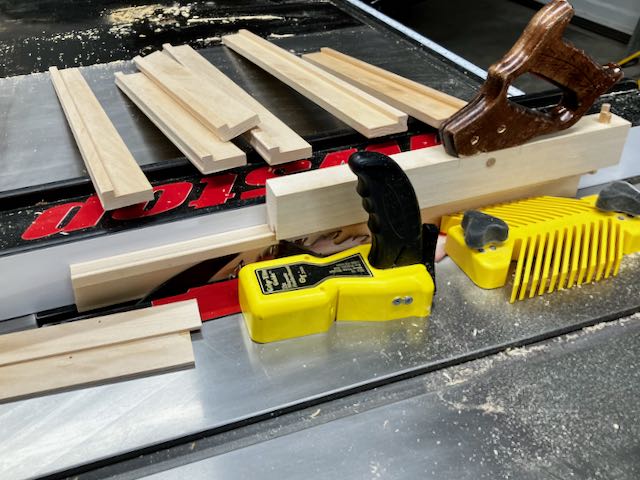
Once the spandrel was made it was time to start creating the molding for the frame. I liked the small, unobtrusive molding on the original piece. I’m imitating that so started out with 3/4″ x 2 3/4″ Basswood. Simplicity was my goal so the top of it has a shallow profile created with a router bit used to make tray bottoms. Knowing it’s almost impossible to center it exactly the insides were marked so that the rabbet is on the same side of each piece. Before cutting the rabbet I took the time to sand a slight radius on the upper edges to prevent the gold leaf from cracking (left picture below). The rabbet was cut on the tablesaw with a rip blade. Marks were made with a marking gauge, the first cut was done flat at the top of the rabbet. Cutting off the remainder of it required careful set up with feather boards and my shop made push stick (right picture below). It took some careful set up and planning but the creating the molding was a success. I know I only need 4 pieces for a frame but cut some extra just in case.
 Profile in progress before creating the rabbet
 Rip blade for rabbeting
The frame was assembled in the usual way, after cutting the miters it was glued up and clamped with a band clamp overnight.
My usual procedure is to apply a coat of Zinsser seal coat shellac to the frame followed by Yellow burnisher sealer. I use slow set, oil based size and gilded the frame and the spandler at the same time. I wait at least 24 hours then burnish the imitation gold leaf with 4/0 Liberon oil free steel wool. The final finish on both of them is several coats of Platinum Blonde shellac applied with an airbrush. To mellow out the gloss of shellac, Liberon wax is applied with 2500 Mirlon abrasive pad. All that’s left is assembling the frame and spandrel.
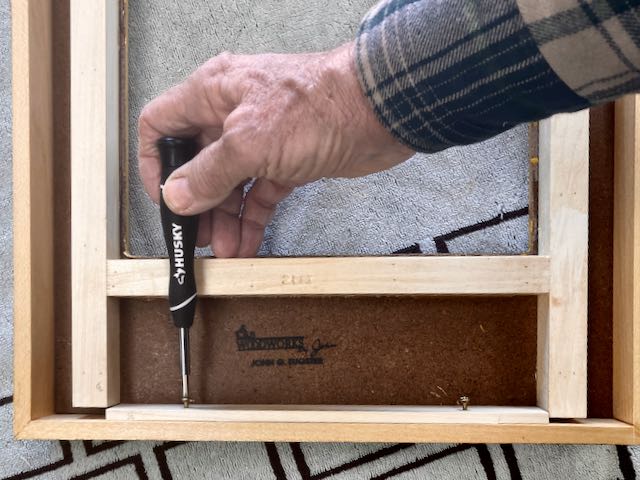
This was a bit of a challenge since there is a very limited amount of space to insert a fastener between the frame and the lattice work on the spandrel for attachment. That dilemma was solved by using a piece of Basswood that I had pre-drilled holes at a slight angle. After putting that piece in place the holes were marked with a pencil. A gimlet was used to create an angled starter hole into the frame for an eventual screw. That part of the frame is only 3/8″ thick so very careful to not go through with the screw. Assembly was successful — no screws p
Here’s a better picture of the finished project than the one above in the comparison shot. I concentrated when laying the leaf to keep the lay lines continuous through the cut out area where the painting is. The painting is on panel and was secured with points.
First Light by Diane Eugster Are All Those Old Turning Manuals Wrong?
 Hulot, pere "L'Art du tourneur mecanicien" 1775
I've always been puzzled why most of the turning tools listed in classic books on turning (published in the 17th - 19th centuries) are what we would now call scraping tools. One possible rationale is that scrapers are a lot easier to make than forged tools like gouges.
As I found myself diving more deeply into the literature, I discovered a couple of things. Early tool catalogs that show turning tools don't show a lot of scrapers.
They show gouges - as you would expect. Pre-1850s tool catalogs show gouges and instructional books from that era show a few gouges along with pages of scrapers. By the second half of the 19th century, this situation changes. Perhaps the tools were hard to make but I am unpersuaded that this is the only reason for the changing landscape.
For a more satisfying answer, let's look at the turning sections in Mechanick Exercises by Joseph Moxon, published in 1680. I have not been able to figure out where Moxon took his pictures from or if they are original. As in the joinery section, the book's turning chapter features what is considered the first set of instructions. Moxon very clearly states that you use gouges when turning softwood. But it gets interesting when Moxon lists the softwoods: "The softwood turners use is commonly either Maple, Alder, Birch, Beach, Elm, Oak, Fir and &c. and for some particular purposes each of these sorts are best."
If you have ever worked Elm or Oak, you will readily agree they are not "softwoods." Did Moxon make a mistake? No. He is differentiating between the woods that are normally used for turning furniture. The woods turners use for making everything from bowls to banisters, and differentiating it from the super hardwoods -ivory, ebony and boxwood among them. These were materials that were used for ornamental turning and by rich people who turned as a hobby. If you are a professional 17th century turner, you were not buying expensive instructional books on turning; you were using your funds to buy gouges and hook tools so that you would be able to make 300 banisters. On the other hand, if you were a wealthy person interested in decorative arts, you might decide to take up turning - and a book on how to turn ivory and other exotic materials might come in handy. Using gouges and other typical tools on ivory, especially in a human-powered lathe, would not really work, since the material is much too hard. But scrapers will work, and they would give you a good finish that could easily be polished up.
This also explains to me why so many of the fancy books by Plumier, Hulot, or Bergeron, devote so much space to scrapers and exotic fixtures for ornamental turning. None of these books are really about the bog-standard turning that professionals did at the time and still do, the standard work for architectural woodworking.
The next question is, When did amateurs start doing regular work and stop doing ornamental turning? That is a different story
that has to do a lot with the rise of the middle-class in the 19th century. The treadle lathe played its part in that story, which we should save for another time.
All the images in this blog post come from Hulot's 1775 "L'Art du tourneur mecanicien." Most of the early books on turning, including Moxon and earlier works, show images of turning tools, but Hulot is the most comprehensive. All of the books basically show one or two gouges. In the image above, we see the tools for "softwoods"; all the later images are for various scrapers for hard materials, including metal. In the last image, we also have chasing tools for making threads on ivory, hardwood, and soft metals (internal and external, coarse and fine). Getting back to the first page for softwoods, the familiar gouge and skew are shown, although you don't have the variety of roughing, bowl, etc, and other gouges that we are familiar with nowadays. These tools hadn't been invented yet. The hook tools shown on the bottom left of the page were common at the time, and very useful. Moxon describes them as the first tool you would use for roughing out stock. He also hints that hook tools basically do the same thing as gouges but they were harder to use. Hook tools are easy to make, but the flex in the hook makes them a little tricky to handle, and therefore potentially dangerous. (I do not think any company currently makes them today.) All tools, especially lathe tools, get a lot of wear and tear in actual use, and the steel of the time was expensive. Sharpening stones of the time were soft and slow acting, and while a larger shop might have a grindstone, it was cumbersome and time consuming to grind and then hone the tools. Hook tools are far easier to make and keep sharp than gouges, which is why they were more popular (until steel became less expensive and sharpening easier). But only for "soft woods."
The other pages show tools for drilling, internal turning, more scrapers and thread chases. These were used on all materials, especially very hard materials. Except for the thread chasing tools, the average scrapers were very easy to make and easily sharpened.
 Hulot, pere "L'Art du tourneur mecanicien" 1775
 Hulot, pere "L'Art du tourneur mecanicien" 1775
 Hulot, pere "L'Art du tourneur mecanicien" 1775
Black milk paint pt II........
 |
| still good (after dinner) |
The milk paint consistency is still good. No evidence it is wanting to turn into a blob of jello. Putting the 3rd and final coat of paint on the front of the frames.
 |
| front and sides done |
In the AM I'll put a second coat on the back and the inside of the rabbet. A couple of coats of shellac and I'll be ready to bring these to Maria.
 |
| AM milk painting |
The backs can get away with 2 coats as they won't be seen once the matting and glass are installed. All the visible show surfaces have 3 coats.
 |
| fingers crossed |
There were some lumps this time but they stirred up easily and disappeared. The consistency is the same as when I first made it. I think I may have solved (at least for me) how to make milk paint. With my first two batches I obsessed about using too much water. On the red and black batches I didn't. I used more water and the results were a huge improvement. Now I just have to get some time on the road to see how long lasting it is.
 |
| hmm........ |
I blew the heat gun on two sides and clamped it up. I applied pressure while eyeballing the it to guess-ta-mate how flat the frame was. Left it to cook overnight and now it is time to see if I clap my hands or cry.
 |
| made it worse |
I think I clamped the wrong corners. The twist almost doubled over what it was. On to plan #2.
 |
| oops |
There will be no plan #2. This side popped off while I was clamping the frame again. Two more sides popped off when I dropped it.
 |
| hmm...... |
The yellowish areas are glue that didn't soak into the end grain. Wasn't expecting this.
I lost over half of the pics and the post from this point. Blogger was not responding so I closed out the browser and opened a new session and over half of it disappeared. Note to self - don't do that again.
 |
| the after pic |
Went back to the shop and shot two more pics. This one was originally done at 1440. I started making it at 0820. A lot of crappola unfolded in between. I made two huge, malodorous brain farts making this.
The first one was about the back slats. I sawed the tails on each end and laid them out on the back edge of the ends. The problem popped up and shook hands when I tried to fit the tails into the pin sockets. Two ends fit and two ends didn't. I had sawn the tails on two ends opposite of the other end. No way the back slats were fitting but one a positive spin, all four tails fit in the pin sockets.
The second brain fart was with the pin sockets. I had sawn and chopped them correctly on the first end edge. The pin sockets go on the back edge. Unfortunately for me on the 2nd end I put the pin sockets on the front edge. No amount of swearing, offering free flying lessons changed that. I tossed both ends and back slats into the shitcan and started over again.
 |
| tapered bamboo pins |
I glued one of these in each end of the back slats. After the bookshelf comes out of the clamps I will put some into the shelf from each end.
I didn't dovetail the 2nd bookshelf instead I put the back slats into notches. I am experimenting with this way of installing the back slats. Will glue and a tapered pin be sufficient to one, stay in place, and two keep the books from pushing it off?.
Tomorrow I'll start shellac on the bookshelf and the pic frames. Mortising the legs for the rails is at the top of the A list.
accidental woodworker
Black milk paint........
 |
| final prep |
I had filled the nail holes and a few dings with wood putty yesterday. Today I sanded them smooth with a 120 grit sanding stick. I use these sanding sticks a lot, much more than I thought I would. They have proven to be handier than I anticipated. BTW, I use the 120 grit stick 100 times more than any other one.
 |
| prepping for black milk paint |
Got the black pigment dye mixed and ready to go. I have 1 oz of lime ready - I'll add it to the water after the quark is in the whizzing machine.
 |
| 9 1/4 ounces of quark |
Making the quark is just as easy to do as the lime and the dye. One thing I'm still struggling with is the whizzing machine. It has two faults with the first being that the whizzing container is too small. Once the lime and dye are added to the quark the contents extend way above the max line. The 2nd hiccup is that it doesn't have sufficient power to whiz up the paint. It struggles and especially so with the quark. It barely breaks it down. I'm looking for a small kitchen blender with a larger container and a more powerful motor - something at least a 1000 watts.
 |
| hmm...... |
This batch is a wee bit thicker than the red milk paint batch. It is still much looser than than the blue milk paint. Stirring it didn't loosen it but I added some water a couple of times (1 TBSP each time) until it got to the consistency of the red milk paint batch. I think if I hadn't added water thinning it, it would have turned into a blob of black jello.
 |
| hmm....... |
I have four of these books from the Lost Art Press. I'm in a lull so I decided to make a small bookshelf for them. Chris says that more of these small books are coming and I'll be ready. I'm using 1/2" thick New Zealand pine I got from Lowes.
 |
| changed already |
I didn't want to saw up the 2nd board to get the two back slats so I made two of them from cherry. Changed my mind on that when I found a scrap of NZ pine to get two back slats. Now the entire bookshelf is the same wood.
 |
| practice run |
Instead of putting the back slats in a blind mortise I'm thinking of using a dovetail joint.
 |
| not my best dovetail |
Gaps and definitely not self supporting but doable. Laid out the back of the pin socket wrong but it didn't matter. I sawed both the pin and tail with my dozuki saw.
 |
| ta da |
Second try and much better. No gaps and a snug fit off the saw. I think this will work and I'll pin the joint with a dowel for insurance.
 |
| hmm...... |
The books will rest against the back slat without any problems. The wedging action of the joint will keep it in place and the books will rest against it. I'll have to stay on my toes so I saw the pin in the correct orientation.
 |
| ready to go |
Not much wood needed for it. I'll start on this in the AM as it was already past quitting time.
 |
| haven't forgotten it |
Due my unknown lung issues I decided to employ more machine work in the making Miles's desk to speed things up. I'm doing it strictly as a time savings but I'll still be doing handwork too. I ordered a plunge router from Amazon (hasn't come yet) and I'll use that to make the mortises. I'll do the tenons and the fitting by hand.
 |
| hmm....... |
Spiral up cut router bits. I don't think that I have ever used either one. But I digress as both will still be unused. The diameter is 6mm and the cutting depth is 7/8". The mortises need to be about 5/16" and one inch deep. I'll be using a double flute, 1/4" x 1" router bit instead.
 |
| 2 hours later |
Some foam on the top but the paint underneath still had the same consistency. After rubbing down the frames with the grey pad I painted on a 2nd coat. Coverage was good after one but two was better.
Had some problems with the SD card with the last 3 pics not cooperating. They wouldn't upload into the blogger. One of the pics was my attempt at untwisting one of the pic frames. I'll post it and how it turned out in tomorrow's post.
accidental woodworker
Hall of Fame picture frames........
 |
| fingers crossed |
I thought I had a good shot at this coming out of the clamps twist free. The Bessey clamps looked like they flattened the frame but I didn't get lucky. The same amount of twist before I clamp]ed it, was the same amount that shook hands with me unclamped.
 |
| way too much |
It looked flat but the twist is still 1/8" and it isn't any better on the opposite corner. That is too much to plane off. The frame is only a 1/2" thick and I would guess a total of a 1/4" would be planed off both sides to remove the twist.
 |
| last one |
Whacked out the bridle joints on the tablesaw. In spite of doing the donkey work there, I still had to tweak the tenon. For some reason I haven't found yet, the height of the saw blade moves. Sometimes up and sometimes down so it left the shoulder short this time.
 |
| one done |
I had to trim every shoulder with a chisel. The bottom right has a wee bit of a gap that I closed up with a should plane.
 |
| sigh |
I had to make a replacement. This one slipped out of my hands and said hello to Mr Saw Blade. Got lucky that the two jigs I had used to make the tenon sides were still set up.
 |
| 2nd one dry fitted |
The 2nd frame is atop the twisted one. No hiccups fitting the replacement side - frame was still dead nuts square.
 |
| first pic frame |
Both of these frames basically were self squaring. The clamps mostly kept the frame from shifting/moving while it cooked. The bridle joints were all snug and self supporting but I clamped them anyways.
 |
| 2 1/4 lines |
I'm not 100% sure but I think each line represents 1/8" off horizontal. This is a healthy amount of twist.
 |
| nope |
I didn't think it would work but I tried it anyways. Sawed off 1/2" on all sides but the twist was still there laughing at me. I'm not done with it yet. I'm thinking of wetting it and hitting with the heat gun to see if I can remove the twist then.
 |
| back frame |
Mitered both of them due to how visible they will be. Used the 1/2" shoulder plane to flush/even the toes of the miters.
 |
| done |
Decided to make two bridle joint frames so the Grandsons get the same frame. I don't want any sibling rivalry drama over the frames. The bottom frame is from the first two I made. It is an extra and I don't know what I'll do with it. The inside measurements of it are too small for a 5 x 7 pic - the R/L is 6" but the T/B is a frog hair over 7".
I'll be making a batch of black milk paint for these frames. If that batch goes south on me I have a can of black latex 'milk paint' I can use.
accidental woodworker
New Model Mandolin: 1
No sooner one mandolin is complete than another comes along!
So, after a very long gestation period, my New Model Mandolin is finally being realised. In this first episode of a new build series of videos, I look at its overall shape and go into detail about the making of the external mould. The mould is used for accurate construction of the mandolin’s rim.
Miles's desk pt VI........
 |
| what will it be? |
Resisted the urge to unclamp this after dinner. With my track record with miters, I let it cook over night. No hiccups noted when I took it out of the clamps and it passed the shake test with flying colors..
 |
| hmm....... |
Had second thoughts on how wide the reveal should be on the rails and the leg. This look is a 1/4".
 |
| 1/2" |
This looks to be a wee bit too much and I'm not sure yet which one I'm going with. Here the apron is centered on the leg and it allows more room for the contemplated chamfer I'm thinking of putting on the outside edges of the legs.
 |
| it worked |
It was bit awkward setting/clamping the board on the knife line and time consuming to do but worth it. I'm sure I could have done it free hand but this eliminates the saw jumping the line on me. Noticed that the crosscut gents saw I used had trouble sawing the cherry. I'll have to find someone who can sharpen it for me because I use this one constantly.
 |
| teeny bit of twist |
It wasn't much but enough to cause it to rock on the tablesaw. Planed it off with the #3.
 |
| back frame |
The back frame is as thick as the frame itself. Because of that I mitered the corners which will be visible.
 |
| better |
I didn't like the width of the frame and I sawed off 5/8" on all four sides. IMO the thinness of the frame now fits in the overall scale. This will be matted and have conservation glass to be hung on a wall.
 |
| squared off |
Chamfered the inside/outside edges with my cordless router. Had to square off the inside ones. If the outside of the frame had rounded corners I would have left it rounded. With the frame having 90° corners, rounded chamfers look like crap IMO.
 |
| one down, one to go |
Made the right choices. This frame is a much better fit than the original one which was 1 1/4" wide.
 |
| question mark |
When I took this frame out of the clamps, it had a noticeable twist to it. I didn't need to put the sticks on it, I could see it. In spite of that I put splines in the corners. I'm hoping that the splines will pull some twist out of the frame. I'll find out how well that worked in the AM.
If this doesn't work I'll make another frame. It won't be mitered this time. I'll make this one with bridle joints.
accidental woodworker
Armoires and chests from Halberstadt
The city of Halberstadt north of the Harz region in Germany houses a good collection of medieval furniture and wooden objects, mainly consisting of armoires, chests and caskets. They can be found in the Liebfrauenkirche, the Dom, and the Domschatzkammer. This blogpost shows the armoires and chests from these places, a next post will show some of the other medieval furniture pieces. Unfortunately the most spectacular armoire in Halberstadt was not on display. Nevertheless I have added pictures of this painted armoire from other resources in order to make the furniture collection from Halberstadt complete.
The Liebfrauenkirche


The armoire is ornamented with two carved dragons and some foliage on the sides.


The Liebfrauenkirche has two medieval chests of the hutch type. Both chests are kept from the ground by wooden blocks in order to prevent further damage to the feet.


The Dom treasury


The chest is constructed using a box-like design, with each side consisting of a single solid wood plank. The lid thickens in the center lengthwise, forming a curve. The front and back panels butt against the side panels, held together by wooden pegs. The front and back panels are dovetailed to accommodate the side panels, which are then chamfered in a corresponding shape. The bottom of the chest sits between the front and back panels and supports the side panels; here, too, wooden dowels secure the connection. In addition, six long iron bands encircle the body from the front, along the bottom to the back, stabilizing it. Four more long bands run along the sides and down to the bottom, ending before the outermost of these front-back bands. Iron bands reinforce the corners of the chest. Iron fittings also cover the corners of the lid. The lid was once hinged by seven hinges, of which six remain. It was originally secured by a butterfly lock and three padlocks (now lost). Two carrying rings on each side serve for lifting.


You can see the two carrier rings on the side of the chest.
The numerous long straps, the hidden second inner drawer, and the choice of the apotrophic animals griffin and lion, intended to ward off an attacker, thief, etc., indicate that the chest was used to store and secure valuable items or objects, possibly documents or books.


The north transept has been identified as its medieval location in the Liebfrauenkirche. In the 1820s and 30s, it stood "on the north side of the [main] altar". As the Liebfrauenkirche was no longer used after 1812 and its future purpose remained undecided, it fell into disrepair. For this reason, several valuable furnishings were moved from the church to the cathedral (Dom), particularly to the New Chapter House, starting in 1828, where they were stored safely and in dry conditions. Between 1833 and 1842, the armoire was also moved there. After 1848, when the Reformed congregation received the Liebfrauenkirche as a gift following a restoration financed by King Frederick William IV of Prussia, it was not returned to the church, but kept in the Cathedral Treasury with a reference to its former origin.


Late Gothic spruce chest with a base and cornice, including crenellations (some of which are missing). The side panels each consist of a single board, while the front is horizontally divided into a base cabinet or closed panel in frame construction and a tall door section with a door. Painted decoration covers the walls, and flat carvings adorn the base, cornice, and door frame. This decoration is characterized by foliate tendrils and, on the door and side cornice panels, by painted heraldic representations. While the coats of arms on the cornice panels feature flowering tree motifs, the large painted coat of arms on the door identifies Provost Balthasar von Neuenstadt. Painting and carving are in direct dialogue. However, there are differences in design even among the flat carvings: while the background on the base and side cornice panels is punched (star punches on the base, concentric circles on the cornice), the background on the door frame and the front cornice panel is black. The tendrils also differ slightly in motif, indicating two separate production processes. The cabinet is only partially preserved. Extensive alterations and replacements characterize the base (or the closed base panel of the front), the back panel (the central addition is a reused piece), the back panel of the base, the mortised middle shelf, the door strike plate, and the lock. On the inside around the door frame, there are doubled-up strips for the insertion of a glass door (now missing). The armoire was used as a display cabinet for a time; for this purpose, strips for intermediate shelves were also nailed diagonally to the side panels. Original parts of the cabinet include the door with frame, base, cornice, side panels, top shelf, hinges, and the metal handle for opening the door.


in between day.......
Today is not a national or state holiday. I checked because the mail was late. It usually comes around noon-ish but still no mail by 1609. I checked to verify it wasn't a holiday but I did find out that there are 14 national observation days. Six I thought were kind of ok and 8 were absurd.
In the order I found them - National Ear Muff Day, National Ken Day (as in the Barbie Doll Ken), National Jewel Day, National Open An Umbrella Indoors Day, National Smart and Sexy Day, and National Sleep Day. I say why not celebrate a National Belly Button Lint Collector Day or a National Toys Made From Ear Wax Day?
 |
| hmm..... |
Thought 3/4 stock was too thick for the Hall of Fame frames. 1/2 inch poplar looks better to my eye. I wanted to dowel the frames together but I don't have any thin (>1/4") diameter dowels so I'm going to miter the two frames.
 |
| Osbourne miter gauge |
Norm had this one so of course I had to have one. The plan was to saw the 45 on the saw and sweeten it up with the 45 shooting board.
 |
| surprise |
You could have knocked me out with a feather. Every single 45 was dead nuts according to Mr Starrett.
 |
| nope |
All the shavings came from the practice pieces on the right. I couldn't dial in the '45' on the miter jig. The problem was the stock moved as I pushed the plane forward. Instead of chasing my tail I went back to the tablesaw and sawed the parts to the exact same length.
 |
| hmm....... |
Bottom right miter threw a hissy fit deciding to have a gap. I eventually got it tighter after sanding and planing the opposing toes and heels.
 |
| better |
I have had and used these miter clamps for almost 50 years now. Easier with a lot less fussing getting all the miters closed up vice the Woodpeckers above.
 |
| sigh |
The heels slipped a wee bit and it had already set by the time I noticed it. All the miters are tight and I'm leaving this as is. I am going to chamfer the inside and outside edges and that will hide this boo boo.
I am going to glue up both frames with these geriatric Craftsman miter clamps. I will do the 2nd one in the AM. I don't have good luck gluing up miters and I don't have a warm and fuzzy with these two.
 |
| spline jig |
These arms are toast and I need a new set. I am not relying on glued miters but glued miters that have splines.
 |
| done |
I didn't have any 3/4 thick scraps but I did have 1/2 poplar. It just has to last to do two frames.
Only got about 90 minutes in the shop today. I had a clinic appointment with the pulmonary docs at the West Roxbury VA. Still don't have a diagnosis as to what the mass is in my left lung. The head doc explained to me that it could be cancer but there is another problem with my lungs that isn't cancer but Interstitial lung disease which is a scaring of the lung tissue.
I'll be going to West Roxbury again to have a CT guided lung biopsy probably next month. In the interim I will have some other tests done at the Providence VA. At this point I just want to know what is wrong with me. Fingers and toes crossed that the CT biopsy yields something definitive.
accidental woodworker
The Japanese Gennou Hammer & Handle Part 22 – Tasting the Pudding

True perfection is unattainable, but if you chase perfection you will catch excellence!
Vince Lombardi
In previous articles in this series about a craftsman-made gennou hammer handle, we discussed how to design and make a handle to fit Beloved Customer’s body and way of working. This article assumes you’ve mostly completed your handle, attached the head, and are now ready to test it. So let’s get started.
Why Testing Matters
I don’t know about you, but after all the research, design and fabrication work we’ve invested in your gennou handle, I need to see how it performs and determine if its performance is superior to a Minion impaled on a stick. Being a Beloved Customer and therefore highly intelligent, you’ve asked yourself the following three indubitably perspicacious questions about testing.
- What can I learn from testing?
- Against what performance standards should I compare my most excellent new hammer handle (besides to a Minion on a stick)?
- How should I conduct that evaluation?
To perfect your hammer, you will need the answers to these questions and more. You can get them over years of use, or get many of them now by testing it in a methodical manner and paying attention, but one way or another, you must get answers, bro.
Desired Testing Results
We can learn several things from testing our gennou with its new handle, but I encourage you to do your best to ascertain the following two things at minimum.
The first thing, of course, is whether or not the hammer with its new handle is comfortable and stable to use, and if possible, what needs to be improved to make it more stable and comfortable. This may entail many small details depending on your requirements and powers of perception.
Whether it’s comfortable in-use or not is subjective and entirely up to you, but you can probably identify problems easily through this testing process. Pain, soreness and blisters and the lack thereof are solid indicators (ツ).
Whether or not it’s stable in use is another important thing to determine early. Does it tend to track straight on the downstroke, or does it want to twist off your intended path of travel striking chisel handle or nail head erratically? When it hits the chisel or nail, does it convey its energy into the target smoothly, or does it wiggle like an eel on a hook on impact?
An unstable head and handle combination may perform well for one or two consecutive strikes, but because Murphy’s Law of Buttered Toast irrevocably dictates that small errors accumulate to maximize damage, an unstable head will often wiggle off-line enough for the third swing to hit weakly, even miss entirely, ruining your rhythm, damaging your confidence, and eliciting snide looks from resident bench cats. Oh, the shame…
A second thing you need to learn is whether or not the face of the hammer is striking the chisel/nail squarely and if the center of mass of the head is aligned with the vertical axis of the chisel handle or nail. Please make sure you understand the meaning of the previous sentence.
With this experience and the answers to these questions under your belt, you will be in a position to adjust the handle to perform its best for you and the way you work.
Testing Procedures
Out of an abundance of well-deserved humility combined with a strong desire to avoid looking even more the fool, your humble servant will refrain from suggesting any specific objective tests, or urge you to use quantifiable standards, or seek concrete empirical results because that would be too silly to even contemplate. Unless, of course, Beloved Customer will conduct these tests in your super-secret laboratory, possibly located at the heart of a dormant volcano on an uncharted South Pacific island, maybe covered by coconut palms with cold beer taps, probably surrounded by hundreds of horny bikini babes, likely frolicking in crystal surf. BTW, if you do have such a lab, please text me the address!
In this super-secret lab you will probably have access to equipment and software suited to more scientific, empirical, replicable methods of comparison, such as those developed for analyzing and improving the apparent performance, marketability and profitability of mass-produced sports equipment such as baseball bats, golf clubs, and green dildos (シ). Sadly, while your humble servant does not possess such equipment, most (but not all) humans own and operate one of the world’s most refined super-computers and sensor networks: our bodies and brains. I therefore propose you focus these formidable tools on this analysis. (brains and bodies, that is, not dildos).
Below are four absolutely subjective tests only you can perform, the results of which only you can evaluate.
Incorporating Test Results
To thwart the confusion promulgated by Murphy and his multitudinous malevolent minions, I strongly recommend you use the results of your analysis to guide you in making incremental improvements to your handle over time rather than large changes immediately, so to that end, please plan to remake your handle, once, twice or even thrice, improving it a little each time. Such is the true path of the craftsman.
Please update your handle drawing each time to record the improvements you’ve made and ensure no “increments” are misplaced.
In scobe veritas. (“In sawdust, truth”).
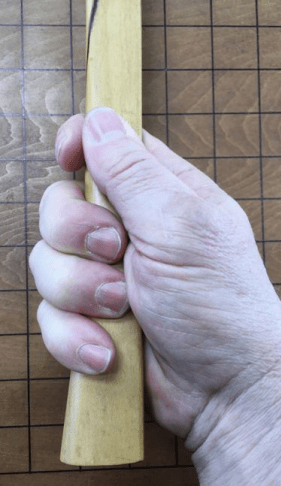
The Grip
As you are aware, for any testing other than drinking beer or women choosing wall paint color to be meaningful, some basic techniques must be established and followed to reduce variables to a manageable degree. How you hold the gennou handle to be tested is just such a basic technique.
The handle design presented in this series of scribbles is intended to work best when gripped in a particular way, so when performing the following tests, it’s important that you grip the hammer correctly thereby removing one huge, often-problematic variable.
Of course, I’m describing a particular grip here as being “correct,” but that’s just my well-informed opinion. In any case, I promise your hammer will work more efficiently if you abandon the so-called “hammer grip” (what I call the “Hobbit-killer” grip with the handle grasped in your fist) right away and switch to this more advanced grip.
I didn’t invent this grip, BTW, but observed and consulted with craftsman I respected in the USA and Japan who used it for many decades, all of whom are now working overtime in the big lumberyard in the sky. I later came to call it the “Sam Snead grip,” after the extremely successful pro-golfer of the same name who made it famous, and him rich, in tournaments and in dozens of books he wrote on the subject of using golf clubs skillfully.
We’ve talked about this grip in some detail in Part 13 of this series, but please review the photos below to confirm your understanding.
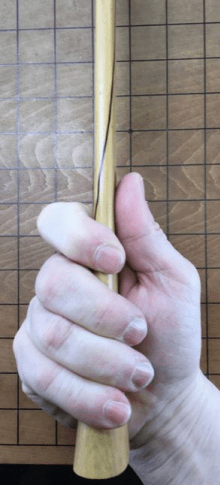
The first photo labeled “Bridging the Palm” shows how the hammer’s handle is NOT held in a fist, but is angled diagonally across the palm, supported on the first joint in the index finger, as well as the heel of the palm.
You can see how the index finger wraps around the handle while the thumb is pressed against the side so that the handle is strongly clamped between index finger and thumb, but can still pivot the handle if the operator so desires. This grip affords the joints of the forefinger and thumb, digits accustomed to fine motor control (unlike the fist), absolute control over three critical surfaces of the handle.
This grip also provides better control, more power, and greater reach without forcing the wrist to do the strange, unnatural contortions the Hobbit Killer grip does.
 Bridging the palm
 Index finger wrapped around the handle with the tip pressing against the rounded front edge of the handle.
 Handle pressed between tip of the thumb and first joint of the index finger. The tip of the index finger presses against the rounded front edge of the handle, and applies most of the force required to return the handle to battery.
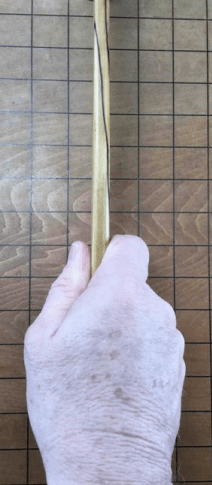 Notice how the handle is pressed between the pad of the thumb and the side of the index finger in the famous “Sam Snead” grip.
The Three Tests
Following are three tests to help you ascertain how well your new gennou and its handle suits your body and your work style.
Before attempting these tests, however, it is important to use your new handle for a time to establish a connection between it, your hand, and your eye (using the proper grip, of course).
Besides moral virtue and a sense of humor, you will need a few things.
- A wood chisel suitable for cutting a mortise hole, around 24mm.
- A piece of light-colored scrap wood for cutting a test mortise hole;
- A stick of light-colored wood approximately the size and shape of the handle of the chisel you would normally use for cutting mortise holes:
- An ink pad, wide-tip marking pen, or Dykem.
- A lab assistant. I recommend a buxom, young lass with a cute giggle wearing a sexy lycra lab uniform (Warning: bad stuff may happen if you let She Who Must Be Obeyed meet, or even see, this assistant!)
So, now that we have our supercomputer and its sensor suite warmed up and focused, our tools laid out, and a bubbly lab assistant standing by, sound the trumpets and let the testing begin! We who are about to dye salute you!
Test No. 1: The Blind Retrieval Test
After you have used your gennou with its new handle for a few weeks such that your hand has become accustomed to it, please give your bench dogs a few treats, shoo away any arrogant bench cats, set it on your de-cluttered bench, step back a few steps, close your eyes and turn in-place once or twice like a ballerina with hairy legs. Now, have your lab assistant, perhaps a child, a friend, a neighbor, your girlfriend, or wife, or even a clever bench dog (but never your neighbor’s girlfriend’s wife’s cat!) change the gennou’s orientation on your benchtop by turning it over, switching it end for end a few times, spinning it, or whatever. Random orientation is what’s needed.
Next, with your eyes still closed, grab the gennou with your hammer hand in a proper grip ready to rock-n-roll. Notice how easy or difficult it is to grip the handle correctly, without fumbling and without opening your eyes. If it’s not easy to do, however, you need to know it now. It may be simply that you’re not accustomed to the chisel, more importantly, it might mean the geometry or details are out-of-wack.
By “correctly” in the previous paragraph, I mean (1) the flat striking face of the head is facing away from you and toward the chisel or nail; (2) the head is aligned straight in your hand, and not twisted, (3) the heel of your hand is pressing against the flat spot on the handle adjacent the butt; (4) the distance from the center point of the face to the heel of your hand is located precisely the distance shown in your design drawing.

BTW, whether you picked up the habit from your daddy or some internet guru, choking-up on the grip is an inefficiency you should discard simply because it’s counterproductive and silly, like a powerful cane corso dog wearing flower brocade.
If your grip is shaped as shown in the drawing with a flat back edge and sides perpendicular to it, a radiused front edge, and a flare beginning at the grip area, it should be easy to instantly grip the handle in precisely the proper place, with the intended striking face oriented properly, without opening your eyes and without any fumbling whatsoever.
If, on the other hand (the one with six fingers (ツ)), your hammer doesn’t leap into your hand in perfect alignment without argument or eyeball action, some adjustments to the handle are called for. For example, a frequent cause of disagreement between handle and hand is the leading edge of the grip being square instead of rounded. Or the sides and butt of the handle being angled wrong. These details can all be adjusted once you know they need to be adjusted
A gennou that naturally orients itself in your hand with the striking face in the right direction, the same distance from the striking face first time every time without your having to look at it, will provide you a tremendous advantage in speed, efficiency and confidence. It will become a good friend and companion.
BTW, just for gits and shiggles, try this test with any name-brand one-size-fits nobody nail bender you have laying around. The virtues of your new handle will become immediately apparent.
Test No. 2: The Blind Swing Test
This test will teach you something about handle length and other details.
Once again, perform this test after you have used the gennou with its new handle for some time and have become accustomed to it. A sexy lab assistant (one who doesn’t talk too much) in slinky woodworking togs is optional (ツ).
Grip the gennou properly in one hand and the stick shaped like your chisel handle in the other just as you would an actual chisel. But instead of placing the end of the stick against something as if you might cut it, please keep the stick in the air without butting it against anything. Now, with your eyes still closed, swing the gennou at the end of the stick of wood.
You should be able to strike the stick with the flat end of the gennou solidly and squarely on the first, or perhaps second try. Success in this test is common.
If your hammer misses the stick consistently, it may be because you are not yet accustomed to the handle, or it may be that you are chocking-up up on the grip, or maybe you need to make it shorter or longer, or the grip shape needs to be adjusted. Or it may be that Murphy keeps distracting you by sending dick pics. It’s absolutely worth figuring out.
Once again, if you consistently miss the target, pay attention to why and where you are missing. Is the handle too long? Is it too short? Are you missing off to the side? Make notes recording the results and your observations on the design drawings to incorporate in your Mark II handle.
If accuracy can be improved by shortening the handle or modifying the grip, go ahead and make the necessary changes a little at a time. It’s easy to shorten the handle, but lengthening one requires an ACME Wood Stretcher Mark 2. I can lend you mine if you don’t have one (ツ)
Test No. 3: The Ink Test
Never fear: this test has nothing to do with gossip screeds or crime scene investigation. It will help you determine if the handle of your gennou is the right length, if it is cocked at the most effective angle, and whether or not it should be canted to the left or right, and all without pulping an innocent tree.
This test works best if preformed after the Blind Retrieval Test and Blind Swing Test.
Begin by coloring the striking face of your gennou with an ink pad or by applying dark marking pen ink or Dykem to the gennou’s striking face (the flat face). Clean or sand the end of your chisel’s handle to produce a clean, white surface. Then cut a mortise using this gennou in the same posture you assume when cutting most of your mortises.
For instance, if you mostly cut mortises in wood located at a constant height on your workbench, such as drawers and furniture parts, you should employ that position. Or, if you tend to cut mortises in timbers while sitting on or straddling them using the venerable butt-clamp, please assume that position.
The impact with the chisel’s handle will wipe ink off the face of hammer and deposit it on the end of the chisel’s handle at the same time. This ink transfer will print the story you need to read. Check the ink on the gennou’s face and the end of the chisel every two strikes.
This is a time-tested technique professional golfers use to select/design golf clubs, BTW.
If the ink at the center of the striking face is scrubbed clean first, and the center of the chisel handle becomes inked first, then you have made your handle the right length with the head angled correctly. If not, you should make notes describing the results in the handle drawing you made earlier, and adjust the design of your next handle accordingly.
Again, you may find it enlightening to perform this same test with conventional hammer with a standard handle.
When your done testing, be sure to record your conclusions. Either erase and adjust the drawing, or trace over it to make and date a new drawing with your revised details. Tracing paper is our friend.
In either case, be sure to add a date and/or revision number to the drawing to ensure you don’t confuse it with older, superseded drawings. Don’t put this off but do it right away before you forget. This applies to all the tests described herein.
Adjustments to Your Handle
You should use the results of these tests to make small, incremental adjustments to your handle, as you deem necessary, rather than big, drastic changes.
For instance, you may need to shorten the handle. This is easily done if your handle is a little long and you’ve made the neck as I recommended. Worst case, make notes, adjust the drawing and remake the handle with as few changes as possible to avoid confusing over-complication.
A common correction you may want to try is, after becoming accustomed to using the hammer, to reshape the grip area to distribute pressure more evenly over the hand, and to reduce stresses induced in skin, muscle, tendons and bones by easing edges and corners while maintaining control and indexing. Most importantly, you should shape the handle so it doesn’t twist in your hand stretching your skin in uncomfortable ways, a common cause of blisters, especially in plastic-handled one-size-fits-nobody hardware store hammers.
If I may share an example from my experience, every new hammer handle I make tends to produce a blister on the first joint of my right hand index finger. Obviously a lot of pressure focus on this location on my hand. So I know to smooth the transition from back edge to the side just where this joint bears to avoid blisters.
This modification creates an obvious dent in the smooth lines of my handles, but your humble servant is resigned to sacrificing beauty for performance when necessary. Just look at the sorry state of my career as a fashion supermodel.
Another less-common problem is the hammer’s face striking the chisel handle or nail head at an angle instead of being centered on, and at a 90˚ angle to, the long axis of the chisel handle. The ink test will reveal this impish behavior.
This tendency usually improves with practice, but you can adjust for it by making a new handle with the head skewed to the left or right as necessary.
As a way to determine how much skew is required, you can plane down the sides of your test handle, glue on slips of wood, shape them as you see fit, and test the results. Once you’ve determined how much total correction is necessary, you can remake your final working handle accordingly.
Once again, work patiently to achieve small, incremental improvements, and be sure to record the results on your drawings.
Don’t hesitate to methodically scrape, shave and experiment with this first handle.
The design of this handle, and the process your humble servant has described for making it, is suited not just for Japanese gennou hammers, to all short-handled hammers and axes. Give it a try and you’ll see what I mean.
In the next article of this series we’ll apply a protective, and maybe even tastefully elegant, finish. Please remind me to call Ramon and beg him cater the unveiling party! I simply love his cheesy shrimps on crackers, don’t you?
YMHOS
If you have questions or would like to learn more about our tools, please use the questions form located immediately below. To see a list of our tools and their pricing, or to contact us, please click the “Pricelist” link here or at the top of this page.
Please share your insights and comments with all Gentle Readers in the form located further below labeled “Leave a Reply.”
We see data miners and their bilious bots as dastardly sneak thieves and so promise to never share, sell or profitably “misplace” your information for any reason. If I lie may the heads of all my hammers fly away to Valinor!
 Brother Saint Martin and the Three Trolls by John Bauer. Supernatural creatures are everywhere, if you have eyes to see.
Previous Posts in The Japanese Gennou & Handle Series
- Part 1 – Introduction
- Part 2 – Ergonomics
- Part 3 – What is a Gennou?
- Part 4 – The Varieties of Gennou: Kataguchi, Ryoguchi & Daruma
- Part 5 – Kigoroshi
- Part 6 – The Ergonomic Anaya
- Part 7 – The Unblinking Eye
- Part 8 – Head Style & Weight
- Part 9 – Factory vs. Hand-forged Gennou Heads
- Part 10 – Laminated Gennou Heads
- Part 11 – Decorative Gennou Heads
- Part 12 – The Drawing: Part 1/6
- Part 13 – The Drawing: Part 2/6
- Part 14 – The Drawing: Part 3/6
- Part 15 – The Drawing: Part 4/6
- Part 16 – The Drawing: Part 5/6
- Part 17 – The Drawing: Part 6/6
- Part 18 – Wood Selection
- Part 19 – Laying-out the Handle
- Part 20 – Making Sawdust
- Part 21 – Installing the Head
Miles's desk pt V.......
 |
| finished glamour pic |
I've been trying to get a hold of my sister Donna out in Indiana and nada. I'll past this on to my sisters Kam or Susan. I'm no longer going to populate the boneyard with projects.
 |
| last night |
Came back to the shop to clamp the front rail up. Decided to use it because I don't have any 4/4 cherry 6" wide.
 |
| ready for layout |
Thought about using a different wood for the drawer fronts. Walnut came up first but I don't have enough for two drawers. Pine is out of the question and I have no other 4/4 hardwood in my stash. It is looking like it is going to cherry after all.
 |
| hmm...... |
Still liquid and no 'foam' covering it this time. I stirred it and applied some to a scrap of pine. Covered well and seemed to be sticking. I wasn't expecting this to still be viable.
 |
| tenon layout |
Initially I tried to do the layout with not one but 3 different mortise gauges. I felt like I didn't have thumbs - I couldn't get any of them to lay out equally from each edge. The tenon is a few frog hairs wider than a 1/4".
 |
| mortise layout |
I took my time doing this layout. There is no bottom rail on the front and it is way too easy for me to screw things up. Got a layout triangle on the top that helped a lot with keeping me on the right track. Got it laid out first with light pencil marks, took a coffee break, and came back to check it was correct before finishing the layout. I checked it again before I killed the lights for the day.
 |
| rail inset |
This is the outside line for the rail putting the tenon centered on the leg.
 |
| got lucky |
I was going to use a long 4/4 cherry board to get the two drawer fronts. While picking out that I saw these cherry scraps off to the left. The grain flows pretty good across the two so I'll be able to get a good match right to left.
 |
| hmm...... |
Got a snug fit on the ends and it is proud on the width. I'll plane them to fit when I do the 1/2 blind dovetails.
 |
| hall of famer at Cooperstown |
Got a request to make two frames for these. One for each of the grandsons. They are related to hall of famer but I don't know how. My wife is the one who does the digging into dead people stuff. He was a great uncle to the grandson's paternal grandfather. Either of these two frames is way too big for for a solo pic.
 |
| finally |
Maria had told me bigger is better when matting a pic/photo. I started with a frame that would have a 2" border all around. It looked off to my eye so I started shrinking the frame. It took me 4 cuts before I got this. I'll whack out these two and bring them when I go to Maria's to check on two frame jobs I gave her last month.
accidental woodworker
New Shooting Board
Miles's desk pt IV (?)..........
 |
| seven rails |
Learned something prepping the rails that had gone over my head like a cement balloon. There is an order of operations with prepping the rails that I wasn't following. First op is to rip the rail to width. 2nd op is square one end and then square the opposite end and saw the rail to length. I was flattening/straightening one edge, squaring the ends, and finally sawing it to final width. The problem with that sequence? The ends were square to the original reference edge but not with the other one (width wasn't parallel end to end). For years I did prep that way obviously wandering in La La Land without knowing it.
 |
| 23 slats |
I was able to get this many slats out of the off cuts from the stock prep.
 |
| my desk |
33 slats on my desk that I will repeat on Miles's desk. I have a fondness for the look of this. They will be 3/4" wide by 3/8" thick. I doubt I'll use less then this number but I may add a couple more - to close the distant between the last slat and the legs.
 |
| 44 slats |
The width and thickness was different between the 5 batches of slats I did. To even all the slats I did one final ripping to width and thickness. The total operation of making the 44 slats took me 2hours.
 |
| cherry sawdust |
Generated a bigger pile than I expected. There was also a fine sawdust in the shop that covered everything.
 |
| headache time |
Didn't realize until after I was done with the front that I had made a hiccup. I was looking to get a continuous grain flow. I didn't want one drawer, I wanted two inset ones. The headache was caused by trying to figure out the length of the drawers.
 |
| the front rail |
I first saw this done by Norm Abrams from the New Yankee Workshop. I think it was called the library table. I have done this once before without any problems. Trying to find the length of the drawers and the left, middle, and right dividers was making me feel like I had the IQ of a lima bean.
The result of this is the drawer inserts came out short. I just lost my continuous grain R to L.
 |
| hmm....... |
Normally I would have used biscuits but I recently got a Stanley #59 doweling jig and I used it instead of biscuits. I did good on the alignment on the bottom but I was off on the top. I thought I had registered the jig but I did it wrong for the top one -either the divider or the top rail.
 |
| double, triple checking |
I would have bet a lung I had done the registration correctly. Of the 4 registrations I was right on 3 and off on one. I was happy with the bottom - it came out dead flush on all 3 dividers. The fix was easy, glue in dowels and redrill for them.
 |
| I couldn't wait |
Twenty minutes after I glued the dowels in the errant holes I sawed off the proud and flushed them. Tried it with the center divider and I was flush top and bottom.
 |
| happy face |
Dead on flush, top & bottom, on all three dividers.
 |
| it won't stretch |
Got a 1/4" gap and I tried but I couldn't stretch it enough to close it up. Eyeballed it and I couldn't think of any way to 'fix' it. I can't use these drawers for slats as they aren't long enough. I will save them in the wood pile for a future use.
 |
| nope |
I thought I was clever using a scrap of pine to figure out the length of the drawer. When I did it the pine was a snug fit in the opening. Turned out that the pine was the same length as the cherry drawer from the git go. Don't understand how that happened. But I did remember how I had done the previous front rail from many moons ago.
On that one I had left the right and left outside dividers over length. On this one I had sawed the top and bottom to the same length as the back rails. I should have left the middle part over sized. Got me thinking about maybe redoing this. I have extra stock and the 'fix' for it.
 |
| nice jig |
One thing I have learned over the years is to leave jigs etc set up until everything is glued and cooking. This way it isn't a scramble to set the jig up again to 'fix' a me-steak.
accidental woodworker
The Japanese Gennou Hammer & Handle Part 21 – Installing the Head

No one should be ashamed to admit he is wrong, which is but saying, in other words, that he is wiser today than he was yesterday.
Alexander Pope
In the previous article in this series we finished fitting and shaping the handle of our gennou hammer in accordance with our design document. Some refinements may be pending the results of testing, but in any case the time has come to attach the head.
This is an important task, perhaps not as easy as it sounds, because this is a craftsman’s handle, made with love and skill, not a mass-produced cockroach killer ground out by barefoot Bangladeshi farmers and secured with crude wedges. It’s not a typical tool of the sort sold at Home Despot designed to fail quickly and be tossed into a landfill soonest. And because the head is not secured with barbaric wedges but relies entirely on the extremely tight fit between the eye of the steel head and the tenon Beloved Customer cut on the end of the handle, some careful, but nonetheless violent action is required to successful connect head and handle. The purpose of the article, therefore, is to help you install it carefully with all due violence.
Installing the HeadBeloved Customer can install the head either before or after sanding and finishing the handle, but in this example we’ll attach the head before testing and finishing the handle. This approach will be most efficient if you decide to adjust or rework the handle after performing the tests I recommend in the next article.
In this case, I use the word “finish” to mean to apply a chemical “finish material” to the wood, not to “complete” the work or “conclude” the job. This difference in definition matters to me because confusion regarding the dual, even treble meaning of the word “finish” has caused problems for me in the past. So there you are.
Preparing the Tenon
First, remove any tape remaining on the tenon and, if necessary, use a solvent such as lacquer thinner to remove any adhesive residue. DO NOT USE soap, water, or any water-based chemical as this will make the tenon swell! After cleaning there should be no finish material, wax, oil or unicorn wee wee left on the tenon.
Depending on the relative humidity the handle is acclimated to, it may be advisable to make an effort to shrink the tenon a bit by placing the handle in a low-humidity environment for a time. Please do NOT microwave your handle, cook it in your oven, or heat it in your toaster, not even with cheese and Tabasco Sauce.
There are several ways to remove moisture from the tenon in order to shrink its width and thickness a bit without ruining the handle or burning down your workshop. Perhaps the safest way is to store it for a time in a tightly-sealed plastic container with packages of silica desiccant. Other ways include placing it in a warm spot close to an operating gas furnace, or indirectly exposing it to an electric room heater for a day or so.
If you use any method that involves heat, make sure you are nearby to monitor progress and deal with scorching and fires.
Orienting the Tenon
You’ve already shaped the handle, and shaved and lightly chamfered the tenon so it should partially fit into the head’s eye almost as deep as the chamfer, but should go no further using only hand pressure.
Please keep in mind during this process that it’s extremely important to get the tenon started in the eye straight, and to keep it straight, without allowing it to become cocked.
It’s also important to install the head in the correct orientation. This usually means it’s flat striking face is oriented towards chisel or nail, and with the brand oriented towards the handle’s butt.
Some people like to orient the head’s brand so it faces up (away from the butt) when using the hammer. I can understand this compulsion, and while it makes no difference in performance one way or the other, you should be aware that it’s seen as bass-ackwards among professionals in Japan.
Starting the Tenon
Of course, in accordance with your humble servant’s advice in previous articles, you’ve already created an elegant dome on your hammer’s butt to prevent these taps and strikes from damaging the handle.
I like to place the head on a working surface such as a benchtop or a softwood board like pine or cedar resting on the floor/ground cushioned by a piece of leather or rubber to prevent slipping.
Insert the tenon into the eye, and, after sighting the handle and head from multiple directions to check alignment, when you are absolutely certain the tenon is poised to go into the eye straight, tap the handle’s butt with a flat-faced hammer, genno (not a domed-face hammer) or mallet. After a few taps, stop tapping, check your progress, and make sure the tenon is going in straight and not cocked.
Although the tenon should not have entered the eye more than a millimeter or two, it should be an extremely tight fit, with each tap making barely any progress.
I can’t describe the sensation in writing, but if the fit is too tight at this point in the process, you may need to scrape or sand the tenon a little.
Driving the Tenon Home
This is where the “violent” part of the job I mentioned above begins.
With the tenon properly aligned and started in the eye, stand up, hold the hammer in a fist with the head hanging straight down, and strike the butt of the handle with your hammer or mallet paying attention to its progress into the eye with each strike and the friction created. Gradually adjust the impact force of your strikes accordingly. Don’t be surprised if it takes literally dozens of extremely hard strikes to install the handle completely. If the tenon just slips in, however, we have a problem, Houston.
If you find that the fit is too loose, however, don’t despair, simply shim it with quality paper as described in the last section of the previous article. Remember, most people find it difficult to get the tenon/eye fit right the first time. Such adjustments to a new handle are nothing to brag about, but neither are they something to be ashamed of. It’s more the rule than the exception until experience is gained.
Some people like to make their tenon extra-long so it projects out of the eye 6-12mm or so. Nothing wrong with this approach, but it looks silly to me in the case of a new handle. Once again, beauty is in the eye of the bean holder.
I was taught that the ideal is for the tenon of a new handle to remain recessed inside the eye a few millimeters. The purpose for this goes back to one of the reasons for the gennou handle design described in this series of articles, namely, that the handle does not have a tumorous swelling below the head but the neck is approximately the same dimensions as the eye for a portion of its length to permit the user to tap the handle further into the eye should it loosen. By leaving the end of the tenon short of the end of the eye in the case of a new handle, one provides visual evidence that (1) the handle is tightly fitted and; (2) that plenty of tenon length is available for making such adjustments.
Accordingly, a tenon projecting a long way out of the eye indicates to the knowledgeable observer that either the handle is either old and has been adjusted many times, or the tenon fit was sloppy from the beginning. In my humble opinion, a tenon of a new handle projecting from the eye a significant distance looks odd, but in practice, it doesn’t make much difference. The choice is yours.
In the next article in this series of articles about danger and violence, we’ll test you’re new handle. How exciting!
YMHOS
If you have questions or would like to learn more about our tools, please use the questions form located immediately below. To see a list of our tools and their pricing, or to contact us, please click the “Pricelist” link here or at the top of this page.
Please share your insights and comments with all Gentle Readers in the form located further below labeled “Leave a Reply.”
We see data miners and their bilious bots as dastardly sneak thieves and so promise to never share, sell or profitably “misplace” your information for any reason. If I lie may all my hammers swim away from me!
 Title: Cormorant. This ink drawing was made by Japan’s most famous swordsman, Miyamoto Musashi (c. 1583 – 13 June 1645). This style of art (suibokuga) is not well-known outside Asian countries, but despite the few materials used (paper, ink stick, inkstone, brush and water), it’s an extremely difficult art to master. Why? There’s no pencil layout to follow, so the artist must have the drawing planned down to the last stroke in his mind’s eye. Each stroke must be made precisely but without hesitation or mulligans. The ink is black, so color gradations can only be achieved by altering the speed of the brush and the ever-changing water/ink balance contained in the brush. High-speed, high-precision, powerful lines, no wasted strokes. Very much the work of a swordsman.
Previous Posts in The Japanese Gennou Hammer & Handle Series
- Part 1 – Introduction
- Part 2 – Ergonomics
- Part 3 – What is a Gennou?
- Part 4 – The Varieties of Gennou: Kataguchi, Ryoguchi & Daruma
- Part 5 – Kigoroshi
- Part 6 – The Ergonomic Anaya
- Part 7 – The Unblinking Eye
- Part 8 – Head Style & Weight
- Part 9 – Factory vs. Hand-forged Gennou Heads
- Part 10 – Laminated Gennou Heads
- Part 11 – Decorative Gennou Heads
- Part 12 – The Drawing: Part 1/6
- Part 13 – The Drawing: Part 2/6
- Part 14 – The Drawing: Part 3/6
- Part 15 – The Drawing: Part 4/6
- Part 16 – The Drawing: Part 5/6
- Part 17 – The Drawing: Part 6/6
- Part 18 – Wood Selection
- Part 19 – Laying-out the Handle
- Part 20 – Making Sawdust
- Part 21 – Installing the Head
Leave a comment Cancel reply
miniature chest finale and pt I of Miles's desk.........
 |
| grey pad work last night |
Everything I read/watched about milk paint said sanding between coats wasn't necessary. However, a scratch pad works wonders smoothing out the paint. It surprisingly didn't generate any appreciable dust. I had used this grey pad (the only one I had) between each application of the paint.
 |
| happy with it |
There was a 'foam skin' covering the top that stirred into the paint without leaving lumps. The consistency of the paint has remained the same since I first mixed it up. Hope that I have mastered making it now.
 |
| 3rd coat |
Although this doesn't look like latex paint with regards to coverage, I'm happy with how three coats of this batch of milk paint look like. I'll be ready to slap 3 coats of shellac on it in the AM.
 |
| the next day |
The paint still had a 'foam skin' covering the top. Unlike last night it took some vigorous stirring to make it lump free. Consistency remained the same - encouraging that there hasn't been the slightest hint of it wanting to turn into a jello like blob.
 |
| 4th coat |
Didn't need another coat but I was curious about how the paint would be after sitting out on my bench for two days. Is it just me or does it look like the color has deepened a wee bit? The paint laid down with no problems or hiccups.
I started looking on line about making linseed oil paint. My grandfather worked as a house painter when he first came to the USA. He made the paint that he painted houses with. Supposedly linseed oil paint doesn't peel/blister/crack like modern latex/oil paints do. Just something to have on the back burner to muse about.
 |
| legs |
Sawed out the legs for Miles's desk. This 8/4 cherry stock is 1-7/8" thick.
 |
| prepping |
Planed two adjacent faces square, flat, and twist free. Next step is to plane the four legs to equal thickness on the lunch box planer.
 |
| hmm...... |
Leg prep was done and I measured the two adjacent faces. This face was almost 2" wide and the other face was 1 7/8". That gives about 1/8"+ for wiggle room. There is nothing carved in stone for the thickness but I was shooting for as thick as possible.
 |
| done |
It was a beautiful pre spring day for planing. The temp at the time I did this was 67F/20C. It didn't take long to do - it took longer to set up and break down then planing the legs.
 |
| not perfect |
All the legs when checked against each other were close. On a couple there was less than frog hair and I have no intentions of chasing my tail on them making them perfect.
 |
| calling this done |
Still have to hinge it and get shellac on the lid but no one will see that in a pic. I like these chests better painted than left natural. I wouldn't paint a nice hardwood one, but pine is a good choice for milk paint.
 |
| back/side view |
There is a difference in the two paint jobs. The blue is a ton more streaky while the red is uniform with almost zero streaks. The red also covered imperfections/glue blobs much better then the blue did.
 |
| sigh |
The area I sanded due to lifting grain. It lifted again but no as bad. Thought briefly about making another batch of blue but nixed it. Wish this wasn't on the front but I can live with it.
 |
| legs |
I had to redo my layout. On the first one I saw that I had put planer snipe facing the where the mortises were. There were only two of them, one I was able to place at the bottom and the 2nd one facing out toward the front. I'll plane the snipe off after the base is done.
 |
| wow |
I love this bottom piece of cherry. I wanted to use it for the front but all the lovely grain was on the right side. The left side was flat sawn and bland. If the right grain was more centered I would have used it.
 |
| big empty hole |
I need seven rails for the desk. The one with the knot hole will be used for the top back - the knot won't be seen in the finished desk. It doesn't extend all the way to the opposite face.
accidental woodworker
Center Punching

I got the idea for this blog entry because Im learning to turn and I've been watching a lot of lathe videos. What has struck me about the very simple operation of mounting a piece of wood between two centers is how complicated people can make it. When I first started turning, I would follow some of these more complicated instructions to the letter and I didn't get great results. Mostly my own fault, but now that I know more I can say these protocols were also unnecessarily hard and complicated ways of getting stuff done.
I'm not exactly sure where I first saw the method I will describe in this post. I instantly concluded, Oh, this is much easier. It might have been from the videos of Richard Raffan, who has put out some excellent turning videos which I highly recommend. And he's eminently practical.
The Gramercy tools treadle lathe comes with a 1" crown center to drive the work and a live cup center to support the spindle work at the other end. There are a lot of excellent reasons for using a crown and a cup center to support the work, including safety, but one real advantage is that it makes mounting the work in the lathe really, really simple.
All you need to do is find the center of each end of the stock and put a punch there. Other types of centers require an actual drilled hole, but when you use a crown center and cup center, you don't need more than a punch mark.
The question is, Where does the punch mark go? And the answer is, In the center of the stock. There's a whole host of gadgets for figuring this out. They sort of work, but if the stock isn't actually square, they don't really work. Moreover, they are not necessary anyway.
Here's what you do:
Take a pencil hold it at approximately halfway over the stock and mark the stock all around (above). You can't see it too well in the picture but I am using knuckle on my middle finger as a fence against the wood so that the pencil square is centered all around on the stock.

You will end up with a little square in the middle. Put a punch mark in the center of that square. Eyeballing that center is perfectly fine (but don't punch yourself in your eyeball).

I use an automatic punch, but you can use a nail and a hammer. I always punch twice cuz I just do.
Then we do the other side.

That done, it's time to mount it in the lathe. The crown center is a spring-loaded pin. All you do is put the punch mark up against the pin on one side, with a little pressure so it doesn't slip out. Then you advance tailstock so that the pin in the cup center presses into the punch mark on other side. They you tighten the tailstock until the cup digs into the stock.
That's it! You are done. As you turn, the crown center especially has a tendency to loosen up a little bit. And the cup center may work itself a little deeper, so you might want to tighten the tail stock periodically. It's pretty easy.
Incidentally, as I mentioned in the beginning of this blog post, I've been watching Richard Raffan videos. He has a method of putting stuff between centers without any layout at all, just eyeballing it as he's putting it on the centers. I tried this method and it works fine. The reason I don't just eyeball it is that I think the method I've described here is even easier and requires even less thinking. Although you do need a pencil and punch handy.
Straightening a Kinked E. C. Atkins Handsaw
A few months ago, I responded to an ad for an old handsaw. When I looked at the saw, I noted a fairly bad kink in the plate, so I told the seller I'd pass on it. Realizing it was not worth much, he said "OK, just take it for free". Not only that, but he also gave me an old Craftsman saw and an old Dunlap smoothing plane. Those I'll address separately.
 |
| 26" crosscut saw from E. C. Atkins |
 |
| The beech handle close-up. The type of wood, the screw locations and the lambs tongue were the details that helped me try to identify the model. |
 |
| And the medallion |
Turns out the saw is a 26", 8 ppi (7 tpi) Atkins crosscut handsaw. I don't know the model number for certain, but the handle and description mostly match a #54 in the 1906 catalog (and 1919 and 1923 catalogs) I found at a blog on Atkins saws by Mark Stansbury. That doesn't mean this saw is from 1906 - that's just one of the catalogs I saw a similar saw in. But there is one big difference: the saw I've got has a breasted tooth line, and I didn't see any breasted saws in the catalogs I looked at.
After looking further at the catalogs, it could also be a #58 or #63 or #71. No etch was seen on the plate before, during or after cleaning up, so that's no help in identifying it.
I've read articles and seen video of getting a kink out of a saw plate, but had never tried it and this saw was a perfect candidate. The following picture attempts to show the kink in the plate. The kink is on a diagonal starting about 8" back from the toe at the tooth line and about 5-6" back from the toe at the top of the plate. The picture does not show how pronounced the kink really was.
 |
| Looking up the tooth line from the heel. The kink was much more pronounced than it looks here. |
 |
| A straightedge was used to help locate the center of the kink |
Then the pounding began. I used the end grain of a chunk of maple butcher block countertop as my anvil. My hammers include a 3 lb. small sledge, a 1 lb. carpenter's hammer and a small ball peen hammer.
 |
| The "anvil" setup |
 |
| Hammering out the kink |
The hammering took a long time. It's possible that my small sledge didn't have enough curvature on its head because I noticed much quicker results about an hour later when I used the small ball peen hammer. But with the kink's convex side up, I hammered and hammered and gradually the kink started straightening out. I did this in sort of a grid around the main kink area, an inch or two either side of the main kink line, but focusing more blows along the kink line.
 |
| Using the small ball peen hammer might have been a better choice |
Last year I picked up Matt Cianci's book "Set & File", in which he covers fixing kinked saw plates. I recommend the book to anyone who wants not only to fix kinked saws, but also who wants to know how to sharpen saws.
I also give credit to Bob Rozaieski, who has a nice video on YT about hammering out a kinked plate. I'll get into the rest of the rehab of this saw in another post.
Red Milk Paint.......
Got a late start in the shop today. I had to go AAA to renew my truck registration. I maintain my AAA membership just to be able to do DMV (Dept of Motor Vehicles) business. It took less than 15 minutes to renew. At the DMV it probably would have been more than an hour.
After this I was going to go to the local recycling drop off but it didn't happen boys and girls. Luckily for me I had checked the site on line before leaving. The only thing in the truck that the drop off would have taken were the 2x4s. They don't accept plywood (had tons of it), stained or finished wood, sheet rock, and pressure treated wood. The 2x4s were at the bottom in my truck so I'll be moving on to plan 2.
All I have on plan 2 is naming it plan 2. The Johnston landfill won't take construction debris which is what in my truck. At this point in time I don't have a clue as to where I can depose what is in my truck bed.
 |
| lime and pigment |
Had to make a quick run to buy vinegar to make the quark. I got the pigment dye mixed and the lime was the next batter.
 |
| 9 1/4 oz of quark |
The author says the minimum is 8 oz/250 grams with any extra not sinking the ship. I brought a cup of water for mixing/whizzing everything up. Spoiler alert - I didn't use any of the water.
 |
| red milk paint |
Kind of looks like tomato soup with some cream it it. The consistency is a little looser than the blue milk paint but not the same consistency as latex paint. Felt better with how this paint came out. I covered it to let it set up while I was topside cleaning up the containers.
I am not thrilled with the whizzing machine. It sounds labored and initially it didn't whiz up the quark at all. It all got whizzed once I added the lime. I will look and see what is available in small blenders. They should have stronger motors than the I whizzer I have now.
 |
| wow |
I was surprised with how this batch laid down. No streaks and no bald spots. It laid down like a latex paint and covered. I wasn't expecting this and it is what I hoped for with making my own milk paint would be like.
 |
| hmm....... |
I am not thrilled with the color of the red. I was expecting it be fire engine red whereas this is more of a salmon color(too much orange IMO). It doesn't look too much out of place against the blue of the chest. This will have to do.
 |
| this was surprise |
This is one coat on the end grain. Usually paint on end grain soaks in and looks bare. I thought this milk paint would do the same. The milk paint went on and lay on the end grain like it was sealed. The only prep I had done on the end grain was to sand it with 120.
 |
| wow again |
The second coat coverage is outstanding. I can't see the wood grain clearly underneath the paint anywhere. This is what I wanted from this milk paint. The 2nd coat went on two hours after the first one. The paint still had the same consistency as it was for the first coat. I plan on putting a 3rd and final coat on after dinner. In the AM I'll start on shellac.
The only change I made with the red is using the quark right away. I didn't drain or stick it in the refrigerator (I did refrigerate two leftover ounces). I also didn't go nutso on my water management. I used 5 TBSP of water with the lime because it appeared to be a wee bit on the dry side. I used a lot of water mixing the red pigment. Not sure exactly how much but I'm guessing 6-8 TBSP? I hope that I can repeat my success with this on the next batch.
I will keep the leftover red milk paint and track to see how long it will last before heading south. Very happy that the paint didn't turn to jello between the 1st and 2nd coats. (PS - didn't turn to jello between 2 and 3 neither)
accidental woodworker
Leave a comment Cancel reply