Hand Tool Headlines
The Woodworking Blogs Aggregator
“Glory to God in the highest heaven, and on earth peace to those on whom his favor rests.” - Luke 2:14
Be sure to visit the Hand Tool Headlines section - scores of my favorite woodworking blogs in one place.
General Woodworking
Leo's desk pt XII.......
Yesterday when I quit the shop my lower back hurt and my joints were achy. I thought after a good nights sleep that all would be well in Disneyland. Well boys and girls that didn't happen. I woke up stiff, still achy, and my right foot hurt like hell. I think my days of going balls to the wall are over. Or maybe if I do more of them I'll get used to it again.
It took a while before the back and joints stopped aching. The foot took a while longer. I went slow and easy for most of the AM/PM sessions. I killed the lights early and I'll probably repeat today's routine tomorrow.
 |
| didn't fit |
I had to drill the dowel holes a bit deeper. I only did it in the legs. After that the drawer rail fit tight to the leg.
 |
| back rails dry fitted |
It took a couple of taps before the rail aligned top and bottom. I moved the top rail only to make sure the bottom of the slats were fully seated in the bottom rail mortises. There is about 3/16" of dead space in the top rail mortises.
 |
| flushing the epoxy |
The mound of epoxy was still proud of the top. Removed the bulk with the blockplane and cleaned/smoothed it with a card scraper.
 |
| underside |
I am not going nutso on the underside at all. I flushed the glue joints with the #4 first and sanded it with 100 grit.
 |
| done |
Smooth and clean. I kind of like this side of the top - there is a shimmering quality to all 3 boards in the glue up. But I'm leaving it as the underside.
 |
| sigh |
Made a boo boo doing the slots for the table top clips. I routed on the wrong side of the layout line. The table top clip wasn't bearing down on the bottom of slot - it wouldn't work for holding the top down tight to the rails.
 |
| a ways off |
The bottom line was the first slot position. The top one is where it should be.
 |
| before I committed again |
Used a couple of scraps to test the slot position. This one was iffy. The clip wasn't bearing down on the slot sufficiently. Micro adjusted the slot upwards a few frog hairs.
 |
| made a test slot |
This one was too high and there was a gap under the clip where it screwed to the board.
 |
| 3 times was the charm |
The 2nd one was still too high. It was like the 3 bears fairy tale.
I had to glue in fillers in the slots I did earlier. I will let them cook until the AM and redo all the slots.
The plan for today, sans the aches and pains, was to bring the side and back slat assemblies topside to the driveway and spray shellac on the slats. The over spray goes everywhere in the shop and it leaves fog. Yesterday was sunny and I don't know what tomorrow will be like. I want to spray the slats before I glue the back and drawer rail to the sides. Fingers crossed tomorrow will cooperate.
accidental woodworker
Driving the Work - Lathe Headstock Centers
 5 Ways of driving things in the lathe
We've talked a lot about our folding treadle lathe. But let's not lose sight of the attachments, which also deserve our focus.
When using a lathe, the work is driven by the headstock and supported, if necessary, by the tailstock. Bowls and similar pieces can be gripped or screwed on to the headstock and wouldn't need tailstock support. A long spindle can be held multiple of ways, but it is driven by the headstock, and the tailstock simply functions to support it.
Old turning manuals show a million ways of holding the work. If you look at 19th century and pre-19th century depictions of lathe tools and attachments, you'll see a lot of effort devoted to driving the work. The reason is very simple: Turners of that era did not have our wonderfully made three- and four-jaw universal chucks. They also didn't have standard interchangeable tapers and threads.
Modern wood lathes all have hollow spindles, so some-sort-of center tasked with holding the work will be able to be popped into the spindle. Some very inexpensive lathes use a set screw and a collar to hold the center, but better (but still inexpensive) lathes have a tapered hole in the spindle, which can hold a center by friction. The standard American woodturning lathe will have an MT2 (Morse Taper 2) hole in the spindle for a center driver, and a threaded outside, 1"- 8 TPI, for screwing on larger chucks and face plates. Larger lathes will have all larger tapers and threads. All standard accessories with MT2 shafts and 1"-8 threads are interchangeable. This includes the lathe accessories we sell. All similarly tapered and threaded accessories from other vendors will fit our Gramercy Tools treadle lathe as well.
Long, thin work is typically held between headstock and tailstock centers. Bowls and other short workpieces are typically held in a chuck in the tailstock. But all sorts of work-holding arrangements arise depending on the situation.
The tailstock is simply there to support the work and keep a long piece steady while you turn. The headstock center is what actually drives the work. Whatever way you are holding the work, the headstock center has to force the work to turn and not slip when cutting force is applied.
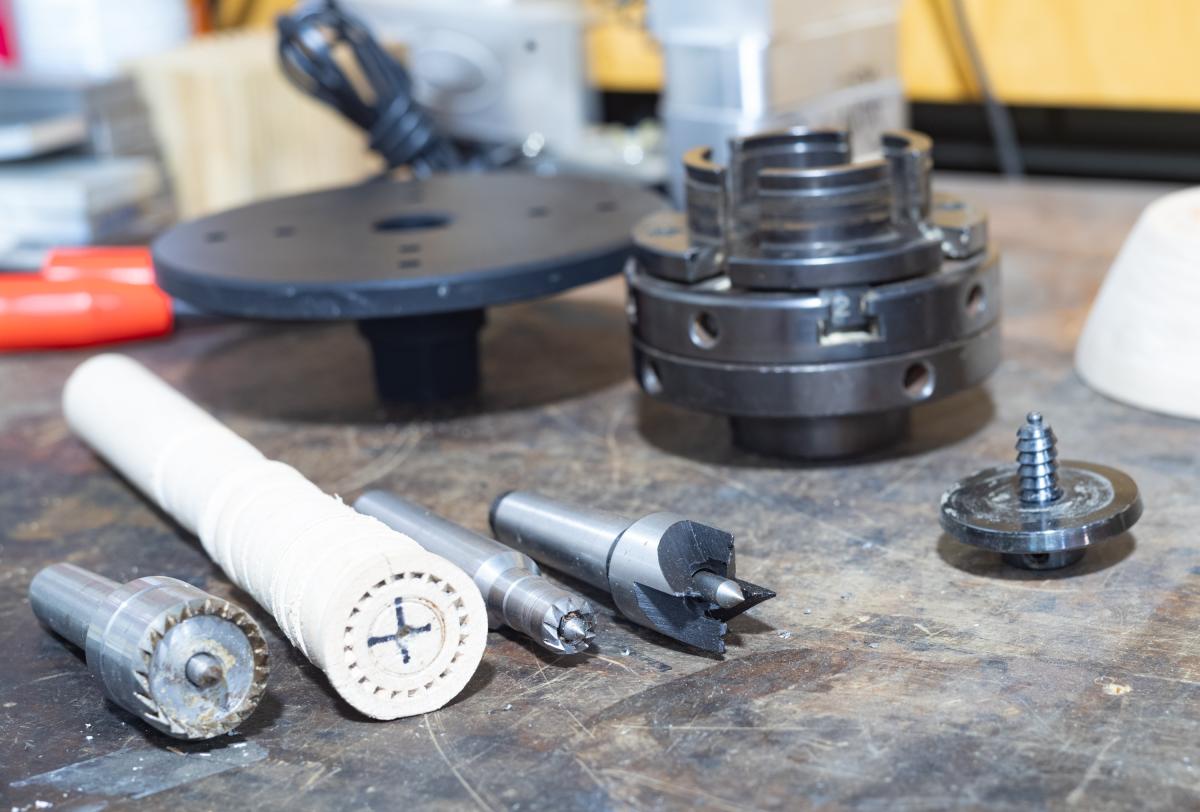
 Four Prong Drive Chuck
Historically, the most popular way of driving spindle work is by using what's known as a "four prong center" or a "four prong chuck." (see photo above). You'll see these centers in old turning literature, but other options are eclipsing them. The four prong center is very simple to use. You drill a small hole in the center of the the piece and then put two saw cuts at 90 around that. Some people will just put in the center hole and then use a hammer to bang in the prongs. Then it goes in the headstock. The prongs in the slots drive the work. To make it work, you'll need to make saw slots or bang in the prongs, and I don't like either method. So we supply a crown center with our lathes, which we think is a lot easier to use.
 Crown chucks
A crown center (above) looks like a crown, hence the name. The center pin of a crown center is spring-loaded. To mount your work, just put a center mark on the work at the center; put the loaded pin on the mark; and then tighten up the tailstock. With the tailstock tightened, the crown edge digs in. Thats it - youre done. If you manage to do something silly and accidentally jam a tool, such that you would stop the work from spinning - and this is especially true on an electric lathe, as treadle lathes really dont have the power - a traditional four prong center will just keep on moving. This can cause real damage to the work, split the wood, break a tool, etc. With a crown center, on the other hand, the work is held more gently by crown points that do not penetrate the the workpiece that deeply. Because the individual crown points are not stuck that deeply, a jammed tool causes less havoc. The crown points just slip and work a groove in the work. Not ideal, but not a big deal. The turner just notes the problem, tightens up the tailstock again to engage the crown points again, and then resumes working.
We stock two sizes of crown driver; a 1 inch crown, which comes with a lathe, and a smaller half inch crown. I like them both. The only real downside that I can see for a crown drive is when your workpiece's diameter is very, very small diameter work and even a 1/2" crown driver will be too big.
 Faceplate
 While it is rarely used today, a traditional way of holding the work is using a faceplate. The work is attached to the faceplate - typically with screws, but also sometimes with little clamps - and away you go. There is no built-in centering mechanism, so it's not surprising that nowadays the faceplate is the workholder of last resort. Ive personally never used one, but it was a very common traditional way of mounting.
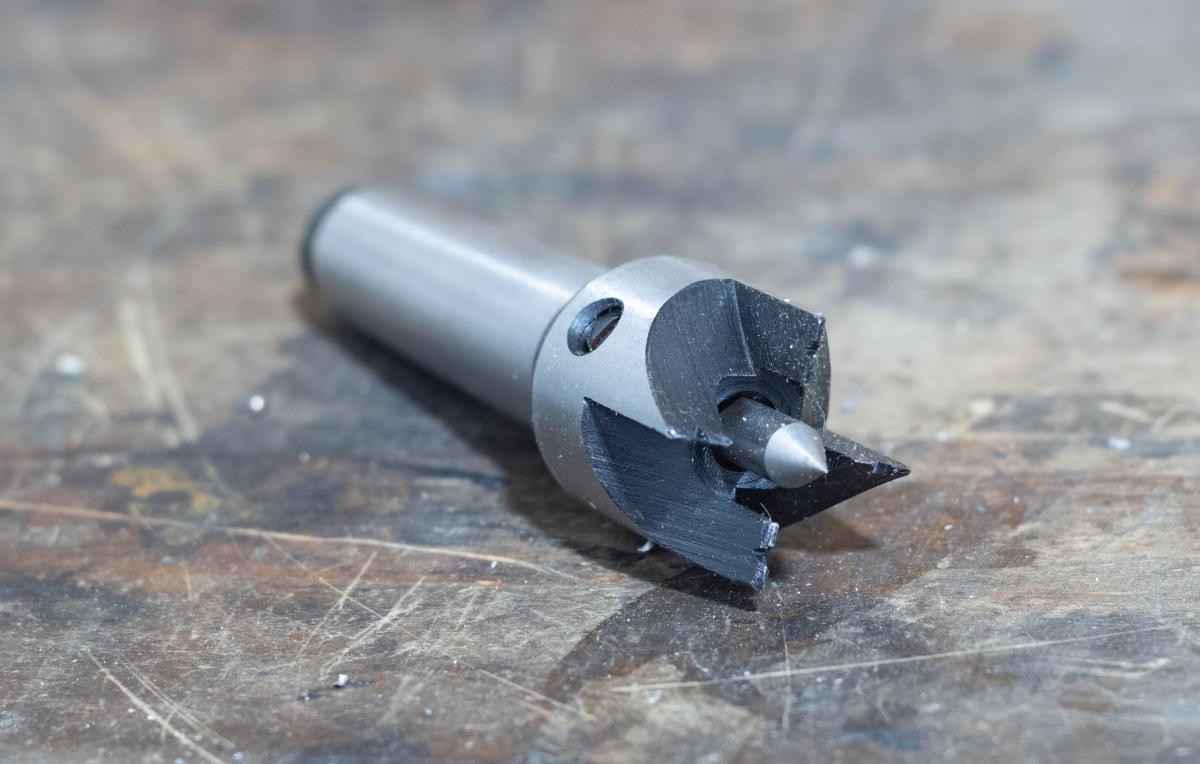
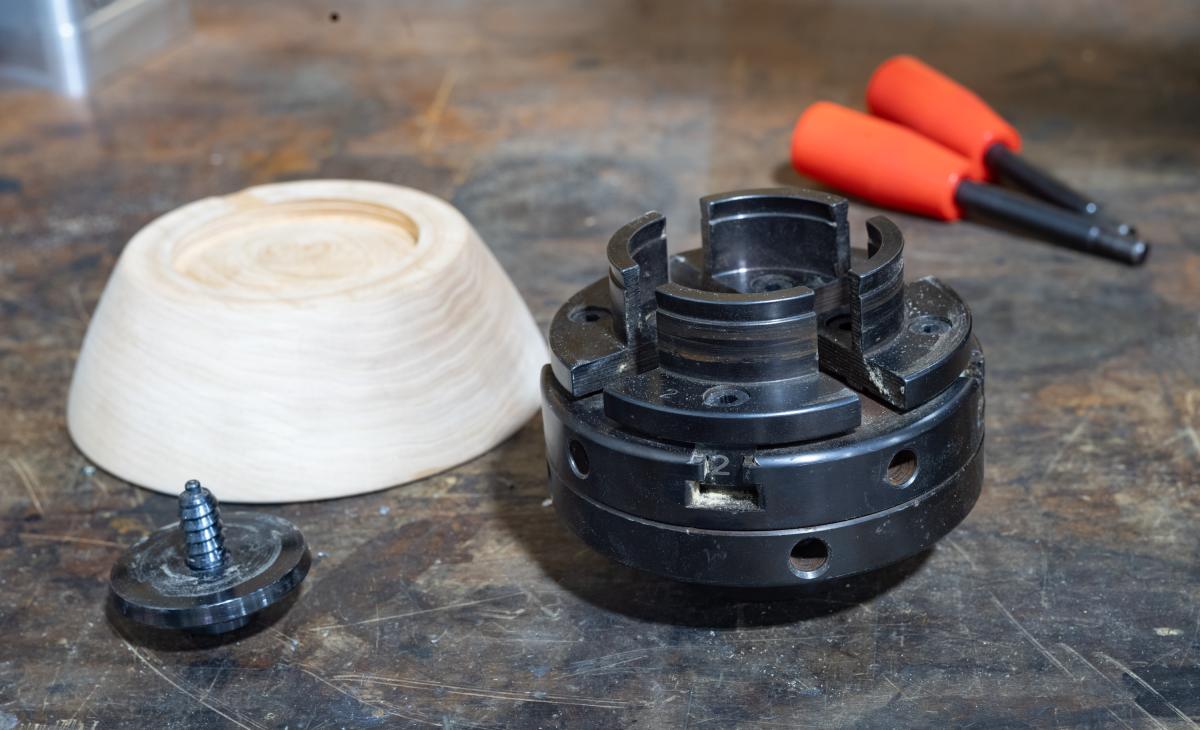 A screw chuck (left) and a Four Jaw Universal Chuck
 Here we have the most common way of holding a bowl for turning. You start by drilling a hole in the center of what will become the hollow side of the bowl blank and screw the stock onto a screw chuck (above left). The screw chuck can be driven a bunch of ways. In this version, the disk at the bottom of the chuck is clamped in a four jaw universal chuck. With the work in the lathe the outside of the bowl is turned, and in this particular case I also turned a recess in the base. With the outside done, I then flipped the blank around and clamped the work by expanding the four jaw universal chuck (above, right) into the recess I cut in the base. This method works solidly and reliably and is probable the most common way of clamping a bowl.
On wood lathes, four jaw chucks like the one above are standard. The jaws move as a group so the work is centered. Independent four jaw chucks are used mostly on metal lathes when the work is not round, or needs very careful manual centering, more accurately than a universal lathe can provide.
The four jaw chuck for a wood lathe comes in all sorts of permutations. We stock a nice but fairly primitive one without the attachments. The price ranges from "not a lot" to several hundred dollars, depending on features, precision and capacity. The jaws come in various sizes and are usually interchangeable on a particular chuck. Depending on which jaws are used, you can clamp on the inside of a recess by expanding outward, or on a lip clamping inward. The lips of the chuck jaws are tapered so grab the work solidly even if the recess or ledge on the work is pretty small.
On a final note, here are some pictures of some of a couple of chucks from Bergeron's 1742 "Manuel Du Tourneur." We see the elements of a faceplate and screw chuck - and even a very early independent four jaw chuck from a time when cutting screw threads was a big deal. But figure 8 is both interesting and practical. Particularly for production work, the turner would make a collet by drilling a piece of wood the same size as the stock; then cut slots in it thereby creating fingers; and then use a ring to force the fingers tightly closed. Or course this would only work for one size of stock, but for that size it works fast and tight. These types of collet chucks were very popular especially in production work.
I am barely scratching the surface of the different type of chucks that were used, but for most of us, a crown center coupled with some sort of four jaw chuck will cover 95% of the work were going to do. If you find yourself do oddball stuff, thats when you start doing some research especially in old books.
I'll talk about the tailstock when I next write about centers.
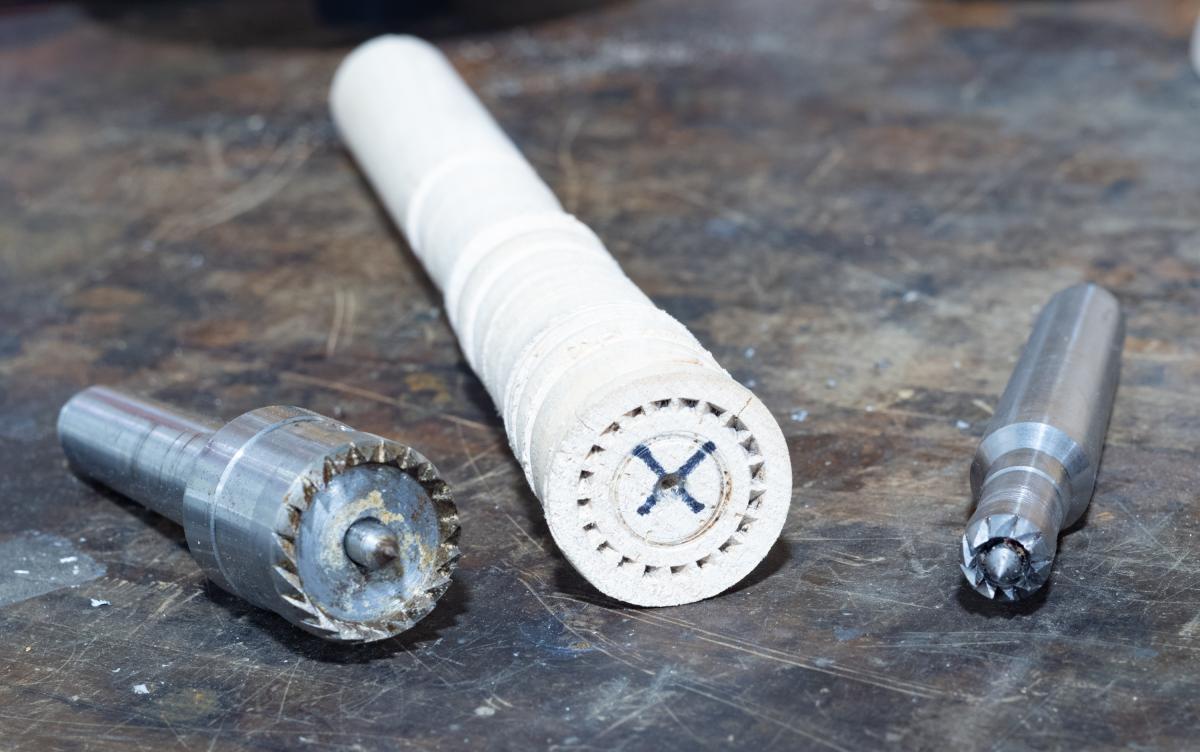
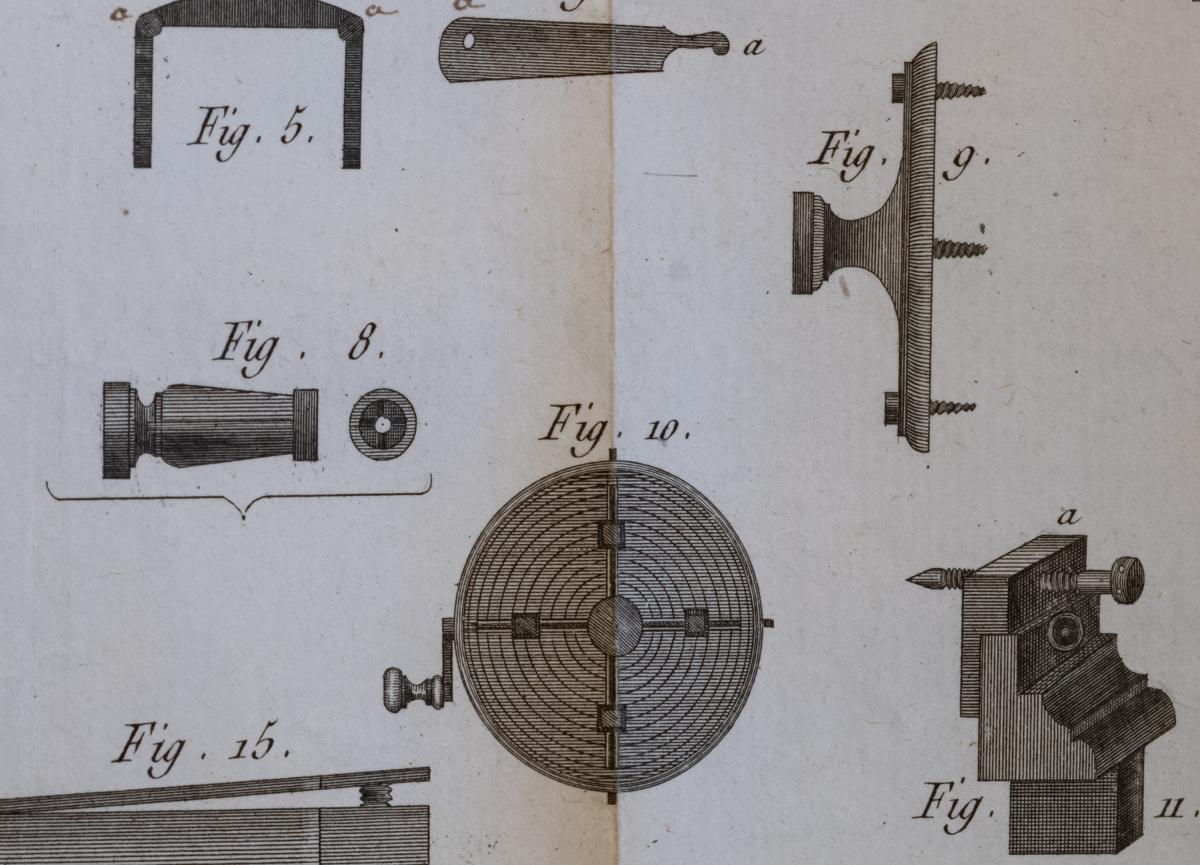 Various chucks from Bergeron's Manuel Du Tourneur Paris 1742 - #8 - collet chuck. #9 - Faceplate chuck with screws. #10 what looks like a very early four jaw independent chuck
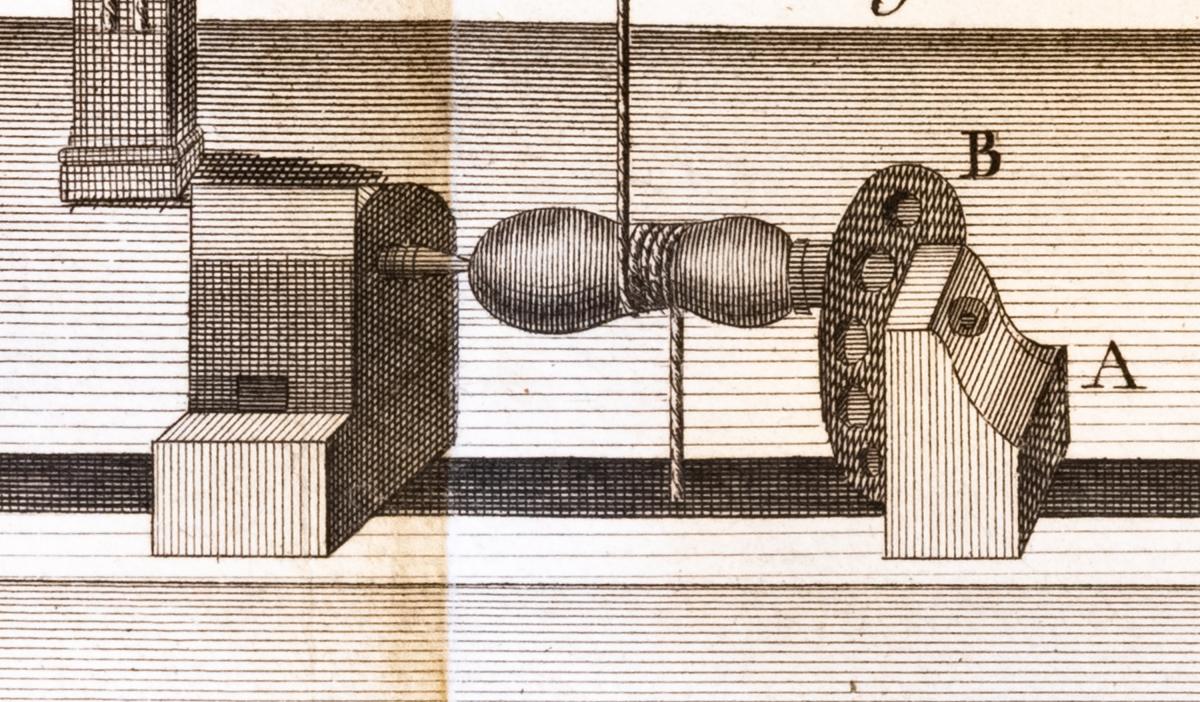 Disc support for holding handles for drilling - Bergeron's Manuel Du Tourneur Paris 1742
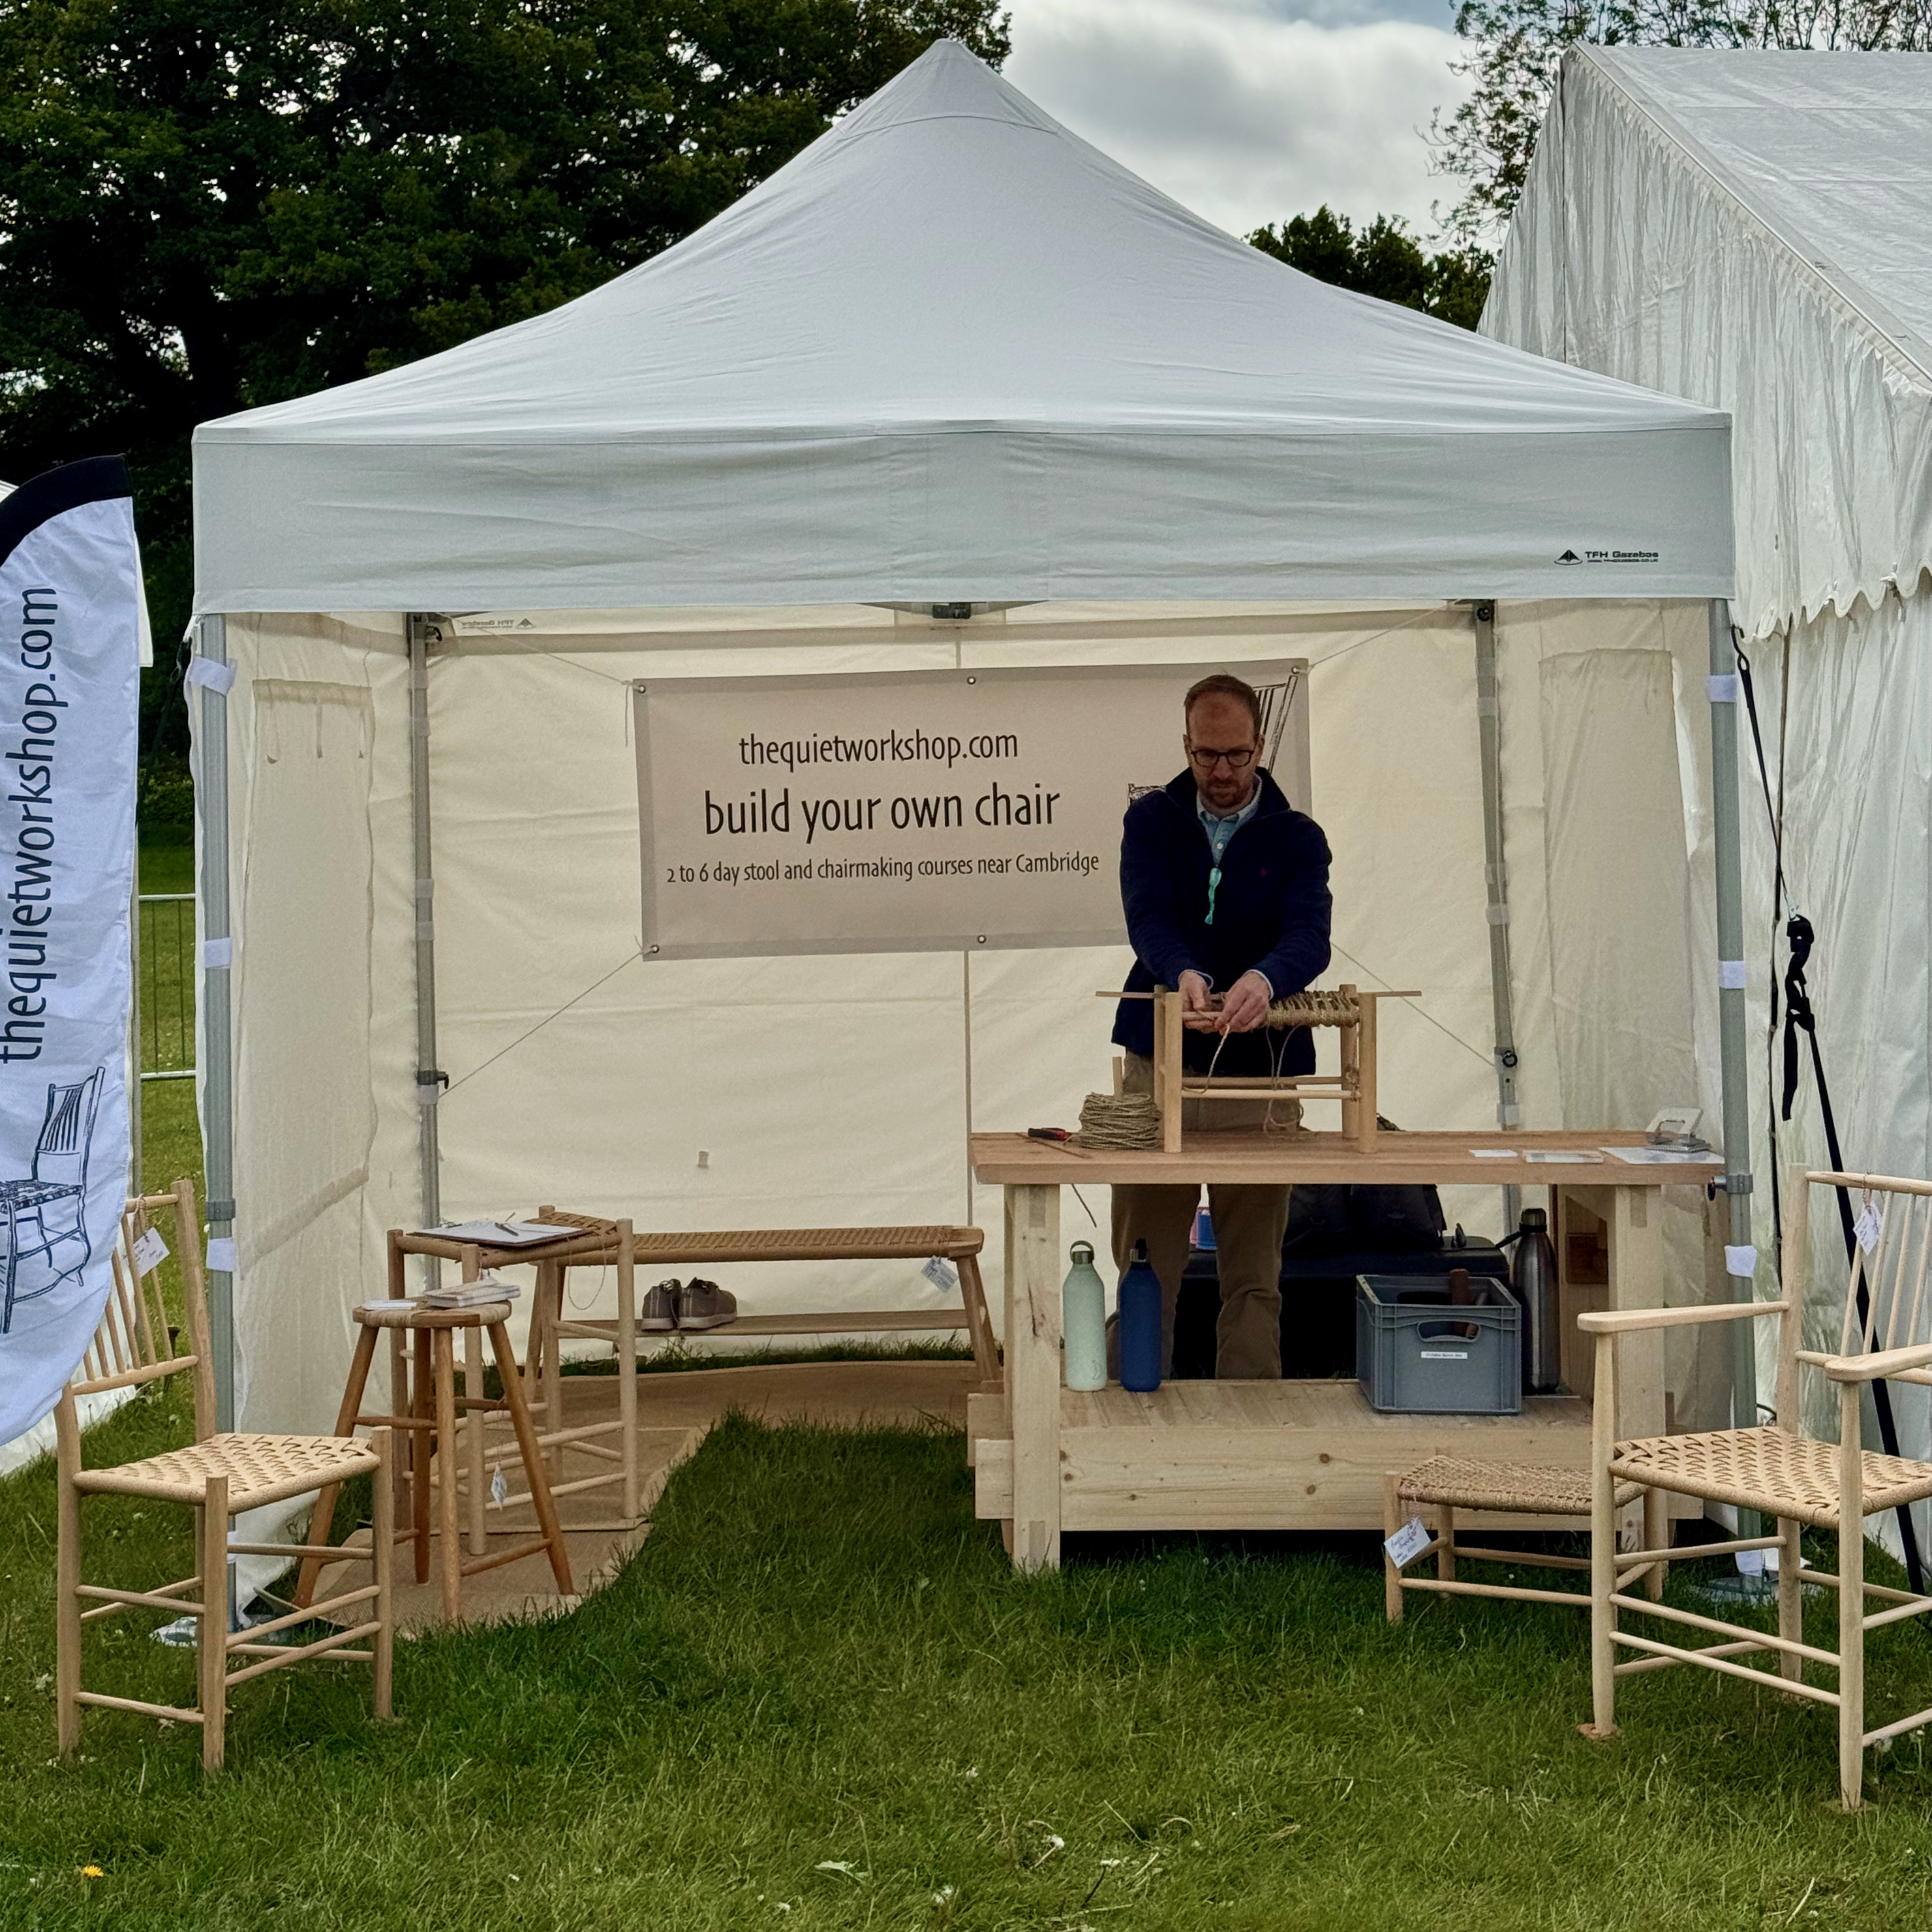
The Quiet Workshop Spring Newsletter
Is it still spring? It’s been such a busy start to the season that we suddenly seem to be in summer already. Thank you to everyone who has come on courses already; just as it starts to calm down we move into show season.
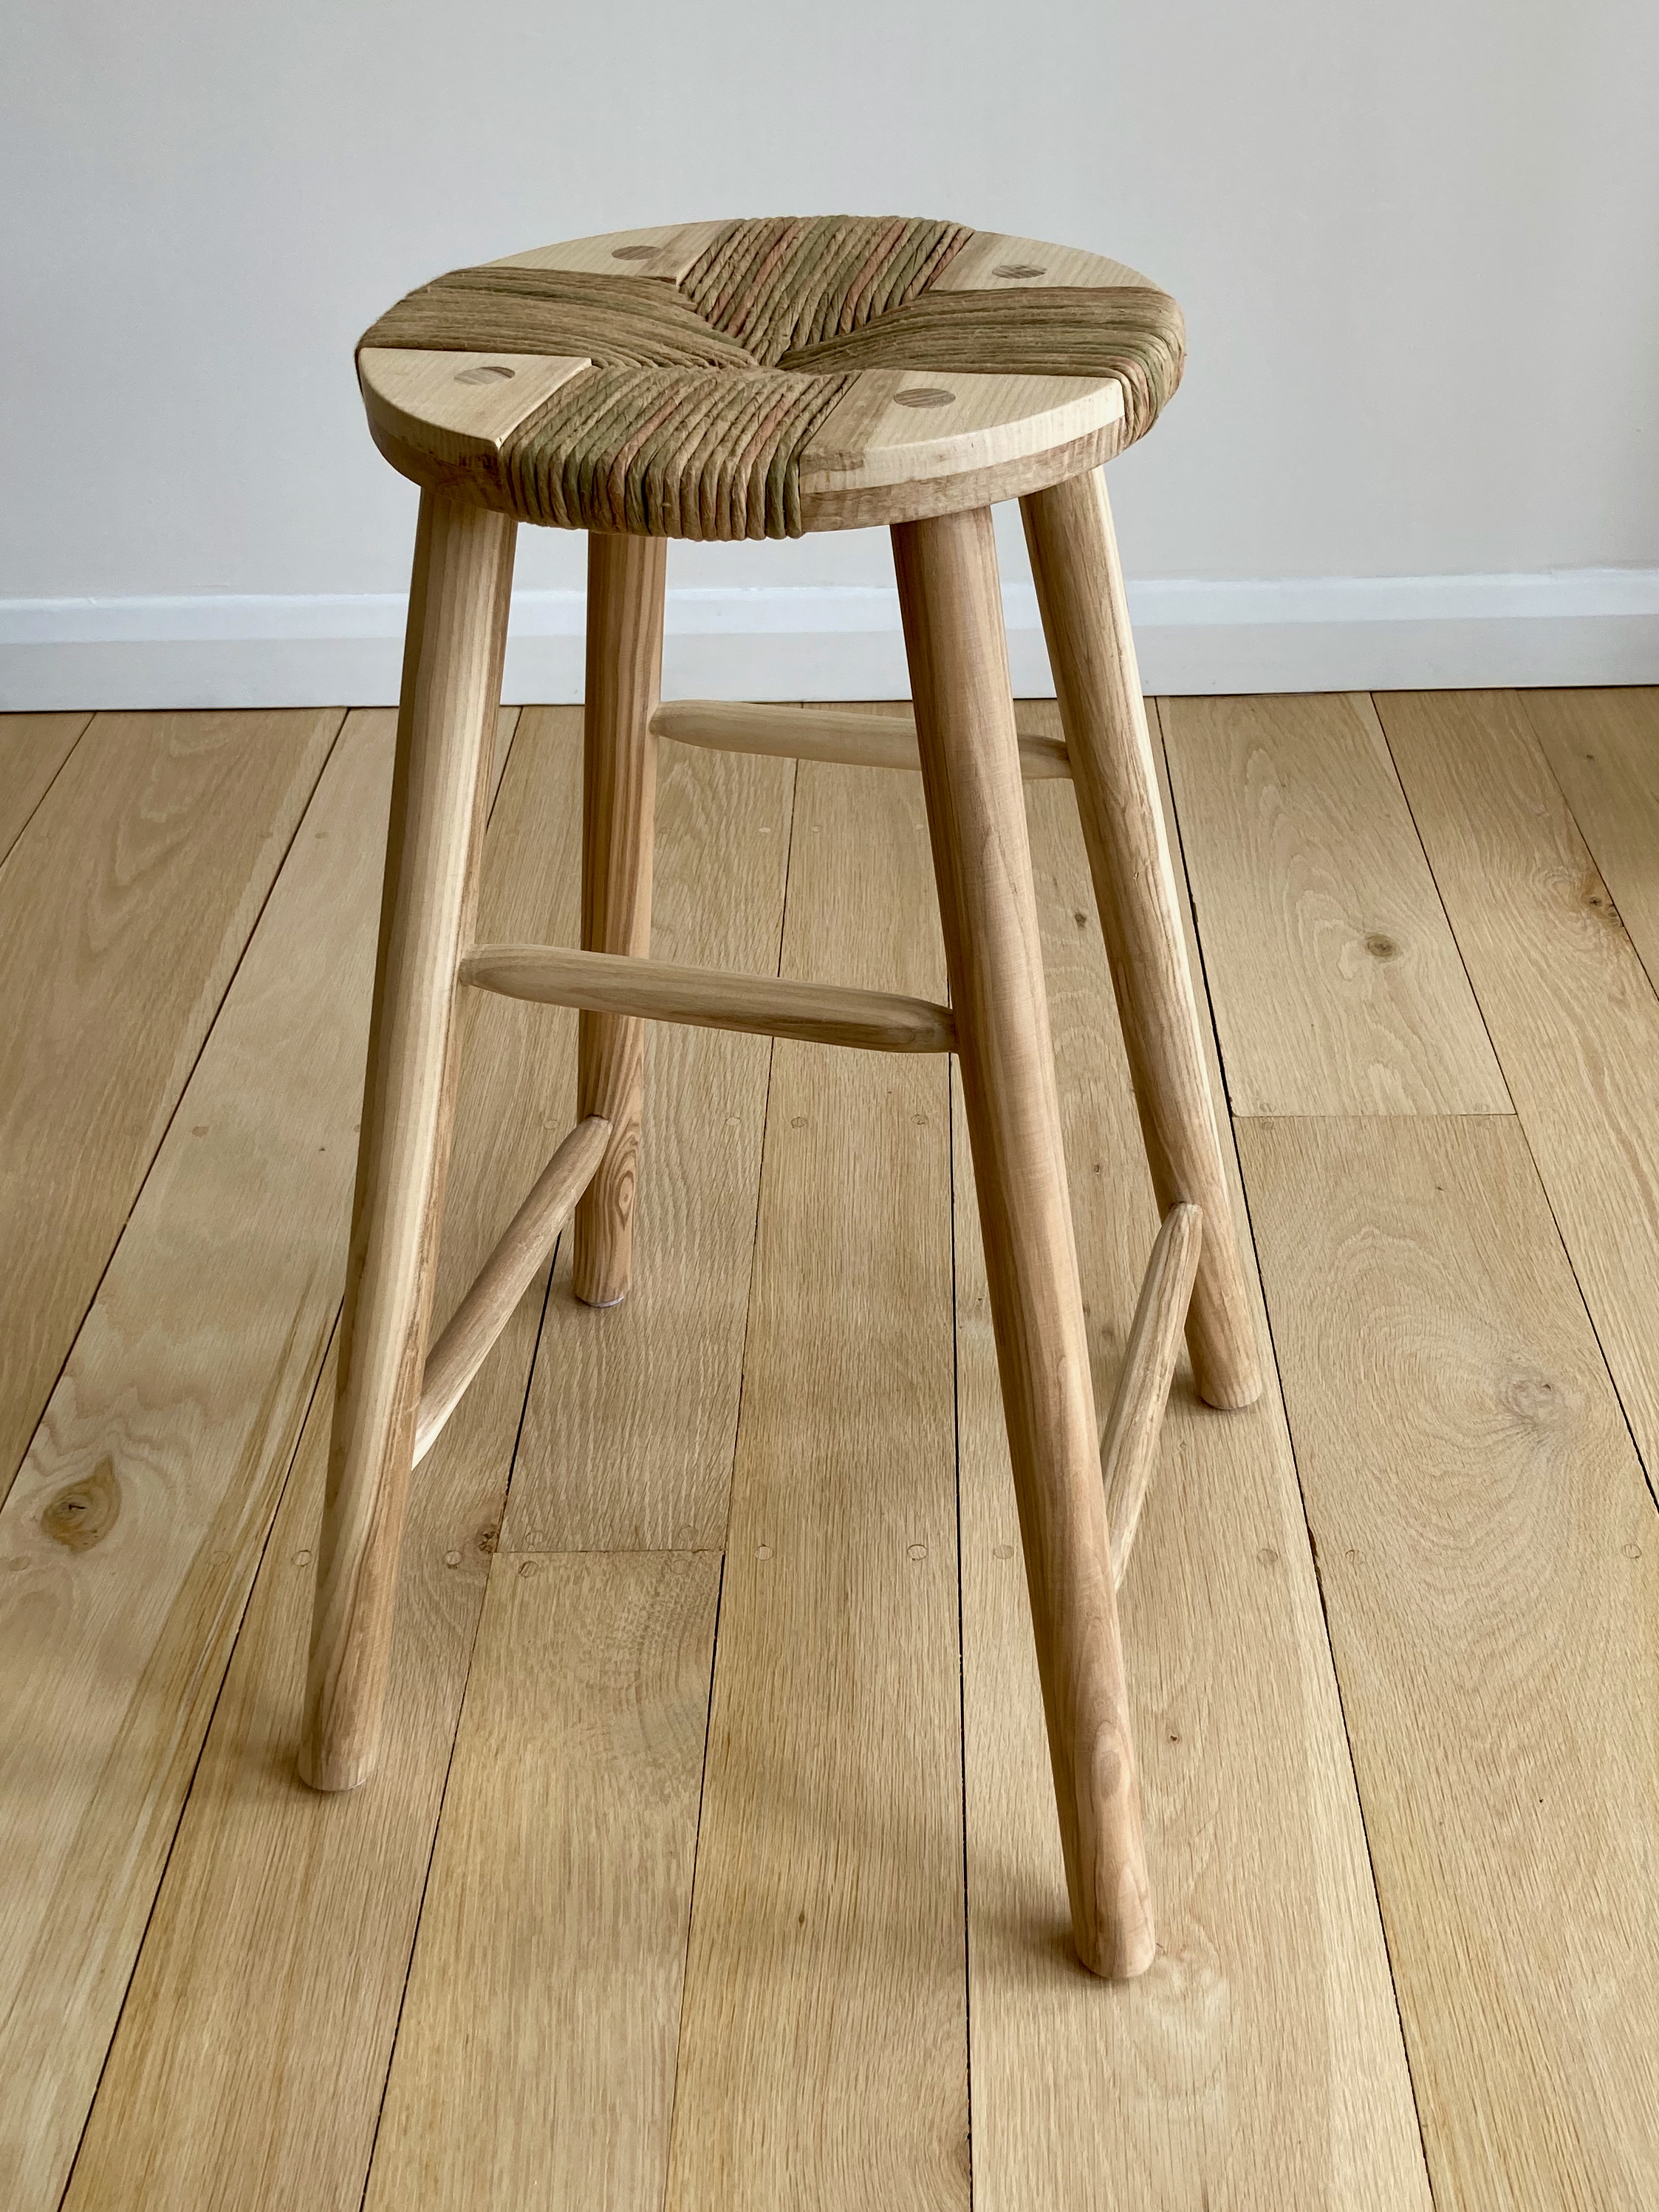
We’ve been invited back to the Festival of Upholstery and St.Alban’s Upholstery School to teach expanded workshops at both: at the festival we’ll be teaching a three day weaving course which will cover our standard square weave, L nail weaving and the envelope weave. Participants will be putting together a stool from a kit and will take home their final project. We’re really looking forward to it; we had a great time there last year.
We’ll be teaching another Danish cord workshop at St.Albans in September and then a dedicated envelope weave course in January. At these workshops you bring your own chair to weave so start looking out for one now!
Our vice screw kits have had a good reception and we’re almost out but we’ll be restocking over the summer.
Course Dates 2026
The dates for all of our courses for the rest of 2026 are available on our website. They link through to Craft Courses for booking.
So that we don’t disappoint anyone we always run courses that have bookings; on the rare occasions that just one person books on a particular date then that course will run. Whilst this makes no financial sense whatsoever we feel that if people make plans in advance they should be confident that they’re not going to be disappointed.
If you’d like a course for a small group and our dates don’t suit you please get in touch. If we haven’t had a booking at a time that does suit you we’re always happy to move things around.
Shows – 2026
Our show season started with a lovely four day exhibition at Hatfield House for Living Crafts. It was great to meet so many people who are interested in traditional crafts.
- 13-14th June Cambridge Town and Country Fair, Parker’s Piece, Cambridge
- 4-5th, 11-12th, 18-19th & 25-26th July Cambridge Open Studios – right here in Great Wilbraham
- 8-9th August Cambridge Country Show, Stow Cum Quy
- 12-13th September The Wonder of Wood Fair, Burwash Manor, Cambridge
- 30th-31st October London International Woodworking Festival, LDE UTC, Royal Docks, London
If you think there’s a craft show within an hour’s drive of Cambridge that we should attend please drop us a line. We’re always grateful for new opportunities.
Danish Modern kit
If you want to learn L nail weaving or just want to build an elegant and comfortable stool at home we’re launching a new kit.
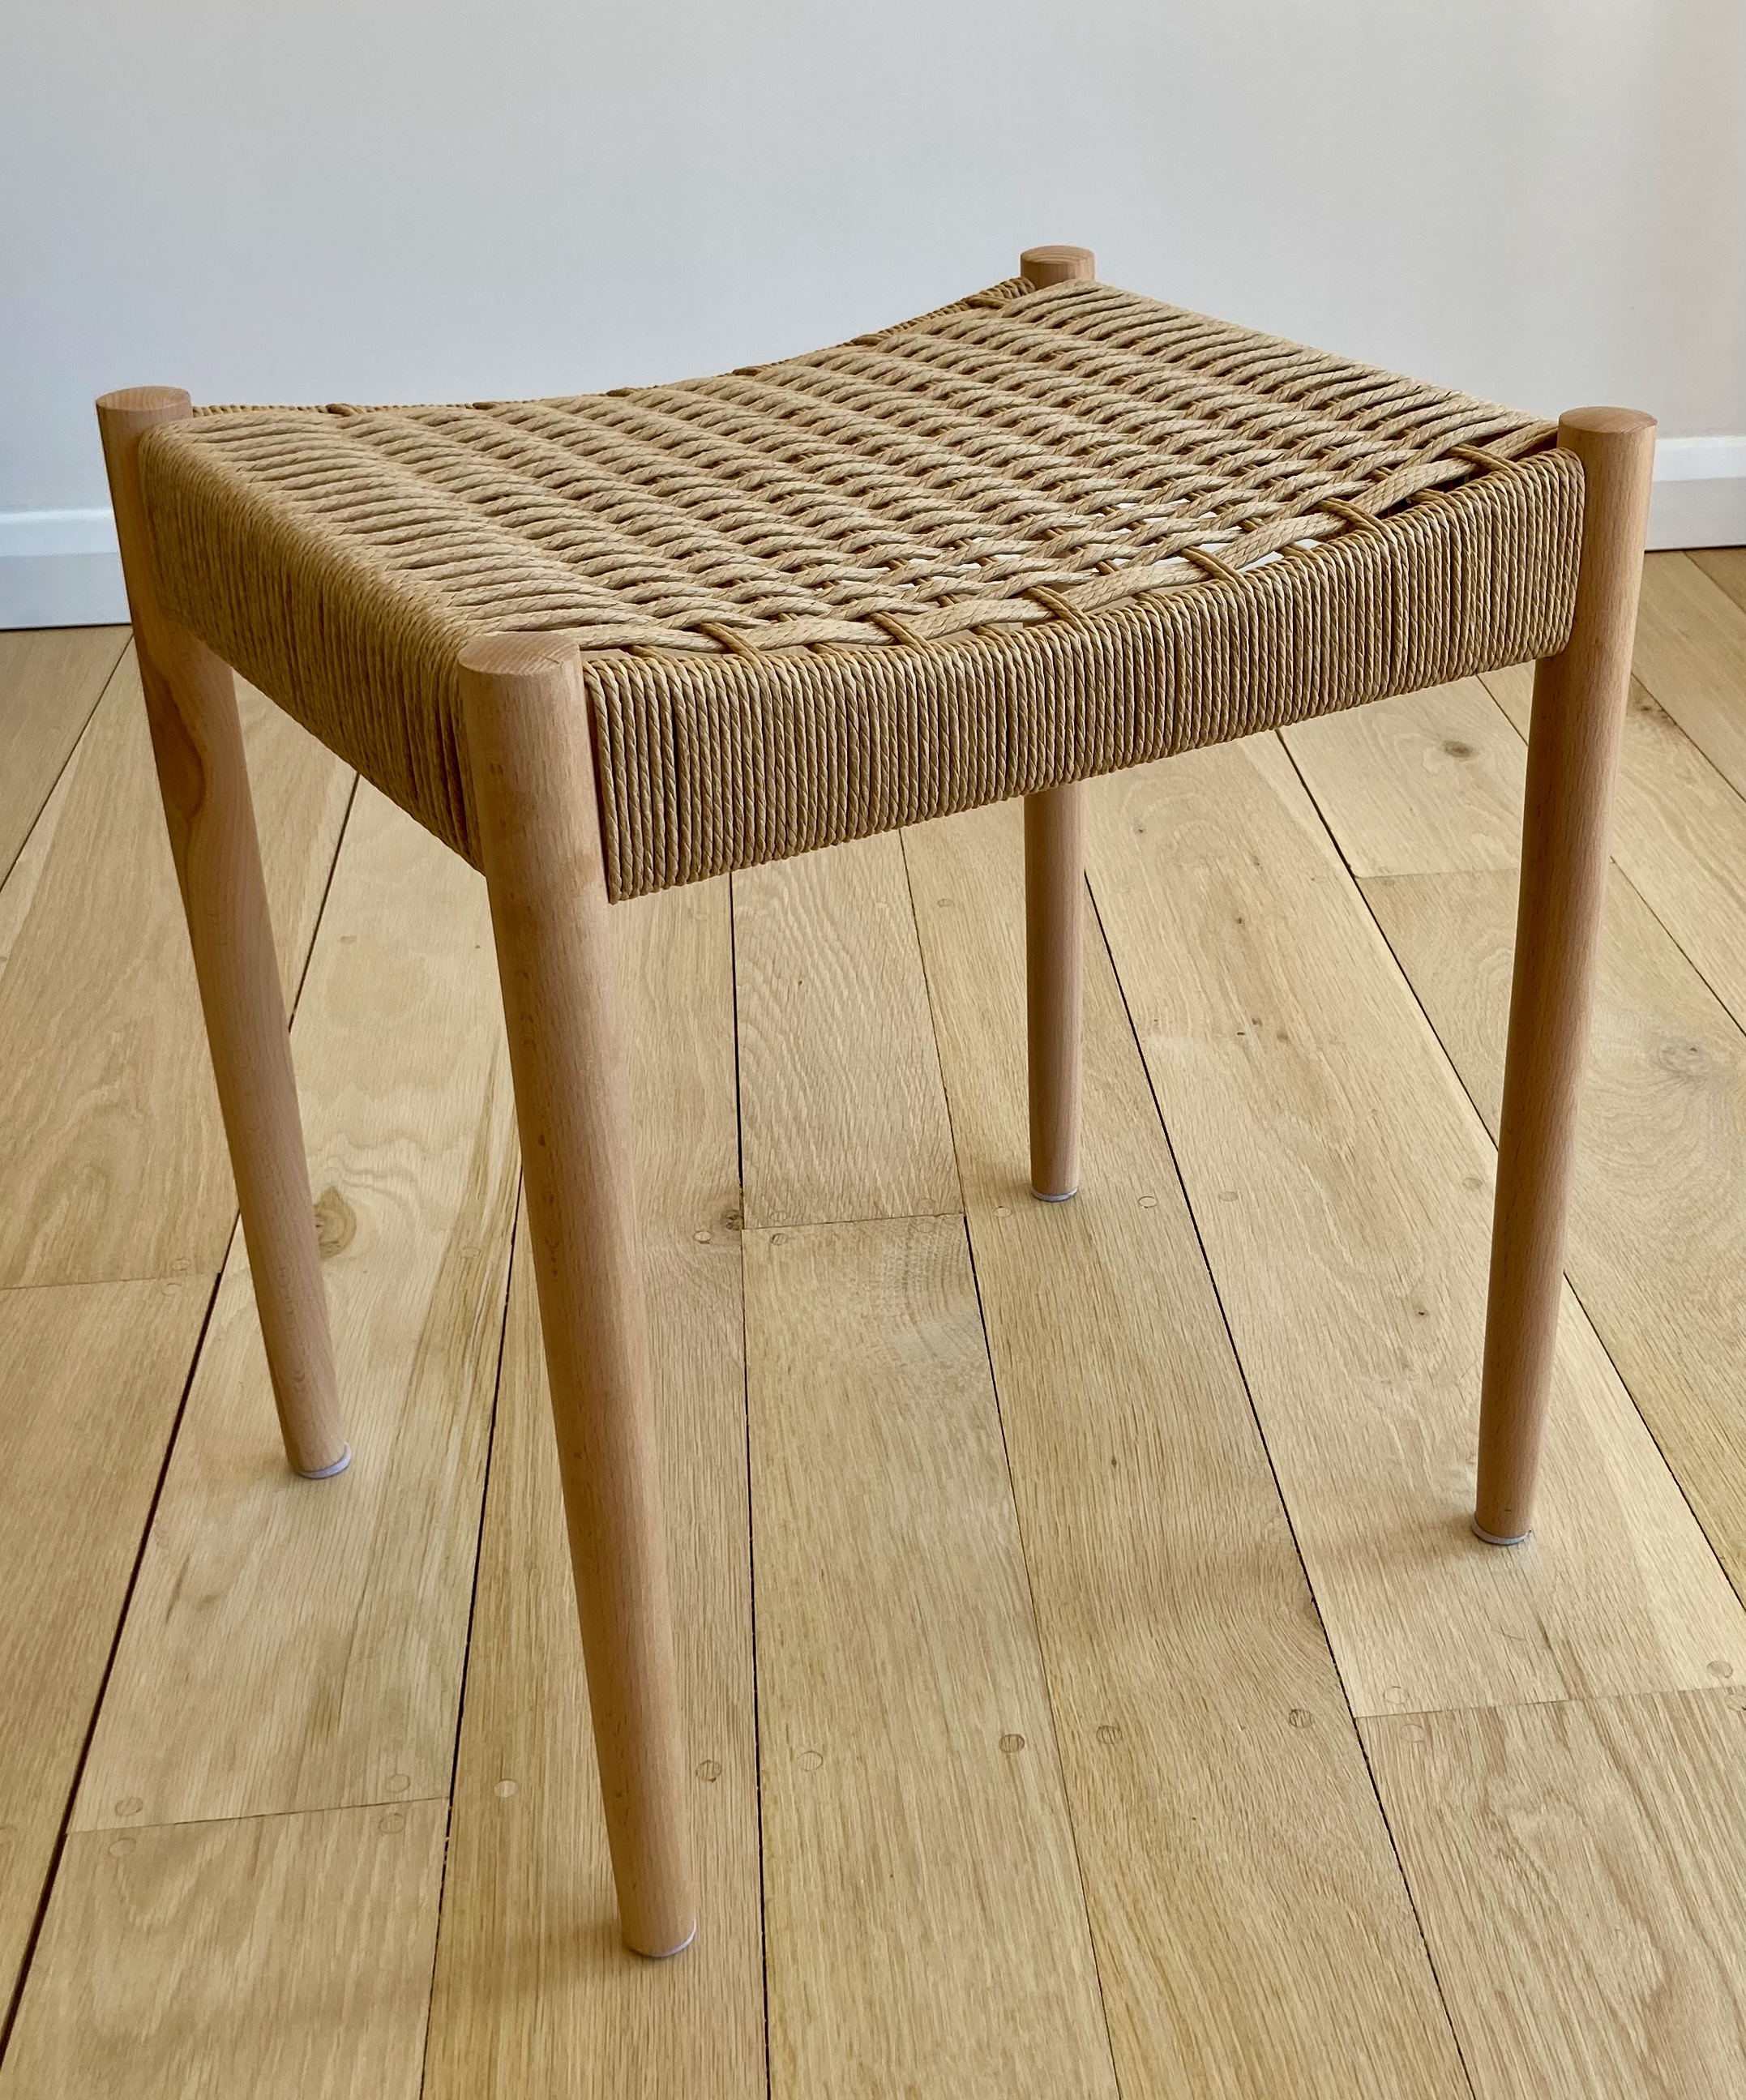
The kit will contain all the materials needed. You just provide a few basic tools and a couple of clamps. We’re working on a video to talk you through putting the stool together and weaving the seat. When it’s ready we’ll make it available in our shop.
Fresh Bakes
Lunch and refreshments are included on all our courses. Three times a day we down tools and decamp to the conservatory to eat Bryony’s lovely bakes and talk about chairs (and anything else). We think these breaks are really important to give you an opportunity to go back to the workshop well-fed and refreshed, ready for more chair-making!
 Freshly baked Shoo Fly Buns – a new course favourite
Open Studios – steam bending demonstrations
We’re opening the workshops to the public every weekend in July as part of Cambridge Open Studios.
We often get asked at shows how we bend timber for the backs of our chairs so we’re going to do a steam bending demonstration at 12 noon on the 18th July. If it’s not raining this will be outdoors.
As always, if you’re interested in coming on a course and you want to find out more please give us a ring (07778 397328) or drop us an email. You can book all of our courses through the links on our website. If our dates aren’t perfect for you or you want to book for a group give us a call; we can usually work something out. Don’t forget course fees include all materials, lunch and refreshments each day.
Enjoy your time in the workshop.
StJohn & Bryony

Leo's desk pt XI.......
 |
| chamfering the holes |
This doo da does an acceptable job chamfering the dowel holes.
 |
| problem |
I initially knocked down the top of the holes with a chisel but I could still feel a wee bit of a raised bump. The hand chamfering tool got rid of that. I didn't want anything to keep the rail from laying up tight to the legs. It also gives a little relief for glue.
 |
| sigh |
I need to chamfer for the head of the screw I intend to put here. I have off set screwdrivers for driving the screw but no offset chamfer doo da. I have an idea percolating in the brain bucket. It is a trick I saw on a Popular Woodworking You Tube post. Fingers crossed that it will work.
 |
| back rails |
I had to take the back rail slats out again to plane/clean up the top edge with the mortises.
 |
| two taps |
Doing the last dry clamp before gluing it up. I put a piece of blue tape on the leg face that the side rails will be glued to.
 |
| hmm....... |
The offset that I knew about shook hands with me. Rather than glue a piece on the top I am leaving this as is. I will glue a thin piece of cherry over the face like I did on Miles's desk.
 |
| ditto |
The other rail has the same offset.
 |
| less than a 16th difference |
 |
| survived the first one |
Paid attention this time to getting all the glue squeeze out cleaned up on both sides of the rail. Had a slight panic attack due to glue freeze. It took a while to get glue applied to the dowels and the in the holes. The clamps pulled the legs tight to the rails.
 |
| 2nd one done |
No hiccups with this one. A bit of a PITA getting the squeeze out cleaned up. Noticed that I forgot to do the slots for the table top clips.
 |
| sigh |
Had a mind fart. Initially I glued one end of the rails to the wrong face of the leg. Even though I had put blue tape I still managed to ignore it and screw up. Lucky for me I noticed that the offset on the rail with the leg wasn't correct. I caught it within a couple of seconds. I had to clean out the glue in the holes. Before I glue up the back rails I will run a drill through these holes again.
 |
| another oops |
I assembled this and the diagonals were OTL (out to lunch). One was 38 3/4" while the other was 39 1/2". The distance between the two rails was 14 5/16" R/L. I had a parallelogram. The top and bottom mortises were misaligned. (Don't know why I have four fingers here - can't remember why).
 |
| success |
Aligned the mortises correctly and checked my diagonals again. This time they were both dead nuts on 39 1/4".
 |
| missed it |
The first time I assembled this I noticed that the center wide slat looked crooked. I assumed that it was because the rails were slightly offset R/L from each other. Should have checked for alignment then rather then assembling the entire thing.
 |
| sigh |
I had glued the chip now missing here with superglue. It didn't last at all. The chip missing is on the top rail so it will be difficult to see, if at all.
 |
| the misalignment |
This is the result of not centering the layout stick. I had centered it on Miles's desk and had no hiccups with his.
 |
| aligned |
 |
| sizing the top |
The top has to lose about 2" off one of the long edges. This last board is a little more than 7" wide. That will leave this at roughly 5". hmm...., don't like that much.
 |
| the other option |
If I take 2" off this edge it would balance out the two outside boards
better. However, it would remove this knot defect that I want to keep.
Sucked it up and sawed 2" off the other edge.
 |
| hmm....... |
This was surprising because the 'hole' didn't look that deep. It had been less than a minute and it had already sunk. FYI - You don't need a pound of dye mixed in with the epoxy. I used less than a 1/4 of what I used previously. The color is still deep and with no clear spots.
 |
| first saw cut |
Used my cordless skil saw to do both the long rip and cross cuts.
 |
| yikes! |
Where is all this epoxy going? Less than 5 minutes after doing pour #2, I had to do a 3rd one.
 |
| hmm..... |
The diagonals are off by 1/8". You can't see that amount eyeballing the top. I doubt anyone would throw a square on it or break out a tape and check the diagonals.
 |
| no choice |
I had no choice. I couldn't fully lower the blade below the top. This mess has a 'hole' that the gear extends into when raising the blade up/down. It was packed full and it was a solid blob of saw goo. I dug that out thinking I had fixed the problem but I was wrong.
 |
| tight quarters |
This rod (I removed the handle and nut) turns a worm gear which engages a half circle toothed gear that raises and lowers the blade. Everything from this view point seems to be working as it should.
 |
| sigh |
That looks a lot like a hole for a pin that would keep the worm gear from spinning as the handle turns it. And spinning is exactly what the worm gear is doing. It will spin forward, stop, engage the toothed gear, and lower/raise the blade. What it won't do is lock down and keep the blade at a specific height. Which the problem I have had with this saw for a while now.
 |
| time flies |
I came to the shop just before 0800 and worked through lunch. This was the time when I checked it. Been a long time since I worked this much and missing filling the pie hole. I kept on trucking.
 |
| 4 times filling this |
It has been over an hour and the epoxy is still raised. When I checked it again before I killed the lights it was the same. Hopefully it will be same in the AM.
 |
| side drawer guides |
Used the scrap from sizing the desk top to get the four guides. Fingers crossed that I won't use them for something else without thinking of them.
 |
| 1/2" maple |
I've had this piece of maple in the shop for 5+ years. I can get 3 bottom supports for the drawer guides from this. I'll address the cup after I rip out the pieces.
 |
| hmm...... |
Planed the hump first and then I attacked the cup. Started with the #3 criss crossing and switched to the #4. I thought it might be difficult to remove the cup on such a thin width but it wasn't.
 |
| done |
I got all three flat and straight. I'll need to make a Lowes run and buy a 1/2" maple board for the 4th guide.
accidental woodworker
Leo's desk pt XI.........
 |
| round 2 |
What will it be this time? I heated the top on all sides before clamping and setting it aside to relax over night yesterday.
 |
| hmm........ |
It closed up a wee bit more but still not enough. I can effortlessly close it flat with hand pressure. I clamped the center and set it aside until I need it. I am definitely leaning in the direction of screwing it to underside of the table.
 |
| made good progress |
Got the rest of the slats trimmed and fitted for the back. I was having problems aligning the slats to their respective holes and switched to clamping it. That worked way better than I expected without all the nightmare scenarios banging around in the brain bucket.
I started the first two in their mortises and then used the clamps (one at each end, one in the middle) slowly closing them as I worked from left to right. I have a good, snug fit in all the mortises and when it comes time to install it I'll do it dry. There isn't any need to glue the slats. Plus it will make it easy to replace one if ever needed.
 |
| no hiccups |
I was expecting to do some adjustments to get the rails to align with the legs but I didn't. I didn't have to tap either rail in any direction to have the dowels in the rails align perfectly with the holes in the legs. I quick and painless dry clamp.
 |
| hmm....... |
The top of the rail is flush with the top of the legs. I thought after yesterday it would have been down about 1/8". Having the top flush like this will make installing the drawer guide assembly a lot easier.
 |
| first side done |
Trimmed and fitted the slats on the first side and dry clamped it. I had to do a couple of mallet taps on the top rail before the dowels in the rails aligned with the holes in the leg.
 |
| last one |
The holes are the same on the legs so this works for checking for fit. Two taps on the top rail and the fit was like a hand into a well worn glove.
 |
| final prep |
Planing and sanding to get the side assemblies ready to glue up. The master plan is to glue up the two sides first and let them cook. Then I will glue the back and drawer rail. After that is making drawers and attaching the top. IMO doing the slats is the hardest part of building this desk.
 |
| careful time |
I can't mix up the slats. They have been individually fitted to each rail and aren't interchangeable. I have a bad habit of not adhering to that particular policy.
 |
| ready |
I planed all the rails when I fitted them. I eyeballed each one to make sure they were clean and smooth on all four edges. I won't be sanding them and I'll go with the finish off of the plane.
I'll prep the legs in the AM and hopefully get the two sides glued and cooking.
accidental woodworker
Leo's desk pt X.........
 |
| drawer rail |
After dinner last night I went to the shop, unclamped this, and heated it with my heat gun. Clamped it back together and let it go until the AM. Any bets?
 |
| hmm....... |
It straightened out a wee bit but not enough. Yesterday it was less than a frog hair more then 1/8" at the center. Today it is a couple of frog hairs under 1/8". I heated it again with the heat gun, clamped it, and set it aside. I'll check it in the AM. I'm not betting the ranch on it working.
 |
| done |
Got the last slat mortise chopped and cleaned up. Stopped here and brought Miles's frame to the Frame it shop.
 |
| heebie jeebie dance time |
I find doing this a tad nerve wracking. It so incredibly easy for me to miss and not position the jig correctly. Which is exactly what I did on the first holes I drilled. I was so focused and intent on getting the jig positioned correctly that I forgot to also make sure it was also on the right face.
Got lucky with boo boo. Because it was the front leg I was able to erase the old reference marks and do new ones based on the leg being rotated 90°. Sometimes you get lucky.
 |
| hmm....... |
I did this one wrong. The right side edge was the original one for the slat mortises. I changed my mind and did the mortises on the left edge. The hiccup was I had already drilled the holes before I made this change. The hole spacing is not the same R/L L/R. Not sure how I'll deal with this.
 |
| another hiccup |
The mortises are a wee bit off too. I did the layout from the left end going to the right on all the rails. I have to align the bottom rail keeping that in mind with the top rail. I think this is the last hiccup I have to account for.
 |
| hmm...... |
I got the holes drilled for all the top rails. Before I did the bottom rails I had to determine where they were going to live. I eyeballed it and 5" up from the bottom is what looked good to me. The slats ended up being 15 1/8" long.
 |
| done |
I survived another round of drilling dowel holes. Other then the initial brain fart, I got all the holes drilled exactly where they should be.
 |
| lifesavers |
This mark is worth its weight in gold squared. I used to do this with RF and LB etc and with numbers. This can't be beat and I used it extensively when setting up the doweling jig.
 |
| done |
Got all the slats sawn to the same length. Fitting them is in the on deck circle.
 |
| first one fitted |
Started with the wide center slat first. Got it fitted in the bottom and top rails.
 |
| first 8 slats |
I was going to fit the slats in the bottom rail first and then in the top rail one at a time. I only did the first rail and stopped. It was too awkward moving the rails in/out of the vice. So I did them the same way I did Miles's desk, fitted them all in the bottom ones first and then the top.
That plan went south because I came upon two cracks/splits among the slat mortises 9 thru 16. I had to glue them and let them cook. Instead of killing the lights I fitted the first 8 slats into the top rail.
Then I killed the lights for the day. I should have this glued up by monday?
 |
| Amazon came at 1804 |
I had to satisfy my curiosity about the fluted dowels. I would say that they are 6mm and not an imperial 1/4". I'll have to check and see if Dowel Max has metric bushings.
 |
| metric equivalent of 1/4" |
This is a spiral dowel. Extremely happy that I got a true 1/4" dowel. (6.30mm = 1/4")
 |
| a 1/4" is 0.250 |
This is close enough to 0.250 IMO. These dowels were a loose fit but tighter than the 6mm ones.
accidental woodworker
Exhibition
Vertical grain. Why riven oak? Radially riven oak is the most stable, because the rings of the tree are at 90 degrees to the face of the timber, or vertical. Better than quartersawn. Come and see how it's done in practice. Sign up for a course, or see demonstrations at Birdwood House Gallery, Totnes 12th-18th July. 'Jonathan Bayes (&Co)-Carving History'

Leo's desk pt IX...........
 |
| almost ready |
It is the AM and I let the holiday I painted yesterday dry thoroughly overnight. Got the 2nd coat of shellac on and the 3rd and final coat in the PM session. I'll get this and Miles's drawing to Maria in the AM.
 |
| shoulda, woulda, coulda, but didn't |
All the holes filled in and flushed without any hiccups. However, up close I can see a difference between the two epoxy pours. It would have been better if I had dyed the epoxy black. From a couple of feet away, I can't see anything different. And who (besides me) would eyeball the the black spots up close and personal?
 |
| side rail mortises |
The side rails have two more mortises (total) to chop than the back ones (with the wide center slat). One benefit of this new method is the long sides of the mortises stay cleaner and crisper.
 |
| snug fit |
I like the fit of the slats so far. It is snug on the width and doesn't fit at all the other way. There are burn marks on the sides that I will plane off. That should be enough for the slat to fit.
 |
| chopping away |
It isn't taking a lot of time per mortise. I would estimate that it isn't more then five minutes each.
 |
| yikes |
A brain fart that shouts and laughs at you. Missed drilling the holes in one of the top rails. I didn't notice here that I made the stinky fart me-steak again with the bottom rail. Fixed that one later on in the PM session.
 |
| too shallow |
I measured the holes and they were all about 7/8" deep. Too shallow for the 2" dowel pins I intend to use. I marked the stick at 1 1/16" (16th for glue) and redrilled all the holes to that depth.
 |
| last two |
Got the outlines done on the last two side rails. Stopped here for two reasons. The first was my right wrist was starting to hurt which means I was waking up my carpal tunnel. To go along with this, my lower right back was hurting. Bending over for hours ain't what it used to be. Not a real problem as the pain goes away once I straighten up and head upstairs.
The 2nd one is the 3/8" chisel edge was chipped. I was still chopping clean but I could see the one big and small chip missing on the blade's toe. Stopped here and sharpened it removing the chips first which didn't take much time on a 100 grit runway.
 |
| this one is 80 grit |
I have two of these runways that I use. This one is 80 and used for heavy removal and squaring blades. The other is a double sided runway with 100 grit on one side and 150 on the other.
 |
| can you see it? |
This is the front top, drawer rail. It is bowed an 1/8" at the middle. This has to be straight so that the flush drawer fronts stay flush. So for the leading candidate is to screw it to the underside of the top on either side of the center block.
 |
| worth a try |
It is easy to flatten it with hand pressure and the quick grips are strong enough to do it too. I'll check this in the AM and see what shakes out with it. If I see no results, I'll try hearing it with my heat gun and clamping it again. I really don't want to make another drawer rail.
 |
| fluted dowels came today |
Not 2" long but about 1 7/8". There are from China too so I don't have high hopes that they 1/4" diameter pins neither.
 |
| they ain't a 1/4" |
In a 1/4" hole this dowel has a 32nd space all around. I don't think that is tight enough even allowing for glue swelling to be joint worthy. The spiral dowels are coming in tomorrow. Fingers crossed that they are imperial and a 1/4" in diameter.
 |
| dead battery |
It worked yesterday but its dead the next day. There was a little battery corrosion that cleaned off the contacts with alcohol. Went to CVS to get a L1154C button battery and nada. CVS has cut way back on the range of button batteries it used to sell. I went to Wally World next and the same results. They don't sell N batteries anymore neither and they used it because they were my source for them. Ordered both batteries from Amazon and I'll have them tomorrow. Then I can measure these pins - the calipers read imperial and metric.
accidental woodworker
Leo's desk pt VIII...........
I got to the shop late this AM - I rolled out of the rack at 0708. I had woke up at 0130 and couldn't go back to sleep. Watched YouTube until 4-ish when I finally got the eyelids to slam shut. I had to quit the AM session to go to the VA for an appointment. I had a high resolution CT of my chest. It was odd because they asked me if I had any thing metallic on my right side. They said something showed up on the last scan they did.
 |
| first pic of the day |
I can see a pattern emerging - lots of blurry pics lately. Laid out the mortises on the 4 side rails. I was glad I had to go the VA because my right wrist was sore still from chopping mortises yesterday.
 |
| one coat of shellac |
Two coats on the back and 3 on the front and the front outside edges will do it.
 |
| sigh |
Teeny holiday but it sticks out like a neon sign on a foggy night. This killed getting one coat on the entire frame. And I forgot to paint it before I went for my appointment.
 |
| epoxy |
I used clear epoxy to fill the in the holes on the side rails. I had some left over so I filled in the fissures on one of the drawers. At least one tail will end up dead center on them. If I run into any hiccups I'll regroup and make new drawer fronts.
 |
| PM session |
I had planned to work on the side rail mortises but that didn't happen boys and girls. The epoxy I used has a 24 hr cure. I thought it was 5 minutes - I was wrong. So I decided to work on the legs. They hadn't budged in any direction. Both reference faces were still dead nuts square. They were still flat and straight too so no reason to wait.
I want the legs to be square and not rectangular. The short side is roughly 1 7/8" and the longer one is 2 1/8". To ease the strain on the lunchbox planer, I ripped the long edge to close to the short one.
 |
| happy with this |
I almost got my 1 7/8" square but two legs threw a hissy fit. I had to settle for 1 3/4". Miles desk legs are 1 7/8" but this is close enough. Neither desk will ever be side by side for a comparison.
 |
| nice curly Q |
Removed the planer nick humps with a chisel before sawing the legs to finished length. I had planer snipe on every single leg. I was lucky because the leg lengths are 29" and the blanks were 36" long. I was able to saw it off on all 6 legs.
 |
| done |
It took a while but I finally settled on an orientation of the legs. The front legs both have straight, vertical grain on all four faces. The back legs have straight, vertical grain on the front and back faces. The other two have straight-ish grain - the grain lines are wider but there aren't any cathedrals.
I had three legs with straight, vertical grain and I initially placed the 3rd one at the back but pulled it. I didn't like the look of the odd leg not even closely matching it's opposite mate. As is, the two front ones match as do the back ones.
 |
| I like |
Used one of the off cuts as a test piece to check the rail placement. There is a 1/4" offset from the edge of the leg to the rail - perfect IMO. And I got it on the first try.
 |
| 1/4" dowel rod |
I couldn't push this into the holes I drilled with a 1/4" twist drill bit.
 |
| hmm....... |
These are 1/4" spiral dowel pins. They aren't a snug fit but they are denying gravity. These dowels are 1 1/2" long and I need 2" dowel pins.
 |
| 1/4" fluted dowel pins |
Same as the spiral dowel pins but with a twist. They were looser than the spiral pins but the twist is these are 6mm and 6mm is not the same as a 1/4". Went to Amazon and bought 2" spiral pins that I'll have tomorrow. I'm guessing that they are imperial and if they aren't, I'll buy 1/4" dowels and make my own pins.
 |
| snug fit |
I chamfered the bottom of the pins and easily tapped them home with the hammer. I would say that the holes aren't changing much so far.
accidental woodworker
Leo's desk pt VII........
 |
| Miles's frame |
The front face has only one coat. I was surprised at the coverage too. I'll bet the ranch that I can get away with two coats. A couple of coats of shellac, I'll be able to get this to the Frame it shop by saturday at the latest.
 |
| Leo's desk top |
Just did a quick flush of the glue joints with the #3. I only did this side which will be the face. I'll do the back side when I am ready to get it to final size.
 |
| hmm...... |
Ready to flush/plane all the epoxy on the side rails. All of them were still overfilled, no sunken areas anywhere.
 |
| sigh (blurry pic again) |
This is the biggest epoxy spot and after I got it flushed, a hole popped out. Not a bubble hole and it is visible despite the small size of it. I'll fill it in later.
 |
| lower right corner |
I like the reddish background against the black epoxy.
 |
| done |
All four side rails flushed. Another small hole shook hands with me that I'll have to deal with. Three of the rails are about the same - the 3rd one down from the top - doesn't have a 'circle' but it is what it is.
 |
| drilling the side rails |
Got all the side rails holes drilled. As I was doing the last one a thought occurred to me, maybe I should have waited before drilling the holes. Would they change size before I glued them? I will be finding out that mystery shortly.
 |
| hmm....... |
This was going to be the edge where I chopped the mortises for the slats. I'll be swapping the edges - the other one doesn't have any of these fissures.
 |
| hmm...... |
Tried a new way of doing the mortises. Instead of doing each one at a time, I chiseled the outline of each one first. Then I started chopping the mortises one at a time.
 |
| one done, 5 to go |
Did a better job chopping this set. I only had to glue one chip and one split.
 |
| back rails done |
I got the 2nd one done five minutes before quitting time.
 |
| oops |
Both of the back rails are the same size. All the top rails are 5 1/2" wide and the bottom ones are all 4 1/4". I ripped this one to match the other bottom rails.
accidental woodworker
Don't Forget to Tip Your Guide
 Olive Bread from Vesuvio
One of my great joys at Tools for Working Wood is steering our visitors to great local places, whether great Mexican food in Sunset Park or worthwhile museums they might have otherwise missed. In that spirit, let me tell you about some of the food shopping I did with my son over the weekend.
We built up our fortitude for errands with a falafel at one one of my favorite falafel spots, the original Mamoun's on Macdougal Street in Greenwich Village. According to their website, the restaurant, which was founded in 1971, is "the oldest falafel restaurant in New York and one of the first Middle Eastern establishments in the United States." (This isn't exactly true - Mamoun's may be the oldest falafel shop in NYC, but from the late 19th century until its relocation to make way for the Brooklyn-Battery Tunnel and what would later become the World Trade Center site, New York had "Little Syria," a vibrant Middle Eastern neighborhood in downtown Manhattan.)

When we finished my meal, we headed to Pino Prime Meats for some lamb sausage. The shop makes the sausage fresh everyday, and I don't know a better supplier of lamb sausage anywhere. It's great with many things, including a side of robustly spiced pasta. This shop is tiny! There's a single corridor for customers and butchers, and the shop was pretty mobbed. (I generally have been at the shop on Saturdays, and it's always busy on Saturdays.) Just as noteworthy as the quality of the meats: Pino takes cash only. The trend in the past few years was to eliminate cash payments - with sufficient pushback that NYC passed a law mandating that stores are legally required to accept cash if their customers choose that method of paying. Well, no need for that intervention at Pino, which is a traditional store in this and so many other ways. The current family that owns Pino Prime Meats has been operating the store only since 1990, but the butcher shop has been operating the neighborhood (though I am not sure if it's at the current address only) since 1907.

Then it was off to Vesuvio Bakery for a snack, in this case some olive bread. Let me say they do not stint on the olives at this bakery. Vesuvio has a long history in the neighborhood as well. The original bakery was opened in 1920 but closed around 2009 - and then was reopened by a fan who was inspired to renovate the bakery's storefront and restore its operations.
 Raffetto's Fresh Pasta
And then we finally headed to Raffetto's Fresh Pasta on Houston Street. Raffettos too has a storied past: it was founded as M. Raffetto & Bros. in 1906. As the shops website says, In its early years, M. Raffetto & Bros. made three basic products: egg noodles, meat & spinach ravioli (Genoa Style) and, a little later, cheese ravioli (Naples Style). Since refrigeration was the exception more than the norm at the turn of the century, we produced and sold dry egg noodles much more than fresh egg noodles, made with the one roller machine our grandfather bought in 1916 (that machine is still used today). From the 1970s on, the popularity of fresh noodles and having only one machine to roll out the dough made us discontinue making dry noodles. Today, Raffettos produces about 50 different kinds of pasta. We often wonder what Marcello would think about our range of homemade creations that include pumpkin ravioli, black squid ink linguine and rosemary pappardelle. Regardless of whether it is a classic pasta or something a little new and creative, our family still chooses to follow the same principles that has guided our familys philosophy since 1906: use the best quality ingredients to produce the best quality pasta.
We bought some ravioli for dinner later in the week and headed home, snacking on the olive bread.
Probably the best part about dealing with these stores is that they're all owned, run, staffed by people I can identify with. They know the product, they know their business. They care. They make the best products they can. They engage with customers. Food in these stores isn't a commodity designed for easy barcode scanning. It's a craft and making a living at any craft is an achievement. Fewer people on any given day need a wonderful hand made chair than some sausages, but the principle is the same and needs to be encouraged.
As I was enjoying the olive bread reflecting upon my shopping experience, the thought occurred to me that this is what craft is about. Almost anyone can make olive bread, but actually making the bread, and doing so in such a way that the bread is stuffed with olives, and sold to a sufficiently appreciative customer base to pay enough to make the profit that enables you to pay the rent and the staff - well, that is about mastery of craft. Same with making lamb sausage every day, at a price that is in the sweet spot of affordable-profitable, etc.
My enjoyment of woodworking is really about the enjoyment of craft, appreciating the skill it takes to make something. And respecting the lifetime of skill it takes to master a craft effectively.
Leo's desk pt VI.........
 |
| 1/8" router bit |
It is solid carbide with a 3/4" long cutting length. I like how easy it was to make the slots for the table clips with my plunge router. Hopefully I'll remember to do it before I glue the rails up.
 |
| hmm...... |
Missed about one inch on the first pour. In my defense it was covered with tape. Filled it in and all the other sunken holes.
 |
| not expected |
If I had known I would have stuffed in cherry shavings before filling them with epoxy. Fingers crossed that the 2nd pour will fill them.
 |
| done |
30 minutes after I filled them, all the holes were over filled. Looking like a win for the home team.
 |
| gluing the top |
The middle and right board are carved in stone. The far left board is one of two that I will marry to them.
 |
| still working |
I worked through all the ways I could use these two left boards and it took a while to make up my mind. There is no way I could get a color/grain match with the other two. I started by sawing about an inch off of the two right boards. I did that so that the third board would be wider than 6". I didn't like the look of two 11" inch boards with a small 5" wide board.
 |
| two boards |
Dry clamped the first two boards together. I had a nice, tight joint line from R to L. It came together with minimal clamp pressure.
 |
| dry clamp run |
I had thought about using dowels on this glue up - 3 in each board. Didn't need them as the boards were easy to align within a frog hair or two.
I smiled looking at this because it brought back a memory. When I first started woodworking I couldn't glue up stock to get wide boards. I would limit myself to making things that didn't need anything wider than a 1x12. I've come a long way in the past 51 years.
 |
| hmm..... |
One clamp and everything is still together. The ends didn't shift up/down and the joint lines were still tight. The glue up went off without a hitch. One end had the ends shift by with the glue and I had to put a clamp on them to flush it.
 |
| nice touch |
This doo da lets you keep going with the doweling jig. You insert this 1/4" aluminum pin in the last hole drilled to keep drilling holes. I also have one that goes out 12'(?).
 |
| eight holes |
This is one of the back rails. Drilled 5 holes, put the pin in, and drilled 3 more holes.
 |
| Miles's frame |
He wanted red and this was the brightest red I found at the paint store. Got good coverage with one coat. I'll get a second one today and start on the front in the AM.
 |
| mortise layout |
Laying out the mortises for the slats. I'm sticking with the same number that I did on Miles's desk. I don't want any blaring differences between the grandson's desks.
 |
| story stick |
I couldn't layout the mortises for the side rails (epoxy is still setting up). I will use this to lay them out once the epoxy is dry.
 |
| started |
Got the outline of all the mortises chiseled and the center one outlined. This is where I stopped for the day. I need to sharpen the 3/8" & 5/8" chisels. I didn't feel like doing that now so I'll pick it back up in the AM.
accidental woodworker
Leo's desk pt V.........
Found some sinus medicine that almost cleared my snot locker. 95% better than what it was without it. Got a good night's sleep and only got up twice for the toilet trots. I still had to empty it through out the day but less frequently and with a lot less snot.
 |
| it is full |
The house shit can holds two boxes of snot rags. This is after 2 1/2 days.
 |
| happy face |
Both of the leg blanks are laying flat and straight on each other. Happy that I don't have to deal with any stupid wood tricks.
 |
| reference edge |
The plan was too establish one face and one long edge as references. Then I would run them through the lunch box planer to thickness. It wasn't necessary at this point but I like planing cherry.
 |
| hmm...... |
Used my catch all bench chisel to remove all the nicked blade ridges on the faces of the two boards.
 |
| last one |
Made the long edge square to the face I planed a couple of days ago.
 |
| moving along |
Got the leg blanks planed to thickness - not quite 1 7/8" thick. Next batter was sawing the legs out of them.
 |
| hmm...... |
The tablesaw was struggling to rip out the legs. I did get one done with the blade high enough to rip it out. All the subsequent legs I ripped out half way from one face, flipped the boards 180, and ripped the leg off. I had to go slow because the saw bogged if I pushed too fast.
 |
| drawer guides |
These are all that are left over. I think I can get all four side drawer guides from them.
 |
| two extras |
I ripped out two legs first, one each from each outside edge. I ripped another leg from the middle portion left. The four faces aren't straight grained but swirling with some cathedrals. I got 3 legs out of each blank.
 |
| the four desk legs |
This leg on the left only has straight grain running vertically on three faces. This one has some cathedrals and I'll put this at the back. The other three legs all have straight grain running vertically.
 |
| time to relax |
When I sawed out the legs only one of them curled a bit. It didn't pinch the blade and the legs are over length by about 6-8". I can saw off the bit of bow. I'll let these hang out on the table for a few days to make sure they don't do any stupid wood tricks. After that I will run them through the lunch box planer to square them up. I think I can get them at a minimum of 1 3/4" square.
 |
| rail stock |
Next up on the A list was sizing the rails to width and length. The top rails will be 5 1/2" wide and 31" long.
 |
| finally |
See the rough spot left here? It was originally almost 12" long and it was a valley. It took me 10 minutes to plane this edge straight and flat. It also made the width of the board a few frog hairs less than 5 1/2". Didn't know that yet.
 |
| side rail |
Rather then work around the knot holes and pockets, I am leaving them and I'm going to fill them with black dyed epoxy.
 |
| hmm...... |
I used putty to fill in a couple of defects in the splines. With shellac they will pop out and I don't like that. So I asked daughter #2 to ask Miles what color he wanted me to paint his frame. I'll find out tonight what the color will be. Amanda said it will probably be red.
 |
| side rails |
The defects are more prominent on one one side than the opposite one. At least both will have something visual to look at.
 |
| helping hand |
I'm trying to avoid the me-steak I made with Miles desk twice or was it three times? Anyways I laid the rails out as they will be and marked the edge with chalk that will get the mortises for the slats.
 |
| 2nd bite |
I had to remove the screws on the front to rip it to the new width. When I put the screw back in, it cracked the block again. Glued and clamped again and set it aside to cook. Sigh. If the screw cracks it again I'll have to replace it somehow.
 |
| I like |
Used the Dowel Max to check drilling holes in one of the side rails. I love the spacing of the holes, it almost perfect on the two outside ones.
 |
| hmm....... |
Filled in the defects with black dyed epoxy. It is going to need a 2nd round because a couple of them are sinking. Some of them were a surprise because they didn't look deep enough to suck in that much epoxy. I'll do round 2 in the AM.
 |
| the legs |
I was a roll so I planed a reference face on two edges. That is all I need to run through them through the lunchbox planer. I might be getting ahead of myself but I was feeling good about the legs behaving.
 |
| not working |
I need a 1/4" drill collar to set the depth for the doweling jig but none of these fit the 1/4" drill.
 |
| this explains a lot |
I had bought these a bazillion years ago and I remember having the same problem - they didn't fit the drill bit. It didn't occur to me then that they weren't imperial. I checked three of the collars with my metric drill bits and they fit. Big sigh. I'll check Amazon and get some imperial ones on order.
Had a good day. Got in a full AM & PM session and I made a serious dent in Leo's desk. Fingers crossed that tomorrow will be as productive too.
accidental woodworker
definitely sick.......
Spent another fitful night trying to sleep. Besides getting up for two toilet trot races, I got 7 times total to blow my nose. There was absolutely no position where I could sleep for more than an hour or so. I hope this blows over quickly because it sucks pond scum feeling like this.
 |
| I was hopeful |
Took the clamps off and nothing moved or groaned. All the miters were still tight and passed the wiggle test. Felt good about the frame here.
 |
| last test piece |
Trying to set this jig makes feel as smart as a box of pointy rocks. I thought I had it set correctly - I had measured from the plywood to saw blade - but it took me 7 attempts before I got it.
 |
| miters still suck |
Two of the miters let go while putting the splines in them. I think the other two stayed together only because I already had splines in them. I had to use bar clamps to close up all the miters.
 |
| cleaning up the back frame parts |
Working in the shop today was difficult. I had the desire to be there but with the snot locker jammed full it was a chore working. I spent the AM session working in spurts which kind of worked in my favor. The frame shook hands with me several times before I killed the lights for the day.
 |
| 2nd one |
I had to replace the first spline because it was too thin. There were gaps on both sides of it. Without glue I was able to push the splines and seat them fully by hand. With glue, two of them locked solid before being fully seated. So I made the last two splines looser by sanding them. One filled/swelled the groove with glue but this one didn't.
 |
| sigh |
Screwed up on the length of these, again. I've done this twice before but I thought I was done having that brain fart. It ain't so boys and girls.
 |
| new set |
An hour later I made a new set for the back frame. I made the length a 1/4" over to allow for planing the miters and fitting.
 |
| almost done |
Nailed and glued the back frame, set the nails, and filled them with putty. Thinking of using shellac on this frame. But if I change my mind, I'll paint it black.
 |
| hmm....... |
I am leaving the frame as is. No chamfers on the inside and outside edges. I'll get this to Maria on tuesday so I can get it done as quick as possible and get a pic of it to Miles.
Hoping to feel better so I can get started on Leo's desk. I want to get it done ASAP. Been thinking of renting a U haul to bring the things I made for Amanda to her. Waiting in the boneyard are Leo's dresser, Miles' desk, the small cherry table, and the bookcase. Leo's desk will be joining it in a couple of weeks. My wife can only bring one at time when she visits. Depends on the cost which is probably cheaper than having it shipped.
accidental woodworker
Leo's desk......
Starting feeling like crap yesterday afternoon. I couldn't sleep last night for more then an hour. My snot locker was stuffed full and I couldn't breathe with the CPAP machine lying down on my side. I spent a fitful night sleeping propped up against the headboard. Didn't feel much better in the AM.
 |
| broken dog |
I lost the doo hickey at the top of the dog. Found this on the deck when I came to the shop in the AM. I would have just made a new one but as usual I couldn't find something. The something I was searching for was the bullet catch on the side of this dog. So instead of a replacement dog, I glued a new doo hickey on at the top.
 |
| checking the leg stock |
Both boards behaved themselves over night. They looked to be still flat and straight. Neither one grew a hump back too. Cleaned one short edge on both boards. I'll make them 90 before I run them through the lunch box planer.
 |
| happy face on |
Both boards passed the flat test with flying colors.
 |
| both for $6 and change |
I couldn't resist the miniature bin. I like that it is clear so I can see what I have in it. The 5gal bucket was a lot cheaper than I expected. Lowes even had pink buckets for the ladies.
 |
| pic frame coming |
I sent a pic of the frame I made for Leo's drawing and he remembered doing it. I didn't want Miles's to feel left out so I'm making a frame for a pic he sent me before my CT biopsy.
 |
| done |
After I got back from Lowes I finished the fitting the doo hickey on the dog. The dog is maple and the doo hickey is too. It keeps the dog from falling through the dog hole in the bench.
 |
| flushed the top |
I still have the original metal dogs from when I built this desk. I switched to wooden dogs the last time I nicked a iron on them. I haven't noticed any difference in gripping power between the metal and wooden dogs.
 |
| shooting the miters |
I'm making Miles's frame the same size as Leo's but Miles's is 3/4" thick. I didn't have any 1/2" thick stock but I don't like making the exact same thing for the grandsons.
 |
| sigh |
Gave up on this again. The slip nuts were nice with adjusting but I couldn't get all four miters closed and gap free.
 |
| hmm..... |
And this slip nut wouldn't tighten, as it got close it slipped. Go figure on that. I switched it with another one and the same thing. I didn't feel like playing with it to find what went south. I won't be playing with this clamping method for the foreseeable future.
 |
| nope |
I was able to get 2 then of the 3 miters to close up tight. I fiddled and faddled with it and then gave up. I went back to the miter shooting board and touched up the miters again. That didn't improve it and one miter was still open a frog hair.
 |
| sigh |
I was expecting this to be the winner. I even tried sweetening the miter heels with a block plane. It worked for one but with the 2nd one I started chasing my tail around the frame.
 |
| this surprised me |
This is the first time I can remember all four miters closing up tight with these miter clamp doo hickeys. I took it apart and repeated it with the same results. Decided to glue it up with these. If this hadn't worked I was going to try my metal band clamp.
 |
| success |
Clamping this up wiped me out. I didn't feel winded or tired, just spent. Like I had nothing left to give. I think I'm coming down with a spring cold because my snot locker fills up quicker than I can empty it.
Didn't go back to the shop for a PM session. Instead I sat at my desk and watched Unforgettable on Amazon prime.
accidental woodworker
New Model Mandolin: 4
The body of the mandolin is now together, so what’s next? In this video, I look at routing the rebate for the purflings and bindings. The purflings take quite a while to fit as there are tricky mitres to cut and the bindings (made from walnut) need to be bent on the bending iron to fit exactly. All good fun! Oh, and a bit about the fretboard too!
Cheers Gary
Making a Potting Bench
This is a project I've thought about for a long time. We don't do a whole lot of gardening here at the humble abode, but when we do get a new plant it would be nice not to have to re-pot it on the ground or at the kitchen sink.
 |
| The completed project |
It started with an internet search for some ideas and then later a Sketchup drawing.
 |
| Sketchup drawing |
I did end up changing a couple things from the drawing, most notably I didn't use the shelf supports that are shown with the upper two shelves.
This project is far from "fine woodworking". The lumber is just common pine 1x4s, with 1x6s for the upper shelves. None of the boards was straight and there were lots of knots, but I wasn't looking for anything more.
 |
| 18 1x4s, each 8' long |
The construction was fairly simple. The 36" front legs and 64" rear legs are each made of two lengths of 1x4, glued together at right angles. I planed the edge on one piece, but did not bother planing the face of the mating piece. The two main platforms, one at 8" off the ground, the other at 36", were basically boxes glued and pocket-hole screwed together. Each was 20" x 47 1/2". I added slats that were supported by a piece that was glued and screwed to the inside of the long sides of these boxes.
 |
| The two "boxes" roughed out and screwed together |
 |
| I got to pull out the miter box to cut the 24 slats. There's a board clamped upright in the end vise acting as a stop for repeat cuts. |
 |
| Here, I'm checking the fit of slats in one of the boxes |
 |
| I got to use a variety of hand tools for screw holes and screws |
 |
| Attaching a slat to the support piece |
The gap between slats was 3/8". Twelve fit into each box, with the first and last slat made less wide to fit the space and leave a 1/4" gap at the end.
To support the boxes on the legs, I glued and screwed small blocks to the inside of the legs. The boxes rest on those blocks and are later screwed to the legs.
 |
| Starting to come together. Here it is dry-clamped. |
I fit the two upper shelves similarly with blocks glued and screwed to the inside of the back legs. I cut those shelves for a good fit between the legs and they are also pocket-hole screwed to the legs.
 |
| View from underneath an upper shelf. You can see the support block and also the pocket screws from shelf to leg if you look closely. |
The back edges of the upper shelves were planed straight so that I could glue on a strip to keep things from falling off the back of the shelf. Those pieces were glued to the back edge of the shelf and also pocket-hole screwed to the legs.
 |
| Back view showing the strips glued to the upper shelves and pocket-hole screwed to the legs |
I thought I would glue and screw the main boxes to the legs, but after just screwing them together without glue and feeling how solid it was, I decided the glue was unnecessary. This will allow me to disassemble it later if the need ever arises.
For the moment, I'm thinking there will be no finish applied. It will reside under a balcony and will rarely, if ever, get wet. I might change that decision later. Maybe BLO or a poly on the main work surface to make it easier to clean off the dirt and cuttings. Oh yeah, I might still add a shelf just below the right side of the main work surface. The shelf would hold a plastic bin to catch dirt that falls between slats.
That's it. A rough project, but I like the way it looks. And it should make it better for us to do some gardening work.
Leo's desk pt III(?).......
Made the trip to Highlands today and now I'm thinking maybe I should have waited a few more days. A lot of the cherry shorts were rough sawn while last month when I got wood for Miles's desk the cherry shorts bin was stuffed full with S4S. Not so today. But I still managed to get what I needed for his desk. Albeit it is going to take more time to prep it.
 |
| rough sawn 8/4 cherry |
There was no S4S 8/4 cherry to be had. There also wasn't any wide rough sawn 8/4 cherry (for four legs). I picked these two out to get the legs from.
 |
| 4/4 cherry |
The S2S 5/4 and 4/4 cheery bins were full. The two stacks on the right here are 4/4. The wide boards are for the miniature cherry chest that is coming after Leo's desk. The thinner width 4/4 boards are for the rails. A lot more than what I need but the extras are for the cherry chest.
 |
| 5/4 cherry |
I bought two 10 foot boards for the top and had them sawn in half. I only need 3 with one orphan board.
 |
| hmm..... |
Both of the 8/4 cherry boards are cupped. I am going to flatten one face on both first to allow them relax for a few days. I always start by knocking down the hump side of the board. I will flatten and straighten that face first and then ran them through the lunchbox planer.
 |
| legs? |
The plan is to get the legs from each outside edge. They are mostly straight grain which is what I want for the legs.
 |
| hmm....... |
Might have some trouble with this board. The outside edge straight grain on the right is a little thin. I'll put these two legs at the back.
 |
| comparison |
Cherry is a pretty wood off the plane. The right board is almost there. It has a wee bit of twist and I still need to smooth it out from the #6 plane.
 |
| still some twist |
Along with the twist there was still a hump. I traversed this board at an 45° and a 90° several times but it was slow going.
 |
| hmm...... |
I like this plane because it works equally well pushing or pulling it. Here I pulled over an area that I identified as high. It took a lot of back and forth before I got this one flat and straight end to end.
 |
| 2nd board |
Wash, rinse, and repeat. Of course this one had a hissy fit and went into camera shy mode.
 |
| no twist |
After the first 4 planing runs over the board I checked it for twist. There was none and it stayed that way until I got it flat and straight.
 |
| sigh |
This board was a pain to flatten. The hump refused to cooperate and go away. I attacked it with 5 different planes but it was as stubborn as a mule. The first board took about 45 minutes and I was already well past that with this board.
 |
| wow |
Time flies when you are having fun. I stayed until I got the 2nd board done. I wanted to have both of them relaxing over night.
 |
| LN #4 |
This plane got a work out on the 2nd board. It was only plane that seemed to be knocking the hump flat. I spent a lot of time pulling the plane vice pushing it.
 |
| finally |
This check is the last one I do - checking it for flat. I grab the far end of the straight edge and move it left/right and watch for where it pivots at the opposite end. For the longest time it was pivoting about the 1/2 way point - still had a hump.
Here the straight edge pivoted around the pencil mark from this diagonal and the other diagonal. That proves the board is flat. I got this tidbit from watching Keith Rucker at the vintage machinery website. Anyways it took a lot of time and calories before this board got flat and straight.
 |
| final check |
Still twist free which surprised me. With all the back and forth I did planing the hump flat I was expecting some twist to shake hands with me.
 |
| before I left the shop |
The left and middle boards are 11" wide and the top needs to be about 26-27 inches wide. I got two boards with a partially open knot/gum pocket so I can match Miles's desk. The far right board is 10 inches wide and I only need about 5" of that one. Not sold on this but I won't probably get to the table top until next week, maybe monday.
accidental woodworker
take it easy day .........
The foot was a wee bit sore when I rolled out of the rack this AM but it was so much better feeling than yesterday. No problems walking or standing but I took it easy nonetheless. I wandered up down to the shop several times but I didn't exert myself. I think the most strenuous thing I did all day was to sweep the deck in the shop.
 |
| sigh |
I can't bring myself to shitcan these cherry scraps. Went searching the shop for something to put them into and nada. I'll have to make a Lowes run and buy a 5 gallon bucket.
 |
| hmm........ |
Thinking about doweling Leo's desk. I read the literature again on the Dowel Max and tests showed that doweled joints were stronger than mortise and tenon. I had no problems doweling the small table. I don't anticipate any headaches with the desk. I checked and I can get 7 dowels on the ends of the top rails.
 |
| only one |
I put 2 1/4" long screws in the top - one at each block. On the bottom I put one screw at each end and two in the middle block. On the bottom I don't have to allow slots for the table top clips.
 |
| ouch |
The screw I put in at the top split the end block. It wasn't a complete break and it closed up nicely when I glued it. Instead of putting a 2 1/4" screw back into it, I put a 2" screw. It held and the block didn't split, break, or crack again.
 |
| youngest grandson is an artist |
I am going to hang this one in the shop somewhere. I will have to do some rearranging but I'll find a hole for it.
 |
| for my wife |
My wife is fascinated with old township/district maps from the late 1700's to the middle 1850's.
 |
| proof |
This is one of five frames that I made for my wife. All of them are still together. All the miters are tight still and zero evidence that they are planning to go south.
 |
| Union #3 |
Because I am brain dead I pissed away a couple of hours trying to get this spit a shaving that was the full width of the iron. After the umpteenth time putting it back together I noticed that when I screwed down the right screw in the frog, it titled backwards pushing the bottom edge at the mouth up.
Screwing down the left screw wasn't the same - no tilting or movement. With that one screwed down first the right still cause movement in the frog. But it wasn't as bad as when the right one was done first.
 |
| unbelievable |
I put the plane together for the last time intending to put it on a shelf and forgetting it. However, I tried to make RML shavings one last time. I couldn't believe what I saw. The last time I had made RML shavings the lever adjust was fully over to the left. Today it is full over to the right. ????????
 |
| RML shavings |
All three are the same thickness but the right one isn't as long as the other two. I made two more runs and I got RML shavings that were all about the same. The right ones were a wee bit more wispy than the RM ones.
I'm done with plane. Now that it is together I put it on top of my shop cabinets to gather dust.
accidental woodworker
partial work day.......
I didn't sleep that well last night. My right foot was sore and achy. It woke me up a couple of times to shake hands with me. When I got up the foot really said hello to me. It hurt like hell to walk and I limped for the entire day. The pain lessened a little but it flared up off/on all day. Something is not right with it and I'll be calling the foot doc for an appointment.
I thought of going to Highlands today because it turned sunny before lunch but I didn't. I'll be going on friday which is supposed to be partly sunny/cloudy here and sunny in New Hampshire.
Getting ready for that trip I filled up the pickup and I was less then a second from having an involuntary bowel movement. I had gotten gas less then two weeks ago for $3 and change a gallon. Today the same gas was $4.17 gallon. The trip to NH is going to be expensive I have fill up before I leave (done), fill up again before I leave NH, and one last time after I get home. Ouch - it was $45.87 to fill up from a 1/2 tank today.
 |
| forgot this |
This pen box was the third thing I worked on yesterday but I forgot to include it in that post. It is done - four coats on the inside and outside. Tomorrow I'll rub it down with wax and ship it off to my sister.
 |
| glamour pic |
Plain and simple with little adornment or embellishment. Just the way I like it.
 |
| done |
Don't know what I'm going to do with all bookshelves I made in the past couple of months. I have 12 of them - one is being used (my shop books), two are going with Miles's and Leo's desks, and one to Maria tomorrow. The other eight are waiting adoption.
 |
| rejects |
Worked on sawing the slats to width and thickness. These are the rejects from thicknessing. I added 8 more when I sawed the slats to width. I had to do this in batches because standing wasn't that comfortable. Surprisingly going up and down the stairs was easier than walking and standing.
 |
| plenty |
I might have to make a new 2" wide slat. When I measured it after cleaning it up with the 5 1/2 it was dead on 3/8" thick. All the narrow slats are 1/64 more than 3/8". I'll check the fit of it after I chop the first narrow slat mortise.
 |
| the drawer runners |
Went to Lowes to get some 1/2" maple for the drawer runners but nada. What they for sale was all twisted, cupped, or bowed. Bought some New Zealand pine instead. I'll let this relax in the shop until I make the drawers.
 |
| more drawer stock |
The prefinished plywood will give up the two drawer bottoms. I have enough poplar to make one drawer. I have my wood list for Highlands and it includes two six foot 1/2" poplar boards.
I might be taking it easy tomorrow too. Maybe the walk I went on yesterday is the cause of my current foot headaches. I could check up on my reading because the pile isn't shrinking at all.
accidental woodworker