Hand Tool Headlines
The Woodworking Blogs Aggregator
“Glory to God in the highest heaven, and on earth peace to those on whom his favor rests.” - Luke 2:14
Be sure to visit the Hand Tool Headlines section - scores of my favorite woodworking blogs in one place.
General Woodworking
good news and bad news........
Had to share this as I just heard it from the Doctor who did the bronchoscopy. The good news is there were no cancer cells in the lung biopsy or in the lymph nodes. That was unexpected because I had already made my peace with having lung cancer. Everything pointed to it. That was a leading reason for my fire sale too.
Now that I know I'm not under the Sword of Damocles anymore, maybe I can breathe easier. The flip side of the coin is the doc doesn't know what is causing the enlarged lymph nodes (which didn't have bacteria) nor what is in the infected lung area.
So I'm out of the woods with the big 'C' but on the fence with the unknown with what is out of whack with my left lung. It isn't slowing me down when I stroll. The doc is hoping something will show up on the PET scan I have scheduled for the 11th of Feb.
I can get back to long term planning and doing. I'm still going to empty the boneyard because I'm sure that I can fill it again. And I decided to do the wood type poster frame. I'll be hanging it in the wife's 'reading room'. Although I'm thinking now of changing the color of the frame from black to some other color, brown maybe?
accidental woodworker
packing day.......
I had a few takers on my plane fire sale and spent most of the day packing them up. I also made a few trips to the computer shop for help with my printer. I tried for several days to get the printer to work and finally said NO MAS. The techie at the shop said it booted up and saw the printer right away. He printed a test page and couple more from the Providence Journal site.
Turned out that I was using the wrong USB port. That is the one thing that I didn't think of to change/check. That was a quick $65 for Tech 911. The printer is working and the 4 extra toner cartridges I bought won't be going to waste.
Going to and back from the computer shop was a PITA. They were doing construction at one of the busiest intersections on Post Road. What should have been a 10 minute road trip turned into a 30 minute journey from hell. And I got to enjoy it 4 times.
 |
| better |
The iron and chipbreaker on the 4 1/2 had a line of rust on it. Of all of the planes on the bench this was the only plane with rust. Cleaned it up and touched up the iron on the stones.
 |
| one down |
I couldn't believe the prices on the priority boxes. The cost of them jumped more than $5 since the last time I used one. The smallest box was too small for a #3 and and next size up was too big. I had some boxes that were a little smaller.
The #5 fit in a priority box and the cost is $22.95. That is $2.05 less then the cost of the plane. Yikes.
Still feeling a little out of sorts due to the anesthesia, but better then yesterday. The throat is still sore and it doesn't seem like it is healing all that fast neither. Fingers crossed it will be better in the AM. It doesn't bother me to eat but I can feel it - a burning, achy feeling that sucks pond scum.
accidental woodworker
take it easy day........
I didn't feel 100% today so I took it easy. Anesthesia makes me feel funny for a couple of days. I spent most of the day cleaning and sorting out the boneyard. My wife wants half of the space for a reading room. That will happen after she gets back from going to North Carolina. She is going to keep daughter #2 company while her husband is away on business.
 |
| flattening |
This is the frame I glued yesterday. All of the corners were proud. Knocked them flush before doing the merry go round routine with the #4.
 |
| survived |
Sanded all the sides with 80 and 120 grit and nada. None of the corners whimpered or wiggled in the least. Strong and secure and I'm thinking of using it for a photo.
 |
| wee bit of twist |
Both the top and bottom had some twist to them. I'll have to think up a way to hold the photo within the frame. I want it to be set in from the front.
 |
| boneyard |
This is actually cleaned up some. I can the bookcase against the far wall.
 |
| hmm...... |
Forgot I had these molders. If I remember correctly these are Ohio tool molders and the far right one is a 1/8" beader.
 |
| another batch |
These are 4 match planes that I never got around to playing with. I offered these up to someone and if he declines I'll send them to whoever expresses an interest in them.
 |
| Lie Nielsen leg vise |
This is up for sale too and priced to move. $40 plus the dreaded S/H. I couldn't find it on Lie Nielsen's website and I think I paid around a $100 for it.
 |
| last of the scraps |
I filled up 1 1/2, 30 gallon shitcans with wood scraps. I got rid of every piece I had in the boneyard. I had the heebie jeebies doing this last pile. I know that I'll regret it in the next couple of days because I could have used it.
 |
| xmas gift from 2008 |
I made this for my wife but the movement never worked properly. The chimes never worked even once. It kept time good until the pendulum stopped moving. Don't understand that because the pendulum is/was independent of time keeping. I put another movement in it (no chime) and I'll let it go for a few days. I was going to give it away to my sister but my wife wants it back.
 |
| 5 hours later |
Except for the clock and the 15 drawer dresser, the rest of the stuff is going to my sister Kam. I'll email her first to see if she if interested. Fingers crossed on that. If she says nay, nay, I'll put it curbside.
 |
| blast from the past |
I am in the 2nd from the top, on the far left. Hard to believe it has been over 50 years since this pic was snapped.
 |
| old delta mortiser |
This is going to cost a fortune to ship so local pick up only. It comes with a 1/2" mortise chisel that I think is unused or at least I don't recall ever using it. It is missing the fence and it is no longer available at any of the tool part sites I tried. It would be easy to make a new one - just need a 25mm rod and someway to fix a fence to it at 90 degrees. Free to whoever wants it.
accidental woodworker
Fire sale........
I need to move along 12 planes. A few years back I went nutso rehabbing planes for my own use. These 12 are all extras but I did use them. I have tried to sell them before and this will be my last attempt at that. I think I've priced them to sell quickly too.
All of these planes were used by me in my shop for a couple of months. I didn't have any problems with any of them making shavings. You'll be buying a plane that can be put to work after you fettle it to your way of working.
 |
| first lot |
Four #3 hand planes. From the left - my personal user for several years. I only replaced it because I rewarded myself with a Lie Nielsen #3. This plane has my initials engraved on the lever cap. If yours are RJB, it is a done deal.
2nd from the left is a Union #3. Every bit as good as any Stanley #3.
3rd&4th from the left are Stanleys. Both of them don't have the frog adjust. 50 years of using planes and I have only used a frog adjust once. IMO they aren't necessary.
 |
| 2nd lot |
Five #4's. The first one on the left is a Miller Falls. Again this was a personal user that got used for about 7 months of work. No complaints with it all. The other four are all Stanleys and all got a work out with no headaches.
 |
| 3rd lot |
First one on the left is a 5 1/4, the second one is Miller Falls #5, and the last one is a Stanley #5. This Stanley jack plane is the only one in all the lots with a frog adjust. The Miller Falls was my first non Stanley jack and it impressed me. It was the first time I had compared another plane against a Stanley. It opened my eyes to start to look for other manufacturers plane's to rehab. I use the MF plane for almost a year.
 |
| 4th lot |
I had to satisfy my curiosity about these. I rehabbed 4 others and sold them, and another I kept because I couldn't find parts for it. From left to right #3, #4 1/2, #5, and a #7. I used these for a short time. They have a different feel and it took me a few to make shavings and get used to them. They are easier to push and worked as well as their metal siblings.
All the planes are for sale for $25 plus actual S/H ( I know S/H sucks pond scum). All the #3's (except the transitional #3) and the #4's will fit in Postal boxes. The rest will need custom boxes.
I would like to sell the transitionals as a set for a discount at $75. Barring that they go singularly for $25 ea.
My email is rjboumenot at gmail dot com. The one with the earliest time stamp wins the brass ring.
accidental woodworker
An Observation

Here is a question for you: should the point of a marking gauge be sharp or dull? And why?
Woodworking instructors answer most questions based on their experience. And most of the time when you're studying with a woodworking instructor, what you're paying for is not some universal truth of woodworking but rather your instructor's way of doing something. "This is the way I do it and that's what I know how to teach," is the instructional mantra. The more open-minded of the group will also say something along the lines of, "This is the way I was taught, and I recognize other traditions do it differently, but as I said, I teach what I know and I know that's just works very well." Some instructors have been teaching the same way for decades, whereas others see themselves as lifelong learners and explorers so their instructing evolves along with them.
My own woodworking mentor, Maurice Fraser, was compulsive, and basically taught woodworking techniques only if he had explored them extensively. The reason he taught a particular technique a particular way was because he tried every other possible method he could think of (or found out in his books) and determined that that way was the best.
Many years ago I wrote extensively about flatness of the back of a chisel or a plane blade and I polled some woodworking experts for their opinions. A very famous woodworker, a writer and instructor addressed my question, Why flatten the entire back of a chisel rather than only the first 1/32" - especially considering that Japanese chisels are purposely not flat and have a hollow? He responded by saying it was easier to teach a student to flatten the entire back properly rather than stop after the first 32nd or 16th of an inch.
A secret of woodworking is most techniques actually work. They may work at different speeds and efficiencies; they may require more or less capital investment or practice; but they work.
Certain tools fall out of favor for one reason or another, and then they can come back into vogue. Sic transit gloria mundi.
The ancient Egyptians built stone pyramids, furniture, and an empire with bronze tools.
When it comes to marking gauges, I have seen all sorts of modifications. Many of the modifications seem based on misunderstandings about how these gauges can be used. When you start out you don't know anything, you feel free to assume the problem with the tool is that it's not as good as it should be. As I turn on the treadle lathe I am connecting with New Learner energy. The trick is to bring some humility to the process as well. The wheel has been invented; I have to continually remind myself that I do not need to reinvent the wheel.
Incidentally if you want to know how to use a traditional marking gauge click here to a article I wrote ages ago. If you just want to cut to the chase, the answer is a slightly dull point works a lot better than a very sharp point because it doesn't cut the fibers. The dull point simply depresses the fibers of the wood - no scribe line that will catch stain or finish and leave a mark. The dull point also isn't as vulnerable to grain shifts as a sharp point is, so it stays straight and doesn't wander in the grain.
I'm hopeful that this year I will be able to write more blogs. I'm constantly getting comments about people who say they enjoy reading them, and I like writing them. I really do. But my time has been very very constricted this past year because I'm working on the lathe and running a business in a very tough environment. Whoever said necessity is the mother of invention is actually completely and totally wrong. Leisure is the mother of invention. If you don't have time to sit down, relax let your mind free and wander, you won't get any new ideas, and if you don't have time to actually explore new ideas from a practical sense, you won't have them fully fleshed out either.
Happy New Year, everyone!
one hour to 90 minutes.........
That is what the pulmonologist said was the time needed to do their procedure - a bronchoscopy and a needle biopsy of my lymph nodes. . Well boys and girls that didn't happened. Three doctors did the procedure starting at 1300 and the they completed it at 1637. I woke up in the PACU (Patient After Care UNIT) at 1655. I felt a used dish rag. Tired, disorientated, and weak as new born babe along with a wicked sore throat. I was able to go home at 1740 with a happy face on.
I debated even posting a blog for today I was feeling so crappy but decided to do it to maintain the streak. I got in a couple of shop hours in the AM. I didn't leave for the VA until 1030. Not much but I got to play woodworker before the procedure just in case.
 |
| super glued frame |
Absolute toast. I barely twisted it and popped apart effortlessly. Super glued miters are garbage and unreliable. It is good for holding miters together while yellow glue does the actual securing of them.
 |
| yellow glue frame |
Like night and day against the super glue frame. I twisted all the frame sides and nada. The miters held. I didn't go Cro Magnon on them but I did use a wee bit of force.
 |
| hmm........ |
What to do with this? This is the frame I clamped off the miter box rough and trimmed the miters to fit with a chisel.
 |
| cooking |
Yellow glue applied. Glued it just see how it will come out. Sized the miters first before applying the 2nd coat of yellow glue. I couldn't get the top left corner to seat flush.
 |
| done at 1800 last night |
The plywood bottom blends perfectly with the box sides. Four coats of shellac and I'm calling it done. The wife doesn't want it but I do. I like how the inside and the bottom looks. I'll use it at my desk for something?
 |
| 1900 |
I had to come to the shop to get the camera so why not? Unclamped the frame and twisted the sides 2 at time. I didn't feel like Cro Magnon man so the twist was on the weak side, but all the sides held. The miters look decent with no gaps and I'll clean the smooth them in the AM with a plane.
accidental woodworker
it snowed again........
Saturday was supposed to rain and turn to snow. That didn't happen but sunday around dinner time the snow came. It looked like fluffy stuff and when I peeked outside in the AM about 4 inches had fallen. I had gotten up early to shovel the driveway so I could go for my monday breakfast. When I got back from breakfast I finished shoveling the driveway and the front walk. That wiped me slick and I didn't get to the shop until after lunch.
 |
| winter wonder land |
The snow I had to shovel is what we call in these parts here about, heart attack snow. It was heavy, wet, and packed together. Every other shovel half of it would stick. Made shoveling a royal PITA.
 |
| wee bit of twist |
Both the top and bottom had some twist I planed away. This is the taped miter experiment I started yesterday.
 |
| hmm...... |
I didn't like the uneven stick out on both ends. I made this end the same as the other end - 3/8".
 |
| bottom on |
I need another box like I need a third eye in the middle of my forehead. I'll ask the wife if she needs it and if not, I'll toss it into the boneyard.
 |
| 2nd part of yesterday's experiment |
I'm using the extra stock I made for the bead moldings. 3/4" x 5/16" which is way smaller then experiment #1 stock.
 |
| pit stop |
I had to sharpen the iron in the LN 51 because the iron was chipped. This is an O1 iron which I prefer over A2. This one I can sharpen on my diamond stones.
 |
| hmm...... |
Gluing the second one. On the first one when I rolled it up the tape wasn't fully secured to each piece. On the 2nd one I pressed the tape down on each piece to ensure it was fully adhered.
 |
| better |
Happy with how well the blue tape closed up the miters. Much better then how the blue tape did on the super glued miters.
 |
| not bad |
This is the super glued miters and they look pretty good. No gaps to speak of and the frame is square.
 |
| super glue sucks |
When I removed the tape on the super glued frame, it came apart like it wasn't glued at all. I hadn't sized the miters before applying the super glue. Glued it back together with super glue and taped it shut again.
 |
| done |
The miters looked about the same as the first set. However, this is why I don't like super glue for joinery. It can not handle any stress to the joints. I have tried several different types of super glues and all of them failed the same way.
 |
| got curious |
I sawed a new 45 on my Poor Man's miter box and clamped it up off the saw. Not pretty but it also isn't ugly. The miters are open (to varying degrees) on all four miters. This is something I should have done yesterday but didn't. I don't think this would survive being glued with yellow glue.
 |
| hmm...... |
Used the chisel, shaving the miters a wee bit, and checking the fit. The bottom right miter improved as did the other three.
 |
| happy with this |
It took 4 trim and checks before I got to this. I find this acceptable - the miters are decent looking without any glaring gaps.
 |
| super glued frame |
The tape didn't pull the miters apart as I removed it. The miters feel secure and they survived the shake test.
 |
| hmm.... |
This miter is flexing on this side. It is tight on the opposite face. It took nothing to twist the miter apart.
 |
| needed help |
I don't know why I'm wasting so much time trying to glue this frame with super glue. This is the final time I'll be gluing it - the next failure will be free flying lessons right into the shop shitcan.
 |
| shellac work |
Got four coats on the bottom of the cleat and I'll get 3 on the top of it. Two coats on the new box with one more to go. I plan on returning after dinner to finish this two.
Did more searching for a Stanley #59 decal and nada. Instead I bought 5 Stanley Tools decals from ETSY. Bought five because one was $2.15 and S/H was $2.99. Same S/H for five decals.
accidental woodworker
Stanley #59 box done......the real finale.....
Yesterday I thought was done, complete. nothing left to do with the Stanley #59 box. I was wrong. Last night after dinner I had got the last coat of shellac on. This AM when I inspected the box and lid I saw some boo boos I had to address.
 |
| loaded up is next |
The last shellac coat was dry. No stickiness but before I loaded it up and found a hole to stick it in, I eyeballed it one last time.
 |
| sigh |
All the corners on the lid and bottom had waterfall drips. They were visible in raking light and set off my OCD alarm. Steel wool didn't touch them - it just smoothed them. I used a small card scraper to remove them and slapped another coat of shellac on the box.
 |
| now it's done (one hour later) |
Now it is 100% complete. I double, triple eyeballed the corners and declared them all drip free. BTW that is not a gap between the lid and the bottom.
 |
| chamfers |
I planed a small chamfer on the lid and bottom. There was (still there) a small defect in one of the plywood edges on the bottom. The chamfer hid it and the two unify the joint line between the lid and bottom.
 |
| japanese toolbox |
I took inventory in the boneyard because I'm thinning the herd and bringing the excess to my sister Kam. I don't like the look of the locking cleat.
 |
| yikes |
I don't remember this being this askew. It is in an inch at the top and it sticks out at the bottom over 2 inches. I don't remember this being this much out of whack when I finished it a few months back.
 |
| sigh |
Made a replacement cleat but I got the angle wrong. The cleat is tapered and angled top to bottom and it is also handed. Unfortunately for me, I made it for the wrong hand.
 |
| done |
When I made the 2nd one I kept eyeballing the original to make sure I did the taper and angle correctly.
 |
| hmm...... |
The cleat extends about the same on both ends. Unsure about whether or not to flush them. It doesn't look to bad to me and it gives something to whack to set or remove the cleat. I've got time to think about it while I apply shellac to it.
 |
| step one |
Decided to try an experiment to satisfy my curiosity. First step is mitering four pieces of pine. The pine is too tall for my poor man's miter box so I sawed them this way.
 |
| love seeing this string |
I started with 1/2" thick stock but a one board was thicker than the other one. Ran a knife line and planed the two boards down to them. I had to redo the boards to 3/8" because I planed a taper on one of the boards. Didn't expect to be this rusty planing the boards to thickness.
 |
| finishing the miters |
The miters don't look that bad off the saw. I am getting better but I still need a ways to go yet. I saw Paul Sellers saw 45's at the Springfield woodworking show and they were a perfect 90 when put together. That is a goal of mine that I hope to reach someday.
 |
| hmm...... |
Not there yet but this is close. I should have but didn't, try clamping it with a band clamp to see how it looked.
 |
| cleaned up |
Miters, cleaned up and smoothed.
 |
| the experiment |
I have seen miters glued and clamped up this way on YouTube for years. Two inch wide tape and the stock is 1 7/8" wide. I sized the miters before I applied the final glue and taped it shut.
 |
| the experiment failed |
I pulled the tape as hard as I could. It was square, I checked each corner both ways and all were square. However, there were gaps in the miters. None of the corners, top or bottoms, were tight. I had to clamp it to fully close the miters.
Maybe this experiment was too ambitious so I'll try it again. Although I have seen bigger tape jobs than mine on YouTube. I'll try it again with smaller and thinner width pieces. Might do two of them because along with yellow glue I have seen super glue used too.
accidental woodworker
A Unique French Plane
I was going through my tool collection yesterday when I stumbled on this little plane. It looks like any other coffin smoother with a convex sole until I took it apart to look at the blade.
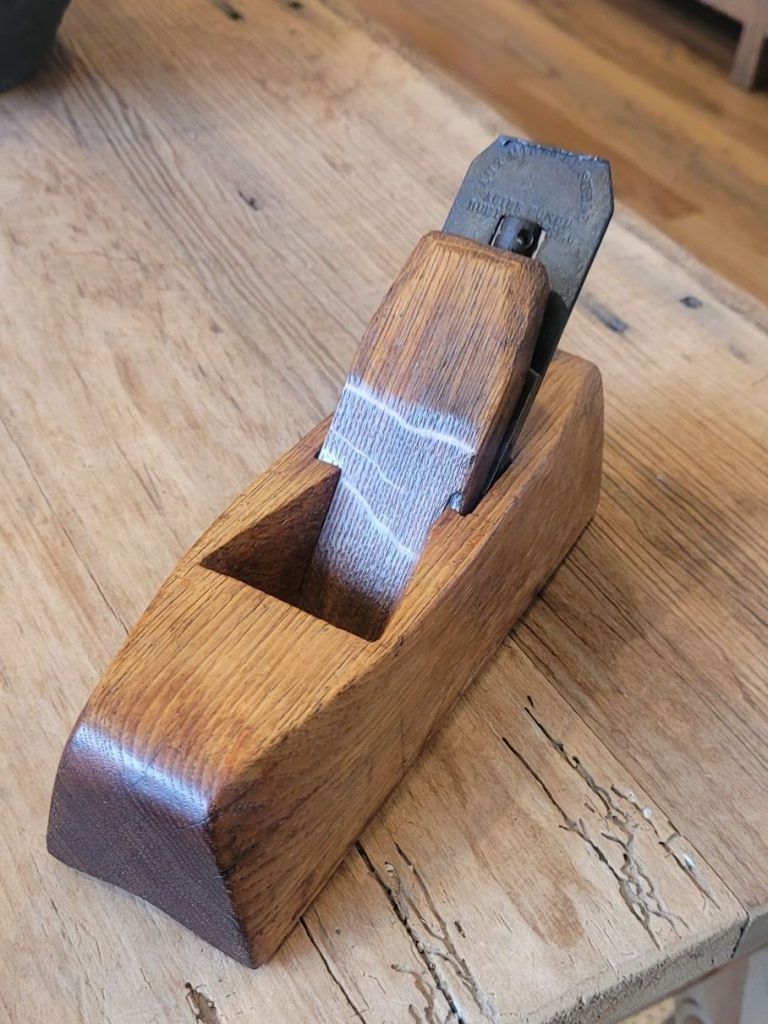
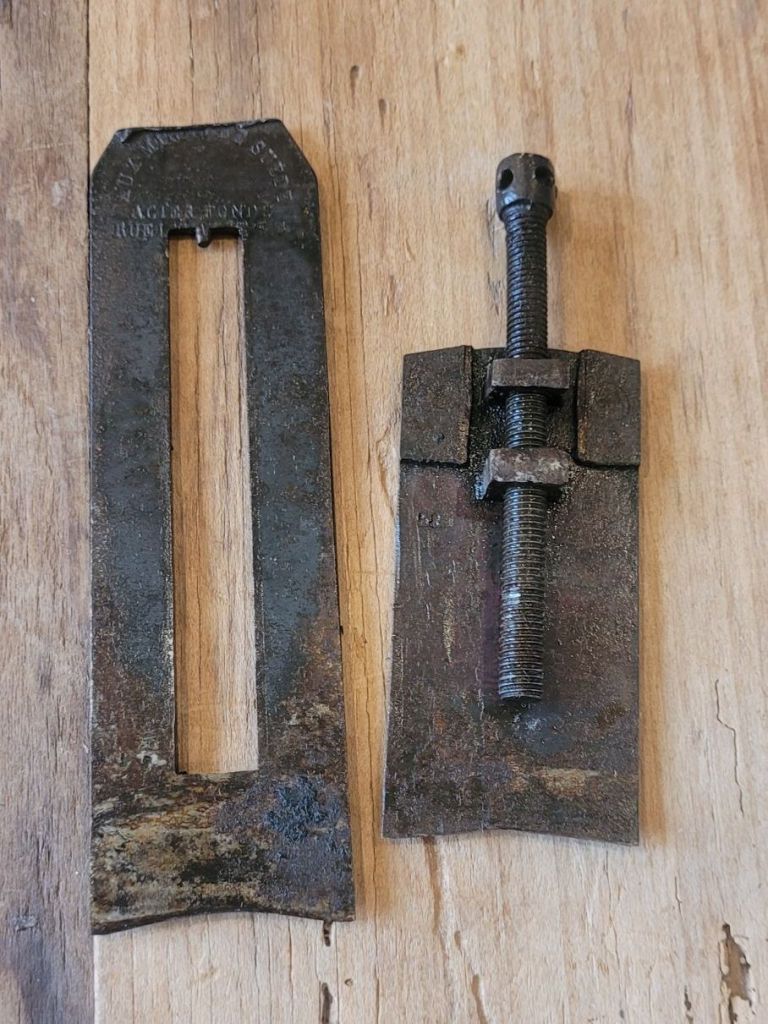
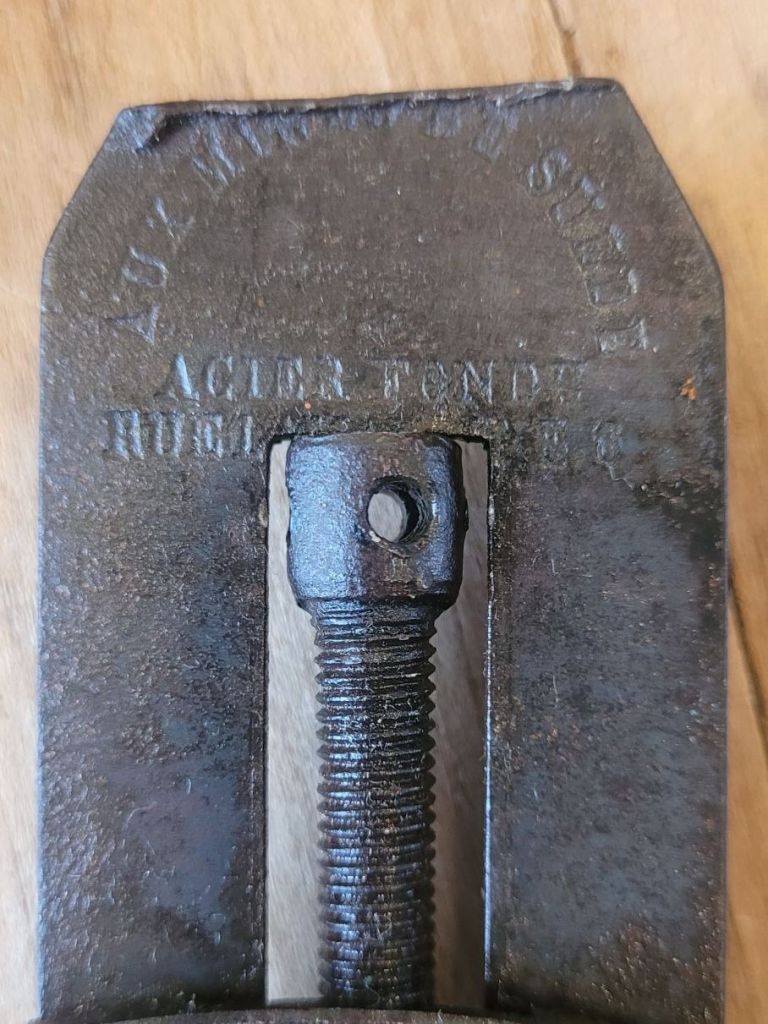
When looking at the back side of the plane, you can see where there is a screw mechanism to advance the cap iron up and down.

I took a brad awl and stuck it in the hole spinning the screw all the way down hoping I could remove the cap iron, but it didn’t work. My thread got stuck underneath the nut and I couldn’t turn it anymore.
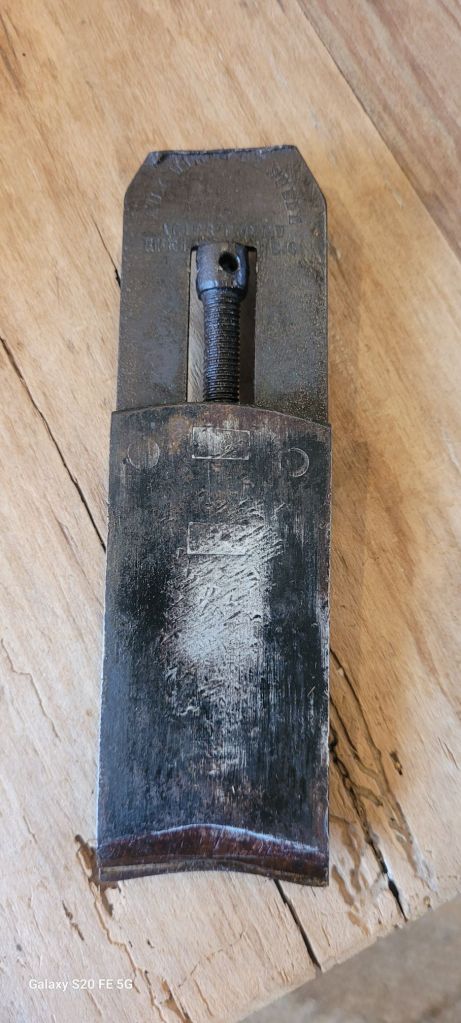
Then, as luck would have it, when I wiggled the cap iron a little bit, it came loose off the blade. My tool oil I used must have loosened up the rust that has been sitting in the blade for decades. You can see a little nib at the top of the blade where the cap iron mechanism lays into.
The plane was made by some French company but I can’t read the name. ACIER FONDU is cast steel in French.
The body of the plane looks to be made from oak. Quite possibly French Oak made by the original owner as you can still see the knife marks on the side where he was marking where to cut out the inside of the plane.
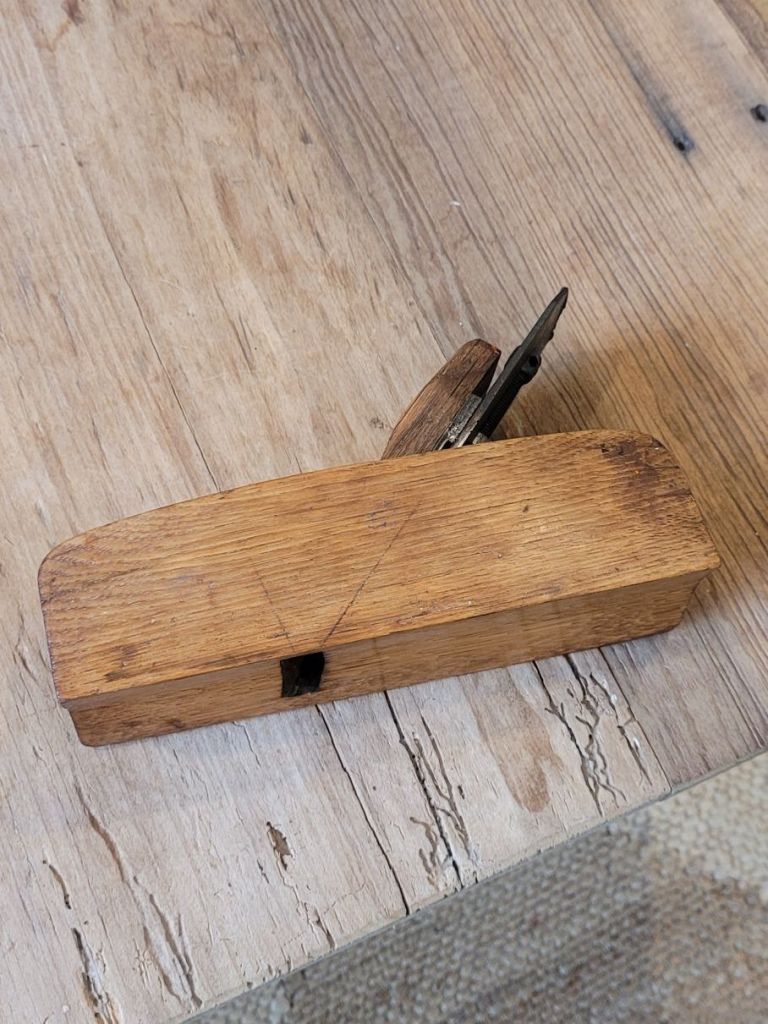
This is a really neat plane that I have ever seen anything like before. The owner may have used it on making wine barrels, but who knows?
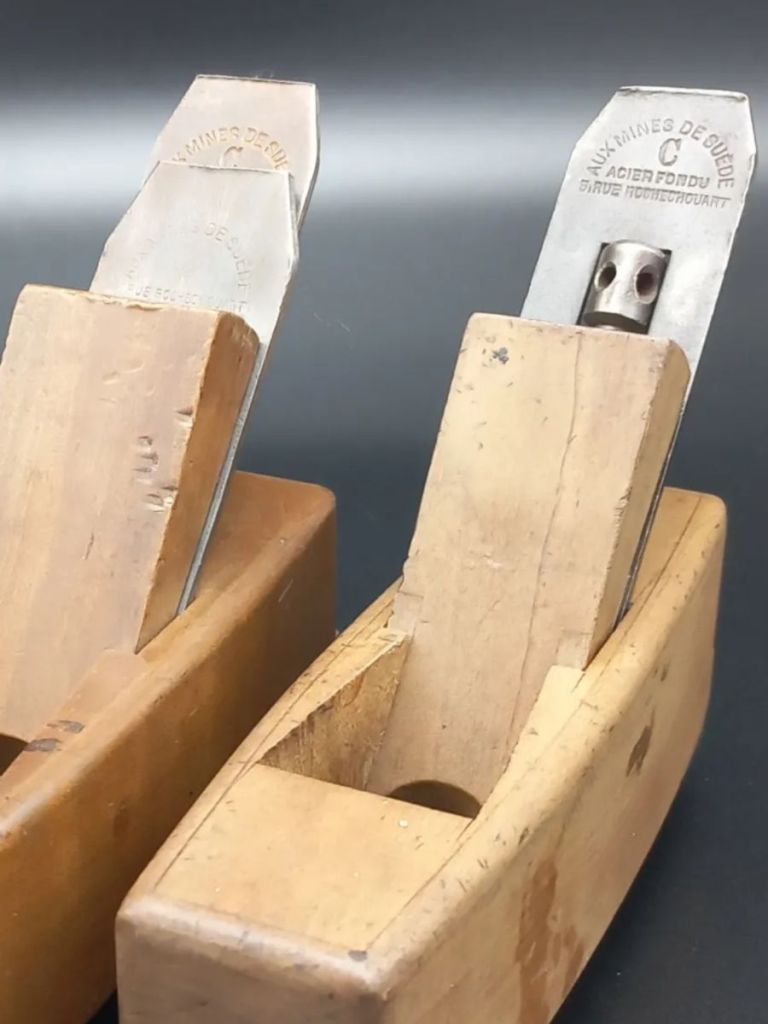
After posting this post, I did find an image of this plane from a French website. The maker of the plane is Aux Mines De Suede as it has the same cap iron mechanism.
I did a Google search on Aux Mines De Suede and found a downloadable PDF file of their catalog. Interesting tools in it.
Stanley #59 box done......
 |
| bushing block |
I determined the height of the block by how little would stick out and I could still grab and remove any of the bushings. I ripped the block to that and glued on a piece of 1/8" plywood to the bottom.
 |
| I waited |
I had gone back to the shop after dinner and I resisted the urge to unclamp it. I was a good boy and waited until now.
 |
| done |
Ripped the lid off with my rip carcass saw. I had one little glitch that bit me on the arse later. Wandered off the cut line and I had to plane the lid to flatten and straighten it out.
 |
| sigh |
The jig and the bushing block don't fit side by side. I need the width to be 3/4" wider to account for the thumbscrew on the left.
 |
| depth stop |
At least where I planned to put the depth stop had plenty of real estate.
 |
| keepers |
At this point the plan was to finish this box and make a new, wider one for the #59. These keepers will be glued to the inside of the lid.
 |
| serendipity |
It fits this way. I had put the jig back in the box to set it aside and found this. The thumb screw extends a wee bit into the bushing block, but it fits. I had thought of removing the thumbscrew but that would have meant having two more things to stow in the box along with the jig body.
 |
| hmm....... |
I'm ignoring the thumbscrew intrusion and instead focusing on the depth stop. I had space for it in the corner but not enough for a 1/2" dowel to put it over on. I notched a block to hold the jig secure and then a half round (7/8") to secure the depth stop. I like this, it is compact and all parts are secure. Nothing is rattling around.
 |
| dry fit |
I mitered the keepers in place. I found out that mitered corners work better then butt joints. One corner had a gap due to a short length keeper. I glued a piece of veneer in the gap closing it.
 |
| done except for the shellac |
Got the lid to fit in both orientations. I had to sand the outside face of the keepers to loosen up the fit. It was too snug before I did that.
 |
| shut out |
Does anyone know of where I could get a decal or tag like the one on the box? Doesn't have to be an exact match to the color and the lettering and numbers. I'm open to a rework of the label as long as it has Stanley, #59, and Dowel Jig. And I'll pay in US dollars.
 |
| doesn't fit |
The instructions didn't fit in the new box no matter which way I tried. I think the use of the jig is intuitive and doesn't need instructions. I'll keep them in the original cardboard box.
 |
| still working |
The Bim Bam movement is still counting out the hours and the time keeping matches the shop's digital clock. The hour count is still sounding with the minute hand at 6 o'clock. I'll get back to this next week. I wanted to plane the cherry today but there was rain and snow in the forecast for today and tomorrow. As I'm typing this no rain or snow has fallen yet. Should have done it.
 |
| 99% done |
Got four coats of shellac on the box but it still isn't shiny. I'll go back to the shop after dinner and get the 5th and final coat, shine or not. It is just a shop box and 5 will be the charm.
accidental woodworker
Making Multiples of Small Parts
For the mini chest of drawers that I recently completed, I struggled to decide what type of drawer handles to use. Eventually I chose small wood handles that angled on each side and had a tenon to fit into a mortise in the drawer face. After making a couple of one-off prototypes to figure out sizing, I decided on a shape I liked.
 |
| The prototypes - one sticks out 3/8", the other 1/2" |
I needed four of these handles. Sometimes when making small parts like this, it makes more sense to make them all from one stick of wood, then cut them apart. You can get greater consistency between parts, and it's far safer and easier to work with a longer stick of wood.
 |
| A 5/16" thick, 1" wide stick laid out for 6 handles. Always good to make extras just in case. |
 |
| Routed out dadoes which will be tenons later |
 |
| Then removed the tenon sides |
 |
| I used this "stop" to chisel a bevel on the wide sides (top and bottom of handle) |
 |
| You can see the beveled shape with the piece on edge |
 |
| Then I used the stop again to bevel the edges (sides) of each handle |
The tenon areas were made longer than needed so that I could cut the tenons off at the length I wanted (1/4") and still have some cleanup to do on a shooting board to get the next handle ready.
 |
| Cutting off a handle with 1/4 long tenon |
 |
| That leaves the next handle with extra material ... |
 |
| ... that I remove safely on the shooting board |
The tenons were just over 3/16" thick and they fit nicely into mortises chopped into the drawer fronts.
 |
| One handle fitted |
The moral of the story is this. When making multiples of small parts, it makes sense to lay them out on a stick much larger than needed for a single piece. It's easier to lay out this way, safer to do the cutting, and the repeatability is probably better, too.
Stanley #59.........
I am not somebody who gives a rat's ass about original boxes tools came in. I have the original box for my Stanley #59 along with the instructions for it. Today I made a new, wooden box for it. I'll put the original instructions in the new wooden box and I'll save the original box. I've seen Stanley boxes for sale on eBay for high prices that seem to sell real quick. I just hope who ever gets my workshop doesn't shit can the empty boxes I have - a mix of Stanley and Lie Nielsen.
 |
| final prep |
Sanded the poster frame, first the wood putty on the nails, and then the frame itself on both sides.
 |
| done |
Ready for milk paint. A little hesitant about making it. There are a lot of variables with milk according to the author. Before I go pissing away $$$ on milk I'll do a wee bit more research.
 |
| hmm.... |
My wife wants this corner of the boneyard for a reading room. I'm thinking of taking down the beach painting and putting the wood post frame there. The bigger headache is where am I going to put all the crappola I have in the boneyard?
 |
| wee bit off |
Using 6mm plywood to make the box for the Stanley #59. The miters don't line up at the toes - one is a wee bit longer than the other.
 |
| shop computer is back |
Got it up and running. Ubuntu is different then Linux Mint but I am slowly working my way around the OS. It is going to be a few days before I get used to having this one to look at. Here I'm watching the Wrist Watch Revival YouTube channel.
 |
| correct sequence |
Miter the corners first and then do the groove for the top and bottom. No blowout on the grooves or the exit. I made the bottom groove a few frog hairs higher than than the top groove is down. Concerned about the weight of the #59 bearing on a thin web of plywood.
 |
| checking |
Making sure that there is sufficient room for the jig. Nothing will ruin your day quicker than being a frog hair too short. That over sight has bit me on arse more than once.
 |
| double, triple checking |
I think I dodged the big one, but not by much. I accounted for the top and bottom panels but not for the lid separation. I think I'm ok but my spatial ability lives in a shit can.
 |
| glued and cooking |
The top and bottom panels were snug fitting and they could have kept the box together while the glue cooked. But to be safe, I used the band clamps top and bottom.
 |
| bit of a pain |
In the Stanley cardboard box all the bushings were tossed in to roll around loose. Don't like that so I made this block to hold them. It was difficult to find the correct size drill bit to drill for each bushing. I used two metric drills, one for the 1/2" bushing and the other for the 3/8" one. Used imperial drill bits for the others. I was shooting for a 64th over the OD for each one.
 |
| hmm...... |
This is the depth stop and the id is a 1/2". I have a few ideas for securing this one but I need the box done first. I need see how much room there is in the corner I'm thinking of using for this.
 |
| hmm...... |
It has been over an hour since I glued this up but I'm not going to unclamp it now. It is mitered and I want them to stay clamped for a wee bit longer - till the AM at the earliest. I'll probably saw the lid off by hand because that will have the smallest kerf. The table saw kerf is a 1/8" and I don't trust the bandsaw to saw plumb
accidental woodworker
Wood poster frame done.......
 |
| not the worse ones |
I only needed 4 but I ripped out 20. The five in my hand were the first ones I ripped. Each one bowed or cupped rendering them useless for moldings.
 |
| nope |
I thought had left the trim router setup. I was wrong and I had to set the router bit again which is a time consuming PITA.
 |
| fiddly setting |
I would set the bit and tighten it. Check the molding in the bit and it was off. Tightening the base would shift it up/down enough to throw it off. Wash, rinse, repeat a bazillion times before it was set properly.
I had to reset it three more times after the router was in the table. Note to self: don't break down the router again so soon. I got 6 moldings for the outside routed and ready to go.
 |
| my only quibble (so far) |
These are the leveling screws for the router base plate. They are exposed and could be accidentally whacked or bumped in the shop. I bought this table because of its portability and size. I'll have to find a hole to stick this in somewhere in the shop or the boneyard.
 |
| 2nd coat |
I was really surprised when I checked the handles and they were bone dry. No stickiness or any evidence and I had drenched these handles in BLO yesterday. I drenched them again and a couple of hours later they were dry again. Just a hint of stickiness - these handles were beyond bone dry. A couple of more coats upcoming.
 |
| hmm...... |
Bought this sander a while ago and I was hoping I could use it on the miters for the
frame moldings. It only does vertical sanding - useless for what I
needed.
 |
| it worked |
I couldn't find/figure/use a backer for shooting one of the miters. I have a miter trimmer thing a ma bob but it went MIA on me. This kind of worked and because I'm painting the frame I used it. Any gaps in the miters will be filled with wood putty.
 |
| inside moldings done |
I hand nailed the moldings on, both inside and outside. Miters looked decent but two corners were slightly misaligned. I'll have to address them with sandpaper and chisels.
 |
| working the outside moldings |
I found the outside moldings a wee bit harder to do over the inside ones. I had gaps on two corners but no misalignments. One corner required sanding to level the toes before I could fill the miter with wood putty. Wonder if milk paint will cover putty? I'll find out.
 |
| done |
I nail set all the nails and filled them with putty. I checked the poster in the frame and the frame is 1 1/2" bigger than the poster in both directions. The poster border is black which is the same as the frame color. I'll have to think of color for the matting that won't cause a jarring break between the two.
accidental woodworker
making moldings.......
 |
| hmm...... |
This came 3 days early, was it a plan to look good? Either way the wind blew on that I can finally make the moldings for the poster frame.
 |
| nope |
I was hoping that my trim router, being a DeWalt clone, would line up on the DeWalt 611 screw holes. Spoiler alert - it didn't.
 |
| 2x4 scrap |
This is going to be the holder thing a ma bob for the router table. I left the thickness as is but ripped the width to 1 7/8". Lucky me there was no twist.
 |
| hmm...... |
I thought I saw something awry. The handle tapers away from the head to the left and the head is skewed slightly to the right. Felt funny hammering a couple of 1" brads into some scraps. I'll look at Lowes and see what they have for small hammers. My favorite hammer was a Craftsman I bought from Sears a bazillion years.
 |
| yikes |
Houston, the vise handle is in the way. It was the same with the other
vise on the sharpening bench. This was my preferred placement of the
router table.
 |
| sigh |
Three of the four holes were off. I had to use the rat tail to enlarge 3 holes.
 |
| M4 coarse |
Checked the screws to determine whether they were metric or imperial. I expected metric because the trim router came from China.
 |
| WOWIE |
I almost had an involuntary bowel movement when I saw the price of this - $16.99 from Ace Hardware. I had a partial can of BLO but it wasn't liquid, had no choice but buy a can.
 |
| test run |
Used a scrap to set the router height etc etc etc. The right side of the bead has a quirk that I don't want. I want that to be round going straight down vertically.
 |
| got it |
This is the look I was shooting for. The quirk on the left will go up against the frame.
 |
| eyeballing the moldings |
I mitered a couple pieces of scrap moldings for one, to see how it will look, and more importantly to help me with mitering the real moldings. Miters can kick my butt and especially so when it is profiled. Got a finished edge with a shadow line between it and the frame.
 |
| hmm....... |
I tried 5/16" but I didn't like the width of the quirk - too little. 3/8" thick had the width I liked.
 |
| done |
Got the blanks ready to rout with a couple for oops.
 |
| ugly looking |
The fence had moved on me causing this 'step' on the end. It won't be a problem because I made both the short and long moldings 4-5" longer then needed.
 |
| hmm..... |
I shot the miters to check how they laid up in the corners. All four looked good and none had any gaps dry fitted.
 |
| extras |
While trying to not shxt my pants after seeing the BLO cost, I almost lost control when I saw the price of these screws - 95 cents each. But through experience they are worth the cost. I've lost router plate screws in the past. I'll put these extras in the trim router box.
 |
| thinking cap on |
Both moldings blew out when shooting them with the plane. The bottom is ok and the blow out there just needs a clean up swipe with sandpaper. The top is problematic because the plane exits past the round over. That blowout destroys the round over.
I don't have a left hand donkey ear jig so I have to shoot both miters on the right. I'll have to come up with some type of backer for the bead when planing this one.
 |
| moldings are done |
There was a slight quirk on the right side of all of the moldings that I sanded off. That side of the molding will be facing out and be visible. A 'line' like that will stick out when painted.
 |
| oops |
Not a bad oops, just a forgot oops. I made the moldings for the inside of the frame but not the outside. Sure glad the router table and the table saw is still set - I'll whack out the outside moldings in the AM.
Got no shop time in the PM. I had two appointments at the VA in the PM to attend to. The heart doc said I'm good to go until next year. Pulmonary is going to schedule a bronchoscopy sometime next week?
After I got back to the barn I had to bring my SATA Hard Drive to the computer shop. Ordered it from Amazon because Best Buy didn't have any internal hard drives in the store.
I should be able to get the moldings attached to the poster frame tomorrow. Once that is done I can mix up my first jar of milk paint for the miniature chest. The 2nd attempt will be black milk paint for the poster frame.
accidental woodworker
new hammer handle........
 |
| hmm...... |
Not sure if this is the correct way to handle a hammer head but it is the way I'm doing it. Slowly working down the head until it will fit fully in the eye.
 |
| yikes |
I was sharpening this draw knife by clamping the handle in the vise. I don't think I applied a ton of pressure but the handle said No Mas. The breaks were all clean and I had no problems getting the handle back to its original shape dry.
 |
| glued and cooking |
I could have made another handle but I couldn't have made one like this. I don't have a lathe and this handle fits my hand perfectly. I'll let this cook for a few hours. The wood is dried out and I think that is why it split/cracked in the vise.
 |
| the before and after |
The plan is to make the one on the left side to look kinda like the one on the right. I started by eyeballing the two to gauge how much wood to remove.
 |
| not yet |
Gave up on the draw shaves. This piece of hickory is like working stone with a butter knife. Used flat and round bottom spokeshaves, two block planes, and couple of chisels. I was going slow doing frequent checks to gauge my progress.
 |
| big piece of hickory |
The slow way seems to be working. None of the tools I was using were taking big shavings, but they were easier to operate over the draw knives. I was almost there - the hammer head would have gone on with a bit of gentle persuasion.
 |
| getting there |
The hammer head is only around a 1/4" into the hammer head with about an inch to go.
 |
| my gauge marks |
Used the ridge marks all the way around to gauge the next round of wood removal.
 |
| hmm..... |
Thought I was going out into left field here. The eye is bigger than the handle. I thought initially I was going for a tight fit.
 |
| almost done |
Not happy with the gaps but I've seen about the same in the YouTube vids I watched. Once the wedges are inserted it should flare out the handle tight to the eye walls.
 |
| Yikes |
I had the handle fully inserted into the eye. I wanted to remove it so I could clean up the fuzzy stuff before wedging it. I also wanted to separate it so I could finish shaping the handle. Ain't happening today boys and girls.
 |
| store bought handle |
Decided to put the store bought handle on the hammer head. This hammer is for the grandson's toolbox.
 |
| took some work |
The handle was too thick and I had to thin that before it fit. Not sure what to make of the gaps. The R/L is worse then the top/bottom. But this is the handle recommended for this size eye.
 |
| wedged |
The handle came with a wooden wedge and two much smaller metal ones. No gaps at all and the wooden closed up almost all of them. The two metal ones were inserted at 90 degrees to the wooden one. The addition of those two closed up the remaining gaps. The head felt solid and secure.
 |
| hmm...... |
The handle feels off. It is too long for the size of the hammer head IMO. Overall I don't like the look of it. It feels off in the hand too.
 |
| still square |
I bought this precision square back when I was going nutso rehabbing planes and old tools. The accuracy is way beyond anything needed for tool rehab but in for a penny, in for a pound. I made these wooden squares before Chris S at LAP did is big wooden square.
 |
| 2nd one is still square too |
I don't like using wooden squares and I prefer to use metal. Both of these wooden squares are displayed on my cabinet doors behind the workbench.
 |
| done |
Scraped and sanded the handle smooth so I could eyeball the glue lines. All of the were tight with no gaps.
 |
| the sibling handle |
It didn't like unbalance having one with a finish and the other sanded smooth. I'll buy a can of Boiled Linseed oil tod refinish the two.
Don't know if I want to make a hammer handle again. I don't like the store bought one at all. If I do I'll remove that handle and replace it with?
This one was going ok until the handle broke while trying to remove the head. I think now that the reason my other handle attempts failed was because I used softwoods. Although this handle is plain, there are curves and dips that are hard to execute in soft wood and especially so when there are knots and squirrely grain.
The Ubuntu OS is working fine. I am pretty much over the learning hump with a few more tidbits to figure out. But they don't interfere with surfing or posting my blog. The computer is so much faster. I expected a speed jump but it is a significant jump. Can't wait to see how the shop computer turns out.
accidental woodworker
switched .......
 |
| toast |
Before I pissed away calories and time again, I brought this to a computer shop to have them check it out. They said the boot loader was corrupt and that was why my installs were going south on me. He also told me that Linux Mint was buggy and I can agree with that. Nice display, easy to use, but it threw curve balls now and then at me. He recommended using Ubuntu. Said it was stable and support goes out to 2034.
 |
| current set up |
Bit the bullet and I am having the computer shop blow in the latest Ubuntu version. Until then this is my computer setup. Small screen size of the laptop sucked. The keyboard is a PITA to use because several keys stick. Fingers crossed that I won't have to endure this torture for long.
 |
| no balls, no blue chips |
I've had this handle to replace for over a year. I tried to make it a couple of times before and they were disasters (on scrap). Totally unrecognizable as a hammer handle. I've been watching a lot of tool handle vids on YouTube and I'm ready to jump into this again with both feet.
I got this piece of wood from a reader of my keyboard diarrhea and it is time to pony up. I don't know why I'm hesitating on this. I've always been a jump and do and let the chips fall where they may kind of a guy. Been cautious and slow because I don't want to waste the gift I was given.
 |
| ouch |
I forget what type of wood this is (hickory or beech?) and it is hard and difficult to shave wood off. I've had these draw shaves for over 25 years and this is the first real use of them.
 |
| sharp cures all |
I vaguely remember 'sharpening' these with a file. Of course back then I was clueless on how to do it. I'm pretty sure I read it in a book (pre YouTube) on how to do it. This time I'm going to use my old diamond stones.
 |
| yikes |
The business edge looks like crappola. I have no idea what caused the striations along the whole edge. I only did a cursory sharpening before I checked it on the handle. Big improvement. Still difficult to make shavings, but they were coming. Found that a smaller bite made the going much better.
 |
| 4 hours later |
I was surprised when the shop called me saying it was done. It is going to take some doing to get familiar with it. The biggest reason I went with this was Terminal supposedly works better in Ubuntu vice Linux Mint.
I will attest to that bearing fruit. I used the terminal to remove the admin user the shop had inputted to load the OS. I had tried this in Mint and got nowhere. Most of the terminal commands weren't recognized in Mint .
I brought the shop computer in to have them load Ubuntu on it too. They called me 30 minutes after I dropped it off to tell me the hard drive was toast. He said multiple sectors were corrupt. Understandable as the hard drive was probably used on the ark. I'll have to buy another SSD hard drive and drop it off.
Never got back to sharpening the draw knives. I'll pick that back up in the AM. Spent most the PM playing with the new OS. It will be a learning curve familiarizing myself how to work with this - trying to find and use 'settings' is a wee bit different now. But I'm good at '.....what does this button do....."
accidental woodworker
success is fleeting.........
 |
| started with this one |
I got the Linux operating system (OS) on my shop computer with no headaches. This OS blew in a lot cleaner and quicker then the last Linux OS I did. I got Fire Fox set up and signed into my google account with no hiccups. All was looking golden in Ralphie's workshop.
 |
| hmm..... |
Made a left turn to play with the Stanley #59 doweling jig. I was clueless as to what this doo dad was. Labeled 3/16 -1/2 at the bottom.
 |
| test |
Dug these 3 out of the shitcan for doweling them together. Laid out my marks and drilled some holes.
 |
| happy face |
Glued the 3 up with no problems. The joints lines aren't dead flush but well within 1 frog hair. On top is a comparison look between the Stanley and the Dowel Max. I don't have a lot of time on the pond with either one but I can see where one would be easier to use then and other one.
 |
| it had instructions |
Their were two instruction sheets in the box. The one on top of this one was for the dowel making jig. It is a depth stop - goes from 3/16 to 1/2 inch.
 |
| it was working |
I updated the OS with all the updates and restarted the computer with no problems or hiccups. Surfed the internet and YouTube for a while and shut it down.
 |
| ditto |
I went to Best Buy and bought a SSD Hard Drive. OS loaded as quick and easy as the shop computer. Did the same dance steps on this one too. Happy face on.
 |
| came yesterday night |
I cost almost as much to ship as the lime. S/H and the tax were more than the lime itself. I decided to eat the extra cost to get clean Hydrated Lime. This 5 lb pail should last me a bazillion years.
 |
| booting up for the first time |
Good feeling that none of the crappola I endured yesterday shook hands with me today.
 |
| my home page |
This was the last thing I played/checked before bringing it upstairs.
 |
| toast |
Shop computer wouldn't boot up at all. Got nothing but nonsensical garbage. I don't understand what is wrong. It seems the longer the computer is off, the less the chance it will boot up.
 |
| back to the laptop |
I left the computer on and made a run to the grocery store. When I got back I had to sign in because I forgot to remove the screen activity time out. The computer wouldn't recognize my password. Kept telling me it was incorrect. So I shut it off and rebooted it. This is what the screen said hello to me with. I couldn't get it past this screen. It is frozen and won't go past the initial boot up.
Earlier I had two functioning Linux computers and a few hours later I two heavy paper weights. I'm ready to go find my 3lb sledge and do some gentle persuasion with these )(*^&%(@&)_*%!%K! computers.
The only bright spot in the day, other than the initial success loading the Linux OS, was the Stanley #59 doweling jig.
 |
| I'm convinced |
Cleaned the test piece with the #3. Big smile on the face. I remember watching my neighbor 40-50 years ago using a doweling jig. Don't know if it was Stanley but he used it to edge joint boards. The jig looked easy to use and I can see myself using it for a long edge glue up for alignment. Especially so if one or both boards is not straight.
accidental woodworker
Pair of snipe planes finished.
I'm happy with these. They are for my own use.


The blades are modified from other snipe planes. When I get some time, I will forge some new blades.
ugh......
Today was one of those days where I felt like I walking through liquid fecal matter up to my armpits. Every thing I tried to do immediately went south on a bullet train. There were a few times where I had evidence of things going right only to hear laughter as the light went out. I'll attack this again in the AM and I don't plan on taking prisoners.
 |
| wristwatch size |
The time keeping movement is a lot smaller than what I expected. I gave up on this and shit canned it. I let it go for over two days and nada. The hands didn't budge a frog hair.
 |
| hmm..... |
Yesterday I thought this was pendulum movement and I had lost the arm. It ain't so boys and girls, this is/was a non pendulum movement.
 |
| missed it |
The pendulum movement arm has a magnet and the copper coil - those two are what keep the pendulum arm swinging right and left.
Spent the morning playing and failing with the movement that keeps time and Bim Bams. However, it isn't Bim Baming correctly. It is singing 4-5 minutes before the hour. I played with moving the hands and nada. Came close a couple of times but no cigar. After beating myself up with it for over an hour I said NO MAS.
 |
| another rabbit hole |
My USB stick with the latest Linux Mint OS came two days early. This OS install made me feel like my IQ had dropped down into triple negative numbers. I couldn't get the computer to boot into the Linux OS. I went in and out of the settings so many times it was ridiculous trying different combinations. I tried to install it 7 times and 7 times I failed.
I had changed something in the RAID settings that the computer didn't like. The computer wouldn't even boot up into the start screen. I couldn't get into the settings to change it neither. I cleared this headache by pulling the BIOS battery.
In the end I think I have a problem with the hard drive. One recurring error was that it couldn't find something, it was missing. I couldn't feel any movement in it and I couldn't find in the settings. Not 100% sure of that and I'm kind of rusty with this. New Solid State drives are only $40 or so. If I change this it will be the last thing I try with computer. I have dumped enough $$$ trying to revive it.
 |
| dark as I feel |
I looked and I think this computer will accept legacy IDE hard drives. I'll think about that over night.
 |
| the bright spot |
I got Linux installed on the shop computer. Got the network connected and it was looking like people were dancing in the streets of Mudville. That didn't last long.
I messed up jumping ahead of myself and crashed the install. I tried to reboot it but I got a scrolling line of numbers. I was beyond frustrated at this point. The urge to give both of these computers free flying lessons was making my toes tingle. Killed the lights here and I'll attack this one in the AM too.
 |
| before I left |
This is a Stanley doweling jig and it was on the table with the shop computer. Forgot I had it. To calm myself I made a bunch of holes. This is a slick and well designed doweling jig. I assumed that it was crude and not worth the calorie count to use. I was wrong, so very wrong.
The vertical scale on the right is for the center of the dowel hole. The short scale on the left is for the size bushing. You align the bushing size with the measurement on the right scale. Changed my mind an opinion of this. I will definitely be considering using this in future projects. The one bright spot in a overall dismal day.
accidental woodworker
Dining Room Renovation
Welcome back folks, it’s been a while. A lot has happened over the past few months, and despite my best efforts it’s been hard to find the time to sit down and write. There’s so much I’d like to share here on the blog but between commissions, teaching, and the house renovation, time has become… Read More »Dining Room Renovation
The post Dining Room Renovation appeared first on Big Sand Woodworking.