Hand Tool Headlines
The Woodworking Blogs Aggregator
“Glory to God in the highest heaven, and on earth peace to those on whom his favor rests.” - Luke 2:14
Be sure to visit the Hand Tool Headlines section - scores of my favorite woodworking blogs in one place.
Hand Tools
it wasn't 16 feet.......
I must have gotten some snow blindness because I was way off on how much I had to shovel. 16' didn't even make it to the end of driveway. I measured once I cleared it out to where the plow trucks dumped their stuff. From where I left off yesterday to the snow line in the road was almost 42 feet. I would have gladly accepted it being 16'. I started shoveling it at 0738 and I got done with it at 1248. I worked right through lunch because I just wanted it over and done with.
 |
| a little over 3 hours |
I still have a chunk of snow on the right to shovel. My shoulder was starting to hurt a lot here. To add an insult to injury, it snowed for most of the time I shoveled. It turned to rain briefly before ending. On a brighter note, Mr Sun said hello around 1400.
 |
| awesome helpers |
These are like football cleats that went on a super crash diet. Absolutely no slipping and sliding with these on. Because they slightly elevate your shoes they don't get soaking wet. I wouldn't have survived shoveling the driveway without them.
 |
| almost forgot to snap this pic |
The fruits of my labor. I am going to be sore for a while. I can't lift lift my arm up above my left shoulder. Can't remember whether to ice it or apply heat. I'll google it later on.
I went to Shaws to get some vittles and my street was barely a single lane. There is no way two cars could pass each other. I noticed that a couple of side streets weren't plowed at all. The main road going to Shaws was clear but the left lane (4 lane road) was a wee bit short on the width. That made for an interesting drive dealing with the morons in the right lane.
 |
| hmm....... |
This walnut bookshelf didn't want to get its pilot license. It isn't rocking here at all. No rocking when I checked on the tablesaw top neither. I'll be keeping an eye on it to make sure it behaves.
 |
| been two days |
I was too impatient to wait another day because I had to see how it looked right now.
 |
| about the same |
I really couldn't see any difference after this second heat and clamp. There is still a wee bit of a cup on one face and a hump on the other face. Still much better than what it was before I tried this. When it comes time to plane the hump/cup I shouldn't lose that much in the thickness. Hoping it will be about a 16th or less.
 |
| almost done |
This almost didn't get the final check mark today. My shoulder stopped singing arias and was screaming at me. I stayed in the shop long enough to get the last two bandings on and clamped. This was all I got done in the shop today. I don't expect to light the world on fire with shop time in the AM. That is dependent upon how much use my left arm will have to render.
accidental woodworker
Carve an Ice Cream Bowl
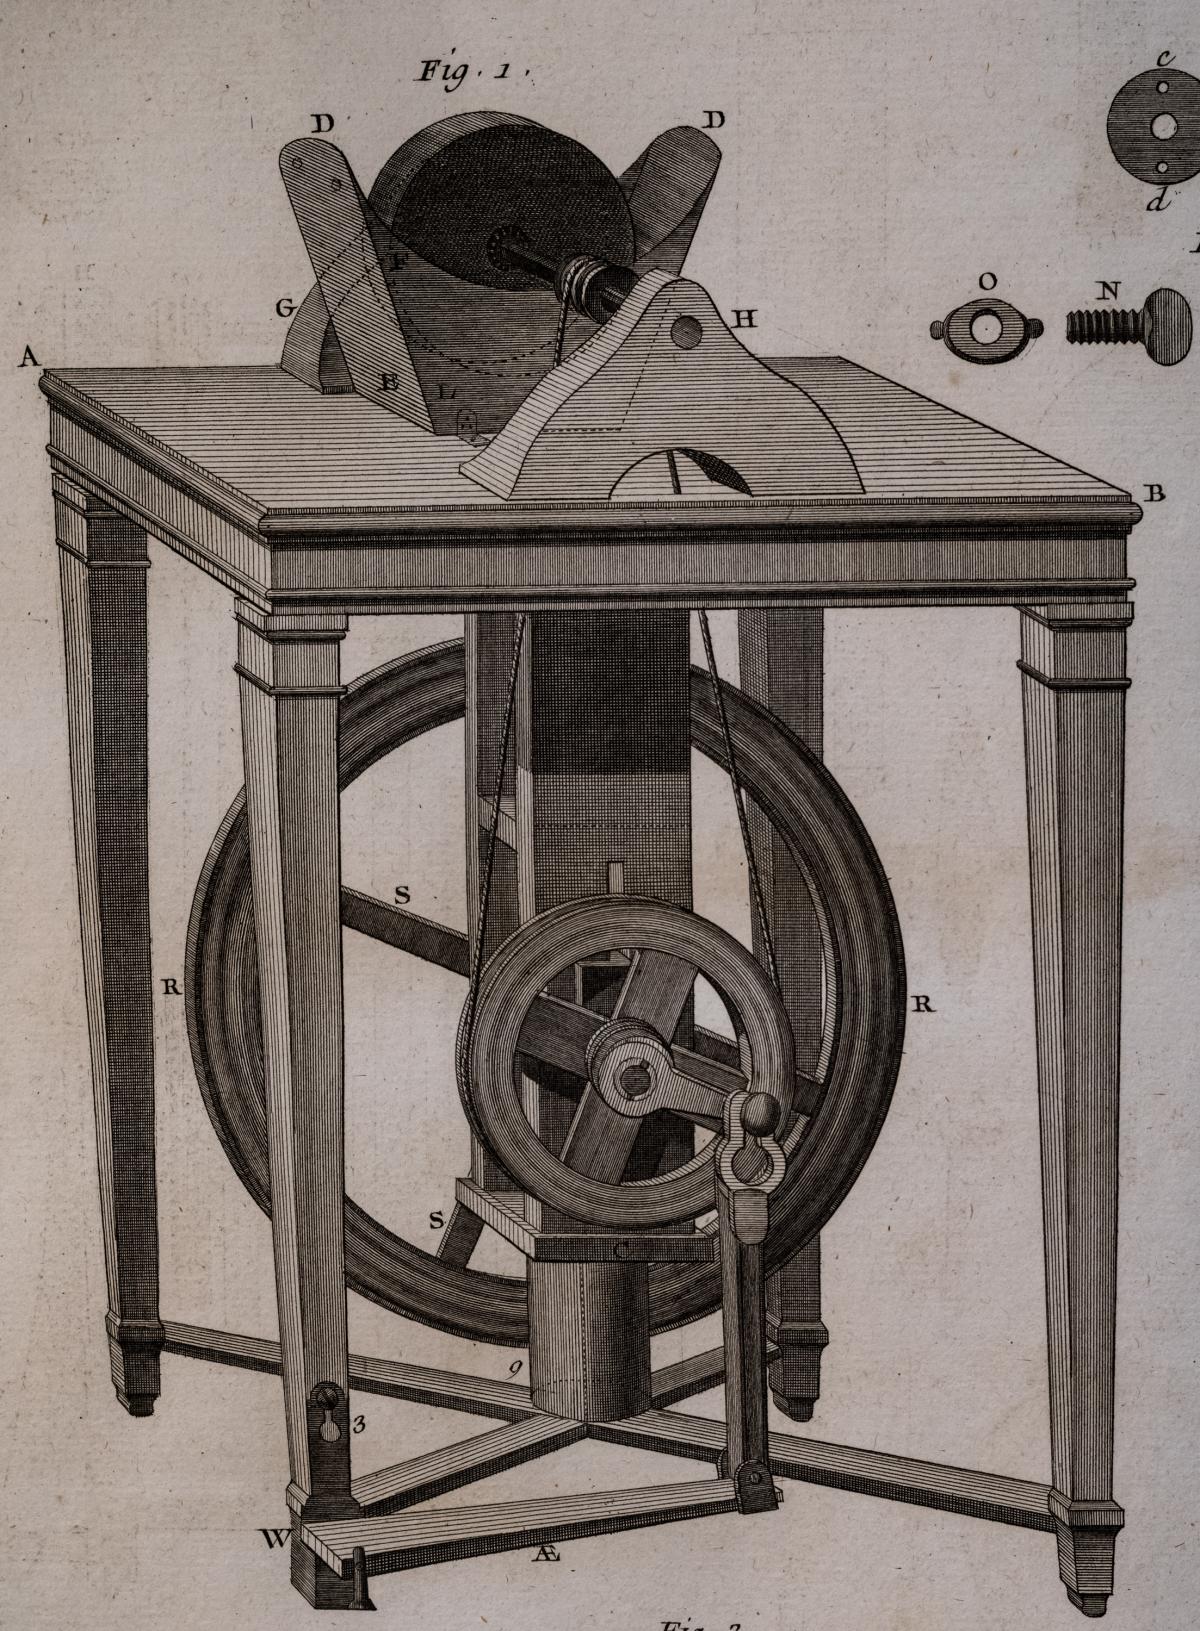
The Flywheel, Lathes, and the Industrial Revolution
 Hulot, pere "L'Art du tourneur mecanicien" 1775
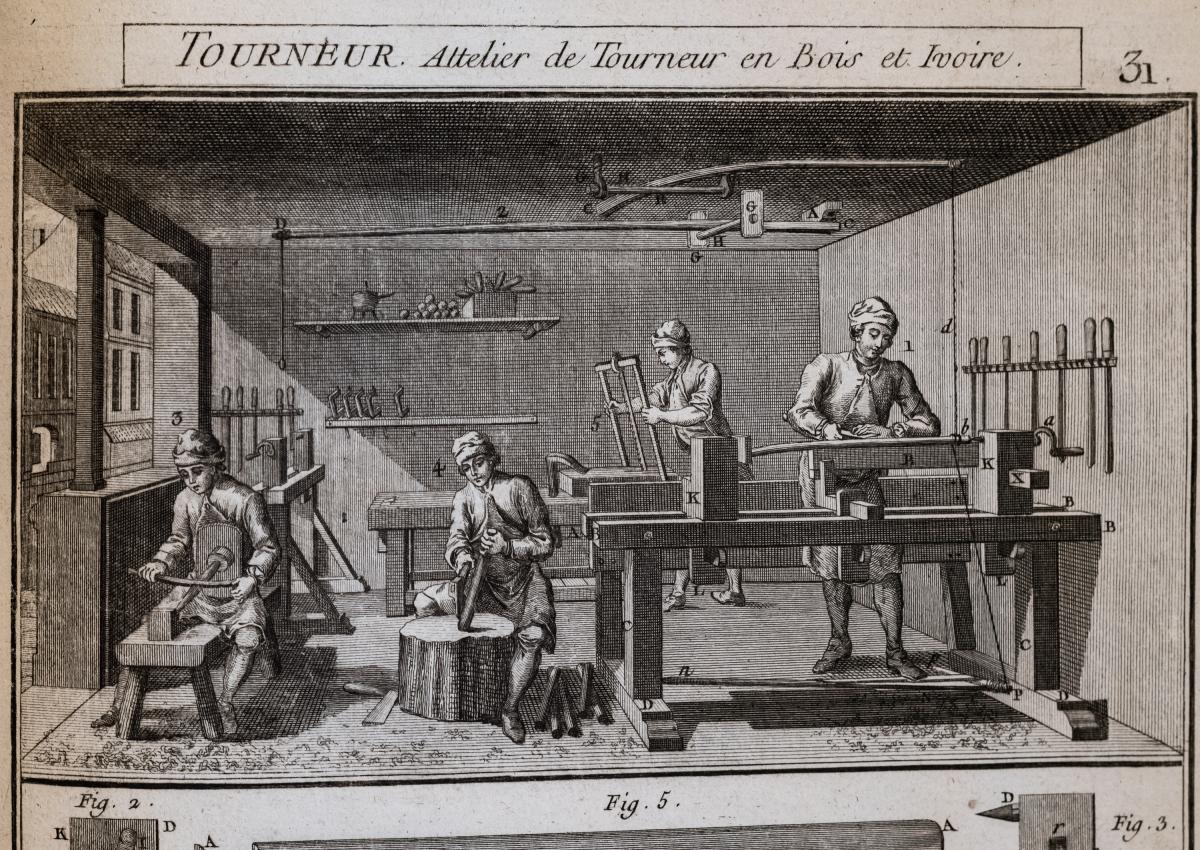
Prior to the Industrial Revolution, the two most common styles of lathes were pole lathes and great wheel powered lathes. Pole lathes featured a string looped around work held between centers. One end of the string was fastened to a springy wood pole and the other was attached to a pedal. The turner would press down on the pedal and the work would rotate in one direction. The work would be cut and then the turner would let up on the pedal so that the pedal would be pulled up, rotating the work in the wrong direction, and concurrently resetting the string for the next cut. This method worked well -- and a pole lathe was very easy for a capital-deprived turner to afford. The image above features a pole lathe in action at a French shop for wood and ivory turning. Interestingly, while the person in the back is sawing out stock, two people, one looking pretty young, are roughing out stock before it gets turned. Pole lathes work with an interrupted motion, and rounding the stock saves oodles of time. The lathe itself, with a springy pole attached to the ceiling, was pretty standard. This image from 1775 isn't the earliest image of turning, but it is representative (and also makes for a great opening picture for this blog post).
 Joseph Moxon's "Mechanick Exercises" 1680
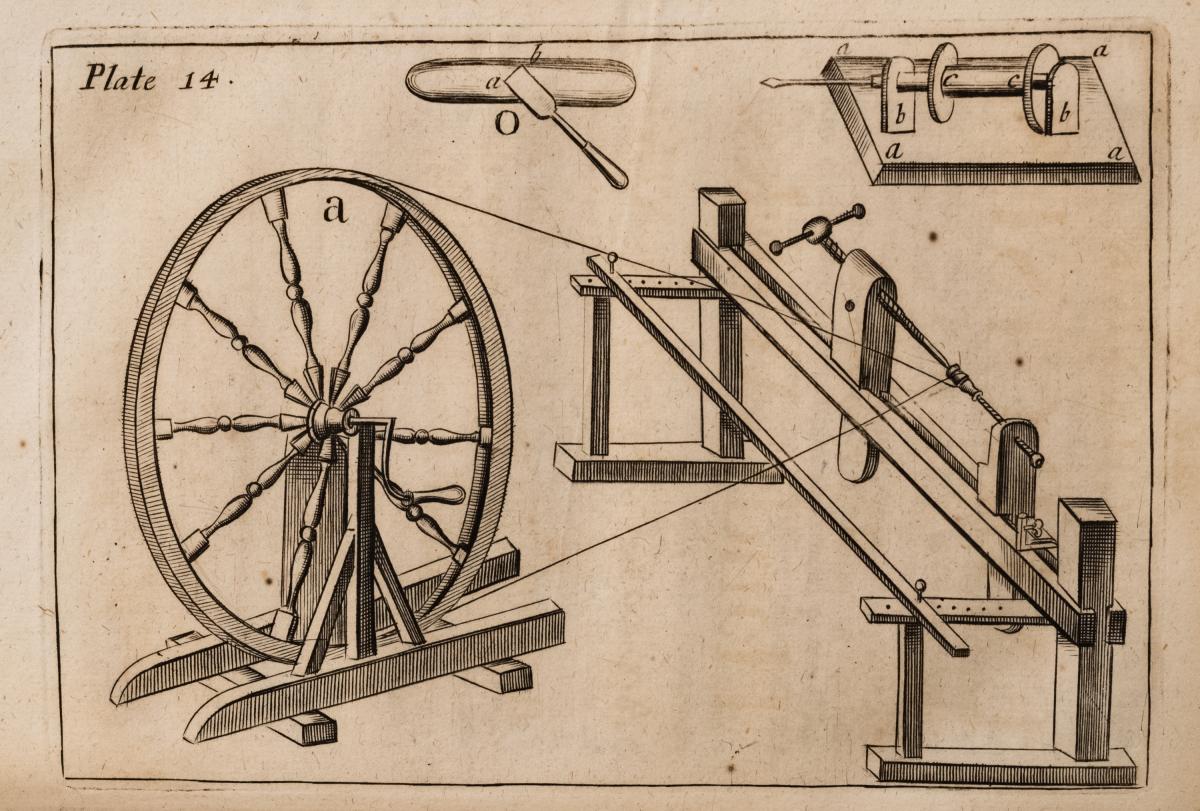
The second way of powering a lathe was using a great wheel (as in the picture above). A large wheel - as large as the turner had space for - was mounted in line with the lathe and connected with a string belt. A second person turned the wheel, powering the lathe while the turner cut wood. This model worked very well, giving the turner continuous motion, but had the downside of requiring a second person's involvement.
At the time of the picture (1680) water and water mills could have been used to gear up a wheel to power a lathe, as it was used for all sorts of larger machinery. I do not know know of a specific case where this occurred, and I am not sure if the mechanics at the time were precise enough to drive a line-shaft fast enough to be practical for a lathe.
Many permutations of the pole and great wheel lathes existed. The spring of the pole could be replaced with a bow, and all of the early books on lathes show pole type lathes with small crankshafts on the ceiling which could be pumped by a second person with the cord attached to the crank.
The main problem with a pole lathe was the interrupted rotation. The main problem with a great wheel lathe (and its derivatives) was the need for a second person. You could, I suppose, also use a treadmill apparatus for an animal, but I haven't found any examples of lathes being powered in such a way.
There exists a drawing from 1480 by Leonardo da Vinci that shows a treadle lathe. Was it something he saw, dreamed up but didn't build, or actually built what he designed? There is no proof one way or another for any of these options. The earliest image I have of a treadle lathe dates from 1680 and appears in Joseph Moxon's "Mechanick Exercises." That might be the first published image of a treadle lathe in literature, but I'm not sure. Considering how many pages are devoted to pole lathes and great wheel lathes in the few lathe books that exist from the 17th and 18th century, you have to make an assumption that treadle lathes were not that common. Moxon shows the treadle (below) on a special lathe for oval turning. It's doing fairly light work, but Moxon says that the treadle is useful for turning oval work, as is a great wheel lathe, because you needed continuous motion.
 Joseph Moxon's "Mechanick Exercises" 1680
 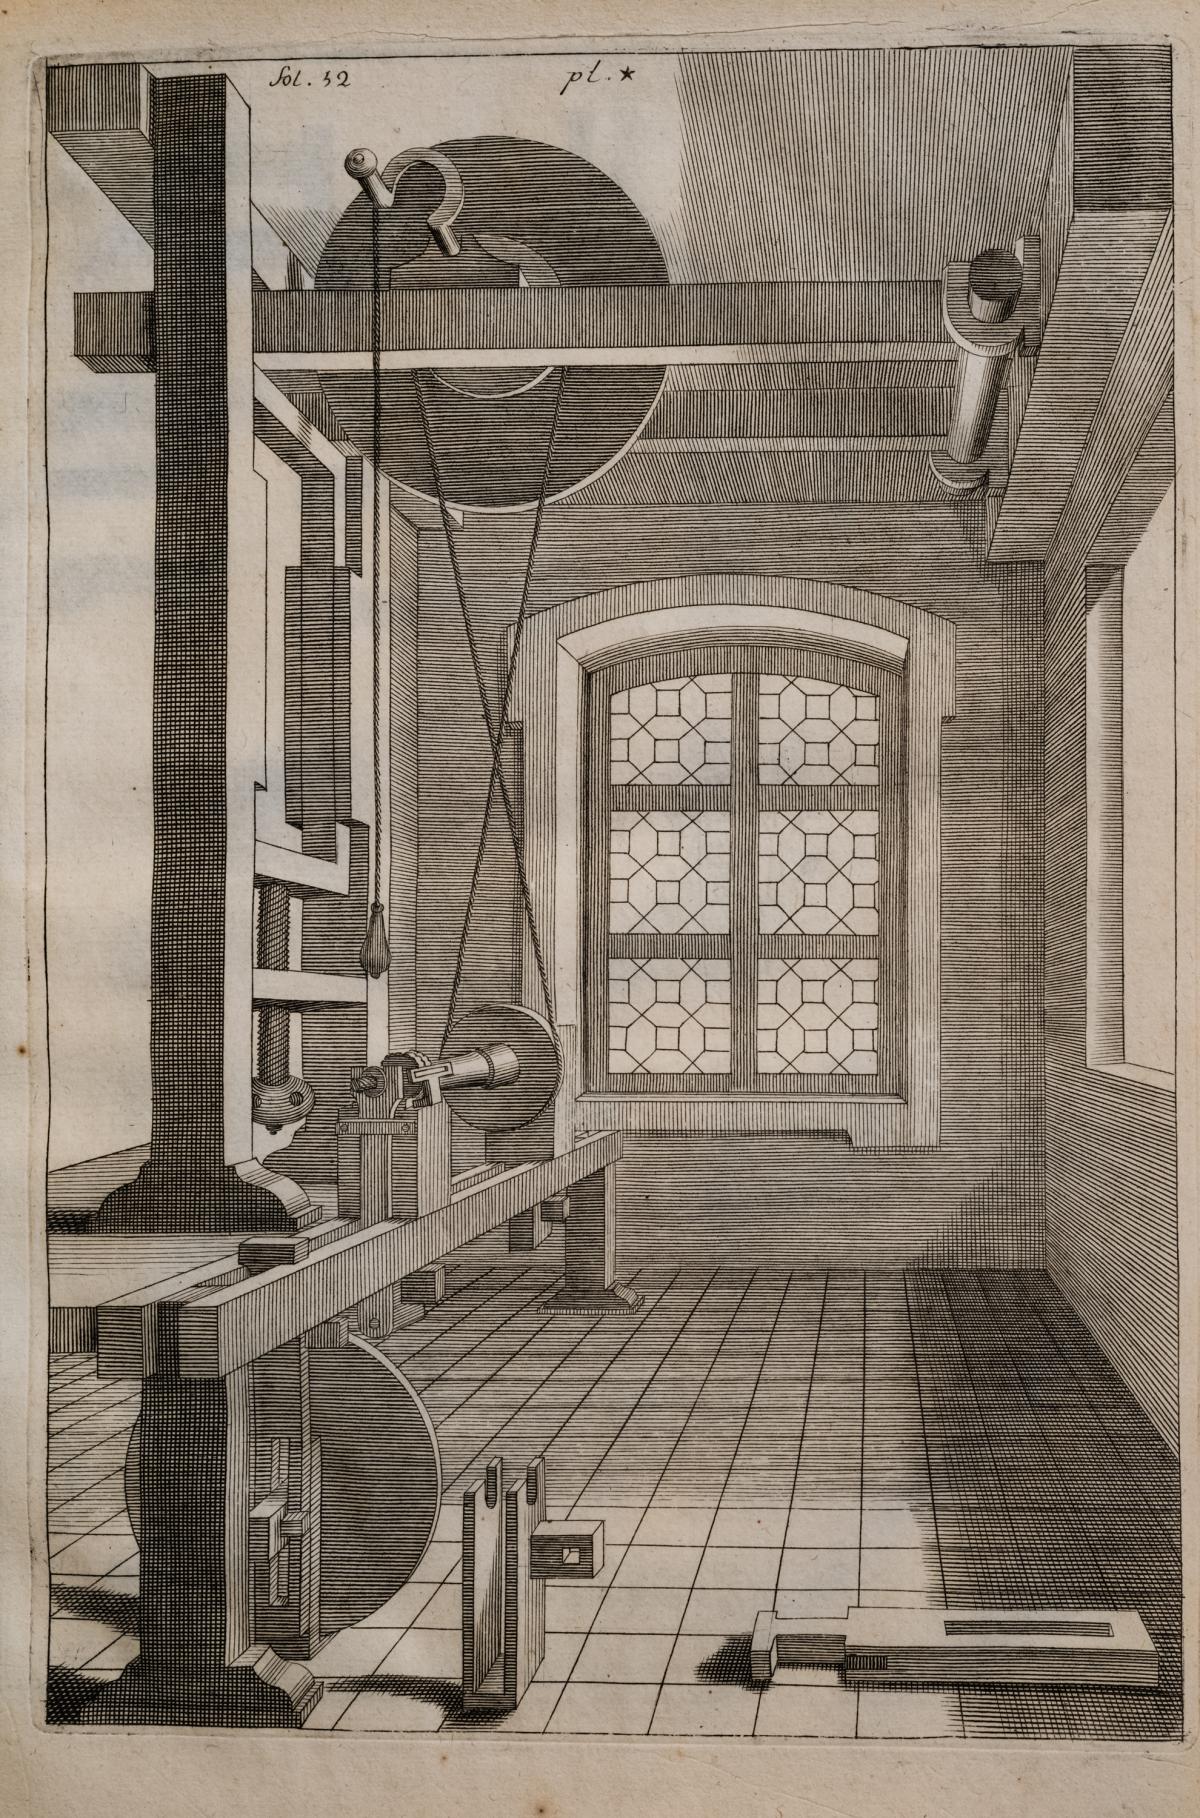 Charles Plumiers "LArt de Tourner" 1701
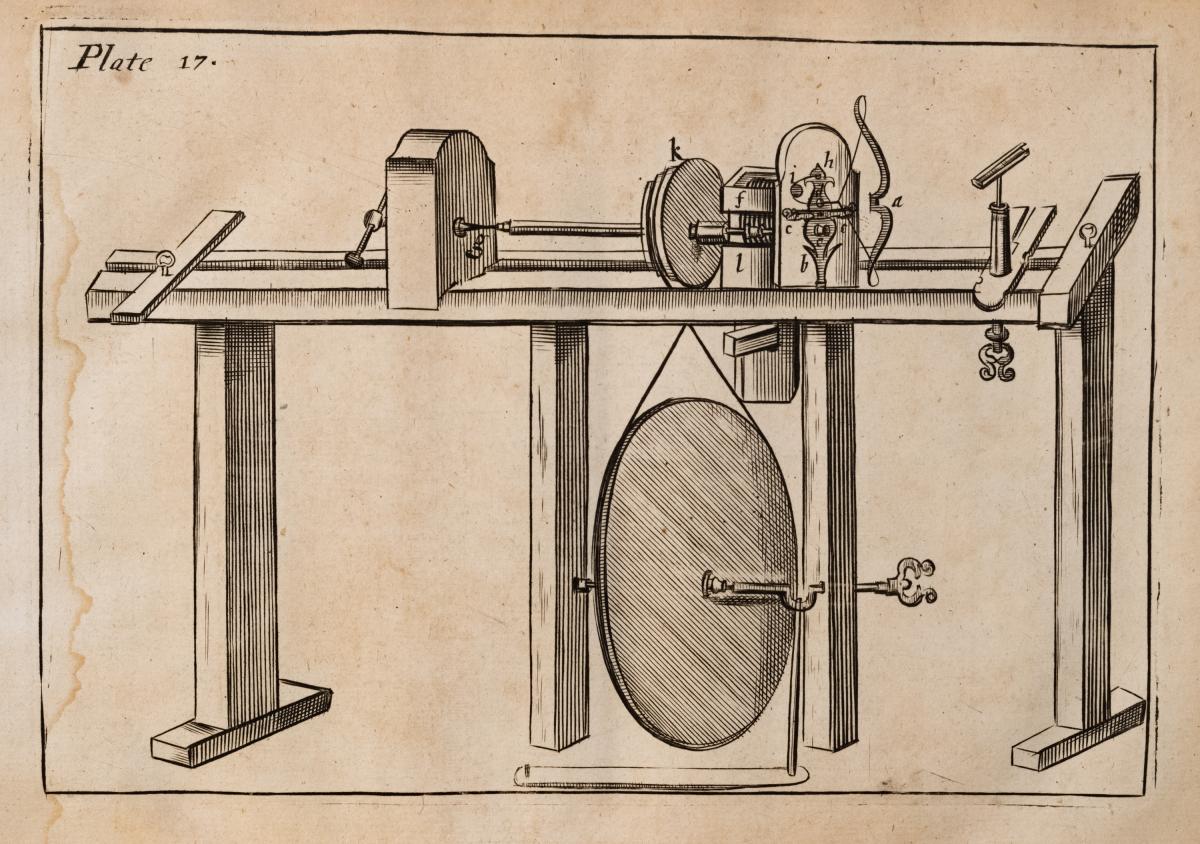
Plumier, writing in France in 1701, has drawing upon drawing of pole lathes, great wheel lathes, overhead drive mechanisms. The first illustration in his book is of a large lathe which has an overhead hand cranked wheel and a pole option. But a few pages later, a large illustration (above) of another main lathe shows the same hand-pumped flywheel mounted on the ceiling as before - but no spring pole option. Later in the volume, he detailed the parts of this lathe, and the detailed drawings shows something interesting.
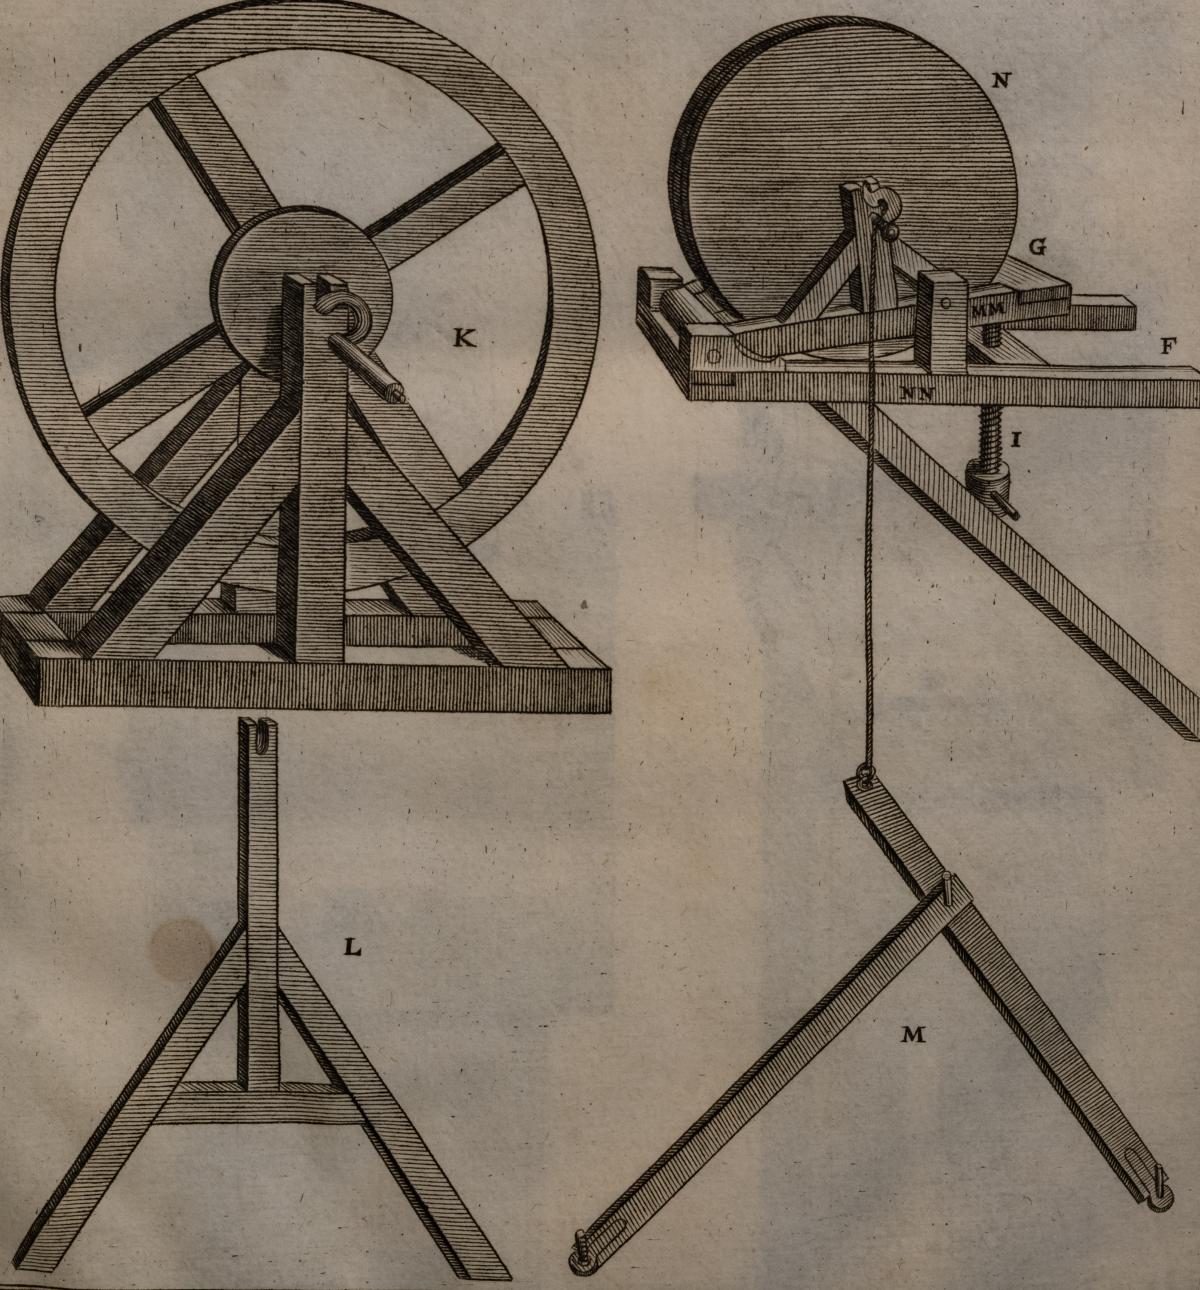 Charles Plumiers "LArt de tourner" 1701
Whereas in the main drawing the pull cord for the flywheel is clearly meant for hand action, the drawing above shows how to connect the flywheel on the ceiling to a floor pedal. As near as I can see from the drawings, the flywheels are just heavy wheels of solid wood and would work but are pretty light for a general purpose lathe. This is a big deal. Part of the advantage of a flywheel is that the flywheel stores energy and evens out the footwork so the lathe is powered all the time, not just on the downstroke of the pedal. The pedaler might be coasting on the way up, but the lathe is still drawing power throughout the entire stroke.
Later in the book, Plumier shows a light duty treadle lathe. This makes sense: a lot of the fancy work Plumier described required continuous motion and many of his readers were hobbyists who would want to work alone.
But these circumstances changed. By 1800 (and certainly by 1840), treadle lathes became all the rage - from the high end of Holtzapffel, to random low-end lathes for homeowners and hobbyists. I found many advertisements for these lathes. If you were a small shop or a hobbyist, the treadle lathe was the way to go. Great wheel lathes disappeared and factory line shafts appeared in mills. Pole lathes remained in use at least until the middle of the 20th century by bodgers working in the forest, where it was easier to turn chair parts in the forest then haul out raw wood.
What changed?
What happened?
It's easy to point to the nature of invention, to say that things have to be invented piece by piece by piece by piece. And the treadle is a natural evolution for small lathes. But I don't think that's the real case. If you're in a production environment, a great wheel lathe allows you to have continuous turning - as long as you have someone to do the powering. With the overhead drive motion seen in Plumier and Moxon and even earlier in Felibien (below), a turner could be very productive cranking the overhead crank if you had somebody else helping. In a production environment, a great wheel made a lot of sense. Pole lathes made a lot of sense as well because they entailed very little capital to build one, and they worked well for a one-man shop. Moxon's treadle lathe is a dainty little thing, with Plumier is not far behind. Plumier's overhead flywheel powered by a treadle could be operated by one person. The wooden flywheel could be big and store more momentum, but it would far from ideal. Plumier also illustrates a fairly lightweight treadle lathe, but it had a wooden flywheel.
I think the key is that there's a technical problem with all treadle lathes before 1780. The flywheels that you see in Moxon and Plumier are of wood - and they are simply not heavy enough. Holtzapffel tells us that the flywheel should weigh anywhere between 30lb and 100lb (for a big metal turning lathe). The flywheel also has to be machined and balanced, otherwise the entire lathe would shake and wobble. The cast iron flywheel on our treadle lathe weighs about 30lbs. But the operative word is cast iron. Cheap cast iron is an 18th century invention, and the ability to machine the grooves easily is a very late 18th century invention. While a great wheel lathe can be huge and made of wood, it gets its momentum from its diameter, not its weight. A treadle flywheel that has to live under a lathe bed and has a maximum diameter. It gets its momentum from mass. While it was certainly possible, even in the 16th century, to make a heavy bronze flywheel, accurately machining and boring it would be very difficult before 1800. And if the flywheel isn't machined, it's useless.
Up until the late 18th century it was possible, but very difficult, to can make a balanced cast flywheel except on a onesie-twosie basis, so it wasn't until the 19th century that machining a cast iron flywheel was cost-effective.
We actually tested a wood flywheel in an early prototype of the lathe. It worked, but not as well as the same same flywheel did when we bolted some metal plates to it. There are of course tradeoffs in weight, and some basic physics involved. If you have a light flywheel, the lathe is easier to start and spin, but it doesn't hold a lot of momentum, so heavy cuts slow it down a lot. If you have a heavy flywheel, the lathe is hard to start and you have to pedal for a few seconds to get it up to speed, but then it can power through work and its overall performance is better. In other considerations, a heavier flywheel is harder to move around, and it and costs more. Flywheel design is a compromise between usability and cost.We thought the learning curve would be easier with a cast iron flywheel, ideally in the sweet spot of a good bit heavier than a wood one, but on the lighter side of the weight range.
Incidentally, there's almost no literature on the design of treadle lathes. Part of the interest fueling this project for the past 3 years has been understanding the engineering why something was done and then actually testing it out - i.e., reinventing the wheel.
The drawing of a treadle-powered grinder (below) from Hulot is interesting. Chronologically, Hulot is later than the other references in this blog. The book published in 1775, with parts written very significantly earlier than that. But the grinder, unlike the traditional pole turning lathe at the start of this blog, is high tech. I can't tell if the flywheel is metal or not, but it looks metal to me, and in 1775 or earlier making it would have been quite a trial.
Lastly, Flibien's book is slightly earlier than Moxon's, but the lathe is nearly identical to the other lathes shown here. And we have the combo power option of pole or wheel. I originally thought that this was a drawing convention with a weird perspective, but I wonder if having a pole made it possible for one person to do pretty heavy turning, but having a wheel option allowed for faster, lighter work, if a second person were available to pump. (Lighter work because it's a wooden flywheel)
 Hulot, pere "L'Art du tourneur mecanicien" 1775
 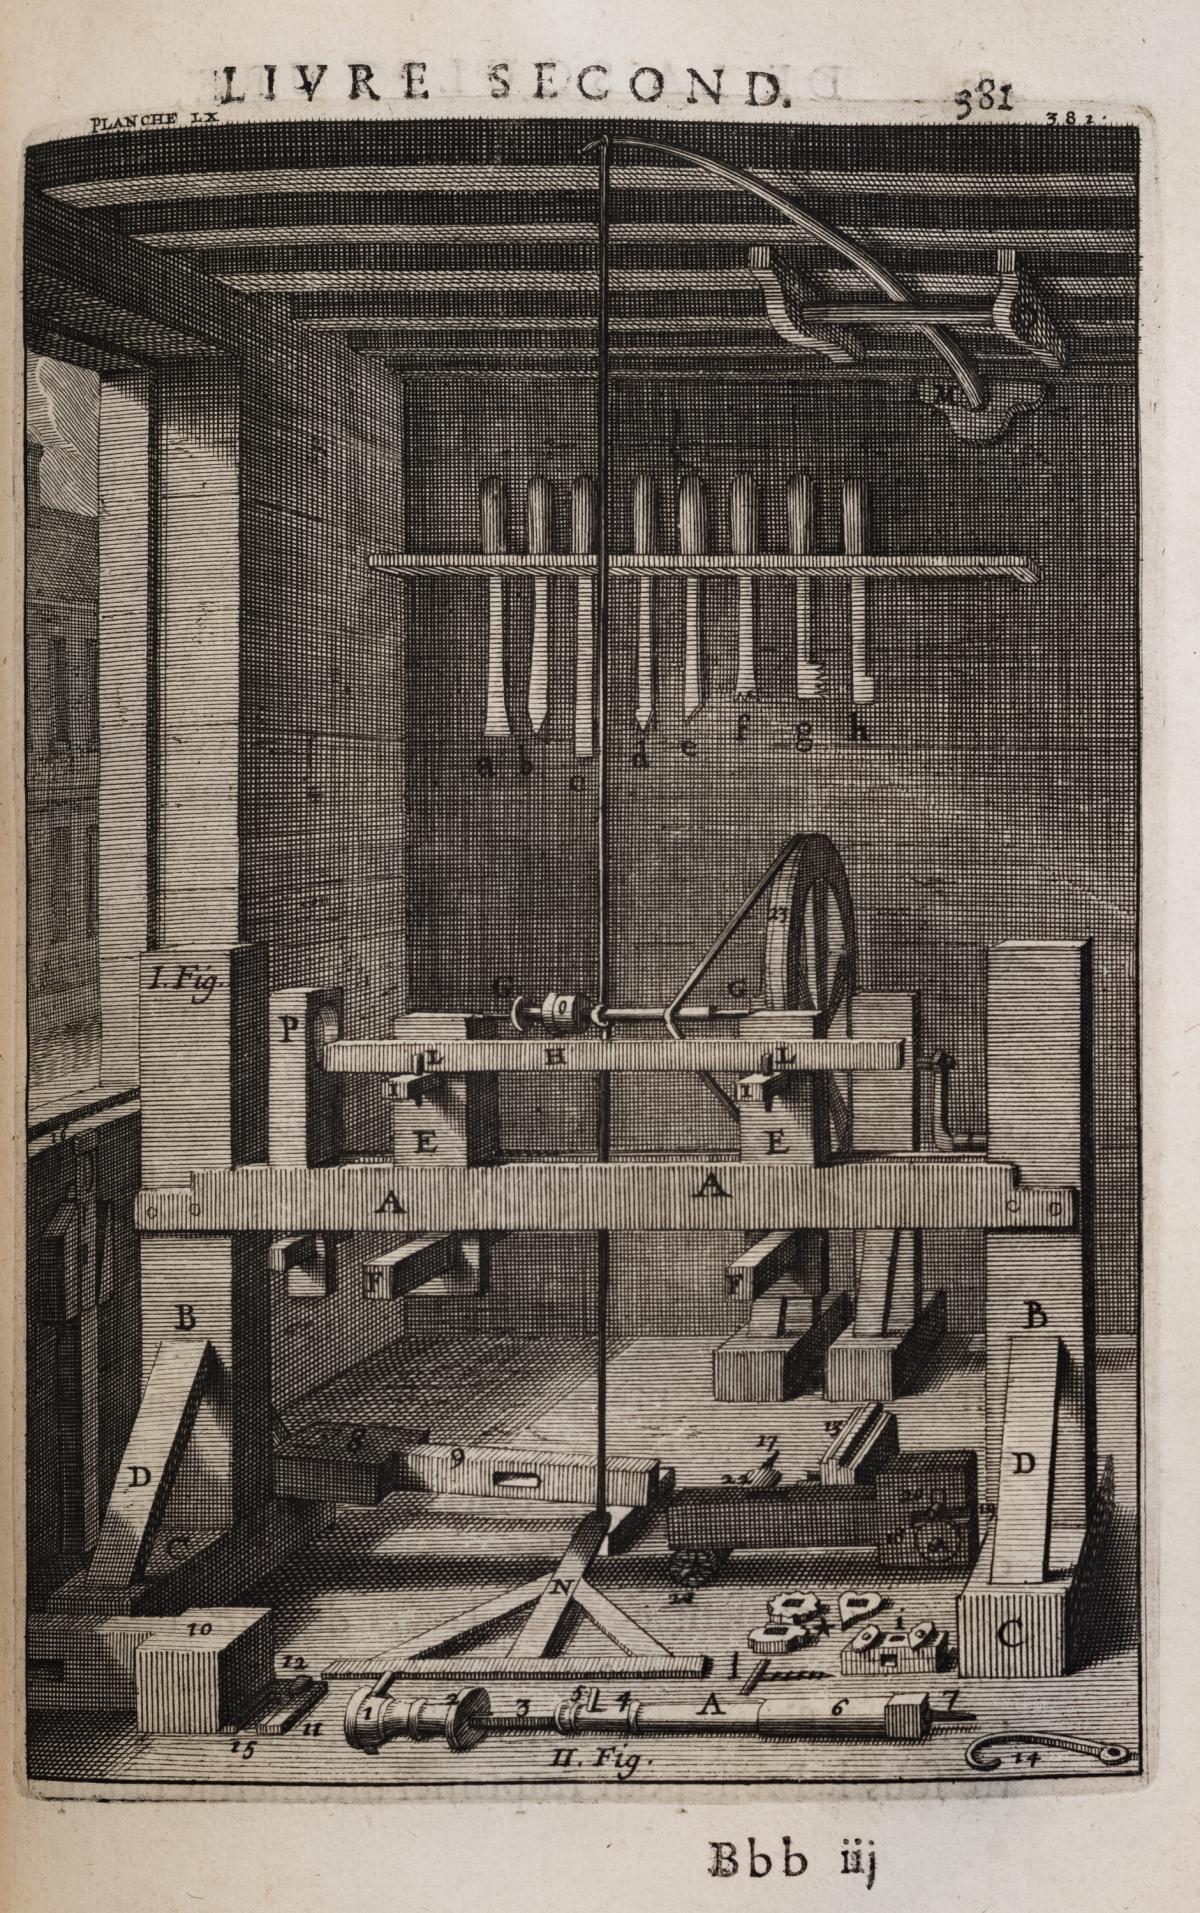 Andr Flibien "Principes de l'architecture, de la sculpture, de la peinture, &c." 1676
 record breaking blizzard.........
The last big blizzard was in 1978 and I missed it. I was somewhere in the north Atlantic onboard the USS Cavalla SSN 684. My wife had to deal with it but she survived, She had gone to her mother's house to ride out the blizzard. The snowfall from this blizzard was over 2" more than the 1978 one. Kind of wish I had gone to north carolina with my wife now.
 |
| this sucks |
I shoveled the spot in front of the truck and my wife's parking spot first. I waited until after I made a trip to the shop first.
 |
| this is going to hurt |
The city only plowed a single lane down the street. The end of my driveway has an extra 5 foot wide mountain of snow I'll have to shovel . The headache is there is ittle real estate to dump snow. On a brighter note, about a 1/3 of the driveway had almost no snow. The wind blowing pushed a lot of snow down to the end of the driveway.
 |
| hmm....... |
Starting the banding yesterday and before I went out to shovel all that white crap, put on two more pieces. I attached the banding with super glue and fingers crossed that it holds up over time.
 |
| wife's spot |
Shoveled the back stoop and this spot. The sun was shining and it was kind of warm, the temp was above freezing (0C). Almost 2 hours of my life that I'll never get back.
 |
| 21" |
When there is this much of the white stuff, this is close enough. The back right corner was over 24". This is the foundation of the old garage and it is where I park the truck. Shoveling my wife's spot and mine took me a little over four hours.
 |
| welcomed |
The bare spot was nice not having to shovel. This part of the driveway is a ROYAL PITA. The left side doesn't have any where to dump snow. So I have to shovel and walk it over to the right and dump it there. It was good work out. I quit here with about 16 more feet to go before I hit the road.
 |
| 90 minutes |
Cleared it from the front door to road. At least the postman and deliveries can be made. I didn't do the front sidewalk. I'm sure the plows will be coming through again to widen the road, or I hope they do. Then I'll shovel a path to walk in.
 |
| hmm...... |
Banding is almost done. There is one more going around the top of the lid. This would have looked better if I had inset the banding into the box. This being plywood, it would have been a nightmare plowing the dadoes for that.
 |
| WTF? |
The walnut bookshelf is rocking still. The left rear leg is a 32nd off the saw table. I am at a total loss as to what is causing this to lay flat on one day and the next day rocking again?
 |
| awkward |
I had to sand the left front leg to eliminate the rocking. Moving the bookshelf over the sandpaper and trying to hold it at the same time was difficult. I finally got it to lay flat on the tablesaw and not rock. Also didn't rock on the outfeed table and the workbench. There is free flying lessons available if this rocks on me in the AM.
 |
| done |
These were done a few days ago but I forgot to post it. I am going to have to figure out a stop of some kind for kickstand leg. As is it goes back to far, thinking of gluing a ribbon as a stop. Other than that I like how they turned out.
Didn't finish the shoveling. I will be back at in the AM. My back doesn't hurt right now but my arms and shoulders are a wee bit sore. How I'll feel in the AM is a question mark.
accidental woodworker
The Japanese Gennou & Handle Part 19 – Laying-out the Handle

Not all those who wander are lost.”
J.R.R. Tolkien, The Fellowship of the Ring
Introduction
In previous articles in this frightfully sexually-charged series, Beloved Customer produced a design drawing for your gennou handle based on the parameters of your actual gennou head and your body. You should have also selected, or at least rolled out of bed onto the floor, opened on eye, and seriously considered, an appropriate stick of wood. Assuming you’ve procured said stick, let’s get to the layout.
Tools
There are as many ways to layout the shape of a hammer handle as Carter has pills. I won’t tell you how to do it or what tools to use, but after making dozens of gennou, hammer, and axe handles for myself and customers, I prefer to use the following tools. You will need to have a similar set of tools on hand for layout and fabrication.
- Divider with sharp points;
- Sharp pencil;
- Small try square;
- Marking gauges (Titemark and kama kebiki);
- Marking knife;
- Rip and crosscut handsaws for roughing out;
- Handplanes for creating the flat sides and edges in preparation for layout;
- Dozuki crosscut and/or rip saw for cutting the tenon;
- Auriou cabinet rasp (Lie-Nielson);
- Bogg-pattern flat-sole spokeshave (Lie-Nielson);
- Bogg-pattern curved-sole spokeshave (Lie-Nielson);
- Sandpaper;
- Satin Polyurethane finish;
- Mineral spirits.
Can you get by with fewer tools? Of course. A pencil, handsaw, hammer, marking gauge, dividers, and pocket knife are a minimum set. Will this minimalist set take more time, produce more blisters, prove frustrating, and produce an inferior handle? Absolutely yes. But it can get the job done.
Layout
Select a board or stick with dimensions a little greater than the length, height, width, and thickness of your handle design, with 6 flat, parallel, square sides.
You can prep this board or stick using electrical tools, but if you can’t do it with handtools alone, I strongly encourage you to work on your basic skills. In this age, surprisingly few have these skills.
Looking back on the old texts, one of the first tasks assigned trainees in cabinetmaking technical schools and apprenticeships was making a number of sticks or boards like this because this job combines many of the essential tools skill while developing an understanding of the material. I can attest to the bullet-proof validity of this concept.
- Begin your layout by selecting and marking a flat and wind-free side of the selected board corresponding to a profile view on the drawing to be the “reference face.” Don’t forget to label this critical surface somehow so there will be no confusion moving forward.
- Plane the surface of the board that will form the handle’s back edge (seen from above in plan view) flat and perpendicular to this reference face. All further layout will be indexed from these two faces.
- Mark the maximum thickness of the handle on the surface opposite the reference face, as determined by the widest dimension of the butt, using a marking gauge against the reference face.
- Plane all the surfaces flat, free of wind, and where appropriate, planar. This needs to be done pretty precisely.
- Use a marking gauge to draw the appropriate centerlines on both sides, edges, ends of the board/stick.
- Use dividers to measure and layout the width of the eye, centered on the centerline you just marked, and spin this around the eye, butt, back edge and front edge.
- Make paper, cardboard, or wood patterns based on your design drawing of the handle’s elevation and profile views. Paying close attention to minimize grain runout, especially in the tenon and neck area, position the patterns and mark the board.
- Using these cardboard patterns, carefully layout all the tenon’s dimensions on the board, measured from the reference face and back edge. Be sure to make the tenon a half-sheet of copy paper too large in width and thickness. This can be trimmed down later if the fit is too tight.
- Adjust the lines of the handle design to meet your requirements for beauty.
In the next post in this series we will begin making sawdust. Oh joy!
YMHOS
 Two Trolls by John Bauer, 1909. Not wanting to pay for the bread oven your humble servant has just installed, Granny Troll is trying to convince me to climb inside and do a closeup inspection. Will I fit? Do you like my fetching new shoes?
If you have questions or would like to learn more about our tools, please use the questions form located immediately below. To see a list of our tools and their pricing, or to contact us, please click the “Pricelist” link here or at the top of this page.
Please share your insights and comments with all Gentle Readers in the form located further below labeled “Leave a Reply.”
We see data miners and their bots as dastardly sneak thieves and so promise to never share, sell or profitably “misplace” your information for any reason. If I lie may the heads of all my hammers fly away to Valinor!
Previous Posts in The Japanese Gennou & Handle Series
- Part 1 – Introduction
- Part 2 – Ergonomics
- Part 3 – What is a Gennou?
- Part 4 – The Varieties of Gennou: Kataguchi, Ryoguchi & Daruma
- Part 5 – Kigoroshi
- Part 6 – The Ergonomic Anaya
- Part 7 – The Unblinking Eye
- Part 8 – Head Style & Weight
- Part 9 – Factory vs. Hand-forged Gennou Heads
- Part 10 – Laminated Gennou Heads
- Part 11 – Decorative Gennou Heads
- Part 12 – The Drawing: Part 1/6
- Part 13 – The Drawing: Part 2/6
- Part 14 – The Drawing: Part 3/6
- Part 15 – The Drawing: Part 4/6
- Part 16 – The Drawing: Part 5/6
- Part 17 – The Drawing: Part 6/6
- Part 18 – Wood Selection
official snowfall is 32.8 inches.......
I don't know where this official level was done, but it wasn't in my part of the universe. The drifts here might be that high but the actual amount of snow on the ground is probably less than a foot. The wind blew all day long blowing snow into drifts and then blowing them away into a new drift. I didn't shovel at all today because of the wind. I'll do the shoveling tomorrow, as long as the wind has died down.
 |
| hmm..... |
The two walnut bookshelves side by side. Initially I was going to leave the left one with flat feet. Nixed that in favor of having the shelf tilted backwards. There are slight differences between the two of them as I didn't want to make clones.
 |
| back slats |
With the angled fronts this design allows for the back slats to be positioned higher. With the rounded ends I have to be careful about how close I place the top one to the round over.
On Miles cherry bookshelf I put the top back slat a wee bit too far down. It has no effect on the bookshelf's function it is more of an aesthetic option.
 |
| needs help |
I sawed the front and rear legs with a dozuki saw. First look was good but it was rocking some. Trying to plane the front leg was difficult and I switched to a 80 grit sanding stick.
 |
| 99% |
Took 5 sand/plane and check steps before 99% of the rocking disappeared. Called it done here.
 |
| yikes |
The holder for the saw went south on me. I stapled the heel of the plastic for now. If it fails again I'll go to plan #2.
 |
| sweet |
Wow. This came out much better than I expected it to. The cup on this end was more than an 1/8" at the middle. Now it is about a 32nd and to the eye it looks flat. I'll try this again hopefully with the same results.
 |
| not square |
I should have planed the angle on the ends before I glued the bookshelf.
I didn't and it was awkward trying to hold the bookcase and plane the
angle. Got it done but it ate up a lot of calories and time.
 |
| no twist |
The bookshelf was rocking again. )@&#Q%_*_^_)*(^@%& Checked for twist and there was none. On the workbench it was, with the back left foot a good 16th shy of it. Did I cause it by planing and sanding it after I did it the first time?
 |
| done, again |
No plane this time. I got it done with a 80 grit sanding stick.
 |
| double, triple checking it |
Tried it for rocking on the tablesaw, the out feed table, and the workbench. This time I installed the Miller dowels before I sanded the feet. That added a more rigidity to the bookshelf.
 |
| new batch of shellac |
Used the last of my shellac flakes and I'll have to order some more. I think I have enough to finish the current 3 bookshelves.
 |
| why I'm banding it |
I have to cover the screw holes I plugged because they look like crap. I have enough of this banding left to do the top of the bottom and the bottom of the lid. I am using super glue to attach the banding.
 |
| hmm..... |
The end that wasn't cupped, decided it wanted some attention too. I heated both ends with my heat gun and clamped it again. This time I'm going to leave it clamped for a few days.
My wife just emailed the snowfall tallies for Rhode Island. Warwick, where I live, had 30 inches fall. I just looked out at my driveway and I still don't see 30 inches. The wind is still blowing and drifting the snow.
accidental woodworker
Jump Start

NB – Pictures from last summer

With a break in the brutal winter weather I got myself up into the woods to chop up that grove of black birch trees that came down last winter. The amount of firewood from this one incident of windfall is about what we should need next winter, but even when done here I’ll keep at it. It’s fun and good exercise.
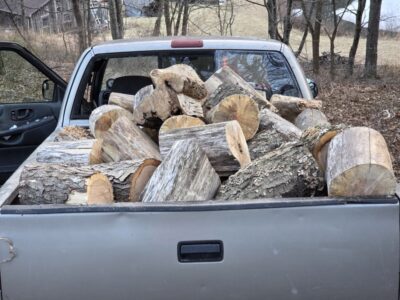
The work site was quite the mess so I spent most of the first day just clearing brush, then got to work chopping my way up the trunks. I got two good truck loads of 6-8″ 16-inch bolts with the occasional 10-12″ piece, but those were almost outside my lifting ability. I followed those two loads with two more today.

Once I get to the biggest section of this tree, about 20 feet from the root ball, the pieces will be 20-inches in diameter or more. Those will be so heavy I will have to roll them to the tailgate and up the ramp into the truck. If past experience is any indicator each one of the biggest sections will yield 32 pieces of firewood that are manageable in size.
Another couple days and another couple truckloads and I will be done with harvesting from this site. Then on to splitting and stacking. I’ll use a system new to me I’m adapting from Mike Wilson, whose yootoob channel is one of my favorites. Previously I just spent way too much time stacking carefully to make everything “just so,” crisscrossing each layer for good stability and air flow. This new system should cut my time by at least half with even better air flow.
Then on to harvesting some more windfall elsewhere on the homestead.
Good thing my little 4WD S10 is strong and nimble. It may be dissolving before my eyes and maybe not reliable for long trips anymore but I’ll keep it until it runs no more
Democratising Workbench Logic
 This is my basic made-in-the-garden English Joiner's Workbench. Made from very common construction grade softwood, but there is nothing soft about this workbench. Thirty-five years ago, some people kinda dissed the idea. "Not heavy enough.", "Wouldn't last.", "Will move all over the place under the forces of sawing and planing." Balderdash! They were simply looking for fault. I doubt that many put more duress on a workbench with hand tools than I do. It's a gutsy little bench and I refined it to be made by any Newby woodworking starting out in their back garden with only hand tools, That's who I am!
I made and started to use my plywood workbench in 2019. My first Paul Sellers workbench video came together in 2012 and went out in 2013. I think some people saw it as an interim workbench until they could attain the status symbol of something to match their as yet to be established skill levels. The reality became obvious: you cannot achieve any more or even as much as you can with any other workbench, and especially one without a quick release, Record-type vise like those that I use and advocate for. Nothing else comes close to the speed and the clamping power.
 And then there are those who look for other problems. Birch plywood is not cheap, but it is good value for money. Someone commented on the prohibitive price of good plywood. Here's my response: £250 pounds for the two sheets of the top quality birch plywood it takes is not prohibitive if you amortise the cost of a bench that will last a hundred years of full-time use. Let me see, even if I just divide it by a hundred that’s £2.50 a year so 5 pence or so a week so let’s reduce the life span to 25% of my estimated 100 years (and it will likely last 300 in a dry and well-kept workshop), even so, we come out at 20 pence. Come on now. A single coffee now costs over £3 per day. Let’s put this in proper perspective here.
Thankfully, my articles have never been sensational, even though some things I have done have caused quite a sensation through the years. Imagine, my eleven-part series making a softwood workbench grossed 5M views to date. And get this, the reviews were so good that 98% found that the bench would do everything they ever wanted to do and stayed with that one alone. You see, my work is not about sensational woodworking, but the nuts and bolts of what it really takes to become a real woodworker. Cut out the quest for being validated by owning a machine shop with half a dozen machines, dust extraction equipment and the 'etc' of it, and suddenly, you start mastering the skills of real woodworking. No one really needs anything bigger than my five footer, and I have never used a tail vise in my life. "Don't know what you've missed, Paul" Well, I don't use any kinds of bench dogs or holdfasts either. My woodworking life as a maker of fine furniture and every kind of joinery has been highly successful without any of this stuff. You don't need it, either.
 The Paul Sellers workbench is perfect for training anyone to start out woodworking with hand tools only. Use it as a personal training exercise where you can master your introductory skills in developing something you might just use for decades to come. . . Both the workbench and the tools.
The softwood bench has been great. I've actually used one for 61 years as the benches I worked on as an apprentice, the ones ten other makers worked from when I was an apprentice, were all made from what was then called Russian redwood. Redwood was also known as Scots pine (UK), Baltic redwood, Finnish redwood, Archangel redwood, Russian redwood, Polish redwood, red deal, yellow deal For the bench in my first videos filmed in the garden of my then North wales home, I used construction studs. I had just made ten benches to start my UK school with and made these from the same wood. This wood was basically spruce, not the kind of wood people looking for status make their workbenches from but a truly practical wood for any serious woodworker or a beginner too.
 Lukas Brütsch made this workbench from my intsructions. He said, "I used "Fichten-Holz" (i guess in english its "spruce") for my workbench."
Whereas I have no need to prove my first UK versions of my unchanged workbenches, they are still going strong with not deterioration and for a bench costing less than £75 my divergence to plywood was an interesting experience. This bench has all of the essence of using say solid maple and then some. There is both a simplicity and solidity to this bench I have not experienced in other benches. It's the cross-ply striations that make the difference. No shrinkage or expansion anywhere, no flex nor movement between any components. The six years of use has surprised me because it still feels like a new workbench with little more than the usual staining benches and use will incur through normal, six-day-a-week daily use. It is weightier than my spruce versions, and it rests squat-tight where it sits. I'm not treating mine like some do theirs, as a piece of furniture, a chisel and saw slip happens, a drip of finish and stain from restoring a rust saw will tarnish the new look. That's not my world. A bench needs to be a workbench. Periodically, I take a card or a #78 cabinet scraper and skim off the lightest pass. That's always enough.
 This version has been relegated to a friend's kitchen as a conversational decorative feature and it looks great there. I don't think it would work for me, but we have made progress with QR vises and some of the best now come from Asia.
I am an advocate for hand work in woodworking. When I tell you to go and buy a tablesaw and a power planer, you'll know PS has lost it. To make this workbench, unlike the all wood version, I used a bandsaw to rip all of my strips. Beyond that, I used handsaws of different types and then hand planes for the final surfacing. That means I (and most likely you) can make the whole workbench in a couple of days. Obviously, installing a vise can take a couple of hours, and you might want the apron drawer and other accessories to make the bench efficient. That's the fun part, though. I have customised my bench for efficiency. Oh, and if anyone tells you the apron drawer is inaccessible most of the time, just ignore them. 98% of the time you will find it the best tool in your workbench bar none. This single piece of kit stows every small tool you might otherwise never find a home for.
 In March 2019, I wheeled out my softwood workbench to install the new and innovative birch plywood version for trialling. I have used it daily for six years now and customised it for convenience and economic working. It's staying!
So, my workbench? All of my advice on woodworking and working mainly in a machineless way has always been about dismantling industrial processes and establishing the real skills of real woodworking. This work started back in the late 1980s, when I held my very first class. When I saw the demise of skilled woodworking, I made a decision that woodworking with hand tools needed to be put to the forefront in a serious way. Colleges and educational institutions are compelled to produce workers for industry, and everywhere I have ever seen as a training institution caters to that end by training people to use machine only methods and give only a token nod to hand tools in a one or two day class using hand tools. The men teaching and training are almost always non-expert hand tool woodworkers. They may tell you differently. I can identify a dozen training centres close to home and abroad who don't have a clue. My task in this has always been to democratise woodworking through a strategy I have developed over three decades. The workbench is a democratised alternative that gives every ounce of support to any big and heavy behemoth you care to name. No hounds tooth dovetails here, not a one and installing the best vise in the world, a quick release 9" vise will support everything you care to want to hold. Imagine this. Sixty-one years in the saddle of daily furniture making and woodworking of every type and all from my basic workbench and a Record-type QR vise. Why fix what ain't broke!
And here is that first real video we did that plunged us into teaching online. When everyone back then that we were just a bit mad, we didn't know we couldn't do it so we went ahead and did it. And remember this in the mix of it all, we never took sponsorship or freebies and never allowed product placement hovering somewhere in the background to make money from. Why? We just wanted the freedom to be real and have no obligation other than to our audience.
Democratising Workbench Logic

bracing for the big one........
The snow fall dump forecast has increased. It now stands at 18" to 24" with drifting up to 4 feet. Sounds like lots of fun will greet me in the AM. The governor has declared a state of emergency. There is a ban on driving after 1900 today into tomorrow. Fingers and toes double crossed that it won't be as bad as the weather seers are saying.
 |
| oh what a relief...... |
The epoxy has hardened and set up. The color is fantastic. I have used liquid dyes and stains before with epoxy with mixed results. This pigment color is rich and deep. There are zero occlusions and no dead spots in the epoxy. Very happy with how this came out.
 |
| sigh |
This pine board is cupped but only on this near end. The other end is dead flat. Why I don't know. I had clamped this end yesterday and it didn't take out the cup. Helped a little but still too much to be usable.
 |
| worth a try |
I remember watching a japanese woodworking You Tube vid where he ran a cupped, bowed, and twisted boards over a kerosene heater to straighten out the board. The boards were used to make a 4 drawer dresser with doors. I don't have a kerosene heater but I do have a heart gun. I warmed up the 4-6 inches on this end on all four edges for about 5 minutes. After that I clamped it again. I'll check on it in the AM.
 |
| 2nd walnut bookshelf |
Got the layout done on the 2nd one. Having a lot of squares was helpful with each one set to a specific measurement.
 |
| looks good |
There is still a gap but I did get the larger part of it plugged. Not sure what to do with small gap. The cherry putty I have is too red to fill it. Hide glue and cherry sawdust sounds like a better choice.
 |
| self supporting |
Ok with that but having no gap is much better.
 |
| hmm...... |
Tried this and it worked. This is my small saddle square. I used it to ensure that I had the last 1 1/4" (the chisel width) at the end was square. I didn't use it on the rest of the dado.
 |
| first one dry fitted |
Two left side back slat mortises were loose on the cheek walls but snug on the top/bottom. The clamps didn't have any issues with fully seating the shelf in the dado leaving the front gap free.
 |
| wow and wow again |
Not at all what I was expecting. I put the 3/8" blade on the bandsaw and I prayed it would stay sharp for the two cuts I had to make on the bookshelf. It was like a hot knife going through a tub of butter. Smooth, effortless, fluid, and with zero hesitation. I have never made a continuous round cut like this ever on this bandsaw. It didn't bind and easily made the curve all in one stroke. Did I say wow already?
 |
| sneak peek |
Eyeballing the cheery shelf against the walnut. Decided against staining it and I'll leave it natural. As this bookshelf ages the cherry will darken and the walnut will lighten another reason to leave the cherry natural.
 |
| caught it |
Went to adjust the depth on the router and noticed that the depth stop doohickey was MIA.
 |
| got lucky |
 |
| 2nd walnut bookshelf dry fitted |
It was looking pretty good that I would get two bookshelves glued and cooking before 1500 roll around.
 |
| hmm........ |
A lot closer to the dado bottom than I would like to be. At least with this one I remembered to saw the angle on the bottom. I think I should be ok with the shelf and the dado, there will be Miller dowels helping out too.
 |
| Besseys suck |
I rarely use the big Jorgensen bar clamps. I had to because the Bessey wouldn't pull the ends in to fully seat the shelf in the dado. The bar clamp did with with barely a 1/8 of a turn of the handle. The 'J' bar clamps have a large clamping head - bigger than the clamping head on my aluminum bar clamps
 |
| hmm...... |
The glue is bleeding through the saw cut out. Not a lot just a few little beads of glue. I'll clean them up when I take it out of the clamps.
accidental woodworker
big storm coming..........
The weather seers ain't giving out good news. Snow starting on sunday with a blizzard on monday. The predicted snowfall for the two days - 12-14 inches. This is the lowest estimate from the three weather stations I checked. I have a plenty of projects on my plate to wait out anything Mother Nature throws at me in my part of the universe.
 |
| done |
Kind of like this one considering it went south and came back up north.
 |
| cooked overnight |
No hiccups when I took the clamps off. The headaches come from it moving as you loosen the clamps - not a good sign. Creaking and moaning could go either way. None of those symptoms today.
 |
| done |
12 Miller dowels, 6 on each end. I will need to buy more cherry dowels, I have enough to do the remaining 3 cherry bookshelves.
 |
| Yikes |
Blew out a big chip rasping the cutout. Put a damper on getting this ready for shellac.
 |
| small cutout |
The important thing is that it isn't rocking. I don't understand why this cutout is so much smaller than the previous ones.
 |
| sigh |
When I had clamped this I didn't see a gap on this side. Out of the clamps and the gap was shaking hands with me. Used the cherry in the vise to saw off a shim to fill the gap.
 |
| filled |
This was the second shim. The first I did had the end grain facing up. This one has the face grain up.
 |
| 2nd walnut bookshelf |
Prepping the stock for the next walnut bookshelf. Thinned the back slats to 5/8" and planed the four edges smooth.
 |
| cherry shelf |
I went to Kosezla lumber this morning to check out the black walnut. They only had two 4/4 boards but both were only about 4" wide. There was a lot of 8/4 but I wasn't interested in resawing stock that thick. She told me more walnut was coming next week but I don't want to wait. This bookshelf will be cherry and there is also the possibility that I could stain the cherry walnut.
 |
| black pigment |
Trying out the black pigment mixed with epoxy. Not sure how this will look. I don't have doubts about it mixing well with the epoxy.
 |
| wow |
This color is incredible. It is a deep, edge of space, rich black. I filled in the voids/defects in the back slats. fingers crossed on this epoxy setting up because the last time I used it, it didn't harden. I put the two back slats on the furnace to help keep them warm.
accidental woodworker
Double Top Classical Guitar For Sale: Engelmann Spruce/Wenge, Made in New Mexico! Plus a Video of this Guitar!

Ebony fretboard, East Indian rosewood bridge with MOP tie block cover, Manuel Ramirez style rosette.
Back and sides are laminated with curly Spanish cedar.
650mm string length
52mm wide at nut, 58mm string spacing at bridge. Please scroll down the page for more photos of this stunning guitar!
Regular price was $8000, price reduced to $4000! I am moving to a new studio and I want to liquidate my current stock of guitars!
For more specifications on this guitar, please click here!
Watch Juri Yun play this guitar! Please visit my YouTube channel, @wilsonburnhamguitars8563
"Wilson's guitars are outstanding! They have incredible voices and are easy to play! They are easy to play because the treble strings are there, they are present and you can hear them above the bass strings! You don't have to work hard to make these guitars sing!"
Nathan Fischer, president of the New York City Classical Guitar Society


The sides are attached to the top with blocks of ebony, these ebony blocks make the guitar louder in sound!

one a day.......
One down and five to go on the bookshelves. If I keep up this rate I will whack out one a day woodworking wise. Applying the shellac will take a couple of days. I can see them piling up in the shop as wait to finish them. And it will be something else to find a hole to stick them in. Of the eventual eleven of them, only 3 have been adopted.
 |
| Highland Hardwoods haul |
I'll start on Miles desk next week sometime. Until then I'll let the haul hang out and relax. That will give it a chance to acclimate from Highland to my shop.
 |
| done |
Happy with the shine on the end grain. I had slapped the last coat of shellac on it last night after dinner.
 |
| 2nd glamour pic |
All of the bookshelves are finished 360. They can be viewed and placed without regard to the back of it being seen.
 |
| 2nd cherry one |
Got this one laid out, chopped and dry fitted before lunch. I couldn't close it up with hand pressure on the shelf. The back slats fitted ok and all four, including the shelf, fit in their respective spots snug.
 |
| hmm...... |
This left side isn't bottoming out even with clamp pressure. After playing with for a while and clamping it with different clamps I got nowhere with closing it up. I was getting frustrated so I left it be to go have fish 'n chips. That gave me while to think about what might be the problem.
 |
| came today |
These walnut dowels ain't cheap. With S/H, 200 dowels are .36 cents each. You can do the math to get the cost.
 |
| better |
The wall on the bottom of the dado was a wee bit off 90°. Straightened that out and got it to close up. Fingers crossed that I can repeat this when I glue it up.
 |
| hmm....... |
No round overs this time. Instead I put a small angle on the front. I used the cherry bookshelf I keep by my desk for the pattern.
 |
| glued and cooking |
Had a senior moment aka, a brain fart. I forgot to do the cutout for the legs/feet. Oh well, I'll have to put on my big boy pants and do it after it comes out of the clamps.
 |
| hmm...... |
Got the walnut for the first walnut bookshelf prepped. The back slats look too thick to my eye. As is they are 3/4" and I planed them down to 5/8". That thickness looked like the winner IMO.
 |
| not easy |
Doing layout on the walnut was a bit difficult. Lead pencil doesn't show on the walnut and my 71 year old peepers were almost useless. I got it done by using a different square for each layout line. Took me twice as long to do as the cherry and pine ones.
 |
| layout done |
It was past quitting time when I got the layout done. I'll chop on this in the AM.
 |
| hmm...... |
There is some wane on the left end but that will be removed when I do the angle on it. Decided to nix the round over and do an angle like I did on the cherry one. The defect on the back slat I'm keeping. I will fill that in with epoxy and black pigment. I just have to remember to keep it facing up when I do the glue up.
accidental woodworker
Hand Tool Woodworking with Accoya Timber
Accoya timber is one of those materials that quietly changes the way you think about woodworking. It looks like any other softwood at first glance, but what’s happening beneath the surface is entirely different. This timber is essentially radiata pine that has been modified through a process called acetylation, which changes the chemical structure of the wood. The result is a material that is incredibly stable, resistant to rot, and surprisingly durable, even in harsh outdoor conditions. For a hand tool woodworker, this makes it both a joy and a challenge. It planes, saws, and finishes beautifully, and because it doesn’t move much with changes in moisture, you don’t get the warping or cupping that makes other softwoods frustrating for work.


What’s also fascinating about Accoya is its environmental story. Unlike some exotic hardwoods, it comes from sustainably managed forests, and the acetylation process itself doesn’t introduce toxic chemicals. This gives you peace of mind, especially if you’re making furniture or joinery that will be in contact with people, animals, or even food. The stability of the wood also opens up possibilities for projects you might have avoided with traditional pine or cedar. Decking, window frames, cladding, or outdoor furniture all benefit from the low maintenance and long lifespan Accoya offers. You’re not constantly worrying about sealing, staining, or replacing pieces after a few years.
Using Accoya doesn’t feel like using a compromise. It’s strong yet lightweight, easy to work with hand tools, and takes finishes well. You can glue it, screw it, and even carve it with the kind of predictable behavior that makes woodworking enjoyable. It’s the kind of material that rewards patience and craftsmanship because what you craft from it will last decades without the usual problems of movement and decay. Every cut, plane, and joint you make holds its shape, and over time, you realize that the effort you put into crafting something is protected by the wood itself.
Accoya isn’t cheap compared with ordinary softwoods you might pick up for a quick shed or internal project. It’s marketed as a premium engineered wood, and that’s because its performance and durability come from a chemical modification process that makes the wood resist moisture and rot far better than untreated pine. Accoya’s own site says it is a premium product and not the lowest cost option, but the trade‑off is longevity, less maintenance and strong warranties that ordinary timber just doesn’t offer. You can read more about that on the manufacturer’s site here: https://www.accoya.com/au/faq/is-accoya-expensive/
Actual prices in Australia give a sense of what that means in practice. For example, Accoya cladding boards listed at one timber supplier are around forty to fifty dollars per metre for thinner pieces and just over fifty dollars per metre for wider boards. Another supplier shows decking starting around thirty eight dollars per metre and running up to around seventy six dollars per metre for some profiles. A third local dealer lists sample retail prices including decking and cladding from roughly thirty to over a hundred dollars per metre depending on size and thickness.
Those numbers put Accoya solidly above untreated pine or basic timber products but in a range comparable to durable hardwoods and high‑end engineered materials. What that means in a build is a higher upfront material cost, but with the benefit of reduced movement, fewer refinishing cycles and decades of performance that often makes the initial spend feel worthwhile to people building long‑lasting work.
Here a link to where I sourced the prices from :
https://www.canterburytimbers.com.au/collections/accoya-decking
https://www.canterburytimbers.com.au/products/accoya-natural-cladding-185x21mm
https://austim.com.au/pricing/
To get a closer look at Accoya and see what makes it special, watch this video from the makers themselves.
NB. For the regular home hobbyist who isn’t a banker, Accoya’s cost may put it out of reach. Many of us are now forced to scale down our projects rather than creating the furniture and larger items we once enjoyed. Timber prices have risen sharply over the last five years and continue to grow, which makes some of us question whether woodworking can remain a financially viable hobby.
Highland Hardwoods........
Rolled out of the rack at oh dark 34 and I was headed north to New Hampshire at 0501 I arrived at Highland at 0734. It took a little over 2 1/2 hours which was dead on with the google driving estimate. Traffic going up on 95 was busy and thinned out a little on 495. Not bad for a weekday.
I went to the McDonald's about a mile from Highland and got a coffee and an egg Mcmuffin to kill the 20 minutes until Highland opened. When they opened I went nutso buying cherry for Miles desk. Added poplar and shorts of walnut to round out the bill. I left Highland $460 lighter.
I got back to the barn at 1130 which was about right for the round trip. I haven't been to Highland since COVID shut things down. Memory muscle kicked in and no problems driving up and back. Other than the exit numbers being changed there wasn't anything to throw me a curve ball. Decided to buy the wood for the desks one at a time, so I'll be making a 2nd trip up north for Leo in march/april?
 |
| what $460 looks like |
From left to right - 1/2 poplar for the drawers, should be enough for Miles and Leo's desk plus extra. Next is 8/4 cherry for the legs (again for Miles and Leo) with the walnut shorts on top of it. The walnut came from the shorts bin and it cost over $50. I got it to make a walnut bookshelf. The next batter is 5/4 cherry, dressed to 1" thick. This will be used for the desk top. In the clean up slot is 4/4 cherry for the rails and slats. I went overboard on this getting much more than I'll need. Whatever is left over will go to Leo's desk.
 |
| breaking down the poplar |
I sawed all the poplar into 2 foot lengths for the drawer stock. I was shocked at the BF price for 1/2" poplar. I should have looked at it before I bought it ($62 for six, 6 foot boards).
 |
| cherry back slats |
I found some left over 1/2" cherry to give up the slats I needed. I sawed them to 7/16" on the tablesaw and planed it smooth.
 |
| hmm....... |
I kind of like this uneven width between the back slats. It is a few frog hairs less than 1/8". The wider one will go on the bottom and thinner one on the top.
 |
| walnut |
This is long enough to get two sets of ends from. There is some wane but I can saw it off and still have the width I want for the ends.
 |
| reference edge |
I planed one rough edge flat and smooth. The opposite face it still rough sawn. I'll have to thickness because as is it is about an inch thick.
 |
| hmm...... |
There was enough walnut to get two bookshelves. When I got it at Highland I thought I would get one from it.
 |
| sigh |
This chunk of wane puts a damper on this piece of walnut being used as a shelf. I want a shelf that is a minimum of 5" wide. Sawing off the wane would leave a width of roughly 4". I ain't driving back to Highlands to buy another walnut short.
 |
| oops |
Need two more slats for the 2nd bookshelf. Don't know how I zoned that out.
 |
| going nutso again |
I have whacked five bookshelves already. I have 6 more waiting for me to build.
 |
| why not? |
Thinking of using this piece of cherry as the shelf. Cherry and walnut have a good contrast between them. Another option is to go to Koszela lumber which I might do. I really would like these two to be all walnut if possible.
 |
| milk paint dyes |
This is for another project I have in the queue. I want to make another miniature chest and use these to color the milk paint. I need to get a few more colors, red and yellow being on the top of the list. I couldn't find these on Amazon where I got these 3. I'll search again tonight.
 |
| hmm....... |
No more Gurney's sawmill pine left excepts for small scraps. This is Lowes pine and I'll have to make another run to buy a couple of more boards. The EWP (eastern white pine) bin at Highlands was empty as in no pine at all.
 |
| hmm....... |
The top board will give up the sides and the bottom board can be a front, back, or lid. The current project queue is full to bursting. I'll be busy for a while.
accidental woodworker
It's Only a Pamphlet

But it could have been better. Information-postwar became more consumably low-grade but then again excessive too, to the degree that too much information took too much spend-time for people to pay enough attention to actually read it. Professor Henry Simmons, a specialist in information, said that it became an issue when there was too much information for individuals to process in the time that they had available. How much more so today. Especially as 98% of what's taking our time is of no worth at all. And that was back in 1965, btw. But things did become slack, as is the case in this leaflet. Of course, back then, the processing of hand outs like this were more time-consuming to produce than in our digital world today. How often do I hear, "Oh, I just use ChatGPT, it's amazing." . A new age of printouts was still yet to come. In our age of instant digital full-colour printouts, we can produce a leaflet at the drop of a hat and send it around the world in the same drop-of-a-hat split seconds, no problem. Enough said. This leaflet was given away free in the box with Record planes. I read it and thought it could have been much better.
Firstly, the Record Company of Sheffield, UK gives no acknowledgement to the designer of the plane and presents it as a Record Company plane design when they designed not one jot of the design in any way. The plane is a Leonard Bailey USA knock-off design of a hundred and fifty years ago. This Leonard Bailey design surpassed any and all British made versions in terms of longevity, adjustability, cost and so on. Though there have been more robust versions made (meaning heavy, clunky and too weighty for versatility in any field of use), I'm thinking mostly BedRock versions with minor but no better frog differences made by engineers using better tooling and tighter tolerances––but not one of them outperforms the Stanley originals in any way. So, the authors should have acknowledged that the Record plane was nothing to do with a Sheffield design, but should at the very least have acknowledged Leonard Bailey as the inventor and designer. In the same way, most if not all modern copyists of all Stanley versions never mention nor show any acknowledgement or respect for Leonard Bailey. A dozen copyists and more fail to respect what this designer gave to the woodworking world. For the main part Lie Nielsen, Quang Sheng, Juuma, Wood River, Clifton and many more, instead of hoping Leonard Bailey's name will be forgotten, should attribute the inventor by acknowledging clearly that they did nothing more than copy the whole of his original designs but with very minor tweaks.
What's Wrong Then?
The pamphlet states: "Record planes have many points of advantage to users." They don't offer anything beyond the Stanley invention of Leonard Bailey bench plane designs, so no such thing, and certainly no more than the common or garden Stanley.

"The parts for adjusting the cutting iron are accurately made to give very fine adjustment." Not really. There is as much slack in a Record plane take-up as there is in any Stanley. That said, slack is fine. The slacker, the better for me. A quick spin of a well-worn adjustment wheel and a floppy lateral adjustment lever works well by the flick of a thumb or forefinger. My fingers take up the slack in a heartbeat, and I'm set.
The article refers to the underside of the plane, the sole, only as the "base of the Body" and never identifies the plane sole as such anywhere. Now as far as anyone knows the underside of the plane has always been referred to as the plane sole.
"This Cutting iron is hardened and tempered under scientific control, which ensures accuracy and uniformity." Come on, I mean. I mean, what's scientific control but twaddle-speak anyway? I have never found any noticeable difference between Record and Stanley plane irons, either...to the point that I use them interchangeably.
More: "It is of the utmost importance that the correct grinding angle of 25º is maintained." That's never really been true. If you want a two-bevel method you can do that, but for three centuries before this time craftsmen responsible for some of the finest woodwork ever in history never ground their cutting irons to twin bevels nor a hollow grind as standard but rough ground and then whetted or honed, same thing, the whole bevel to a sort of, roughly, near to a quarter ellipse as show in the drawing. Having examined many a hundred plane irons that go back two centuries and more, every plane iron I ever saw was simply sharpened to a camber. It's just our generation that thinks we are better and more developed to come up with a complex composition of micro and macro this or that so that we can tell others you must do this and that.


I can tell by eye if or when I have allowed a bevel to get too 'thick' and I think I may have checked a bevel angle once or twice in the last three decades. That said, we do need a goal to shoot for, and why not somewhere between 20º and 35º? Why 20º? Well, not for plane irons, but yes, for paring chisels. These chisels are rarely if ever struck heavily, and neither are they levered with much either. They rely on hand and arm power to pare cut surface protrusions and such, so the bevel of resistance can be deemed less necessary. You are unlikely to get cutting-edge fracture with hand paring actions. But we do gently tap a paring chisel in necessary situations. I should also point out that on bevel-down planes the angle of the cutting iron bevel can be anywhere between two or three degrees less than the bed angle of the frog, so on Bailey-pattern planes that's around 44º so you can go as steep as 42º and it will cut fine. What am I saying? The bevel on bevel-down planes has no consequential effect on the cut because, well, it's tucked out of the way wholly behind the flat face and never touches the wood. Any wall of resistance on these cutting irons will be on the wide flat face, not the bevel. Duh!
It’s Only a Pamphlet

Yin and Yang, Weather Edition
Now about a month out from our weather episode that brought three inches of snow, three inches of sleet, a half inch of rain, and another two inches of snow, we are starting to see some ground again.
These two picture were taken from the same spot, just turned 180-degrees. South facing slope? Grass! North facing slope? Glacier.

Tomorrow – harvesting firewood Day 1
busy day.......
Still haven't finished the 'extra' cherry bookshelf. It might be done tomorrow though. fingers crossed on that. Wandered down a one way street and I played with making two more small cherry bookcases. Spent most of the afternoon shift in the boneyard cleaning up and organizing what is staying, what it going to the dump, and what is going to my sister Kam. I have to have all this sorted out before the wife comes home from North Carolina.
 |
| forgotten pic |
This was the one thing I said I got done yesterday but forgot to include pics of in the post. Kind of large but it fits in the drill stand cabinet - I am slowly smarting up and putting drill related things in that cabinet.
 |
| good fit |
I wanted to make the box out of solid wood but I didn't have any thin wood in this width. The lid is a decent fit with a consistent gap 360.
 |
| 2 1/2" |
The OD is 2 1/2" and I was mildly surprised by the quality of it. Not what I expected from China.
 |
| unexpected |
Came with a replacement center drill bit and the allen wrench.
 |
| hmm...... |
Don't know what the purpose of the spring.
 |
| nice fit |
I really like this fit - it is just a couple of frog hair worth of clearance. Seriously thought about removing the insert and redoing it. Nixed that because I glued the insert in with hide glue.
 |
| 1/8" dowels |
They ain't a 1/8" diameter, they are a 64th under. An 1/8" drilled hole is too loose and I want these to be snug.
 |
| done |
Got two dowels in each pad. I was nervous about the thinner back one possibly cracking/splitting but they didn't. I drill the dowels at a slight angle too.
 |
| sneak peek |
This will work well for DVD/CDs. I don't have any paperbacks to check how they would seat on the shelf.
 |
| hmm...... |
This is the left over cherry from the 3 other cherry bookshelves. These are the two boards from resawing one in half. There is one divot on the left one and two big and one small one on the right one. The plan was to thin the boards to 1/2" and hopefully that would remove the divots. The thickest part of either board is wee bit more than 9/16".
 |
| gone |
Wasn't sure that I could get this to a 1/2" and remove the divot. Got lucky and I have a 1/2" thick cherry board for a shelf.
 |
| wash, rinse, and repeat |
The right board was a bit dicey IMO because one divot was deeper than the other two. The divots on this board planed away smoothly with no headaches.
 |
| the problem divot |
This is the before pic of the big divot on the right board. The only problem I had planing this to thickness was planing it down to the gauge lines. The left side ate up a lot of calories and time before they disappeared.
 |
| about 32nd more |
I planed a ton of shavings off this side seemingly without lowering the face. Eventually I got it. The divot disappeared long before this gauge line did.
 |
| gone |
Extremely happy that I planed the divot away and didn't dip below the 1/2" thickness.
 |
| hmm...... |
Planing to thickness for the ends, one I had to plane 3/16" off and the other a 1/4". The plan is have the ends at 5/8", the shelf 1/2", and the back slats 3/8".
 |
| done |
This board I was expecting some tear to happen but none did. Got zero tear out using a #6, #7, #5 1/2, and #4.
 |
| my LN 4 1/2 |
This isn't a plane that I use that much but I needed it today. The second board I planed to thickness for the ends tore out. The grain on it ran almost dead straight end to end except for one little curly Q spot. The 4 1/2 plowed through it without a whimper and dead smooth. I keep a 55° frog in this plane just dealing with wonky grain.
 |
| done |
I still have to plane the back slats from a 1/2" to 3/8" but I didn't do that today. Playing with the shelves and ends had me sweating by the time I stopped. A little over 2 hours start to finish. As an aside the shop temp is hovering at a comfortable 63F/17C. The temp in shop has risen 4 degrees in the past 3 days.
 |
| final prep |
Sanded the end grain on the ends up to 220. Almost forgot to do and caught it as I was ready to slap shellac on it.
 |
| fanned out |
Don't know if I mentioned this before but in case I didn't here goes. When I'm done with my shellac I manually fan the brush out. It holds this shape well until it is time to use it again. I have found that it dissolves in alcohol much quicker than if I didn't do this.
 |
| shellac time |
The cherry one is awfully close to be done. The pine one is just starting out. I do the bottom first 4-5 coats before I do the rest of it.
 |
| the problem spot |
It raking light the end grain looks a bit dull IMO. Since I'm applying shellac to the pine one I'll keep putting shellac on this area until I'm happy with it.
 |
| made in Germany |
This belonged to my wife's grandmother and she doesn't want it. Typical german engineering because it is built like a tank. The drive belt is all metal - no rubber at all. If anyone wants it let me know - it would be just the sewing machine and accessories. The cabinet has water damage and rot so it is toast.
 |
| nice touch |
That is the original oiler for the machine along with the instruction booklet. It is a small instruction booklet, I would have expected something closer to 8" x 11".
 |
| nice haul |
I saved the hardware for just in case. I might not ever have the need for it but you never know. This do dad thing was for locking down the lid.
 |
| hmm....... |
Found this in the boneyard - box I started and stopped. I had applied hinges but removed them and plugged the screw holes. Never progressed beyond that. Thinking now of applying the banding on the box bottom and lid bottom and top. I ordered more banding today and I'll leave this on the workbench so I don't forget about it.
 |
| boneyard find #2 |
This is a jewelry box I made a bazillion years ago. It is a pine box with a floating cherry panel in the lid. Because it is mostly pine it really hasn't resonated with me as being worthy of a jewelry box. That changed and I'll be finally finishing this. All it needs is for me to slap a few coats of shellac on it.
 |
| the interior |
The hinges took me several years to install. I used Brusso hinges and I epoxied the screws in the lid. Because of the thin lid I couldn't use a full length screw. Maybe this would be good enough for one of my young nieces?
accidental woodworker
Just Another Day

The shavings fell from every plane and the river of shavings kept building before my broom could get to them. "Get a move on, lad!" Merlin shouted across the bench as I swept the shavings as vigorously as a two-foot wide broom could go. You'd be surprised how much plane work resulting in shavings half a dozen men can produce in an hour of full-on planing. Pines of different kinds, oak, walnut, ash and beech. All of a different hue and scent. This becomes enrichment to a boy like me. That was then and this is now. I still have the same scents in my shop every day. Looking back on it now, I doubt that there are many out there who have ever seen what was a common sight back in the pre 1960s. Ten bin bags but hessian or burlap sacks went to burn in the boiler where I stoked waste wood to heat the workshop all day long. But I loved it. The banter back and forth, the way the men talked about their political beliefs, the arguing for one party or another and then those in the union condemning those who weren't. Then there was a certain kind of solitude in the working of the hand tools. Three men using handsaws, two with planes and another two with chisel chops coming from mortising an extra mortise. But then there was something else in these postwar heroes. They sang, they whistled, they hummed, and they sang songs they knew from their war years that lifted their spirits' in camaraderie. George was way too young for the war, but he too knew all the songs, and he'd sing along or whistle. I liked it best when they would spontaneously start ad hoc music with sticks and flexed saws; Keith pulled out his harmonica, he was good, and then the a cappella singing of men harmonising quite out of the blue had the distinct brilliance only spontaneity can bring; I have yet to hear anywhere ever again in such a real and vivid man's working environment. The masculinity of it was pervasive as if mixing with the scents of the wood, the accumulated aromatics unique to only truly vintage woodshop.
After sweeping, I would end up on the clamping machine that we used to clamp massive or small frames together, seating a dozen or so mortise and tenons in a frame all at the press of a single foot treadle before we drove the pins through the joints to hold them. Even then, there was a synchrony that somehow steadied the work from every man and boy. I learned the songs they sang. Vera Lynn's "We'll meet again..." but then they'd mingle in a classical opera piece or a more modern singer from the 50s. What is it that we lost from that era. Where do you ever hear men sing together at work? The work itself never stopped, except for an odd crooning moment where two or three of them sang Etta James' "Stormy Weather" in perfect pitch and harmony. The deep, 'do woos' background and such followed by lots of Nat King Cole "Unforgettable", "Rambling Rose."

Our singling lasted for 20 minutes. The work harmony melded with the camaraderie every other day. It was spirit lifting and we to a man took our part. Old Bill had just about lost the breath to sing, but his lips moved in unison with everyone elses. The prompts from the radio usually sparked one or another to start singing, but then too there was another aspect to the environment I saw from these men. An illness, a broken relationship, the loss of a newborn, a teen crisis by one prompted support from another. It was a whole support network never spoken or voiced into being, and yet two men, maybe three, huddled in a group to support some failure on the part of one family they might never have met. These few men impacted my life. It wasn't always good, but generally, they somehow softened under the weight of supporting one another. The war changed the working classes to empower them in ways we could never really anticipate. I wonder where we are today.
Anyway, just a few thoughts!
Leave a comment Cancel reply