Hand Tool Headlines
The Woodworking Blogs Aggregator
“Glory to God in the highest heaven, and on earth peace to those on whom his favor rests.” - Luke 2:14
Be sure to visit the Hand Tool Headlines section - scores of my favorite woodworking blogs in one place.
Hand Tools
in between day.......
Today is not a national or state holiday. I checked because the mail was late. It usually comes around noon-ish but still no mail by 1609. I checked to verify it wasn't a holiday but I did find out that there are 14 national observation days. Six I thought were kind of ok and 8 were absurd.
In the order I found them - National Ear Muff Day, National Ken Day (as in the Barbie Doll Ken), National Jewel Day, National Open An Umbrella Indoors Day, National Smart and Sexy Day, and National Sleep Day. I say why not celebrate a National Belly Button Lint Collector Day or a National Toys Made From Ear Wax Day?
 |
| hmm..... |
Thought 3/4 stock was too thick for the Hall of Fame frames. 1/2 inch poplar looks better to my eye. I wanted to dowel the frames together but I don't have any thin (>1/4") diameter dowels so I'm going to miter the two frames.
 |
| Osbourne miter gauge |
Norm had this one so of course I had to have one. The plan was to saw the 45 on the saw and sweeten it up with the 45 shooting board.
 |
| surprise |
You could have knocked me out with a feather. Every single 45 was dead nuts according to Mr Starrett.
 |
| nope |
All the shavings came from the practice pieces on the right. I couldn't dial in the '45' on the miter jig. The problem was the stock moved as I pushed the plane forward. Instead of chasing my tail I went back to the tablesaw and sawed the parts to the exact same length.
 |
| hmm....... |
Bottom right miter threw a hissy fit deciding to have a gap. I eventually got it tighter after sanding and planing the opposing toes and heels.
 |
| better |
I have had and used these miter clamps for almost 50 years now. Easier with a lot less fussing getting all the miters closed up vice the Woodpeckers above.
 |
| sigh |
The heels slipped a wee bit and it had already set by the time I noticed it. All the miters are tight and I'm leaving this as is. I am going to chamfer the inside and outside edges and that will hide this boo boo.
I am going to glue up both frames with these geriatric Craftsman miter clamps. I will do the 2nd one in the AM. I don't have good luck gluing up miters and I don't have a warm and fuzzy with these two.
 |
| spline jig |
These arms are toast and I need a new set. I am not relying on glued miters but glued miters that have splines.
 |
| done |
I didn't have any 3/4 thick scraps but I did have 1/2 poplar. It just has to last to do two frames.
Only got about 90 minutes in the shop today. I had a clinic appointment with the pulmonary docs at the West Roxbury VA. Still don't have a diagnosis as to what the mass is in my left lung. The head doc explained to me that it could be cancer but there is another problem with my lungs that isn't cancer but Interstitial lung disease which is a scaring of the lung tissue.
I'll be going to West Roxbury again to have a CT guided lung biopsy probably next month. In the interim I will have some other tests done at the Providence VA. At this point I just want to know what is wrong with me. Fingers and toes crossed that the CT biopsy yields something definitive.
accidental woodworker
The Humanity of Designing:
Design: from the word to designate
I like the demand of design, the process that creates the uncreated from a moment's thought. It's the isolation of high demand. The isolating essential of putting all else outside the creative head-sphere to give myself over to a vision kept yet private as the pictures in various perspectives and profiles form in bytes but only in my mind.
The alignment of real and imaginary lines sweep in strokes to declare proportion relating to space. Sizing is all-critical for a design to fit and be fit. The placement of pencilled dots start a baseline, a perpendicular vertical creates the ninety and alters to maybe, not sure yet, a ninety-five and then a compound complexity takes over at the tops of this as yet unmade post where rails meet, a tenon's formed and fits the mortise and a union in two distinct and direct opposites bring integrity to the union of several parts.
 Nothing is square. The lines all taper and the shoulders are all 94.75º. It's a design concept.
My wood, once planks, became scraps kept from the bigger projects and retrieved as offcuts for a day when I might need them or use them. They're small and useless, space-hogging bits all others might chuck, but this week, today, I made some use of them.

I like the singular reality that all things designed are designed only by humans and that those designed things become 98% of our everyday three-dimensional objects designed for our human convenience, control, economy of motion and comfort. A field fence and gate enclose, the gate swings and the catch catches to hold and contain. The ladder lifted suspends two-dozen rungs on two poles and the taper from top to base lightens the weight on the end to be lifted most, yet strength is given to the base a man's life will be suspended and dependent on. And who looks at the gutter and the downspout, the cranked neck connecting on to the other, the sash made light that holds panes of glass that's yet unchanged in two hundred years and can still be made from wood?
 Even the rugged reduction of a sapling stem is reduced to create various forms and every aspect of working is designed for the hiuman form to work with and from.
Designs always start with the limitation of space. The space in the hand to hold. The cage and box and drawer to contain. In the initial consideration phase, buildings, paths and roads are sized according to the space and distance allocated. A village designated long ago becomes a town and possibly a city from the long-term consideration and forward planning. That one becomes a city and another not. Mostly it hinges to the possibility of support infrastructure and the amounts of water, rainfall and water collection, geography and terrain. I once lived in a place called Willow City, Texas, population 13 in its entire sixteen-mile stretch. The layout for the city was drawn up and plans to build soon were sorted, but yet to come was the flood that could not be diverted, and the plans were aborted.

The buildings are designed to meet the needs of people, usually in groups large and small. The vast array of building types varies according to the local needs of communities, purpose of the buildings, location and available space. Housing takes the initial priority in providing a place for workers and generations to live close to their work. Work buildings follow and include all forms of manufacturing, services, offices of different types, labs, shops, places for leisure and so on. Most buildings follow the widely accepted tenet of construction design: form follows function. Inside those buildings, we furniture makers and woodworkers become adoptive; the same philosophy of space allocation and space fit within an allocated sphere limits our sizing. For home furnishing, office furniture and such, we recognise a secondary design type called interior design that tries to defy the tenet I speak of yet the work of the designer cannot quite fully defy the tenet I speak of because they must work according to budget, space constraints and more, but then there are those who tend often to defy too much constraint in following the "form follows function" as the only principle of design. The reality in my world is that these two elements, form and function, are spiritually one and the same and therefore defy separation. Form, human form, ultimately determines both shape and purpose whereas purpose defines and determines the ultimate and optimal size, positioning, material composition and so on. In my world, designing and living with furniture, wooden objects and tools, such like that, one cannot live without the other.
 Ever wondered about every aspect of the cello or the violin, those scalloped bouts, the 'f' shaped hole, the arching to the front- and back-plates. Think accommodation, weight to strength ratio, sound resonance and vibration, projection and clarity. No part of this section of the cello or the bow is decorative. Even the inlaid purfling has its essential purpose.
Additional to all of this, we then enter the realms of decorative design both in comlimentarianism but then too the serious consideration of symbolism, the influence of diverse cultures, and the complimentariness of aesthetic. Practical needs should never dismiss these elements to design, but practical needs should firstly accept them and ultimately absorb them.
The Japanese Gennou Hammer & Handle Part 22 – Tasting the Pudding

True perfection is unattainable, but if you chase perfection you will catch excellence!
Vince Lombardi
In previous articles in this series about a craftsman-made gennou hammer handle, we discussed how to design and make a handle to fit Beloved Customer’s body and way of working. This article assumes you’ve mostly completed your handle, attached the head, and are now ready to test it. So let’s get started.
Why Testing Matters
I don’t know about you, but after all the research, design and fabrication work we’ve invested in your gennou handle, I need to see how it performs and determine if its performance is superior to a Minion impaled on a stick. Being a Beloved Customer and therefore highly intelligent, you’ve asked yourself the following three indubitably perspicacious questions about testing.
- What can I learn from testing?
- Against what performance standards should I compare my most excellent new hammer handle (besides to a Minion on a stick)?
- How should I conduct that evaluation?
To perfect your hammer, you will need the answers to these questions and more. You can get them over years of use, or get many of them now by testing it in a methodical manner and paying attention, but one way or another, you must get answers, bro.
Desired Testing Results
We can learn several things from testing our gennou with its new handle, but I encourage you to do your best to ascertain the following two things at minimum.
The first thing, of course, is whether or not the hammer with its new handle is comfortable and stable to use, and if possible, what needs to be improved to make it more stable and comfortable. This may entail many small details depending on your requirements and powers of perception.
Whether it’s comfortable in-use or not is subjective and entirely up to you, but you can probably identify problems easily through this testing process. Pain, soreness and blisters and the lack thereof are solid indicators (ツ).
Whether or not it’s stable in use is another important thing to determine early. Does it tend to track straight on the downstroke, or does it want to twist off your intended path of travel striking chisel handle or nail head erratically? When it hits the chisel or nail, does it convey its energy into the target smoothly, or does it wiggle like an eel on a hook on impact?
An unstable head and handle combination may perform well for one or two consecutive strikes, but because Murphy’s Law of Buttered Toast irrevocably dictates that small errors accumulate to maximize damage, an unstable head will often wiggle off-line enough for the third swing to hit weakly, even miss entirely, ruining your rhythm, damaging your confidence, and eliciting snide looks from resident bench cats. Oh, the shame…
A second thing you need to learn is whether or not the face of the hammer is striking the chisel/nail squarely and if the center of mass of the head is aligned with the vertical axis of the chisel handle or nail. Please make sure you understand the meaning of the previous sentence.
With this experience and the answers to these questions under your belt, you will be in a position to adjust the handle to perform its best for you and the way you work.
Testing Procedures
Out of an abundance of well-deserved humility combined with a strong desire to avoid looking even more the fool, your humble servant will refrain from suggesting any specific objective tests, or urge you to use quantifiable standards, or seek concrete empirical results because that would be too silly to even contemplate. Unless, of course, Beloved Customer will conduct these tests in your super-secret laboratory, possibly located at the heart of a dormant volcano on an uncharted South Pacific island, maybe covered by coconut palms with cold beer taps, probably surrounded by hundreds of horny bikini babes, likely frolicking in crystal surf. BTW, if you do have such a lab, please text me the address!
In this super-secret lab you will probably have access to equipment and software suited to more scientific, empirical, replicable methods of comparison, such as those developed for analyzing and improving the apparent performance, marketability and profitability of mass-produced sports equipment such as baseball bats, golf clubs, and green dildos (シ). Sadly, while your humble servant does not possess such equipment, most (but not all) humans own and operate one of the world’s most refined super-computers and sensor networks: our bodies and brains. I therefore propose you focus these formidable tools on this analysis. (brains and bodies, that is, not dildos).
Below are four absolutely subjective tests only you can perform, the results of which only you can evaluate.
Incorporating Test Results
To thwart the confusion promulgated by Murphy and his multitudinous malevolent minions, I strongly recommend you use the results of your analysis to guide you in making incremental improvements to your handle over time rather than large changes immediately, so to that end, please plan to remake your handle, once, twice or even thrice, improving it a little each time. Such is the true path of the craftsman.
Please update your handle drawing each time to record the improvements you’ve made and ensure no “increments” are misplaced.
In scobe veritas. (“In sawdust, truth”).
The Grip
As you are aware, for any testing other than drinking beer or women choosing wall paint color to be meaningful, some basic techniques must be established and followed to reduce variables to a manageable degree. How you hold the gennou handle to be tested is just such a basic technique.
The handle design presented in this series of scribbles is intended to work best when gripped in a particular way, so when performing the following tests, it’s important that you grip the hammer correctly thereby removing one huge, often-problematic variable.
Of course, I’m describing a particular grip here as being “correct,” but that’s just my well-informed opinion. In any case, I promise your hammer will work more efficiently if you abandon the so-called “hammer grip” (what I call the “Hobbit-killer” grip with the handle grasped in your fist) right away and switch to this more advanced grip.
I didn’t invent this grip, BTW, but observed and consulted with craftsman I respected in the USA and Japan who used it for many decades, all of whom are now working overtime in the big lumberyard in the sky. I later came to call it the “Sam Snead grip,” after the extremely successful pro-golfer of the same name who made it famous, and him rich, in tournaments and in dozens of books he wrote on the subject of using golf clubs skillfully.
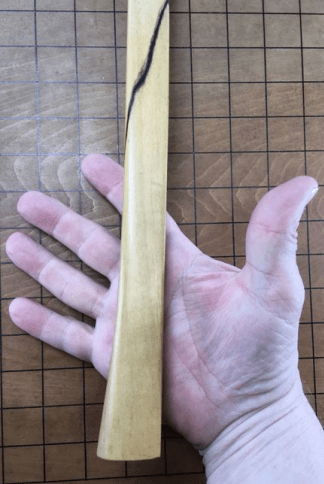
We’ve talked about this grip in some detail in Part 13 of this series, but please review the photos below to confirm your understanding.
The first photo labeled “Bridging the Palm” shows how the hammer’s handle is NOT held in a fist, but is angled diagonally across the palm, supported on the first joint in the index finger, as well as the heel of the palm.
You can see how the index finger wraps around the handle while the thumb is pressed against the side so that the handle is strongly clamped between index finger and thumb, but can still pivot the handle if the operator so desires. This grip affords the joints of the forefinger and thumb, digits accustomed to fine motor control (unlike the fist), absolute control over three critical surfaces of the handle.
This grip also provides better control, more power, and greater reach without forcing the wrist to do the strange, unnatural contortions the Hobbit Killer grip does.
 Bridging the palm
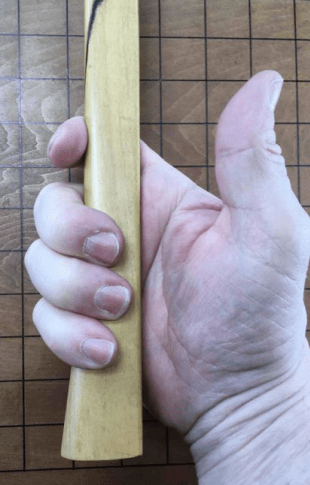 Index finger wrapped around the handle with the tip pressing against the rounded front edge of the handle.
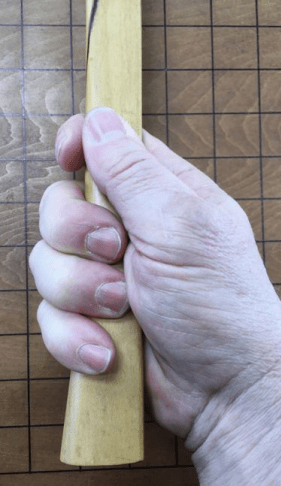 Handle pressed between tip of the thumb and first joint of the index finger. The tip of the index finger presses against the rounded front edge of the handle, and applies most of the force required to return the handle to battery.
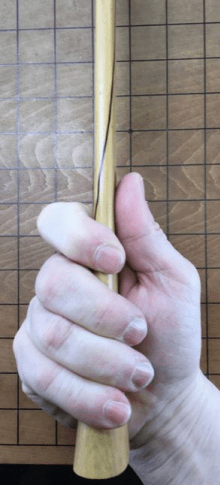
 Notice how the handle is pressed between the pad of the thumb and the side of the index finger in the famous “Sam Snead” grip.
The Three Tests
Following are three tests to help you ascertain how well your new gennou and its handle suits your body and your work style.
Before attempting these tests, however, it is important to use your new handle for a time to establish a connection between it, your hand, and your eye (using the proper grip, of course).
Besides moral virtue and a sense of humor, you will need a few things.
- A wood chisel suitable for cutting a mortise hole, around 24mm.
- A piece of light-colored scrap wood for cutting a test mortise hole;
- A stick of light-colored wood approximately the size and shape of the handle of the chisel you would normally use for cutting mortise holes:
- An ink pad, wide-tip marking pen, or Dykem.
- A lab assistant. I recommend a buxom, young lass with a cute giggle wearing a sexy lycra lab uniform (Warning: bad stuff may happen if you let She Who Must Be Obeyed meet, or even see, this assistant!)
So, now that we have our supercomputer and its sensor suite warmed up and focused, our tools laid out, and a bubbly lab assistant standing by, sound the trumpets and let the testing begin! We who are about to dye salute you!
Test No. 1: The Blind Retrieval Test
After you have used your gennou with its new handle for a few weeks such that your hand has become accustomed to it, please give your bench dogs a few treats, shoo away any arrogant bench cats, set it on your de-cluttered bench, step back a few steps, close your eyes and turn in-place once or twice like a ballerina with hairy legs. Now, have your lab assistant, perhaps a child, a friend, a neighbor, your girlfriend, or wife, or even a clever bench dog (but never your neighbor’s girlfriend’s wife’s cat!) change the gennou’s orientation on your benchtop by turning it over, switching it end for end a few times, spinning it, or whatever. Random orientation is what’s needed.
Next, with your eyes still closed, grab the gennou with your hammer hand in a proper grip ready to rock-n-roll. Notice how easy or difficult it is to grip the handle correctly, without fumbling and without opening your eyes. If it’s not easy to do, however, you need to know it now. It may be simply that you’re not accustomed to the chisel, more importantly, it might mean the geometry or details are out-of-wack.
By “correctly” in the previous paragraph, I mean (1) the flat striking face of the head is facing away from you and toward the chisel or nail; (2) the head is aligned straight in your hand, and not twisted, (3) the heel of your hand is pressing against the flat spot on the handle adjacent the butt; (4) the distance from the center point of the face to the heel of your hand is located precisely the distance shown in your design drawing.

BTW, whether you picked up the habit from your daddy or some internet guru, choking-up on the grip is an inefficiency you should discard simply because it’s counterproductive and silly, like a powerful cane corso dog wearing flower brocade.
If your grip is shaped as shown in the drawing with a flat back edge and sides perpendicular to it, a radiused front edge, and a flare beginning at the grip area, it should be easy to instantly grip the handle in precisely the proper place, with the intended striking face oriented properly, without opening your eyes and without any fumbling whatsoever.
If, on the other hand (the one with six fingers (ツ)), your hammer doesn’t leap into your hand in perfect alignment without argument or eyeball action, some adjustments to the handle are called for. For example, a frequent cause of disagreement between handle and hand is the leading edge of the grip being square instead of rounded. Or the sides and butt of the handle being angled wrong. These details can all be adjusted once you know they need to be adjusted
A gennou that naturally orients itself in your hand with the striking face in the right direction, the same distance from the striking face first time every time without your having to look at it, will provide you a tremendous advantage in speed, efficiency and confidence. It will become a good friend and companion.
BTW, just for gits and shiggles, try this test with any name-brand one-size-fits nobody nail bender you have laying around. The virtues of your new handle will become immediately apparent.
Test No. 2: The Blind Swing Test
This test will teach you something about handle length and other details.
Once again, perform this test after you have used the gennou with its new handle for some time and have become accustomed to it. A sexy lab assistant (one who doesn’t talk too much) in slinky woodworking togs is optional (ツ).
Grip the gennou properly in one hand and the stick shaped like your chisel handle in the other just as you would an actual chisel. But instead of placing the end of the stick against something as if you might cut it, please keep the stick in the air without butting it against anything. Now, with your eyes still closed, swing the gennou at the end of the stick of wood.
You should be able to strike the stick with the flat end of the gennou solidly and squarely on the first, or perhaps second try. Success in this test is common.
If your hammer misses the stick consistently, it may be because you are not yet accustomed to the handle, or it may be that you are chocking-up up on the grip, or maybe you need to make it shorter or longer, or the grip shape needs to be adjusted. Or it may be that Murphy keeps distracting you by sending dick pics. It’s absolutely worth figuring out.
Once again, if you consistently miss the target, pay attention to why and where you are missing. Is the handle too long? Is it too short? Are you missing off to the side? Make notes recording the results and your observations on the design drawings to incorporate in your Mark II handle.
If accuracy can be improved by shortening the handle or modifying the grip, go ahead and make the necessary changes a little at a time. It’s easy to shorten the handle, but lengthening one requires an ACME Wood Stretcher Mark 2. I can lend you mine if you don’t have one (ツ)
Test No. 3: The Ink Test
Never fear: this test has nothing to do with gossip screeds or crime scene investigation. It will help you determine if the handle of your gennou is the right length, if it is cocked at the most effective angle, and whether or not it should be canted to the left or right, and all without pulping an innocent tree.
This test works best if preformed after the Blind Retrieval Test and Blind Swing Test.
Begin by coloring the striking face of your gennou with an ink pad or by applying dark marking pen ink or Dykem to the gennou’s striking face (the flat face). Clean or sand the end of your chisel’s handle to produce a clean, white surface. Then cut a mortise using this gennou in the same posture you assume when cutting most of your mortises.
For instance, if you mostly cut mortises in wood located at a constant height on your workbench, such as drawers and furniture parts, you should employ that position. Or, if you tend to cut mortises in timbers while sitting on or straddling them using the venerable butt-clamp, please assume that position.
The impact with the chisel’s handle will wipe ink off the face of hammer and deposit it on the end of the chisel’s handle at the same time. This ink transfer will print the story you need to read. Check the ink on the gennou’s face and the end of the chisel every two strikes.
This is a time-tested technique professional golfers use to select/design golf clubs, BTW.
If the ink at the center of the striking face is scrubbed clean first, and the center of the chisel handle becomes inked first, then you have made your handle the right length with the head angled correctly. If not, you should make notes describing the results in the handle drawing you made earlier, and adjust the design of your next handle accordingly.
Again, you may find it enlightening to perform this same test with conventional hammer with a standard handle.
When your done testing, be sure to record your conclusions. Either erase and adjust the drawing, or trace over it to make and date a new drawing with your revised details. Tracing paper is our friend.
In either case, be sure to add a date and/or revision number to the drawing to ensure you don’t confuse it with older, superseded drawings. Don’t put this off but do it right away before you forget. This applies to all the tests described herein.
Adjustments to Your Handle
You should use the results of these tests to make small, incremental adjustments to your handle, as you deem necessary, rather than big, drastic changes.
For instance, you may need to shorten the handle. This is easily done if your handle is a little long and you’ve made the neck as I recommended. Worst case, make notes, adjust the drawing and remake the handle with as few changes as possible to avoid confusing over-complication.
A common correction you may want to try is, after becoming accustomed to using the hammer, to reshape the grip area to distribute pressure more evenly over the hand, and to reduce stresses induced in skin, muscle, tendons and bones by easing edges and corners while maintaining control and indexing. Most importantly, you should shape the handle so it doesn’t twist in your hand stretching your skin in uncomfortable ways, a common cause of blisters, especially in plastic-handled one-size-fits-nobody hardware store hammers.
If I may share an example from my experience, every new hammer handle I make tends to produce a blister on the first joint of my right hand index finger. Obviously a lot of pressure focus on this location on my hand. So I know to smooth the transition from back edge to the side just where this joint bears to avoid blisters.
This modification creates an obvious dent in the smooth lines of my handles, but your humble servant is resigned to sacrificing beauty for performance when necessary. Just look at the sorry state of my career as a fashion supermodel.
Another less-common problem is the hammer’s face striking the chisel handle or nail head at an angle instead of being centered on, and at a 90˚ angle to, the long axis of the chisel handle. The ink test will reveal this impish behavior.
This tendency usually improves with practice, but you can adjust for it by making a new handle with the head skewed to the left or right as necessary.
As a way to determine how much skew is required, you can plane down the sides of your test handle, glue on slips of wood, shape them as you see fit, and test the results. Once you’ve determined how much total correction is necessary, you can remake your final working handle accordingly.
Once again, work patiently to achieve small, incremental improvements, and be sure to record the results on your drawings.
Don’t hesitate to methodically scrape, shave and experiment with this first handle.
The design of this handle, and the process your humble servant has described for making it, is suited not just for Japanese gennou hammers, to all short-handled hammers and axes. Give it a try and you’ll see what I mean.
In the next article of this series we’ll apply a protective, and maybe even tastefully elegant, finish. Please remind me to call Ramon and beg him cater the unveiling party! I simply love his cheesy shrimps on crackers, don’t you?
YMHOS
If you have questions or would like to learn more about our tools, please use the questions form located immediately below. To see a list of our tools and their pricing, or to contact us, please click the “Pricelist” link here or at the top of this page.
Please share your insights and comments with all Gentle Readers in the form located further below labeled “Leave a Reply.”
We see data miners and their bilious bots as dastardly sneak thieves and so promise to never share, sell or profitably “misplace” your information for any reason. If I lie may the heads of all my hammers fly away to Valinor!
 Brother Saint Martin and the Three Trolls by John Bauer. Supernatural creatures are everywhere, if you have eyes to see.
Previous Posts in The Japanese Gennou & Handle Series
- Part 1 – Introduction
- Part 2 – Ergonomics
- Part 3 – What is a Gennou?
- Part 4 – The Varieties of Gennou: Kataguchi, Ryoguchi & Daruma
- Part 5 – Kigoroshi
- Part 6 – The Ergonomic Anaya
- Part 7 – The Unblinking Eye
- Part 8 – Head Style & Weight
- Part 9 – Factory vs. Hand-forged Gennou Heads
- Part 10 – Laminated Gennou Heads
- Part 11 – Decorative Gennou Heads
- Part 12 – The Drawing: Part 1/6
- Part 13 – The Drawing: Part 2/6
- Part 14 – The Drawing: Part 3/6
- Part 15 – The Drawing: Part 4/6
- Part 16 – The Drawing: Part 5/6
- Part 17 – The Drawing: Part 6/6
- Part 18 – Wood Selection
- Part 19 – Laying-out the Handle
- Part 20 – Making Sawdust
- Part 21 – Installing the Head
Miles's desk pt V.......
 |
| finished glamour pic |
I've been trying to get a hold of my sister Donna out in Indiana and nada. I'll past this on to my sisters Kam or Susan. I'm no longer going to populate the boneyard with projects.
 |
| last night |
Came back to the shop to clamp the front rail up. Decided to use it because I don't have any 4/4 cherry 6" wide.
 |
| ready for layout |
Thought about using a different wood for the drawer fronts. Walnut came up first but I don't have enough for two drawers. Pine is out of the question and I have no other 4/4 hardwood in my stash. It is looking like it is going to cherry after all.
 |
| hmm...... |
Still liquid and no 'foam' covering it this time. I stirred it and applied some to a scrap of pine. Covered well and seemed to be sticking. I wasn't expecting this to still be viable.
 |
| tenon layout |
Initially I tried to do the layout with not one but 3 different mortise gauges. I felt like I didn't have thumbs - I couldn't get any of them to lay out equally from each edge. The tenon is a few frog hairs wider than a 1/4".
 |
| mortise layout |
I took my time doing this layout. There is no bottom rail on the front and it is way too easy for me to screw things up. Got a layout triangle on the top that helped a lot with keeping me on the right track. Got it laid out first with light pencil marks, took a coffee break, and came back to check it was correct before finishing the layout. I checked it again before I killed the lights for the day.
 |
| rail inset |
This is the outside line for the rail putting the tenon centered on the leg.
 |
| got lucky |
I was going to use a long 4/4 cherry board to get the two drawer fronts. While picking out that I saw these cherry scraps off to the left. The grain flows pretty good across the two so I'll be able to get a good match right to left.
 |
| hmm...... |
Got a snug fit on the ends and it is proud on the width. I'll plane them to fit when I do the 1/2 blind dovetails.
 |
| hall of famer at Cooperstown |
Got a request to make two frames for these. One for each of the grandsons. They are related to hall of famer but I don't know how. My wife is the one who does the digging into dead people stuff. He was a great uncle to the grandson's paternal grandfather. Either of these two frames is way too big for for a solo pic.
 |
| finally |
Maria had told me bigger is better when matting a pic/photo. I started with a frame that would have a 2" border all around. It looked off to my eye so I started shrinking the frame. It took me 4 cuts before I got this. I'll whack out these two and bring them when I go to Maria's to check on two frame jobs I gave her last month.
accidental woodworker
End to side-edge joinery, part 10

New Shooting Board
Miles's desk pt IV (?)..........
 |
| seven rails |
Learned something prepping the rails that had gone over my head like a cement balloon. There is an order of operations with prepping the rails that I wasn't following. First op is to rip the rail to width. 2nd op is square one end and then square the opposite end and saw the rail to length. I was flattening/straightening one edge, squaring the ends, and finally sawing it to final width. The problem with that sequence? The ends were square to the original reference edge but not with the other one (width wasn't parallel end to end). For years I did prep that way obviously wandering in La La Land without knowing it.
 |
| 23 slats |
I was able to get this many slats out of the off cuts from the stock prep.
 |
| my desk |
33 slats on my desk that I will repeat on Miles's desk. I have a fondness for the look of this. They will be 3/4" wide by 3/8" thick. I doubt I'll use less then this number but I may add a couple more - to close the distant between the last slat and the legs.
 |
| 44 slats |
The width and thickness was different between the 5 batches of slats I did. To even all the slats I did one final ripping to width and thickness. The total operation of making the 44 slats took me 2hours.
 |
| cherry sawdust |
Generated a bigger pile than I expected. There was also a fine sawdust in the shop that covered everything.
 |
| headache time |
Didn't realize until after I was done with the front that I had made a hiccup. I was looking to get a continuous grain flow. I didn't want one drawer, I wanted two inset ones. The headache was caused by trying to figure out the length of the drawers.
 |
| the front rail |
I first saw this done by Norm Abrams from the New Yankee Workshop. I think it was called the library table. I have done this once before without any problems. Trying to find the length of the drawers and the left, middle, and right dividers was making me feel like I had the IQ of a lima bean.
The result of this is the drawer inserts came out short. I just lost my continuous grain R to L.
 |
| hmm....... |
Normally I would have used biscuits but I recently got a Stanley #59 doweling jig and I used it instead of biscuits. I did good on the alignment on the bottom but I was off on the top. I thought I had registered the jig but I did it wrong for the top one -either the divider or the top rail.
 |
| double, triple checking |
I would have bet a lung I had done the registration correctly. Of the 4 registrations I was right on 3 and off on one. I was happy with the bottom - it came out dead flush on all 3 dividers. The fix was easy, glue in dowels and redrill for them.
 |
| I couldn't wait |
Twenty minutes after I glued the dowels in the errant holes I sawed off the proud and flushed them. Tried it with the center divider and I was flush top and bottom.
 |
| happy face |
Dead on flush, top & bottom, on all three dividers.
 |
| it won't stretch |
Got a 1/4" gap and I tried but I couldn't stretch it enough to close it up. Eyeballed it and I couldn't think of any way to 'fix' it. I can't use these drawers for slats as they aren't long enough. I will save them in the wood pile for a future use.
 |
| nope |
I thought I was clever using a scrap of pine to figure out the length of the drawer. When I did it the pine was a snug fit in the opening. Turned out that the pine was the same length as the cherry drawer from the git go. Don't understand how that happened. But I did remember how I had done the previous front rail from many moons ago.
On that one I had left the right and left outside dividers over length. On this one I had sawed the top and bottom to the same length as the back rails. I should have left the middle part over sized. Got me thinking about maybe redoing this. I have extra stock and the 'fix' for it.
 |
| nice jig |
One thing I have learned over the years is to leave jigs etc set up until everything is glued and cooking. This way it isn't a scramble to set the jig up again to 'fix' a me-steak.
accidental woodworker
The Japanese Gennou Hammer & Handle Part 21 – Installing the Head

No one should be ashamed to admit he is wrong, which is but saying, in other words, that he is wiser today than he was yesterday.
Alexander Pope
In the previous article in this series we finished fitting and shaping the handle of our gennou hammer in accordance with our design document. Some refinements may be pending the results of testing, but in any case the time has come to attach the head.
This is an important task, perhaps not as easy as it sounds, because this is a craftsman’s handle, made with love and skill, not a mass-produced cockroach killer ground out by barefoot Bangladeshi farmers and secured with crude wedges. It’s not a typical tool of the sort sold at Home Despot designed to fail quickly and be tossed into a landfill soonest. And because the head is not secured with barbaric wedges but relies entirely on the extremely tight fit between the eye of the steel head and the tenon Beloved Customer cut on the end of the handle, some careful, but nonetheless violent action is required to successful connect head and handle. The purpose of the article, therefore, is to help you install it carefully with all due violence.
Installing the HeadBeloved Customer can install the head either before or after sanding and finishing the handle, but in this example we’ll attach the head before testing and finishing the handle. This approach will be most efficient if you decide to adjust or rework the handle after performing the tests I recommend in the next article.
In this case, I use the word “finish” to mean to apply a chemical “finish material” to the wood, not to “complete” the work or “conclude” the job. This difference in definition matters to me because confusion regarding the dual, even treble meaning of the word “finish” has caused problems for me in the past. So there you are.
Preparing the Tenon
First, remove any tape remaining on the tenon and, if necessary, use a solvent such as lacquer thinner to remove any adhesive residue. DO NOT USE soap, water, or any water-based chemical as this will make the tenon swell! After cleaning there should be no finish material, wax, oil or unicorn wee wee left on the tenon.
Depending on the relative humidity the handle is acclimated to, it may be advisable to make an effort to shrink the tenon a bit by placing the handle in a low-humidity environment for a time. Please do NOT microwave your handle, cook it in your oven, or heat it in your toaster, not even with cheese and Tabasco Sauce.
There are several ways to remove moisture from the tenon in order to shrink its width and thickness a bit without ruining the handle or burning down your workshop. Perhaps the safest way is to store it for a time in a tightly-sealed plastic container with packages of silica desiccant. Other ways include placing it in a warm spot close to an operating gas furnace, or indirectly exposing it to an electric room heater for a day or so.
If you use any method that involves heat, make sure you are nearby to monitor progress and deal with scorching and fires.
Orienting the Tenon
You’ve already shaped the handle, and shaved and lightly chamfered the tenon so it should partially fit into the head’s eye almost as deep as the chamfer, but should go no further using only hand pressure.
Please keep in mind during this process that it’s extremely important to get the tenon started in the eye straight, and to keep it straight, without allowing it to become cocked.
It’s also important to install the head in the correct orientation. This usually means it’s flat striking face is oriented towards chisel or nail, and with the brand oriented towards the handle’s butt.
Some people like to orient the head’s brand so it faces up (away from the butt) when using the hammer. I can understand this compulsion, and while it makes no difference in performance one way or the other, you should be aware that it’s seen as bass-ackwards among professionals in Japan.
Starting the Tenon
Of course, in accordance with your humble servant’s advice in previous articles, you’ve already created an elegant dome on your hammer’s butt to prevent these taps and strikes from damaging the handle.
I like to place the head on a working surface such as a benchtop or a softwood board like pine or cedar resting on the floor/ground cushioned by a piece of leather or rubber to prevent slipping.
Insert the tenon into the eye, and, after sighting the handle and head from multiple directions to check alignment, when you are absolutely certain the tenon is poised to go into the eye straight, tap the handle’s butt with a flat-faced hammer, genno (not a domed-face hammer) or mallet. After a few taps, stop tapping, check your progress, and make sure the tenon is going in straight and not cocked.
Although the tenon should not have entered the eye more than a millimeter or two, it should be an extremely tight fit, with each tap making barely any progress.
I can’t describe the sensation in writing, but if the fit is too tight at this point in the process, you may need to scrape or sand the tenon a little.
Driving the Tenon Home
This is where the “violent” part of the job I mentioned above begins.
With the tenon properly aligned and started in the eye, stand up, hold the hammer in a fist with the head hanging straight down, and strike the butt of the handle with your hammer or mallet paying attention to its progress into the eye with each strike and the friction created. Gradually adjust the impact force of your strikes accordingly. Don’t be surprised if it takes literally dozens of extremely hard strikes to install the handle completely. If the tenon just slips in, however, we have a problem, Houston.
If you find that the fit is too loose, however, don’t despair, simply shim it with quality paper as described in the last section of the previous article. Remember, most people find it difficult to get the tenon/eye fit right the first time. Such adjustments to a new handle are nothing to brag about, but neither are they something to be ashamed of. It’s more the rule than the exception until experience is gained.
Some people like to make their tenon extra-long so it projects out of the eye 6-12mm or so. Nothing wrong with this approach, but it looks silly to me in the case of a new handle. Once again, beauty is in the eye of the bean holder.
I was taught that the ideal is for the tenon of a new handle to remain recessed inside the eye a few millimeters. The purpose for this goes back to one of the reasons for the gennou handle design described in this series of articles, namely, that the handle does not have a tumorous swelling below the head but the neck is approximately the same dimensions as the eye for a portion of its length to permit the user to tap the handle further into the eye should it loosen. By leaving the end of the tenon short of the end of the eye in the case of a new handle, one provides visual evidence that (1) the handle is tightly fitted and; (2) that plenty of tenon length is available for making such adjustments.
Accordingly, a tenon projecting a long way out of the eye indicates to the knowledgeable observer that either the handle is either old and has been adjusted many times, or the tenon fit was sloppy from the beginning. In my humble opinion, a tenon of a new handle projecting from the eye a significant distance looks odd, but in practice, it doesn’t make much difference. The choice is yours.
In the next article in this series of articles about danger and violence, we’ll test you’re new handle. How exciting!
YMHOS
If you have questions or would like to learn more about our tools, please use the questions form located immediately below. To see a list of our tools and their pricing, or to contact us, please click the “Pricelist” link here or at the top of this page.
Please share your insights and comments with all Gentle Readers in the form located further below labeled “Leave a Reply.”
We see data miners and their bilious bots as dastardly sneak thieves and so promise to never share, sell or profitably “misplace” your information for any reason. If I lie may all my hammers swim away from me!
 Title: Cormorant. This ink drawing was made by Japan’s most famous swordsman, Miyamoto Musashi (c. 1583 – 13 June 1645). This style of art (suibokuga) is not well-known outside Asian countries, but despite the few materials used (paper, ink stick, inkstone, brush and water), it’s an extremely difficult art to master. Why? There’s no pencil layout to follow, so the artist must have the drawing planned down to the last stroke in his mind’s eye. Each stroke must be made precisely but without hesitation or mulligans. The ink is black, so color gradations can only be achieved by altering the speed of the brush and the ever-changing water/ink balance contained in the brush. High-speed, high-precision, powerful lines, no wasted strokes. Very much the work of a swordsman.
Previous Posts in The Japanese Gennou Hammer & Handle Series
- Part 1 – Introduction
- Part 2 – Ergonomics
- Part 3 – What is a Gennou?
- Part 4 – The Varieties of Gennou: Kataguchi, Ryoguchi & Daruma
- Part 5 – Kigoroshi
- Part 6 – The Ergonomic Anaya
- Part 7 – The Unblinking Eye
- Part 8 – Head Style & Weight
- Part 9 – Factory vs. Hand-forged Gennou Heads
- Part 10 – Laminated Gennou Heads
- Part 11 – Decorative Gennou Heads
- Part 12 – The Drawing: Part 1/6
- Part 13 – The Drawing: Part 2/6
- Part 14 – The Drawing: Part 3/6
- Part 15 – The Drawing: Part 4/6
- Part 16 – The Drawing: Part 5/6
- Part 17 – The Drawing: Part 6/6
- Part 18 – Wood Selection
- Part 19 – Laying-out the Handle
- Part 20 – Making Sawdust
- Part 21 – Installing the Head
Leave a comment Cancel reply
miniature chest finale and pt I of Miles's desk.........
 |
| grey pad work last night |
Everything I read/watched about milk paint said sanding between coats wasn't necessary. However, a scratch pad works wonders smoothing out the paint. It surprisingly didn't generate any appreciable dust. I had used this grey pad (the only one I had) between each application of the paint.
 |
| happy with it |
There was a 'foam skin' covering the top that stirred into the paint without leaving lumps. The consistency of the paint has remained the same since I first mixed it up. Hope that I have mastered making it now.
 |
| 3rd coat |
Although this doesn't look like latex paint with regards to coverage, I'm happy with how three coats of this batch of milk paint look like. I'll be ready to slap 3 coats of shellac on it in the AM.
 |
| the next day |
The paint still had a 'foam skin' covering the top. Unlike last night it took some vigorous stirring to make it lump free. Consistency remained the same - encouraging that there hasn't been the slightest hint of it wanting to turn into a jello like blob.
 |
| 4th coat |
Didn't need another coat but I was curious about how the paint would be after sitting out on my bench for two days. Is it just me or does it look like the color has deepened a wee bit? The paint laid down with no problems or hiccups.
I started looking on line about making linseed oil paint. My grandfather worked as a house painter when he first came to the USA. He made the paint that he painted houses with. Supposedly linseed oil paint doesn't peel/blister/crack like modern latex/oil paints do. Just something to have on the back burner to muse about.
 |
| legs |
Sawed out the legs for Miles's desk. This 8/4 cherry stock is 1-7/8" thick.
 |
| prepping |
Planed two adjacent faces square, flat, and twist free. Next step is to plane the four legs to equal thickness on the lunch box planer.
 |
| hmm...... |
Leg prep was done and I measured the two adjacent faces. This face was almost 2" wide and the other face was 1 7/8". That gives about 1/8"+ for wiggle room. There is nothing carved in stone for the thickness but I was shooting for as thick as possible.
 |
| done |
It was a beautiful pre spring day for planing. The temp at the time I did this was 67F/20C. It didn't take long to do - it took longer to set up and break down then planing the legs.
 |
| not perfect |
All the legs when checked against each other were close. On a couple there was less than frog hair and I have no intentions of chasing my tail on them making them perfect.
 |
| calling this done |
Still have to hinge it and get shellac on the lid but no one will see that in a pic. I like these chests better painted than left natural. I wouldn't paint a nice hardwood one, but pine is a good choice for milk paint.
 |
| back/side view |
There is a difference in the two paint jobs. The blue is a ton more streaky while the red is uniform with almost zero streaks. The red also covered imperfections/glue blobs much better then the blue did.
 |
| sigh |
The area I sanded due to lifting grain. It lifted again but no as bad. Thought briefly about making another batch of blue but nixed it. Wish this wasn't on the front but I can live with it.
 |
| legs |
I had to redo my layout. On the first one I saw that I had put planer snipe facing the where the mortises were. There were only two of them, one I was able to place at the bottom and the 2nd one facing out toward the front. I'll plane the snipe off after the base is done.
 |
| wow |
I love this bottom piece of cherry. I wanted to use it for the front but all the lovely grain was on the right side. The left side was flat sawn and bland. If the right grain was more centered I would have used it.
 |
| big empty hole |
I need seven rails for the desk. The one with the knot hole will be used for the top back - the knot won't be seen in the finished desk. It doesn't extend all the way to the opposite face.
accidental woodworker
Center Punching

I got the idea for this blog entry because Im learning to turn and I've been watching a lot of lathe videos. What has struck me about the very simple operation of mounting a piece of wood between two centers is how complicated people can make it. When I first started turning, I would follow some of these more complicated instructions to the letter and I didn't get great results. Mostly my own fault, but now that I know more I can say these protocols were also unnecessarily hard and complicated ways of getting stuff done.
I'm not exactly sure where I first saw the method I will describe in this post. I instantly concluded, Oh, this is much easier. It might have been from the videos of Richard Raffan, who has put out some excellent turning videos which I highly recommend. And he's eminently practical.
The Gramercy tools treadle lathe comes with a 1" crown center to drive the work and a live cup center to support the spindle work at the other end. There are a lot of excellent reasons for using a crown and a cup center to support the work, including safety, but one real advantage is that it makes mounting the work in the lathe really, really simple.
All you need to do is find the center of each end of the stock and put a punch there. Other types of centers require an actual drilled hole, but when you use a crown center and cup center, you don't need more than a punch mark.
The question is, Where does the punch mark go? And the answer is, In the center of the stock. There's a whole host of gadgets for figuring this out. They sort of work, but if the stock isn't actually square, they don't really work. Moreover, they are not necessary anyway.
Here's what you do:
Take a pencil hold it at approximately halfway over the stock and mark the stock all around (above). You can't see it too well in the picture but I am using knuckle on my middle finger as a fence against the wood so that the pencil square is centered all around on the stock.

You will end up with a little square in the middle. Put a punch mark in the center of that square. Eyeballing that center is perfectly fine (but don't punch yourself in your eyeball).

I use an automatic punch, but you can use a nail and a hammer. I always punch twice cuz I just do.
Then we do the other side.

That done, it's time to mount it in the lathe. The crown center is a spring-loaded pin. All you do is put the punch mark up against the pin on one side, with a little pressure so it doesn't slip out. Then you advance tailstock so that the pin in the cup center presses into the punch mark on other side. They you tighten the tailstock until the cup digs into the stock.
That's it! You are done. As you turn, the crown center especially has a tendency to loosen up a little bit. And the cup center may work itself a little deeper, so you might want to tighten the tail stock periodically. It's pretty easy.
Incidentally, as I mentioned in the beginning of this blog post, I've been watching Richard Raffan videos. He has a method of putting stuff between centers without any layout at all, just eyeballing it as he's putting it on the centers. I tried this method and it works fine. The reason I don't just eyeball it is that I think the method I've described here is even easier and requires even less thinking. Although you do need a pencil and punch handy.
PATINA Toolapalooza
This coming weekend is the PATINA tool swap near Frederick Marlyand. You can get the details here. If you are anywhere in the Mid-Atlantic it is well worth the effort to get there. Yes, there are scores of tables with thousands of premium vintage tools, but for me the real treasures are out in the tailgating tool swap.
I’ll be there Saturday morning on the hunt for tools appropriate to little boys. Can you believe Lil’T is four years old? And his brothers and cousin are stair stepping right behind him. I’ve got plenty of tools a-waitin’ for them, but not nearly enough.
Anyway, it you see me there and recognize me come up and say “Hi.” If you see me but do not recognize me, well, don’t.
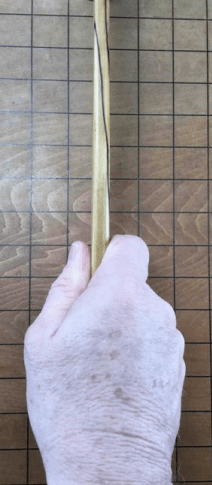
Straightening a Kinked E. C. Atkins Handsaw
A few months ago, I responded to an ad for an old handsaw. When I looked at the saw, I noted a fairly bad kink in the plate, so I told the seller I'd pass on it. Realizing it was not worth much, he said "OK, just take it for free". Not only that, but he also gave me an old Craftsman saw and an old Dunlap smoothing plane. Those I'll address separately.
 |
| 26" crosscut saw from E. C. Atkins |
 |
| The beech handle close-up. The type of wood, the screw locations and the lambs tongue were the details that helped me try to identify the model. |
 |
| And the medallion |
Turns out the saw is a 26", 8 ppi (7 tpi) Atkins crosscut handsaw. I don't know the model number for certain, but the handle and description mostly match a #54 in the 1906 catalog (and 1919 and 1923 catalogs) I found at a blog on Atkins saws by Mark Stansbury. That doesn't mean this saw is from 1906 - that's just one of the catalogs I saw a similar saw in. But there is one big difference: the saw I've got has a breasted tooth line, and I didn't see any breasted saws in the catalogs I looked at.
After looking further at the catalogs, it could also be a #58 or #63 or #71. No etch was seen on the plate before, during or after cleaning up, so that's no help in identifying it.
I've read articles and seen video of getting a kink out of a saw plate, but had never tried it and this saw was a perfect candidate. The following picture attempts to show the kink in the plate. The kink is on a diagonal starting about 8" back from the toe at the tooth line and about 5-6" back from the toe at the top of the plate. The picture does not show how pronounced the kink really was.
 |
| Looking up the tooth line from the heel. The kink was much more pronounced than it looks here. |
 |
| A straightedge was used to help locate the center of the kink |
Then the pounding began. I used the end grain of a chunk of maple butcher block countertop as my anvil. My hammers include a 3 lb. small sledge, a 1 lb. carpenter's hammer and a small ball peen hammer.
 |
| The "anvil" setup |
 |
| Hammering out the kink |
The hammering took a long time. It's possible that my small sledge didn't have enough curvature on its head because I noticed much quicker results about an hour later when I used the small ball peen hammer. But with the kink's convex side up, I hammered and hammered and gradually the kink started straightening out. I did this in sort of a grid around the main kink area, an inch or two either side of the main kink line, but focusing more blows along the kink line.
 |
| Using the small ball peen hammer might have been a better choice |
Last year I picked up Matt Cianci's book "Set & File", in which he covers fixing kinked saw plates. I recommend the book to anyone who wants not only to fix kinked saws, but also who wants to know how to sharpen saws.
I also give credit to Bob Rozaieski, who has a nice video on YT about hammering out a kinked plate. I'll get into the rest of the rehab of this saw in another post.
Boring Shrink Pots
Red Milk Paint.......
Got a late start in the shop today. I had to go AAA to renew my truck registration. I maintain my AAA membership just to be able to do DMV (Dept of Motor Vehicles) business. It took less than 15 minutes to renew. At the DMV it probably would have been more than an hour.
After this I was going to go to the local recycling drop off but it didn't happen boys and girls. Luckily for me I had checked the site on line before leaving. The only thing in the truck that the drop off would have taken were the 2x4s. They don't accept plywood (had tons of it), stained or finished wood, sheet rock, and pressure treated wood. The 2x4s were at the bottom in my truck so I'll be moving on to plan 2.
All I have on plan 2 is naming it plan 2. The Johnston landfill won't take construction debris which is what in my truck. At this point in time I don't have a clue as to where I can depose what is in my truck bed.
 |
| lime and pigment |
Had to make a quick run to buy vinegar to make the quark. I got the pigment dye mixed and the lime was the next batter.
 |
| 9 1/4 oz of quark |
The author says the minimum is 8 oz/250 grams with any extra not sinking the ship. I brought a cup of water for mixing/whizzing everything up. Spoiler alert - I didn't use any of the water.
 |
| red milk paint |
Kind of looks like tomato soup with some cream it it. The consistency is a little looser than the blue milk paint but not the same consistency as latex paint. Felt better with how this paint came out. I covered it to let it set up while I was topside cleaning up the containers.
I am not thrilled with the whizzing machine. It sounds labored and initially it didn't whiz up the quark at all. It all got whizzed once I added the lime. I will look and see what is available in small blenders. They should have stronger motors than the I whizzer I have now.
 |
| wow |
I was surprised with how this batch laid down. No streaks and no bald spots. It laid down like a latex paint and covered. I wasn't expecting this and it is what I hoped for with making my own milk paint would be like.
 |
| hmm....... |
I am not thrilled with the color of the red. I was expecting it be fire engine red whereas this is more of a salmon color(too much orange IMO). It doesn't look too much out of place against the blue of the chest. This will have to do.
 |
| this was surprise |
This is one coat on the end grain. Usually paint on end grain soaks in and looks bare. I thought this milk paint would do the same. The milk paint went on and lay on the end grain like it was sealed. The only prep I had done on the end grain was to sand it with 120.
 |
| wow again |
The second coat coverage is outstanding. I can't see the wood grain clearly underneath the paint anywhere. This is what I wanted from this milk paint. The 2nd coat went on two hours after the first one. The paint still had the same consistency as it was for the first coat. I plan on putting a 3rd and final coat on after dinner. In the AM I'll start on shellac.
The only change I made with the red is using the quark right away. I didn't drain or stick it in the refrigerator (I did refrigerate two leftover ounces). I also didn't go nutso on my water management. I used 5 TBSP of water with the lime because it appeared to be a wee bit on the dry side. I used a lot of water mixing the red pigment. Not sure exactly how much but I'm guessing 6-8 TBSP? I hope that I can repeat my success with this on the next batch.
I will keep the leftover red milk paint and track to see how long it will last before heading south. Very happy that the paint didn't turn to jello between the 1st and 2nd coats. (PS - didn't turn to jello between 2 and 3 neither)
accidental woodworker
A Life in Oak
The chance to see and touch and investigate so many thousands of square feet of Early Oak carving, in one place doesn't happen every day. So, I took the day today for a trip to Paul Fitzsimmon's - A Life in Oak auction viewing.

Every inch a joy. For a carver and furniture maker, like me, the opportunity could not be missed.

To see the backsides, the underneaths, the details which may not be shown in full photos. A few hours well spent.

Somewhat sad, but infinitely interesting were the lots I saw last; collections of parts. Spare bits from a life in oak. Maybe they will find their missing bits one day, or someone will make the missing parts once more.

Well done Paul, for all your hard work; collecting, researching, contributing so much to the understanding of Early Oak furniture!
it is melting.......
Over the last 3 days the snow dumped by the blizzard has finally melted down significantly. I can see about 20 feet of my front sidewalk. Tomorrow it is forecasted to be 63F/17C so I guessing my entire sidewalk should be clear. Looking forward to not having to shovel it. The good news is I think we won't have any more of the white stuff for about 7-8 months.
 |
| happy with this |
Got 3 coats on the new screw boxes. I separated the two of them - one has only flat head screws and the other has round and oval head ones.
I'm calling the miniature chest blue paint job done. The coverage still isn't what I wanted but stepping back, I am ok with it for being milk paint. Decided to go ahead and make up a batch of red milk paint for the lid. I am can be a wee bit stubborn about some things and I just can't walk away from this milk paint hiccup.
I plan on using the quark right away for the red and I am not going to obsess about how much water I use. The blue batch actually started to look and lay down like paint when I added water. Fingers crossed on that and I'll be trying that in the AM.
 |
| why not |
I measured each screw and put a tag in its compartment. I did it for all four of the #5 & #6 screw boxes. Thinking that I should also do it for the #4 screws. The rub on that one is that 16 of the compartments are flat head with two being oval head. hmm......
 |
| platform |
I keep the screw boxes on top of my version of Roy Underhill's multi drawer cabinet. There is enough room on top for the 4 boxes but not for the current 6. The two cleats on the underside will fit in between the top moldings and keep the platform from moving/shifting.
 |
| top of the cabinet |
This is where the platform will go. The platform is 16 x 19 and will easily hold the 6 screw boxes plus two smaller boxes. These two hold loose screws and brass brads.
 |
| done |
I didn't want the platform to overhang on the R/L. Instead I put the overhang out at the back.
Another slow day. It is getting easier to get my right shoe on but the right foot is still swollen. Walking is slowly getting better but not as fast I want it to. Some things I have zero patience for but I'm forced to have it with this.
accidental woodworker
Blue milk paint pt III........
Debating whether or not to do the red milk paint. After the results of the blue milk paint it ain't looking good for the home team boys and girls. I read the book again and I spent a lot of time on You Tube watching milk paint vids. Nothing I saw addressed the the paint turning it a big blob of jello milk paint. The only thing about the blue milk paint that I didn't have any hiccups with is the pigment dye. But that is only 1/3 of what makes up milk paint.
 |
| sigh |
The milk paint got underneath the grain and it lifted. Having this pop up here and now sucked the wind out of my sails. I don't want to plane it but I can't leave it as is. I'll try sanding it with 120 and give it an eyeball after.
 |
| surprise |
I was expecting to find a blob of blue jello but it is liquid. Not the the consistency of loose pancake batter, just a wee bit thicker. The shelf life of milk paint is short. Depending upon who you listen to it is anywhere from 24hrs to maybe 3 days if it is refrigerated.
I have to cover the spots I painted and I don't want to mix up a batch of new blue milk paint so I'm going to try and use this. I'm encouraged by the fact it is somewhat liquid.
 |
| hmm..... |
Of course the first coat sucks. I can't leave these as streaks so I'll wait until it is dry to the touch and lay on another one. Fingers crossed the paint stays liquid.
 |
| hmm...... |
2nd coat and it looks a wee bit better. The paint is covering just like it did when I painted the chest. I did notice that it covers just a little better if I brush it on against the grain. With the grain the paint appears to slide over it without covering.
 |
| nope |
The hinges I'm using for the new screw boxes requires a #3 screw. I have #3 screws but they are all flat head and I need a round head. I drilled out the screw holes on the hinges to accept a #4 RH screw.
 |
| one down, one to go |
I am becoming a fan of the 90° stop hinges I used. They are flush mounted and more than adequate for these screw boxes. I don't like flush mounted hinges but for shop projects my OCD stays quiet.
 |
| lid first |
I tried to clamp the box and the lid in the vise and apply the hinges to both. It turned into a real shit show on the first screw box from many moons ago. It is a lot saner for me to do the lid first, clamp the lid/box in the vise, and secure the hinge to the box.
 |
| done |
Both boxes are hinged and have the first of 4 coats of shellac.
Only made 3 trips to the shop today. My right foot blew up to the size of a watermelon and it did the same today. I know I should be resting and keeping it elevated but I can't sit and do nothing. But I did manage to limit my time in the shop and how many times I had to go up/down the cellar stairs.
PS - Who knew? I was totally oblivious to the time change. Wee bit of a shock when I got up this AM.
accidental woodworker
fine joinery saw yew
An Interesting Dovetailed Saw Till by Bill Pavlak
This article was written in April 11, 2018 for or on behalf of finewoodworking I’m not sure, but it is an excellent article.

Few things inspire a collision of opposing thoughts in my head quite like a beautiful tool chest. Every time I see one there’s a simultaneous burst of “Oh I really want to make something like that” and “why would anybody spend that much time on a tool chest?!” Because I’m in the midst of designing and building a traditional cabinetmaker’s chest, the noise and impact of these clashing thoughts has intensified. The potential for headaches is high; thanks, in part, to my own indecisiveness and to a mysterious man named R.F. Matthews. Writing his name amounts to telling you close to half of what I know about him.
The other half is that when Mr. Matthews emigrated from England to America in the early 19 century, he brought his neatly fitted-out chest of tools with him. It’s still here with many of its original tools in the collection of Colonial Williamsburg.
 Photos by Bill Pavlak with permission from The Colonial Williamsburg Foundation
Though I often copy original pieces directly, I wanted to make a tool chest that was uniquely my own while still within the parameters of historic examples. This is, after all, exactly how so many 18th-century cabinetmakers made their tool chests. The Matthews chest is stunning and unique in some ways, but in a lot of ways, it’s just like many other tool chests from the era (its overall size, general interior organization, and decoration are all pretty standard). There is one feature of the Matthews chest that I couldn’t resist borrowing and that’s its saw storage system.
 Photos by Bill Pavlak with permission from The Colonial Williamsburg Foundation
Sure, there are simpler and equally effective ways to build saw storage into a chest till, but a dovetailed box with saws sticking out of it is undeniably cool. When I started designing my own chest, I wanted to keep its decoration fairly austere – show off nicely figured mahogany, but no elaborate veneer work – and its organization straightforward – no mechanically activated, secret compartments. Nonetheless, like so many originals, I wanted my chest to have some features that transcend the purely practical and that could become small points of pride going forward. The pull of the Matthews saw till was irresistible, so let’s take a closer look at it.
 Photos by Bill Pavlak with permission from The Colonial Williamsburg Foundation
 Photos by Bill Pavlak with permission from The Colonial Williamsburg Foundation
As the above photos show, the saw box is built like a traditional drawer, but turned on end – half-blind dovetails and primary wood (mahogany) up top, and through-dovetails in secondary wood below (spruce on the original and long leaf pine on mine). The partitions in the middle are dadoed to the underside of the top and secured to the bottom with wedged through-tenons. These partitions solidify the box (remember it will be sawn nearly through several times) but also support and restrain the toe end of the shorter joinery saws. The slots for the saws run deep to keep the saw handles below the plane of the box top. In both the Matthews chest and mine, there is a till above the open till where this saw box is kept, so nothing can stick out above it. The saw box should be made to fit your saws, so I’m not going to get into measurements here other than to suggest an overall length between 16 in. and 20 in. One more word on the structure of this saw box: It’s weak all by itself – some of those saw slots undermine its strength laterally. It will, however, last at least a couple of centuries if it’s kept snugly in another box that will
prevent it from flexing to the side – the larger till in both the Matthews chest and mine.
Though the construction is straightforward, the building process requires a few special considerations.
The layout of the half-blind dovetails is dependent on saw placement. Matthews was careful not to saw through any of his fine dovetail pins, but rather place them between the saw slots. This approach means you first need to figure out where the saws will go. To do this, I simply cut a couple of scrap boards to the overall width of the till and experimented with where to place each saw so that there was enough room around each handle for my hands to get in.

Once this was done, I could confidently lay out my dovetails and proceed with all of the joinery. You may have noticed that the saw box top has half-tails instead of half-pins on its outer edges. While this might offend the sensibilities of woodworking writers from the past century and a half, it held up quite well, so don’t worry about that – half-tails show up regularly in period work.
If you want to glue up your box and then cut your saw slots on the tablesaw, skip this paragraph. If you’d rather cut your handsaw storage slots with your handsaws, there a few things to keep in mind. Before I glued up my box, I dry-fitted it and made sure that all of the parts (except for the bottom) were perfectly coplanar on one side. I marked this edge as a reference on each board then knocked everything apart. While I knew it was a terrible idea to completely saw the slots into the parts before assembly, I also felt that at least starting the cuts in each part would help keep things far more accurate and easier later on.
The only risk in starting the cuts prior to assembly is that they might not line up perfectly (misalignment would result in storing the saws with bent blades). This is where the aforementioned reference edge comes into play. With a marking gauge riding along this edge, I scribed the location of the saw slots on
each board. Next, I clamped all the boards together, face to face, with the scribe lines perfectly aligned and cut the first 2 in. or so of each saw slot all at once. For each backsaw I made three cuts: one for each side of the spine and one in the middle for the blade. On my box, because only two of the saws go through all four vertical pieces (the ends and partitions), I had to remove pieces from this clamped-up stack as I went along.

Once everything was glued up I connected all of my saw cuts. Sawing a nicely dovetailed box is likely to test your nerves, but the starter cuts will guide you and go a long way toward making everything come out great. In general, I used a saw with a larger kerf than the saw that was going to live in a particular slot so things wouldn’t be too tight. For the wider backsaw slots, I used a coping saw and chisels to finish up the stopped ends. With the slots that run all the way through the box, I started my cut from one end and after I made it a little over halfway across the top, came in from the other side.

When you get right down to it, the scraps I used to figure out saw placement could have been fixed into my saw till and might have done a fine job keeping my saws safe for a lifetime. There’s nothing wrong with something so simple and practical, but there’s also nothing wrong with treating yourself to some impractical cabinetmaking every now and then.

Blue milk paint pt II........
 |
| couple of hours later |
Went back to the shop after dinner to get a 2nd coat on the chest. It was about 3 hours after the first coat and the paint was not like it was for the first go around. It had the consistency of hard peanut butter - like it had been in the refrigerator for a while.
I stirred it but it didn't go back to the loose pancake batter consistency. I put a little water and stirred it in without much success. It got a bit better but was still too thick to apply with a paint brush. I doubt I could have spread it if I had used a trowel.
 |
| whizzed it up |
This and a little more water, got me back to the pancake batter. I wasn't expecting the paint to go into La La Land on me like this. Got it thin enough to apply another coat with a paint brush.
 |
| not a happy camper |
Not getting a warm and fuzzy with the 2nd coat coverage. It is barely better than the first one which was disappointing. In some spots, as you can see, the coverage was good but most of it is streaky. The paint just wasn't grabbing and laying down completely. The batch of milk paint, although it has a better color, isn't any better than the paint job on the first miniature chest.
 |
| hmm....... |
Milk paint on poplar. Thinking maybe the eastern white pine I've been using is the problem. The paint coverage on the poplar wasn't shouting back at me. It is streaky and the coverage was just as poor and spotty as on the pine.
 |
| cherry |
It is looking like to me that this milk paint doesn't give a rat's arse what it gets slapped on. The coverage and look is the same. So far the only thing giving me a happy face is the pigment - the color is good and without being splotchy.
 |
| this sucks pond scum |
It is the AM and the milk paint is a blob of a nice looking blue color. It wiggles like it is jello with the same consistency. I stuck, or rather tried to put a stick in it and nada. It was like it was rubber and I had to put some oomph into getting the stick inserted in it.
No way this could brushed on. I tried putting some water in it and got nowhere. Stirring did nothing and I just ended up with a big blue, rubbery blob on the end of the stick.
 |
| whizzing it again |
I started with 4 TBSP first and only a small portion was liquid. I had to dump in about a 1/4 cup more of water before it whizzed up into a smooth, but thick consistency.
 |
| better but...... |
I was hoping for a better build with this after the 3rd coat. I have had latex paint act like this milk paint but this sucks pond scum result wise. The coverage is still not at the level I want. It has some good dark coverage spots but still has way too many streaky spots.
 |
| screws came in from McMaster-Carr |
I don't have any room in my current screw boxes. Decided to make two more for #5 and #6 screws. These two boxes will be just for flat head screws. The current #5 & #6 boxes will hold round and oval head screws.
 |
| current screw boxes |
#2  (in one box), #4, #5, and #6 screws (atop the big cabinet).
 |
| hmm...... |
I'm using the original ends intended for the current miniature chest. They were 11/16" thick and I had to thin them down to 1/2". This chunk popped off when I planed the board straight across.
 |
| two boxes there |
The sides of the boxes are only 1 3/4" high so I'm using a single dovetail at the corners. I'll glue a 1/8" plywood panel on the bottom of each box. Got the dovetails done on each box. The next batter is doing the 1/2 pins.
 |
| 1/2 pin sockets done |
Next up is the part that always gets me revved up. How will it fit off the saw? I did both at the same time whereas I usually would do these one at a time.
 |
| first dry fit |
Good fit and after a few pulls and tugs, got the diagonals to agree dead on.
 |
| glued and cooking |
The dovetails were snug enough that I didn't need clamps. I had enough stock for the sides and one lid. The back box needs another piece. I'm not a fan of glued up lids but with my 4 other screw box lids, two of them are glue ups.
 |
| almost |
Found a scrap of pine more the large enough but I had to thin it down to a 1/2". I left it a wee bit proud and I'll flush it after the glue has cooked.
 |
| dividers |
I only did a groove for the two long dividers. The ends of the smaller cross dividers I'll secure with super glue. I already know that each of the compartments will hold more than a 100 screws.
 |
| one down, and one to go |
No hiccups or an oops with the first egg crate dividers. My other boxes have 18 compartments and these two will have only 15.
 |
| shooting for 2 for 2 |
I got the half lap sawn on the long ones. I set them down on the cross dividers as far as they would go and marked them.
 |
| mark both sides |
When I sawed the half lap I positioned the saw blade centered between the layout lines by eye.
 |
| two dry fitted |
Happy that this came out without any me-steaks. I can easily finish this in the AM with the exception of slapping some shellac on them.
Slow going today and I didn't get as much done as I had hoped for. A couple of days ago when I took the desk top out of the clamps, it fell off the clamps and smashed down on my big toe on my right foot. I hopped around on one foot, screaming expletives for 10 minutes.
The toe blew up and turned some rather interesting shades of purple, red, and black. It took me 5 minutes to get my boat shoes on the next day but I was able to do it without passing out. The day after I dropped the top I woke up to a huge blood blister on the big toe. Popped it and the toe felt a little better. Still walked with a slight limp.
Yesterday I repeated the dropped desk top exercise on the same right foot. Didn't drop it on the big toe again but on the next two adjacent toes. Now those are an interesting shade of purple and black.
The big toe swelled some more along with the two other toes. This AM it took me seemingly forever to get my right shoe on. The limp is more pronounced and I can't bend/flex my toes while walking. Walking flat footed very slowly and I had to rest and sit a lot while I was in the shop. Chopped the tails and pins sitting down which is a first for me.
I think it is going to be a few days before I will be able to do a full day in the shop. I will try to confine my movements/walking while in the shop as much as I can.
accidental woodworker
Leave a comment Cancel reply