Hand Tool Headlines
The Woodworking Blogs Aggregator
“Glory to God in the highest heaven, and on earth peace to those on whom his favor rests.” - Luke 2:14
Be sure to visit the Hand Tool Headlines section - scores of my favorite woodworking blogs in one place.
Hand Tools
Miles's desk pt VIII.......
 |
| sneak peek |
Dry clamped the base and set the top on it. I haven't that got to its final size yet but I wanted to check that I got it right. Spoiler alert, I did.
 |
| dry clamped base |
This is looking good IMO. Simple, plain, and functional. Thinking about doing something with the bottom of the legs - maybe a small taper?
 |
| hmm....... |
Three of the four legs have cracks in them at the top. The tenons all fit snug and a few were obviously too snug. I'll glue the cracks and set them aside to cook until tomorrow.
 |
| glued and cooking |
Just to be sure I'll keep these clamps until tomorrow. On the fourth leg I tried to open any hidden cracks in it with a chisel leveraged against the mortise walls. No cracks or even the slightest hint of any.
 |
| slats |
The slats are slightly over 3/4" x 3/8". The mortises are a frog hair under 3/4" x 3/8". The plan all along was to plane each slat to fit. I want the tenons to be gap free in the mortises.
 |
| ain't happening |
I haven't used this mortise machine in over 5 years? The switch is toast and I had to replace the starting capacitor. It still turned on (switch is now plug it in/out) without any sparks and ran smoothly. However, the widest rail is too tall to fit under the mortising chisel. The shortest one barely fit, there was barely a 32nd of clearance. Scratched the idea of using the machine to chop the mortises.
 |
| first step |
I have done slats in this manner 3 or 4 times already. I found that taking a chip on all four inside edges first helps a lot. It greatly helps with keeping the top of the mortise clean and defined.
 |
| first mortise done |
It shouldn't take more than one or two swipes of a plane to clean up and fit the slats to the mortise.
 |
| more 3/8 and less than a 1/2 |
I am eyeballing the depth of the mortises. I want them roughly to be 3/8-1/2 inch deep. The slats are not structural so there isn't any need for the mortises to be deeper than this. It is also the same depth I did on previous slat mortises.
 |
| sigh |
Had two boo boos chopping the mortises on the first rail. The first was a big chip blew out on the 3/8 width. Super glued that back down ok. The second one was a split/crack that said hello when I chiseled down on the long mortise wall. Glued that one back together with yellow glue.
 |
| sigh, again |
After waiting 30 minutes I started chopping the mortises again and another split/crack shook hands with me again. Glued that one and the first again because it wanted attention too. Clamped it and set it aside to cook.
 |
| ready to chop |
Got the other 3 rails ready to chop the mortises. I went with 9 slats on each side. After eyeballing the layout adding another 2 slats (11 total) didn't make much of a difference. I might add extra to the back though as it is several inches longer than the sides.
accidental woodworker
Miles's desk pt VII..........
 |
| surprise |
The glue bond from the PVA so far has been very easy to break with just a few gentle taps of a mallet. I tapped the bottom of the vertical divider first, then a few on the back of it. I was surprised to see that I had used the same dovetail joinery that I had used on the rails.
Before I can see if this will come free, I'll have to unscrew the drawer guides at the front. Fingers crossed that I'll be able to break it free intact then reglue it hiccup free.
 |
| one more |
I thought this was done but it ain't so boys and girls. Workshop dust settled on the shelf and if felt 100 grit sandpaper. I rubbed it down with 4-0 steel wool and applied the last coat of shellac.
 |
| splitting the cheeks off |
None of the cheeks ran into the center of the tenon. For the most part they split straight down with a few running out toward the outside face.
 |
| done |
Quick and easy to whack this out. It took me about 45 minutes to do all 7 rails.
 |
| first one |
Haunch not done, just fitting the tenons to the mortises first.
 |
| fitting the top front rail |
I have to fit and dry clamp all the rails first. Once that is done I can layout and do the spindles on the sides and the back.
 |
| dry fitted |
I hadn't realized that there was such a color difference between the front drawer rail and the legs. However, the grain pattern I like a lot and it will be a focal point of the desk once it is done.
 |
| ugh |
Got a gap on the left bottom side. I fiddled and faddled with it for almost an hour trying to close it up.
 |
| closed up |
I fettled this in small increments which is why it took so long. I used my shoulder plane to knock down the back shoulder - from eyeballing it, it was tight on the back and a gap on the front. (oops it would appear upon editing that I didn't post the correct pic)
 |
| first dry fit |
This looks a bit bigger than my desk even though this one is few inches smaller in both directions. No gaps anywhere - I was able to close up all the shoulders tight with the clamps.
 |
| last two rails |
I got the first 5 rails fitted by 1457. Decided to stay past quitting time and fit the last two. Got those done by 1546. Shut the lights and headed topside.
I had a few hiccups along the way. Nothing that caused a shutdown but required a few minor tweaks. I did the haunch wrong on two rails - neither boo boo will show once the rails are glued and cooked. The last one was the back top rail.
 |
| sigh |
I wasn't paying attention and when I fitted the tenons and the knot hole ended up on the outside face. Got lucky and I was able to reverse the tenons into the opposite mortises. I had to thin one tenon to get it to fit. It was too snug and split the leg. I'll have to glue them up before I do the rails.
accidental woodworker
My Piece for the Woodcarving Illustrated magazine
Just a quick blog post about my carving being featured in the Fall 2025 issue of Woodcarving Illustrated. I wrote a step by step guide on how I create my whimsical houses and accompanied it with detailed photographs. It was a fun little project.
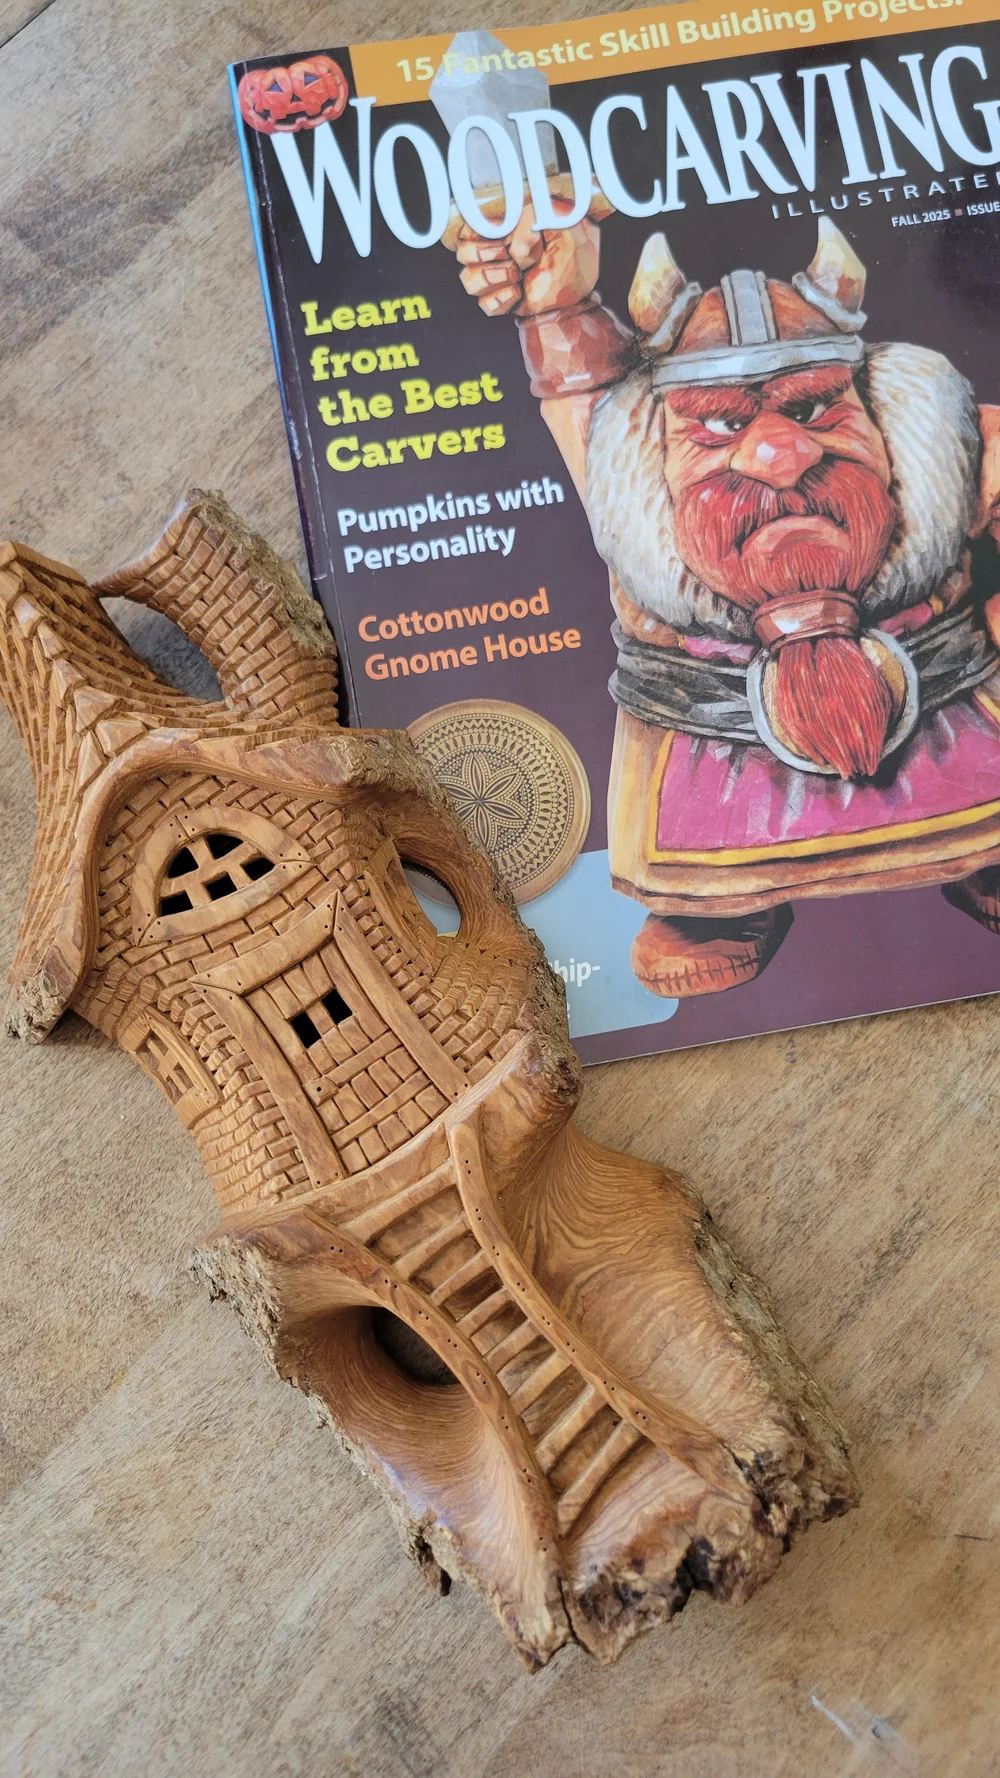
The piece is named ‘‘Guide’s Cottage’’ and is around 14 inches tall, done in cottonwood bark from British Columbia.

Why are you reading this?

Miles's desk pt VI & Leo's dresser pt I........
I had 3 things on the 'A' to do list and two were good and one went south on the express. The express one was frustrating and I wish I could have reached out and grabbed and gave it free introductory flying lessons. But I digress so on with the keyboard diarrhea.
 |
| the first good thing |
I was determined today to at least get all the mortises done for the desk. I had to add this piece of a 2x4 for the router. Without it was getting tippy while at the end of the cut. All of the top rails will have a haunch and this facilitated making that easier and safer.
 |
| yikes |
On the last mortise the router bit gave up the ship. Got lucky that it broke off and didn't go nutso and chew up the mortise walls. I finished getting to depth with a solid carbide 1/4" diameter up cut spiral bit. Cleaner and nicer finish then the broken router bit did.
 |
| outside mortise wall |
The plan was to make the tenon a wee bit wider by chiseling the outside wall. I had set the router bit a few frog hairs off the outside of the layout line.
 |
| hmm..... |
I took off a strong 32nd on all 12 mortises.
 |
| dips and dings |
All of the dips and dings happened on the outside mortise walls. Chiseling didn't remove them entirely, but enough. The shoulders on the rails will hide all of the dips and dings.
 |
| done |
It took a while and it wasn't until the 3rd leg that I hit my stride and developed a rhythm doing the mortises. Got the mortises completed a lot quicker than I would have if done with a mallet and a chisel.
I think if I use the router again for mortising that I will make a cradle for the legs. Doing it on the workbench was a PITA due to the vacuum enclosures thing a ma bobs on the router. I got a wee bit frustrated with them and I ended up breaking them off with a mallet. After they were gone things progressed a lot smoother.
BTW I tried to remove the vacuum hood/enclosures but I couldn't figure it out. It looked to me that they were a permanent things. I don't think that I will miss them because I had no way to hook up my vacuum to it anyways.
 |
| erasing the layout lines |
Used my high frog 4 1/2 to plane off the layout lines. I didn't have any issues with squirrely reversing grain tearing out.
 |
| interesting |
I had forgotten about this black milk paint. When I stirred it there was some bottom settling but I had no problems stirring it up and getting it lump free. I painted a scrap of pine and the adhesion seemed to be as good as the first time I used it. I am clueless as to what bad milk paint would look like, smell, or what the consistency should be.
 |
| shoulder work |
Mortises done - ends squared off and the outside walls chiseled. Next up was sawing the shoulders on the 7 rails. I didn't think I would get them all done today but I did. I sawed the last one at 1505.
 |
| LN tapered carcass saw |
This is the 3rd time I used this tapered LN carcass saw. I bought this when I had sent my other LN carcass saw to them to be sharpened. I didn't want to be without one while it was being sharpened. I bought the tapered one because the straight blade carcass saws were out of stock.
 |
| done |
Tomorrow I'll start on the tenons. The plan is to chisel the cheeks and plane them to fit the mortises with my rabbeting blockplane.
 |
| hmm....... |
I hadn't planned on doing this but the rail came off with gentle persuasion with a block of wood and a mallet. The fit of the rail is snug and I'm thinking now of using yellow glue - tite bond - to secure it.
 |
| hmm...... |
I found the can of gray paint but it didn't look so good. It is almost two years old and had skinned over on the top. I got it from Benjamin Moore and I'm sure they have it in my customer data base.
 |
| hmm..... |
I remember now how I rabbeted the back of the rail. I glued & nailed on a strip of pine but the 'rabbet' stayed attached to the plywood. I'll have to figure out how to attach the plywood to the back of the rail.
 |
| kept going |
Popped off the third rail and this time the 'rabbet' came with the rail. I pulled it off, scraped the old glue off it and the back of the rail and glued and nailed it back on. The dust panels aren't structural and aren't necessary to be glued/secured to the back of the rails.
 |
| glued and cooking again |
Used the same nails to register and secure the 'rabbet' again. I stuck in the vise to ensure a good glue bond this time.
The dresser is almost fixed now. It went a lot quicker and easier than the nightmare scenarios I was running through the brain bucket. Maybe I can talk my wife into painting it when I fix glue failures.
I spent over an hour on the southern express trying to log into my government accounts to get my IRS 1099 forms. It was an absolute shit show. There are too many accounts and all are different. The problem is I only log into them 2-3 times a year and they have expirations on the time for passwords. It seems they system forgets you and you have to start from ground zero to verify and log in again. I got two 1099s and I have two more to get. Not looking forward to that happy time.
accidental woodworker
The Japanese Gennou & Handle Part 23 – Finishing the Job
A man in love is incomplete until he has married. Then he’s finished.
– Zsa Zsa Gabor
This is the last article in our series about designing and making a handle for a Japanese gennou hammer.
In previous articles in this series Beloved Customer completed designing, shaping and fitting the handle of your gennou hammer and attached the head. Then you tested it and perhaps made adjustments. Assuming Beloved Customer is satisfied with the results of those adjustments, at least for now, the time has come to sand it and apply a finish.
Finishing Options
There are a couple of approaches your humble servant might propose on the subject of finishing tool handles. The first is perhaps the oldest, and easiest, and that’s to do nothing. After all, tools are made for hands not museums, and flashy finishes too often make otherwise workmanlike tools look silly.
In addition, most woods (except for those that might cause allergic reactions) perform just fine unfinished, thankee kindly. In this “au natural” approach, you may choose to leave tool marks on the surface of the handle without sanding them into oblivion, lending your handle undeniable gravitas and dignity, even character.
An unsealed, unfinished handle will, however, unavoidably become stained and discolored, and it’s head may not stay attached as long as a well-sealed, well-finished handle. I say this from experience.
A good light-duty finish material for an au-natural handle is a quality non-slip floor paste wax like Johnson’s well-known product in the yellow metal can. Does it seal the wood? No, but it does help keep the handle looking cleaner. Why floor paste wax? Some waxes, for instance those used to polish furniture and automobile paint, are intended to provide a slick surface that encourages water to run off and to which dirt doesn’t adhere well. History has shown that slippery waxes used on floors will result in slips, falls, and a transfer of wealth to the legal profession. For the same reason, carnuba automotive wax is not ideal for tool handles, while non-slip floor wax is.
And then there are the chemical finishes such as linseed oil (BLO), milk finish, tung oil, shellac, varnish, lacquer, polyurethane, etc. To one degree or another, these chemicals tend to seal the wood reducing the penetration of dirt and oil, and (sometimes) slowing the movement of moisture into and out of the wood.
But what chemical finish is best suited to a gennou handle? It is far beyond the scope of this humble scribble to properly describe, much less evaluate, the many varieties of finish applied to wood, so I will simply provide a few comments.
Linseed oil and BLO, a by-product of the flax plant, are organic materials used for centuries if not millennia as a traditional finish in Europe. It was once used widely for paint and, until it was replaced by rubber and later petroleum products, flooring and waterproofing materials. Have you heard of “linoleum?” Of course, this was back in the day when lead was a common ingredient in paint and makeup. Linseed oil no longer has any value as a finishing material for wood because it never really dries without adding problematic, even toxic, chemicals called “driers,” it seals poorly, collects dirt, and discolors badly over time. But because it’s constantly mentioned in old writings, which many people trust just because they are old, linseed oil products are still in-use today. To advocates of linseed oil products I say “make sure you soak your oily rags in water and dry them outside well away from any fuel (like your house).”
I am a fan of the modern milk paints, but do not like it for tool handles. Nonetheless, it’s a valid option.
Tung oil is an ancient finish, but the price nowadays far exceeds its value, assuming you can even find an unadulterated source.
Shellac creates a beautiful surface coating but it’s far too delicate for tool handles.
Standard synthetic varnish, nitrocellulose lacquer, urethane and polyurethane are readily available, easy to use and can create a beautiful, durable finish, but when used in the traditional manner, the surface film coating they produce eventually chips and cracks with time, exposure to ultraviolet light, and expansion and contraction of the wood to which they have been applied. And every scratch accelerates this degradation.
Why is degradation of film finishes the a problem you say? The obvious downside of a once beautiful finish looking ratty aside, every defect in a surface film finish promotes the movement of moisture into and out of the wood, and of course increases the swelling and shrinkage of the wood it’s intended to protect. What most people don’t realize is that, as time goes by, the solvents and compounds in film finishes intended to provide flexibility in dealing with expansion and contraction of the wood dissipate causing the finish to gradually become more brittle, and break down and crack at a ever-increasing rate, independent of dings and other defects.
In modern times, the use of latex rubber in water-based paints has greatly reduced this problem, but such paints are not especially durable as a tool handle finish.
Sanding
If the au-naturel approach appeals to you, I recommend erasing marks left by files and rasps and replacing them with crisp marks and cleanly cut surfaces left by sharp edged tools like knives, carving tools, and spokeshaves. Unless a chemical sealer/finish material is applied afterward, a plain sanded finish is probably the worst surface treatment possible, whereas a surface cleaned with sharp blades will serve you better. I often use this texture for the endgrain butts of my hammers and saws.
If, on the other hand, you prefer a smoother finish, and are prepared to apply a chemical finish, then by all means sand away. But please do not sand the tenon. If you decide to sand the handle before installing the head, please apply masking tape protection to the tenon.
How fine should you sand your handle? I think 600 grit is fine enough, but I’ve gone as high as 1200 grit on fine-grained, hard woods like black persimmon. Did using such fine sandpaper make a difference? Nah.
After you’ve sanded the surface to where you like it, the next job is to eliminate hidden hairs. No, this does not involve applying hot wax to delicate areas of the body and then violently ripping out body hair so that you look delightfully-sleek in your new sequin string bikini, but rather it’s the job of encouraging the naughty ends of wood fibers still connected to the handle, but currently pressed flat onto and into the handle’s surface, to stand up so we can cut them off using sandpaper.
Dealing with these fiber is always important when finishing wood because, with time and moisture, they may pop up over time creating rough patches in the finish encouraging degradation. Once they are standing and no longer hidden, we can cut them off at the base with sandpaper to create a durable, smooth surface long-term even when exposed to moisture and sweat.
Although it’s not used much nowadays, sanding sealer was originally a shellac product developed specifically for this purpose.
To raise hairs, lightly wet the handle’s surface (but never the tenon) with water and allow it to dry completely. Some hasty people like to dry the wood quickly with a forced-air blower or even propane torch at this point to make any loose fibers stand up immediately in preparation for the next sanding pass. But simply allowing the wood to dry naturally is effective too.
This is an ancient, very effective technique. Please do this at least twice, after which you can apply the finish material.
 Kanō Hōgai, Two_Dragons_in_Clouds (1885), ink on paper. Philadelphia Museum of Art. Father and son dragons are depicted playing in the clouds.
The London Finish
There’s a durable wood finishing technique I learned from custom gunstock makers that I wrote about in an earlier article about handplanes called the London Finish. This is the finish I recommend for hammer handles too. It can be as subtle or as flashy as you like.
A pretty handle is nice, but the key objectives for applying a finish to your gennou handle should be (1) to moderate swelling and shrinking of the tenon during seasonal and climactic changes in humidity; and (2) to prevent oil and dirt from penetrating the wood making it look grubby. This matters because such swelling and shrinking can cause the head of your gennou to loosen and do naughty, acrobatic stuff at inconvenient times. And a greasy, dirty handle is no way to treat a friend.
If the head is attached when applying the chemical finish of your choice (I recommend it be so), please tape it well to keep finish off the metal. Apply masking tape to the hammer head on all four sides of the eye, but leave the end of the wooden tenon exposed.
Tape the rest of the head well with masking tape.
Soak the finish material (flat varnish or polyurethane thinned 100% with high-quality thinner) into the eye and the butt as deeply and thoroughly as possible. Plan for three or four applications allowing time for the material to soak in and dry.
Do no use low VOC thinners as they contain politically-correct compounds of water, acetone, emulsifiers and other counterproductive substances the State of California’s poorly-educated but thoroughly-conflicted and richly-corrupt lawyers have determined will save the polar bears, but that will weaken the finish.
If you faceted the butt and want to keep it that way, you must be careful when sanding it or the facets will disappear. This is a matter of personal preference.
Of course, be sure to apply lots of finish to other surfaces of the handle, and wet sand them well as described in the article linked to above. Don’t allow a surface film to dry except for the first time as described in the webpage linked to above.
Hammers are lifelong tools, but too often handles are not. You can help your gennou’s head stay tight longer, stay cleaner, and look better longer by applying a London Finish instead of a thick surface film finish.
YMHOS

If you have questions or would like to learn more about our tools, please use the questions form located immediately below or email us at Covingtonandsons@gmail.com. Please share your insights and comments with everyone in the form located further below labeled “Leave a Reply.” We aren’t evil Google, incompetent facebook, or gossipy X and so won’t sell, share, or profitably “misplace” your information. Promise.
A list of our gennou heads: C&S Tools – Gennou Hammer Head Pricelists & Photos
Previous Posts in The Japanese Gennou Hammer & Handle Series
- Part 1 – Introduction
- Part 2 – Ergonomics
- Part 3 – What is a Gennou?
- Part 4 – The Varieties of Gennou: Kataguchi, Ryoguchi & Daruma
- Part 5 – Kigoroshi
- Part 6 – The Ergonomic Anaya
- Part 7 – The Unblinking Eye
- Part 8 – Head Style & Weight
- Part 9 – Factory vs. Hand-forged Gennou Heads
- Part 10 – Laminated Gennou Heads
- Part 11 – Decorative Gennou Heads
- Part 12 – The Drawing: Part 1/6
- Part 13 – The Drawing: Part 2/6
- Part 14 – The Drawing: Part 3/6
- Part 15 – The Drawing: Part 4/6
- Part 16 – The Drawing: Part 5/6
- Part 17 – The Drawing: Part 6/6
- Part 18 – Wood Selection
- Part 19 – Laying-out the Handle
- Part 20 – Making Sawdust
- Part 21 – Installing the Head
- Part 23 – Finishing the Job
The front page.
A lot of work has gone in so far. It's good to be appreciated.

On the front page, and more inside.


Ploughless Ploughing Grooves

This blog post is of course free, but you might want to watch the video we made and join your fellow enthusiasts. Here is the link. If a picture does paint a thousand words, then a video could do more. Enjoy the following:
Hard to imagine so little wood can give back so much. Imagine, four lifetime tools designed and made to last for 150 years of full-time daily use from a few scraps of wood that. If you bought it, the wood might cost no more than £8. Oh! Interesting. You didn't need more than the real power of hand tool woodworking. Not a machine in sight. Imagine.So you don't own a tablesaw or a so-called power router. If you're like me, you don't want these space hogging screaming banshees anyway. Thriving without them truly improves your self high-demand life. The small cluster above would take me a couple of hours of machine-free woodworking, I get the ideal exercise to renew and maintain my whole body and mind and my happiness is quite complete. No need to make a bunch of jigs, buy in an array of support supplies or rely on dust and chip extraction, wear dust masks, eye and ear protection for any of it and I could listen to a podcast or music as well.
 We don't all own a plough plane to plough with, and sometimes we need a precisely made groove, yet we'd rather do it using our own hands and work totally in self-powered ways throughout our days. I have dug out many a recessed channel in wood without a plough plane close to hand.
I know not everyone owns a plough plane and when you need a short length of groove or channel in wood you might not want the cost and trouble of buying one in. I've made this ploughless groove often enough through the years because not all grooves go all the way through for different reasons. Generally, plough planing grooves rely on the groove going all the way through. Take your time and follow the steps, and it will work for you too. Here is the video but hope you'll stiil read through this post. Enjoy!
 Using your imagination, use this picture to inspire you. Your hands pick up a quarter-inch chisel. You've sawn the walls with a tenon saw, and all you are doing now is tap, tapping a few chops in between the two kerfs to split-separate the fibres with or along the grain. Keep reading!
Step One:
It's best to set the mortise gauge to the width you want and to mark the parallel lines in the place you need them. This process parts the surface fibres, which is just a good and practical strategy.
 If you do not have a mortise gauge, just use a marking gauge, working from both sides of your workpiece.
Step Two:
With a sharp, pointed knife, carefully define the walls of the groove slightly deeper by pulling the knife point into the gauge lines to cut deeper into the fibres. Watch for grain change in direction and counter any straying grain intent on taking you off course. Sometimes you simply need to change direction 180º and go the opposite way. Sometimes you simply lower the angle so the blade rather than the point severs the fibres.
 Deepen the gauge lines with a pointed knife, ready for sawing. You could install the guide first if you want to. Often, I do not use any fence, and that is why you don't see me using it here.
Step Three:
I suggest you do this, though I often do not; Superglue a strip of wood right on the gauge line so that saw cuts are with thin the groove area. Three tabs of glue dots sped up with accelerator secures the strip firmly enough to work to with the saw strip in two seconds. . .
 . . . But I added one for this article. The simplest and most practical way to attach a one time or temporary fence to guide tools like saws and chisels is to use clamps, but that is not always practical on narrow edges. I usually use superglue with a squirt or two of accelerator. This accelerator sets the glue in under five seconds, and two or three dots will usually be enough.
 Adding a brief and short burst of accelerator corresponding to the superglue blobs means that, when setting the guide to the workpiece, the set is almost instant, and you are ready to register your tools to it.
 No margin, just tight to the line, works perfectly well. The saw plate rides to the guide. If the depth is critical, you can clamp a depth guide to the saw plate itself so that the saw stops cutting when the depth guide hits the surface of the long guide you are working to. I probably would just go for a guesstimate depth.
Step Four:
With a mid-sized tenon saw (12" or so), start at the point furthest away from you and saw with short strokes, using the point of the saw inside your gauge line, and moving backwards until all of the teeth engage. With subsequent strokes, lowering the saw as you go, saw down as far as your intended groove depth.
 The saw kerf of my tenon saw deepens the walls to depth with a few strokes. My 5mm depth on a short length of ten inches takes only ten strokes, and the end result is a pristine, to-the-line sidewall to any groove.
 A swift strike splits the glue line right down the middle of the hardened glue, but not usually damaging the wood. Residue is easily chiselled away with no harm to the cutting edge of the tools. Both separated pieces can be used many times over.
Step Five:
With both walls sawn down to depth, use an appropriate sized chisel to develop stop cuts as you might say a mortise. Work bevel down and backwards. This will part the fibres by short split-cuts that can then be removed with jab-cuts to remove the bulk of the waste
 We call these chop cuts. Work from the point furthest away from you and come backwards. You will gauge the distance between chops according to your wood type. They all split differently. Even so, 6mm apart is plenty and at those short distances the splits come quickly. By this, we rely on the characteristic, long-grain splitability of grain to split longwise along the grain. The waste wood is easily lifted away with a few jabs with the chisel bevel-down.
 Here is the fast result of bevel-down jabbing to lift the fibres away and ready for the poor man's router plane (below) to level the field.
Step Six:
A simple hand plane router can be made from any odd scrap of wood and a suitably sized chisel. In my case, the groove is 1/4" and I installed a 3/16" chisel through a tight-walled hole by tapping it into place. With the first strokes in the groove it will usually feel a little jarring, but the jaggedness can be countered by tilting forward to reduce depth of cut. Subsequent cuts at a lower angle remove material smoothly.
 Simple solutions help to make woodworking both enjoyable and doable in the zone. This is the original Paul Sellers' Poor Man's Router. Go to this link to watch the simplicity of making and using one. This one I am showing above is a small version. For my blog post, go here. Notice that the bevel of the chisel faces down, not up. It makes a huge difference to the finish. Oh, ignore the groove. It was a scrap.
 Although this usually delivers a perfect recess, sometimes it might not be as smooth as you want, but the bottom will establish a level you can work with just fine without compromise. It's important to tilt the plane forward in the opening strokes. You can control the depth of cut this way, and it saves incremental shallow setting to speed up the process.
The result is good, and especially in close-grained beech.
 My end result is as perfect as it gets, and that's because grain orientation aligns with the stars. The advantage of routing the bottom with a hand router plane like this one is the ability to reorient the plane accordingly.
Tools used:
Mortise or marking gauge
Knife. I use a Stanley 0-10-598 folding pocket knife
A 1/4" and 3/16" bevel-edged chisel
Chisel hammer or mallet
Tenon saw
another one bit me on the butt.......
About 4 years ago (?) Tools for Working Wood sold a white PVA glue. I bought a small bottle to try and I liked it. I liked it a lot and I bought a gallon. No problems with it and it worked differently then yellow tite bond. However, things went south with the last gallon I bought. Things I glued up with it were falling apart. Glue joints were going south in droves. TFWW gave me a refund on the gallon I bought and as far as I know they don't sell it anymore.
I made a lot of things and I am not sure of what I made with this glue. So far 5 projects I glued up with it have failed. I was able to reglue them with tite bond without any hiccups. When my wife got back from North Carolina she brought another glue failure home. The dresser I had made for Leo was coming undone. I'll be fixing it along with all the other things I have on my plate now.
 |
| almost there |
With the exception of the end grain tops of the ends, this bookshelf has 5 coats of shellac on it. I only have to get as many on the tops of the ends. I've been searching for hole to stick this in and so far nada. I really want to keep this and the books in the shop somewhere.
 |
| sigh |
It doesn't look that bad from 8 feet away. I unscrewed the drawer enclosure on the top to make it easier to bring it down to the shop. Amanda told me that it was getting impossible to open and close the drawers.
 |
| right side |
All of the cross rails came loose on the right. On the left side only
two are loose and two are still secure. Or at least I couldn't jar or
move them with gentle taps of a mallet.
 |
| hmm..... |
This was encouraging - I was able to easily clamp the ends of the rails tight tight to the sides. I think I'll use epoxy to secure them this time. I'm not sure that I'll be able to remove the rails, scrape the bad glue off, and reglue them. I don't know if the white PVA glue will loosen with heat and moisture.
 |
| dust panels |
I don't remember how I secured the dust panels. From feeling the underneath of the rails it I think the dust panels are in a rabbet and not a groove. The glue bond there wasn't good enough to keep the rails in place.
The back rails are still secure - they don't have the dovetail joinery that I used on the front rails. The back rails are secured with screws from the back plywood panel into the rails. It makes sense that the screws are keeps things secure and tidy on the back.
 |
| one done |
I am rusty with using a big boy router. I made a couple of dings on the mortise walls. I had to push the router against the rotation of the bit. A little hairy trying to keep the edge guide up tight against the stock. I like how clean and precise the mortise came out. Instead of doing anymore I'm going to wait until the AM.
Getting the dresser out of the car and down into the cellar took a toll on me. I'm feeling my age because it took me a lot longer to get into the shop then I remember getting it out of the shop a couple years ago. (finished this in 07/2024) Not feeling sore yet but I do feel like taking a nap big time.
Ordered some shellac yesterday and with S/H it came to $72.95. It has gone up again but I'll keep buying it because it is my favorite finish. I have been looking for something called a 4 part finish. Shellac, linseed oil, beeswax, and ????. I read an article about it (no recipe) and it was the finish valued by old masters. Still hunting down what the ???? part is, maybe it is alcohol?
accidental woodworker
Cleaning up an E. C. Atkins Crosscut Handsaw
Last time I wrote about hammering out the kink that this saw had. When I was satisfied with the plate's straightness, I moved on to the handle, the cleaning of the plate, and then sharpening.
The finish on the beech handle scraped easily and after filing and sanding it smooth, I gave it a couple coats of BLO. I much prefer the feel of an oil finish over a varnish or poly finish.
 |
| The handle ready for finish |
 |
| A few days later after the BLO had dried |
I also took a wire wheel in a drill to clean up the saw bolts and medallion. They really shine up nicely when rubbed on a strop.
For the plate, I started with a razor blade to scrape off the heaviest rust and grime. Then I used sandpaper, eventually using a stick with sandpaper wrapped around it to help remove the rust and grunge that had built up over time. Sanding included grits of about 50 up to 220 (or 400?) and it looks pretty respectable now, though there are still some rough marks or light pitting. There was no etched maker's mark on the saw plate, so I didn't have to avoid any areas with the sanding.
 |
| The plate before cleaning |
 |
| Sanded in sections - a lot of elbow grease expended |
 |
| Still some light pitting |
 |
| But the plate looks so much better than before |
 |
| This pic shows the degree of curvature of the breasted tooth line |
I took great care in sharpening the saw. The breasted tooth line needed a lot of jointing to get down to a shiny bare metal spot on every tooth tip. I was very careful to file the teeth so as not to end up with alternating deep and shallow gullets (cows and calves). I used about 15 degrees rake and 25 degrees fleam. The saw was over-set by a lot, so I stoned the tooth line on both sides several times to knock down the set.
 |
| Looks razor sharp to me |
I shined up the brass screws and nuts and put it back together. The saw looks great and I'm sure it will be a nice user saw for decades to come.
 |
| Thar' she blows! |
Last thing: I didn't have a screwdriver that fit the saw nuts properly, so I made one from a piece of an old saw blade, a plumbing fitting, and a hunk of cherry. Last year I made a similar screwdriver for bench plane cap-iron screws and this one is almost identical but with a thinner blade.
 |
| The saw screws are much happier with their own custom-fit driver |
 |
| Fits well enough to stay in the slot |
Another nice saw in the collection. I've used the saw a couple of times now, and it cuts like a hot knife through butter. Sweeet!
two more checked off.........
 |
| a teeny bit |
Out of the clamps and on the flat reference surface with some rocking. Not enough that I am going to play with removing it. Now that this is done I'll have to find a hole to stick it in somewhere in the shop. It will hold all my reference books in one spot now.
 |
| reference line |
Laying out my reference line for the tapered pins. Ended up putting in 3 on each end. Two of them bled some glue and it looked like I drilled the holes for them at an angle rather then at 90°.
 |
| sneak peek |
The bookshelf is big enough for a couple of bigger reference books. The grey one is Robert Wearing's book the the next one is a shop reference book.
 |
| wood putty |
Decided to fill the gaps with wood putty over filling them with wood shims. Once books are in it the 'gaps' won't be seen anymore.
 |
| hmm....... |
Felt like I had no thumbs and an IQ ten points less than a lima bean. Couldn't figure out how the micro adjust thing work. Took a lot fiddling before I got it. But the big hiccup was turning the damn thing on.
The switch is built into one of the knobs. To turn it on you have to depress one part down and then squeeze another part of the switch. You have to do it in a sequence that initially escaped me. I was thinking about returning it because I thought it was defective. Finally got it to turn on but I couldn't duplicate it after I shut it off. Took a few but I finally figured out the push down and squeeze sequence.
 |
| one more to go |
Got the last coat on the back first thing in the shop. Two coats on the front until the final check mark goes in the done column.
 |
| this is surprising |
Instead of a stamped metal wrench, this one is actually cast metal. Metric too, rather than imperial. DeWalt is an american company but this router was originally made by Elu in Germany and now is made in Canada.
 |
| test cut |
This test cut took a while. Mostly figuring out how to turn it on and then setting the edge guide. I set the bit to be in between the pencil lines. I didn't do the mortising today but tomorrow for sure. I concentrated on getting the frames and the bookshelf done.
Found a new You Tube called Blond Mary. It is about a female automotive mechanic from somewhere in Europe. Not eye candy You Tube stuff but a competent mechanic who also does body work. So far it appears that she works mostly on Hyunda/Mazda cars and vans. When I was 16 I tried to get into an automotive tech school but I couldn't afford the tools. I like watching You Tube vids rebuilding engines and she does a lot of it. Not a lot of explaining and it is wordless.
accidental woodworker
Are All Those Old Turning Manuals Wrong?
 Hulot, pere "L'Art du tourneur mecanicien" 1775
I've always been puzzled why most of the turning tools listed in classic books on turning (published in the 17th - 19th centuries) are what we would now call scraping tools. One possible rationale is that scrapers are a lot easier to make than forged tools like gouges.
As I found myself diving more deeply into the literature, I discovered a couple of things. Early tool catalogs that show turning tools don't show a lot of scrapers.
They show gouges - as you would expect. Pre-1850s tool catalogs show gouges and instructional books from that era show a few gouges along with pages of scrapers. By the second half of the 19th century, this situation changes. Perhaps the tools were hard to make but I am unpersuaded that this is the only reason for the changing landscape.
For a more satisfying answer, let's look at the turning sections in Mechanick Exercises by Joseph Moxon, published in 1680. I have not been able to figure out where Moxon took his pictures from or if they are original. As in the joinery section, the book's turning chapter features what is considered the first set of instructions. Moxon very clearly states that you use gouges when turning softwood. But it gets interesting when Moxon lists the softwoods: "The softwood turners use is commonly either Maple, Alder, Birch, Beach, Elm, Oak, Fir and &c. and for some particular purposes each of these sorts are best."
If you have ever worked Elm or Oak, you will readily agree they are not "softwoods." Did Moxon make a mistake? No. He is differentiating between the woods that are normally used for turning furniture. The woods turners use for making everything from bowls to banisters, and differentiating it from the super hardwoods -ivory, ebony and boxwood among them. These were materials that were used for ornamental turning and by rich people who turned as a hobby. If you are a professional 17th century turner, you were not buying expensive instructional books on turning; you were using your funds to buy gouges and hook tools so that you would be able to make 300 banisters. On the other hand, if you were a wealthy person interested in decorative arts, you might decide to take up turning - and a book on how to turn ivory and other exotic materials might come in handy. Using gouges and other typical tools on ivory, especially in a human-powered lathe, would not really work, since the material is much too hard. But scrapers will work, and they would give you a good finish that could easily be polished up.
This also explains to me why so many of the fancy books by Plumier, Hulot, or Bergeron, devote so much space to scrapers and exotic fixtures for ornamental turning. None of these books are really about the bog-standard turning that professionals did at the time and still do, the standard work for architectural woodworking.
The next question is, When did amateurs start doing regular work and stop doing ornamental turning? That is a different story
that has to do a lot with the rise of the middle-class in the 19th century. The treadle lathe played its part in that story, which we should save for another time.
All the images in this blog post come from Hulot's 1775 "L'Art du tourneur mecanicien." Most of the early books on turning, including Moxon and earlier works, show images of turning tools, but Hulot is the most comprehensive. All of the books basically show one or two gouges. In the image above, we see the tools for "softwoods"; all the later images are for various scrapers for hard materials, including metal. In the last image, we also have chasing tools for making threads on ivory, hardwood, and soft metals (internal and external, coarse and fine). Getting back to the first page for softwoods, the familiar gouge and skew are shown, although you don't have the variety of roughing, bowl, etc, and other gouges that we are familiar with nowadays. These tools hadn't been invented yet. The hook tools shown on the bottom left of the page were common at the time, and very useful. Moxon describes them as the first tool you would use for roughing out stock. He also hints that hook tools basically do the same thing as gouges but they were harder to use. Hook tools are easy to make, but the flex in the hook makes them a little tricky to handle, and therefore potentially dangerous. (I do not think any company currently makes them today.) All tools, especially lathe tools, get a lot of wear and tear in actual use, and the steel of the time was expensive. Sharpening stones of the time were soft and slow acting, and while a larger shop might have a grindstone, it was cumbersome and time consuming to grind and then hone the tools. Hook tools are far easier to make and keep sharp than gouges, which is why they were more popular (until steel became less expensive and sharpening easier). But only for "soft woods."
The other pages show tools for drilling, internal turning, more scrapers and thread chases. These were used on all materials, especially very hard materials. Except for the thread chasing tools, the average scrapers were very easy to make and easily sharpened.
 Hulot, pere "L'Art du tourneur mecanicien" 1775
 Hulot, pere "L'Art du tourneur mecanicien" 1775
 Hulot, pere "L'Art du tourneur mecanicien" 1775
Black milk paint pt II........
 |
| still good (after dinner) |
The milk paint consistency is still good. No evidence it is wanting to turn into a blob of jello. Putting the 3rd and final coat of paint on the front of the frames.
 |
| front and sides done |
In the AM I'll put a second coat on the back and the inside of the rabbet. A couple of coats of shellac and I'll be ready to bring these to Maria.
 |
| AM milk painting |
The backs can get away with 2 coats as they won't be seen once the matting and glass are installed. All the visible show surfaces have 3 coats.
 |
| fingers crossed |
There were some lumps this time but they stirred up easily and disappeared. The consistency is the same as when I first made it. I think I may have solved (at least for me) how to make milk paint. With my first two batches I obsessed about using too much water. On the red and black batches I didn't. I used more water and the results were a huge improvement. Now I just have to get some time on the road to see how long lasting it is.
 |
| hmm........ |
I blew the heat gun on two sides and clamped it up. I applied pressure while eyeballing the it to guess-ta-mate how flat the frame was. Left it to cook overnight and now it is time to see if I clap my hands or cry.
 |
| made it worse |
I think I clamped the wrong corners. The twist almost doubled over what it was. On to plan #2.
 |
| oops |
There will be no plan #2. This side popped off while I was clamping the frame again. Two more sides popped off when I dropped it.
 |
| hmm...... |
The yellowish areas are glue that didn't soak into the end grain. Wasn't expecting this.
I lost over half of the pics and the post from this point. Blogger was not responding so I closed out the browser and opened a new session and over half of it disappeared. Note to self - don't do that again.
 |
| the after pic |
Went back to the shop and shot two more pics. This one was originally done at 1440. I started making it at 0820. A lot of crappola unfolded in between. I made two huge, malodorous brain farts making this.
The first one was about the back slats. I sawed the tails on each end and laid them out on the back edge of the ends. The problem popped up and shook hands when I tried to fit the tails into the pin sockets. Two ends fit and two ends didn't. I had sawn the tails on two ends opposite of the other end. No way the back slats were fitting but one a positive spin, all four tails fit in the pin sockets.
The second brain fart was with the pin sockets. I had sawn and chopped them correctly on the first end edge. The pin sockets go on the back edge. Unfortunately for me on the 2nd end I put the pin sockets on the front edge. No amount of swearing, offering free flying lessons changed that. I tossed both ends and back slats into the shitcan and started over again.
 |
| tapered bamboo pins |
I glued one of these in each end of the back slats. After the bookshelf comes out of the clamps I will put some into the shelf from each end.
I didn't dovetail the 2nd bookshelf instead I put the back slats into notches. I am experimenting with this way of installing the back slats. Will glue and a tapered pin be sufficient to one, stay in place, and two keep the books from pushing it off?.
Tomorrow I'll start shellac on the bookshelf and the pic frames. Mortising the legs for the rails is at the top of the A list.
accidental woodworker
Black milk paint........
 |
| final prep |
I had filled the nail holes and a few dings with wood putty yesterday. Today I sanded them smooth with a 120 grit sanding stick. I use these sanding sticks a lot, much more than I thought I would. They have proven to be handier than I anticipated. BTW, I use the 120 grit stick 100 times more than any other one.
 |
| prepping for black milk paint |
Got the black pigment dye mixed and ready to go. I have 1 oz of lime ready - I'll add it to the water after the quark is in the whizzing machine.
 |
| 9 1/4 ounces of quark |
Making the quark is just as easy to do as the lime and the dye. One thing I'm still struggling with is the whizzing machine. It has two faults with the first being that the whizzing container is too small. Once the lime and dye are added to the quark the contents extend way above the max line. The 2nd hiccup is that it doesn't have sufficient power to whiz up the paint. It struggles and especially so with the quark. It barely breaks it down. I'm looking for a small kitchen blender with a larger container and a more powerful motor - something at least a 1000 watts.
 |
| hmm...... |
This batch is a wee bit thicker than the red milk paint batch. It is still much looser than than the blue milk paint. Stirring it didn't loosen it but I added some water a couple of times (1 TBSP each time) until it got to the consistency of the red milk paint batch. I think if I hadn't added water thinning it, it would have turned into a blob of black jello.
 |
| hmm....... |
I have four of these books from the Lost Art Press. I'm in a lull so I decided to make a small bookshelf for them. Chris says that more of these small books are coming and I'll be ready. I'm using 1/2" thick New Zealand pine I got from Lowes.
 |
| changed already |
I didn't want to saw up the 2nd board to get the two back slats so I made two of them from cherry. Changed my mind on that when I found a scrap of NZ pine to get two back slats. Now the entire bookshelf is the same wood.
 |
| practice run |
Instead of putting the back slats in a blind mortise I'm thinking of using a dovetail joint.
 |
| not my best dovetail |
Gaps and definitely not self supporting but doable. Laid out the back of the pin socket wrong but it didn't matter. I sawed both the pin and tail with my dozuki saw.
 |
| ta da |
Second try and much better. No gaps and a snug fit off the saw. I think this will work and I'll pin the joint with a dowel for insurance.
 |
| hmm...... |
The books will rest against the back slat without any problems. The wedging action of the joint will keep it in place and the books will rest against it. I'll have to stay on my toes so I saw the pin in the correct orientation.
 |
| ready to go |
Not much wood needed for it. I'll start on this in the AM as it was already past quitting time.
 |
| haven't forgotten it |
Due my unknown lung issues I decided to employ more machine work in the making Miles's desk to speed things up. I'm doing it strictly as a time savings but I'll still be doing handwork too. I ordered a plunge router from Amazon (hasn't come yet) and I'll use that to make the mortises. I'll do the tenons and the fitting by hand.
 |
| hmm....... |
Spiral up cut router bits. I don't think that I have ever used either one. But I digress as both will still be unused. The diameter is 6mm and the cutting depth is 7/8". The mortises need to be about 5/16" and one inch deep. I'll be using a double flute, 1/4" x 1" router bit instead.
 |
| 2 hours later |
Some foam on the top but the paint underneath still had the same consistency. After rubbing down the frames with the grey pad I painted on a 2nd coat. Coverage was good after one but two was better.
Had some problems with the SD card with the last 3 pics not cooperating. They wouldn't upload into the blogger. One of the pics was my attempt at untwisting one of the pic frames. I'll post it and how it turned out in tomorrow's post.
accidental woodworker
Old Bodger Videos

I’ve been on the pole lathe turning a pile of parts for upcoming 18th-Century Chairmaking classes. I’ve turned a few hundred parts on the pole lathe before, but this is the first time I’ve turned this many – 75 legs or so – on the pole lathe in one go. I’m really enjoying it.
Batch production like this is one of the best ways to develop skills. My surfaces are getting smoother and my work more efficient. It’s also forced me to make a few changes to my lathe treadle. Body positions that were passable for an hour became unbearable after a day. Now, I’ll benefit from the changes every time I use the lathe.
This time at the lathe has also reinforced what I already knew: turning on the pole lathe can be just as fast as a power lathe. I’ve been turning Samuel Wing’s simple chair legs in less than four minutes, starting with turned cylinders (I used the power lathe for roughing these cylinders, which is much faster for this). Could I turn the legs faster on the power lathe? Maybe, but I doubt it. Would the surfaces be smoother on the power lathe? Probably. But then again I’ve spent the last 25 years turning on the power lathe, so that’s a unfair comparison.
Another good way to develop skills is by watching people who know what they are doing. So I’ve been revisiting videos of the old English chair bodgers, trying to learn their secrets. A few videos I’ve posted here before. But there’s at least two I haven’t, and they’re some of the best:

This first one is from the BBC, ca. 1950. It’s of a pair of brothers, Owen and Alexander Dean, some of the last chair-leg turners in England. Watching this again, I saw something new: the chisel can stay put when the treadle stroke ends. I’ve been backing it up slightly before the next cut, but there’s no need for that – just leave it in place and begin again on the next treadle stroke. Saves a lot of energy.

The second video is from 1941 and is of Albert Carter, chair-leg turner. The narrator says he works 14-hour days and turns out about 10 gross per week, or 1440 legs. If he’s working 6 days per week, and doesn’t break for lunch or tea or anything, that’s 3.5 minutes per leg. Was he splitting and shaving all those legs himself? If so, he’s doing pretty well for a 75-year-old.
The post Old Bodger Videos first appeared on Elia Bizzarri - Hand Tool Woodworking.Pictures From An Exhibition (of tools)
I had a great time at the PATINA toolapalooza on Saturday, connecting with many friends and acquaintances, and communing with hundreds of thousands of tools. Every year I can spend up to a dozen minutes shopping for clothes and such, but I could spend dozens of hours browsing and shopping here.

There are two parts of the event, and I always start at the tailgating outside in the parking lot. That’s often where the real deals are found.

My big score for the day was a full NOS sleeve of vintage 220-grit 3M Tri-M-ite sandpaper. My experience is that this is getting harder to find, but one fellow had several tables of sandpaper-ish inventory, most of which I did not need. But the Tri-M-ite was priced nicely so I bought the whole pack.
I was only tempted a little by a smaller patternmaker’s vise that was missing a lot of parts. It was only $60 but I let someone else go home with it.

But if vises were what you wanted, there were plenty.


Inside was packed with both people and tools. Bins and shelves of tools.


The only other things I bought for myself were a file handle for $3, a Lufkin 10-foot tape measure for $2, and an extension carpenter’s rule for $8. I did buy a number of good tools for the grandsons, small back saws, eggbeater drills, and chisels for a future date, etc.
Very much looking forward to next year.
I’m involved in a couple more tool events this year; stay tuned.
Hall of Fame picture frames........
 |
| fingers crossed |
I thought I had a good shot at this coming out of the clamps twist free. The Bessey clamps looked like they flattened the frame but I didn't get lucky. The same amount of twist before I clamp]ed it, was the same amount that shook hands with me unclamped.
 |
| way too much |
It looked flat but the twist is still 1/8" and it isn't any better on the opposite corner. That is too much to plane off. The frame is only a 1/2" thick and I would guess a total of a 1/4" would be planed off both sides to remove the twist.
 |
| last one |
Whacked out the bridle joints on the tablesaw. In spite of doing the donkey work there, I still had to tweak the tenon. For some reason I haven't found yet, the height of the saw blade moves. Sometimes up and sometimes down so it left the shoulder short this time.
 |
| one done |
I had to trim every shoulder with a chisel. The bottom right has a wee bit of a gap that I closed up with a should plane.
 |
| sigh |
I had to make a replacement. This one slipped out of my hands and said hello to Mr Saw Blade. Got lucky that the two jigs I had used to make the tenon sides were still set up.
 |
| 2nd one dry fitted |
The 2nd frame is atop the twisted one. No hiccups fitting the replacement side - frame was still dead nuts square.
 |
| first pic frame |
Both of these frames basically were self squaring. The clamps mostly kept the frame from shifting/moving while it cooked. The bridle joints were all snug and self supporting but I clamped them anyways.
 |
| 2 1/4 lines |
I'm not 100% sure but I think each line represents 1/8" off horizontal. This is a healthy amount of twist.
 |
| nope |
I didn't think it would work but I tried it anyways. Sawed off 1/2" on all sides but the twist was still there laughing at me. I'm not done with it yet. I'm thinking of wetting it and hitting with the heat gun to see if I can remove the twist then.
 |
| back frame |
Mitered both of them due to how visible they will be. Used the 1/2" shoulder plane to flush/even the toes of the miters.
 |
| done |
Decided to make two bridle joint frames so the Grandsons get the same frame. I don't want any sibling rivalry drama over the frames. The bottom frame is from the first two I made. It is an extra and I don't know what I'll do with it. The inside measurements of it are too small for a 5 x 7 pic - the R/L is 6" but the T/B is a frog hair over 7".
I'll be making a batch of black milk paint for these frames. If that batch goes south on me I have a can of black latex 'milk paint' I can use.
accidental woodworker
New Model Mandolin: 1
No sooner one mandolin is complete than another comes along!
So, after a very long gestation period, my New Model Mandolin is finally being realised. In this first episode of a new build series of videos, I look at its overall shape and go into detail about the making of the external mould. The mould is used for accurate construction of the mandolin’s rim.
Miles's desk pt VI........
 |
| what will it be? |
Resisted the urge to unclamp this after dinner. With my track record with miters, I let it cook over night. No hiccups noted when I took it out of the clamps and it passed the shake test with flying colors..
 |
| hmm....... |
Had second thoughts on how wide the reveal should be on the rails and the leg. This look is a 1/4".
 |
| 1/2" |
This looks to be a wee bit too much and I'm not sure yet which one I'm going with. Here the apron is centered on the leg and it allows more room for the contemplated chamfer I'm thinking of putting on the outside edges of the legs.
 |
| it worked |
It was bit awkward setting/clamping the board on the knife line and time consuming to do but worth it. I'm sure I could have done it free hand but this eliminates the saw jumping the line on me. Noticed that the crosscut gents saw I used had trouble sawing the cherry. I'll have to find someone who can sharpen it for me because I use this one constantly.
 |
| teeny bit of twist |
It wasn't much but enough to cause it to rock on the tablesaw. Planed it off with the #3.
 |
| back frame |
The back frame is as thick as the frame itself. Because of that I mitered the corners which will be visible.
 |
| better |
I didn't like the width of the frame and I sawed off 5/8" on all four sides. IMO the thinness of the frame now fits in the overall scale. This will be matted and have conservation glass to be hung on a wall.
 |
| squared off |
Chamfered the inside/outside edges with my cordless router. Had to square off the inside ones. If the outside of the frame had rounded corners I would have left it rounded. With the frame having 90° corners, rounded chamfers look like crap IMO.
 |
| one down, one to go |
Made the right choices. This frame is a much better fit than the original one which was 1 1/4" wide.
 |
| question mark |
When I took this frame out of the clamps, it had a noticeable twist to it. I didn't need to put the sticks on it, I could see it. In spite of that I put splines in the corners. I'm hoping that the splines will pull some twist out of the frame. I'll find out how well that worked in the AM.
If this doesn't work I'll make another frame. It won't be mitered this time. I'll make this one with bridle joints.
accidental woodworker
Armoires and chests from Halberstadt
The city of Halberstadt north of the Harz region in Germany houses a good collection of medieval furniture and wooden objects, mainly consisting of armoires, chests and caskets. They can be found in the Liebfrauenkirche, the Dom, and the Domschatzkammer. This blogpost shows the armoires and chests from these places, a next post will show some of the other medieval furniture pieces. Unfortunately the most spectacular armoire in Halberstadt was not on display. Nevertheless I have added pictures of this painted armoire from other resources in order to make the furniture collection from Halberstadt complete.
The Liebfrauenkirche


The armoire is ornamented with two carved dragons and some foliage on the sides.


The Liebfrauenkirche has two medieval chests of the hutch type. Both chests are kept from the ground by wooden blocks in order to prevent further damage to the feet.


The Dom treasury


The chest is constructed using a box-like design, with each side consisting of a single solid wood plank. The lid thickens in the center lengthwise, forming a curve. The front and back panels butt against the side panels, held together by wooden pegs. The front and back panels are dovetailed to accommodate the side panels, which are then chamfered in a corresponding shape. The bottom of the chest sits between the front and back panels and supports the side panels; here, too, wooden dowels secure the connection. In addition, six long iron bands encircle the body from the front, along the bottom to the back, stabilizing it. Four more long bands run along the sides and down to the bottom, ending before the outermost of these front-back bands. Iron bands reinforce the corners of the chest. Iron fittings also cover the corners of the lid. The lid was once hinged by seven hinges, of which six remain. It was originally secured by a butterfly lock and three padlocks (now lost). Two carrying rings on each side serve for lifting.


You can see the two carrier rings on the side of the chest.
The numerous long straps, the hidden second inner drawer, and the choice of the apotrophic animals griffin and lion, intended to ward off an attacker, thief, etc., indicate that the chest was used to store and secure valuable items or objects, possibly documents or books.


The north transept has been identified as its medieval location in the Liebfrauenkirche. In the 1820s and 30s, it stood "on the north side of the [main] altar". As the Liebfrauenkirche was no longer used after 1812 and its future purpose remained undecided, it fell into disrepair. For this reason, several valuable furnishings were moved from the church to the cathedral (Dom), particularly to the New Chapter House, starting in 1828, where they were stored safely and in dry conditions. Between 1833 and 1842, the armoire was also moved there. After 1848, when the Reformed congregation received the Liebfrauenkirche as a gift following a restoration financed by King Frederick William IV of Prussia, it was not returned to the church, but kept in the Cathedral Treasury with a reference to its former origin.


Late Gothic spruce chest with a base and cornice, including crenellations (some of which are missing). The side panels each consist of a single board, while the front is horizontally divided into a base cabinet or closed panel in frame construction and a tall door section with a door. Painted decoration covers the walls, and flat carvings adorn the base, cornice, and door frame. This decoration is characterized by foliate tendrils and, on the door and side cornice panels, by painted heraldic representations. While the coats of arms on the cornice panels feature flowering tree motifs, the large painted coat of arms on the door identifies Provost Balthasar von Neuenstadt. Painting and carving are in direct dialogue. However, there are differences in design even among the flat carvings: while the background on the base and side cornice panels is punched (star punches on the base, concentric circles on the cornice), the background on the door frame and the front cornice panel is black. The tendrils also differ slightly in motif, indicating two separate production processes. The cabinet is only partially preserved. Extensive alterations and replacements characterize the base (or the closed base panel of the front), the back panel (the central addition is a reused piece), the back panel of the base, the mortised middle shelf, the door strike plate, and the lock. On the inside around the door frame, there are doubled-up strips for the insertion of a glass door (now missing). The armoire was used as a display cabinet for a time; for this purpose, strips for intermediate shelves were also nailed diagonally to the side panels. Original parts of the cabinet include the door with frame, base, cornice, side panels, top shelf, hinges, and the metal handle for opening the door.


Leave a comment Cancel reply