Hand Tool Headlines
The Woodworking Blogs Aggregator
“Glory to God in the highest heaven, and on earth peace to those on whom his favor rests.” - Luke 2:14
Be sure to visit the Hand Tool Headlines section - scores of my favorite woodworking blogs in one place.
Hand Tools
Miles's desk pt XII & Leo's dresser.......
 |
| hmm...... |
My set up thing-a-bob is several frog hairs short. I thought I would definitely need it for the back rail to set the bottom drawer guide rail.
 |
| the fix |
I glued a thin piece of cherry to the guide to build up the depth of it. Planed it until it was dead nuts but all for nothing. I broke the jig rendering it into kindling.
 |
| center drawer guide |
I'm not crazy about the width of the maple at 5 1/2" wide but it will work. Thinking that I will use only screws to assemble it, no glue. I'm pretty sure that I used glue and nails on the drawer guides on my desk.
 |
| before I broke it |
With the guide in place and the bottom drawer guide rail butted against it, the top of it was flush with the bottom of the drawer opening.
 |
| hmm...... |
Upcoming hiccup to resolve. The front drawer rail is 5 1/2" wide and the back one is a little more than 5". The in/out guides will be sitting atop the front and back drawer guide rails. I will have to half lap the in/out guides on the back drawer guide rail.
 |
| nope |
There isn't enough room to drill the Miller dowels in at 90°. I won't be drilling them at at an angle. Instead I'll drill them at 90° from the outside.
 |
| cooking |
Hiccup free glue up of the base. Happy that clamping pulled the twist out of the left side that was twisted. The base isn't rocking nor does it look like it is twisted. The diagonals on the top were less then a 16th off.
 |
| maybe |
The dust panel is proud on the left side. I'll find out if it will be a hiccup when I install the drawer.
 |
| needs a paint touch up |
All the drawers fitted, easily pulling in/out without any hiccups. I went to Benjamin Moore paint store and they had a record of the paint I bought for the dresser in june of 2024 - Smoke Gray. The important thing is that drawers slide in/out and the rails I glued are rock solid now.
 |
| top drawer unit |
This is good to go. No dings or 'white' spots on it anywhere. I'll screw it back down to the top after the painting is done.
 |
| haul from the paint store |
Dresser paint, 4-0 steel wool, and two empty quart cans for shellac.
 |
| paint prep |
Sanded the drawers and the dresser first with 220 and followed that with a card scraper. Filled in the dings, etc with wood putty. Tomorrow I'll sand those spots and paint it. Hopeful that it will only be one coat but I don't think it will be so.
 |
| Miller Dowels |
This was it for today. I'll have to cool my heels and let things cook until the AM.
accidental woodworker
Spring Update

Goodson Woodcraft
by Eric Goodson on March 31
Hi everyone,
The snows have melted and the daffodils are emerging here in Newbury, MA after an especially icy winter. I wanted to send around a quick update on upcoming events that might interest you.

Gatherings
There is simply no better, cheaper, or more fun way to continue your craft practice than to join others in creative camaraderie. Here are a few upcoming events, both near and far, that might interest you. For more information about these and other events, feel free to email me.
“Sloyd Social”, Sunday April 15th, 2-5pm, at my shop in Newbury, MA/
Come join other burgeoning craftspeople for a little pot luck, carving, turning, weaving, whathaveyou gathering. It is a cozy affair, usually just a handful of folks, and a great chance to meet other creatives in this area.
“Spoon Camp NJ”, May 1-3 in West Milford, NJ.
Held at camp Vacamas in the woods of western NJ, this is a really delightful event (pictured above). Free, with donations to the camp encouraged. You can stay in the cabins, which have bunkbeds, hot showers, and a communal kitchen where we cook family-style dinners, or you can camp out if that is your thing. Folks come from as far away as North Carolina, Delaware, and Maine for this event. I will be heading down Wednesday to help set up, and you can come early too. Come hang with a bunch of spoon nerds.
“The Spoon Gathering” in Milan, MN, June 5-7, with pre-classes starting on Tuesday the 2nd.
The oldest gathering of its kind in the US, if not the world. Over 200 people descend on this tiny Minnesota town once a year to camp out, carve spoons, and connect with other folks passionate about greenwood carving. This is such a spectacular event. I went for the first time last year, and will be returning to teach an “Intermediate Spoon Carving” class during the pre-festival. I know it is a hike, but well worth the trip.

Courses
This year is shaping up to be a big teaching year, surpassing the sixty class days I held last year and ranging from Maine to Minnesota. Here are a few highlights:
Introduction to Spoon Carving at the Newburyport Art Association, April 11th.
A one-day intro to spoon carving in a beautiful gallery space. Come visit scenic Newburyport for the day–carve some spoons, walk the beaches at Plum Island, and maybe end the day with a nice dinner in one of the many restaurants in the area.
Woodturning Two Ways at Snowfarm in Williamsburg, MA, May 10-15
Spend a full week exploring a wide range of woodturning projects in western MA. Snowfarm is a wonderful craft school, with a vibe that feels like summer camp and food to die for.
Week of Slojd at the Nantucket Historical Association in MA, July 20-24
What could be better than enjoying the island life on Nantucket and taking a week of sloyd classes at the Historical Association? We will cover spoon carving, chip carving, kolrosing, and even heddle making. I will also be teaching kids classes and an adult turning class if you are on the island.
Bowl Turning and Tool Forging for the Pole Lathe at Historic Eastfield in East Nassau, NY, Aug 31-Sept 4th.
Spend a week forging your own hook tools and then turning bowls with your hooks in this unique hybrid course. Co-taught with blacksmith Beth Holmberg, you know you will get first-class instruction all around. Oh, and lodging is free in the renovated 19th century tavern, but you have to bring your own candles!
For a complete list of classes, see my webpage.
Latest Work


I am shifting my craft focus a bit, producing fewer product runs and instead spending my time on gallery items. I am especially focusing on skruvask, or locking-lidded boxes, and how to expand the form and design of these unique vessels.
I just published an article in the latest edition Spoonesaurus Magazine on spoon gatherings. It is a small quarterly magazine put out by fellow-carver Emmet Van Driesche. I am also working on an article for American Woodturner, which should be submitted soon. Finally, I continue to write on craft and craft pedagogy on my blog.
That is all for now.
As always, thanks for your support, and feel free to reach out with any questions.
-Eric

Goodson Woodcraft
Defending Convention & Progress

I am periodically confronted about my defensiveness of issues. The key in this is to know if you are being unnecessarily defensive or not. Another consideration is whether the person confronting is actually being passively aggressive because our tendency when we are confronted by such a sentence is to say, "No, I am not." In my world, I see nothing wrong with being defensive when someone is offensive or on the offensive or when you really have something worth defending. Defending what's worth defending is a right for any person. People use phrases such as, "Why are you offended?" or worse still, "Why are you so offended, Paul?" Well, all too often it is not that we are so much offended or defensive, thin-skinned and so on at all. They will always take any come-back to deflect their own very culpable and often mindless distraction. It is most likely that the accuser did or said something very thoughtlessly, childishly or dismissively and tossed something out, over their shoulder, and tried to walk away from being responsible for what stupid or thoughtless, mindless thing they said. I write blogs and post content that I seriously think through and dwell on, reread, carefully consider a few times before posting or filming my content, and then I post. Their comment is not at all some innocent thing but a form of passive aggression. A blog post might take me a short time to pull together but a long time to reconsider the content in my personal search for value and truth to my craft, consideration of my audience and much more. My work is not fun in the sense of the real meaning of the word, which is foolishness. I care more about massing on my skills for the remainder of my life so that the art of real woodworking will be perpetuated in future generations. What I do is worth defending to me. This post is 3,500 words. I write it knowing that not everyone will give it a fraction of the time it took me to write it, but that eventually a few hundred thousand woodworkers will.
 A unique cluster group of planes arrayed distinctively to provoke the question why?
Though it might appear that way, I’m not always conventional. The methods I use are mine by owning the mastery of hand tools as well as machines. I used both equally from age fifteen until 1995. Because of my established skill and mastery, it's not a boast but a simple reality, I was able to withdraw from being a machinist. After closing down my woodworking schools, I no longer needed nor wanted machines to dominate the space in my shop nor in my life. I extracted myself through the disposal of six machines to the metal scrapyard. Some said i should have passed them on. I wanted to shut them down so that they would never work again in any circumstance. It was cathartic.

Any craft you care to name comes from its incremental evolvement, with each generational iteration adopting the past, but then too adding in the different developments in any given era. Remarkably, until the Industrial Revolution supposedly dragging us out of our Neanderthal past, change was slow. It was in this period that we adopted the term 'progress'. Progress became the manipulation of the majority and the use of that word is used time and time again against those who love working with their hands and using 'primitive' methods that are not nor every were they primitive. They simply matched the speed of our humanity. We worked within our natural limitations and 'did' the work...emphasis on physical 'working' with our bodies and minds wholly engaged in every aspect and task. Movement from within the crafting artisans by those creatives strove for highly economic handwork with no dream of owning machines or a machine shop. They worked according to their own owned speed, working with the established efficiency of their own human body. Within this unique sphere, they discovered themselves in ways that gave them time to think, time for knowing their material and time to master the hand tools they would use forever to move through each project critically aware enough to remain crucially aware all the time. You cannot simply delete time. Any project takes time from us in payment for the privilege of working the raw material. We, the makers, must allow time for the material to yield, to expand our vision, to create something designed to occupy space and to serve its useful purpose in whatever we designed it to be. The hands and eyes move dextrously; through this union of a whole being, every sinew and muscle, every neuron within, we move our material, work our tools, charge our bodies, and the brain decides on every shift in direction. To counter this interdependency of specifically arranged 'coworkers', the brain the hands and the materials, this union comes together in sensing creativity in ways we only dream could happen, and by this basic human ingredient we have developed every form of composition.

It's from the full-orbed machine world that we hear, time and again, the question, "But why would anyone want to do it that way?" Well, why do people run when the bus runs every ten minutes? Because we want to. But we, the hand maker's, volunteer our whole being altruistically into the private world to live out our chosen occupation long term: we have no need to give any account or reason to others, though others often demand it from us quite forcefully and sometimes aggressively. We have no real gain from answering or explaining, nor offering much to that end. Not unless, that is, we no longer look for discussion, refuse argument, but are prepared to speak something that might lead them to reconsider how they are working and then the why of it. You might simply question whether a chop-saw chop cut, that's, of course, minimalist woodworking and maximalist machining, the pushing of a button or squeezing of a trigger, and the pulling of an arm down with minor effort, is a skilled process or whether it simply substituted for developing any skill at all and shows all the more that they evolved into being a skilless machinist.

Our world of encouraging hand making for millions has steadily and progressively impacted the trend and broken the mould of automatism. Within hand-making, we find the antidote to every dilemma we come across. We discovered a lost past that matches a pace our humanity can work beautifully in, that removes unnecessary pressure and favours our wellbeing. Choosing not to mortise holes by machine, nor want to cut the tenon cheeks by anything but our two hands, a saw, a chisel a brace an auger bit, sufficiently equips us. We mastered sharpening of our saws, planes and chisels. An axe parts off the wasted quickly, and so too the drawknife on a shavehorse.

We lift the tool we might have made ourselves and trim off the excess to refine our joints. We rely on our inner power and dynamic to make fit what we make and feel the energy go out from us with sensitivity and measure. Things that don’t exist get made, and things that exist badly or offered in an overpriced way get made, too; that's mostly because high-priced items might be prohibited to the majority. But I, like the conventional things I enjoy, have been evolving too. I take what provides well by its provenness and carry it forward until something better comes along for me to weigh and measure in its value to my hand work. I keep some things that worked and lasted well, knowing that not too much exists in our woodworking world with hand tools that didn't exist two-hundred years ago. My world strives to improve on what was preexistent before it, but not for the sake of selling so much as accepting we are meant to improve within our sphere that which can be improved.

I think of the Ultamatum brace below over the beech version with its short grain weaknesses but then its displacement by the subsequent manufacture of our modern swing (bit brace USA) brace as a perfect example. Each generation of braces took on preexistent problems to solve and thereby improve them. Of course, the development of small, electric motors rendered many hand tools obsolete. But it was not necessarily that they always improved on what existed. Electric-driven equipment makes for greater ease, but along with it increased production demands that then, no surprises here, demanded more production and we ended up being driven by equipment putting us on the production line. Less time to think through other issues and the need to catch what was coming down the line on the conveyor belt of life before it dropped off production because of our slow response.
 The Ultamaum brace was made as the ultimate brace. This one is made from solid brass and steel castings that are then infilled with ebony, box or rosewood. Beyond that, braces were made from beech but the beech ones snapped in two because of the short grain under pressure and the Ultimatum solved that issue. But life was short-lived for the Ultimatum because bit braces took advantage of steel parts with no wood beyond the pad and the handle.
I have extended my world of truly hand made furniture into the lives of others seeking out the knowledge through a new form of apprenticing into the future. There is an honesty projected from my lived life using, testing and experiencing a vast range of woodworking hand tools but then a proven reliance on them over the past two decades using 98% hand tools in hundreds of furniture pieces to create every design on my various platforms for training. When people kept telling me of the ease of this or that, pull-stroke Asian saws, a particular plane type costing upwards of £300 to £400 pounds, I had the experience to compare them and, never taking sponsorship or personal freebies, the freedom to give honest thoughts and opinions to those seeking an unbiased and unbought answer. I found that 98% of Asian saws being sold to any unsuspecting customer had impulse-hardened, non-resharpenable teeth, and that alone made them dispose-of-when-dull throwaway tools; people bought into it lock stock and barrel. I was as equally unlikely to buy into this as I was tools that offered no more than a secondhand tool bought on eBay when I knew that within a few hours of work, everyone owning any tool with a cutting edge had no choice but to start the journey into mastering sharpening. I sharpen all of my Western saws in under four minutes and have owned and used my saws for daily use for many decades, some a good century and more old at that, with no repurchasing saws but the occasional saw file. So amongst all other hand tools requiring sharp edges, the main reason hand tools fell into disuse, ridiculous though it might seem, is because people lost the ability to perform simple tasks like sharpening a cutting edge or a series of saw teeth. Buy any secondhand tool online, and it will arrive dulled and way beyond a level that it should have ever gone to (believe me here, do not let sharpening a saw intimidate you.) Secondhand tools usually take only a few minutes to restore their cutting edges. They were never abandoned because they didn't work and work well, but because they dulled, owners were lazy, and they had lost any knowledge about how to sharpen them. But here is another problem: most new tools being sold are not truly sharp or sharp at all, and it's here that we see some measure of success for those who came up with the answer of producing tools with sharp edges. If makers made saws with sharp cutting points or planes with a sharp edge, the old makers who sold planes yet to be honed would become a thing of the past, they would win over new customers simply because the tool arrived sharp.
People working with hand tools now tell me (and you) that a premium plane costing £400 + or a saw costing £150 is a better tool and worth the extra just for the finer example of a working model. They will also say such a tool is far superior to the wooden versions of planes or the steel is superior for this or that but my experience tells me harder steels can result in compromise one way or another. "It's got harder steel, weighs in much heavier, is a beefier tool built to last, has at-your-fingertips adjustment through tweakers, gadgets, gizmos, levers, winders and dare to say it, an adjustable frog." You will most likely, like me, never use such an adjustment point but once in a whole-life working lifetime.
 In these three planes, all identical in quality, there is no new innovation or inventiveness nor anything that added to the existing functionality of the original design. The plane handles were likely finished better than the 100-year-old originator's invention, but not too sure about that either. Tighter engineering tolerances does not translate into a better model in the hands of we the users. Loose threads spin more readily for take-up and will continue to work after a hundred years of daily use, as I am proving every day.
 There are some facts we should all know; the reason metal planes replaced wooden ones was because it took a good half a day and more to make a good quality and saleable wooden bench plane of any size, and the bulk of that work was achieved by pure skill in hand work in both wood and metal. On the other hand, you can assemble about two hundred all metal versions using production line methods in the same time. Pouring molten metal into a few hundred moulds linked by sprues that allowed a pour like this meant the plane soles cost a fraction of those it took to make wooden plane bodies. Let's not talk about plasma cutters and water jets for cutting through plate steel within super-tight tolerances. That's not quite how the whole thing worked out for Stanley Rule and Level back in the late 1800s but it was well on its way. The problem for Stanley's innovative Bailey-pattern and subsequent BedRock version was that woodworkers just did not like the weight of the Stanley planes, and liked even less the way they stuck like molasses to the wood surfaces being planed by comparison to the current wood-to-wood versions now centuries old and still crafted by hand. Stanley thought that they had produced the "better mousetrap", but it took them 50 years to finally prise the wooden plane from the hands of true makers of the day. Furthermore, that only happened because back in the day, machining all aspects of wood was taking over anyway. Woodworking changed over a short period to become only wood machining. Manufacturers wanted skilled and thinking workers, but only to be compliant and to do and think within their framework of allocated work. They knew anyone that thought too much could become their competition in the future. They had to be able to exert total control. They demanded something controllable; they wanted to develop a workforce of mindless drones that they could easily replace on a continuing basis at the first signs of any Luddite raising a head above the parapet. Unfortunately, we now have proponents and owners of premium planes who actually believe that a £400 plane will work that much better than a vintage style wood on wood version and then a vintage Stanley bench plane of any size. Of course, that's not true at all. Both British wooden and so-called premium all metal planes are heavy, clunky and awkward to use. T least at first when it comes to the wooden planes. Wood on wood is near frictionless, unlike heavy cast metal ones, which stick like glue to the wood unless you grease or wax them. Mostly that is because people involved in making hand tools are that rare breed that never actually use or rely on them beyond selling them. They just saw a niche in the market because British Stanley and Record after the 1960s became so sloppy it was shameful and shamed the Sheffield manufacturing with its former reputation for quality tool making, and rightly so. Oh, well!

It was indeed industrialism and the Industrial Revolution that destroyed the then high levels of highly skilled artisanry and craftwork taking place in domestic realms–that's because that became the ultimate goal of the wealthy classes. Factory owners needed to program and own individual independents to become specialised in the minutest of tasks so that speed could increase efficiency at every level in a productive system. And handwork needed to be replaced by machine work at a rapid pace. They coined the term 'progress' back then, but more accurate terms would have been ownership and manic control. Enter Henry Ford with the first known true production line and the famous quote that took life in a funny way, "Any customer can have a car painted any colour that he wants so long as it is black," Of course it was a metaphor for a powerfully controlling freak individual, hell-bent on efficiency and his famed black Model T Ford. The quote highlighted his utter drive for production efficiency; black paint was highly durable, dried faster than colour, and so sped up his assembly line. He, as with all industry magnates of the previous centuries and more than ever today, wanted and want absolute control and to perpetuate a readily replaceable labour force and thereby a constant supply of assembly-line assembly workers they can replace should any rebellion arise or someone grow old or sick, not unlike they did the parts being assembled on any production line. And boy, how that translates into today's workforces on every level. Dumb down skill and rely on machinery, and you can control masses and masses of people by cost values, credit debt, high overhead and wars and rumours of wars because the majority of the mass public now choose and buy all things only according to cost. And here we are. Fifteen years ago, on eBay UK, I was buying any Stanley plane you care to want for even as little as £1. Rarely do they go for more than £20-25. No one believes that a secondhand plain and basic non-retrofitted Stanley can work just as equally well as a £400 heavyweight selling under the banner 'premium plane' or whatever, but of course, it can, does, will and always will, with the simplest of sharpening methods and a few tweaks to correct any previous user misuse issues.
 The difference between me and others is that when I pick up a tool for fine woodworking, I rarely consider the heft to be of much real value to me. A plane needs to be light and sharp for me.
By industrialising workers, methods of work and technological advances, we now have generations of so-called woodworkers living quite skilllessly from machining wood. In the once common-to-all handwork, through the Industrial Revolution, came the ultimate destruction of small family-owned and family-run businesses which were subjected to being as near as possible to being owned without calling them slaves by the dominant and highly privileged classes. So What's new? It was exacerbated by confusion with what was called the UK's Land Enclosure Movement that forced ordinary working people off common land the result of which corralled them and forced them into work in the rapidly emerging factorial systems so they became factory fodder breaking up family life by pumping family members from five years old on up through factories owned by the rich made richer by highly nefarious occupations including foreign land possession, slavery or whatever. Those richer landowners and squires started renaming crafting artisans as the "Luddites" to show them up as rebellious malcontents whose whole intent was on halting progress. In the mix of all of that, though, they did discover that community-owned endeavours eventually lost the willingness to input and ended up in a take-take-take mode. Overgrazing on free land destroyed things, even when they owned their own land. Oh, well, back to the drawing board.

At woodworking shows, people actually used the same term for me when one or two in the audience suggested I too was "Just a Luddite!" or some kind of "Neanderthal". Or then too that I was keeping people in the dark ages. That wasn’t at all true. In those days, I used machines, but they never displaced my hand tools and my hand skills because all too often, they could not do what my hand tools could do with the same level of expedience and efficiency. My hand tools actually helped me to make my own exodus from being swallowed up as a machinist and machine-only woodworker. Many things I did, cutting dovetails and planing surfaces, were faster than using machines. My hand planing reduces any power sanding by 80-90% and that's because I can go straight to 250- and 350-grit after hand planing and even then, it actually roughens the surface, not smooth it. Better to give ‘key’ to the surface for the finish to hook up to.
 Look at the garden gate made with such care. Draw-bore pins, stopped chamfers, mortise and tenons throughout. Wide shoulders to the lock and bottom rails. Tongue and groove panelling, such like that. No one knows that convention made the gate in a time when such things really mattered.
I haven't altogether broken with convention, but what I want to say is that it is important not to merely dismiss past technologies as being somehow archaic and no longer valid just because they might be ancient. Many things generated in our past history and evolution remain unchanged by any kind of improvement process hoped for. That's because those with an open mind refused to throw out whatever was working and working well. It did not negate the search for improvement whee it might be possible. Not at all. Many things have never changed, though, and that's because there often was no need at all to change them.
Another consideration, though: we thinkers often change the intended function of a tool from one specific use and devoted task to use it for an alternative function. We might even dismiss a particular tool for its former specific task because it might no longer have that function. This takes some reasoning, but take a shoulder plane for instance. In my general day to day, I do not use a shoulder plane for planing the shoulders of my tenons, even though I have one on the shelf behind me. No one has yet asked me the question as to why they never see me use it, but I have two good reasons. Back in the pre-plastic, pre-aluminium pre boxed steel section days of the Victorian, when doors were all made from various woods, commercial buildings and rich family homes had massive doors made from hardwoods the shoulders of which could be up to 18" long. Such doors were very much hand made by craftsman woodworkers, relying on hand skills and hand tools. The shoulder planes of that day were developed to refine these ultra-long shoulders on the rails in creating these massive wooden doors. They predate tenoners, large machines that cut the tenons and shoulders both sides, one wide rail or a dozen side by side smaller rails in a single pass, cutterheads both under and over, leaving perfect tenons with dead square shoulders or even coped cuts to match the long grain mouldings they corresponded seamlessly to. On the other hand, that same machine can cut 18” wide rails to leave a tenon with perfect shoulders both sides of the tenon became obsolete by the use of plastics and metal doors. This reality left shoulder planes to gather dust as obsoletes in the day to day of the joiner’s shop. Prior to that, these joints were cut by hand and the shoulder plane was employed for the final square both-ways fit after the tenon saw cut the shoulders. My reference to plastic and metal is because the big entryways to commercial buildings now are rarely if ever wood and more likely boxed metal or plastic construction with the advantage of only minimal consequential expansion and contraction through any change in atmospheric heat and moisture levels.
 Hand cut, hand ploughed, hand grooved a millimetre wide and tapered at that and then every facet surface planed to a smoothness that sanding to 1200 grit would have roughened not smoothed. How can this be? But this it is.
The second good reason for us not needing a shoulder plane in most of today's woodworking is simple to understand; using knifewalls over narrower widths means we get dead square shoulders from a combination square and a sharp knife alone, with no further need of the shoulder plane. Subsequent cuts with saws can be pare-cut with chisels directly to the knifewall we created. Using the knifewall is not new in any way at all, only the naming of it is new. I decided that we needed a new name, a term that identified the outcome of the task. I coined 'knifewall' to that end three decades ago. I felt that the terms used were obsolete and not truly fit for purpose. I didn't think striking knife or marking knife were really ideal terms in the sphere I was using them, which was fine woodworking and furniture making. I decided my using a sharp knife to create a wall across the grain to create shoulders created a neat knife wall in the wood and hence I started to use the more descriptive and identifiable knifewall as the ideal term as the knife cuts through the surface fibres and leaves a clear-cut wall for subsequent cutting to with either a chisel, saw or a plane.

In general woodworking, it is pointless to use a knifewall along or with the grain, the benefit is for crosscut work where otherwise the teeth of the saw tend to rip and pull the fibres, even when the teeth of the saw are shaped to a pinnacle point for crosscutting tasks. No matter how good the steel or how hard, saw teeth deteriorate in sharpness levels stroke on stroke. Crosscut saws have bevels to both the front and back edges of the teeth, culmination in two bevels to the insides of the teeth and each with a pinnacle-point tooth. The very tip of the saw tooth penetrates as the thrust or pull cut deepens to sever the fibres, each side of the saw. The issue for most of us is that our smaller saws are seldom sharpened for crosscut but for rip cut. That's because 95% of our work will be rip cut in joint making. Think cheeks of tenons and dovetail angles. Dovetail shoulders are commonly chopped and pare-cut, so almost not crosscutting there. Shoulders to tenons might often be one eighth the width of our tenon cheeks. That means that a crosscut saw for sawing tenon cheeks would be grossly inefficient. Another point that's not a pun is the size of the teeth on our tenon saws. They ten to be ten points and more to the inch so quite small and small teeth cut smoothly, even across the grain as in shoulders so the same ripcut saw works well across the grain too. No point in having two saws in each size when one will do quite well enough.

In effect, though Western saws are designed to cut efficiently on their thrusting cuts, they also cut more mildly on the reverse stroke too, but the lessened efficiently is because of the pitch at the back of the teeth. You can increase the aggression of the saw teeth by the verticality of the front of the teeth when you file the teeth. Increasing one side, the front, decreases the pitch on the back of the teeth. That's the same with rip cut saws, but a rip-cut saw does not cut on the reverse stroke because the teeth negatively engage the wood.
Handworks is back for 2026, and I’m lucky enough to be able to be presenting there this year. This…

Handworks is back for 2026, and I’m lucky enough to be able to be presenting there this year. This should be a lot of fun.
Handworks 2026 will be on Fri-Sat Sep 4-5 at the Amana Colonies, IA. Christopher Schwarz and Mike Siemsen are the special presenters. Lord knows what they will be talking about, but it will be terrific.
As for yours truly, I’ve started planning out what I’ll be doing. I’ll be bringing a whole bunch of Japanese tools, of course, but this will be different from my past experiences. I’ve given talks and workshops that have ranged from 1 hour to a whole day, but Handworks will be more like an improv jam for the two days. Suggestions are more than welcome.
Looking forward to seeing you there! More information at the Handworks 2026 website.
Miles's desk pt XI & Leo's dresser.......
 |
| dust panels |
Happy with the rails. They are secure, tight, and appeared to be glued good this time. One sharp rap with a mallet and the rails just giggled at me. However, the dust panels didn't fit - they were about a 16th too wide.
 |
| dust panels |
One panel I was able to drop into rabbets. The other didn't have rabbets. When I made the rails I brain farted and put the rabbets facing down rather than up on two of the rails. The panels aren't structural so I was able to glue the 2nd one in place along with nails.
 |
| been a while |
Been a couple of months since I last posted a blurry pic. This one is for the center divider. I flushed it with 80 grit sandpaper. I will have to slap on at least one coat of paint to cover this and a few others spots.
 |
| leveled |
This is the epoxy filled in knot hole after 99% of it has been leveled. No pin holes from bubbles so far. You have to be careful with the pigment because even dry, it will stain the wood. Like an idiot I mixed the epoxy and stain on this board. Note to self, don't do that again.
 |
| cute |
Went to Lowes and bought a 4 foot length of 1/2" maple for drawer runners. Saw these miniature 5 gal pails on the way in and bought two of them. Food safe too. Absolute no idea why I bought them because I don't need them.
 |
| wee bit of a panic |
Got the bottom of the slats in with no hiccups but I couldn't say that for the tops. The dry fit went off without a hitch but with glue in the equation I couldn't solve it. Had a devil of a time getting the first three slats started. After several frantic minutes I got them going and then slats 10,11, and 14 had a major hissy fit. They finally fell into place. What took me 3 minutes to do dry, took me almost ten with glue applied.
 |
| sigh |
Put the center stile in upside down. The cathedrals point down. I brain farted and put it in the bottom rail with a the labeled top facing up when it should have been facing down.
 |
| dry fitted |
I didn't glue the base up here. I wanted to leave it dry because I was going to dry fit the drawer guide assembly. Wasn't sure if I could do it with the base glued and cooked.
 |
| sizing the top |
I barely had to saw more than a 1/8" off either end. Not something I had any confidence in sawing with a handsaw.
 |
| happy face on |
The overhang on all four sides was dead on.
 |
| sigh |
Couldn't find the slat I used to make the dutchman for the missing part of one of the legs. Could have sworn I saved it.
 |
| table clip slots |
I didn't brain fart on the table clips. I got all four inside edges done correctly.
 |
| ta da |
Found the dutchman. I'll get it installed after I glue the base up. Until then I'll keep it here on the base.
Didn't get any time in the PM session. On a trip out to the recycling bins, I tripped and did the bounce test on the back door stoop. I slammed into the cobblestones and ripped a pound of flesh off both my knees. I'm sure that I'll be feeling it in the AM.
accidental woodworker
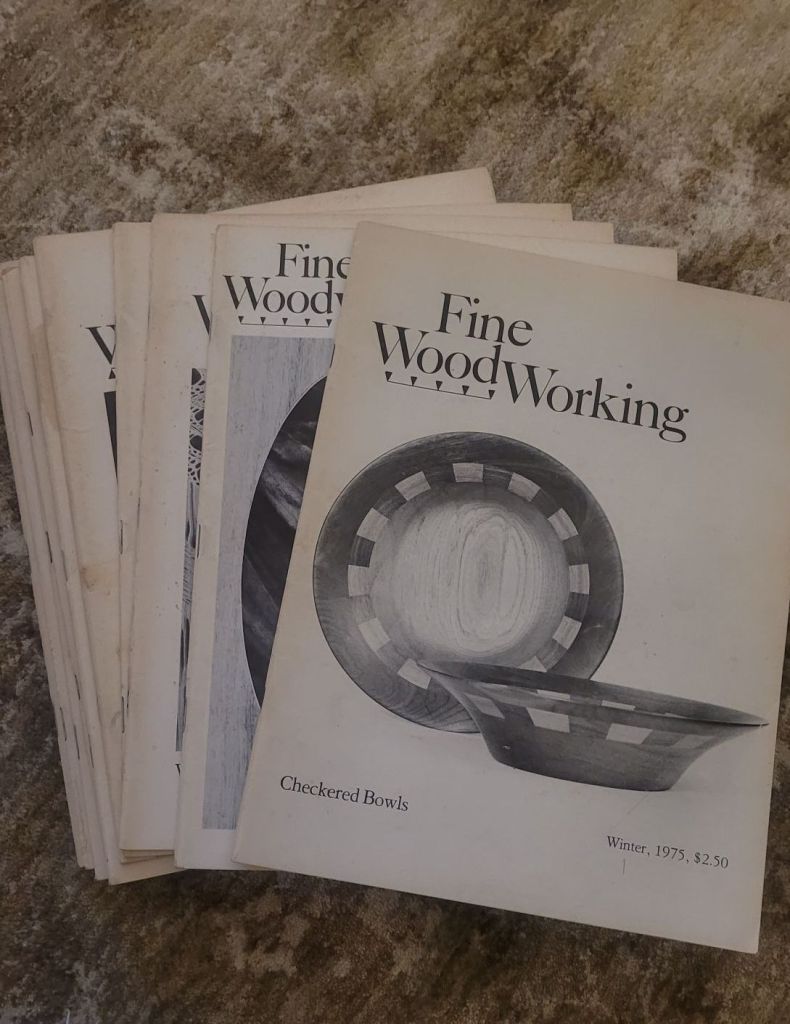
Fine Woodworking’s first 10 Issues
This weekend I had the opportunity to buy the first ten issues of Fine Woodworking at an antique mall in Northern Ohio. When I saw them laying on a magazine rack, I couldn’t believe what I was looking at. Even more so was the price of each issue. A mere $0.50 each. Unbelievable!
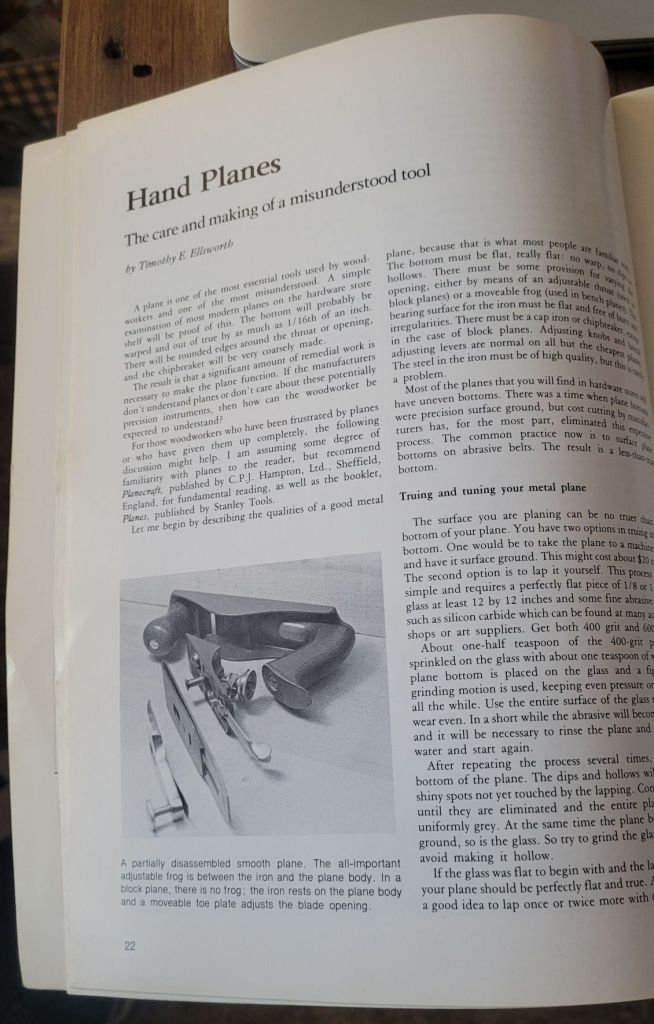
When I got home, I looked through the issues and read some of the articles. The first issue of Fine Woodworking had an article near and dear to my heart. Hand planes, with the caption “The care and making of a misunderstood tool.” This shows you how this was the very beginning of a magazine dedicated to woodworking if the common woodworker thought of a hand plane as being a weird foreign object.
Scanning the issues, I saw Tage Frid was an early contributor with several articles he wrote in first few issues.
Along with Frid, there are articles by James Krenov, Jere Osgood, and Bruce Hoadley. A basic who’s-who of 20th century woodworkers.
The first issue had very few advertisements, but the magazine quickly grew thicker in a couple of years as woodworking companies saw the opportunity to reach their audience by placing an ad in their pages.
It’s interesting, but a bit sad to see the companies that were thriving 50 years ago, only to go bankrupt or be acquired over the years. The issues are full of now defunct woodworking companies.
I’m still in the process of reading all the articles, but there is a wealth of knowledge with these issues. The one thing I did notice is back in the early days, the magazine focused a lot on wood carving and occasionally had articles on blacksmithing. Something that you would rarely find in today’s issues.
I checked eBay to see what these magazines might be worth. They’re actually worth a lot less than I would have thought. You can currently buy the first 12 issues for around $40.00. Of course you can buy all the issues of Fine Woodworking online if you don’t mind having a digital copy. I’m old school and still like holding a magazine in my hand instead of on my phone.
Miles's desk pt X......
 |
| hmm....... |
I don't remember it, but I can see how I did the drawer guides for my desk. I kept it simple and easy. I'll be replicating it for Miles's desk and Leo's later on.
 |
| center drawer divider |
I've been using this desk for years (10 or more?) and the drawers still work flawlessly. the guides (red oak) show almost no wear at all. No worn drawer bottom grooves at all but I won't be using red oak on either for the grandson's desks.
 |
| Miller dowels |
I pinned the sides with Miller dowels on the inside faces. The dowels worked perfectly as they were a 16th less than the width of the legs. The back I might have to do the doweling from the outside face. I'll deal with that when I glue the desk together.
 |
| table top clips |
I am going to attach the top to the base with these clips. I chopped the mortises for them with a 1/8" chisel. Three each on both sides.
 |
| back top rail |
Put five in the back rail - I didn't think 3 would be sufficient.
 |
| filled in |
The actual hole is smaller than what you see here. It got larger when I hit the epoxy with a heat gun to pop the bubbles in it. If I don't like it after it has set up I'll move on to plan B which is a dutchman.
 |
| hmm..... |
Wasn't sure if I was going to do the table top clip mortises in the front rail. I was a little gun shy after screwing up the back but I bit the bullet. If I did them wrong it would be easy to whack them out correctly. As a bonus the errant mortises will be hidden with the drawer guide rail.
 |
| hmm........ |
Whacked out a jig to help with setting the front drawer guide rail. The top edge of it will be flush with the bottom of the drawer opening. This simple jig will ensure it is even across between the legs.
 |
| fingers crossed |
Scraped the ends of the rails and the housings as best I could. Glued and installed the rails again. They will cook at least until the AM and maybe longer.
 |
| top rail |
I didn't have any problems getting the top rail and the center divider out. The dovetail detail was on the thin side and a small splinter stayed behind from the bottom of the divider. Scraped what I could and glued it again.
 |
| sigh |
The ends of the rails seated flush and snug. The center divider was a PITA. I tried frantically for several minutes but I couldn't get it flush. The screw holes for the drawer guides lined up but the center divider is proud of the rails. After the glue has set I'll see what I can do to flush it.
 |
| drawer set up |
There is a bottom bearer on the front and one on the rear. The drawer guide will be screwed to it. Underneath it will be a board that drawer will ride in/out on.
 |
| center divider |
This is an idea of what the whole thing will look like. The white wood is maple which should wear well as the drawer will be moving in/out over it. I don't have enough of it to do all three so I'll be making a Lowes run tomorrow.
accidental woodworker
Ploughed Grooves and Ply

I realised a few years ago that many of you might be dismissing plywood, thinking mostly that it is some kind of lesser wood. I know in colleges they adopt MDF as a substrate to veneer work because of ease and its relative stability, flatness and so on. I'm not going to advocate that. I'm doubtful of many things when it comes to cheap sheet goods designed for industry and industrial processing. They are mostly being trained for a different world than mine. MDF is near in ugliness to pressed fibreboard, chipboard and OSB. I'd rather not go that route.
 I made three of these game boards because otherwise you might lose a table to some other purpose like dinner or a jigsaw puzzle.
Nowadays, I have no problem with good grades of plywood, and I have made several simple and complex projects using plywood through the years. Its greatest value lies in its intrinsic, omnidirectional strength, stability and resistance to the expansion and contraction solid woods must be catered to. For the main part, this plywood is quite solidly 98% actually wood layered in thinner sheets, and remarkably made at that.
 Super strong and dimensionally stable, plywood is a remarkable invention, but never go cheap on it.
 The main advantage of plywood lies in its singular expanse in sheet form which means economical cutting to smaller sizes are keeping the sheet where large areas can be spanned for rigid bracing against lateral pressures such as skinning the backs of carcasses, drawer bottoms and so on. Anyway, here i am talking about quality birch plywood as a well-proven material to be relied on. Roughly speaking, 3/4" (19mm) plywood in an eight-by-four-foot sheet comes in at £4 a square foot from my supplier here in Oxford. Standard thicknesses are 1/8", 1/4", 3/8", 1/2" and 3/4" and then too the near metric equivalent. All useful sizes, commonly, available in sheet goods. Occasionally, I might consider going for a decorative facing as a veneer finish, but I prefer not to. These thin veneers are microns thick and don't suffer damage well at all.
 This tongue is the solid consequence of good ploughing with a plough plane, and I can think of nothing more rewarding by this degree of true hand work. Even if I had a power router or a tablesaw I would still have done the past ten years of work with a basic plough plane I bought for £10
There are times when we are looking for simpler, quick-to-make projects for a speedy outcome in our time-strapped world, but sometimes we want a fast-to-make present. At Christmas, this last year, I made some puzzle-cum-craft boards using only grooves in hardwood and sheets of 1/4" plywood. I wanted something stiff, unwarping and slender–something you could simply slide under a couch, a cabinet or a bed for stowing, with or without the puzzle on, or, when the board was not in use, behind a couch, a chair or a cabinet.
 Quality plywood is the must for plywood drawer bottoms if you want the life span to parallel that of the sold wood enclosing it.
 This is just to frame several of the issue surrounding making innovatively. My storage bin here can be made to any size you like. Well-fitting grooves for the plywood synchronises all the elements. I'm not sure if it gives a Scandinavian look, but it does leave a more minimalist look simply by the fact that it was minimally made. It's also a waste-free project in that offcuts are a good and free resource and any local cabinet shop will gladly give scraps away for something so small.
 A bin tidy takes but a short time. Shape the top of the corners after ploughing the two grooves in a long stem, and then cut each to length as you go. That way you have the long stem to plough plane and grip in the vise.
You may or may not have seen me use plywood tongues within solid oak frames or to add lipping to my shelves. It's not sacrilegious. The plywood I use, quality birch ply from Scandinavia, will more than likely last just as long as solid wood and, anyway, some of the things I do could not be done with solid wood for reasons of weakness, expanse, expansion and contraction in relation to atmospheric moisture levels that constantly change.
 Grooves ploughed with a freshly sharpened plane reduces the risk of top-corner tear-out, but not always. I use methods that stop this too, but I must read the grain like text on a page as well.
My latest project relies on long-lasting glue in every way. The layers of plywood are glued with longevity in mind, and I picked sheets we know as WBP. WBP stands for weatherproof and boil proof; this plywood is a high-quality, exterior-grade sheet material manufactured using adhesives designed to withstand extreme moisture and harsh weather conditions without delaminating. It is widely used and accepted throughout the woodworking industry because it offers superior resistance to warping and splitting compared to other plywoods.
 Not all plywoods are created equally, and the core values might be quite different from one manufacturer to the other. Here, we see it in the plies being of equal thickness in the five layers and then reduced for a metric size in the lower one.
Both are often sold here in the UK as a measurement of quarter inch. In the above, the core layers remained standard, but the outer skins were reduced to create a thickness for selling the plywood in Europe as a thinner plywood sheet of 6mm.
 It's quite a minor difference in the grander scheme of things but looking back now, I think i might make yet one more using 1/8" plywood to feel for the weight difference. I could clip off another 20% of the solid wood by dimension changes too.
Even though we in the UK began transitioning to metric in 1965, it took several decades to fully adopt and establish metrication; we are still not altogether there in that we drive on roads giving distances only in miles and drink beer in pints. Going metric was merely a nod to qualifying to become a member of the EU, I suppose. Perhaps dinosaurs like me perpetuate the old ways, I am not sure. I did go metric in the 1960s and can float seamlessly between the two systems most of the time, certainly no European nor any Brit under the age of fifty can do that.
 Overall, my design came together with only minor changes. The chief benefit of prototyping is trialling, making changes at that time or determining by this one that a better design would come in the next one you make. I actually made five of them and all of them came out well enough to use or sell or give as gifts.
My waste bins all stacked up. They deserve all the design accolades you might give to any waste paper bin, and I noticed here again, "Two nations divided by a common language." In the comment section of FB, someone said that's a pretty fancy garbage bin, while another said that's a lot of work to put trash in. US says garbage and trash for everything. The UK says waste and rubbish as two catch-alls. I often identify audiences outside the UK by the language they use. Most Europeans and those on other continents learned American English by watching TV. So butter does not have a 'T' pronunciation but a "D" so butter and better are pronounced budder and bedder. This could be how I should interpret European plywood over European plywood made for the UK.
 I kept the inside of my wastepaper bins simple but made slight differences. On some I use quarter-inch plywood for the lighter weight I wanted, but on others I added bottom-weight by using three-quarter-inch plywood.
There are special plywoods made for a variety of reasons and application and made to order, no doubt. This 3/4" (19mm) is the densest I have ever encountered, and someone made a tool from it.
 At around 51 plies per inch, this birch plywood averages .5mm though actually measure nearer to a two to one ratio.
Additionally, Simpler projects can be simply made. Once the plywood is sized, all I needed after this was to plough the grooves and shape the parts. A saw rasp and a flat file brought several of them together as gifts to use as tidies.
 Ploughed grooves and plywood come together very quickly. The doubled groove creates the handle part and keeps everything clean and sharp.
Also, sized differently but made the same way, my wastepaper bins make quite lovely planters. Find a water retentive outer that fits and then takes the plant pot too, and they make a very attractive planter.
 If you did do this, then make sure you water carefully. Wood and water don't always do that well, and careless splashes of water long term will harm your work. Best to lift out the plant, water, leave to stand and relocate.
 Miles's desk pt IX.......
Went to the shop this AM with one goal in mind. That goal was to get all the slats installed on the back rails. Spoiler alert - made my goal with 12 minutes to go before the quitting bell rang.
 |
| hmm...... |
Split the outside face chopping a couple of mortises. I let them cook while I chopped the mortises on the other rail.
 |
| almost done |
It would seem that my calibrated eyeballing needs a reset. Two of the mortises were not deep enough. Fixed them and made them a few frog hairs deeper than 3/8".
 |
| done |
Got the wide center rail fitted into the top rail. The next batter in the rotation is slat #1.
 |
| planer snipe gone |
Three of the legs had some snipe and I planed it off. This was the 3rd and last one to be done. All of the snipe was placed on the outside faces.
 |
| yikes |
How did this happen? Missing a big chunk at the top of the mortise. It won't effect the rail tenon to mortise connection. However, I will fill in the missing chunk and I'll probably use epoxy due to the shape and location.
 |
| fitted |
I will do this after I glue up the desk.
 |
| sigh |
I would have bet a lung that I had double, triple checked this but something wandered out into La La Land. I really wanted this to face the inside but it ain't so boys and girls. I'll be filling this in with epoxy and black pigment dye.
 |
| it was almost lunch time |
Went dead in the water here. I needed to dry fit/clamp the base so I could measure for the length of the back rail slats. I had planed both of the back rail edges so I knew they wouldn't be the same length as the side ones. It took 6 shavings to clean/smooth the top rail edge and 5 on the bottom one. I had to give this rail at least an hour to cook before unclamping it.
 |
| 5 extras for any oops |
Picked through the remaining slats and got lucky. I was able to get 16 slats that had straight vertical grain. The center wide rail has cathedral grain.
 |
| this is finally toast |
Been well over a week since I mixed this batch and I can say it is now toast. It is still liquid and there was a lot of settling at the bottom. It was mixing in but it smelled like a sewer hole.
 |
| hmm....... |
Clamped it enough to get a measurement for the back rail slats. They were a 1/8" less than the side rails.
 |
| the back bottom rail |
Checked the depth of all the mortises and 3 were too shallow. I didn't want this surprise to shake hands with me when it was being glued up.
 |
| hmm...... |
Should have thought of this when I did the side rail slats. Ganged and clamped 8 slats at once and planed a chamfer on the four edges. A bit of a PITA but it did work. The slats slipped by some while planing and the first 2-3 on the plane lead in did not develop the chamfer like the others. I had to go back and give them special attention.
 |
| sigh |
I shouldn't be griping about this but gaps make me go postal and nutso at the same time. These 4 gaps -slats 1 to 3 and 6- I'll fill in with cherry veneer when I glue them up. Not that bad considering I had to chop 70 mortises.
 |
| looks good |
Sneak peek on the dry fit with all the slats fitted and shaking hands.
 |
| side view |
Thinking about chopping four more mortises to decrease the space on the sides. I'll have to see how difficult it will be to layout them out to match the others.
 |
| sneak peek with the top on |
This will be a good student desk for Miles (Leo will get one too). Initially I was going to put 2 vertical drawers on the right side but nixed it. I don't have that feature on mine and I don't miss it nor do I feel a need for it.
 |
| another head scratcher |
The top of the desk is square within less than a 16th. The bottom is out square almost a 1/2". I thought the legs at the front not having a bottom rail was the cause. Not so, the measurement between the legs at the bottom of the top rail and bottom of the legs was dead on the same. Could be twisted but the desk isn't rocking at all. I'll play this some more in the AM. Killed the lights and headed topside here.
accidental woodworker
Why FreeCAD Belongs in a Woodworker’s Toolkit
There is something deeply satisfying about working wood by hand, the feel of a sharp plane, the sound of a saw cutting cleanly, and the quiet focus it demands. For many people, introducing a computer into that process feels wrong at first. It can seem like it takes away from the craft. But when used properly, a tool like FreeCAD does not replace the craft it supports it.
FreeCAD is completely free to use, and unlike some software, you can use it for commercial projects without any licensing costs. Despite being free, it is a professional grade CAD program that meets industry standards for accuracy, interoperability, and parametric design. You are not just using a hobbyist tool. Your designs can integrate with other CAD systems, generate accurate dimensions, and be used in professional workflows. For woodworking, that level of reliability and flexibility is a real advantage.
One of the biggest benefits is gaining clarity before you ever touch a tool. Instead of guessing proportions or relying on rough sketches, you can build your piece virtually and see exactly how it comes together. Mistakes are caught early, long before they turn into wasted timber. A joint that looked fine in your head might reveal a flaw when you model it, saving hours of frustration in the workshop.

There is also a level of accuracy that is hard to achieve on paper. FreeCAD allows you to define exact dimensions and relationships between parts. If you decide to change something, such as the width of a cabinet or the thickness of a rail, the entire model updates automatically. This kind of flexibility is incredibly useful when refining a design, letting you experiment without committing material or time.

For woodworking specifically, this becomes even more powerful when working with joinery. You can model mortise and tenon joints, dados, rabbets, and see exactly how everything fits together in three dimensions. It gives you confidence that when you cut those joints in real life, they will work as intended. You are not just hoping they line up you have already proven it.


Another benefit is planning your workflow. When you model a project, you naturally consider the order of operations. You see which parts should be cut first, what needs to be milled to thickness, and how the components fit together. This adds a level of intention to your work that is easy to overlook when you go straight to the bench.

There is also a practical side when it comes to materials. By modeling your parts, you can see exactly how much wood you need. You can even create cut lists, which help reduce waste and make your projects more efficient. This is especially important when working with expensive wood.

What surprises most people is that using FreeCAD does not make woodworking feel any less real. If anything, it removes many of the small frustrations that get in the way of enjoying the process. You spend less time fixing mistakes and more time actually building. The craft stays exactly where it belongs in your hands.

At the end of the day, it is just another tool, no different in principle from a saw or a plane. You can ignore it if you want, but if you take the time to learn it, it quietly becomes one of the most valuable tools in your workshop.
 mantle clock
Recently, I’ve switched to open source software for all my 2D, 3D, office, and accounting needs. I now use Blender, FreeCAD, Qcad, Gimp, Inkscape, LibreOffice, PDF Gear, and Express Accounting Software for small businesses with five or fewer employees. All of these programs are completely free, professional-grade, and have come a long way since they were first introduced, offering powerful tools that rival many commercial alternatives. This change has streamlined my workflow, reduced costs, and given me the freedom to work the way I want without being locked into subscriptions.
For anyone interested, here is a list with links to download all the software I use:
- Blender – https://www.blender.org
- FreeCAD – https://www.freecad.org
- Qcad – https://www.qcad.org I use Qcad Professional which cost me a one time fee of $72.
- Gimp – https://www.gimp.org
- Inkscape – https://inkscape.org
- LibreOffice – https://www.libreoffice.org
- PDF Gear – https://www.pdfgear.com
- Express Accounting Software (for businesses with five or fewer employees) – https://www.nchsoftware.com/accounting/index.html
Miles's desk pt VII........
 |
| maintenance pit stop |
These are still sharp but they needed a touch up to chop these remaining mortises. Cherry is harder than pine and wears the chisels down quicker.
 |
| hmm...... |
The chisel blade is too short to be used in the LN honing guide. With it in the guide, it is over an inch short of reaching the 25° angle setting.
 |
| nope |
I surely thought that this guide would work but it ain't so boys and girls. The chisel blade isn't that thick and the screw hold down is a more than a 1/4" from touching it.
 |
| nope again |
Same problem with this one as I had with the LN guide. The chisel blade is too short to reach the 25° angle setting.
 |
| didn't want to |
Had to sharpen the 1/4" chisel by hand. It had a small chip at the toe and it wasn't square. Started on the 120 grit runway to remove the chip, square the edge, and raise a burr. The bevel doesn't have the same consistent shine as the bevels on the other two chisels. It is sharp and ready to chop regardless.
 |
| one down, one more to go |
Got this one done just before quitting time. I had expected to get both done today but it didn't happen. Feeling a wee bit out sorts. No aches or fever, just a blah feeling. That translated into a lowered work output.
 |
| 3 down, 14 to go |
I was able to whack out 3 on the last rail before the quitting bell rang.
 |
| hmm...... |
Noticed a hump there when I slid the mallet across the bench. I think the last time I planed the bench was about 6-7 years ago. It is due for a clean up plane job.
 |
| hmm...... |
The jack wasn't cleaning up much. I got just as much new wood peeking out with the #80. I'll finish this up in the AM.
accidental woodworker
One of the Mysteries
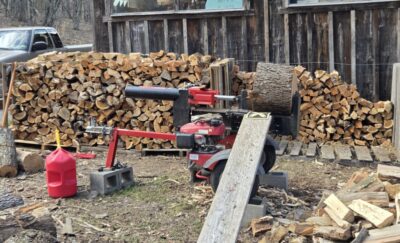
I am finding that in my 70s I am working just as hard and almost as long as ever but only manage to get about half as much done as I used to. After moving a pickup load of mulch for Mrs. Barn this morning, I popped up to continue building the firewood inventory for next winter and beyond. Currently I am working my way through the pile of approximately 300-pound cherry bolts, which must be handled with great care as I am not even remotely interested in experiencing a broken leg.
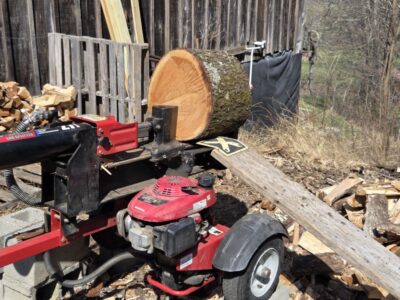
I roll them to the bottom of the ramp then cautiously navigate the way up until it plunks down to the bed of the splitter with a WHAM! I thought about raising the splitter upright but decided that wouldn’t really work any better. I quarter the bolts then move three of those aside (I can handle those at about 75 pounds’ apiece), splitting the remaining quarter into nine full sized pieces of firewood, then repeat the process for the other three.
Once I get done with the last of these it will be time to head back up into the woods to begin processing more windfall. I’m pretty sure we’ve got next winter covered (quite a bit left from this recent brutal winter), but you can never have too much firewood when you live in the mountains and it is your main heat source.
Not especially romantic or blog worthy, but it is a central theme for this time of year. Along with hauling mulch, of course. I’ll resume again in the fall when my brother returns for a visit.
Miles's desk pt XI.......
 |
| ready to go |
Changed my mind on the installation of the slats. I'm going to do the two sides first, get them glued and cooked, while I work on the back slats.
 |
| last one |
Last slat fitted in the last mortise for the bottom rail. Wash, rinse, and repeat for the top rail.
 |
| first dry fit |
The only hairy part of this is fitting the slats into both rails. It wasn't that bad and there wasn't even the smallest hint anything would get flying lessons. I had to do this one more time (for each side) when I glued it up.
 |
| hmm....... |
Before I installed the slats I had dry fitted the rails again and checked the diagonals to get the measurements. Dry fitted again with the slats and the diagonals were off over a 1/4". It took a wee bit of effort with a 4 foot clamp pulling the long diagonal before I got them to agree with what I had without the slats.
 |
| 2nd side slat installation |
First step was to plane a chamfer on all four edges. After that I took two shavings off all edges and progressed from that until the slat fit snugly.
 |
| 2 dry fitted sides |
Looking at the two sides dry fitted, I think I should have gone with two more slats. The gap between the legs and the outside slats is almost 4".
 |
| glued and cooking |
Got both sides glued and I'll let them cook until tomorrow. Survived both glue ups without any hiccups.
 |
| left turn |
Changed my mind on using walnut for the center wide slat on the back rails. I sawed off a length to get the slat from. I don't have enough cherry in my stash to make another desk so being miserly with it doesn't matter. I'll use the rest of this board to make the slats for Leo's desk.
 |
| 2" wide slat stock |
The plan was to get the 2" slat from board where the knot was. It doesn't go through all the way through the board.
 |
| made a story pole |
There are 17 slats on the back rails. One 2" wide (actually 1 7/8") centered R/L and 16 3/4" wide slats. The gap between the last slat and the leg is around 2 1/2" wide. Made a story pole to transfer the layout from one rail to the other.
 |
| success |
I double, triple checked myself on this layout a bazillion times. I got it right this time or at least I think it was right the four times I checked myself. I'll chop these mortises starting in the AM.
accidental woodworker
Miles's desk pt X........
 |
| almost |
Got all the mortises chopped for the slats. Slats are cleaned and smoothed on all four edges. They will be individually fitted to their specific mortise. I'll do all three sets of them at one time.
 |
| dead nuts |
Both diagonals said hello with 37 7/16". The other side came in with the exact diagonals.
 |
| numbered |
I numbered the bottom of each of the nine slats and the inside wall of the top/bottom rail mortises. I resisted the urge to get the slats installed on this but I'll wait.
 |
| sigh |
Another brain fart. I started the mortises on the wrong edge, again. I didn't want to flip it and do the mortises on the top. These mortises would be visible on the underside of the rail - it is the bottom one. You would have to flip the desk over or get on the floor to look at them.
I was able to flip it 180 and switch which tenon went into the legs. No haunches to worry about as there are none on the bottom rails. I had to take a few shavings on one of the tenons to get it to fit - it was too snug.
 |
| the correction |
I did have to plane a bevel on the opposite face so the two rails will have space in the mortises where they meet.
I have one more rail to chop mortises in and the sides will be done. I am making a change to the back slats. I'm going to put one 2" wide slat centered on the rail L/R. I am leaning towards using walnut for it. I really don't want to use any of the cherry stash I have left to get one slat from.
Didn't get a PM session today. My PCP called and said there was a cancellation and I was able to get my echocardiogram done at 1400. I had a student from the local community college do it. She did pretty good with most of it and had to hand it off to the tech for one portion of the test. It took a wee bit longer than having a tech do it but we all have to learn how. No problem with that because when you're retired time isn't a big deal, at least not with me.
accidental woodworker
Seek and Ye Shall Find (perhaps)
 E. Hoppus, "Mr. Hoppus's Measurer", London, 1777
Before the internet, finding things in a book could be challenging. A library with a good librarian could be essential for success if your topic was obscure. But even with the book in hand, a table of contents only got you to the general neighborhood and you might need an index for the actual item. Library indexes date from ancient Greece and Egypt but the indices at the end of the books are a thirteenth century innovation. Tool catalogs really are a late 18th century invention (not entirely). In the picture at the top, we have an 1777 edition of "Mr. Hoppus's Measurer," a book mostly of tables and formulas for computing the value of timber and other items. But the back has a more narrative look at some useful items likes saws and their prices. Hoppus also has a table of contents at the beginning of the book - but no index.
Why am I thinking about the quest for knowledge? It's because I think all time how hard it is for people to find us, and how hard it may be for them to find the things they want from us. My favorite job at Tools for Working Wood is interacting with customers in person. Unfortunately I don't spend most of my time doing that. My main jobs are as follows: paying bills, doing all the bookkeeping, figuring out how to make tools, designing tools based on what I figured out, writing a blog, and caring for and maintaining our website.
I realize I am no damn good at some of these tasks - as many of you know, when you are a small business owner, you still have to do a task even if you are no damn good at it - but Ive actually developed competence at some of them. Competent enough? Its hard to know. We occasionally hear from customers when something really really good happens, but we always hear from some customers when something bad happens.
Bad can mean a lot of things, both to our customer and to us. The nature of complaining is that most complaints are aired to people who cant do much about them - typically whoever is there at the time. As a merchant, I know we are probably not going to hear complaints from people who are new to our site or casual browsers. They will just leave if they cant find what they want.
So the thing I am concerned about and we don't really hear from you enough about is, can you find the things you want to get on our website? We are particularly attuned to this topic because we just changed the websites search engine. (This is why the words enhanced by Google now appear in the search box in the upper right hand corner.) The search engine covers products for sale as well as information in the blogs. So I have a question for you: when you look at our website, can you find what you're looking for? I mean either by typing in a product in the search box, or by drilling down in the list of departments or links from products to products? When you get there, do you find what you're looking for? Between tariffs and high fuel costs, we are out of certain items, and Ashley Iles and Ray Iles products have always been a challenge to have in full stock. But we do have a lot of items that you nevertheless cant find and you may just think we don't stock it. It is those items that concern us the most. We are also interested in products you wished we carried but dont. (Customer requests are literally why we carry Odies Oil, Pica pencils and Fastcap; we look into all customer suggestions but sometimes the wholesale terms are too unfavorable to a little guy like us to consider.)
So we welcome your thoughts about how to make search better. Please add your comments below. And we - and many strangers - thank you.
The picture below is from the index at the end of Randle Holme's 1688 The Academy of Armory (York, England). Not a catalog but full of useful information. The index is invaluable. 19th and 20th century tool catalogs moved the index to the front so you could easily find what you were looking for.
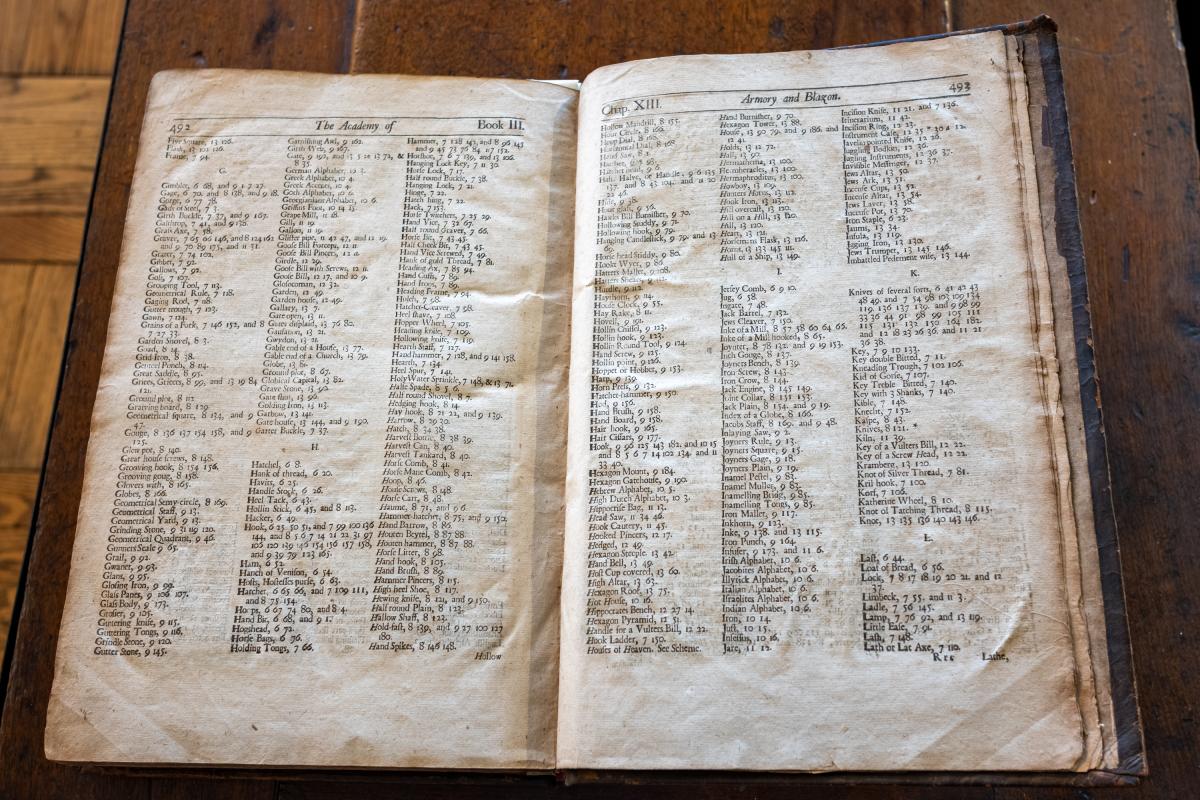 Randle Holme, "The Academy of Armory," York, England, 1688
Hidden Kindness in Georges

My sons learned to sharpen saws from me. After a few minutes, they understood the essentiality of direct thrusts and certain angles with files into and through the gullets uniting each two teeth. The saw thrust is the uniting factor. With handsaw file-sharpening of any type, you are cutting two teeth or the equivalent of one; as the saw file passes into the gullet, it sharpens both the back of one tooth and, in the same stroke, the front of the other adjacent tooth. Generally, this is good and fine. Sometimes, occasionally, we might micro-adjust an individual tooth that needs extra input because it's uneven or damaged. In such cases, we may only file the back or the front of a particular tooth, just to resize or correct its profile to better align and match the other teeth.


I think that people rarely see early on that sharpness and sharpening in-house is a non-negotiable, but we soon come to realise that without sharp tools the work becomes drudgery. I used to tell students in my classes, "If you are not prepared to sharpen and sharpen even mid-task, you should take up machining." You see, we really can't send a saw to be sharpened if we want to become real woodworkers. Cutting edges don't wear so much to dullness but edge-fracture. It's not a water-washing-over-stone wear out but the fracture of edges minute by minute.
 Even really rugged saw plates pitted both sides will give you a good saw if
 I called over to my son and asked him to sharpen one of my saws for me. He was fifteen years old at the time. I gave him the file, he looked at the saw teeth and picked up a flat file as well. Pulling the stool out, he positioned himself with the saw held in a saw chock in the vise, and he first topped (jointed USA) the saw teeth very minimally before filing the teeth. The thing is this. I don't need anyone else to sharpen my saw teeth. I have sharpened my various saws, overlapping them here and there because I do use half a dozen different ones. This probably means a saw every two weeks. Since my 61 years of doing this, that's 25 sharpenings in a year, so we're looking at 1500 saw sharpenings, but then I have sharpened saws for the schools I have had too , along with those of friends and such, acquaintances. I'd add as many again, that being the case, so let's settle on 3,000 sessions of saw sharpening. That's around 200 hours. That could be around 2.4 million saw teeth I have sharpened individually.

It was in 1965, towards the end of the year, a dark winter's afternoon with snow gathering outside at a rapid rate, when George tasked me, "Paul, can you sharpen my saws for me, please?" He handed me two saw files. Stubbs.
 One of my former workshops. It takes something to pack up and move on. More than a house for me. There have been many moves for this man. I am evolving as I grow into occupying my space here on earth as it is in heaven, `i think.
I pulled up a bench stool, locked the handsaw in the vise and started sharpening his very old and well-seasoned 26" Spear & Jackson handsaw. Apart from my filing steel, the shop was warm and quiet. The machines were all shut down, spindle moulder, tenoner, planers and tablesaws. That was quite usual near the end of day. We swept every nook and cranny because we didn't want to leave anything that would spread a fire. With the foreman gone, everyone picked up a brush and dustpan, a broom and shovel; the shavings were bagged in burlap bags to feed the boiler for heating first thing in the morning when old Jack or Billy, the two elderly bricklayers and labourers well passed their sell-by date, but the boss didn't want to see them without the work they loved. This was a more thorough clean-up, more than a gathering and keeping the floor clear and safe as in the day's maintenance times.
 I cut these out of 3/4" pine right in the middle of a class in Texas in front of 20 students because no one could "see" what the difference was between rip- and cross-cut teeth was. This transformed my teaching because they all could physically see the saw file angles from my using a massive, imitation wooden saw file in the gullets, the rolling of the pitch for more or less aggression, things like that.
My eyes searched for the glinting reflections to each tooth. The file strokes, the angle, had to match the previous ones that engaged in the gullets as presets for me to follow. George was not a hard taskmaster, but he did expect thoroughness from me. At that time, I liked the idea that I was doing my bit for George. When he took the saws to cast his critical over them, he declared each one, "Good enough."
 Sharpening saws becomes pure therapy in the positive sense of making something barely wrong right. My saws do not dull visibly. My fingers touch the teeth lightly and if they do not prick the skin and hold under the lightest touch then I stop, take the file, touch the teeth with a half-length stroke and three minutes later I am back on task.
George did the same with his other tools from time to time. Planes and chisels, an auger bit now and then. Rarely did I need to go over something again, and in the end I never did. Bill, old Bill, too often asked me to sharpen his saws, admitting that his, "Eyes ain't any good, 'n' more."
 My axe is 150 years old. George taught me to use one even at the workbench in furniture making and joinery, along with sharpening. He used it differently though, like a handless drawknife, to shape the bulk of a bevel in long grain, such like that.
Often kindnesses need no words, but we don't realise at the time that a task set might not obviate the intent. In my mid-sixties I realised that George did not need me to sharpen his saws and that I was not doing him a favour but he me. You see, he knew I needed more practice and risked his saws to me to give me the added experience. I did the same with my kids when they were learning, too. Bill, on the other hand, old Bill, needed genuine help. His eyes were shot, along with a steady hand and the feel it takes for the file to cut crisply. I continued to sharpen his saws until his time came to leave.
No, this is not my saw and nor was it one of Georges. I post it to show how badly a saw can be sharpened. Believe it or not, the teeth were sharp and apart from the occasional 'grab', it did saw in an okay way. Spectacular Tool
Reflecting on the bountiful tools I saw last weekend at the PATINA tool shindig I was reminded of a tool my friend Justin showed me when he visited a few months ago. Fashioned entirely out of a whale bone, it is spectacular.
Miles's desk pt IX........
What a day, what a day. Glad it is over as it was very frustrating at times but I showed a lot of constraint with nothing being broken or enjoying free flying lessons. I started this journey by going to the VA in the AM to make an appointment. The West Roxbury VA put in an order for an echocardiogram but they scheduled it for May and the CT guided biopsy is in april. Defeats the purpose of the echo needing to be done before the CT biopsy.
Normally this would have been an easy thing - just sign into health evet and message my PCP. Have her get me an echo here at the Providence VA. The rub? I couldn't sign into health evet. But I was able to talk to the clinic rep and she left a message explaining the hiccup to my PCP. Now I wait until they call me.
That didn't that long and I was back at the barn a little over an hour later.
That was errand #1. Errand #2 was dropping off a pair jeans I needed to have taken up. I have short legs and Wally World doesn't sell jeans in my size which is a 28 1/2" leg. Finally wised up and on the way home I stopped at the tailor I used before and they are no more. The location (which is conveniently close to my house) is closing. They are permanently moving to another address.
No biggie, I went to the other location and they aren't open yet. The windows were papered shut and there was a building permit on the shuttered front door. It is going to be a while before they will be open for business.
Found another tailor and it is one my wife had used for a long time. $10 to get my inseam taken up to 28 1/2". I'll find out on friday if it pays off. BTW Lands End sells jeans in my size and it is the only mfg that I know of that will do custom sizes. However, Wally World jeans are $20 and Lands End are $50 plus.
After I was done with errands #1 & #2, and getting gas, I started to deal with the login dot gov hiccup. This is where the frustration exploded. The security associated with these sites makes me nutso - my wife left to go shopping while I did battle with it. I endured and the reward I got was being able to log in finally.
Fixed my health evet login and it worked. Signed in/out four times to make sure it wasn't a fluke. Got my IRS 1099Rs from the last two retirement accounts. Found out that one of my retirement accounts is still intact. I never set it up after I retired from the VA. Not looking forward to the fun setting that up will be. Lost $2317 last year. On a brighter note, since 2021 (when I retired), it has grown over $21K.
I got to the shop after 1300 and I didn't get a lot of time on the pond. Puttered mostly muttering to myself before killing the lights and going topside.
 |
| hmm...... |
Chopped the last mortise in the bottom rail. The chip out is visible and gluing it back down did diddly with hiding/blending it in. At least it is on the bottom and won't be a flashing neon sign hiccup.
 |
| hmm..... |
I thought I had made this mortise (the chip one) wider but I hadn't. The slat is wider in both directions then the mortise is. Big smiley happy face on.
 |
| Houston we have a problem |
I laid out the mortises on the wrong side of the top rail. I had put the rails into the legs to make sure that mortises were in line from the bottom to the top rail. Couldn't do that because there were no mortises on the underside of the top rail. The flip side of the coin this turned out to be lucky for me. The errant mortises will never be seen once the top goes on.
 |
| I'm an idiot |
Checking the other side and what to my unbelieving eyes did I see. The same hiccup with the mortises laid out on the wrong edge.
 |
| the why |
At least I know why I had a serious brain fart twice. Hopefully I'll remember this when I go the two long back rails. Anyway, I saw top labeled on the rails and that is where I did the mortises. Didn't think that all the way through twice.
 |
| getting frustrated |
I must have had a ton of residual nutso energy from straightening out my log in issues because I screwed this up. The front rail should have been flipped 180 with no mortises laid out on it. Oh well it was still a semi productive day for me.
 |
| came today |
Trying a new shellac for me. I usually get blonde mostly because this wasn't in stock when I need to order some. The blonde has a hint of tint to it and I'm curious as to how clear this shellac will be.
 |
| two things for me in one day |
Feels like xmas almost. I already read one of the articles and it calmed me down. I'll probably finish this by tomorrow at the latest.
accidental woodworker
New Model Mandolin: 2
I would have bent my first set of sides during my first year at the London College of Furniture (1976/77) and I’ve bent a fair few bits of wood since. It never ceases to amaze me what you can do with a drop of moisture and a bending iron. I wasn’t 100% sure about the extreme bending that this new shape would need but as you’ll see (spoiler alert) it all went well. So, in part two, I make the rim of the mandolin: bend the sides, fit various blocks, linings etc and use my radius dish for fitting the back. Also, I get the neck blank made too! Quite a lot to take in, so get yourself a cup of tea.
Cheers Gary