Hand Tool Headlines
The Woodworking Blogs Aggregator
With apologies, Norse Woodsmith articles and blog entries are not available online pending some work on the website. The feeds from other sites are all still available. Also, there may be some graphic issues while I migrate the site to a new host, please bear with me. Thanks!
Norse Woodsmith Blog Feeds
Speed ripping by hand
This is a sequel to show the unbelievable speed you can achieve ripping by hand in a seated position. Ripping this fast unless you’re super fit is pretty much impossible.
straggler done.......
Daughter #1 came up from Baltimore today for work and to visit friends. That left me the AM session to get the Miller Falls No 14 straggler ready for adoption. Spent the PM with her taking in the sights in Cumberland RI. She heads back south on monday to rejoin her husband. I wanted to get the shellac going on the 2nd portable chest of drawers but that didn't happen. I'll try to do it on monday.
 |
| ready to assemble |
It took me a lot longer to clean up the MF than I thought it would. There was a stubborn stain on the toe that challenged me with removing it. I had to drop down to 180 grit sandpaper and work back up to 600 grit to remove it.
 |
| no hard outlines |
All the Miller Falls plane handles I have rehabbed all had a hard outline on the flat faces of it. I sanded and rasped that away leaving the handle oval shaped. It feels lot better in the hand now IMO. It is close to how the Stanley handle feels but the MF handle isn't as sinuous as Stanley.
 |
| ready to make shavings |
All shiny and looking good. The only quibble I have with the MF is the tall front knob. I prefer low mushroom knobs.
 |
| RML shavings |
The first ones were good but too thick for my liking. These are just right IMO. This MF is a bit heavier than the Stanley and the MF casting is also a wee bit thicker. Of the two planes I would take this MF to use over the Stanley.
 |
| face shavings |
I forgot to take face shavings with the other two planes. This MF will take wispy thin to thick shavings without any whimpering.
 |
| Stanley #5 |
The iron in this plane has the corners rounded to eliminate plane tracks. It is impossible to see how little that effects taking a full width shaving.
 |
| Stanley #5 1/4 |
No problems making a boatload of face shavings with the 5 1/4. This would be good starter plane for a young woodworker.
No nibbles from any readers of the blogs on the planes. I'll post them on the Saw Mill Creek next week along with the transitionals.
I've been watching Spiral on Amazon Prime and it is a good, gritty French crime drama. I'm having a problem buying entire season episodes though. There are several 'Spiral' links to click on but they are all different. Some don't have a buy it option. Others say the episodes are currently unavailable for viewing. Another option is to buy a 'MHZ' streaming option.
I tried that one but the episodes are dubbed in english and I only watched 5 minutes of season four, episode one, before shutting it off. I would rather hear the actor's voices in french and read subtitles. You lose of lot of the sense of the flow of the story with dubbed voices.
I still have a few more links to click and check out. I found out too that most seasons are only 10-12 episodes while the french TV season is 21 or more episodes. What gives with that? Why should the US import be less than half the french season?
accidental woodworker
2nd portable chest of drawers done.......
Let me put this another way. All the woodworking is done as is the prep for applying the finish. All that is left to get a check mark in the done column is 4-6 coats of shellac. I spent the morning working on it and quit at lunch time. I'll start the shellac tomorrow. The rest of the day was spent prepping the three #5's for sale.
 |
| the drawer stops cooked overnight |
First glamour shot is head on. The only drawers I even tried to pay any attention to for grain and color were the two large drawers. The top drawer on the left sticks out a wee bit. More like a weak neon lighted sign than one that is fully bright.
 |
| critique time |
All of the drawers need improving. For the most part the top and bottom margins look good but the R/L sides aren't. Big gap here on the bottom left drawer. The gap above is what it should be at its maximum.
 |
| small drawers are the worse |
The top and bottom margins are good but I was in La La Land dialing in the R/L ends. My drawer margins are improving and I can recall when I wouldn't do an inset drawer at all. I would only do an overlay because they don't have gaps.
I also don't like the through dado grooves showing at the front. Mostly because I have gaps in them too. I think in order for this joint to look good it should be tight and seamless.
 |
| end panels |
The grain runs and flows around both end panels. The bottom front (both ends) got rounded over in error but it kind of doesn't look too bad. This chest drawers can live hanging on a wall on sitting a horizontal surface.
 |
| back |
If I were to do this again I would put the grain swirl thing at the bottom middle flipped 180 so it was at the top. I think having it at top is better to the eye than having it down. I don't think it will be visible and if it is, won't be noticed by a non woodworker.
 |
| other end panel |
Not much to quibble about on the end panels. It is impossible to view them both so I can't compare them one to another.
 |
| bottom |
I like that the bottom will be up off any horizontal surface that it may land on. That allows air to circulate and will make the shellac last longer. If it were laying directly on a horizontal surface the shellac could stick to it.
 |
| half blinds |
Getting better at doing this joint. Half blinds at the front and through dovetails at the back. I only had one set going a wee bit south on me and it was the last drawer. I had to shim on tail on that one.
I had two of the small drawers move on me while cooking. That is the only thing I think of why when fitted in the drawer openings they were tapered. Left side inset past the front edge and the right side proud of the front edge. I got it sorted out and fixed but it took a while to get there.
 |
| large drawers |
These two came out the best. I used slips on all five drawers and I like them a lot. No grooves weakening the thin sides and no groove to try and bury in a tail. And the slip doesn't eat up any extra interior drawer depth.
 |
| Stanley #5 1/4 |
Cleaned up and ready to be adopted. It is a blue Stanley which makes a fairly new plane - I think this one is a type 18. It has a hang hole drilled in the toe and has no other defects. I am not a fan of hang holes. My grandsons have a 5 1/4 and don't need a second one. I am pricing this one to sell - $80 with shipping included for anywhere in the lower 48.
It spit out even width, length, and thickness shavings. It is ready to go as is but you might want to touch up the iron. I don't use cambers or employ the Charlesworth ruler trick. The bevel is straight, flat, sharp, and shiny.
 |
| pretty plane |
I didn't see this plane come up much for sale when I was going nutso rehabbing planes. The knob and handle I think is maple or birch stained black. It also has the kidney shaped lever cap.
 |
| My daily user #5 |
I don't remember the type of this #5 but I think it is a type 10-11. That is the Stanley type(s) that I like. This was my daily user for about 6-7 years until I got a Stanley #5 bedrock and
it got demoted. Cleaned up and ready for adoption. I am selling this one
to go at $120 which includes shipping anywhere in the lower 48.
 |
| RML shavings |
On the first try too. I have given up trying to get the lateral adjust in the middle of the iron. I am now resigned to getting the plane to spit out even width, length, and thickness shavings right, middle, and left (RML).
 |
| Miller Falls No 14 |
I was hoping to get all 3 planes done but the Miller Falls had something to say about that. The frog adjust screw has rust on the threads. I filled the hole with EvapoRust and I had to let it soak for a few hours. I'll be finishing this one up in the AM tomorrow. I used this MF for about 6-7 months and no complaints. I didn't see or feel any differences between it and a Stanley #5. I had more than one Stanley #5 to compare it to.
Pricing this one to sell for the same as the Stanley #5 at $120. Shipping including to anywhere in the lower 48, and I'll sign the adoption papers.
accidental woodworker
Coffee Table 1: Sassafras Top

My next big project is a coffee table. The top will be an ellipse made out of sassafras. The legs and aprons will be ash.
 sassafras pieces
I had a few 5/4 sassafras boards 8-9 feet long, which when cut in half yielded pieces 48-54″. They went through the planer to remove twist and add snipe. Then I shuffled and flipped them around to finalize their orientation before edge jointing and gluing.
 jointed and oriented
Before gluing I thought to rough in the ellipse. I planned to use dominos to line up the edges while gluing and didn’t want to later cut the edge of the ellipse right through a domino.
 two foci and string for ellipse
There are many tutorials about how to make an ellipse. I found blocklayer.com helpful. I entered the dimensions I wanted to end up with, and they told me where to put the foci. Since my rough dimensions were 54″ long and 33.5″ wide, I went with 49.5″ x 33″. A wholesome 3:2 ratio which will also cut off the sniped ends. At this point I did not trace the entire ellipse, I only made tick marks to note where not to put dominos.
Glue up was in sections, not all five boards at once.
 ellipse drawn with tape, string, and sharpie
After gluing, I drew an ellipse on the underside of the tabletop. When reading about making an ellipse, I thought I would use screws. But this blue painter’s tape worked well enough for practice that I didn’t feel the need to try anything else. The string is cheap ‘mason line’. It kept fraying and getting tangled with a mechanical pencil, but worked well with a generic sharpie.
 ready to cut off corners
To cut the edges I used a japanese saw and cut off a series of smaller and smaller triangles. Straddling the bench like this I could work on opposite corners while not having to adjust the holdfasts so often.
 rough cut edge
The saw gets me this close. I’m not sure how I will smooth the edge. I frequently use rasps and files, but have never had to do something so large. I have a spokeshave hiding in a drawer somewhere, but I remember it being jumpy and chattery. For now I will take a break.
 top side
ready for finish......
Well, it is almost ready for shellac. I think I'm done with the woodworking for the 2nd portable chest of drawers. Of the two of them I like this one more than the first one. It was a bit frustrating doing the last of the woodworking today and it ate up a ton of time and boatload of calories. Before I launch myself into another project I'm going to finish up the #5 planes I want to sell.
 |
| a senior moment |
I thought I had sized the drawers sides so that the drawer would be flush at the front. It seems that I forgot to add the front and back thicknesses to the length. I don't mind inset drawers but this is a wee bit too much.
 |
| two left |
Before I can finish fitting the two large drawers I have to get the knobs installed.
 |
| a few moments later |
The book has only one knob per drawer. I decided to put two on the larger drawers and one on the smaller ones.
 |
| last set back? |
I don't like the width of this gap and I'll fix it before figuring out the drawer stop SNAFU. I am not going to make another drawer and I'll get this one to work.
 |
| adding strips |
I only need to build up the front and the sides. There isn't any need/reason to build up the back top edge.
 |
| front glued and cooking |
I could have worked on something else but it was close to the time to fill the pie hole.
 |
| drawer stops |
The plan was to saw and install two stops at the back of each drawer.
 |
| done |
Got the stops dry fitted on the two large drawers. I was happy with the flush fit of them. It isn't dead nuts perfect but it looks good to my eye as is.
 |
| Pain In The Arse |
I could get my hands in the large drawers but it wasn't happening with the 3 small ones. I needed a flashlight and a stick to position the stops at the back. This first drawer took me the longest to do because I kept running up against hiccups. The first one was glue build up at the back. I was able to eventually clean that up with my paring chisel - it has a 11" long blade.
After that was addressed, the drawer wouldn't flush on the right side. It was flush on the left and tapered outwards until it was about a 1/8" proud on the right. I fiddled and faddled with the stops for a bazillion years and got nowhere with them. I got the proud down to a 16th but no anymore than that.
 |
| finally |
I took the stops out of the first drawer and tried them in the middle one. They worked like a hand going into a glove. The bottom drawer decided that it too wanted to be proud on the right and flush on the left.
Went back to doing battle with the top drawer. I planed the back because I had left it as is after gluing it up. Didn't see any need to go nutso on it but it seems I had to. Planing it smooth and flush ate up some of the proud on the right. Decided then that the best course of action was to leave the stops as is and plane the back right corner of the drawer until it was flush. That worked and it only took 3 dance steps to make it right.
I washed, rinsed, and repeated the same to fix the proud on the bottom drawer.
 |
| serious butt scratching coming |
How do I get glue on the drawer stop and set in place? Not only can't I get my hands in there, I can't see anything neither.
 |
| fingers crossed |
Put a brad in the end of stick and clipped it. The idea is to put the stop on the nail, apply glue to it, and then use the stick to position the stop at the back.
 |
| it worked |
I was concerned with two things using this. The first was the stop staying on the nail until I got it in place. The second was would I be able remove the stop from the nail once I got it where it was supposed to be.
 |
| done |
I used hide glue to fix the stops in place. My first thoughts were to use super glue but nixed that. All the woodworking was finally done. I still have to put my brand on the chest of drawers. Haven't decided where to put it yet. Choices are the back or the bottom or the bottoms of the drawers.
 |
| from Craig |
Asked my friend Craig if he could make me a plow plane iron for 5.2mm plywood. He sent me two to try out.
 |
| didn't work |
The angle on the iron is too steep. Craig had sent me a cleaned up drawing of the one I sent him and I missed this big time. The bevel face to 90° is 60°. That is too steep for an iron. Angles like this always play havoc with my brain bucket.
 |
| my brain fart |
I told Craig the length was 2 1/2" and it should have been 3 1/2". No idea why I obviously fixated on 2 1/2". The iron fit in the Record 043 but not by much. There was only about a 1/4" sticking past the hold down screw.
 |
| not worth it |
Craig made the irons 5.2mm and it is thinner than the 5.2mm plywood ( make the pic bigger to see the gap). I think trying to make an iron for plywood that comes from outside the US is like pissing into a head wind. This plywood it wonky and it moves like crazy. Even the good old US Birch plywood measures differently when measured in several spots along the edges of it. I'm going to have to do a whole lot more serious butt scratching on this before I try anything else.
accidental woodworker
Youtube Logo & Nintendo Switch & Diamond Stand

The following are projects I did with my son.
I tried to get him interested in a woodworking project and he proposed a youtube award. Looking it up, I saw that youtube creator awards are metallic plaques.
 Mixedmorris, CC BY-SA 4.0, via Wikimedia Commons
After agreeing that wasn’t a woodworking project per se, we settled on making the youtube logo.
 trace through paper onto basswood
The logo was printed out and traced onto basswood. The wood is soft enough that pen will leave impressions. Defining cuts were made around the triangle and the outer edges, and then the background was removed with gouges.
 gouging the background
My son did most or all of this work. I told him to point the sharp end away from him, and to keep both hands behind the sharp end. Still it was stressful (for me).
After the carving was done, the piece was cut out from the basswood and the corners were smoothed.
 rounding the corners
Then it was painted with craft paint.
 finished
 wooden nintendo switch
The nintendo switch was a quick project. A blank was cut from maple and the corners smoothed with a file. For the round buttons we made crude dowels and crosscut into discs. It was painted in a few sessions using frog tape to keep crisp edges. The black buttons were ‘painted’ with a sharpie.
This was completed in one day, aside from letting the glue dry overnight.
Most recently we made a diamond shape with feet.
 concept art
The shape was drawn freehand on a piece of sycamore, then the lines were straightened up before sawing.
 positioning to saw
A japanese saw was used for straight cuts and a coping saw for the curves. My son decided to carve only inside the heart shape and not the entire background.
 ready to paint
Now he tells me I need to build a table to keep them on.
Joel and the Barrel Knife
Look Inside Woodworker’s Guide to SketchUp 3rd Edition
and then there were none.......
The crappy weather came back today but the worse of the rain is supposedly coming on friday morning. It doesn't matter as I got all the drawers done for the 2nd portable chest of drawers. Well it might be a maybe got all of them done. One drawer might be iffy. I'll find whether or not it went south tomorrow.
 |
| healthy amount of twist |
I knew this was twisted or was going to be twisted when I glued it up. It was way too much ignore but I was sure I could plane it away. The one hiccup with that was with the twist planed away would that make it too small for the drawer opening?
 |
| 2nd small drawer |
Before I started fitting the first drawer I glued the 2nd one up and set it aside to cook.
 |
| had to plane a lot off |
Didn't realize it at the time but this was the bottom drawer of the 3. I planed and fitted it to the top drawer opening. The bottom one is a 1/8" taller then the other two drawers.
 |
| taking a lot of dance steps |
I misread where the drawer was binding and I planed too much off the sides. The continuing headache was the top was still binding. I am less than 1/2 way into the opening here.
 |
| many minutes later |
Still hadn't dawned on me that I screwed up where this drawer should have been fitted into. This drawer will bottom out in the opening. To get it out I tilted the carcass forward until it fell out.
 |
| out of sight |
I labeled all the drawers on the inside edge of the front slip. You can't see it when accessing the drawer, you have to pull it out and look for it.
 |
| last drawer |
I didn't saw the back to the correct width. I might have to add a strip to the bottom of the two sides to bring it flush with the bottom. I'll decide that tomorrow because I really don't want to make another drawer.
 |
| yikes |
This is where I found out I fitted the drawers to the wrong openings. This is going to be the bottom drawer now. It fits loosely top/bottom but not R/L.
 |
| planed the side |
This gap (top) is a wee bit wider than what I would like it be. If I add a strip to the top front I'll also have to build up the top of the sides. It might be easier to just whack out another drawer - shouldn't take more than an hour to do that and I have stock for it. Another decision for tomorrow.
 |
| knobs came in |
The chest in the book has knobs with a 9/16" diameter that has an integral screw. I don't know whether or not they were metal, wood, or glass. I doubt they were glass because I have never seen any glass ones shaped like this. These are brass and come with a wood screw and a 8/32 machine screw.
 |
| hmmm..... |
I like the wood screw idea but the screw is too long to use on these drawer fronts. They aren't thick enough so I will have to use the machine screw but cut its length down some.
 |
| changed my mind again |
Decided to ditch the brass knobs and use wooden ones. The one on the left I thought of using on the left side large drawers. The one on the right is for the 3 smaller drawers. Killed this one too due to the small tenon size on the right knob.
 |
| dwindling numbers |
I am going to use these small shaker knobs instead. Knob layout sitting at desk is 2 knobs on each of the large drawers and single knobs on smaller ones - all of them the same size.
accidental woodworker
2 left......
Didn't get much time in the shop today. I got a blister on my left foot a couple of days ago and it has been throwing a hissy fit since I got up this AM. It is a throbbing, tooth ache like pain that makes it suck to walk. I got it bandaged and cleaned up but that ain't helping. It is getting red and itchy which is a sign of infection so I'll have to keep an eye on it.
My order from Infinity Tools came today. When I last checked it this AM it was supposed to come tomorrow. My order of 20 Izzy skirt washers has arrived. $7.90 for ten plus about $7 for S/H. Much more reasonable than the $31 S/H from the other site I was going to buy them from.
 |
| table top fasteners |
These are two of the table top fasteners that I use. I have yet to have any issues or headaches with either one of them. The figure 8 fastener on the right supposedly doesn't have a lot of movement but again, no problems. I can see where any movement with it might not be in the right direction depending upon the wood grain it is screwed down to.
 |
| my 20 Izzy Skirt Washers |
Why didn't they put all of these in one bag? Not that I'm complaining because the bags are heavy duty and I'll reuse them for something else.
 |
| hmm...... |
This is an interesting design and it has a lot of room to move around. Not only can't it swing in an arc, there is about a 1/2" of lateral movement. I have a project up coming that I plan to use these on.
 |
| done |
Both of the large drawers are done. Slips and bottoms are installed and fitting them to the openings was in the batters box.
 |
| bottom fitted |
I think this will go in all the way but I stopped it here. I have knobs on order but that haven't arrived yet. I didn't want to risk fully seating the drawer and not being able to pull it back out.
 |
| 2nd drawer |
This is as far as the drawer will go in. I still have to plane the top front of the drawer so it will fit the opening. That will happen after the knobs come in.
 |
| new slips |
I went to Lowes this morning and bough two sheets of 5.2mm plywood for $13 each. 1/4" birch plywood is $21 each but for drawer bottoms the 5.2mm is good enough.
 |
| one down, two to go |
This is the largest of the remaining 3 drawers. Got it glued and cooking with the front slip cooking too.
 |
| kicked my arse |
This back dovetail joint was a struggle for me. I first reversed the sides (put the outside on the inside) but that didn't matter. However when it came time to saw the pin socket I found a boo boo. I had reversed the pin socket on the ends of the back. Muscle memory kicked in and saved me a lot of grief.
Killed the lights here because the foot was singing arias to me. I have never had a blister hurt this much. The goal for tomorrow will be to finish and fit the last two drawers. Hopefully the knobs will be in by then too.
Shout out to Sylvain for pointing out a me-steak I made on my 'herd of woodies' blog post. I wrote that the irons were different where it should have been the 'chipbreakers' are different. The slot for the yoke on the transitional chipbreaker is higher up, closer to the top. The metal plane chipbreaker has the slot lower and about in the middle. I have made the corrections to the blog post.
accidental woodworker
Collections & Fine Furniture sale, 16th April 2024
Collections & Fine Furniture sale, 16th April 2024
What steel was used in vintage plane blades?
Modern planes come blades made of exotic types of steel, but what about vintage planes? For instance, what sort of steel did the Stanley’s use?
The short brochure “Read this before you use STANLEY PLANES”, describes the blades. It appears that for several generations the steel used In Stanley Plane Cutters was made for Stanley in one of the steel mills in Sheffield, England and was known as “Composite” Steel. It was comprised of a cutting edge of “very high carbon, crucible steel, alloyed with tungsten, manganese and other elements in ideal proportions”, and a softer backer made of lower carbon crucible steel. Both were welded together when cast, and made of the best quality Swedish pig iron.
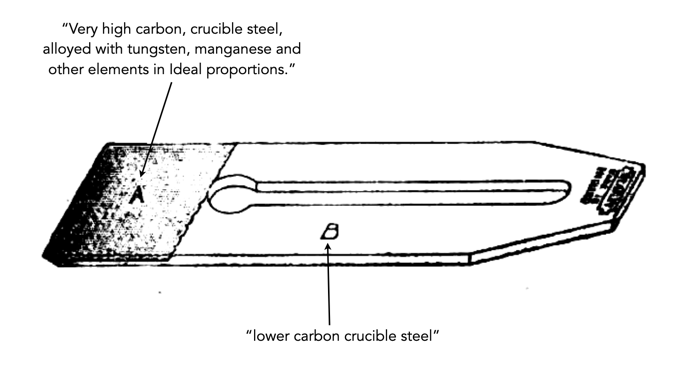 A Stanley composite steel blade
It is hard to know exactly how long Stanley made these composite blades. There is no mention of composite steel in the 1906 Stanley catalog, just “English Steel”. Examining the various catalogs over the years, it is not until No.129 published in 1929 that there is any mention of composite steel. In Catalog No.34 (1915) it describes the use of “the finest quality English steel”, and by Catalog No.34 (1942) is had changed made in Sheffield, England from “the very best grade of Swedish iron”.
Sargent planes of the VBM type, short for Very Best Made, had blades made of the Very Best Tool Steel, whatever that seems to mean (it was a phrase used by many tool companies). Union planes were made out of “a superior grade of heavy steel”. A 1939 catalog from Swedish company E.A.Berg talks about “best quality Swedish steel”, compound-steel, and “Swedish Charcoal Steel”, but fails to discuss specifics. Maybe it was a proprietary blend, or perhaps they just felt that people wouldn’t be interested in the “chemistry” side of things.
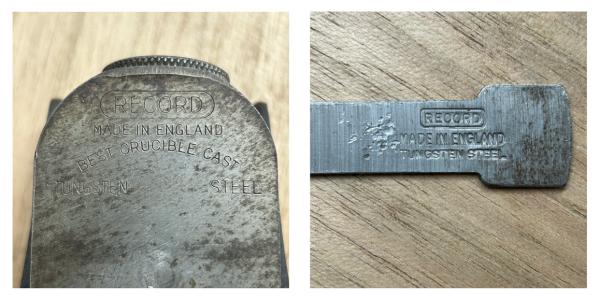 Record took great effort to make sure its blade steel was special.
Record made it well known that their blades were made using Tungsten steel. The concept is explained in Planecraft, first published in 1934. The tungsten combines with carbon to form tungsten carbide, a metal used in machine tools for high speed cutting of metals. Basically “a plane iron containing the correct amount of Tungsten is harder and more resistant to wear, and will take a keener cutting edge, and hold it for a longer period than would an ordinary steel.“. The tungsten also helps create a very small grain size, making a blade more resistant to shock.
Why did so much of the blade steel seem to come from Sweden? Swedish iron ore deposits contain small percentages of the element vanadium, which makes steel produced from it a natural alloy. The presence of vanadium allows production of a tough, fine-grained steel whose high tensile strength is not crippled by brittleness.
New Gramercy Tools Hand Cut Riffler and Rasps
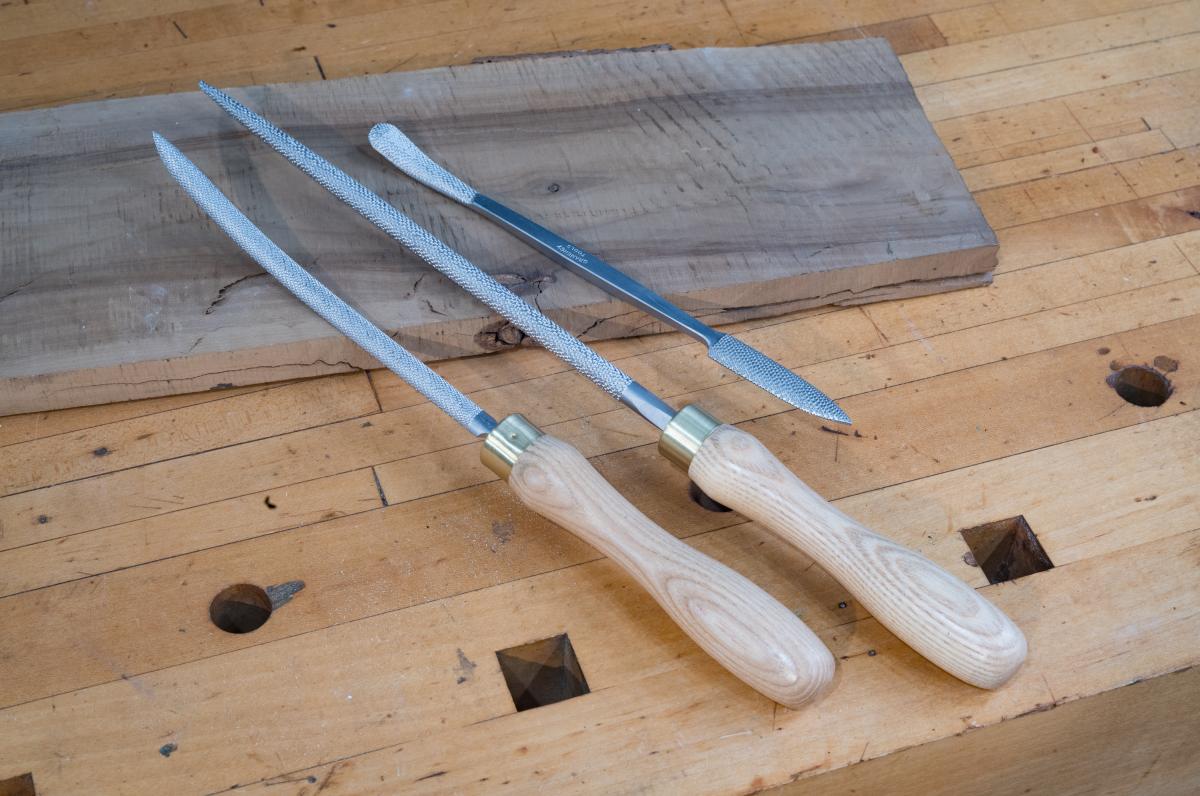
As many of you already know from experience, hand-cut rasps cut smoother and faster than machine-made rasps. For nearly 20 years, we have been selling hand-cut rasps to a great reception. The range we have offered, however, has been pretty static for a bunch of years. The Gramercy Cabinet Rasps and Modeller's Rasps cover most cabinetmakers' needs. We have also added a couple of sets of riffler files for smaller, more detailed work. The only real innovation has been the Saw Handle Maker's Rasp, which is both bent and then toothed on one side, so that you can shape the inside of a handle without accidentally damaging the material opposite.
Over the years we have gotten suggestions and requests for other styles. In the last few months I've been thinking about new permutations of rasps that might be useful to woodworkers and wood carvers. For example, riffler rasps are doubled ended with complementary shapes on each end. The theory is that you can do one operation with one end and then do a complementary operation with the head that is on the other end - you just flip the rasp over in your hand. The actual complementary pairs of shapes are traditional and date from when the biggest use of rasps was in shaping wooden patterns for the foundry industry. The hand shaped wooden pattern is mostly a thing of the past, but the shapes and pairings of the rifflers remain. So we wondered: what would happen if we took two very useful ends of a rifler that are typically on different rifflers and put them together on one rasp? So that's where the new Fine Riffler design comes from.
The second new rasp is simply a longer, thicker Gramercy Tools Rat Tail rasp. I find rat tails espeically handy for decorative work, and a longer, thicker one simply made sense. So there's the second design.
The third new rasp is a customer suggestion - actually the suggestion of several customers. The original Saw Handle Maker's rasp wasn't my own idea; it came about from a suggestion by Larry Williams, the acclaimed planemaker. Its design makes it really easy to shape the inside of a handle or anything that has an opposing surface close by, because the curve is bent up so you don't hit the other side (and even if you do, only one side of the rasp has teeth). We had requests for a narrower version of the same thing. With an narrower rasp, you got a tighter radius on the half roundness of the file. This translates into a freedom to do tighter curves. And in certain situations, the narrower rasps fits the space better.
We are very pleased to announce these new rasps and we have more still to come. They may help solve a specific problem that some of you are working on today, and going forward we hope they open up new possibilities and capacities for fabrication. And that is very exciting indeed.
2 down, 3 to go......
Went for my daily stroll in the AM. I think I'll keep with this schedule because it works better for me. Strolling after lunch breaks up a big chunk of my PM shop session. Today I got back to the shop before 12 noon and quit around 1500. Depending upon when I stroll in the AM I could get an hour or more shop time in the AM too. I'll have to see how that shakes out. The stroll won't happen until after I finish my daily sudoku and crossword puzzles.
 |
| first large drawer |
My goal for today is get the two large drawers glued and cooking. Fitting them will come tomorrow. I was mulling over here whether to chop the pins or put it on the bench and go for my stroll. The stroll won the coin toss.
 |
| before lunch |
Got the tails chopped and one end of the drawer front fitted. I had no doubts that I would get both of these done by 1500.
 |
| needed a visual |
Something was causing my spider sense to start tingling and I couldn't put my finger on it. The back dovetails were off and looking at a drawer from the first portable chest of drawers wasn't clearing things up from me.
 |
| the 'aha' moment |
This is what was causing the heebie jeebies with me. I have too much to the right of the right 1/2 pin. It took me a few minutes before the light bulb came on. The back hadn't been sawn to the correct width - it was still the same width as the drawer front. After I sawed it to the correct width all was well in Disneyland again.
 |
| first drawer cooking |
The pins and tails were snug enough to hold the drawer square. While the drawer was cooking I glued the front drawer slip on.
 |
| 2nd drawer |
About an hour later I had the 2nd drawer the same as the first one. I will glue the side slips on later - probably after dinner.
 |
| back to the first drawer |
Got the side slips glued on and cooking. I found two scraps of 5.2mm plywood for the drawer bottoms. Still leaning in the direction of 1/8" plywood for the 3 smaller drawers but that is subject to change. If I do change lanes on that I'll have to make a road trip to Lowes for 5.2mm plywood.
 |
| 2nd drawer |
Satisfied with the joinery on both of these drawers. I had a bit of apprehension going into these due to thinness of the drawer sides. I shouldn't have because I have done drawers with this thin stock before. Not sure how the slip detail will work on the 3 smaller drawers because they aren't as wide. I'll find that tidbit out tomorrow.
It was another beautiful spring day in my part of the universe. The temp got up to 78F (26C) with sunny skies. Great strolling weather for sure but it is looking like it will be cut short this week. Rain supposedly coming in tomorrow.
I didn't gain or lose this past sunday's weigh in which sucks because I behaved. I found some old 5lb ankle weights that I'm into my second week wearing. I put them on in the morning and remove them before dinner. I walked yesterday with them and today and I can feel them walking up the two hills on my route. I cut out about 15 minutes of the stroll so as to not over do it. I'll keep this up until I feel like I am walking without them and I'll add the final leg of my daily stroll.
accidental woodworker
2nd chest of drawers.......
It was a beautiful spring day. The temp zoomed up to 68F (20C) with an almost cloudless blue sky with winds out of the west south west. That was blowing at a good clip and would have been a PITA if the temps were lower. I think this was the 2nd time this year that I went on my stroll without a coat. The rest of the week is forecasted to turn into crap with cloudy skies first with rain showers coming back.
 |
| clamps off |
I was able to pull out the 2nd divider on the right. The next batter was its sibling above it.
 |
| gentle persuasion |
I got the top one out with the help of slip joint pliers. The rag was to keep them from marking up the dividers.
 |
| ain't budging |
In spite of the rag I left an imprint from the pliers on the dividers. I pulled on this one with all I had and nada. I will wick superglue into the dado on the top and bottom at the front and back.
 |
| hmm..... |
In hindsight me thinks I made a boo boo. Decided to flush all the dividers and the vertical divider is proving to be a problem. Classic planing with and across the grain in the same direction. No way to avoid it neither. Next time I'll do the dividers flush from the git go.
 |
| split the end |
The end went in/out dry without any hiccups. I put some glue on the ends and it froze going back in. I got it to seat but the dado bottom split almost from the front to the back. I glued the split and clamped it.
 |
| drawer stock |
I'm glad I made extras for the front and backs because I needed them. Or at least I thought I did. I forgot that I was using 3/8" thick sides and backs. I fitted two new 1/2" thick pieces for the backs.
 |
| ditto for the right |
Did the same for the 3 drawers on the right - all the backs are now a 1/2" thick.
 |
| oops |
The top is set down 1 1/4" and the bottom is up set 7/8". The 1" radius was supposed to be on the top and me, because I'm brain dead, put it on the bottom.
I could have left it as is making the bottom the top and top the bottom. However, I liked the 1 1/4" at the top so I put a 1 1/4" radius at the top. It didn't look off to my eye on the workbench but I think this would better if it was hung on a wall. That way it makes sense to have the bottom rounded like the top.
 |
| done |
One saw cut removed the bulk of the waste. I did the final removal and shaping with a 80 grit sanding block.
 |
| back rabbet |
Happy with how tight this rabbet turned out. There are no gaps on either the outside on inside of it. The rabbet is also consistent from the top to the bottom. I am not going to nail it.
 |
| layout and labels |
The labeling I do for dovetails is usually one thing I follow. It has saved my bacon quite a few times. I'm doing the two larger drawers first.
 |
| drawer slips |
I thought I had more than this left over from the first portable chest of drawers. No matter as I have more than enough for the two large drawers. I'll have to make slips for the 3 small drawers.
 |
| both ends |
Since I had the slips already I could do the dovetails at the back as well as the front ones. I had to stop and orientate myself again back to the first chest of drawers on the dovetail layout at the back. I think I got it right and the acid test comes tomorrow.
 |
| tails done |
Killed the lights here. I'll do the pins in the AM and the goal for tomorrow is to get the two large drawers done. I'll have to make a run to Lowes to get some 5.2mm plywood for the bottoms. I'm thinking of using 1/8" plywood for the 3 smaller drawers. That would give more depth (minuscule amount I know) in the drawers.
accidental woodworker
Been Busy…
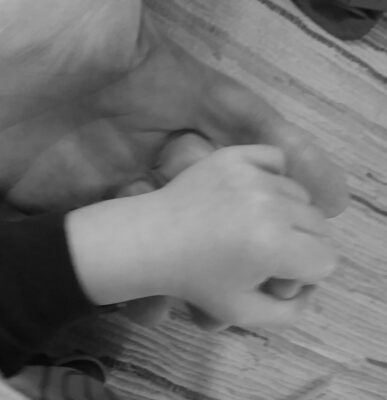
Baby M’s fingers wrapped around one of Grandpa’s.
… and here’s why. L’il T now has a brand new baby brother!
We just back to Shangri-la after a month in New Jersey helping with preparations, pitching in whenever and wherever needed, and doing grandpa and grandma stuff. L’il T and I spent untold hours playing with his cars, chasing balls in the yard, swinging and sliding at the park, reading books. Mrs. Barn got a full dose of medicine to respond to the demands of the grandma gene.
Amusingly (?) when I go to visit I always travel with a bin or two of projects to work on during the “down times.” When packing to return home, I realized I had not opened up those bins this trip except to complete some gold leafing (more about that later).
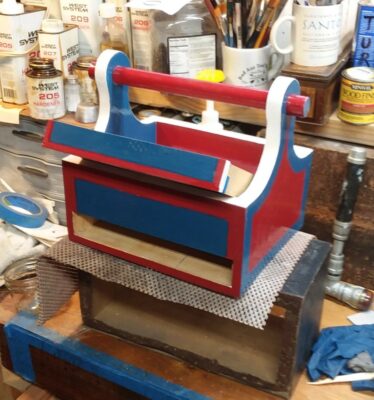
We also celebrated L’il T’s 2nd birthday, and I made him his first toolbox, complete with 23K gold leaf trim and his name. This picture is just before I started the gold leaf trim.
1/2 day......
Just worked in the shop for the AM session. I got the 2nd chest of drawers glued up before lunch. I used hide glue on it so I'll be allowing it to cook until tomorrow. I spent the rest of day watching Spiral which is a french crime drama series. I've watched season one and I'm on into season two. The way this is going I'll be buying season 3 sometime tomorrow too.
 |
| center vertical divider |
I got a snug fit with it after I shaved a wee bit off one end.
 |
| using the original drawer layout |
I was going to do only two drawers on both sides. I changed my mind and I am doing the 3 drawers on the right side of the vertical divider. The right side first two drawers (from the top) are 1 3/4" and the 3rd one is a shade over 1 7/8".
The first spacer is a 1 3/4" followed by a 1/2" one for the divider with another 1 3/4" spacer and a 1/2" divider. I used this setup to layout out both sides of the horizontal dividers on the right drawer opening.
 |
| 2nd one |
The first one I did by hand split on me. I chopped the first dado was on the left with no problems. Doing the second on the top left was working until the center dado said No Mas and split. For the 2nd attempt I made all the dadoes on the tablesaw.
 |
| dry fit minus the drawers |
The drawer openings on the right are off (height) by about a 16th. I doubt that anyone will be able to pick it out. Everything is fitting well and snug. No gaps and the carcass is still dead nuts on the diagonals.
 |
| left them proud |
I will flush the dividers after the carcass has cooked and set up. I am thinking of leaving the top and bottom horizontal ones proud. I like how that looks over having them flush with the ends.
 |
| glued and cooking |
I think I made a boo boo. I only glued the center divider, the ends, top and bottom, and the back together. I inserted the horizontal drawer dividers in dry so the clamps didn't distort the openings. They were a frog shy of snug and now they ain't budging. I couldn't pull out any of them. There isn't any glue or fasteners in them and won't be if I can't pull them out. I'll have to wait and see what shakes out with that in the AM.
 |
| shop is cool again |
The shop temp is down to 61F (16C) right now. It had gotten up to 64F but the night time temps have been barely above freezing (32F 0C) again. Because I used hide glue and the low temp I will leave this in the clamps for 24.
 |
| scraps |
This is 99% of what was left over from three 1" x 12" x 5 foot pine boards. Gave myself a pat on the back for good guess-ta-mating.
accidental woodworker