Hand Tool Headlines
The Woodworking Blogs Aggregator
“Glory to God in the highest heaven, and on earth peace to those on whom his favor rests.” - Luke 2:14
Norse Woodsmith Blog Feeds
Still hand-tools 99.9% of the time
 a new version of an oak carving
The past two days this blog got an average of 164 views -then today it got 1,585 views. Must be Chris – yup Chris Schwarz included a link in his post today – to something I wrote almost 14 years ago! About using hand tools, why I do it, etc. I’ll add some up-to-date thoughts on that subject in a minute. But first, thanks for the nod, Chris. If you are one of the 1,500 people who came here today, welcome. These days this blog mostly serves as an archive of my work. I started it in 2008 – and still post something here once in a while, but mostly I’ve been writing on my “new” blog at Substack – https://peterfollansbeejoinerswork.substack.com/ – I started there in 2023 – after seeing Schwarz’s substack blog. That blog has changed my life – the support I get there is a great benefit for which I am very grateful. When I first left museum work, I spent a lot of time on the road, teaching classes in Maine, Connecticut, North Carolina, Minnesota and some further-flung places too. All that travel got pretty draining and made shop work very choppy. Now I’ve reduced my teaching to just a few times each year and instead I put a lot of effort into the blog – trying to make sure that the readers there get their money’s worth. I try to post at least twice a week and aim to make the posts worth the time & money that the readers spend on them…
One thing I talked about in that 14-year old post is how the work I did for 20 years at the living history museum was a perfect situation for me – my living was derived from working with/for the museum visitors – not selling the handmade things I created. I got so much practice there that wouldn’t have been possible in the “real” world – it was quite an education. A quote from that post is “I often maintain that if I had to sell my furniture to make my living, it would not work the way I do it.”
Well – less than 2 years after I wrote that post, I quit that job and struck out on my own. And I’m still plugging away 12 years after that. And it’s partially true – if my whole income was dependent on selling my handmade items, I’d be hard-pressed. But now my income is split among a few branches of this woodworking I do – teaching a few classes each year at Pete Galbert’s in Berwick, Maine https://www.petergalbert.com/schedule , making stuff to sell – that’s mostly furniture, but also includes some instructional videos I’ve created here in my shop and some plans/drawings I developed with Jeff Lefkowitz – there’s links to those things on my little-used website – https://www.peterfollansbee-joiner.com/ The furniture I usually post on the substack blog – sometimes I put it on the website, then write a blog post pointing to it. And the books through Lost Art Press https://lostartpress.com/search?type=product%2Carticle%2Cpage&options%5Bprefix%5D=last&q=Follansbee&filter.p.product_type= with more to come there.
So – do I still work exclusively with hand tools, now that I’m out on my own and getting older (68 going on 69) every day? Almost 100% yes. I work with green hardwoods – splitting the boards from logs. Mostly oak. Big logs. I split them at the yard where I buy them, then move the large sections here to my yard. So I gladly accept help of friends with a chainsaw to cut those large logs.
 Not my saw
For decades now I’ve had the benefit of Rick McKee’s help when I’m log-shopping. He’s deft enough with that saw – and I’m nowhere near competent with them, so lucky to have his help. Plus it’s better to split those big ones with company too – even if it’s just to provide the rest-breaks that come with conversation. Here at my yard, when I need to saw some of the split bolts to length, I use a corded electric chainsaw. Always starts, no gas, etc. From there, all the woodwork is my usual assortment of hand tools. The lathe is still a pole lathe, powered by foot & caloric intake.
 pole lathe
I did have some help recently from another long-time collaborator – Pret Woodburn, who helped me build the shop – did some tablesaw work for me. I made this large box from some quartersawn white oak boards – but the boards had wide sections of sapwood that needed to be gone.
 white oak strapwork box, March 2026
If it had been riven stock, I could have split & hewn the sapwood off – but it didn’t look or feel reliable enough to split. And hewing dry stock is not all that pleasant. I can use a ripsaw, but when I marked out all the cuts, it just made more sense to get them machined. From there, I did all the planing and cutting – more than enough of it. And it was a pleasure. (same gig for a walnut box that I started about the same time.) But now it’s back to green wood that responds well to the froe, axe and plane.
The only other concession that I have is a grinder – I’ve just replaced my old Tormek with a CBN wheel on a slow-speed-that-seems-fast-to-me grinder. It’s so new I have little to report, other than good so far.
I feel like I’ve been to confession. My plan is to keep using the tools and methods I’ve used all these years til my body gives out. I’ve planed thousands of feet of riven oak boards and I never tire OF it – I get tired from it, but then after a night’s rest, I’m ready to go again. So until you hear otherwise, I’ll keep slashing away; froe, hatchet, planes, saws, chisels & gouges and more. I’m sure I’ll slow down, but I hope to get quite a few more years in. I have stuff I still want to make. And we still gotta eat.
 green shavings, red oak
If you didn’t see Chris’s post – here it is, with the link to my old post at the bottom https://christopherschwarz.substack.com/p/earlywood-if-theyd-had-a-biscuit
Understanding Softwood Dovetails

I have made dovetails in pine literally thousands of times and that is in thousands of dovetailed boxes, drawers for cabinets and cabinets themselves; I think I understand every type of dovetailing there is, but equally important is to understand the many types of woods we use for these projects because they all react differently to the processes of creating them. In my hands-on class workshops, I have taught 6,500 students alone to cut dovetails on their projects. In most of those cases, we mostly used pine. My Shaker-style candle box came about in 1986, so 40 years ago to date. In the

USA we used the softer Eastern white pine, but here in the UK we used Scots (European Redwood Pine). The Eastern White pine is very evenly textured, with only minimal difference between the hard and soft aspects of the growth rings. It pares like butter and barely resists planing. Scots Pine on the other hand, and by comparison, is tenacious, highly resinous and variable in density between the hard and soft aspects of the growth rings. This species is more knotty than its North American counterpart, too. Mostly it's the density of grain that counts the most for those of us working it with hand tools like planes saws and chisels. Measuring the density in wood using the Janka hardness test means pressing a half-inch steel ball bearing into the wood to half its diameter and measuring the amount of pressure it takes to do it. In Eastern White Pine, the Janka hardness test reveals 380 lb
f. In Scots or European Redwood Pine, the pressure measured is 540 lbf.

Offering a dovetail saw to Scots pine and then to EWP (Eastern White Pine) is a night and day difference. The teeth of a well sharpened saw in half-inch EWP will go an inch in a single push, but in Scots pine the saw will take several strokes. In all of this i am saying that when working with softwoods and using hand tools we must learn about the differences in the fibres, the wood's density, the differences in growth rings that affect our tool use and much more.

I thought discussing this set of basic dovetails would be a good starting point all round because it is so tangible. I cut my first dovetails in Scots pine. Since then, I have cut many a thousand dovetails using no more than a dovetail saw, some chisels, a knife a square and a mallet. Different softwoods all work differently. I would never choose spruce or Douglass fir, larch or some of the other softwoods for a box needing good looks and resilience. I'll take it from here into the practicalities of woodworking now.

My laying out my dovetails, tracing around them for recesses and the pins, never comes from a knife and always from a super sharp pencil. Why is that? Well, I am specifically talking about working in one of the softwoods here. In my teaching, much of the work is in hardwoods and in hardwoods, I always trace the outline of my dovetails with a sharp pointed knife and reach tight into the corners. This does not work too well at all on Scots pine. If I did that, the joint would be too tight, and it is unlikely that the paired parts of the joint would go together favourably at all. The chances are they would not seat fully down into the pin or tail recesses if I used a knife to delineate the outline in the same way I would in denser grained hardwoods like oak, cherry or walnut and so on.
The nature and characteristic properties of certain woods determines the best way to work them. My use of a pencil to lay out the dovetails will always be pencil, and I should say here that I would never cut the pins first rather than the dovetails. Frankly, it's just backwards to do it that way, and for a couple of good reasons I won't go into here. Laying out dovetails in pencil shows up well on almost any but the darkest woods. That takes out the guess work and makes sawing exactly to the angled lines easy. Generally, that is nothing new. Most people use pencils for the dovetail outline. The question is more raised when I use my knife on some work and pencil on pine. Let me talk you through the reasoning now.
I do sharpen my pencil to a really fine point. Even so, marking around the dovetails rarely gets absolutely tight into the corners as a knife always does. The margin is barely discernible; a paper thickness would be an exaggeration, but it is there. The dovetails shown here were repeated at the other end for the two top corners of my cabinet. When I cut the tail recesses and pressed the tails into the tail recesses, tapped them with the side of my hand, the recesses started to receive the tails in a dry fit. I then made a fist to tense my support muscle, developed over 60 years, and 90º of the tailpiece entered into the recess piece with a few bumps with the side of my fist. Two or three further taps with my chisel hammer drove them fully home, and all the shoulders were seated to the bottom of the recesses. There were no gaps to be seen. This is the point that needs a little explaining, so here we go.

Almost all woods have different levels of compressibility and consolidation of fibres. Oak, because of its variable grain density, will compress more than say maple or cherry, which both have even texture throughout the growth rings including even the sapwood. In oak, half of the growth rings have more open pores. In many cases, buildings for instance, the oaks' ability to flex, stretch and compress make it ideal for resistance and resilience under the pressures a building must withstand in its day to day as a structure. The softness of pine compresses within itself in a different way and when we start working with pine we realise the many differences not only between softwood species but within the species itself. This changes markedly, and especially the area surrounding and expanding from the knots rooted into the stem. Scots pine variables usually occur according to these levels of resin. Some pieces and sections will have higher levels than others, even just a few inches away within the length of a board. As soon as my saw teeth touch the wood, I immediately know the density and the friction levels caused by resin throughout the fibres my saw will work into.

Dovetailing is a perfect way to understand and absorb the knowledge and workability of any wood as a woodworking species. Scots pine necessitates that I saw tight to my pencil lines, even though they will be that paper-thin distance to each side of the dovetail I determined the position of the recess walls by.

Had I used my usual sharp-pointed knife to establish the angled cut lines to saw to, and cut to those knife lines exactly, as I might in hardwoods, I know that the dovetails would never go together straight off the saw. I will only in the rarest of cases ever pare cut any dovetail part to improve a saw cut. My dovetails always come straight from the saw itself. This then delivers the optimal fit. Unquestionably, this is absolutely the best way to leave the mating surfaces for both tails and pins.
So, why would the tails not go together?
Two things, really. The recesses would indeed be too tight, even though theoretically one part is only occupying the physical exactness of the would be occupying part. But mostly it's two things occurring at the same time. Within seconds of applying glue, wood begins its inevitable surface swelling, which then in turn shrinks the available space between the pins and the dovetails. We generally apply glue to all meeting surfaces because that lubricates the joint and allows us to seat our joints. Glue starvation can lead to what we call joint freeze. The surface friction between the mating parts prevents any movement; applying force of any kind can then break the wood in various ways and ruin our work. The second negative influence is the friction between surfaces. Even if the puzzle pieces are an exact match in terms of size and angles, as the parts come together, the surfaces between the mating joint types become progressively tighter the closer and deeper it gets to the final point of seating. A dry fit in pine like Scots pine, with its very high resin content, markedly increases the friction levels. Most other woods, as in hardwoods especially, do not have this 'resin-stick'.

Other softwoods such as spruce and Douglass fir act differently. Still soft in terms of density, the surface fibres are fractious and though not the same as Scots pine, they cause a 'sticking' point as the joints come together. Again, the glue expands the surface fibres by swelling them. This means that gluing up in any case necessitates our moving systematically and efficiently.

Finally, always remember that wood that's swollen by the glue itself rarely shrinks back between and away from the mating surfaces, and that is because it can't. What am I saying? Wood in the solid always expands and contracts according to the intake and release of moisture in the woods' fibre. What causes this is the atmospheric moisture content surrounding the wood. At any given point, these levels change according to the environment. General humidity to a geographic area is one thing, but within the confiners of a workshop, a home or an office is ever-changing unless you live in the desert areas or frozen climes. When we swell our wood through gluing, the mated faces are bonded to one another and this bonding does not turn loose.

Another finally: You may well buy in your wood at the same time and think each piece you bought to make from has the same moisture levels or that your existing stock you added to will be okay to get stuck in on joinery. A moisture meter is invaluably here. You want the readings to be the same when it comes to wider dovetailing. If you make your dovetails with woods at different levels, though both may well shrink, it's more likely that the one with the higher level will shrink the more and this will inevitably end up with a split somewhere.
If your wood is ready, make your dovetails and whatever other joinery you have and unite them, even if you are not ready to glue up. The retentive value of being so held will serve to maintain the flatness of your boards until you are ready for actually gluing up. Not doing this usually results in cupped boards, making it difficult to get the joint together. Also, changes in the sizes of both pins and dovetails can expand and contract because of the open exposure of the wood. This is the case even over short periods but especially over an overnight period.
Union #3, corrugated sole.......
I am not sure that I can send this plane out now. I got the chip removed but the blade's toe was out of square by a mile. Decided to just swap out blade/chipbreaker. That opened a huge can of worms, bugs, and other slimy things. I couldn't get the plane to make shavings. Spent the better part of the day tiring and failing miserably.
Before I broke the plane down I was able to make RML (right/middle/left) shavings. After that, nada. It turned out to be a complete shit show. I don't remember who I bought the plane from but I am fairly certain that it is a plane made after Stanley acquired Union. Not sure what I am going to do with it now.
 |
| next day |
Left this cook in some cauls overnight. Got a wee bit of hide glue squeeze out on 3 edges.
 |
| hmm...... |
Got some bleed through but it won't interfere with the upcoming shellac finish.
 |
| finally |
What a total, complete, Royal PITA it was fitting the veneered top into the groove. I had to be neat about because it is the underside of the lid and will be visible when it is open. Plane, sand, and check the fit. Wash, rinse, and repeat a bazillion times.
 |
| took a break |
I needed to step away from playing with the Union. Dry fitted the box and clamped it. It wasn't a horrible experience and I will glue it up the same way. This way I won't have any indentations from the band clamp metal corners.
 |
| a great big HMM....... |
I struggled for a bazillion years trying to get the iron to project past the mouth and nothing worked. I tried all the tricks of the trade from the 100+ planes I rehabbed. I just happened to look down into the mouth and there it was - the chipbreaker/iron is too wide. There was a bit of casting build up at the bottom of the inside cheeks there that I filed away.
 |
| finally |
Took my time and carefully filed the outside edges of the mouth until the chipbreaker/iron fit through the mouth. This is the first time I ever filed the mouth of any plane.
 |
| ta da |
There are a couple of frog hairs of clearance on both sides of the iron. I was able to now advance the iron past the mouth but barely.
 |
| another headache |
Got the plane back together and I couldn't advance the iron past the mouth far enough to take a shaving. WTF? Just happened to see this when I took the lever cap off. The chipbreaker/iron is stopped from advancing because of the lever cap screw.
 |
| hmm....... |
There isn't enough meat to file away to allow the chipbreaker/iron to be advanced. More time lost pissing away into the wind.
 |
| another break away |
Dropped playing with the plane and glued up the box. No problems and no urge to cuss or to offer my free flying lessons. Got almost no squeeze out which I didn't expect. Fingers crossed that it all didn't go into the interior of the box.
 |
| my Lie Nielson #3 |
Lots of space between the lever cap screw and the slot for the chipbreaker.
 |
| Lie Nielson #4 |
Still a space but not as much as the #3 has.
 |
| Stanley #7 |
Lots of real estate here for movement. This Stanley #7 is a favorite plane probably because it is the easiest to set and have it stay.
 |
| Lee Valley low angle jack |
Of all the planes I checked for space, this one has the most.
 |
| Stanley #6 |
I only use this as a scrub plane when I thickness boards.
 |
| ???? |
The slot for the lever screw is the same on both irons. It is the same as the ones on three #4 chipbreakers. This ain't the problem. Back to the drawing board to see what else is OTL (out to lunch).
 |
| fixed one and this one....... |
I got the iron to advance as it should. It took a lot of back and forth adjusting the frog back and forward before it worked. However, the iron is slanted in the opening and high on the left. This hiccup is one that I've had to deal with since I first rehabbed it.
I know this plane works because I got the plane to spit out RML shavings perfectly just a week or so ago. Albeit with the blade adjuster thrown as far over as it would go. That played havoc with my OCD but the plane worked but there was no more room left with the blade adjuster.
Nothing I did for the next hour worked. I couldn't get the plane to make shavings on the right. I double and triple checked that the iron and the chipbreaker was square from the right sides. Ideas anyone ?
 |
| photographic proof |
I can make heavy to wispy shavings but only on the left side. Drove myself bonkers trying to reverse it and nada. Too big for a paperweight and useless as a smoother. Gave up on the plane again for today. Being that I can be stubborn and totally brain dead about things like this, I will attack this again in the AM.
 |
| for tomorrow |
I have been putting off sharpening the irons of my block planes. Only two of these get 99% use but I decided to sharpen the irons in the entire herd. That way I'll have a few spares if needed in the heat of a moment.
 |
| couldn't resist |
As I was killing the lights I thought of something and checked it before I did that. There is adequate space above the lever cap screw. I checked to see how the chipbreaker/iron was laying on the yoke. It was laying off square. The left side of the chipbreaker/iron was down further then the right side. Why was the question?
 |
| maybe? |
The left side seat has a battle scar that splits it in two. The front part is flat/smooth and the rear half is scared and a few frog hairs lower than the front part. The square seems to be laying flat from L/R and R/L. I thought maybe the left side was a wee bit lower than the right side seat. Not sure where to go or what to check/do next.
accidental woodworker
Mild Progress on Dining Room Table and Mystery Project
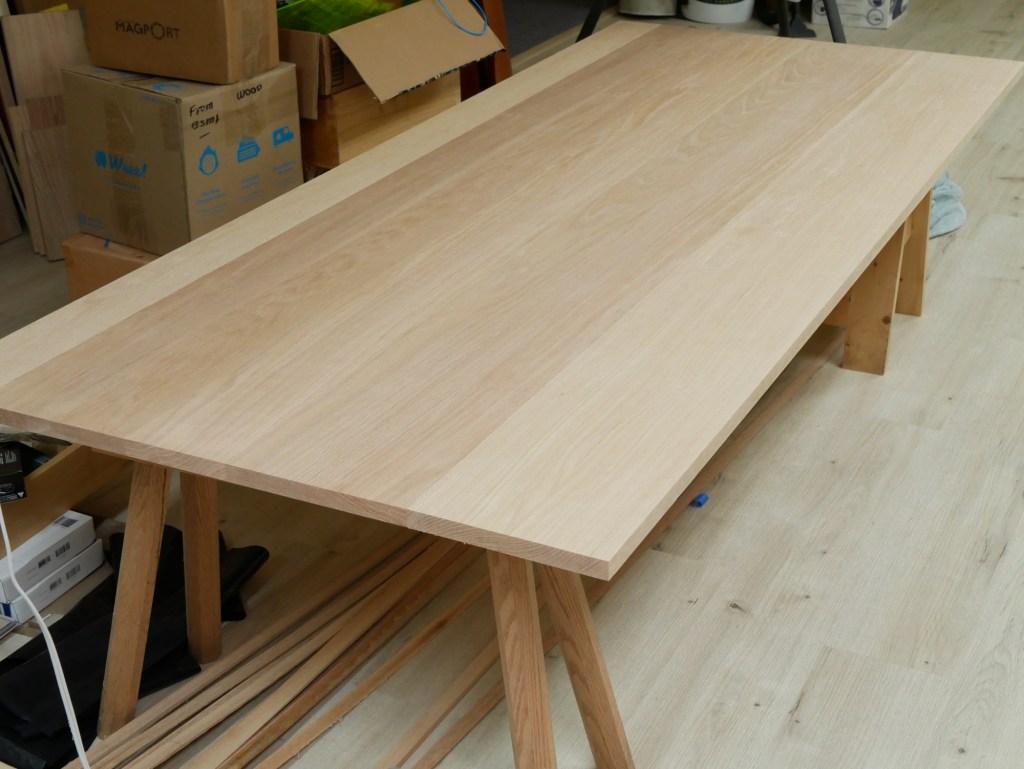
Yeah, that dining room table was supposed to be done last year. Well, that didn’t happen due to what I’d describe as a combination of excessive chaos and lethargy. However, work was accomplished, if not by way of kicking and screaming.
The top has been complete for some time. My progress became slower when it got too large for me to move by myself. Because each additional board required the top-in-progress to be moved to or from the bench three times, that turned into a multiple of times when I needed to find someone to help, which turned out to be more problematic than I would have cared for.
Nonetheless, here is the top, sitting on (and therefore, annoyingly, blocking the use of) my sawbenches:
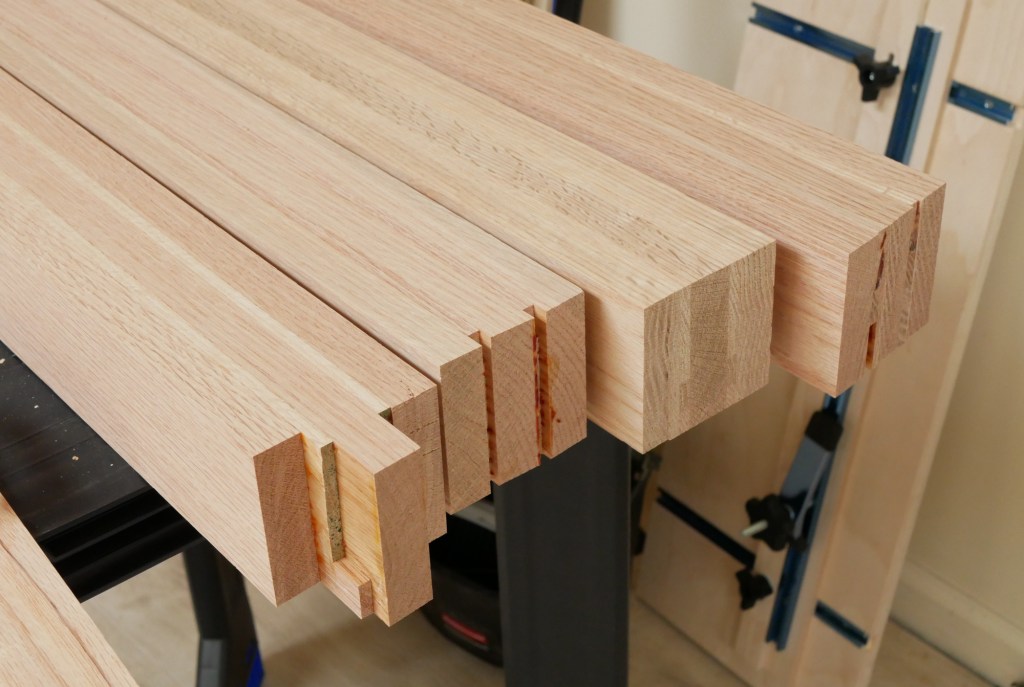
Then I moved on to the legs. I’ve had those glued up, squared, and dimensioned for a couple of months:
And I’m stalled there for the moment. The next steps will involve some mortising in those legs, and I’m not quite ready for that. Or something. Sure, I felt like I wanted a little more experience with my mortiser, for one, but there’s been a bigger problem.
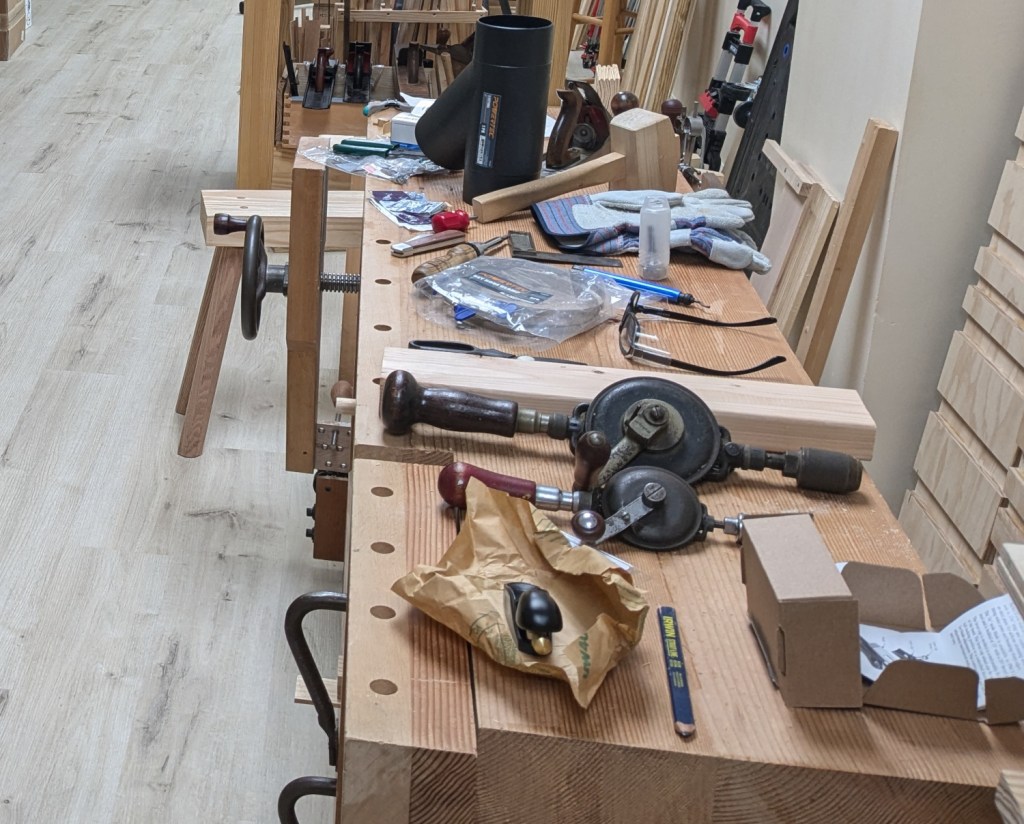
The “new” shop in NJ has been sort of a wild animal, and I feel like I’ve had difficulty finding a way to get things organized in a way that doesn’t involve tools, parts of projects, boxes, and wood sitting all over the place, getting in the way.
Mind you, especially in light of how many times I’ve moved over the last 20 years, it was never terribly good.
This time, it felt worse. I don’t know what it was. It’s felt like I’ve been constantly fighting with the tools and benchtops, trying to keep the former off of the latter, but not having much luck because, sheesh, where is this thing supposed to go again? See below (I know, I know, you’ve seen a lot worse than that, but clearing this all of the time is a drag, and I have to clear it on a regular basis):
Maybe it started with the circumstance of needing to install a new floor before I could even really do anything. It took me more than half a year after moving in to gather the time, energy, and come up with a plan to do that.
Maybe it was discovering that the movers had kindly dented my bandsaw during the move, and that they refused to pay for it despite being obligated by law to. (Trust me, movers, and especially your bean-counters, I will remember that.)
Maybe it was the dust collection saga. I didn’t really have use of my bandsaw and thickness planer until I got that sorted out. I did mostly get it sorted out, though I have to ask why it had to be as unbelievably annoying as it was.
Maybe it was having to deal with lighting for the umpteenth time and still not completely nailing it (yet).
Maybe it was discovering that my vision had managed to get even worse, necessitating new near-vision glasses just to be able to saw to a knife line again.
Maybe it’s still not having a good solution for storing long boards.
Or probably, it’s been a combination of all of these things. Is this preventing me from doing work at all? No; I have done quite a bit of work in the new shop (after installing the new floor, of course). Much of that has been necessity, such as new drawer fronts and such for the kitchen, moulding for parts of the house, and so on. But it’s felt like a struggle, more than it should be.
I resolved to do something about this a few months ago. The difficulty I’ve been facing is that it’s not just “one thing.” There’s no silver bullet that will magically make everything better. However, somewhere along the line, I noted that the things I had stubbornly slugged my way through, such as the floor and the (still in-progress but mostly acceptable) dust collection, had really improved the situation down there.
So I’ve subconsciously mixed in shop improvement with furniture projects this year. Even something as simple as looking at where some boxes are and discovering how they can move a little bit to yield some more usable floor space helps.
And that brings us to the mystery project. I’ve gotta do something about the general hand tool organization problem. Yeah, I’ve got shelves and stuff, but they kinda suck. So here is the start of phase 1:
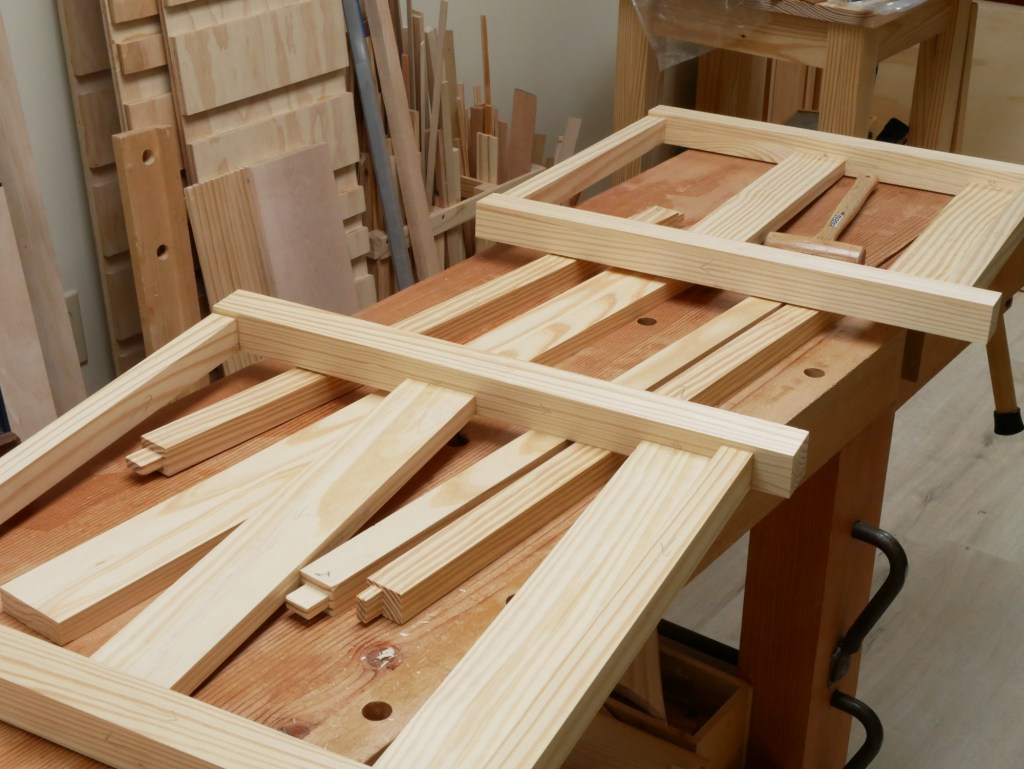
So, yeah, it’s a frame for something. I still need to make the front door, side and rear panels, and some other bits and pieces, but it’s been rolling along pretty well. Hey, I said I wanted more practice with the mortiser, and this thing has delivered (I should also mention that I built a new table for the mortiser, which has been a serious improvement.)
Of course, all of the mortises mean that there are plenty of tenons, and I’ve been working away at sawing those. I’ve tried out a new technique for marking those which seems to be going well, but I want to fool around with it some more before describing it. (And I’ve found myself thankful that I finally bought a shoulder plane; it really does a nice job at that one thing that it’s supposed to be good at.)
So, phase 1. I don’t think I’ll get to phase 2 before I’m in the final stages of the dining room table, but I’m going off of the assumption that any improvement is… an improvement.
not so good day.....
 |
| cooking done |
No rocking on the test surface. Sanding and then I can start applying shellac.
 |
| Leo's desk top |
There is a teeny bit of rocking evident when I push down on a corner. I still have to flatten and smooth it so I'll check for rocking again once that is done.
 |
| #3 |
The shavings on the desk top are all that it took to flush it.
 |
| the start of my not so goo day |
Got both the glue joint line on both sides flushed and I moved on to sizing the top - which would have been about 27 x 36. Didn't get there because the top is 27 7/8 x 33. I screwed up when I ran the saw against the wrong edge of the base.
After all the work to get it clamped and then flushed up and I brain fart. Instead of having Leo's desk top I now have a rather large paper weight. It is too short R/L to be a desk top IMO. I'll have to add the wood for a new top to the list when I go to Highlands.
 |
| hmm...... |
My last 5/4 board - almost 6" wide and 6 feet long. I got two boards almost 12" wide. Not fond of the upcoming top glue up. It would be a 4 board top and I would rather have a 3 board. Fingers crossed that Highlands will have 10" wide 5/4 boards in stock. I'll use these boards for making slats.
 |
| 2nd bookshelf |
The left divot will be facing the front and the right one will be facing the back. There is also a 'chamfer' on the right one on the back and the front. I set it aside while I thought about how to fix and use these.
 |
| a couple of hours later |
Decided to turn the errant desk top into a small table. Turned around my not so good day. I ripped off one of the boards to drop the width (front to back) to about 18". I then ripped out 5 legs from the 8/4 board. It wasn't enough to get four 1 3/4" square legs but I got five 1 1/2" square ones.
 |
| cleaning up the legs |
Cherry burns so easily. I have given up trying to saw it cleanly. It only took a couple of minutes to clean and smooth all four faces of the legs.
 |
| need apron stock |
I am thinking that this table could be used by daughter #2 by her front door. I am not putting a drawer in it and I am leaning toward putting a shelf on the bottom.
 |
| pen box for my sister |
My oldest sister Donna asked me to make a box for her to keep her pens in. I thought it would be a two or three pen box but she said she had about 20 of them to stow in it. Using poplar and it will be a mitered box.
I tried first to run the grooves on the tablesaw but nixed it. Still having hiccups with the blade height changing. I still don't want to dig into that bag of worms so I plowed them by hand.
 |
| the box top |
I'm going to dress up the box a wee bit by veneering the top with cherry.
 |
| first dutchman |
This one was easy to plane down flush. Not thrilled with the look of it even though it will at the back.
 |
| 2nd dutchman |
This one was bit more challenging to knock down. I didn't think it would handle the stress of me hand sawing it off.
 |
| hmm...... |
Knocked it down with the bandsaw. The first cut was simple and easy. The 2nd one was awkward because I couldn't lay it flat on the table. I had to free hand it through the blade.
 |
| they both stick out |
This one is on the front. I looked at my cherry scraps but I only had one that could be an end panel. I'll have to think some more on whether or not to use these two.
 |
| it's gone |
This Union plane was the only one that didn't sell until I got the final email. $25 plus the dreaded shipping and handling. Breaking it down and cleaning it up in preparation for sending it out.
 |
| hmm...... |
There is a chip on the toe on the right. Sharpening an iron wasn't on the menu but I can't send this out like this.
 |
| Yikes |
The iron isn't square and I didn't need the square to confirm it. I replaced it with a spare iron. I have to get a small box - the smallest priority box is too small and the next one up is too large. It sucks because I just tossed a bunch of boxes from Amazon.
Got an overall idea for the small table. I don't have any stock for the aprons and the maybe bottom shelf. I'll make a run to Koszelas tomorrow to see what they have for cherry.
accidental woodworker
Making the Paul Sellers' Marking Gauge Part I

These next three blog posts will show you how to make my marking gauge. It's in three parts because the video series is in three episodes too, so these upcoming posts work in tandem with the videos. Here will be the link to Episode I which comes out on April 15, 2026 at 5 PM UK time.
My making marking gauges came from realising that I only used the combination gauges for mortising and had always picked up the clunkier vintage versions of marking and mortise gauges because, well, they were what I had and what was available. It was when I picked up the Stanley 5061 a few decades ago, held it and used it, that I realised it was the better tool than any UK models I had ever used. Later, I came across a brand new one, that was in 2011, for just £4, and I wondered why all other marking gauges had not been ditched. It's one of those tools that you wonder why it took so long to come, but then realised it was the scarcity to see one, let alone use one. That led me to make my own better version with a few of my own improvements. Stanley's catty-corner presentation relied on a plastic insert to absorb pressure as a pressure point to the corner of the stem, to distribute the pressure from the nylon thumbscrew. I didn't want either piece of polypropylene even though the stuff lasts well enough, I decided on a metal insert against which I could apply a metal thumbscrew without crushing the delicate corner. This meant ploughing a groove to recess a brass or steel strip into. I also had no way of producing a nylon thumbscrew, even though it could be done with a 3D printer these days. Even so, the thought of going for plastic, buying in a 3D printer seemed to be the antithesis of all that I advocate. Additionally, I found that combination gauges are a good option starting out, you will quickly need that mortise gauge for a marking gauge in a few minutes. Also, rarely do I need one gauge of whatever kind at a time on any given project; it's not unusual for me to have three to five gauges on the go at one time. This week I had two for mortising and three for marking.
My choice of wood is close-grained, more non-compressing beech. It has just the right amount of resistance under pressure and also wears well. Would I add a wear plate in brass for better wear resistance? No. My wood is almost always planed level and smooth before it comes to using marking gauges, so the wear is not really a factor for me. Another issue is compression value. Unlike woods with contrasting growth rings, oak, for instance, where one aspect is soft and the other hard, beech is absolutely consistent throughout, making it resilient first but then delightful to work with hand tools too.
Making my gauge is not complicated with hand tools. I suggest that you might make two or three at the same time. You can work longer pieces of wood more readily and cut down the make-time to perhaps get three for the time of making two.
The Stem
Each gauge ends up with a stem of 3/4" (19mm) by 3/4" (19mm) 10" (254mm) long, but that is not the size we start with, so resist cutting until you've read the blog post that follows or watched the video. We need a section roughly 1 3/16" (30mm) wide by a couple of inches. That's because the only way to plough the groove with any kind of accuracy and control using a plough plane is with a square edge. The added width facilitates clamping in the vise while we plough. We plough the groove centred in the narrower edge. Planing the wood to size means we can use faces and edges as registration faces for the marking gauges, square and plough plane to sit against.

The Stock
Again, the actual size of the stock is 2 3/8" (60mm) long by 2 1/2" (64mm) wide by 1" (25mm) thick, but I suggest you start out with something that will perhaps give you two or three stocks and even if just making one, it is easier to hold in the vise for truing if it is longer. A 10" length works.
BEFORE YOU DIVE IN
You might think to get ahead and do the shaping from the details here, but I suggest you wait until you've watched the video (it is a paid video, and optional, but recommended), as transferring the knife walls to the opposite side are not as easy as you might think.

The Tools
Pencil

Compasses

Circle Template

Bench plane: #4

Combination square

Knife

Tenon saw: small to medium (maybe 10–12" (254mm to 305mm)

Chisels

Chisel hammer (or mallet)

Steel hammer (maybe optional) but I wouldn't use a chisel hammer to use the centre punch.

Centre punch

Drill of some kind

7/16" (11mm) drill or auger bit (I used a brace and bit for this size, but a Forster bit works well too). Remember too that this bit is to match my insert rim size, which can be different to your inserts.

5/16" (8mm) bit

3mm twist drill bit

Saw rasp

Flat file

Plough plane (can be optional). See my blog post on ploughless ploughing or my video on No Plough Ploughing Grooves.

Screwdriver flat head

For metal working, you will need a metal-cutting hacksaw.

The Metal

The brass strip measures 6mm (1/4") by 3mm (1/8") thick and 254mm (10") long. Look for brass flat stock on your favourite supplies platform. I have bought mine from both eBay and Amazon.

For the pin, I have used both 2mm and 3mm piano wire with equally good success. You can buy from most modelling suppliers but also from eBay and Amazon. This steel is hard enough for wear resistance yet can be worked with a regular flat file to round and shape the point. You only need a 2" (50mm) piece, but most likely it will come in a specific length.
The Other Hardware
I bought in half a dozen metal inserts for £5 a bag delivered to my door. The size is for a 6mm threaded screw. These inserts have self-tapping threads on the outside that work to bite and self-thread into the walls of a 5/16" (8mm) hole. They have a slight rim that fits nicely into a 7/16" (11mm)shallow recess I bored with a brace and bit just fine with a single rotation once the spurs touched the surface and the screw thread bites.

To secure the brass pressure strip adequately and at even pressure, I use four #4 1/2" (4mm by 12mm long) brass countersunk screws.

The threaded hardware will be a matter of choice and couldn't be easier. My thread size is 6mm by 30mm from Amazon. Look for 6mm by 30mm knurled thumbscrews. I used stainless steel, but here you can go for other options too.

Parts to the gauge

A Stock
B Stem
C Pin
D Knurled Thumbscrew 6mm by 30mm
E Brass pressure strip
Another Tea Box
Lately I've been working on some old tools that I've found at garage or estate sales. I found myself in need of building something - anything! So I though I'd make another tea box, similar to one I made a couple years ago.
This one is made from red alder, which can be a really beautiful wood. Some boards that I've seen have white streaks, and I'm not a fan of that, but the wood for this project was very nice. The back and left side even have some figure to them.
 |
| The sides have a 3/16" deep rabbet that will hide grooves at top and bottom |
 |
| First corner dovetailed and fitted |
 |
| All four corners dovetailed |
 |
| After leveling the top and bottom rims, 3/16" x 3/16" grooves are run |
The top and bottom are identical. All four edges get a 3/8" deep x 3/16" wide groove. I was unable to do the end grain edges with the plough plane, so I used a saw and chisels. Something was not quite right with the plough. I suspect the iron and wedge were not properly fitted - the iron was not forced against the steel skate and that resulted in poor performance. I need to look into this some more later. After the grooves were cut, the inside face was cut down about 3/16" on all edges.
 |
| Fitting the bottom into the grooves in the main box |
 |
| The short divider is housed in 1/8" deep dadoes. The long divider is half-lapped with the short one and its length is fitted to the assembled box interior length. |
I didn't show it, but the box sides are curved using an approximate 10 3/4" radius. This makes the top and bottom edges of each piece about 3/16" to 1/4" thinner than the middle.
 |
| Here's a test fit without the lid |
 |
| I pre-finished the inside surfaces of the box with 4-5 coats of shellac followed by 0000 steel wool buffing and then wax |
 |
| The box is glued up without the long divider installed |
 |
| After the glue dried and the joints cleaned up, the lid is cut from the bottom |
 |
| I used old plastic cards as spacers to fill the kerfs when clamping in the vise |
 |
| Then clean up the saw cuts on bottom and top, and correct any twist |
 |
| Adding hinges |
 |
| I mortised in a small piece of wood for a handle |
 |
| Outside was finished like the inside: 4-5 coats of shellac, then wax |
 |
| The completed box |
 |
| I added green felt to the bottom |
The box is intended to hold tea bag packets - four compartments for four types of tea. This one took a while - I went kind of slow on it. But it felt good to make something again.
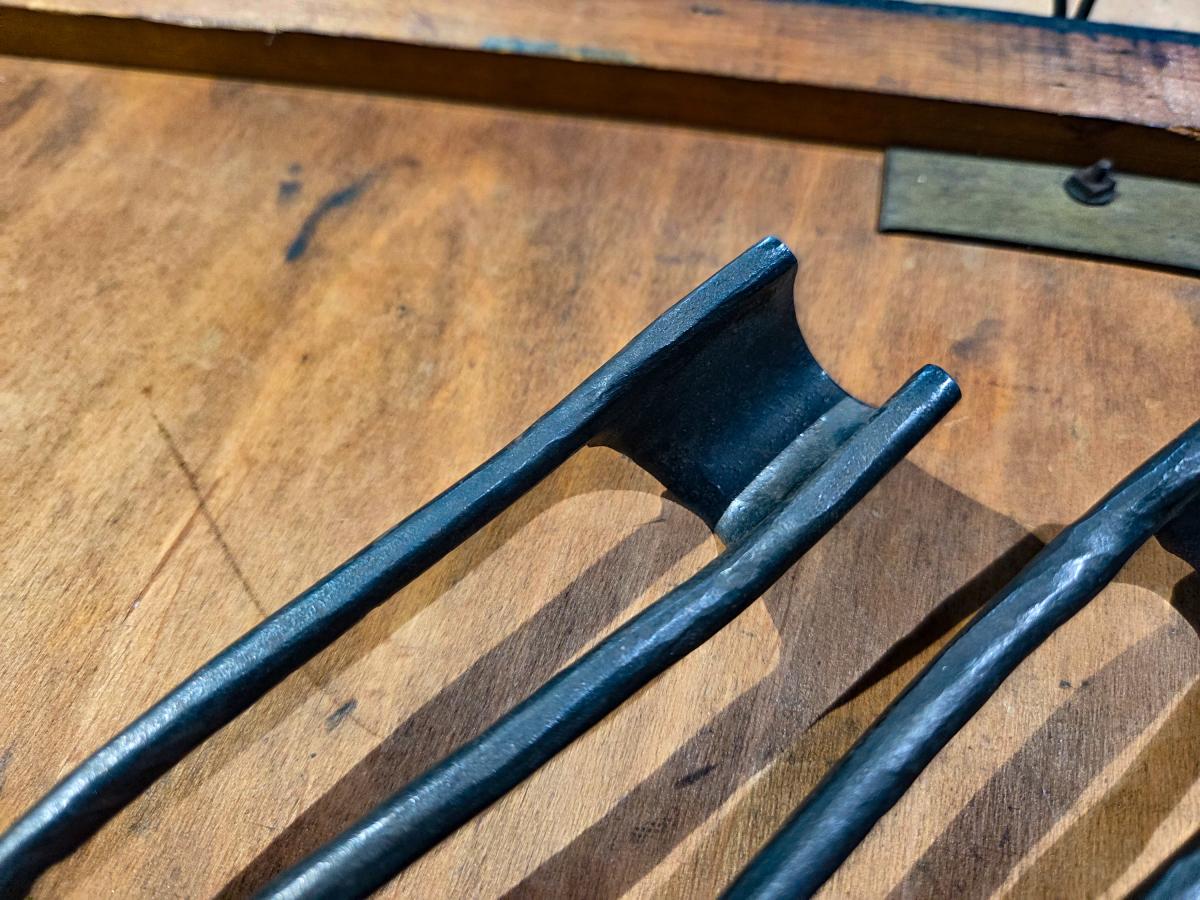
spring is here.......
Yesterday the mercury hit 84F/29C and today it got pushed up to 86F/30C. Along with the temps there was a ton of sunshine, blue skies, and fluffy white clouds. I think it is safe to say it ain't going to snow again for a few months. And I noticed that the trees are starting to bud out.
 |
| slip nuts came |
They were delayed for a day but they came last night a little after 2000. This is going to make adjusting the threaded rod frames a whole lot easier. Pushing the button disengages the threads in the nut and allows you to move the nut up and down the threaded rod lickety split.
 |
| $11.98 from McMaster-Carr |
These are dumb down simple. The threaded rod goes through the hole in the part I'm holding. There is a spring and that is all there is to the nut. A wee bit expensive but the ease of use makes them worth their weight and gold.
 |
| storage |
Unfortunately if the nuts aren't engaged on the threaded rods, they fall apart. Since I don't want to lose any parts I think it is best to keep them on the rods. I'll play with the nuts and a frame later this week.
 |
| done |
A couple of swipes with the #3 and the glue joint line was dead flush end to end. This has got to be one of the best glue ups I've ever done.
 |
| hmm...... |
First dry clamp of the entire desk top. The glue joint line isn't as flush as the first glue up did. But I also didn't have any flattening cleats on the top neither.
 |
| out of the clamp |
It felt secure and the joint lines looked good top and bottom. What happened next you ask?
 |
| nope |
Am I the only person on the planet who can not glue a miter joint and have it stay together? This one broke the 2nd time I dropped it from about 6". I am going to try it one more time and use epoxy.
 |
| better |
Got the flattening cleats on and it made a big difference. The glue joint line is mostly flush but a couple of spots are a few frogs misaligned. Noticed that the middle of the glue up there is daylight under the flattening cleats. And that is where the glue joint line is off set.
 |
| planing a camber |
Planed a 6-8 inch long camber on each end of the flattening cleats. That helped with getting the glue joint line flush, not 100% but good enough. I can easily plane it flush after it comes out of the clamps.
 |
| stress free glue up |
I only had one 2x4 left so I had to use another wood for the right flattening cleat. Sigh. I had some 8x4 sapele but I didn't want to use it as a flattening cleat. So I went to ACE hardware and they were bone dry in 2x4s. They didn't even have a pressure treated one.
I didn't want to but I made a run to Lowes to get a 2x4. They had a rack of 2x4s in two and four foot lengths. Bought a 4 footer for $3 and change. Got the top glued and let it sit on the workbench. I had tried to move but it was too heavy and awkward with all the clamps I left it on the bench.
 |
| done |
Don't know what I might use this for but it is ready. Both side glue joint lines are flush.
 |
| glued and cooking |
3 hours later and I removed all the clamps except the bar ones. Nothing moved, shifted, or groaned when I took the others off. The glue joint line stayed put and I'll let this cook until the AM as is. I eyeballed it several times before I killed the lights for the day.
 |
| first of the last two bookshelves |
Blew off a big chip at the front of the shelf dado. Glued it and set it aside while I worked on the opposite end.
 |
| first two slats |
I'm impressed with how well the back slats fit in the mortises. They are both gap free and tight 360. Oh, and they are snug and self supporting too. This is a long ways from my first one where these were loose fitting, had ugly gaps, and were south of self supporting.
 |
| stayed past 1500 |
Cut the bottom at 7°, made a cutout for the feet, and rounded over the front and back top corners.
 |
| outside shelf corners |
Sawed an angle and used a chisel to clean and smooth them.
 |
| can't beat this |
I firmly believe a sharp chisel is the handiest tool in my shop. The finish left by the chisel didn't need anything else.
 |
| glued and cooking |
I stayed past quitting time to glue this up. Killed the lights at 1534. I'll whack out the 2nd one tomorrow.
accidental woodworker
Mighty T At Bat
Recently L’il T participated in one of the greatest American traditions and rites of passage; he started t-ball. Thanks to diligent practice with his loving dad (boy, did we luck out in the son-in-law department!) L’il T hits the ball practically every time.
We saw is first ever t-ball game last weekend and it was immensely entertaining. Describing it as “herding hogs on ice” would be accurate.

They’re starting them younger now, these tykes were 3 and 4. My brother and I remember playing t-ball at 7 and 8. I was an enthusiastic and pretty good player until late adolescence when my vision started going south. When your eyes can’t pick up the ball coming from the pitcher your baseballing days are over.
My Latest eBay Listing - A Vintage Stanley No.7 Jointer Plane


At 22 inches long with a 2⅜-inch iron, the No. 7’s length allows it to bridge high spots and shave down low spots, producing dead-flat edges ready for gluing. Its precision, weight, and stability make it ideal for preparing long edges and wide panels.
Some 18th Century Bodger's Lathe Tools
 The set of five bedgers tools in a box
A few weeks ago I wrote about about the actual gouges and hook tools used for mainstream turning - as opposed to the scraping tools used mostly in ornamental turning on fancy hardwoods.
In that post I mentioned that I was unaware of any current manufacturer that makes hook tools today. Since I wrote that I have found a few specialty makers that make machined, beefier versions of traditional hook tools for turning the inside of a bowl. As it happens, while I have no practical experience with hook tools, I own a set of hook tools from the late 18th century made by Salt, a company based in Birmingham, England. Some of the tools look exactly like the images in the various books, and some are shapes that I've never seen illustrated anywhere.
So far I have been unable to track down any details about Salt. I think the tools themselves are probably a set (two of them are stamped Salt, but the others have no markings on them), the case seems a later addition. All the tools show a fair amount of wear - and are not sharp enough for use. The surface finish suggests that they were pretty rusty before they became a collectible. The handles are longer than average lathe tool handles because typically people would tuck them against their body and under their arm when using. The dealer who sold these tool told me that they were 18th century bodger's, or chairmaker's, tools. I have no idea if he is correct. Until I can track down the maker, I won't know for sure. Similar tools were used by chairmakers at least until before World War II.
 The three hook tools in the kit
Three of the tools are hook tools: a tight hook, a larger hook, and a third straight hook that are all right out of Moxon.
 The two "gouges" in the set both have their cutting edges on the inside between the rods
 The other tools look like gouges, but the cutting edges are on the inside of edge of the blade, not the outside, and the insides show extensive sharpening. The general geometry of the way the tight and larger hook tools are sharped, and in particular how they curve down from the handle, suggests that they are designed to work with the shaft of the tool on the toolrest and the cutting edge dangling below the center line of the lathe, shaving wood upwards. Green timber would turn wonderfully this way.
These tools were designed for use with a pole lathe. On a powered lathe, or even a treadle lathe, the added speed could be scary. I haven't had the courage to sharpen them up to give them a try. Maybe when I am a better turning and feel more in control I will.
 This small hook tool is very elegantly bent
  The well worn middle size hook tool that's in the kit
 "Salt" of Birmingham - the maker
 started Leo's desk.........
 |
| done |
Leo's bookshelf done with 4 coats of shellac. Just needs his desk to put it on.
 |
| glutton for punishment |
Redoing the miter that failed with yellow glue. Shot the miters clean and glued it up.
 |
| fingers crossed |
Got a good dry fit. Miter closed up toe to heel. I'll find out in the AM how the hide glue performed.
 |
| hmm..... |
This has got to be a Guinness World record. I put the boards on the bench and liked what I saw. I didn't bother trying any other combinations. This will be Leo's desktop .
 |
| brown knot |
This one is loose I'll dig it out and fill in the hole with epoxy. Leo's and Miles's desk will both have a gum pocket on the desktop.
 |
| not easy going |
Two of the boards are bowed and I finally got to use my Horrible Freight deep reach clamps. It took me a while to get the glue joint line flat and straight. After that I expended more calories getting the glue line flush. I was thinking of using dowels but nixed it. I couldn't see anyway to flatten the two boards to engage the dowels in the two boards.
 |
| wow |
The bow is 1/8". The two glue lines are being a PITA but at least the bowing is the same direction on the two. I'll have to do the top glue up in two steps.
 |
| one hour later |
I only had two deep reach clamps and I needed more. Sawed a pine board to help out flattening the top.
 |
| finally happy |
Ignoring the bow and just looking at how the laid up against each other.
The goal I was shooting for was the joint line to be tight along the
entire length with no clamp pressure. That took a lot to accomplish. A
lot of in/out of the vise and eyeballing the joint line. Mostly used the
#8 followed by the 5 1/2.
 |
| good feeling |
Checking the 3 boards for twist. The first one was ok along with having a slight hump running the entire length. The 2nd one was twist free but the third had a wee bit which I planed off.
 |
| better then F clamps |
When I first started woodworking I bought a lot of C clamps. Mostly because I couldn't afford F or bar clamps. I bought most of these at yard sales and I doubt I paid more than a buck each for them.
I haven't used them in years. The F clamps popped off if I brushed them but the C clamps held firm and exerted a lot more pressure on the flattening cleats.
 |
| first dry fit |
I had dry fitted the other two board which went off with no hiccups. For the second one I made new flattening cleats out of a 2x4.
 |
| this surprised me |
As I was removing the flattening cleats I noticed that the boards remained as is. They didn't shift or move and the boards remained as flush as if they were still clamped up.
 |
| another surprise |
This one made me feel better about this upcoming glue up. The amount of the bow is half of what it was from the first dry clamp. This is my first time attempting to glue up 3 bowed boards.
 |
| glued and cooking |
I spent the morning prepping and dry clamping the top. Started a little after 0800 and quit at 1115. Decided to fill the pie hole before gluing it up.
The glue up went beautifully. I was expecting the the boards to slip and slide but that didn't happen. I removed the flattening cleats and the deep reach clamps to wipe the glue up from underneath them and the joint line remained nice and flat along the entire length.
Happy with how well this happened. No stress and the glue line looks real good. Fingers crossed that the 2nd glue up goes just as well.
 |
| checking |
Before I set this aside to cook, I checked that every clamp was laying flat and tight against the top.
 |
| leave it be until the AM |
I am still a wee bit out of sorts with not needing the flattening cleats and the deep reach clamps. I came and checked this several times before I killed the lights.
 |
| last two |
Got the layout done and the dadoes and mortises knifed and ready to be chopped out.
 |
| labeled |
Labeling is important on this because the slat mortises are individually knifed off the back slat. The same with the dadoes for the shelf.
 |
| 2nd one knifed |
I expected to get at least one of these at least dry fitted. However, I also didn't think that I would spend the entire AM session getting 1/2 of the top ready to glue up. Miles's desk top took me less than two hours.
accidental woodworker
Spring Firewood Finished

Last week I finally wrapped up processing all the windfall I’d harvested several weeks ago. The bounty was impressive, the cribs are three rows deep. The pile on the ground near the splitter are all the wonky pieces I will use next winter in the barn wood stove. The haul *should” get us through next winter when combined with the leftover wood still in the cabin firewood crib, but the harvesting and processing will continue through the summer and fall. When you heat with firewood, you can never have too much.
odds and ends day......
It has been a long time since I have posted a blog with this many pics. 30+ when I checked the upload. So that means I go lean on the keyboard diarrhea and rely mostly on the pics to tell my story.
 |
| out of the clamps and zero rocking |
 |
| Leo's on the left, Miles's on the right |
 |
| sigh |
Defect in a bad spot. Decided to saw an angle to remove it.
 |
| nope |
Dropped this on the bench from a height of 6" three times. I broke apart on the 3rd one. I'll try hide glue because I have seen miters in furniture older than me that are still tight.
 |
| oops |
I used the center punch on the wrong side of the line. I'll have to find a way to fill them in. Oh, BTW it had to be a blurry pic too.
 |
| clipping the corners |
 |
| looks like crap to me |
Initially I had just sawed angles on the front and that looked worse to my eye than this did.
 |
| better |
I rounded over both the front and back angles.
 |
| checking/adjusting for square |
 |
| whizzing shavings |
This didn't work as well as I thought it would. Less than half turned into dust. I had to sand a piece of cherry with 80 grit to get the sanding dust I needed.
 |
| hmm...... |
I balled up a bunch of old T-shirts to apply a coat of shellac to the pic frames.
 |
| better |
This worked - The T-shirt ball eliminated 90% of the brush strokes on the frames. I'll repeat this in the AM and call them done.
 |
| hmm....... |
Super glue and cherry dust.
 |
| fake gum pockets |
The filled in center punch holes popped and looked out of place because they were directly above the Miller dowels. This black pen is not alcohol based and shellac covers it without streaking or erasing it.
 |
| thought I had but..... |
I didn't fully seat the shelf against the back of the dado. Filled it in with superglue and cherry sawdust.
 |
| hmm...... |
From 2 feet away I couldn't tell that these weren't real.
 |
| one coat of shellac and the fake gum pockets look good |
 |
| the other end |
I like this one better than the other. This end I only had one center punch hole to fill.
 |
| proving it wasn't a fluke |
 |
| chamfed the holes |
 |
| wasn't a fluke |
I still get over the simplicity of using this doweling jig and the results. The joint line isn't dead flush R to L, but it is barely a frog hair off here and there.
 |
| 3 coats |
Leo's bookshelf might be done today if I go back to the shop after dinner.
 |
| Big Red says it is square |
Found this under of pile of crappola. Remember making it but never using it.
 |
| from 2013 - on the list to redo |
Nine different joints (?) - interested in seeing how well I do it this time.
 |
| one square on the right |
The middle and right ones are used with a plumb bob. I didn't see/find any blobs with these two.
 |
| square needs helps - wee bit out |
 |
| twisted on both legs |
 |
| 2 more cherry bookshelves - on the list for the AM |
 |
| taking inventory |
I have enough 5/4 cherry for Leo's desk top.
 |
| hmm..... |
I don't much stock. I need more poplar for the drawers and a couple more 4/4 boards for rails and slats. Don't need much for Leo's desk.
 |
| sigh |
I need another board of 8/4 cherry for the legs. I can only get three legs out of this.
 |
| wash, rinse, and repeat |
Tried the T-shirt ball on the Miles's desk top. I am not trying to french polish it, just knock down the brush streaks (which drive me postal almost as much as gaps do). It worked but it is going to take a few more outings to get it to my level of satisfaction. Did I mention it is tiring doing a wax on, wax off routine?
 |
| why not |
Found this board on the drill press and I'm adding to two I glued up an hour ago. I don't have a need for this, just playing around with the doweling jig.
 |
| definitely not a fluke |
Had a good day in the shop with most of it spent getting Leo's bookshelf ready for shellac. I'm thinking now that maybe I'll check Koszelas lumber before motoring on up to Highlands in New Hampshire.
accidental woodworker
Leo's bookshelf.......
 |
| hmm..... |
I was leaning towards painting these two frames but maybe not now. They have two coats on them and the poplar isn't white. There is a slight greenish tint to them that I like. A couple of more coats to go before the command decision hammer drops.
 |
| Leo's bookshelf |
I thought I had made Leo's bookshelf already but if I did I can't find it. The size of the cherry matches the one I made for Miles. There wasn't anything else on the workshop plate so I did this.
I'm going to try and go to Highlands this week to get the cherry for Leo's desk. I'm hoping the weather cooperates because it has been nice for the past few days. Hoping that Mr Murphy doesn't want to shake hands with me.
 |
| layout |
The ends have some sapwood on them but one has twice the other one. I am positioning that towards the back inside. If they had been about the same I would have put it on the front outside faces.
 |
| ready for chopping |
Got the dadoes for the shelf knifed and the mortises for the back slats. I was concerned with the mortises because some of the back slats for the desk came out looser than I liked. The goal was to not repeat that with this.
 |
| first one |
I would guess the first goal is to make it self supporting. The 2nd would be a gap free fit. Achieved both on this one.
 |
| first two |
Self supporting, clean, tight, and with snug fitting tenons and mortises. Happy face on. Went 4 for 4 on the mortises and 2 for 2 on the dadoes.
 |
| hmm...... |
The mortises are not long enough to get a router to do the depth. I had to do them with just a chisel. It turned out not to be the nightmare movie I had floating around in the brain bucket. Did them by chiseling lightly and then scraping the mortise flat with the same chisel. Check the depth, wash, rinse and repeat until it was a 1/4" down.
 |
| dry fit |
All the joints were snug and I was able to seat everything with some gentle mallet blows. There is something about doing this - layout, chopping, and fitting that revs my motor. Seeing what I did by hand fitting up as it should is incredibly satisfying no matter how many times I do it.
 |
| small cutout |
There wasn't much room for a cutout but I had planned for it. This cutout is about 5/8" at the highest point but it still has 4 small feet.
 |
| glued and cooking |
Started at 0800 and it was glued up before lunch time. A pretty good AM session IMO.
 |
| first time (dry fit) |
I have had these bessey corner clamps for almost 20 years and this is the first time I have ever had a miter close up in it. I had four of them but one crashed and burned during its first free flying lesson many, many moons ago.
 |
| sigh |
The miter broke way too easily. This is one of the miters I glued up yesterday that was going to be a setting jig that I didn't use. My miters are getting better but what isn't improving is the glue bond. I didn't size this but that doesn't seem to matter.
 |
| glued and cooking |
I got a good tight fit on the miter, toe to heel. The experiment is to see how well the glue bond is. You're saying maybe I should try hide glue. I have and the results were the same as with yellow glue. I will find out in the AM how this one turned out.
accidental woodworker
Miles's desk is done.......
 |
| out of the clamps |
Both frames are laying flat on the tablesaw with zero rocking. The 5x7 frame is spoken for and the larger one is in stand by. My wife changed her mind on buying the map but it is ready for whenever.
 |
| none worked the best |
I used all of these gizmos to screw in the table top clips. The four clips under the drawer guide rails were the worse. I had to use the offset screwdriver to do them. Those four took me a bazillion years to do.
 |
| this one took the longest |
This one was the most awkward one to do. I just couldn't maintain downward force along with a good grip on the offset screwdriver. Note to self - on Leo's desk screw the top on before I do the drawer guides then unscrew it.
 |
| glamour pic #1 |
This is based on the desk I use everyday. The only quibble I have with mine is that it is too small. But with a bigger desk top I would just have a ton more crappola on it. This should be more than adequate for an eight year old.
 |
| glamour pic #2 |
I really like spindles/slats. Thinking ahead to Leo's desk maybe I should do a wide center slat like I did on the back, on the sides.
 |
| glamour pic #3 |
I am glad now that I got the epoxy filled knot hole facing out. Now that it is done it compares favorably to the epoxy fill knot hole on the desk top. IMO it looks like it is a natural occurrence in the wood.
 |
| final glamour pic |
I am going to give Miles the bookshelf along with the desk. If Miles doesn't want to keep it on his desk that is his choice.
 |
| hmm...... |
Too big for the desk, it eats up a wee bit too much real estate. However, after seeing this, a gallery with drawers might work. I am making another cherry desk for Leo but I don't like giving the boys the exact same desk. Thinking now of making a gallery for his desk. Just something a little different between the two.
 |
| spline groove |
Working on the two new pic frames. Got the spline groove done on each corner. I used cherry for the splines because I didn't have any poplar.
 |
| back frame |
Nailed and glued the back frame on. This creates the rabbet for the glass, mat, and pic to sit in. I like having whatever is framed set back toward the rear of the frame. I don't like having the pic up close to the front face of the frame.
 |
| chamfer |
I hadn't planned on doing a chamfer on the frame but I had to. The small frame fell off the bench and one corner got dinged. The chamfer removed it.
 |
| shellac |
Thinking of leaving the frames natural to highlight the cherry splines. If I don't like how they look I can paint them. The shellac can be a primer coat for the paint.
accidental woodworker
Record #2506 Side Rebate Plane

I didn't own one of this particular side rebate planes before this week, but this one arriving made me realise the demise of certain Sheffield makers post-war was for good reason. Record was a company sold back and forth a few times throughout its dying death knells. It wasn't lack of sales that caused it to lose value but lack of care and quality in workmanship. A tool like this, or a bench plane or a saw, would likely need only three or four more minutes of finishing care to have substantially improved it, but who cares anyway, certainly not Record. Why did they end up with such a lacklustre approach of complacency in most British tool making over a period of a few decades? Yes, they relied on their daddy's reputation, I get that, but with such a strong and resilient foundation, why did the owners not realise that with a minor amount of extra input engineering wise they could have been up amongst the very best?

And I looked at the tool and I thought, well, it is a brilliant woodworking device. The design itself lacked nothing. I began to let my mind rip along a zip wire, imagining the tool made in brass or better still bronze all the more. They already had all that they needed in place to make the better tool become that very best, the mould models for casting, the casting equipment to make hundreds, tooling equipment, the workshop building was already paid for ten times over and then too all of the skilled workmen knowing all of the safety practices and protocols. How come they were so very, very blind. Well, I suppose we already know, really. Complacent arrogance soon sets in when you think you've arrived, think you are the best, think you no longer need to try; pure arrogance and pride will always blind the next generations and then the potential dies in their hands.
This side rebate plane was just minutes away from working, but whoever owned it before me had bought it fifty or sixty years before me and had never used it. The box was still intact, and the tiny leaflet lay at the bottom, beneath the plane when I took the plane out. Everything was there except care.

Not needing a plane does not mean not owning one. My passage of discovery was part of the package. I wanted to know the plane, even if I didn't need it and most likely would pass it along or sell it.

The leaflet was really quite vague and unhelpful and pertained to general cutting edges rather than this unique tool with its uniquely angled cutting edge. There was no mention of any angles that would be helpful, not at all how you would get the exact angle you needed?
It was this kind of laziness that began to permeate British tool manufacturing over the postwar decades. It would have taken no more than half an hour to write a proper and decent leaflet with together drawings, and they should have been ashamed for not doing so, but they weren't.
My Plastic Insert Guarantees Accuracy
This could be cardboard but plastic sign material, 1mm, snaps to a knifelike and works and lasts.
First I established the angle I needed for the bevel by cutting a strip of plastic to width and then inserted it into the plane body to get the angle.

The angle is as close to a 30º off a 90º so I used this to create a wedge shaped piece to fit into my honing guide.

From there, I used an angled protractor to establish my cut line onto as bigger piece of plastic.


This then inserts into my guide.

And my blade butts up against the plastic.

The flip-out, flip-over plastic extender gives me the 30º bevel pitch I need to abrade and hone to. I don't usually go for secondary or micro bevels to cutting edges. No real point to it, and too pernickety. But my angles did result in a secondary bevel which because it is a bevel-up plane with the bed angle the lowest of any plane ever, a mere 7º, I felt needed a steeper bevel to enhance the residual strength of the bevel.

With the plastic set up done, offer the guide to the abrasive, no matter the type, and a few rubs establishes the double 30º both ways. Go through the grits to superfine and you are nearly there.

Flip over and remove the wire edge whilst at the same time polishing out the flat face for the first and last time, and the blade is ready for installing again.
Installing the Cutting Irons

Place the plane on a decent flat surface, keep the plane body firmly pressed down and take up the slack on the thumbscrew holding the pressure bar, not too tight so as to allow moving the blades. Now, gently slide the cutters until they just nestle up to the flat surface, aligning the cutting edge with the face of the plane. In this position, cinch down the thumbscrew; the irons will flex slightly past the face of the plane as needed. Slight hammer taps will set deeper, or move them slightly laterally, but I mean slight taps and not blows. There is a little wiggle room in the channel if the blade needs tweaking for alignment and parallel shavings.

Restoration Work
My plane had the 1960's expected flawed workmanship in the plane as well as the neglect that comes from simply being left in a box unused. The blades had a little surface rust, nothing much, but the nickel plating had bulbed up because of minor rust beneath and that needed abrading away. Also, the bull nose front had fused the two parts together immoveably so that needed resolving too.

The leading edge is the top edge and this area has a slight bubbling in the nickel that will mar the wood I am planing, so I want to remove it. You can also see the general roughness in the nickel plating. Generally, this main surface roughness doesn't altogether affect the functionality of the plane, but it looks and feels rougher than it should to pick up, use and put down. The benefit of the plating has proven good, though; there really had been no real rust to speak of. From now on, the best answer to preventing rust will be my daily use, a dry workshop, and a good environment.
 My engineers block beneath the tight abrasive paper works well for flattening, even though that is not my goal here.
Light oiling with my rag-in-a-can oiler or some Boeshield T9 will inhibit future rusting. Also worth mentioning; Boeshield T9 is a high-performance, paraffin wax-based lubricant and rust preventative developed by Boeing for long-term metal protection on their planes. It is a remarkable treatment that works well as a rust inhibitor on tools you might use less frequently than others, and especially useful where you have had to abrade through faulty nickel plating. Also, it works as a lubricant too. Super slick.
 You can see the protrusion of rust and nickel plating.
How flat do these planes need to be? Well, we only use the half-inch on each side of the plane, as the cutting edges are only half an inch wide.
 Light oiling coats the surface to reduce the possibility of rusting again.
At this point, the plane works perfectly well and both of the cutters took off an even shaving straight away. Because of the single securement point for two blades, it can be tricky if one blade works well and the other needs tweaking because, of course, you are loosening the pressure on both blades at the same time.
 Already the plane works well, but a little more refinement makes it feel like it is now mine.
I am suspicious that the bull nose might need some help, and when I tried to remove the front piece, it wouldn't budge. I knew there would be some rust between the components.
 The rust was inevitable from the drilled holes and then too the tapping of the threads and the steel set screw.
The wire brush took care of all of the rust, and drizzling oil into the screw cavity took care of protection. This set screw was inserted 70 years go and had most likely never been removed since.
 The two pins are drilled all the way through the front piece into the second and so everything aligns up perfectly with no slippage.
The last component is the depth shoe. Again, bubbling rust beneath the nickel plating needed abrading away. You can DIY new nickel plating, but that's not really helpful in the case of this plane.
 The roughness of the casting and the nickel plating attests to the lowering standards of tool making in some quarters of Sheffield tool making.
Two seconds on abrasive paper again took out the rust, the nickel plating and gave me a decent surface.
 Half a dozen thrusts will make the shoe smooth and level.
I also filed off the two leading edges with a file to create slight bevels, that way the show will never snag.
 The abrading to 250 grit is plenty smooth enough. Wood is highly abrasive and after use it will never look any better than this.
I am happy with my £42 plane. Thrown in with my other side rebate planes, I will find out which one or ones I reach for over the coming years.
 This is a deeper setting and removes stock fast. And remember, you can cant the plane over for a sloped wall to the rebate if you want or need that.
The other use for a side rebate plane is on grooves that might be a touch too tight. This for me makes the plane invaluable, as grooves by hand are difficult to enlarge with any degree of accuracy.
 For increasing the width of a groove, any of the side rebate planes know no equal. I am glad to introduce this use here, as I have never seen nor heard of anyone else ever using the plane for this.
It's a neat and compact all-in-one tool altogether. The corner points on these plane types are pretty extreme when it comes to sharpness and using them as your hands are close to the points when in use.
Miles's desk pt XXIII.........
Getting awfully close to the finish line on the desk. The slats are done and I got 4 coats on the base. I'm happy with how it looks with that many too. After dinner tonight I'll get the final coat on. In the AM, first thing, I'll attach the top to the base. I'll be done with it by sunday at the latest (fingers and toes crossed).
 |
| done |
Got two coats of shellac on the frame. I brought it to the Frame it Shop after lunch today. Don't know when it will be ready but no one is holding a gun to my head on it neither.
 |
| shoulda, coulda, woulda, but didn't |
I have this miter frame clamping gizmo and I forgot all about it. This could have been used to clamp up my wife's map frame. hmm.... since I am waiting for the base to dry I might as well try this while I'm standing around giving everything my best goofy looks.
 |
| hmm...... |
First thing that shook hands was what a PITA it is to spin the wing nuts down the threaded rod. I was tempted to cut the rods down but I resisted. I don't make the same size frames so that wouldn't advantageous. I got the rods set loosely to the size of the frame I just made.
 |
| new frame |
My wife mentioned that she was thinking of buying another reproduction map so I'm getting ahead of the curve. Made another frame and shot the miters on the shooting jig. Now I'm running into a storm of hiccups.
There is going to be a bit of a learning curve on how to use this type of clamping setup. I fiddled and faddled with it for almost 30 minutes and nada. I couldn't get the frame to square up. This set up is not self squaring as far as I can see. It has to be square to what is being clamped up and each corner tightened individually but in unison. I got a wee bit frustrated with it.
 |
| not aligned |
This was the 3rd time I tried to dry clamp this frame and failed. So far one corner has been off on the toe to heel. One a brighter note this was the best I did so far. I kind of figured out after this about getting the clamp frame kind of square before tightening it down.
I gave up on trying to get the clamp frame work. The frame came together dry almost perfectly. So it should have clamped up without any hiccups. I even set the clamp frame by measuring the diagonals to be the same. That worked but I still couldn't get one corner's heels and toes to align.
I'll try this again because I refuse to let it win. I bought four 1/4-20 slip nuts from McMaster-Carr (~$12 each) and I should have them monday or tuesday. Slip nuts will definitely speed up getting the nuts on/off the threaded rods.
 |
| hmm...... |
Clamped up without so much as a whimper in the Sears Craftman clamps. This 2nd one looked better then the first one I did yesterday - all the miters were tight and gap free on both sides.
 |
| my band clamp |
This clamp can be fussy but I was able to clamp it and get all the miters closed up. It has the same problem I had with the threaded rod clamp but this one was easier to get and keep the miters aligned toe to heel.
This frame came from the off cuts from the frame above. It is big enough for a 5x7 pic.
 |
| helping hand |
This clamp tends to pull up on one corner - one closest to hand screw. Placing a heavy thing on it flattens it and keeps it that way while it cooks.
 |
| getting there |
I put the moving blanket on the workbench to keep the base clean. I had noticed that my dirty workbench top was getting on the legs. Should have done this before I first put it on the bench.
 |
| oh.... |
I didn't think this all the way through. The intent was to put a spline across the miter face. My spatial thinking said this would work. I was wrong and I blame the spatial hiccup. This is going to be a jig for positioning the table top. This is part one and part two will be two pieces of plywood that will set the offset between the base and the outside edge of the top.
 |
| ready for the last coat of shellac |
One more on the bottom of the legs and then the legs and rails. Happy face on. The base looks good and the slats don't look any different the rest of the base.
accidental woodworker
Woodworking in Estonia: From Ants to Meelis
Miles's desk pt XXII........
 |
| ready |
The frame has been sanded smooth, front and back, and it ready for paint. It is laying dead flat on the workbench - no rocking at any corner.
 |
| needed |
The spray shellac is working fine. It is laying down smooth and drip free on the slats. However, the aerosol spray lingers like a fog in the shop. The fan does a good job of airing out the shop in just a couple of minutes. Glad for that because is it sill only in the middle 40's F/7C outside.
 |
| 4 coats |
I should be done with the slats today. The can says it dries in minutes which I assumed was 4-5. It stayed tacky for almost 20 minutes and not dry to the touch for almost an hour. I got time but I'm getting impatience waiting until I can apply the next coat.
 |
| missed it |
Glue squeeze out and it isn't the only spot I missed. I started applying shellac to the base because I didn't want to leave the shop. The shellac made it pop, because without it the glue blended in with the cherry. I removed it here and 2 other spots with a chisel.
 |
| the base |
There aren't any glaring differences between the spray shellac and the batch I mixed. There is only one coat on the base, 5 on the slats, but they look the same.
 |
| 2nd coat |
On the first coat I tried to paint the whole frame. That kind of worked and kind of didn't. The biggest headache was holding the frame to lay the paint down. Decided it wasn't worth it and I only put a 2nd coat on the back of the frame. After dinner I'll put a 2nd coat on the front and that should do it.
 |
| 2nd can of shellac |
Got my answer on how much shellac per can before it is empty. I got four coats on the slats from one can. Noticed that the weight of the can went down after each spraying and it was as light as a feather after the 4th coat.
Getting real close to getting a check mark in the done column with this desk. I should be done with it next week hopefully. Won't be too soon and I'll have to motor up to Highlands to get cherry for Leo's desk.
accidental woodworker